
[vc_row][vc_column width=”1/4″][vc_widget_sidebar sidebar_id=”sidebar-1″][/vc_column][vc_column width=”3/4″][vc_column_text]
Customize Address Labels (Single, Second & Third Address Fields)
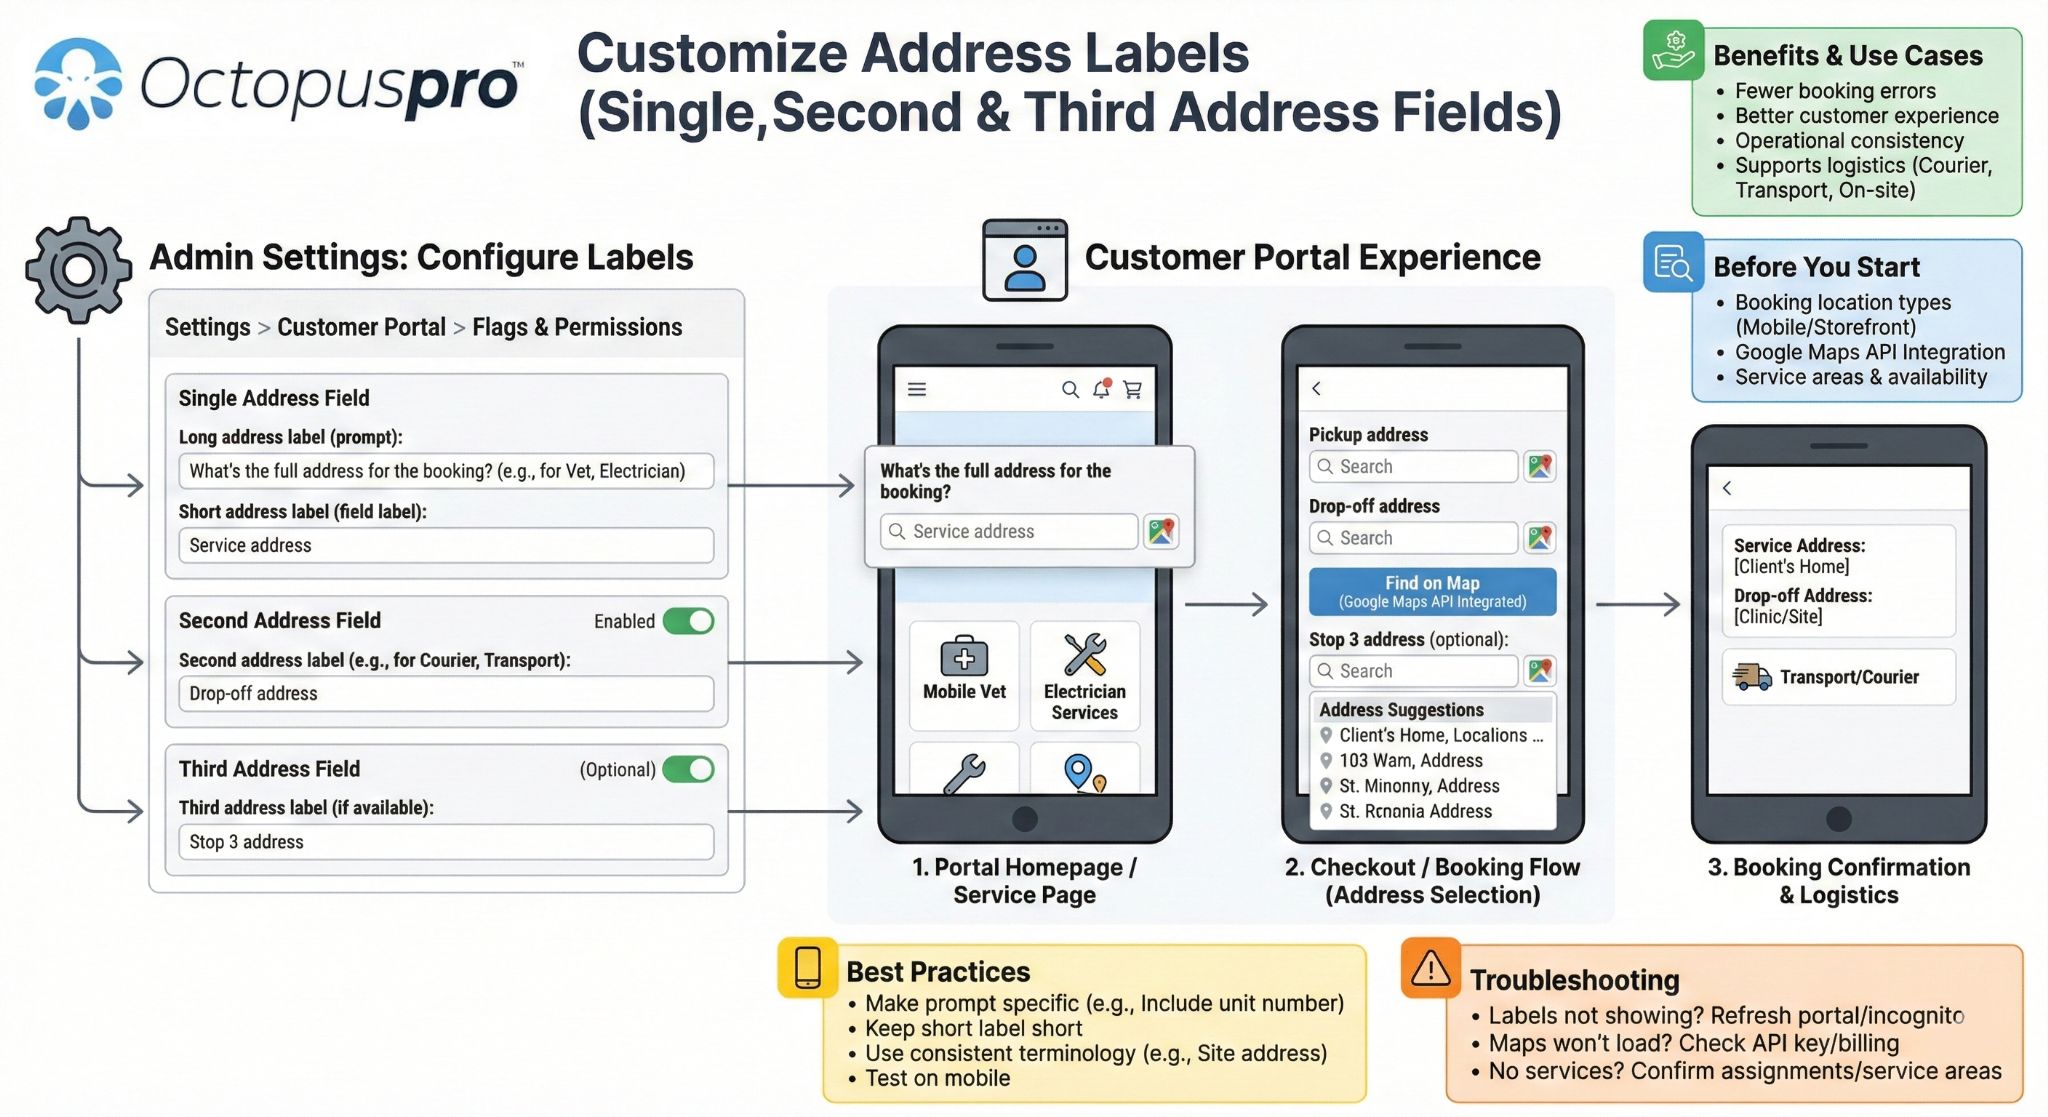
OctopusPro lets you customize the address wording customers see when entering a booking location. This is useful when you need more accurate addresses, want clearer instructions (e.g., “What’s the full address for the booking?”), or want to support multi-address bookings (e.g., pickup + drop-off, multiple stops, two job sites).

Why this matters
- Fewer booking errors: clearer prompts reduce missing unit numbers, incorrect suburbs, or incomplete addresses.
- Better customer experience: customers understand exactly what to enter, especially on mobile.
- Operational consistency: the same labels can appear across the portal flow and booking records, helping your team interpret locations correctly.
- Supports logistics workflows: capture pickup/drop-off or multi-stop addresses in a single booking when enabled.
Common use cases
- Courier & delivery: “Pickup address” + “Delivery address”.
- Transport: “Pickup location” + “Drop-off location” (+ optional third stop).
- On-site services: “Service address” (prompting unit/access details).
- Commercial jobs: “Site address” vs “Billing address” (if you use addresses as references for different workflows).
Table of contents
- Before you start
- How to edit the address labels (prompt + field label)
- Where customers see the address labels
- How to enable a second address field
- How to enable a third address field (if available)
- Best practices
- Troubleshooting
- Related guides
Before you start
- Booking location types: Make sure your services are configured correctly as mobile/on-site, storefront, or remote. Location settings can affect whether address entry is required. See: Configure Booking Location Types.
- Google Maps / address search: Portal address search and map selection require your Google Maps integration to be configured. See: Google Maps API Integration.
- Service areas & availability: Which services/fieldworkers appear after location selection depends on your service assignments and location/service-area setup. See: Assign Services to Fieldworkers and Fieldworker Service Areas.
How to edit the address labels (prompt + field label)
OctopusPro uses two text labels for the main booking location field:
- Long address label (prompt): the question/instruction shown to customers (example: “What’s the full address for the booking?”)
- Short address label (field label): the short label/title shown above or beside the input (example: “Booking address”)
To edit these labels:
- In your admin dashboard, go to Settings > Customer Portal > Flags & Permissions.
- In the Booking Flags section, locate Long address label & Short address label.
- Enter your preferred wording, then save your changes (if required).

Examples you can copy:
- Long label (prompt): “What’s the full address for the booking? Include unit number and postcode.”
- Short label (field label): “Service address”
Where customers see the address labels
Customers can see the address labels in multiple places across the portal/booking journey, depending on your workflow:
- Portal homepage: customers may be asked to enter a location before viewing available services (if your portal uses location-based availability).
- Service page: when a customer views a service, the location field may appear before booking (depending on your portal setup).
- Checkout / booking flow: if the customer hasn’t entered a location yet, they will be prompted to enter one during the booking process.


Address selection experience:
- When the customer types, they’ll usually see a list of address suggestions to choose from.
- If they can’t find the address, they can select an option to find it on the map (if enabled/available in your portal and your Maps integration is configured).


After a customer selects a location, available services and/or fieldworkers may be filtered based on your service areas, travel radius rules, and fieldworker/service assignment setup.

How to enable a second address field
A second address is ideal for pickup + drop-off, two-site jobs, or workflows where you need two distinct locations captured under one booking.
To enable it:
- Go to Settings > Customer Portal > Flags & Permissions.
- In Booking Flags, enable Allow bookings to have a second address.
- Set the label(s) for the second address field (example: “Drop-off address” or “Second site address”).
- Save your changes (if required), then test the portal booking flow.

What customers will see:
- Customers will be prompted to enter both the primary address and the second address during booking (depending on your portal flow).
- They can use address suggestions or map selection (if available) to confirm each location.
- If you prompt customers to use device location (“Find your location on map”), they may need to grant browser/device location permission.


Tip: If you want full clarity, make the second address label explicit (e.g., “Drop-off address (include unit number + postcode)”).
How to enable a third address field (if available)
Some OctopusPro accounts also support a third address field for multi-stop or multi-site bookings. If you see this option in your flags, you can enable it the same way.
To enable it:
- Go to Settings > Customer Portal > Flags & Permissions.
- In Booking Flags, enable Allow bookings to have a third address (if shown).
- Set the label for the third address (example: “Stop 3 address” or “Third site address”).
- Save your changes and test the booking flow end-to-end.

Note: If the third address option is not visible in your portal settings, it may not be enabled for your account plan/configuration.
Best practices
- Make the prompt specific: If incomplete addresses are a common issue, add guidance like “Include unit number, intercom code, and postcode.”
- Keep the short label short: “Service address”, “Pickup address”, “Drop-off address”.
- Use consistent terminology: If your team says “site”, label it “Site address” everywhere (portal, quotes, internal workflow).
- Match your workflow: If you’re doing pickup/drop-off, label address 1 as “Pickup address” and address 2 as “Drop-off address”.
- Test on mobile: Many customers book via mobile—confirm your wording fits comfortably and is easy to understand.
Troubleshooting
Labels aren’t showing after I changed them
- Confirm you updated the correct fields under Settings > Customer Portal > Flags & Permissions.
- Refresh the portal and test in an incognito/private window (to bypass cached assets).
- If you are using a booking widget embedded on your website, refresh the page and test again.
Customers can’t search addresses or the map won’t load
- Check your Google Maps API Integration configuration (API key, enabled APIs, billing).
- Confirm the key is allowed for the correct domains and services used by your portal.
No services/fieldworkers appear after selecting a location
- Confirm services are assigned to fieldworkers: Assign Services to Fieldworkers.
- Confirm fieldworker service areas/availability are set correctly: Fieldworker Service Areas.
- Review Customer Portal booking flags and location rules: Customer Portal Flags & Permissions.
Related guides
- Customer Portal Flags & Permissions
- Multi-Address Bookings, Quotes & Inquiries (Setup + Examples)
- Configure Booking Location Types
- Google Maps API Integration
- Assign Services to Fieldworkers
- Fieldworker Service Areas
To stay updated, please subscribe to our YouTube channel.
[/vc_column_text][/vc_column][/vc_row][vc_row][vc_column]