
Customer Portal Flags & Permissions
OctopusPro allows you to fully control your portal and the information displayed on it to your customers. So, you get to decide if you want to add certain buttons, links to other pages, review sections on your customer portal, and more.
Navigate to Settings > Customer Portal > Flags & Permissions
Table of Contents
-
Website Flags
- Display link to “About us” page in menu
- Display link to “Contact us” page in menu
- Display link to “FAQs” page in menu
- Display a search bar for services in the customer portal
- Display service description brief in the services list in the customer portal
- Display Google Reviews in customer portal homepage
- Display Phone Numbers for Customer to call in the customer portal
-
Booking Flags
- Set the minimum notice time required for any new bookings
- Set time slot intervals
- Set address label
- Allow bookings to have a second address
- Allow bookings to have a third address
- Notify fieldworkers about discussions posted by customers
- Display Schedule an appointment button to customers in the quote booking page after their quote has been accepted
- Allow customers to make repeat/recurring bookings
- Allow customers to buy gift cards
- Allow customers to select preferred Fieldworker when making a booking
- Allow customers to cancel bookings through customer portal and email links
- Allow minimum time required before cancelling settings
- Allow customers to reschedule bookings through customer portal and email links
- Allow guests to make bookings through customer portal
- Allow customers to select an exact start time for their bookings
- Allow customers to upload photos when making a booking
- Allow customers to upload pdf through the booking page
- Allow customers to rate your bookings through the booking page
- Make uploading images mandatory for customers when making a booking
- Display service and custom field pricing structure to customers
- Update service pricing on the go
- Display service minimum price
- Display pricing of custom fields added to the service in the view service page
- Display booking duration / estimated time to customers
- Display “Is parking available?” question during checkout
- Display additional notes area for the customer during checkout
- Select at least one customer property during booking process
-
Fieldworker Flags
- Display fieldworker name to customers
- Display fieldworker contact details like email and phone number to customers
- Display fieldworker social networks links
- Display fieldworker star rating to customers
- Display fieldworker list and make fieldworker profiles public
- Display fieldworker date joined to customers
- Display fieldworker working hours in fieldworker profile
- Enable real-time availability
Website Flags
Display link to “About us” page in menu

Enable this flag if you want the “about us” link to be displayed at the top of the webpage in the customer portal.
An “about us” page is mainly used to inform customers about the company and its operations. When activated, enter the about us page content in the text box where you can control styles, fonts, and more.
For more information visit Display link to “About us” page in menu.
Display link to “Contact us” page in menu

Enable this flag if you want the “contact us” link to be displayed at the top of the webpage in the customer portal.
If activated, when the customer clicks on the “contact us” link, a quick inquiry form will appear to fill in their details and select a service to be able to get a quote.
For more information visit Display link to “Contact us” page in menu.
Display link to “FAQs” page in menu

Enable this flag if you want the “FAQs” link to be displayed at the top of the webpage in the customer portal.
The frequently asked questions is a method that companies use to provide answers to the typical questions that customers might ask about their business.
You can customize your own FAQs to appear on the customer portal when a customer clicks on the FAQs link, go to Settings > Communications > Questions and Answers.
For more information visit Display link to “FAQ’s” page in menu.
Display a search bar for services in the customer portal

Enable this flag if you want a search bar to appear above the services in the customer portal, so your customers can search your services easily.
For more information visit Display a search bar for services in the customer portal.
Display service description brief in the services list in the customer portal

Enable this flag if you want to show a brief description text under the service image for each service on the services list page. If disabled, only the service name and image will be visible.
To edit the service description, go to Settings > Services Settings > Services,
For more information visit Display service description brief in the services list in the customer portal.
Display Google Reviews in customer portal homepage

Enable this flag if you want Google reviews to be displayed on your customer portal homepage based on your chosen settings.
OctopusPro allows you to embed Google reviews on your customer portal by using an API to communicate with Google to automatically pull in review data. You can show your high appraisal from customers and convince visitors that your products and services are trustworthy.
For more information visit Display Google Reviews in customer portal homepage.
Display Phone Numbers for Customer to call in the customer portal

When you activate the toggle, the phone number, date, and time slots will be viewed by customers when they access the customer portal at the top of the page.
To edit your business’ phone number, go to Settings > Company Settings > Business Details, and enter your primary business contact number so that it would be displayed on the customer portal.
For more information visit Display Phone Numbers for customer to call in the customer portal.
Booking Flags
Set the minimum notice time required for any new bookings

Set the minimum notice time required if your bookings require time to be organized and confirmed in advance, so your customers will only be able to book services after the notice time required for each service. For example, if you set the minimum notice time required for new bookings to 45 minutes, this will prevent your customers from booking jobs that start less than 45 minutes ahead of their current local time.
For more information visit Set the minimum notice time required for any new bookings.
Set time slot intervals

Select your preferred time slot interval from the drop-down menu.
Time slot intervals determine the duration between each booking and when a client is able to make a booking. For example, an interval of 30 minutes allows bookings at 1:00 p.m., 1:30 p.m., 2:30 p.m., and every 30-minute interval after that.
Time slot intervals start at the earliest available time for the fieldworker and run until the end of the fieldworker’s available time. For example, if the booking interval is 1 hour and the fieldworker’s available time is from 9 a.m. until 5 p.m., a client can book at 9 a.m., 10 a.m., 11 a.m., etc.
This will also account for the duration that this fieldworker is booked for. For example, with a 30-minute interval, it is still possible to book a fieldworker for 1 hour (provided the fieldworker can be booked for this duration). However, the 30-minute time slot interval that overlaps with the 1-hour duration can no longer be booked.
In addition, time slot intervals will not be presented if the duration of the booking exceeds the available hours of the fieldworker.
For more information visit Set time slot intervals.
Set address label

The address label is shown when a customer is booking a service, they are required to enter a service location to be able to proceed with the booking. Enter the address label you want to display in the text box (e.g. Enter your full address, Enter your home address)
For more information visit Set address label.
Allow bookings to have a second address

Enable this flag if you want to require your customers to add a second address to their booking. For example, if your customer’s home address is different from their billing address, you can enable more than one address field. Enter a label for the second address that will be visible for your customers to enter the requested address in the text box. (e.g. delivery address, billing address)
For more information visit Allow bookings to have a second address.
Allow bookings to have a third address

Enable this flag if your customers want to provide a third address, this is optional for your customers as they have to click on +Add address if they want to provide an additional address. Enter a label for the third address in the text box that will be visible for your customers to enter the requested address. ( e.g. delivery address, work address)
For more information visit Allow bookings to have a third address.
Notify fieldworkers about discussions posted by customers

Enable this flag if you want your fieldworkers to get notifications when the customers post discussions about their bookings. Your customers can open a discussion with the assigned fieldworker regarding the booking from the customer portal by clicking on “Message us” displayed on the right side of the booking page. When you disable this flag, the fieldworkers won’t receive notifications about the comments of the customers and they won’t be able to view the added discussions from the “All Discussions” page.
For more information visit Notify fieldworkers about discussions posted by customers.
Display Schedule an appointment button to customers in the quote booking page after their quote has been accepted

Enabling this option will display the “Schedule an appointment” button in the customer portal, so the customers can select the booking date and the time that they need after their quotes get accepted from the admin users. The customers can find this button when they open the quote from the customer portal and clicking on it will redirect them to a pop-up form to fill in the appointment details.
For more information visit Display appointment button.
Allow customers to make repeat/recurring bookings

Enable this flag if you want your customers to be able to repeat the same booking once or multiple times.
Customers can select to repeat booking once and enter the date and the repeated date or select multiple repeats and enter the first booking date, to date, or how many times they want it to recur and the frequency of the repetition.
For more information visit Allow customers to make repeat/recuring bookings.
Allow customers to buy gift cards

By enabling this flag, a Buy Gift Card button will appear in your customer portal. Customers can use this button to purchase gift vouchers. You can enable and disable selling gift vouchers for each of your services from under your service settings, and the button will only appear for services that have the gift card feature enabled. Your customers can purchase any of your services that have the gift card feature enabled as a gift voucher for their loved ones. You can also set up gift card vouchers to be sold as stand-alone services by creating a new service for your gift cards with the amount you specify.
Gift Vouchers are a great marketing tool to increase sales and spread your brand name. The gift cards feature allows your customers to buy an electronic gift voucher for any service or amount they select and have it emailed to the recipient automatically, sending loved ones the right message on their unique day.
OctopusPro allows you to sell any of your existing services as a gift voucher. When a customer buys a gift card, the purchaser receives an email confirming their order, and the recipient receives a notification email with the gift card details attached and a link with instructions to redeem the gift card and make a booking. Gift cards must be paid in full before being sent to the recipient.
A unique booking code is issued with every gift voucher that can be redeemed when scheduling online through your website or app, or over the phone with your office staff by simply mentioning the gift voucher booking number when calling to book. You can find which bookings used a specific gift card using your booking reports.
Note: Disabling this feature will not prevent existing gift cards from being redeemed, it only prevents new ones from being purchased.
For more information visit Allow customers to buy gift cards.
Allow customers to select preferred Fieldworker when making a booking

Enable this flag if you want to allow your customers to select their preferred fieldworker when booking a service.
When enabled, a “Book fieldworker” button will appear in the fieldworker’s profile below the fieldworker’s name, so the customer can book the fieldworker and then select the service from the list of services the fieldworker provides.
When disabled, the “Book fieldworker” button will not be displayed and the bookings can be assigned manually or automatically based on your job assignment method settings.
For more information visit Allow customers to select preferred Fieldworker when making a booking.
Allow customers to cancel bookings through customer portal and email links

Enable this flag if you want to allow customers to cancel their bookings from the booking view page on the customer portal.
They can also cancel bookings through the automated confirmation email that will be sent to the customers once they book services. So your customers can overview, reschedule or cancel their bookings. When disabled, the customer won’t be able to cancel their booking and the cancel link will not be displayed.
For more information visit Allow customers to cancel bookings through customer portal and email links.
Allow minimum time required before cancelling settings
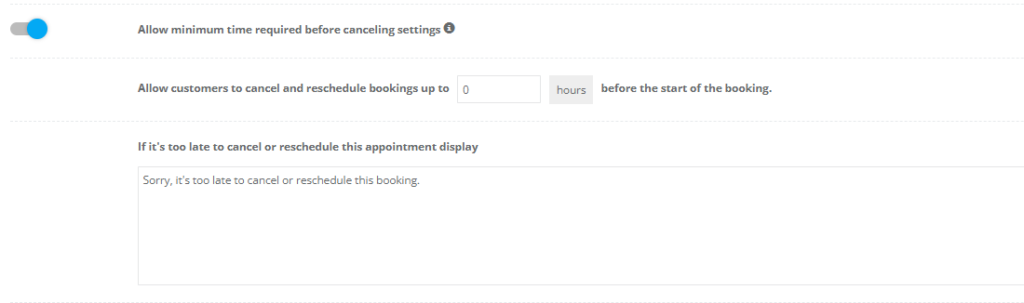
Enable this flag if you want to set a required minimum time for your customers to cancel and reschedule their bookings through the booking overview page. So you can add the number of hours upon your decision before the start time of their booking so that your customers can’t reschedule or cancel their bookings when they exceed the required time.
You can also add a message to be shown in the pop-up that will appear when the customer clicks on the “cancel booking” button after exceeding the minimum required time.
A pop-up window will appear when a customer clicks on “Cancel booking” displaying a notification that they can’t cancel their booking.
You can enter the text below in the empty field that you would like to display to your customers when they have exceeded the required time to cancel or reschedule their bookings.
For more information visit Allow minimum time required before cancelling settings.
Allow customers to reschedule bookings through customer portal and email links

Enable this flag to allow your customers to reschedule their bookings through the customer portal. Your customers can cancel or reschedule their bookings from their booking view page on your portal. Your customers can also cancel or reschedule their bookings through the links in the booking confirmation emails and reminder emails sent. If this flag is disabled, your customers won’t be able to reschedule their bookings.
For more information visit Allow customers to reschedule bookings through customer portal and email links.
Allow guests to make bookings through customer portal

Enable this flag if you want to allow any guests to create bookings through your customer portal without having to sign in or sign up for an account. When disabled, a pop-up window will appear when guests try to schedule a booking through your portal, preventing them from scheduling an appointment without logging in or creating an account first.
For more information visit Allow guests to make bookings through customer portal.
Allow customers to select an exact start time for their bookings

Enable this flag to allow your customers to select the exact start time for their bookings within your available working hours. If your business can’t promise an exact start time and instead provides a time range to customers, then you should disable this flag. Once disabled, your customers will have the option to select a time range instead of selecting an exact time, e.g., dawn, morning, mid-morning, noon, afternoon, evening, night, and midnight.
For more information visit Allow customers to select an exact start time for their bookings.
Allow customers to upload photos when making a booking

Enable this flag if you want your customers to be able to upload photos when making new bookings.
During the booking process, an “upload photos” button will appear where customers can add their selected photos, and then continue with the checkout process.
For more information visit Allow customers to upload photos when making a booking.
Allow customers to upload pdf through the booking page

Enable this flag if you want your customers to be able to upload pdf files to their bookings after completing the booking process.
This will be displayed at the end of the booking view page, so your customers can easily upload their pdf files.
When disabled, your customers won’t be able to upload their attachments as the button will no longer be available on the booking page.
For more information visit Allow customers to upload pdf through the booking page.
Allow customers to rate your bookings through the booking page

Enable this flag if you want your customers to rate their bookings from the booking view page in the customer portal. A “Rate service” button will be displayed below the fieldworker’s name so your customer can rate your fieldworker’s performance.
Note that: customers won’t be able to rate the service unless their booking is completed and the invoice status is closed, if not, the button won’t be displayed.
For more information visit Allow customers to rate your bookings through the booking page.
Make uploading images mandatory for customers when making a booking

Enable this flag to display a mandatory field that requires your customers to upload photos while creating bookings from the customer portal. In the case that the admin user is creating a booking on behalf of a customer, they will also be required to upload photos to proceed with the booking. This option helps with the jobs that can’t be done without providing pictures, like painting walls, floor installations, and packing. To view this field while booking, you should enable the “ Allow customers to upload photos when making a booking” button too. When it’s enabled, you’ll find a mandatory window asking you to upload at least one image in order to proceed with the booking.
For more information visit Make uploading images mandatory for customers when making a booking.
Display service and custom field pricing structure to customers

Enable this flag to allow your customers to view the full pricing list of the service they are going to book. So, when the customers use the customer portal to book a service, a “Full pricing list” button will be displayed before starting the booking process, upon clicking on it, the customers can display a list with the different prices of the same service depending on the size, duration, custom fields added or any other criteria. By disabling this option your customers will not be able to view the full pricing list and they will only check the details of the full amount they will pay at the checkout from the customer portal.
For more information visit Display service and custom field pricing structure to customers.
Update service pricing on the go

Enable this flag to update the pricing displayed to your customers during the booking process every time they select a custom field with additional prices added. When enabled, the quoted service pricing will be updated immediately while scheduling a booking through the customer portal whenever the customer selects additional fields with added prices. If disabled, the total quoted pricing for the service will only appear on the service summary page after all selections have been made by your customers, before they can add it to their cart.
For more information visit Update service pricing on the go.
Display service minimum price

Enable this flag if you want to display the service minimum price set for each service on your customer portal service list page and the service view page as a starting price for each service.
The service minimum price is a price set in your service settings Cost & Payrate page. Once set, it will prevent making a booking for any amount less than the minimum amount set.
To edit or set a service minimum amount, navigate to Settings > Service Settings > Services > Cost & Payrate
For more information visit Display service minimum price.
Display pricing of custom fields added to the service in the view service page

Enable this flag if you want to display the pricing of custom fields added to each service on the service view page.
So, if you have custom fields added to your services with additional prices added affecting the total price of the service, you can display the pricing list of custom fields added to each service on the view service page on the customer portal. When disabled, the custom fields added prices will not be visible on the service view page, and customers will only be able to view the added prices when they add any custom field to their selected service.
For more information visit Display pricing of custom fields added to the service in the view service page.
Display booking duration / estimated time to customers

Enable this flag if you want to display the booking duration / estimated time to your customers when they are selecting a date and time for their booking.
If you have set up the time each service requires to complete when setting them up then the booking duration or the estimated time required will be calculated when making a booking, you can choose whether to hide or display this time duration to your customer in the availability screen when making a booking.
For more information visit Display booking duration / estimated time to customers.
Display “Is parking available?” question during checkout

Enable this flag if you want to display the question “is parking available?” to your customers during checkout before confirming the booking on the booking overview pop-up.
Once displayed, it helps your fieldworkers know if there will be available free parking slots before leaving for their booking.
For more information visit Display “Is parking available?” question during checkout.
Display additional notes area for the customer during checkout

Enable this flag if you want to display a “Leave a note” area on the booking overview popup, which is an additional field for your customers during checkout to add any additional notes, inquiries, or requirements regarding their booking.
For more information visit Display additional notes area for the customer during checkout.
Select at least one customer property during booking process

Enable this flag if you want to require your customers to select at least one customer property when scheduling a booking through your customer portal.
If your bookings require additional information about your customers’ dependants, then you can enable this option to require customers to select/ add properties during the booking process. The customer properties will appear based on the ones you have set up on your account.
For more information visit Select at least one customer property during booking process.
Fieldworker Flags
Display fieldworker name to customers

Enable this flag, so you can display the names of your fieldworker on the booking page in your customer portal. If you prefer not to show the fieldworker’s name while scheduling a booking on the customer portal, you can turn this toggle off.
Display fieldworker contact details like email and phone number to customers

Enable this flag if you want to display the contacts of your fieldworker like the email address and the phone number to your customers when they view the fieldworker’s profiles on the customer portal.
For more information click here.
For more information visit Display fieldworker contact details to customers.
Display fieldworker social networks links

Enable this flag if you want to display your fieldworkers’ social networks in their profiles on the customer portal, so your customers can access the fieldworkers’ social profiles when they click on the displayed links.
If your fieldworker has their social networks linked to their OctopusPro accounts, you can display them to your customers when they click to view any fieldworker profile. When your customers click on any of the icons, they will be redirected to the fieldworkers’ social platforms linked.
For more information visit Display fieldworker social networks links.
Display fieldworker star rating to customers

Enable this flag if you want to display the star rating of your fieldworker below the fieldworkers’ name. The star rating is the real rating your Fieldworkers receive from the customers, it can also be edited by the admin users.
For more information visit Display fieldworker star rating to customers.
Display fieldworker list and make fieldworker profiles public

Enable this flag if you want to display your fieldworkers’ page link that redirects to the fieldworkers’ category on your customer portal homepage header, and also your fieldworkers’ list will appear on each service view page.
When disabled, the fieldworkers’ page link on your top header will not be displayed, your fieldworkers’ list will not be visible to your customers on the service view page, and they will not be able to view the fieldworkers who provide this service.
For more information visit Display fieldworker list and make fieldworker profiles public.
Display fieldworker date joined to customers

Enable this flag if you want to display the dates that the fieldworkers have joined the business, and they will appear on the fieldworkers’ profiles. So, customers can view the date when the fieldworkers have become members of your team while checking their profiles.
For more information visit Display fieldworker date joined to customers.
Display fieldworker working hours in fieldworker profile

Enable this flag, if you want your fieldworkers’ working hours to be visible to your customers by default in their profiles on the customer portal.
Ensure that you have made your fieldworkers’ profiles public to your customers if you want to display their working hours, otherwise, all their profiles would be hidden including their working hours.
For more information visit Display fieldworker working hours in fieldworker profile
Enable real-time availability

Enable this flag if you need the working hours and calendar availability of each fieldworker to be checked before the customers can access the time slots to schedule a booking. Your customers will only be able to set the booking date and time when there is at least one matching fieldworker available for this booking. The available time slots will always depend on the business working hours set in your general fieldworker profile. In case you want to allow your customers to book appointments anytime regardless of the availability of your fieldworkers, you should disable the real-time availability flag. But note that disabling the real-time availability feature will allow your customers to double book your fieldworkers, so it’s important that you manually confirm and organize bookings if you have disabled this flag.
For more information visit Enable real-time availability.
For more information please visit Octopuspro user guide, and subscribe to our youtube channel.