
Booking Locations: Storefront, Mobile/On-Site & Virtual (Remote)
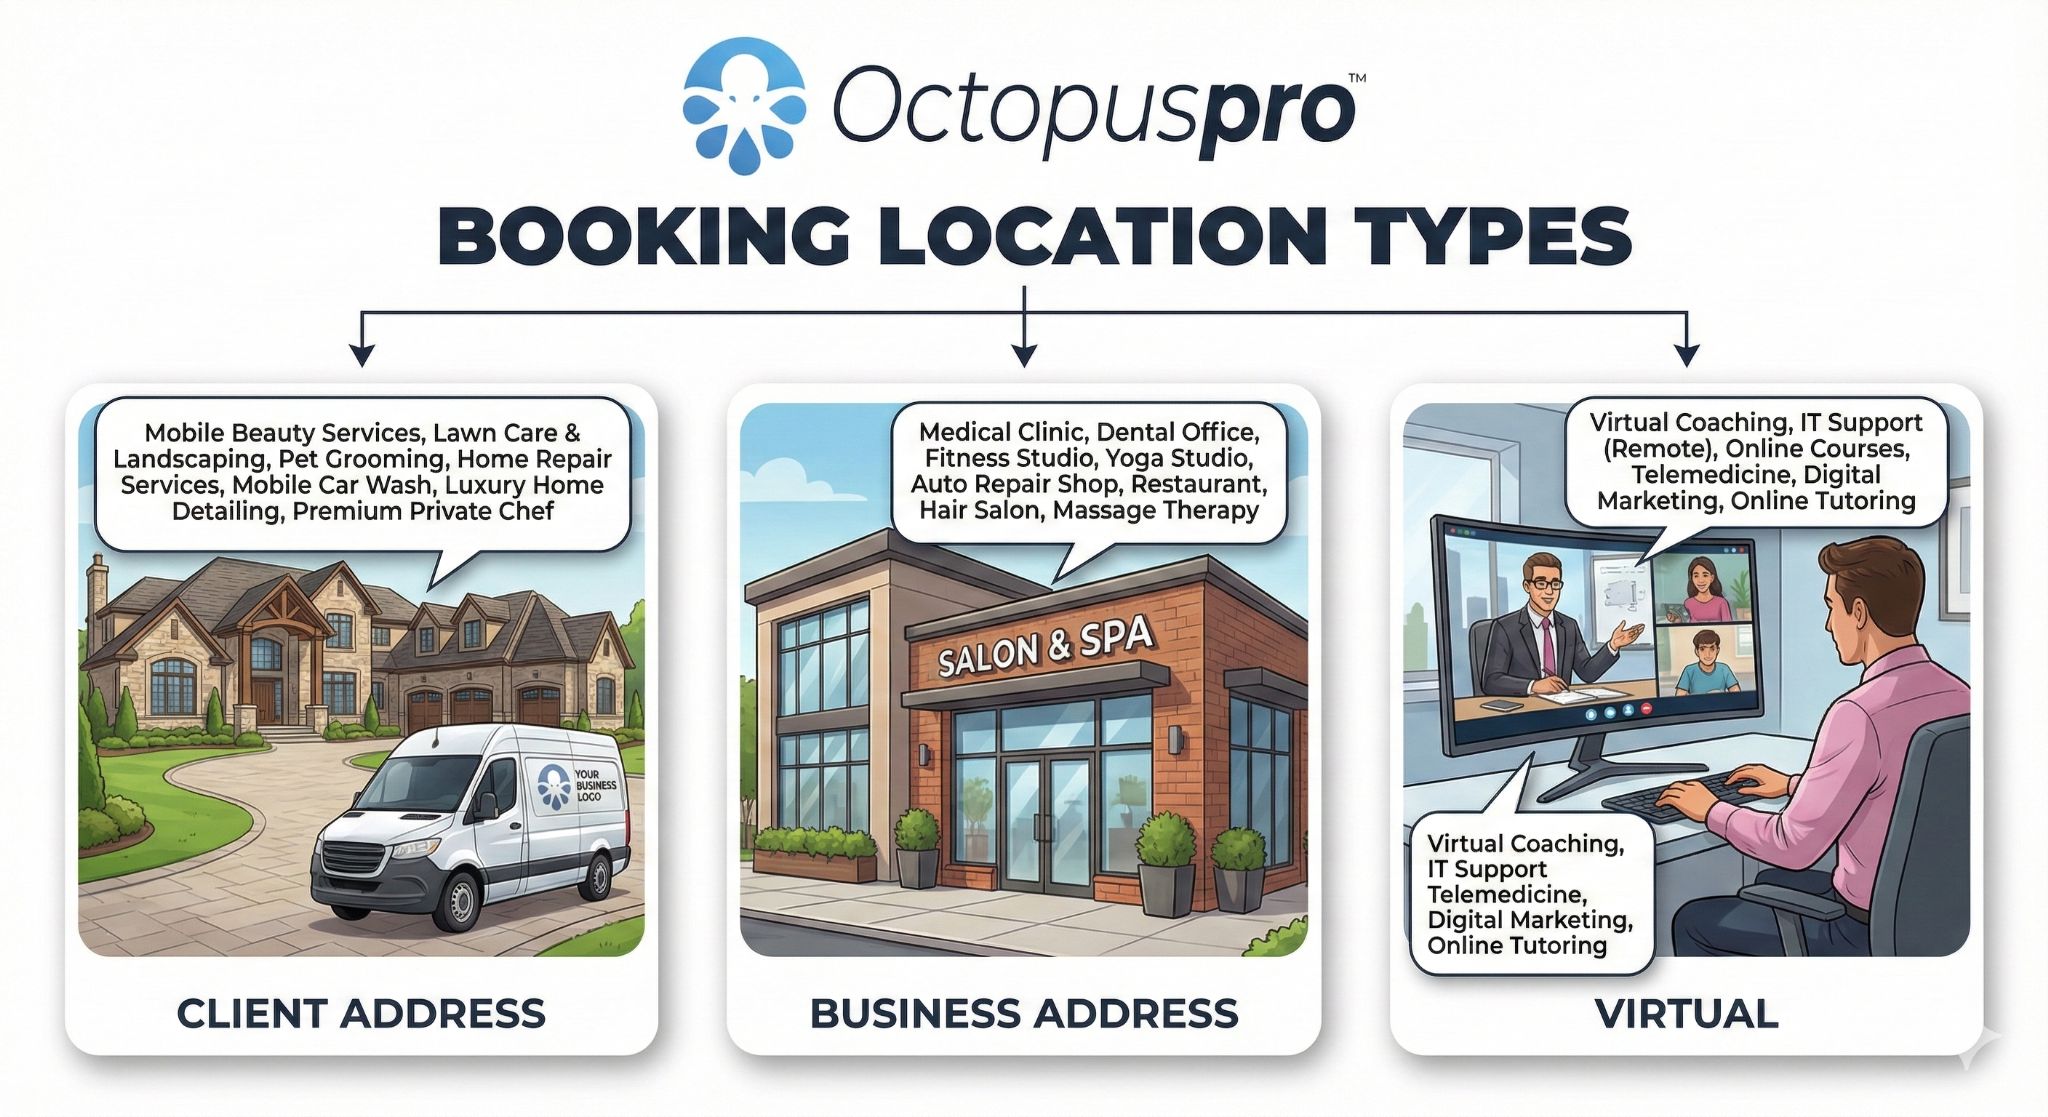
OctopusPro lets you run services in-store at Physical Storefronts or Branches, on-location via Mobile or On-Site Services, and online through Remote or Virtual Services—all within a single account. You can enable one or multiple delivery types at the same time, assign each service to the applicable type(s), and control how bookings are created, viewed, and accepted by admins, fieldworkers, and customers.

Real-World Examples by Service Type
- Mobile or On-Site Services (business travels to the customer):
Auto mechanics, mobile car detailing, mobile hair & beauty salons, pet grooming, electricians, plumbers, mobile massage therapists, landscapers, pool maintenance, mobile pet vaccination clinics, window cleaning, appliance repair (on-site), mobile catering, food trucks, mobile phone/device repair, mobile pet sitting, mobile health clinics, mobile physiotherapy/domiciliary care, handyman services, pest control, moving and removal services, mobile signage/printing.
- Physical Storefront or Branches (fixed location(s) where customers come to you):
Beauty salons; spas; barber shops; gyms; yoga/pilates/dance studios; car wash shops; auto repair garages; medical clinics; dental practices; veterinary clinics; pet stores; retail boutiques; hardware stores; appliance showrooms; laundromats; repair shops; cafés; coworking spaces; tattoo or piercing studios; specialty food shops; photography studios; florists.
- Remote or Virtual Services (delivered online or over distance):
Online education / tutoring; virtual fitness training (e.g. yoga, personal training via video); telehealth / telemedicine; IT / tech support; virtual assistance; online coaching (life, business, career, wellness); digital marketing or consulting; online workshops / webinars; remote counselling / therapy; virtual bookkeeping / accounting; virtual design services (graphic, UX/UI); remote legal advice; remote project management; online language instruction; virtual event planning; remote sales or customer service.
No matter which model your business follows—serving customers at your location, going to them, or operating entirely online—OctopusPro delivers the tools you need: flexible booking types, automated reminders, staff assignment, reporting, and payment processing. Whether you’re scheduling a mobile mechanic, managing appointments in your branch, or conducting virtual sessions, OctopusPro keeps everything under control.
How It Works: Using Multiple Location Types Together
Many businesses need more than one delivery type active at once. For example:
- A salon that has a branch, offers home-visits, and provides online consultations.
- A vet clinic that has a fixed clinic, sends vets to homes, and does remote follow-ups.
- A therapist who works in-office, visits clients, and offers video sessions.

In OctopusPro, you can enable all relevant delivery types for your business, assign each service to the applicable types, and ensure that in each booking scenario only the proper options are shown.
Step 1: Enable delivery types & map each service to where it’s offered
A) Turn on your delivery types (once)
Go to Settings → Company Settings → Locations and enable the delivery types your business uses:
- Physical Storefront or Branches
- Mobile or On-Site Services
- Remote or Virtual Services
You can run one or multiple delivery types at the same time.

B) For each service, choose where it’s available
- Go to Settings → Service Settings → Services.
- Add/Edit the service and open the Service Details tab.
- In Where do you provide this service?, tick one or more delivery types:
- Physical Storefront or Branches
- Mobile or On-Site Services
- Remote or Virtual Services
Tips
- Services can be available in more than one place (e.g., the same service can be offered at a Branch and On-Site, but not Virtual—if that fits your operations).
- If a service needs multiple stops (e.g., Pickup → Delivery), also enable Allow Multiple Addresses per Booking for that service later in Service Settings.
- In Step 2 (staff setup), make sure fieldworkers are enabled for the delivery types they’ll support so they can be assigned correctly.
Quick checklist:
✅ Delivery types enabled in Company Settings
✅ Each service mapped to the right delivery type(s)
✅ Save changes
Step 2: Admin workflow — create Inquiries, Quotes, Bookings, Invoices
- Choose delivery type
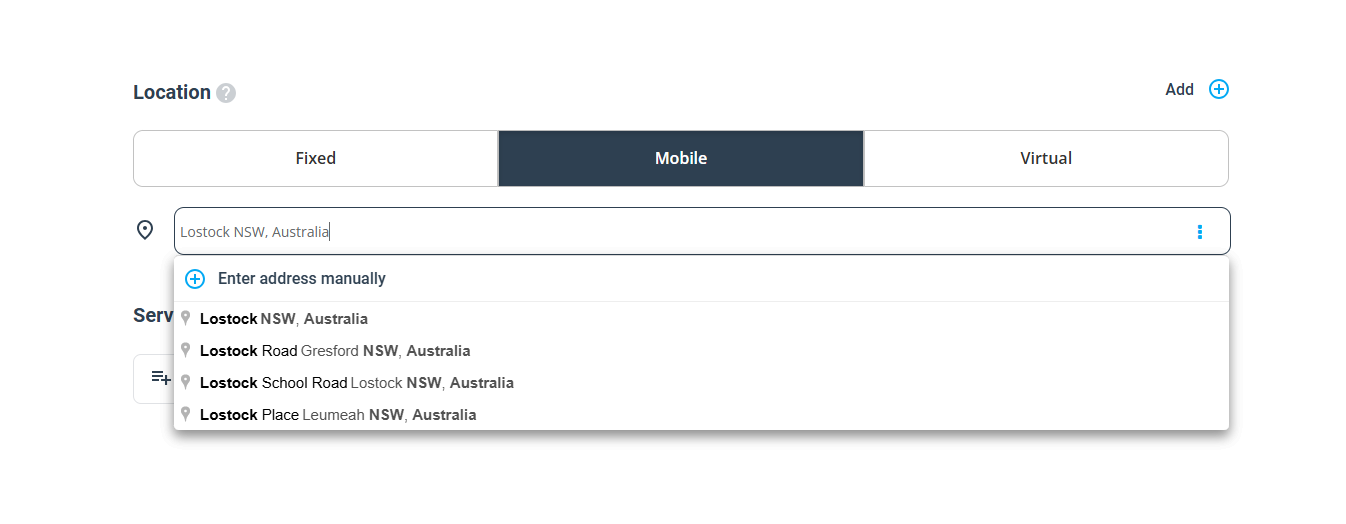
Select Physical Storefront or Branches, Mobile or On-Site Services, or Remote or Virtual Services. - Complete the location details (the form adapts automatically)
- Mobile or On-Site → enter a service address (type to Find address or Pin location on map).
- Physical Storefront or Branches → pick a branch from your saved locations.
- Remote or Virtual → no street address; add the online meeting link (Meet/Teams/Zoom). The link will appear in confirmation emails, Add to Calendar (.ics), SMS reminders (if enabled), the Fieldworker app, and the Customer Portal booking page.
- Pick the service
Only services enabled for the chosen delivery type are shown (prevents picking branch-only services for a mobile job, etc.). - Assign fieldworker(s)
Assign team members who are eligible for that delivery type (enabled in their profile). - Finish & send
Save the item. Customers and assigned fieldworkers receive confirmations (and reminders, if enabled) with the right location and—when virtual—the Join link and .ics.
Notes
• Multi-address bookings: Admins/fieldworkers can always add extra stops via Add (+) in the Location section. To let customers add multiple stops online, enable it in Settings → Customer Portal → Flags & Permissions, and turn on Allow Multiple Addresses per Booking for each relevant Service.
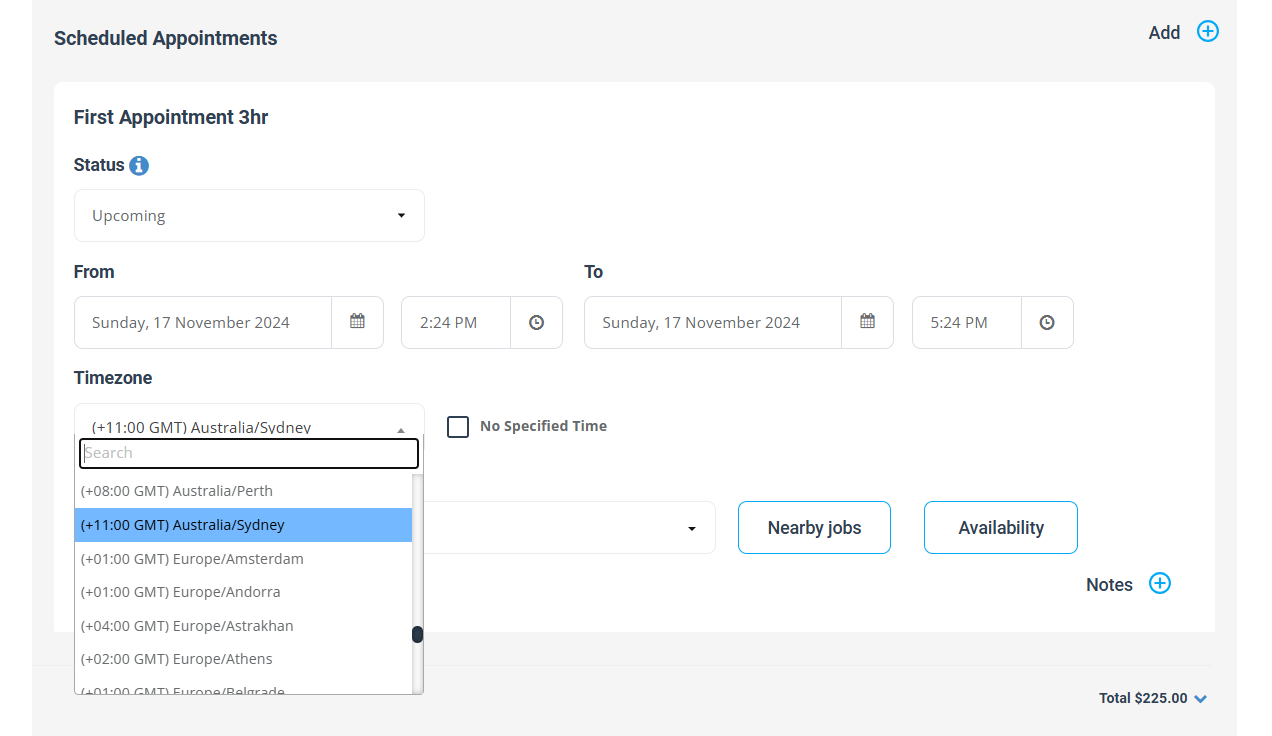
• Time zones for virtual: Schedule in the customer’s time zone; everyone still sees the appointment in their own local time in email, calendar, app, and portal.
Step 3: Fieldworker workflow — create & manage work
- Choose delivery type when creating an inquiry/quote/booking/invoice.
- Complete location details (the form adapts):
- Mobile or On-Site → enter an address (Find address / Pin on map).
- Branch → select the branch.
- Virtual → confirm the Join link is present (Meet/Teams/Zoom).
- Pick the service — only those enabled for that delivery type appear.
- Save — you’ll see the job in your local time and get reminders. For virtual bookings, tap Join from the booking (app or portal).
Permissions
Fieldworkers can create virtual bookings only if they’re allowed to create items (Assign Credentials) and are enabled for the delivery type in their profile.
Step 4: Customer booking workflow — Customer Portal
- Choose delivery type
- Physical Storefront or Branches → customer picks a branch.
- Mobile or On-Site → customer enters a service address (autocomplete/map).
- Remote or Virtual → customer selects Virtual and books in their time zone.
- See only relevant services
The portal shows services you’ve made available for the selected delivery type. - Confirm & receive details
The customer gets a confirmation (and reminders, if enabled) with:- Branch or address (as applicable)
- Virtual Join link (for remote bookings)
- Add to Calendar (.ics) so the event lands in Google/Outlook/Apple Calendar with the correct time and conferencing details
Optional (customers, multi-address)
To let customers add multiple stops (e.g., Pickup → Delivery → Key Return), enable the option in Settings → Customer Portal → Flags & Permissions, and turn on Allow Multiple Addresses per Booking for each relevant Service.
Scenario examples & edge cases (quick guidance)
- Mixed availability
Heavy-equipment services may be Branch-only; light diagnostics could be Mobile; consults might be Virtual. Enable only where each service truly runs. - Hybrid delivery
Some services start On-Site and finish Virtual. Offer the service under both types and schedule the appropriate step per booking. - Address handling (Mobile)
Support both autocomplete and map pin for tricky sites (gates, construction access, breakdowns). Admins/fieldworkers can add extra stops via Add (+). - Time zones (Virtual)
Schedule in the customer’s time zone; all parties see times in their own local time in email, calendar, app, and portal.
✅ Summary
- One account can run Storefront/Branches, Mobile/On-Site, and Remote/Virtual in parallel.
- You decide per service where it’s offered.
- Forms adapt to the chosen delivery type, so only relevant fields & services appear.
- Admins, fieldworkers, and customers always see the right options, locations, and (for virtual) the Join link—keeping workflows clean and reducing errors.
Managing Mobile or On-Site Services (services performed at your customer’s location)
OctopusPro makes it easy to run services at residential addresses, workplaces, job sites, or ad-hoc locations (e.g., a vehicle breakdown on a highway). Simply enable Mobile or On-Site Services in your company settings, then create, track, and complete bookings end-to-end with clear workflows for admins, fieldworkers, and customers. Address capture supports both map/autocomplete and exact GPS coordinates for locations without a standard street address.
1) Set up and enable mobile bookings
- Turn on Mobile or On-Site Services:
Go to Settings → Company Settings → Locations and enable Mobile or On-Site Services for your account. - Make services available on-site:
Go to Settings → Service Settings → Services → Add/Edit → Service Details → Where do you provide this service? Select Mobile or On-Site Services (you can also enable Branch/Virtual for the same service if you operate multiple delivery types). - Monitoring mobile bookings (map, status & ETA):
Turn on booking tracking in Settings → General Settings → Booking Settings to guide fieldworkers through ON THE WAY → ARRIVED → Start Job → Finish Job, share live ETAs, and log route, arrival, time on site, and departure in the booking timeline. From any Inquiry/Quote/Booking, click View map to see the job location(s) and the Available Fieldworkers who match the service/location. When a fieldworker taps ON THE WAY, GPS tracking starts and ETAs are shared; you can replay past routes from Appointments → View GPS tracking map.

2) Admin workflow (creating and managing mobile bookings)
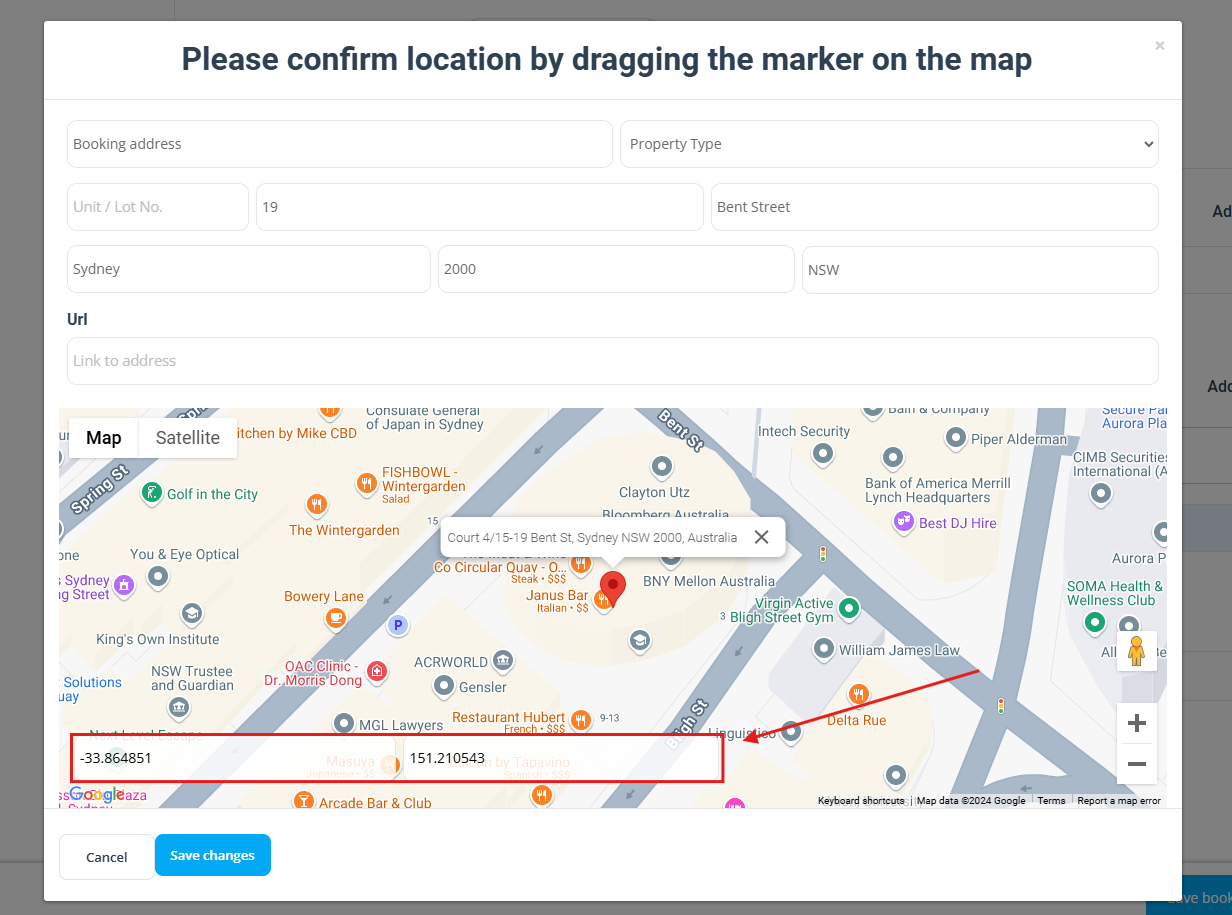
When an admin creates an inquiry, quote, booking, or invoice and selects Mobile or On-Site Services, OctopusPro displays the Booking Address section. This is where you enter, confirm, and manage the exact service location for the job.
This workflow is designed for standard street addresses as well as harder-to-locate sites such as roadside breakdowns, depots, construction sites, loading docks, gated properties, large commercial premises, parks, event sites, and other locations where a general address may not be accurate enough.
You can capture the booking location in four ways:
- Address Autocomplete and Map Selection
Use Find address to search and select the service address using address autocomplete. This reduces manual typing and improves accuracy by matching recognised addresses, place names, and plus codes as you type. After selecting the address, you can confirm the exact location by dragging the map marker if needed.
- Google Maps URL or Shared Pin Link
If the customer sends you a Google Maps share link or a dropped pin URL, paste it into the URL field in the address popup. This is especially useful for roadside call-outs and hard-to-find service sites where the nearest street address is not precise enough. You can then use the map and marker to confirm the exact service point.Example use cases: roadside assistance, side-street access points, rear-lane entry, loading docks, gates, depots, farms, parks, and large sites with multiple entrances.
Tip: Customers can usually generate this link directly from Google Maps by selecting the location, tapping or clicking Share, and then choosing Copy link.
- Exact GPS Coordinates (Latitude/Longitude)
Use latitude and longitude coordinates when the service site does not have a reliable street address or when you need to pinpoint an exact location, such as a breakdown spot, gate, access road, manhole, utility point, or service bay. This improves navigation accuracy, reduces back-and-forth with the customer, and helps fieldworkers reach the correct location faster.
- Saved Service Locations
For repeat customers, you can save and reuse multiple service sites instead of entering the address each time. This is ideal when a customer has more than one service address, such as a home, office, warehouse, job site, or depot. Saved Service Locations help standardise address data, speed up booking creation, and reduce data-entry errors.
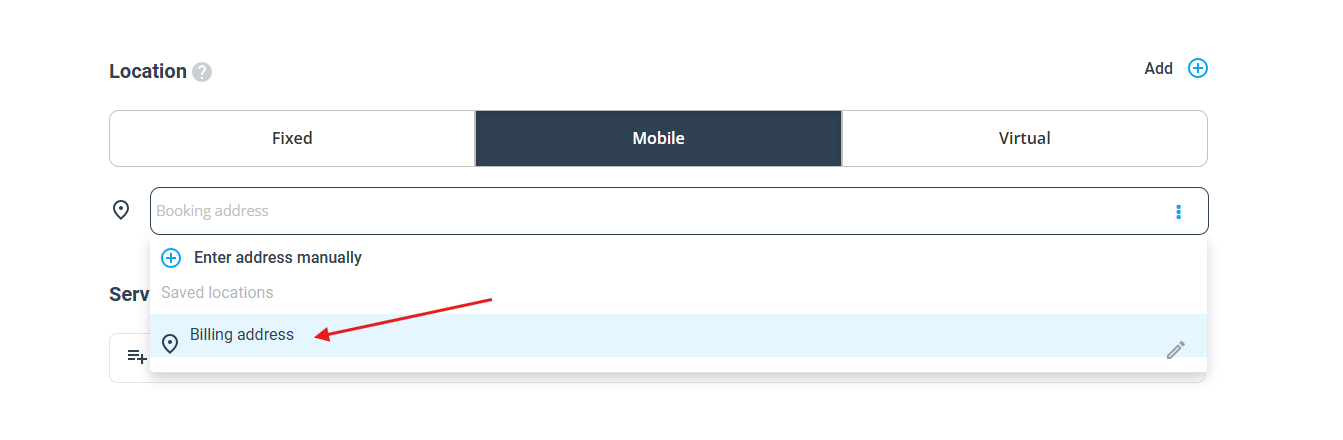
Default behaviour: Each customer profile stores one address by default, which is the Billing Address. During booking creation, admins can copy this address into the Booking Address field.
Need to store multiple service addresses for the same customer? Enable the built-in customer property Saved Service Locations to store and reuse multiple job sites for that customer.
Enable Saved Service Locations
- Go to Settings → General Settings → Customer Properties.
- Enable the built-in customer property called Saved Service Locations.
- Optionally customise the fields to match your workflow.
Default fields (editable):
Site Name, Service Address, On-Site Contact Name, On-Site Contact Phone, Access Instructions / Gate Code, Preferred Parking Instructions, and Default Site.
You can also add extra fields such as Latitude, Longitude, Unit / Level, Dock / Bay, Time Window, Site Reference Number, or any other location-specific details your team needs.
How Saved Service Locations are used
- Customers (Customer Portal): Customers can manage their sites under Profile → Saved Service Locations and select one during online booking to auto-fill the service address and site details.
- Admins and Fieldworkers: When creating an inquiry, quote, booking, or invoice, you can select one of the customer’s Saved Service Locations to auto-populate the address, contact details, and site instructions. You can still override the details or add a new site if needed.
- Best practice: For sites without a reliable street address, store a Google Maps shared pin link and/or latitude and longitude coordinates in the saved location record for faster dispatch and more accurate navigation.
- Note: If a customer profile is deleted, its saved service locations are deleted with it.
How to request a Google Maps pin from the customer
If the service location is difficult to describe, does not have a reliable street address, or the customer is at a temporary or roadside location, ask the customer to send you a Google Maps share link or dropped pin link. This is often the fastest and most accurate way to confirm the exact service location.
This is especially useful for:
- roadside breakdowns
- large properties with multiple entrances
- rear-lane or side-gate access
- depots, industrial sites, and loading docks
- parks, event sites, beaches, farms, and other non-standard locations
- sites where the nearest street address is not precise enough
How the customer can send their location:
- Open Google Maps.
- Find the exact location on the map.
- Press and hold the location to drop a pin.
- Tap Share.
- Select Copy link.
- Send the link to your business by SMS, email, chat, or any other communication channel you use.
Once you receive the link, paste it into the URL field in the booking address popup. Then review the map and confirm the exact location by adjusting the marker if needed.
Best practice: For roadside and urgent mobile jobs, ask the customer to also provide a vehicle description, nearest landmark, access notes, and a contact phone number in case the technician needs help finding them.
Multiple addresses in one booking
Some services require more than one stop in the same job, such as pickup and drop-off, key collection and return, or multiple service points on the same route.
Admins and Fieldworkers
- The Add (+) button in the Location section is always available.
- You can add multiple stops to the same booking and label each stop clearly, for example Pickup, Drop-off, Site 1, or Key Return.

- Each stop can use a full street address, an autocomplete result, a map pin, exact GPS coordinates, or a shared Google Maps pin link where relevant.
Customers (Customer Portal)
- If you want customers to enter multiple addresses during online booking, enable this in Settings → Customer Portal → Flags & Permissions.
- You can also customise the location field labels customers see, such as Pickup, Destination, Drop-off, or any other service-specific wording.
Per-service control
- Because not every service requires multiple stops, enable it only where needed under:
Settings → Services → Add/Edit Service → Allow Multiple Addresses per Booking - This is useful for services such as removals, deliveries, transport, and other route-based jobs, while single-site services can keep a simpler workflow.
- This setting controls how multi-address booking appears for customers, while admins and fieldworkers can still add extra stops manually at any time using the Add (+) button.
Additional notes
- Choosing services: After the location type is set to Mobile or On-Site, the service picker only shows services enabled for that service delivery type. This helps prevent selection errors by hiding branch-only or virtual-only services.
- Viewing locations on the map: On the inquiry, quote, or booking page, open View map to see the job location or all stops together on one map. If there are multiple addresses, you can review them together with markers and labels or inspect them individually.
- Dispatch visibility: The Available Fieldworkers view highlights workers who match the booking’s location and required service skills, making dispatch faster and more accurate.
- Address accuracy tip: For difficult locations, combine the address with site notes such as landmarks, gate instructions, parking details, unit number, access code, and an on-site contact phone number.
Related info
- Bulk import at scale
Import customers and bring their structured site data with them.
• Import Existing Customers (CSV)
• Importing Customer Properties (including Saved Service Locations) - Fieldworker address privacy and ETA updates
Keep the full street address hidden until ON THE WAY, and share live ETA and GPS tracking when enabled.
• Fieldworker Permissions – Address Visibility
• Alarms, ETA Alerts, and Booking Reminders
• Fieldworker GPS Tracking - Service area eligibility
Make sure only fieldworkers whose map-based service areas cover the job site are considered for assignment.
• Define Service Areas for Fieldworkers
• Fieldworker Self-Setup: Address and Service Area Polygon
• Job Assignment and Dispatch Methods
Step 3: Fieldworker workflow (Fieldworker app)
1) Permissions & creating bookings
- Who can create: Fieldworkers can create bookings only if permitted. Set this in Settings → Company Settings → Users → Assign Credentials and ensure their profile is enabled for the relevant delivery type(s) (Mobile/On-Site, Branch, Virtual).
- Create a booking: Add/select the customer → choose the service → complete the location:
- Mobile/On-Site: type to Find address (autocomplete) or Pin location on map; GPS coordinates are supported for precise sites.
- Branch: select the branch from your saved locations.
- Virtual: confirm a Join link (Meet/Teams/Zoom) is present; fieldworkers will see a Join button in the app/portal.
- Saved addresses: When allowed, fieldworkers can copy the customer’s Billing Address or a Saved Service Location into the booking.
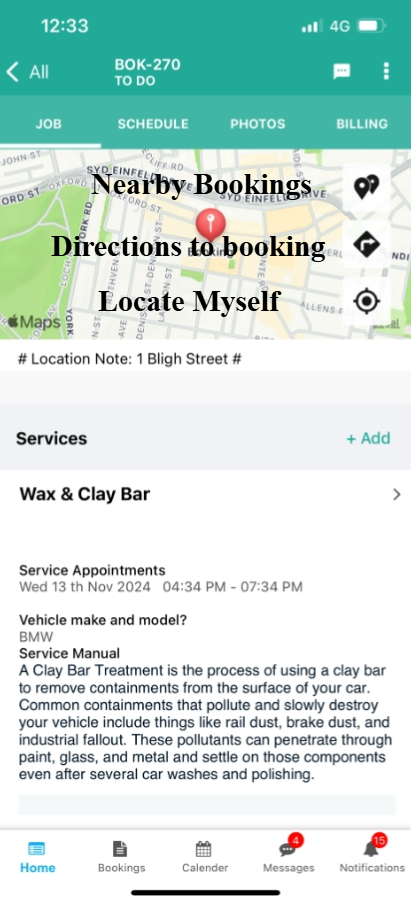
2) View & navigate
- From the booking view, tap Navigate to open turn-by-turn directions in your maps app. Giving technicians one-tap navigation supports efficient routing and on-time arrivals.
3) Address visibility (admin-configurable)
- Default (always visible): Fieldworkers can see the full street address.
- Privacy mode: To hide the full address until travel time, turn off “Display the full booking address to fieldworkers at all times” in Fieldworker Permissions. In this mode, only suburb/locality shows until the technician taps ON THE WAY; then the full address reveals and dispatch is notified.
- If acceptance is required: Fieldworkers must accept an assigned booking before the full address becomes visible.
4) Attendance & timeline buttons (status flow)
Use the in-app buttons to keep dispatch and the customer in sync. Each action logs to the booking timeline.
- ON THE WAY — starts GPS tracking, shares an ETA with admins (and customers, if enabled), and reveals the full address when privacy mode is on. “On-the-way” status with live ETA is a standard pattern in field-service platforms.
- ARRIVED — confirms arrival (GPS-verified within proximity).
- Start Job / Finish Job — records time on site for timesheets and reporting; progressing through Travel/On Site/Completed states is an established workflow.
- RUNNING LATE — sends an updated ETA to admins/customers; late-departure detection helps set expectations and reduce no-shows.
- NO LONGER ATTENDING — captures a reason, shows the cancellation policy (if configured), and triggers reassign/reschedule actions.
- Force attendance updates (optional): Require technicians to confirm missed Start/Finish actions before continuing in the app to keep timelines accurate.
5) Auto check-out (optional)
- Enable auto check-out so the app checks the fieldworker out when they move beyond a defined job-site radius (geofence). Geofencing is a common approach to automate location-based events.
Why this matters: A clear status flow (On the Way → Arrived → Start → Finish) plus live ETAs, GPS visibility, and geofenced check-in/out improves on-time performance and customer satisfaction while reducing manual admin work.
Step 4: Customer experience (booking & tracking)
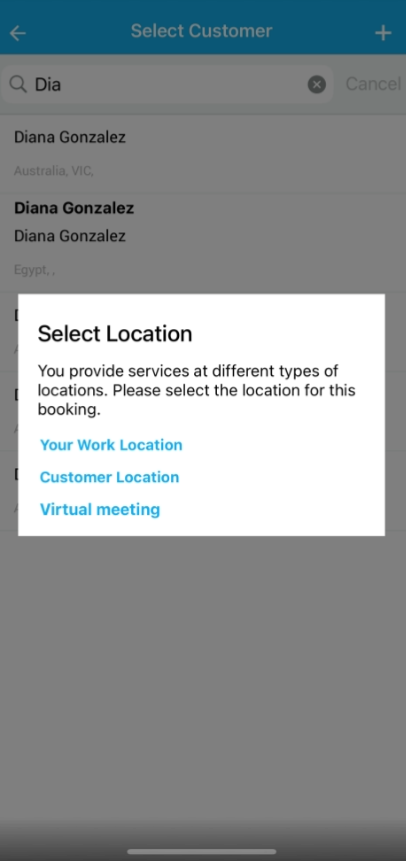
When your Customer Portal is enabled, customers can book Mobile / On-Site jobs in a few quick steps:
1) Enter or select the service address
Customers can start typing to use address autocomplete or drop a pin on the map. The booking stores the site’s latitude/longitude for precise navigation and clean rebookings. This is standard practice: autocomplete reduces typing errors and geocoding turns addresses into exact map coordinates for reliable routing.
![]()
2) (Optional) Let customers add multiple stops
If your services sometimes need more than one location (e.g., Pickup → Destination → Drop-off), you can let customers add extra stops during online booking.
- Turn this on for customers via Settings → Customer Portal → Flags & Permissions (label the fields customers will see).
- Use per-service control: for services that truly need it (e.g., Removals, Deliveries, Shuttle), enable Allow Multiple Addresses per Booking in Service Settings → Services → Add/Edit.
Multi-stop support mirrors last-mile routing best practice for complex jobs.
3) Reuse Saved Locations (for repeat customers)
By default, each customer profile stores one address (Billing). If you want customers (and staff) to reuse multiple service sites (e.g., Home, Office, Depot), enable the built-in Saved Service Locations customer property and customize the fields (e.g., Site Name, Access Instructions, Gate Code, Parking). Address books/“saved addresses” are a common UX pattern that speeds checkout and reduces entry errors.
4) See the booking map & timeline
After booking, customers can open the job to view the site on a map and a simple timeline (arrival, check-in, check-out) so they know what happened and when.
![]()
5) Optional: live ETA & tracking
If enabled, customers can follow the fieldworker’s real-time approach and ETA. Proactive ETA updates and live tracking are widely used in field service and last-mile operations to reduce missed appointments and support calls, improving satisfaction.
Why this flow works
- Autocomplete lowers address errors and speeds form-fill.
- Geocoding (lat/long) makes navigation accurate, even for tricky or unmapped sites.
- Multi-stop bookings cover complex, real-world routes in one request.
- Live ETAs set expectations and cut “where is my tech?” calls.
Admin notes (setup recap):
• Customers adding multiple stops → enable in Customer Portal → Flags & Permissions and turn on Allow Multiple Addresses per Booking for relevant Services.
• Saved Service Locations → enable the customer property to store more than one site per customer (otherwise only the billing address is stored).
5) Tips & best practices (optional but recommended)
- Use reputable address providers and follow best practices for autocomplete and geocoding (restrict results to your service country/region, request only the fields you need, and handle place predictions carefully to control cost and improve accuracy).
- Label multi-stop bookings clearly (Pickup, Delivery, Key return) and verify contact info for each stop to avoid confusion.
Who benefits from Mobile or On-Site Services?
Mobile auto mechanics, on-the-go massage therapists, traveling veterinarians, cleaning services, tow truck operators, solar panel installers, electricians, plumbers, HVAC, pest control, landscaping, personal trainers, mobile dog groomers, makeup & beauty, appliance repair, roadside assistance, and more. These industries commonly rely on on-site visits and field-service processes.
Bottom line: With Mobile or On-Site Services enabled, OctopusPro gives you accurate location capture (address or GPS), clear admin/field/customer flows, real-time tracking and ETAs, and built-in controls for multi-stop jobs—so your team arrives prepared, on time, and ready to deliver.
Managing mobile location bookings (Admin)
Use the map on each Inquiry / Quote / Booking—in the app or desktop—to see exactly where a job will take place and who can attend it.
Open the map
- Open the Inquiry, Quote, or Booking.
- In the Location section, click View map (a map pop-up opens).
- If the job has a street address, the map pins that address.
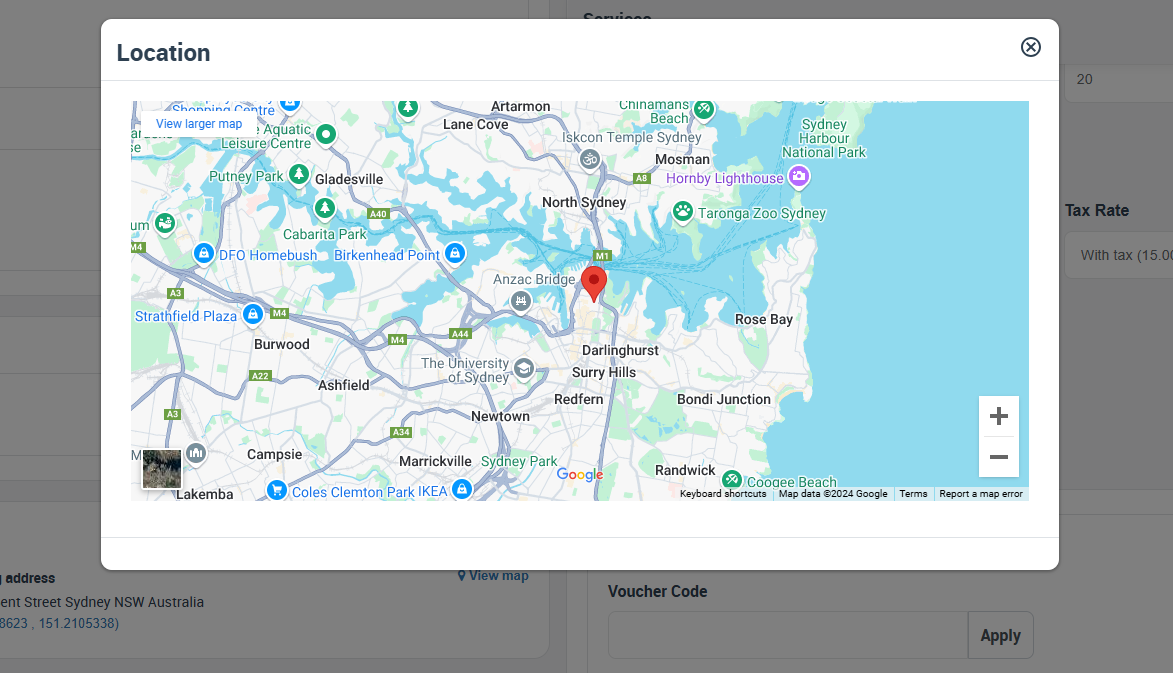
- If there’s no formal address, the map pins the GPS coordinates you captured (lat/long). This is a standard approach when sites don’t have mailable addresses.
- If the job has a street address, the map pins that address.
Work with single or multiple addresses
- Single address: You’ll see one pin with the job label.
- Multiple addresses (e.g., Pickup → Drop-off → Key return):
- View all stops on one map with labeled pins, or open each location separately from the Location section.
See who can attend (Available Fieldworkers)
- The Available Fieldworkers panel (next to the map) shows staff who match the location and required services for the job.

- Use filters (e.g., skills/teams/availability) to narrow candidates, then assign the best technician based on proximity and route efficiency—a widely used best practice in dispatching.
Why the admin map matters
- A real-time map gives dispatchers the geographical context to reduce drive time, optimize routes, and schedule smarter—especially when combined with proximity/skill filters.
Tip: If a location is hard to find (new estate, gate entrance, rural site), enter or store precise latitude/longitude with the job so the map and navigation are accurate.
Tracking fieldworker locations while on the job
Admins can monitor assigned fieldworkers in real time from the booking page. Once a fieldworker taps ON THE WAY, GPS tracking begins, showing their live position en route and on site, with an ETA for smoother coordination. The system records the route taken, arrival, time on site (via geofence proximity), and departure, and saves these details to the booking timeline for past jobs. Tracking ends when the fieldworker taps Finish or moves outside the job-site radius. You can review historical journeys from Appointments → View GPS tracking map to replay routes and confirm visit durations.
![]()
Managing services at your Physical Storefront or Branches
OctopusPro supports bookings delivered at your business premises (one or many branches). Multi-location scheduling is a common pattern in appointment/field-service software and helps customers pick the right branch while your team assigns staff by location—improving utilization and reducing errors.
1) Enable branches and add locations
- Go to Settings → Company Settings → Locations.
- Enable “Physical Storefront or Branches.”

- Add each branch with its address (you can include map/GPS details if you like).
Enabling multi-location setup and keeping a clean list of branches is standard practice for accurate customer booking and reporting.
2) Admin workflow (create & manage branch bookings)
- Create from web or admin app: When you create an inquiry, quote, booking, or invoice, first choose the branch from your saved locations.
- Viewing a branch booking (Admin): Open the booking and check the Location section to confirm the selected branch. Click View map to see the exact site. Use the Available Fieldworkers panel next to the map to see who is eligible for that branch/service and assign accordingly.
- Service filtering: Only services enabled for Physical Storefront or Branches will be selectable (prevents picking a mobile-only or virtual-only service by mistake).
- Assign staff who work at that branch: Use the Available Fieldworkers panel to pick the right person/team for that location (matching skills/availability). Dispatcher views that consider location and skills are widely used to speed assignment.
Tip: Open View map on the booking to confirm the branch location or get directions if needed. Map-based context is a common dispatcher convenience in multi-location operations.
3) Fieldworker workflow
- Create (if permitted): Fieldworkers can create bookings only for the branches activated in their profile. If they work across multiple branches, they must select the correct location when creating quotes/bookings/invoices.
- View & manage: Fieldworkers see their branch bookings in the app or portal and can navigate there in one tap. Streamlined “view → navigate” flows are standard in modern field-service mobility.
4) Customer experience (Customer Portal)
- Pick a branch at checkout: When multiple branches exist, your Customer Portal shows a selectable list so customers book at their preferred location—an expected UX in multi-location scheduling.
- Booking details: After booking, customers see the selected branch on their booking page along with the appointment timeline (start/end).
Why this setup works
- A clear branch list keeps customers from booking the wrong site and helps admins assign nearby, qualified staff—best practices shown across multi-location scheduling and dispatch solutions.
Managing Remote or Virtual Services (online)
Run any online service—telehealth, IT support, coaching, consulting, tutoring, design, translation, and more—by enabling the Remote or Virtual Services location type. OctopusPro lets you create, schedule, join, and track virtual appointments with the same confidence as in-person jobs.
1) Turn it on & map your services
- Enable the location type: Settings → Company Settings → Locations → Remote or Virtual Services.
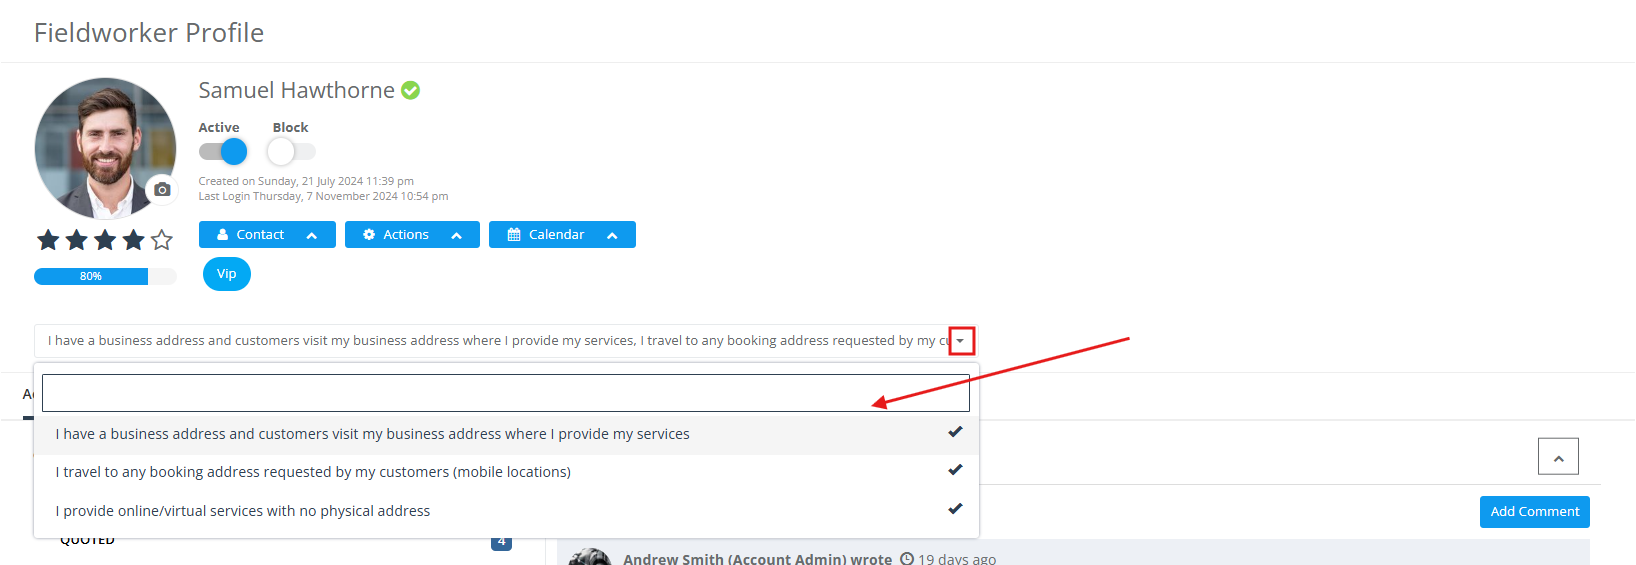
- Map each service: Settings → Service Settings → Services → Add/Edit → “Where do you provide this service?” → enable Remote or Virtual Services (you can also keep the same service available at Physical Storefront or Branches and Mobile or On-Site Services, if applicable).
- Allow staff to deliver virtually: In each fieldworker profile, enable Remote or Virtual Services so they can be assigned (and, if permitted) create virtual bookings.
2) Meeting links (Meet / Teams / Zoom) — where they appear
For Remote or Virtual bookings you can either auto-add a meeting link (if enabled) or paste an existing link from Google Meet, Microsoft Teams, Zoom, or another provider. Attendees can then join in one click from the invite/link.
OctopusPro surfaces the Join link in all the right places:
- Booking confirmation emails to customers and assigned fieldworkers (Join link included).
- Calendar invitations via Add to Calendar (.ics) — the event lands in Google, Outlook, and Apple Calendar with the conferencing details attached.
- SMS reminders (if enabled) for tap-to-join on mobile.
- Fieldworker app & portal — a Join button on the booking.
- Customer Portal — the Join link on the booking page.
Best practice: Use one meeting link per booking to keep things clear for attendees.
See also:
3) Time zones — kept simple
- Schedule in the customer’s time zone (recommended).
- Everyone (admins, fieldworkers, customers) sees the appointment in their own local time; modern calendars store a time-zone reference and convert automatically, including daylight-saving changes.
- The selected time zone also appears in emails/SMS, keeping expectations clear.
4) Workflows at a glance
Admins — create & send
- Create booking → choose Remote or Virtual → pick the service (only services marked for virtual will appear).
- Set date/time + time zone → use the customer’s time zone.
- Assign fieldworker(s) enabled for virtual delivery.
- Add the meeting link (Meet/Teams/Zoom) — auto-add (if enabled) or paste an existing link.
- Send — confirmations go out with the Join link and Add to Calendar (.ics) so no one needs to copy/paste later.
Fieldworkers — what they see/do
- Bookings display in the fieldworker’s local time (with reminders).
- Open the booking in the app/portal and tap Join to start the session (Meet/Teams/Zoom).
Customers — booking & joining
- In the Customer Portal, customers choose Remote or Virtual and select their time zone.
- They receive the Join link in email (and SMS if enabled) and can add the event to their calendar via .ics; the link also appears on the portal booking page.
Quick troubleshooters (optional)
- Join link missing in emails/invites? Make sure a conferencing link was added to the booking; events support only one conferencing provider.
- Times look wrong to someone? Re-create or edit using the customer’s time zone; calendars render in each viewer’s local time automatically.
Creating a virtual booking (details)
Where to create
Use the web admin portal or the admin mobile app to create a booking with the location type set to Remote or Virtual.
Time-zone best practice
Schedule in the customer’s time zone. Modern calendars store the event’s time-zone reference and automatically show the correct local time to admins, fieldworkers, and customers (including daylight-saving changes).
Meeting provider
Use Google Meet, Microsoft Teams, Zoom, or another provider. All support one-click Join from the invite/link.
Service eligibility
After you choose Remote or Virtual as the location type, the picker shows only services enabled for virtual delivery (you can still offer the same service at Branches and/or Mobile/On-Site if applicable).
Where the Join link appears (no extra steps)
- Booking confirmation emails to customers and assigned fieldworkers (includes the Join link).
- Calendar invites via Add to Calendar (.ics), so the event lands in Google, Outlook, and Apple Calendar with conferencing details attached (iCalendar is the cross-platform standard).
- SMS reminders (if enabled) with a tap-to-join link.
- Fieldworker app/portal — a Join button on the booking.
- Customer Portal — the Join link on the booking page.
Best practice: Use one conferencing provider per event. Adding “extra” links in the location/description can attach multiple conferences and confuse attendees; add the official conference via the event’s conferencing field.
Viewing & managing virtual bookings (admins)
- See the right times: On the booking page, you’ll see the appointment in your local time and can also view the customer’s and fieldworker’s local times when they differ (calendars convert automatically from the stored time-zone reference).
- Reschedule or cancel: Update the booking; guests receive updated invitations/notifications with the revised time (and the same Join link, when the provider supports it). Calendar platforms generally send updates when you modify guest events so everyone’s copy stays accurate.
Quick tips (optional)
- If someone can’t find how to join: the Join link is in the email invite, the calendar event, the Customer Portal booking, and (for staff) the Fieldworker app/portal. Teams and Zoom also document joining directly from a link.
- If guests use different calendars: the .ics attachment ensures broad compatibility across Google/Outlook/Apple.
Fieldworkers (what you configure & what they see)
What you (the admin) configure
Permissions to create bookings
Allow fieldworkers to create virtual bookings (if you want) via Settings → Company Settings → Users → Assign Credentials, and make sure each fieldworker profile is enabled for Remote or Virtual Services so they can be assigned (and, if permitted) create virtual jobs.
Service eligibility
For each service, go to Settings → Service Settings → Services → Add/Edit → “Where do you provide this service?” and enable Remote or Virtual Services so it appears in the picker for virtual bookings.
Time-zone standard (recommended)
Schedule in the customer’s time zone. Calendar platforms then show the event in each person’s local time automatically and handle daylight-saving changes.
Meeting link placement (Meet / Teams / Zoom)
Add (or auto-add) a single Join link per booking. OctopusPro surfaces that link in:
- Booking confirmation emails (customers & assigned fieldworkers)
- Add to Calendar (.ics) so the event lands in Google/Outlook/Apple with conferencing details attached (iCalendar is the cross-platform standard)
- SMS reminders (if enabled) for tap-to-join
- Fieldworker app/portal — Join button on the booking
- Customer Portal — Join link on the booking page
Field-standard note: Teams/Zoom/Meet all support joining directly from the invite/link; Teams can also include dial-in numbers when enabled.
What fieldworkers can do (and what they see)
Create virtual bookings (if permitted)
From the app or web portal, enabled fieldworkers can select the service, set date/time, choose the customer’s time zone, and attach (or use the auto-added) Join link. Everyone still sees the appointment in their own local time.
Join in one tap
Open the booking and tap Join to enter the session:
- Microsoft Teams: join by link; dial-in works when included.
- Zoom: join from the invite link (or meeting ID).
- Google Meet: join from the link in the booking, email, or calendar.
Use standard meeting controls
Mute/unmute, screen share, and present using the provider’s built-in tools (Teams/Zoom/Meet). These are accessible from the session launched via the Join link.
Notifications & changes
Fieldworkers receive reminders (email/SMS, if enabled) with the Join link and event time shown in their local time. If you reschedule or cancel, updated invites/notifications are sent so calendars stay in sync (common calendar behavior).
Customers — what they do & see (Remote/Virtual)
Use this section to brief your team on exactly how the Customer Portal behaves for Remote or Virtual bookings, so you can support customers and set notifications correctly.
How customers book (Portal)
- Choose service & delivery type
Customers select the relevant Remote or Virtual service — no street address is required. - Pick their time zone
Customers choose their local time zone so the appointment displays correctly for everyone. Modern calendars store a time-zone reference and show each attendee the event in their own local time (including daylight-saving changes).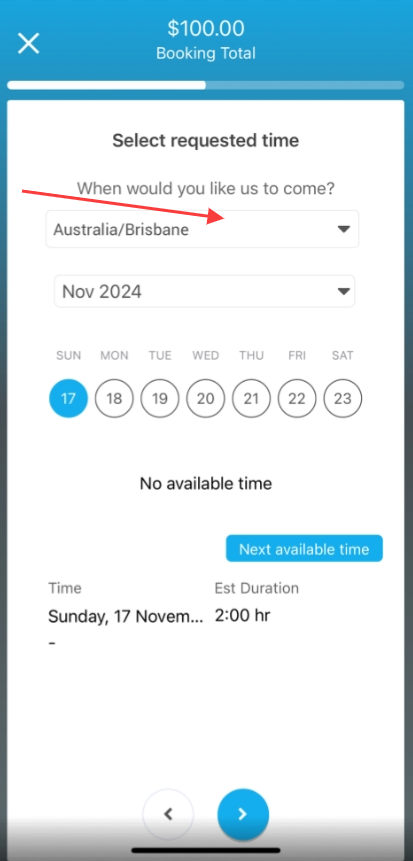
- Submit the request
The booking is created and a confirmation appears in the portal.
What customers receive automatically
- Booking confirmation email (and SMS if enabled) with the Join link for Google Meet / Microsoft Teams / Zoom (or whichever link you attach). These platforms are designed for one-click joining from the invite/link.
- Add to Calendar (.ics) so the event drops into Google, Outlook, or Apple Calendar with the scheduled time and conferencing details included (iCalendar is the cross-platform standard).
Admin tip: Keep one conferencing provider per booking. Adding extra URLs in the description/location can attach multiple conferences and confuse attendees; use the event’s conferencing field instead.
Where customers can find the Join link later
- Customer Portal — booking page shows a clear Join link beside the scheduled time
- Email — in the confirmation (and any reminder emails you enable)
- SMS — tap-to-join link (if SMS reminders are enabled)
What customers see after booking
- A simple timeline (start/end) presented in the customer’s local time; calendars render the same event in each participant’s local time automatically.
Reschedules & cancellations (what customers experience)
- When you reschedule or cancel, customers receive updated notifications (email/SMS if enabled). Their calendar item updates to reflect the new time and keeps the conference details in one place — the standard behavior for modern calendar systems.
Quick checklist for admins
- Offer the service under Remote or Virtual in Service Settings (so it appears in the picker).
- Schedule in the customer’s time zone; everyone still sees their own local time.
- Attach one Join link (Meet/Teams/Zoom) via the conferencing field.
- Keep confirmation emails, .ics invites, and SMS reminders enabled so customers always have the Join link handy.
Why this works
- One-click Join links in emails/SMS/portal reduce “where do I click?” questions.
- Automatic time-zone handling means you schedule once (in the customer’s time zone) and each person sees the event correctly in their own local time.
FAQs
1) Can I enable more than one delivery type at the same time?
Yes. Turn on any combination of Physical Storefront or Branches, Mobile or On-Site Services, and Remote or Virtual Services in Settings → Company Settings → Locations. Then, for each service, enable every delivery type it supports in Settings → Service Settings → Services → Add/Edit → “Where do you provide this service?”.
2) How do I let customers add multiple stops to one booking?
Admins and fieldworkers can always add multiple labeled addresses to a booking (e.g., Pickup → Delivery → Key Return). To let customers add multiple stops online, enable the option in Settings → Customer Portal → Flags & Permissions, and (per service) toggle Allow Multiple Addresses per Booking in Service Settings.
3) Where will the virtual meeting link appear (Meet/Teams/Zoom)?
In all the places people actually use:
- Booking confirmation emails (customer & assigned fieldworker)
- Add to Calendar (.ics) — so it lands in Google/Outlook/Apple with conferencing details
- SMS reminders (if enabled) — tap-to-join
- Fieldworker app/portal — Join button on the booking
- Customer Portal — Join link on the booking page
“.ics” is the cross-platform calendar format (iCalendar/RFC 5545).
4) Should I keep just one meeting link per booking?
Yes. Keep one conferencing provider per event to avoid confusion. Google specifically recommends using the conferencing field (rather than pasting links into the description), as mixing methods can attach multiple conference entries to a single event.
5) Do customers and staff see times in their own time zone?
Yes. Schedule in the customer’s time zone (recommended). Modern calendars then show the same event in each participant’s local time automatically and handle daylight-saving changes.
6) Can customers/fieldworkers join by link?
Yes. Microsoft Teams, Zoom, and Google Meet all support one-click joining from the invite/link; Teams and Zoom also support meeting ID (and dial-in when included).
7) How do I store more than one address for a customer?
By default, the profile stores one Billing Address (which you can copy to the booking). To save multiple service sites (Home, Depot, Site A…), enable the built-in Saved Service Locations Customer Property in Settings → General Settings → Customer Properties. You can customize the fields (e.g., Site Name, Service Address, On-Site Contact, Phone, Access Instructions/Gate Code, Preferred Parking, Default Site).
8) What if a job site has no street address?
Use precise GPS coordinates (latitude/longitude). This is standard for mapping and works well for gates, construction access points, new estates, or roadside breakdowns. (Google’s Geocoding tools convert between addresses and coordinates.)
9) When I reschedule or cancel, do invites & reminders update automatically?
Yes. When you update the booking, attendees typically receive updated notifications and their calendar items refresh to the new time/details (behavior follows the recipient’s calendar platform settings). Google Calendar, for example, is designed to send updates to keep guests’ copies accurate.
10) Why hide the full address until “ON THE WAY”?
It’s an optional privacy/operational safeguard. Admins can keep the full street number hidden until the fieldworker taps ON THE WAY, which also shares ETA and begins GPS tracking. This reduces premature travel and protects location privacy while still giving technicians everything they need at the right time.
11) How do service-area limits affect assignment?
If you use map-based service areas, the Available Fieldworkers list (and dispatching tools) emphasize fieldworkers whose service areas cover the job site, helping you assign the right person and control travel time.
12) Will .ics work for all my customers?
Yes. The iCalendar (.ics) format is the industry standard and is supported by the major calendars (Google, Outlook, Apple). Attendees can add the event (with time zone and conferencing details) in a couple of clicks.
To stay updated, please subscribe to our YouTube channel.