
Inquiry Discussion Management (Internal Notes, Visibility & Notifications)
Inquiry Discussion Management lets your team keep all inquiry-related conversations in one place—so nothing gets lost across emails, phone calls, or chats.
Use the Discussion thread to:
- Collaborate internally on how to respond to a lead (sales, admin, managers).
- Send visible updates to the customer when needed (using “Everyone” visibility + optional SMS/email prompt).
- Maintain a timeline of what was said, decided, and shared—improving speed, accountability, and customer experience.
Tip: Inquiry management is primarily an admin/office workflow. What each user can access and see still depends on their permissions and role settings.
Quick Navigation
- What this feature is
- Why teams use it
- Where to find it
- Notifications & alerts
- View and reply to a discussion
- Add a comment (2 methods)
- Visibility settings explained
- Edit comment visibility
- Delete a comment
- Best practices
- Troubleshooting
- Related articles
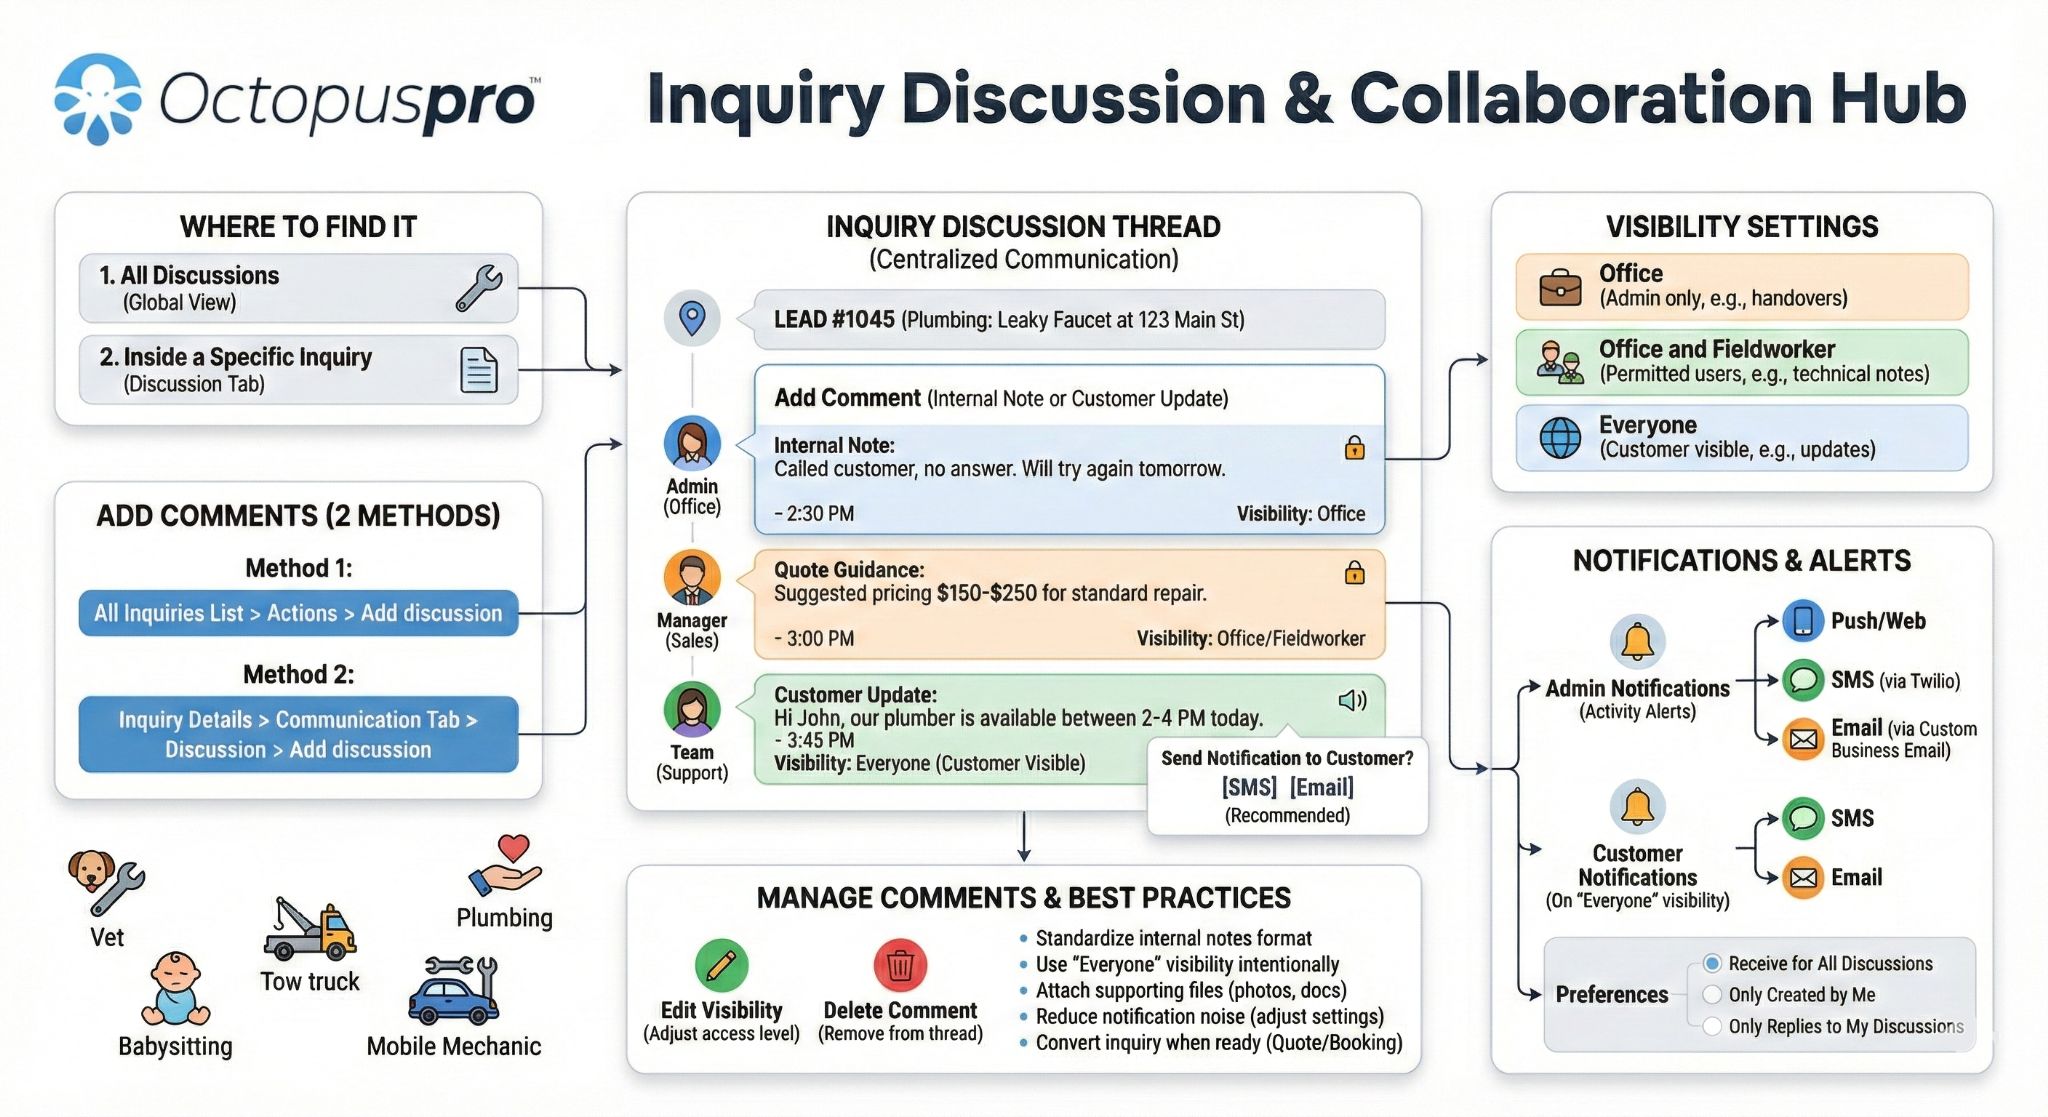
What is Inquiry Discussion Management?
Inquiry discussions are a dedicated thread of comments attached to an inquiry (lead). Your team can add messages, attach files, and control who can see each comment using visibility settings.
When activity happens in an inquiry discussion, your users can be alerted via push/web notifications, SMS, or email (depending on your notification preferences).

Why teams use it
- Faster responses: everyone sees the same context before replying to a lead.
- Fewer mistakes: internal notes stay tied to the inquiry (not scattered across inboxes).
- Better customer experience: you can keep customers updated when needed, without exposing internal-only notes.
- Traceability: helpful for handovers, training, and auditing conversations.
Example workflow: A customer submits a lead. Admin adds internal notes (“Call tomorrow morning”), manager adds pricing guidance, then the team posts a customer-visible update (“Thanks—our team will call you today between 2–4pm”).
Where to find it
You can access inquiry discussions from two places:
- All Discussions (global view) — useful for managing discussion notifications and quickly reviewing discussion activity.
- Inside a specific Inquiry — the Discussion thread appears within the inquiry details.

Notifications & Alerts
To keep your team responsive, OctopusPro can notify users when an inquiry discussion changes (new comments, replies, or customer-visible updates).
Admin notifications
When there is activity in an inquiry discussion, admin users can receive notifications (web/push). These prompts help staff review the discussion and respond quickly.
Customize notification preferences
- Go to Inquiries.
- Click All Discussions (top-right area) to view discussion activity and preferences.
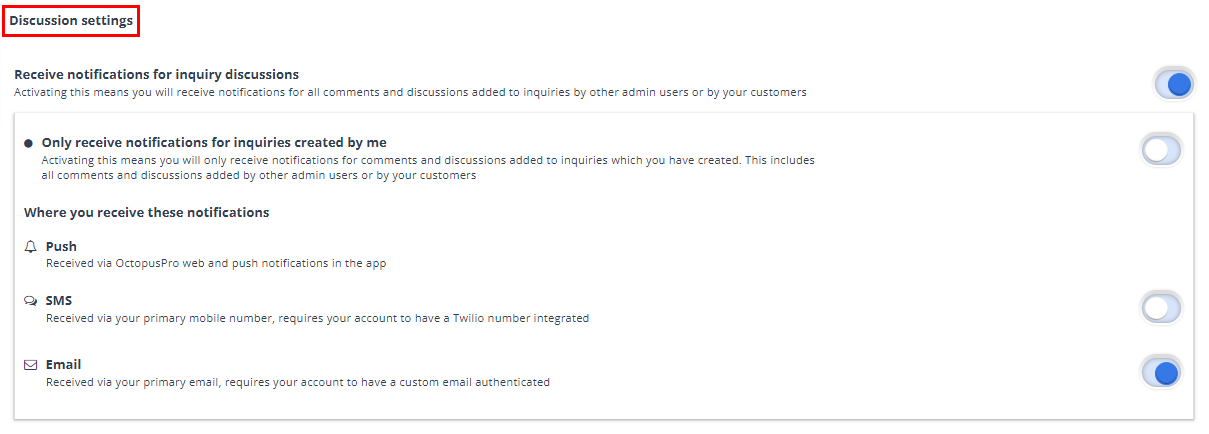
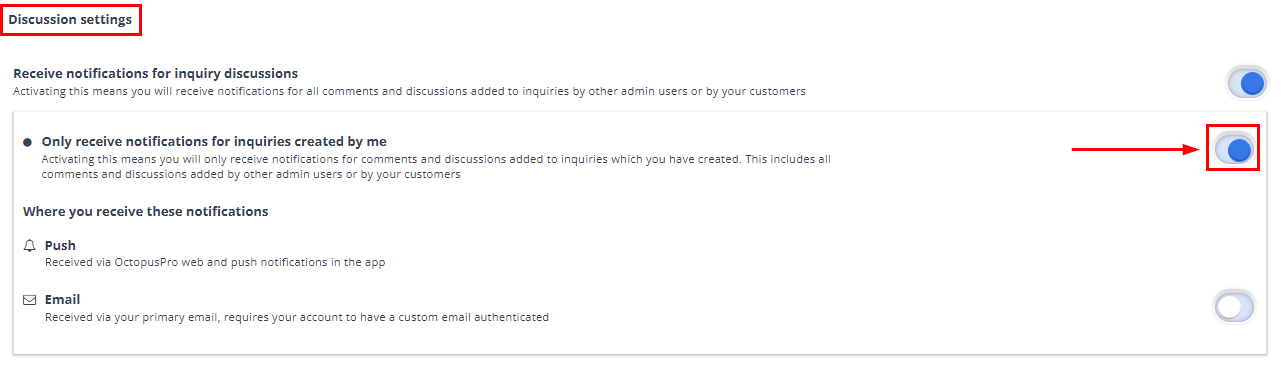
- Click Settings to open Discussion settings.
Choose which discussions trigger notifications
Depending on how you work, you can enable one or more of the following:
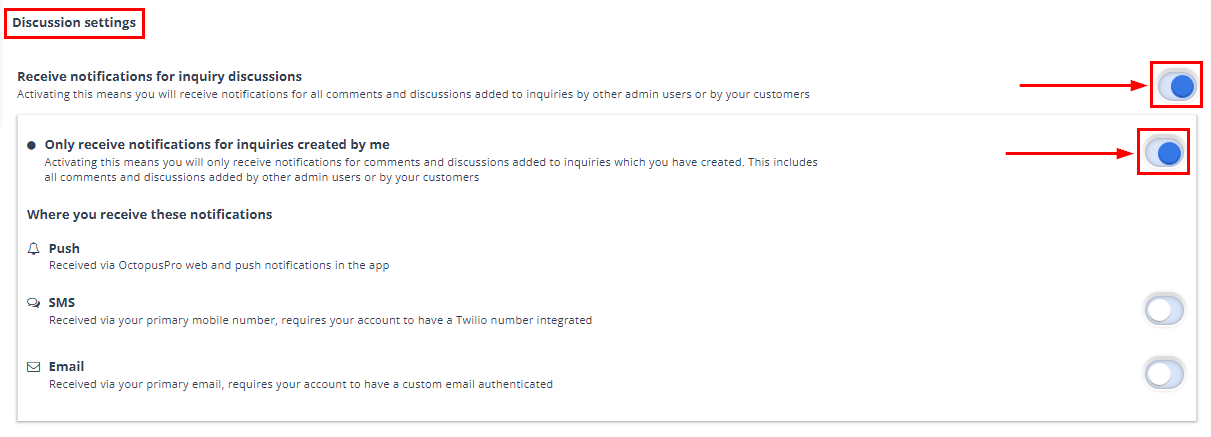
- Receive notifications for all inquiry discussions – get notified for all inquiry discussion activity.
- Only receive notifications for inquiries created by me – focus only on inquiries you created.
Select notification channels
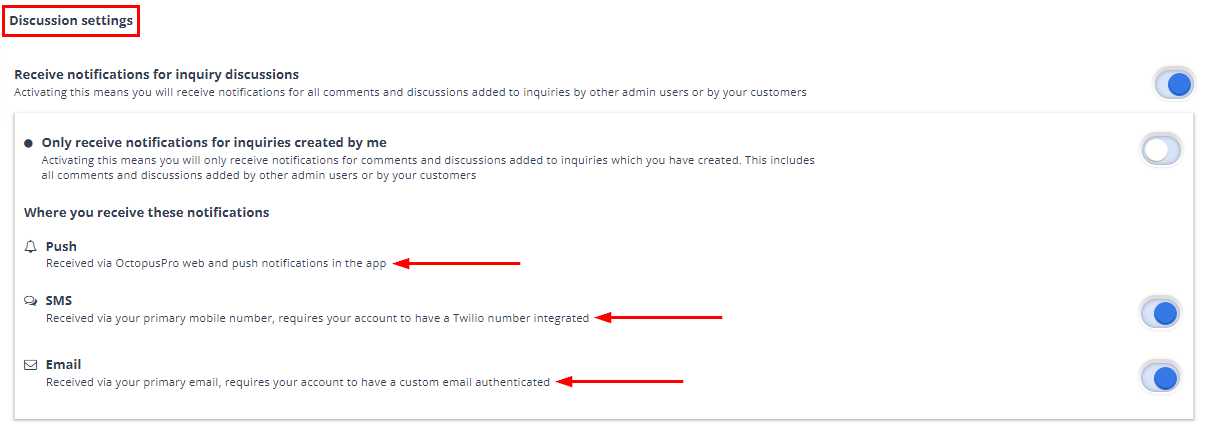
You can choose where notifications are delivered:
- Push/Web: notifications via OctopusPro web and mobile app.
- SMS: notifications to the user’s primary mobile number (requires a Twilio number integration).
- Email: notifications to the user’s primary email (requires custom business email authentication).
Optional: notify only on replies to your own discussions
If you want to reduce noise, enable the setting to receive notifications only when someone replies to discussions you started.
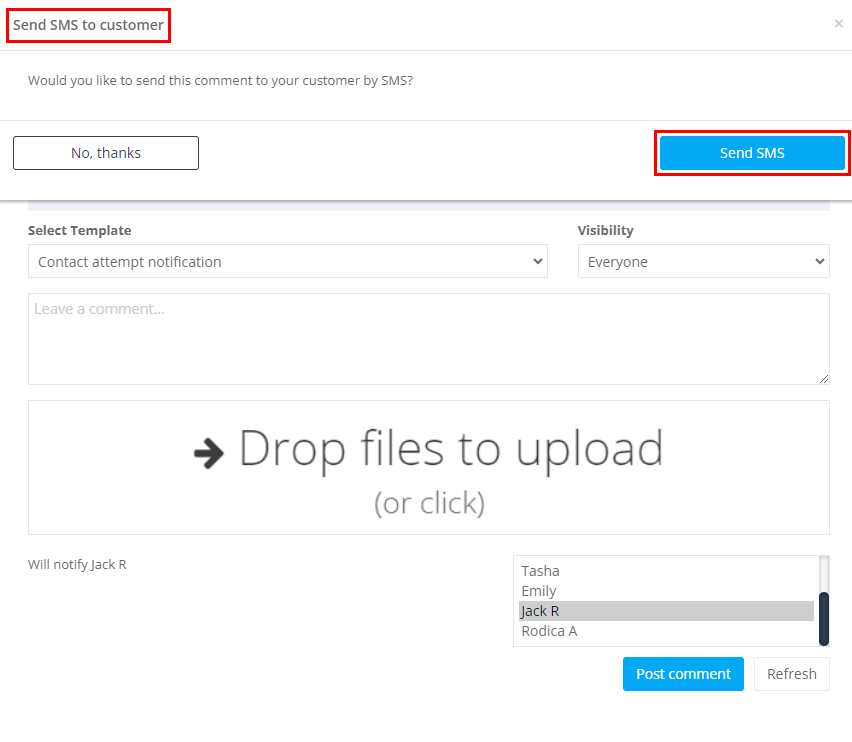
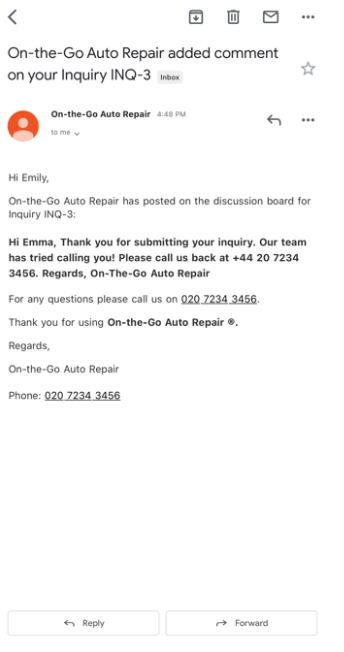
Customer notifications
When you post a customer-visible comment, OctopusPro can prompt you to send an SMS and/or an email notification to the customer so they don’t miss your update.
View and reply to an inquiry discussion
- Go to Inquiries > All Inquiries.
- Find the inquiry (use search if you have the INQ#).
- Click Actions > View inquiry.
- Open the Communication tab and view the Discussion section to read and reply.
Add comments to an inquiry discussion (2 methods)
You can add a discussion comment either directly from the inquiries list or from inside the inquiry details page.
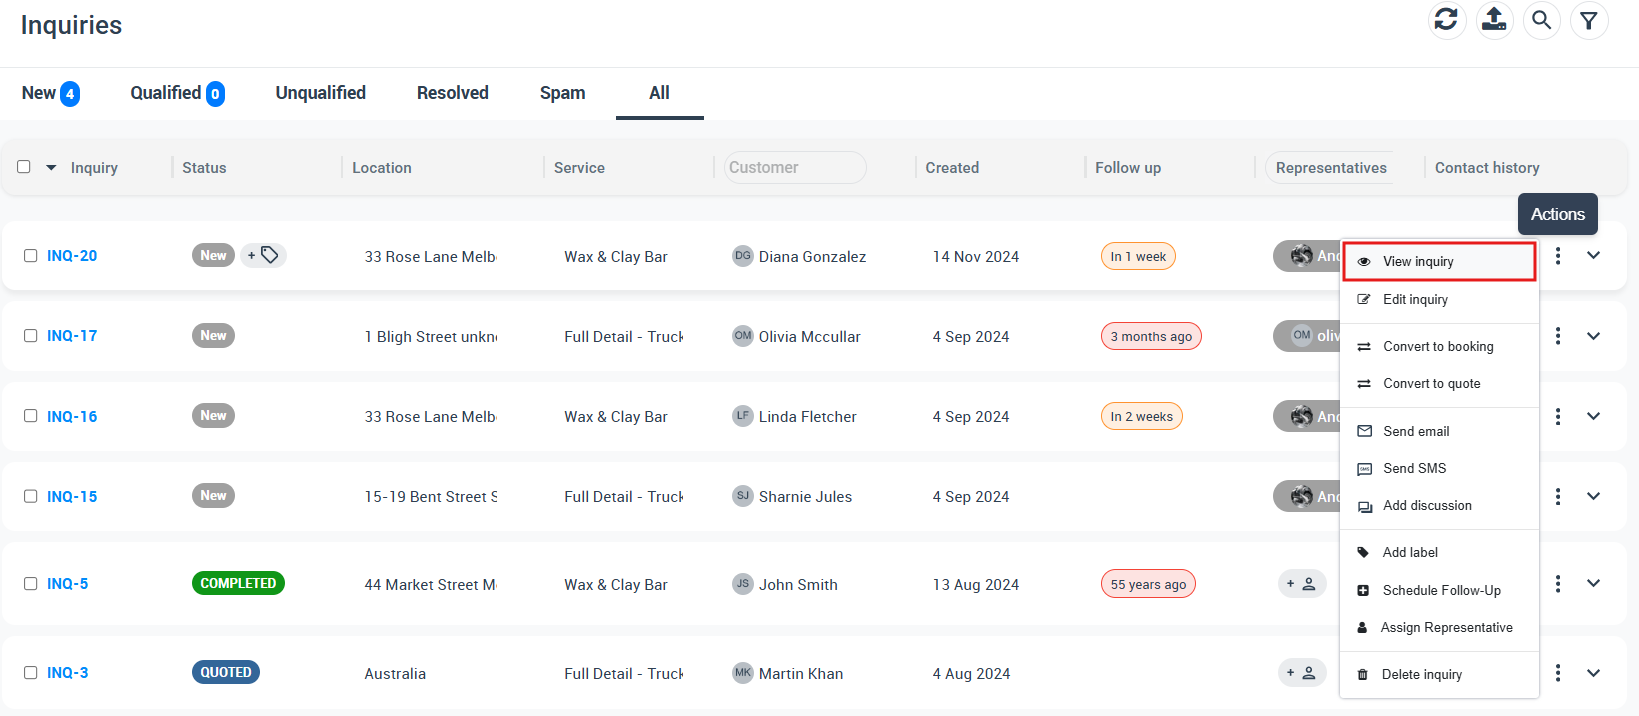
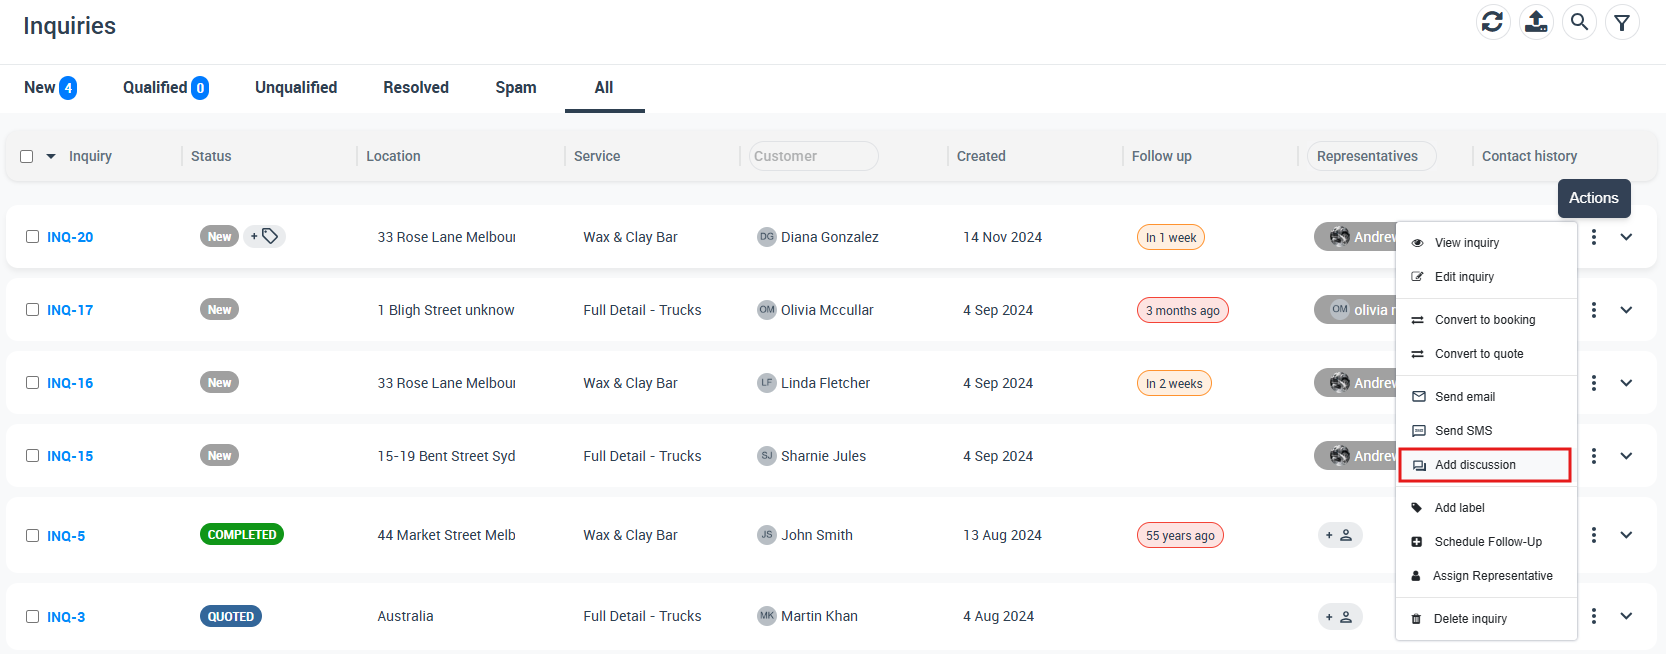
Method 1: From the All Inquiries list
- Go to Inquiries > All Inquiries.
- Find the inquiry, then click Actions > Add discussion.
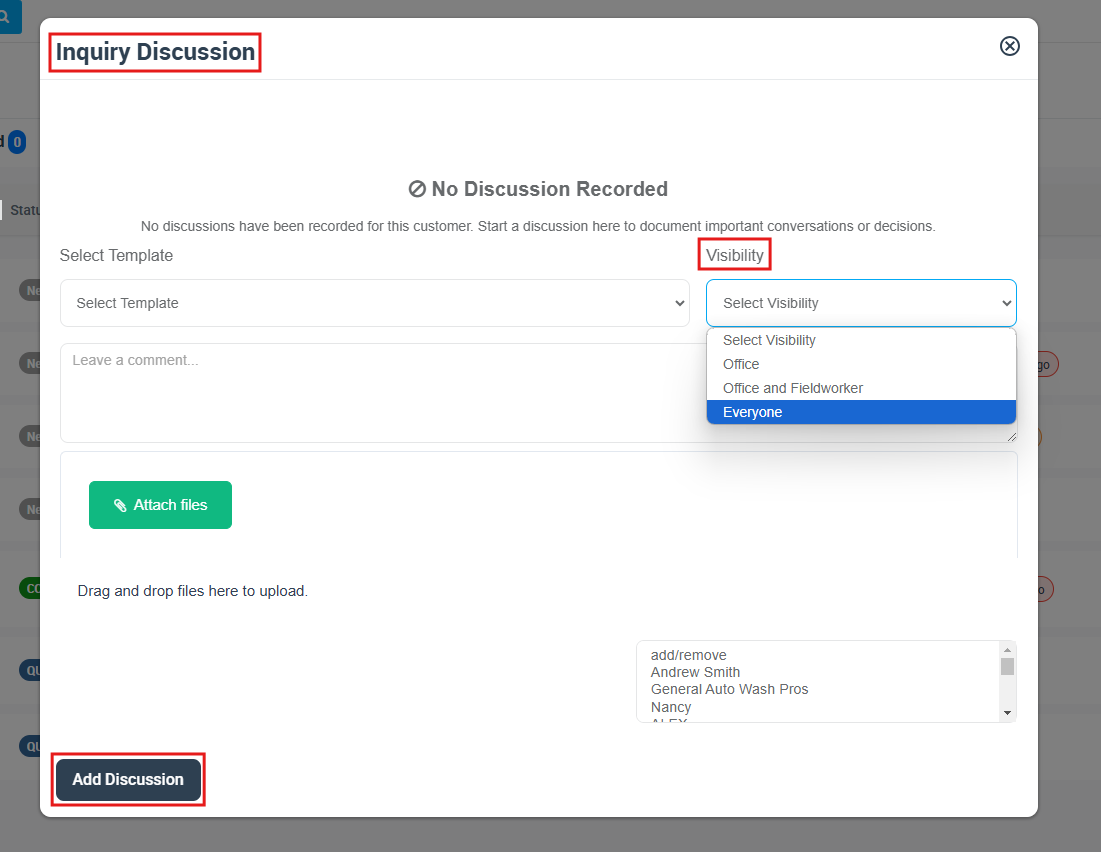
- Select Visibility, type your message, and optionally attach files.
- Click Add discussion to post.
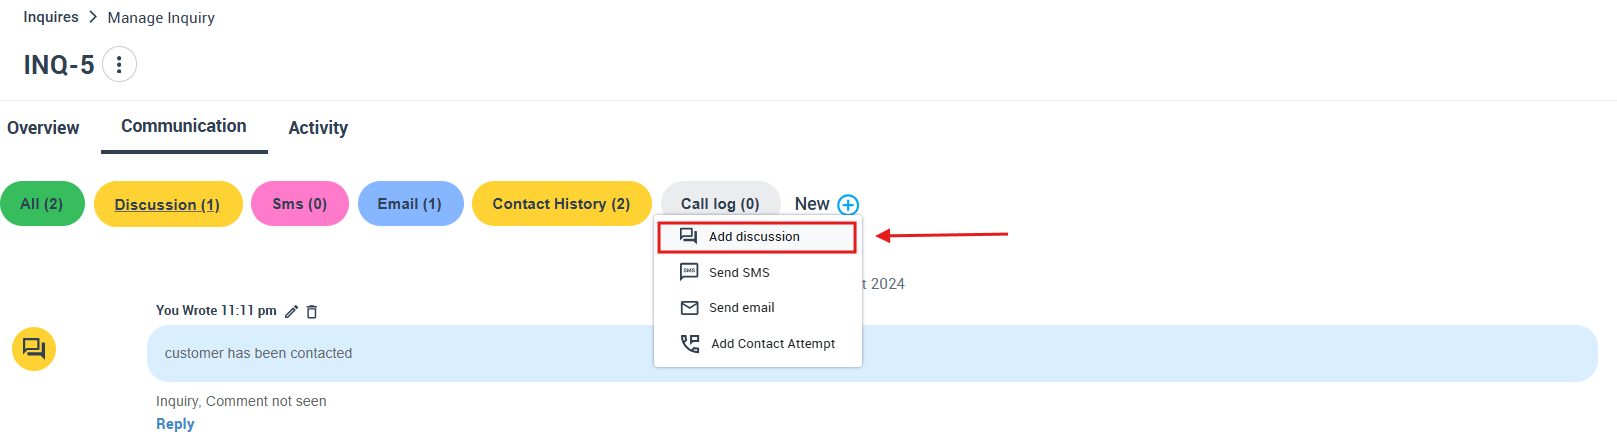
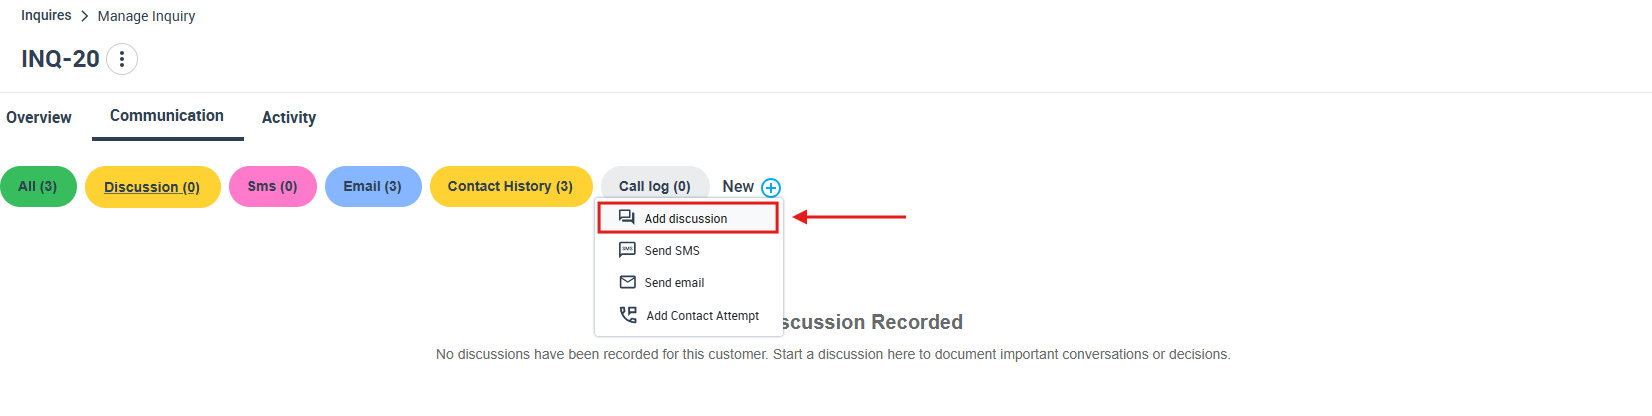
Method 2: From inside the inquiry details
- Go to Inquiries > All Inquiries.
- Click Actions > View inquiry.
- Open Communication and choose Discussion, then click Add discussion.
- Select Visibility, write your message, attach files (optional), then post.
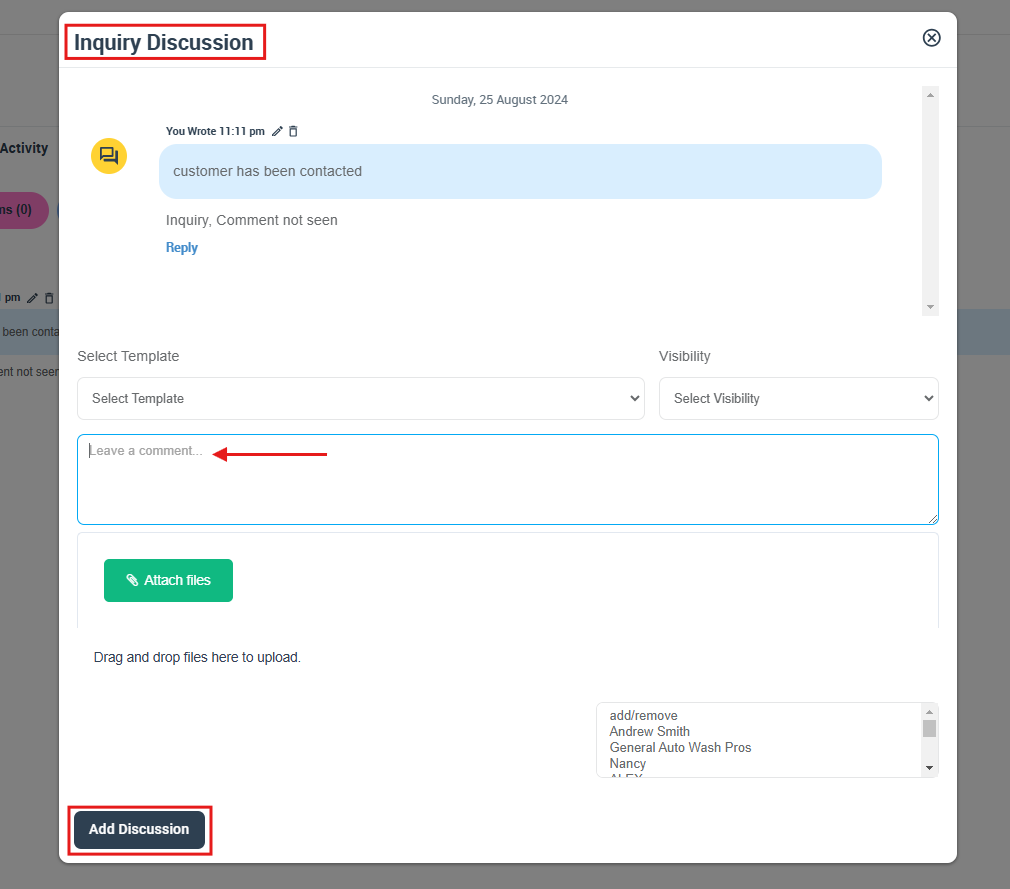
Templates: If your account uses canned responses, select a template to insert a pre-written message, then adjust it before posting.
Visibility settings explained
Each discussion comment has a visibility setting that controls who can see it. Common options include:
- Office: visible to office/admin users only.
- Office and fieldworker: visible to office/admin users and permitted fieldworker users (availability depends on your account permissions).
- Everyone: visible to the customer (customer notifications can be sent after posting).
Best practice: Use Office for internal notes and handovers. Use Everyone only for messages you are comfortable sharing with the customer.
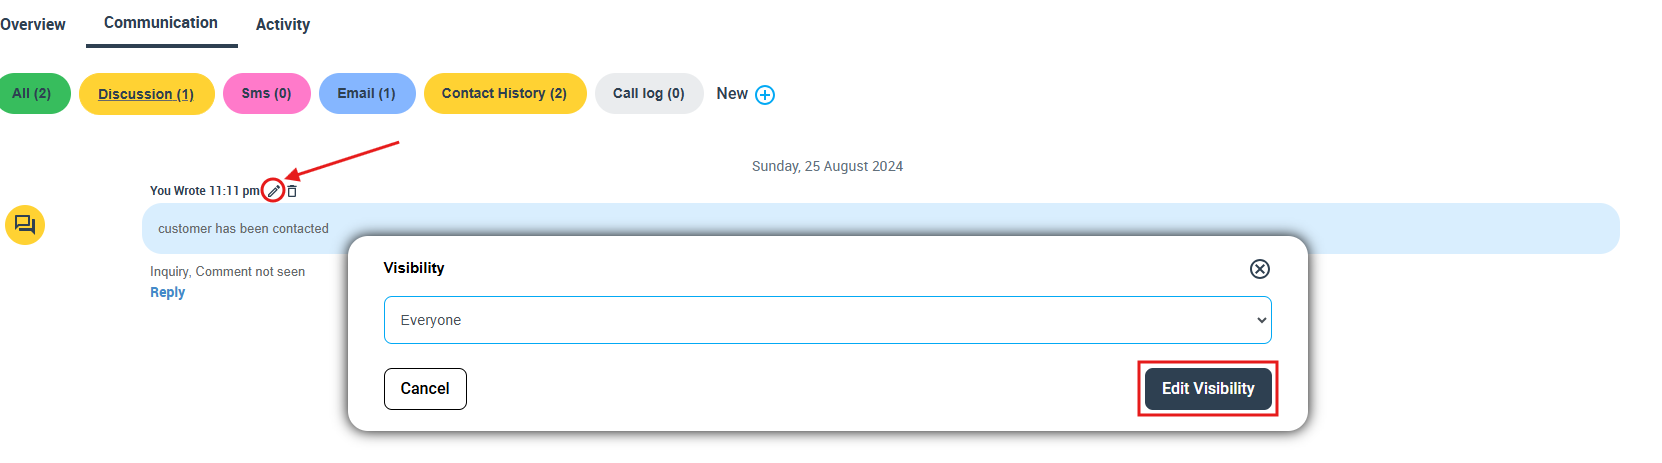
Edit visibility of a comment
- In the inquiry discussion, find the comment you want to adjust.
- Click the Edit visibility icon.
- Select the new visibility option and confirm.
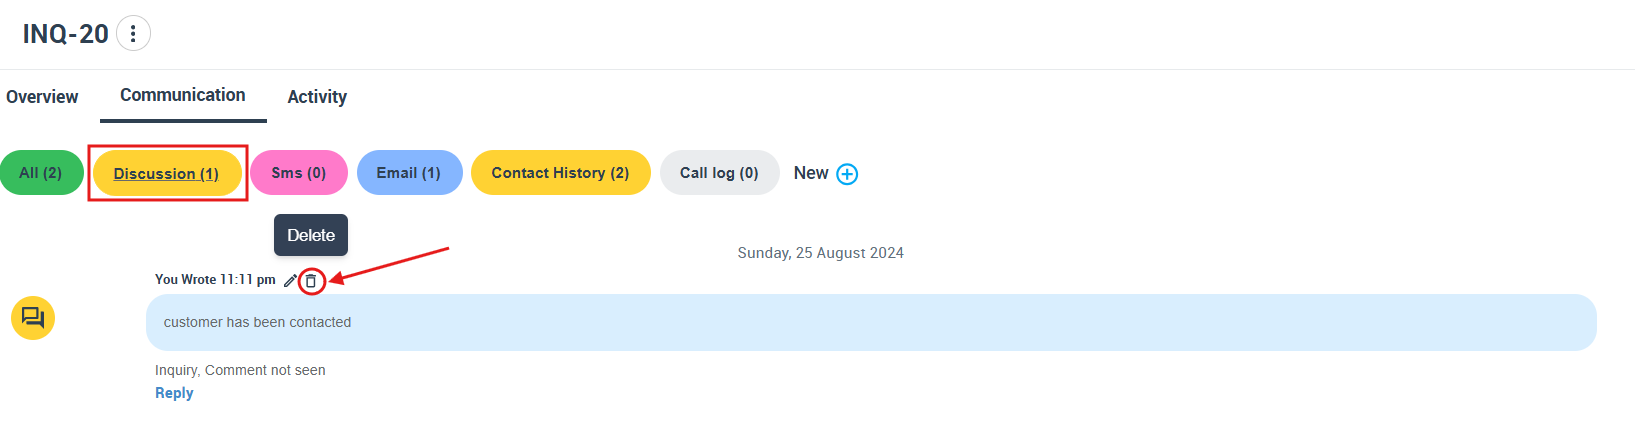
Delete a comment
- Locate the comment in the discussion thread.
- Hover over it and click the Delete icon.
- Confirm the deletion in the prompt.
Best practices
- Standardize internal notes: use a consistent format (e.g., “Next step: … / Owner: … / Due: …”).
- Use customer-visible comments intentionally: set visibility to Everyone only when the message is meant for the customer.
- Attach supporting files: upload photos, documents, or references directly to the discussion so your team can act fast.
- Reduce notification noise: enable “only replies to my discussions” if you only want updates on threads you started.
- Move forward efficiently: once the inquiry is ready, convert it into a quote or booking so the job can be scheduled and billed.
Troubleshooting
- I’m not receiving notifications: confirm your discussion settings and selected channels are enabled. Push notifications also depend on your browser/app notification permissions.
- SMS alerts aren’t working: SMS notifications require a Twilio number integration and a valid primary mobile number on the user profile.
- Email alerts aren’t working: email notifications require custom business email authentication, and the user must have a valid primary email address.
- Customer didn’t get the message: ensure the comment visibility was set to Everyone, and choose the SMS/email prompt when posting if you want an outbound notification.
Related articles
- Managing Leads & Inquiries
- View Inquiry Details
- Edit Inquiry Details
- Inquiry Contact Management
- Adding Attachments to Inquiries
- Adding Labels to Inquiries
- Managing Follow-Up Reminders
- Convert Inquiry to Quote
- Convert Inquiry to Booking
- Deleting Inquiries
- Mark an Inquiry as Spam
- Canned Responses & Templates
- Template Placeholders
- Discussions Log
To stay updated, please subscribe to our YouTube channel.