
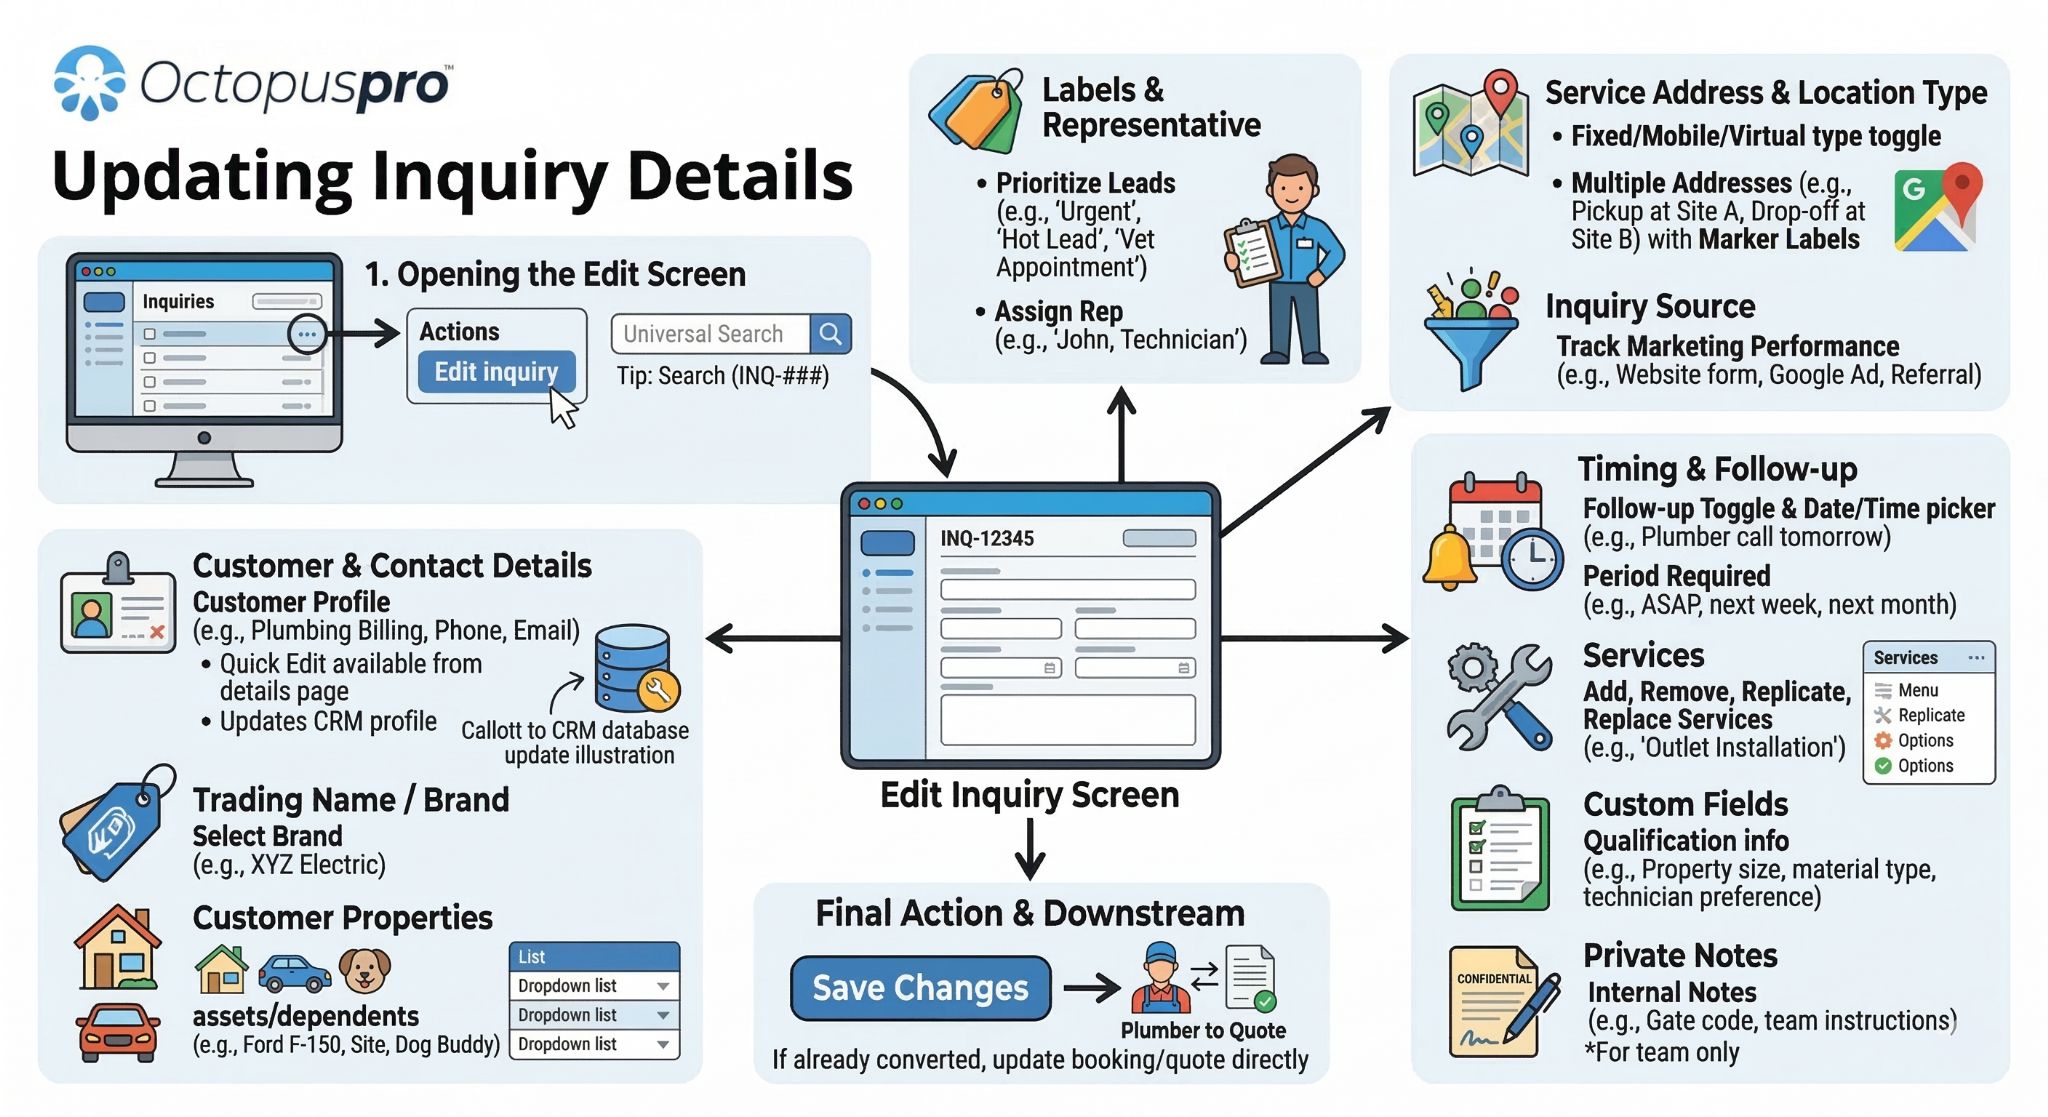
Edit Inquiry Details (Lead Management)
Keeping your inquiry (lead) information accurate helps you qualify leads faster, assign the right team member, schedule follow-ups on time, and convert more inquiries into quotes and bookings. In OctopusPro, you can update an inquiry at any time—customer details, services, addresses, lead source, follow-up reminders, custom form fields, and internal notes—so your team always has the latest information in one place.
On this page
- Open the Edit Inquiry screen
- What you can edit (quick overview)
- Edit customer/contact details
- Update trading name / brand
- Edit labels (tags) and assign a representative
- Manage customer properties (dependents/assets)
- Edit service address and location type
- Edit the inquiry source (lead source)
- Set requires follow-up and follow-up date
- Set period required (preferred time window)
- Edit services added to the inquiry
- Edit custom inquiry form fields
- Add/edit private notes
- Save changes and best-practice tips
- Related guides
Open the Edit Inquiry screen
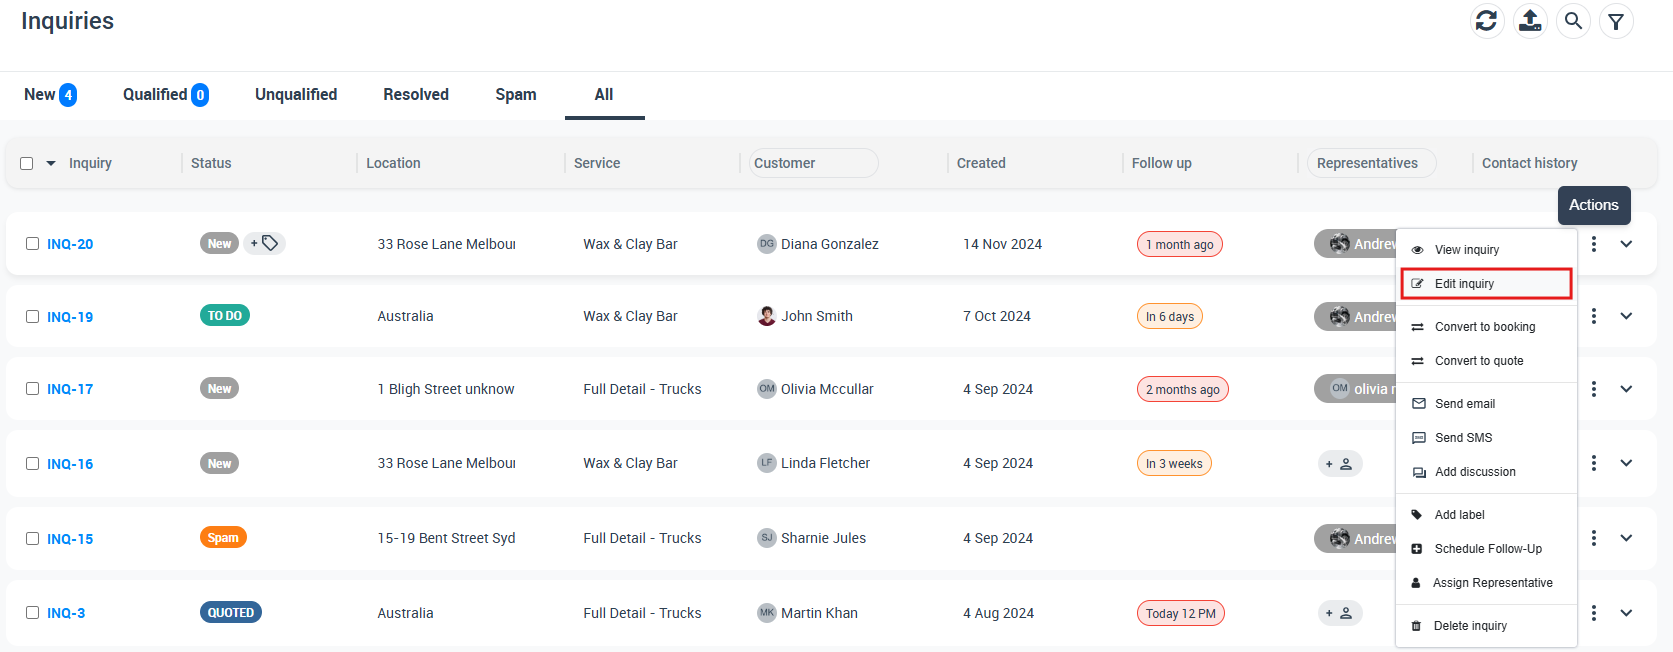
You can edit an inquiry from the inquiries list using the Actions menu.
- Go to Inquiries → All Inquiries.
- Find the inquiry you want to update.
- Click Actions → Edit inquiry.
Tip (faster): If you know the inquiry number (INQ-###), use Universal Search to jump directly to it.
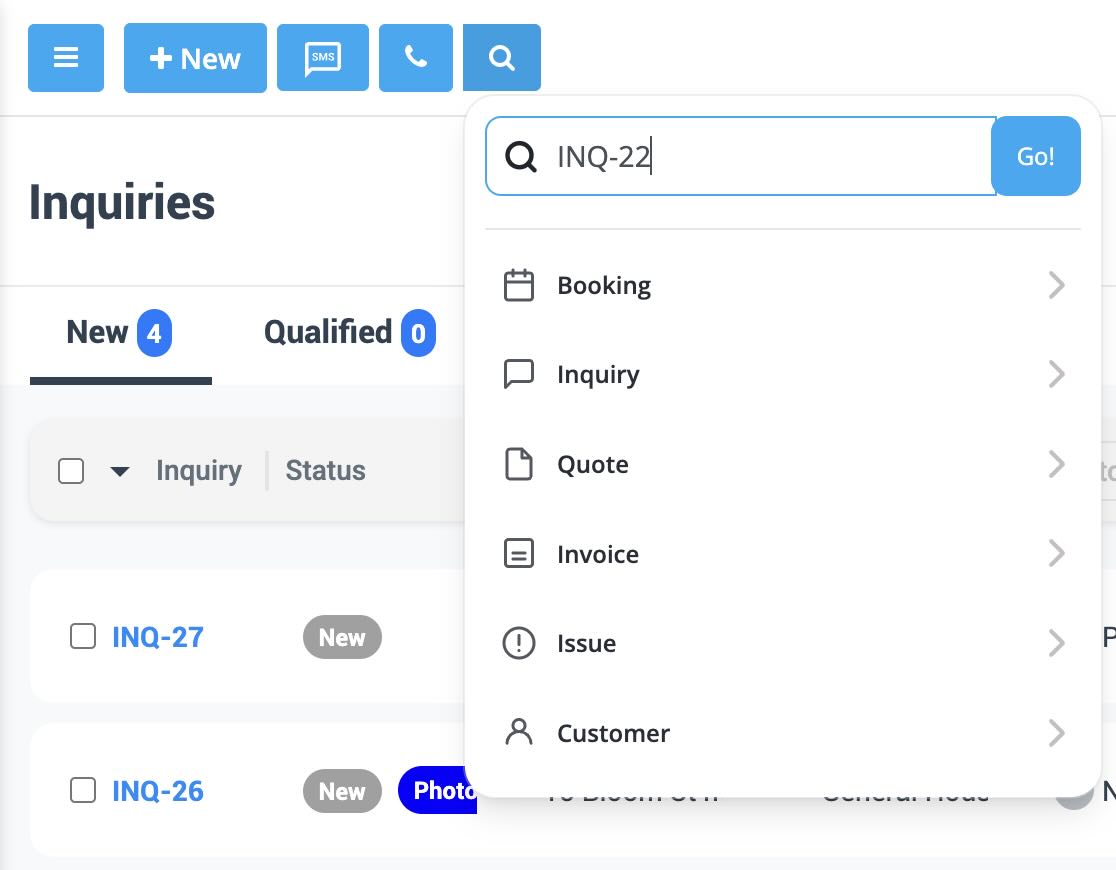
Learn more about Universal Search here: Find any record using Universal Search & Advanced Filters.
What you can edit (quick overview)
Depending on your settings and enabled fields, the Edit Inquiry page can include:
- Customer details (name, email, phone, addresses, billing details)
- Trading name / brand (useful for businesses with multiple brands)
- Labels (tags) and Representative assignment
- Customer properties (dependents/assets like vehicles, pets, properties, etc.)
- Service location (Fixed / Mobile / Virtual) and multiple addresses (if enabled)
- Lead source (where the inquiry came from)
- Follow-up settings (requires follow-up + follow-up date/time)
- Period required (customer’s preferred time window)
- Services (add/remove/replicate/replace)
- Custom inquiry form fields (from your inquiry form / portal form)
- Private/internal notes (for your team only)
Edit customer/contact details
OctopusPro gives you two quick ways to update customer information while working on inquiries.
A) Quick edit from the inquiry details page (recommended for quick corrections)
- Open the inquiry (View inquiry details).
- Scroll to the Customer section.
- Click Actions → Edit customer details.
- Update the details and click Save.

Important: Editing customer details updates the customer’s CRM profile. This improves accuracy for future bookings/quotes/invoices and communications. (Previously sent emails/PDFs remain unchanged, but future messages will use the updated customer data.)
Full guide: Edit Customer Details (CRM).
B) Edit customer details while you’re on the Edit Inquiry page
- From the Edit Inquiry page, locate the Customer section.
- Click the Actions menu for the customer.
- Select Edit customer details, make your changes, then Save.

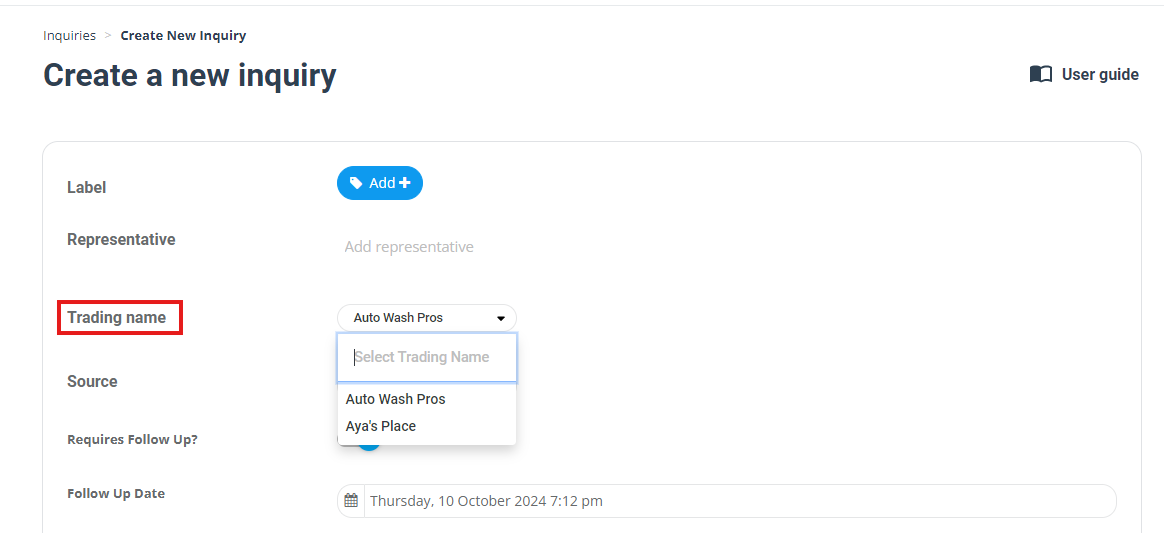
Update trading name / brand
If your business runs multiple brands (trading names), each inquiry can be linked to the correct brand. This helps ensure branding, settings, and reporting stay accurate—especially if you operate multiple websites or service lines.
- On the Edit Inquiry screen, find Trading name (usually in the top “Details” area).
- Select the correct trading name from the dropdown.

Learn more: Manage Multiple Trading Names / Brands.
Edit labels (tags) and assign a representative
Labels (Tags): Use labels to categorize and filter inquiries (e.g., “Urgent”, “VIP”, “High Value”, “Needs Photos”). Labels improve reporting and help teams prioritize the right leads.
Representative: Assign a representative (sales rep / admin owner) to define who is responsible for follow-up and conversion.
- From the Edit Inquiry page, use the Label selector to add/remove labels.
- Use the Representative field to assign or change the inquiry owner.

Related: Add / Manage Labels for Inquiries.
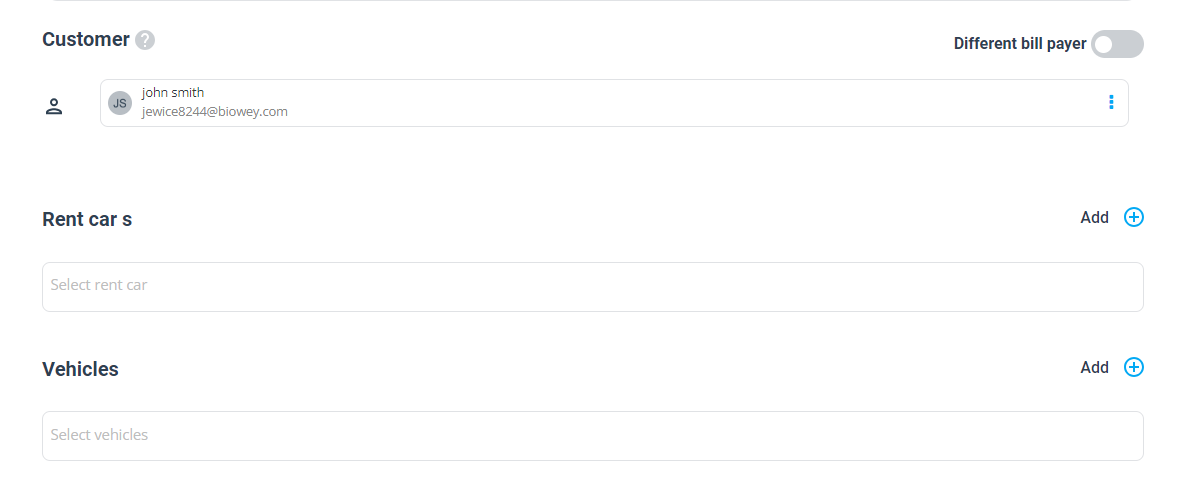
Manage customer properties (dependents/assets)
Customer Properties lets you link relevant dependents/assets to an inquiry—such as vehicles, children, pets, equipment, sites, properties, or any custom “customer-owned” items. This is especially useful for services that depend on the customer’s assets (e.g., car services, pet transport, childcare, property maintenance).
- On the Edit Inquiry page, locate the Customer Properties section.
- Select existing properties from the dropdown, or add new ones (if enabled for your account).

Full guide: Customer Dependents / Properties.
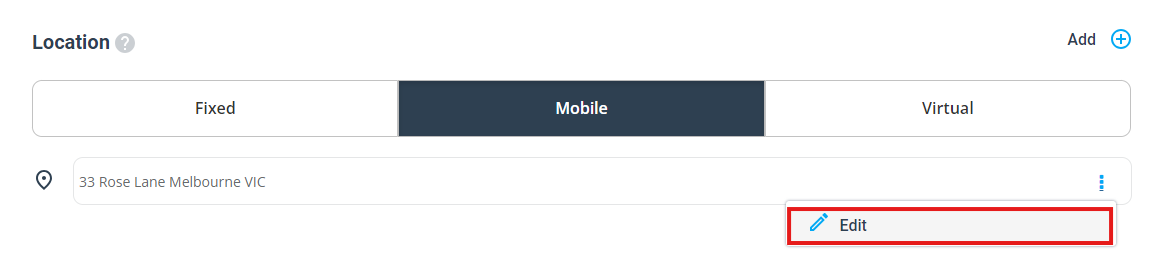
Edit service address and location type
Use the Location section to update where the service will be delivered. Depending on your enabled service delivery types, you may see:
- Fixed (storefront/branch location)
- Mobile (on-site/customer address)
- Virtual (remote service)
To update the address:
- Go to the Location section.
- Click Edit and update the address details.
- If multi-address is enabled, click Add to include additional stops (e.g., pickup → drop-off) and label each stop clearly (Marker Label).

Learn more about multi-stop workflows: Adding Multiple Addresses to Bookings, Quotes & Inquiries.

Learn more about location types: Service Delivery Types (Fixed, Mobile, Virtual).
![]()
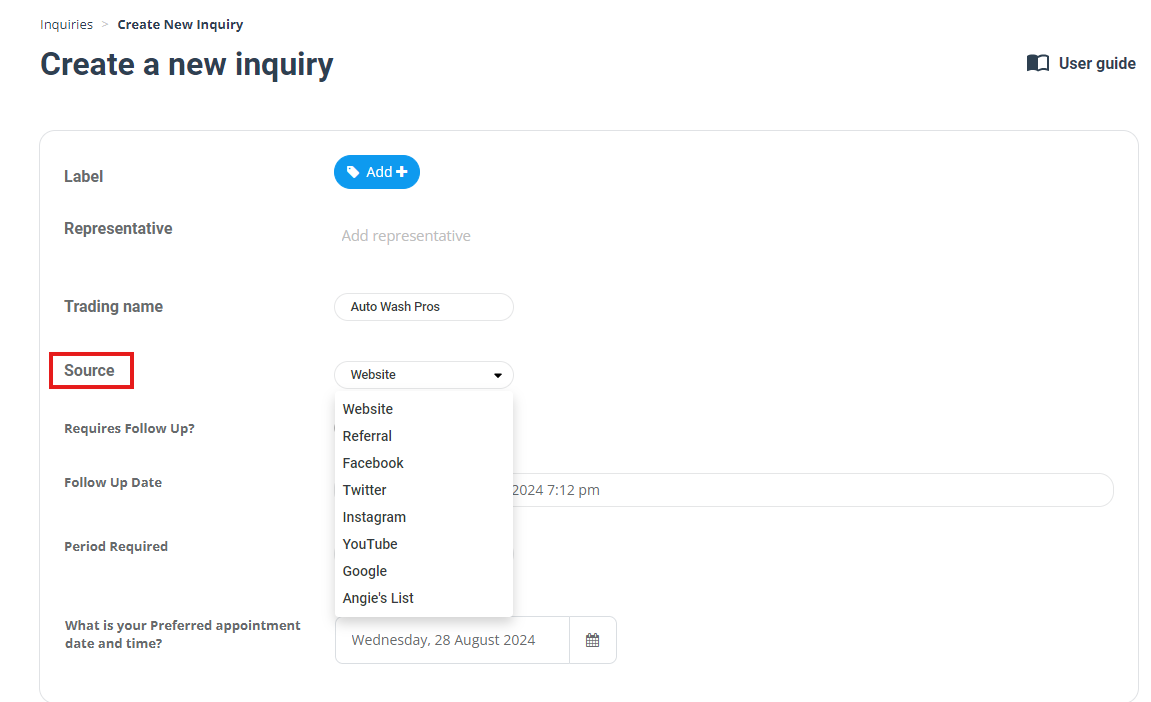
Edit the inquiry source (lead source)
The Source field tracks where the inquiry came from (e.g., Website, Google, Referral, Instagram). This helps you measure which channels generate the best leads and optimize your marketing spend.
- On the Edit Inquiry page, find Source.
- Select the correct source from the dropdown.
Full guide: How to Track and Manage Lead Sources.
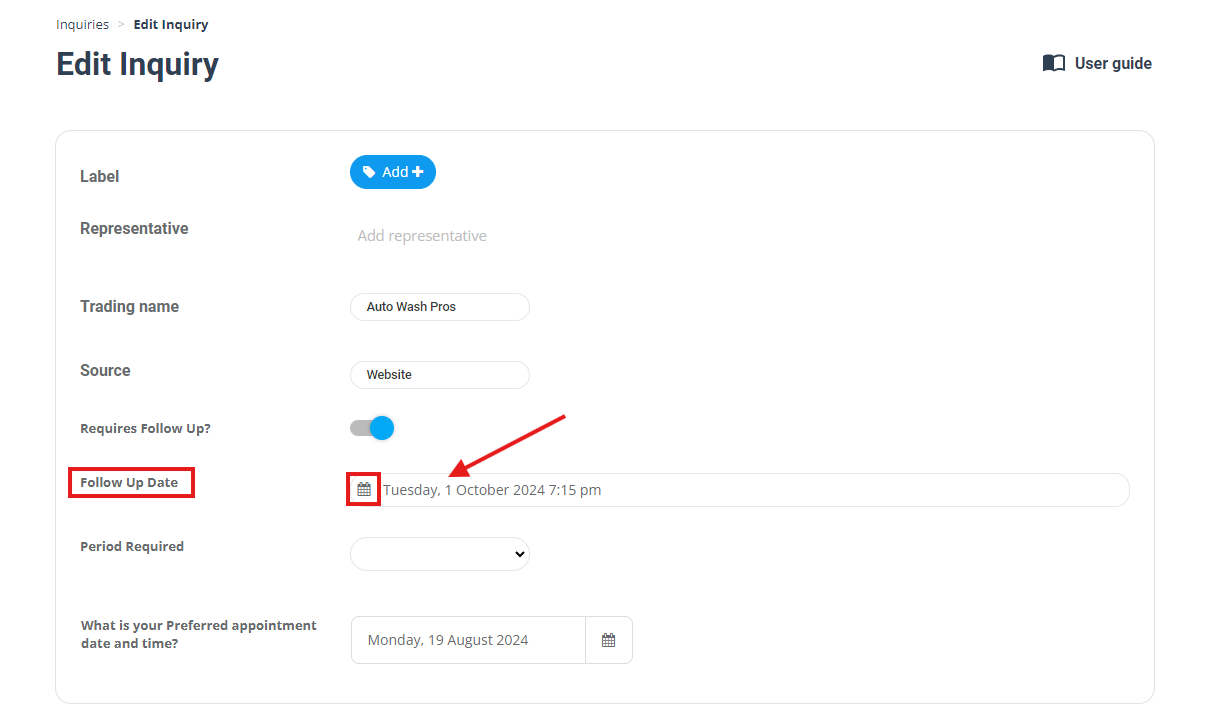
Set requires follow-up and follow-up date
Follow-up reminders help ensure no lead is forgotten. You can:
- Enable/disable whether the inquiry Requires Follow Up
- Set the Follow Up Date and time for your next action (call, email, quote, inspection, etc.)

To update follow-up settings:
- On the Edit Inquiry page, find Requires Follow Up? and toggle it on/off as needed.
- Set the Follow Up Date using the date/time picker.
- Save your changes.
Full guide: Managing Follow-Up Reminders for Inquiries/Leads.
Set period required (preferred time window)
Period Required captures the customer’s preferred time window for service (e.g., ASAP, next week, next month). This is useful when you need to schedule later or dispatch based on availability.

- On the Edit Inquiry page, find Period Required.
- Select the appropriate option from the dropdown.
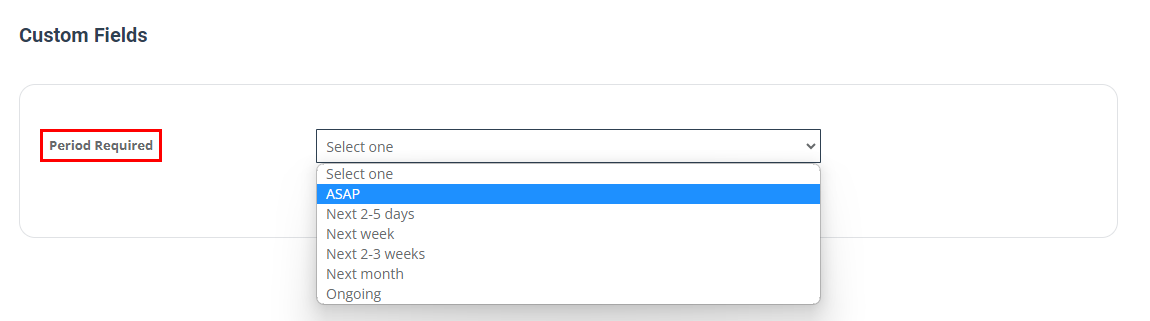
If you don’t want to collect this field, you can disable it from your inquiry form/widget settings.
Full guide: Add/Configure the Period Required field on your Inquiry Form.
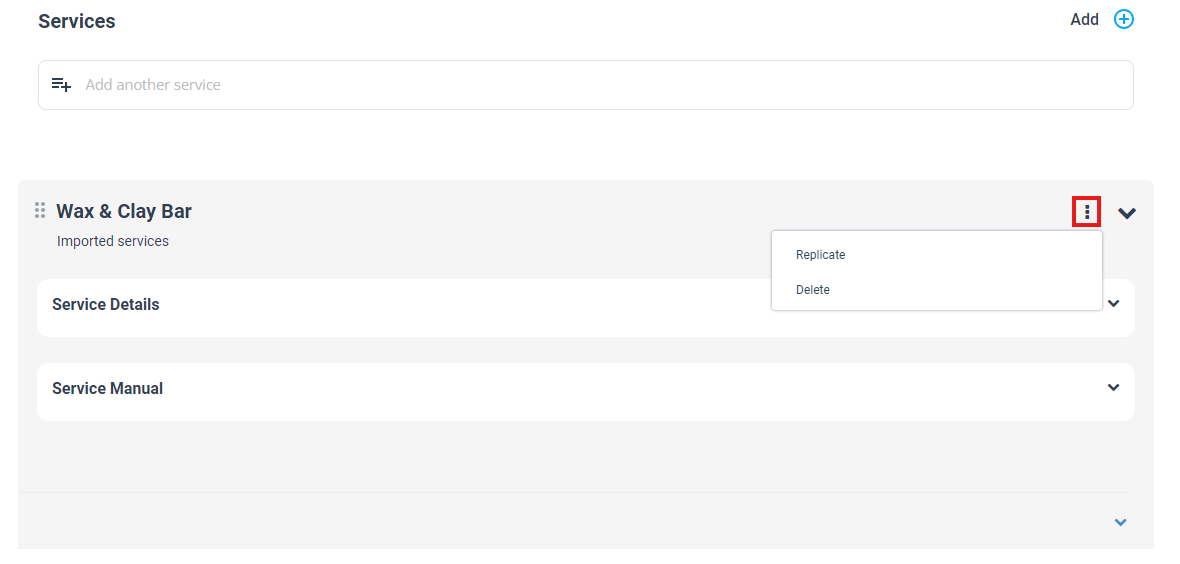
Edit services added to the inquiry
The Services section is where you confirm what the customer is requesting. You can add additional services, remove services, or replicate a service line (useful for repeating service items or configurations).
- To add: click Add in the Services section.
- To remove or replicate: open the service line menu and choose Delete or Replicate.

Edit custom inquiry form fields
Custom fields capture the extra information your team needs to qualify and price the job (e.g., property size, material type, access instructions, preferred technician, photos requested). These fields typically come from:
- Your embedded Lead Capture / Inquiry Form on your website
- Your Customer Portal “Contact Us” inquiry form (if enabled)
- Admin-created inquiries (manual entry)
To edit custom fields:
- Scroll to the Custom Fields section in the Edit Inquiry page.
- Update the field values as needed.
- Save your changes.
Learn more: Custom Fields (Booking, Lead-Capture & CRM Data).
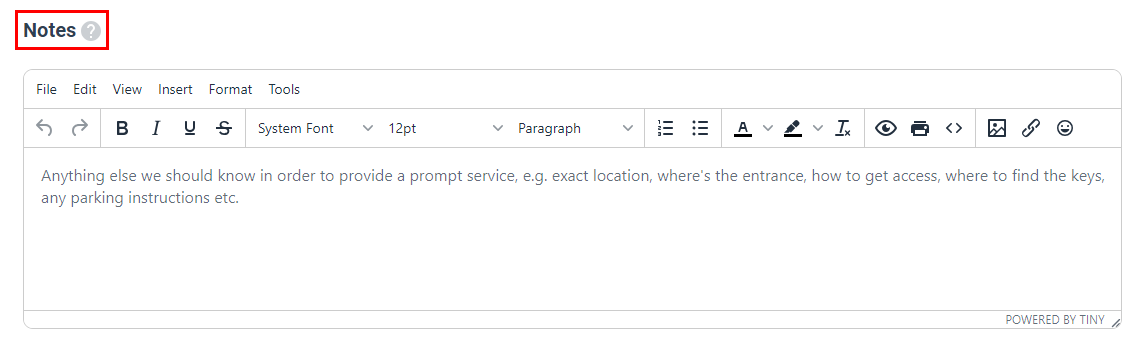
Add/edit private notes
Private Notes are internal-only notes for your team (not shown to customers). Use them to record call outcomes, special instructions, risk flags, or important context for converting the inquiry into a quote/booking.
- Find the Notes (or Private Notes) section on the Edit Inquiry page.
- Enter or update your notes.
Save changes and best-practice tips
When you finish editing, scroll to the bottom of the page and click Save Changes.
- Fields not showing? Some fields only appear if enabled (e.g., Period Required, Customer Properties, Custom Fields) or depending on your service configuration.
- After converting to a booking/quote: If you’ve already converted the inquiry, update the booking/quote directly if you need those changes reflected in the downstream record.
- Keep lead source accurate: Clean source data improves reporting and helps you identify your best marketing channels.
- Use labels consistently: Standardize label names to keep filtering and reporting clean (e.g., “Hot Lead” vs “HotLead”).
Related guides
- View Inquiry Details
- Inquiry Contact Management (Email/SMS/Calls)
- Attach Files & Photos to an Inquiry
- Add Labels (Tags) to Inquiries
- Convert Inquiry to Booking
- Convert Inquiry to Quote / Estimate
- Delete an Inquiry
- Inquiries Statistics Dashboard
To stay updated, please subscribe to our YouTube channel.