
Creating & Editing Bookings
OctopusPro gives you the power to manage your bookings efficiently and effectively, whether they’re made over the phone or directly through your branded customer-facing app or Customer Portal.
With OctopusPro, you can not only create bookings manually but also convert inquiries and quotes into confirmed bookings. All bookings can be confirmed by admins within the system, providing a seamless integration between your customer-facing interfaces and your internal management system.
Before diving into creating your first booking, make sure you have set up the essential aspects of your account. This includes adding your services and fieldworkers. If you need help with this, refer to our pages on ‘Adding a new service‘ and ‘Adding a new fieldworker‘.
This user guide is here to help you navigate through the system with ease, offering a detailed exploration of the booking process. Below is a table of contents that provides quick access to the topics you may be interested in.
Table of contents:
- Creating new bookings manually
- How to edit a booking?
- How to convert an inquiry into a booking?
- How to convert a quote into a booking?
- How to add a Google Map address when creating a new booking?
- Adding multiple addresses while creating a new booking
- How to remind customers and admin users of future bookings?
- How to add a customer property when creating a new booking?
- How to create recurring appointments?
- How to create a new booking with multiple services and different fieldworkers assigned?
- What is the difference between selling products and selling services?
- How to display/hide the Product Sales from the services list and why you might need it
- What is the difference between adding products on the booking level and on the service level?
- How to add a custom form when creating a new booking?
- How to view nearby bookings when creating a new booking?
- How to view available fieldworkers when creating a new booking?
- How to add a voucher code when creating a new booking?
- How to add a discount when creating a new booking?
Creating new bookings manually
Step 1: Starting the Booking Process
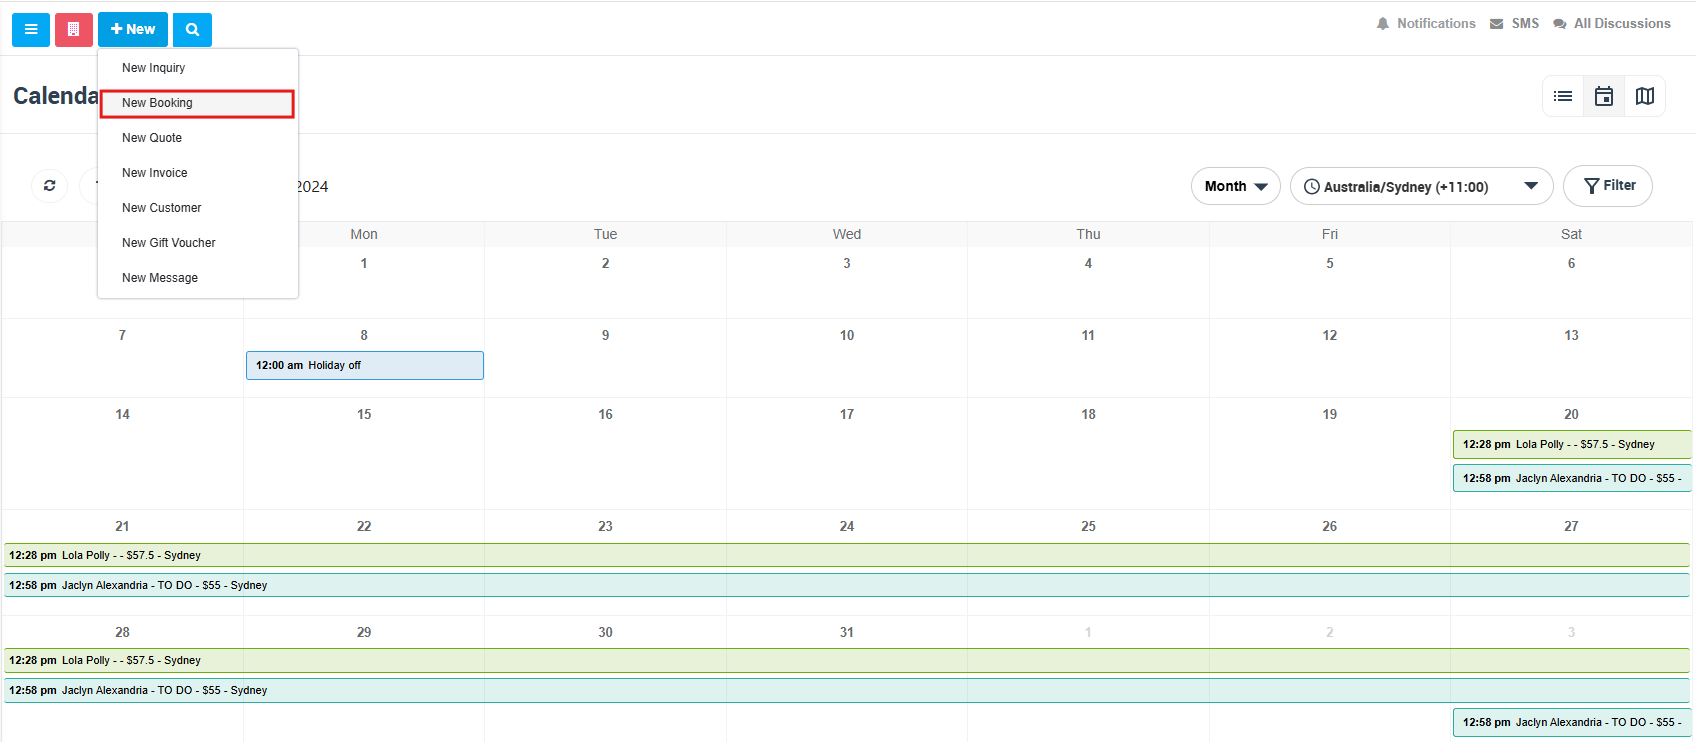
Begin by logging into the OctopusPro platform as an admin user. Click on “+New” at the top left of any page and select “New Booking” from the dropdown menu. Alternatively, you can go to the sidebar menu, select “Bookings”, and then click “Create New”.
Step 2: Fill Out the Booking Form
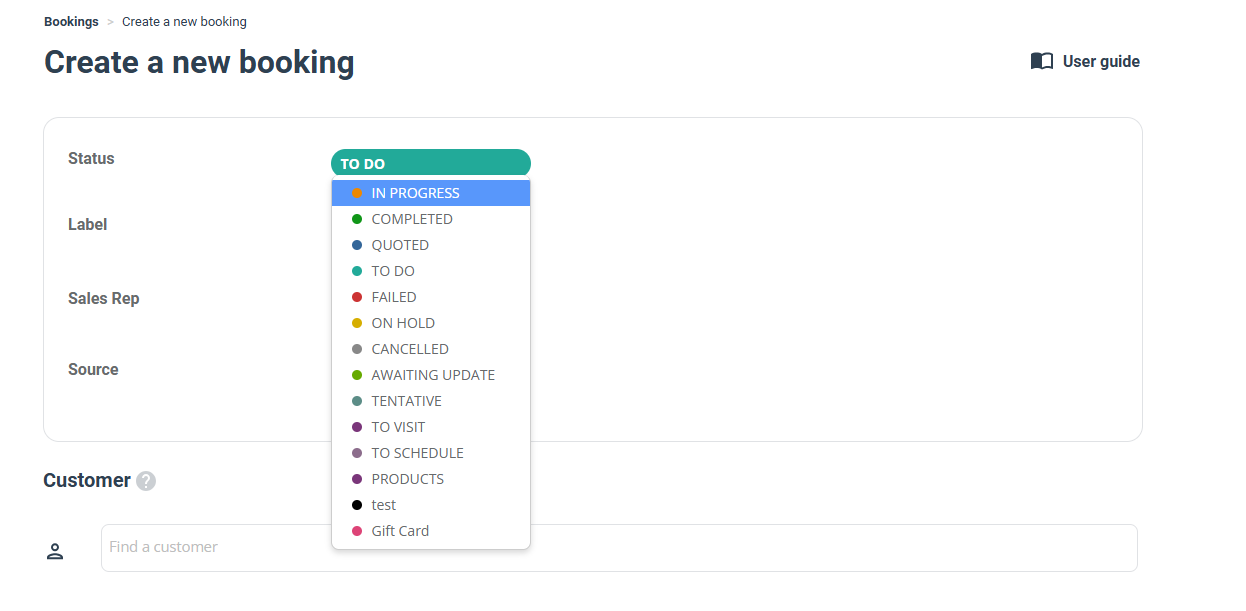
Once you’ve begun the booking process, fill out the necessary fields in the booking form. Start by selecting a booking status from the dropdown menu; this status helps manage bookings at all stages, from quote generation to scheduling and completion. Visit our ‘Booking Status‘ page for further details on this feature.
Step 3: Trading Names
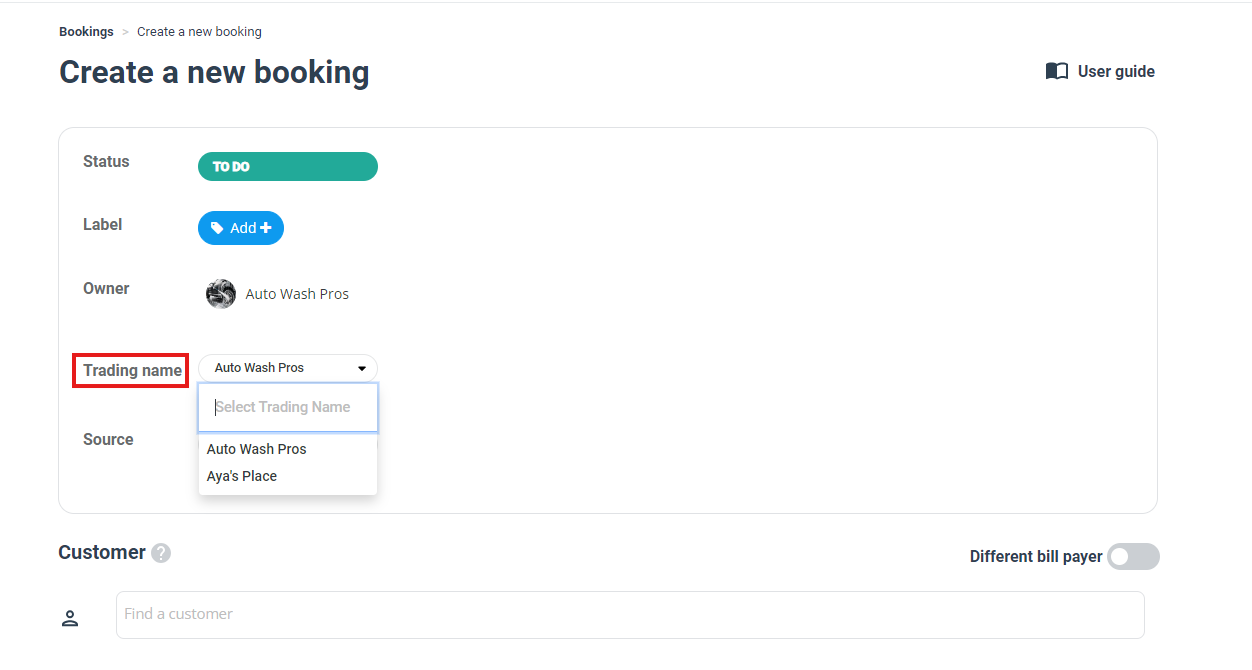
If your company operates under multiple trading names, select the appropriate one for this booking. If no specific name is selected, the default trading name will automatically apply. You can learn more about this feature on our ‘Trading Names‘ page.
Step 4: Booking Source
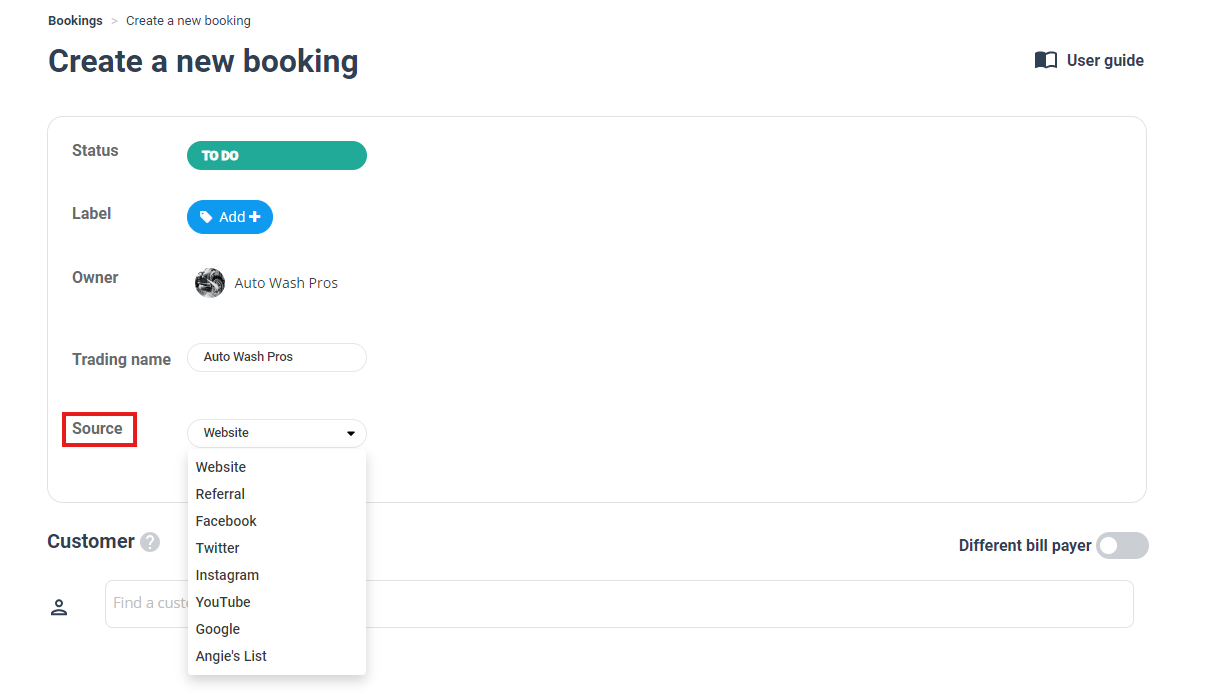
Next, select a source to identify the communication channel through which the customer submitted the inquiry/quote. This step helps categorize bookings according to the channel used.
Step 5: Customer Details
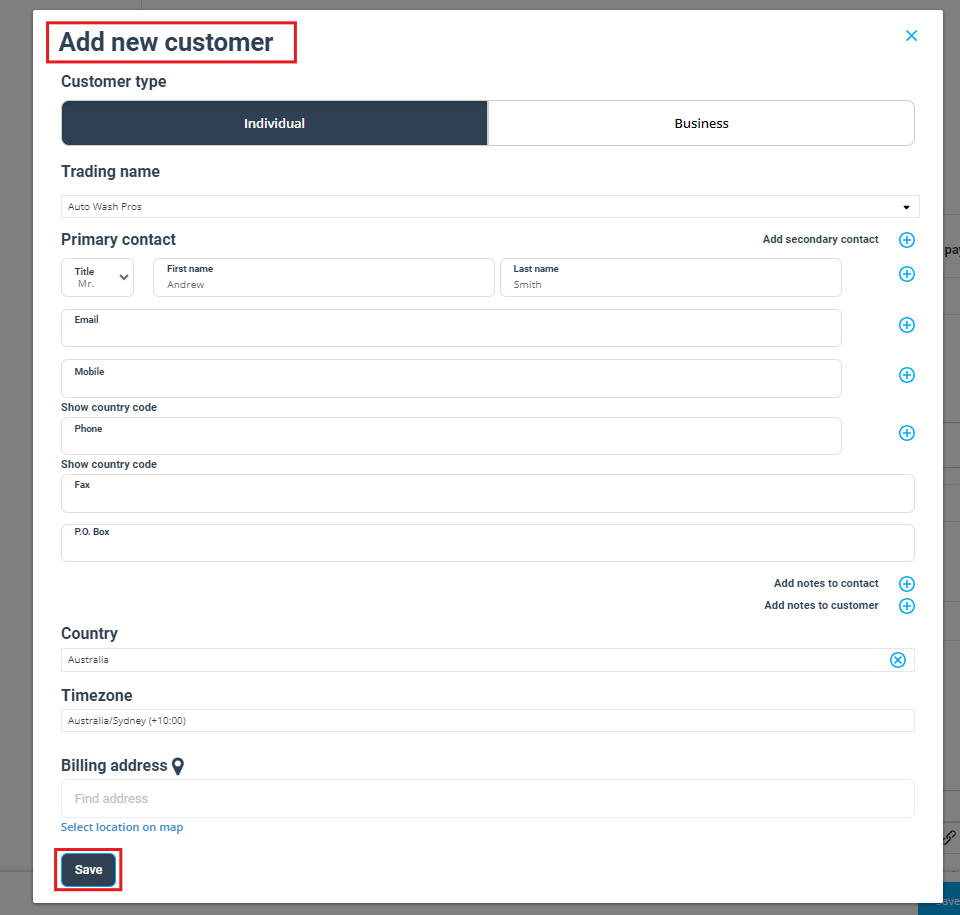
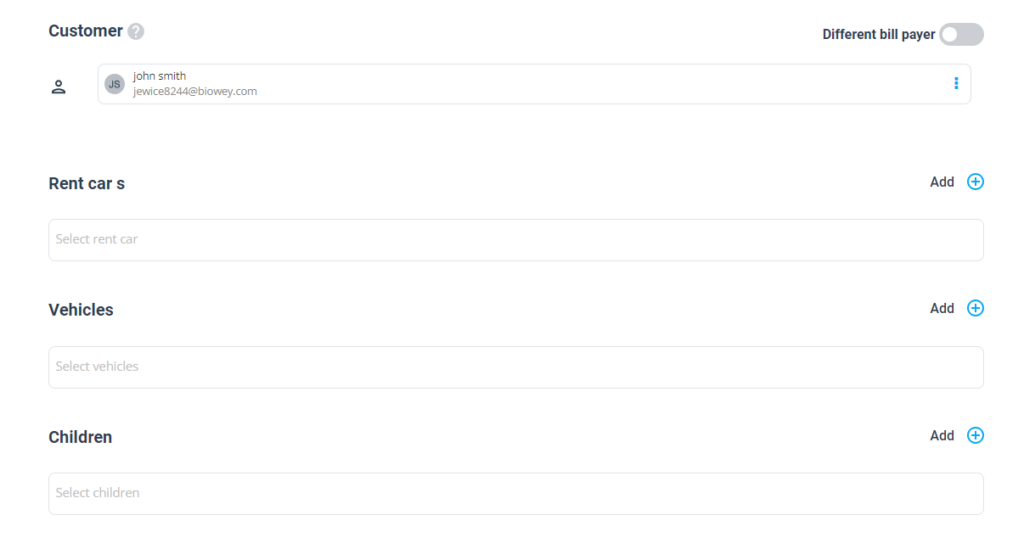
Next, input the details of the customer for whom you’re scheduling the booking. If it’s an existing customer, simply type their name into the search bar. For a new customer, click on “new customer” to enter the new customer’s details. This step opens a form where you can input information like their name, email, phone number, and billing address.

Step 6: Address Details
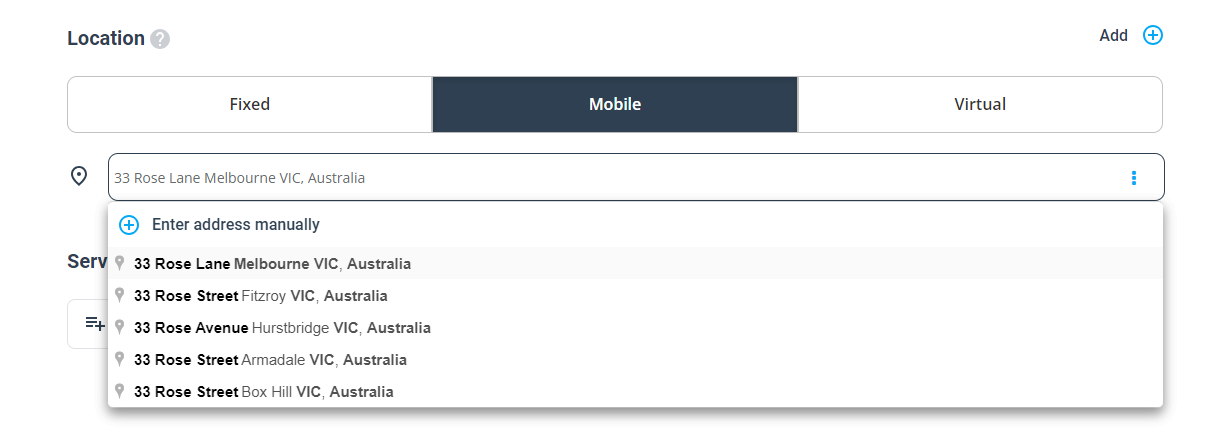
Upon selecting a customer for a booking, their default address within the system is automatically set as the initial booking address. To alter the default booking address, simply click on the address field. Here, you’ll have two options:
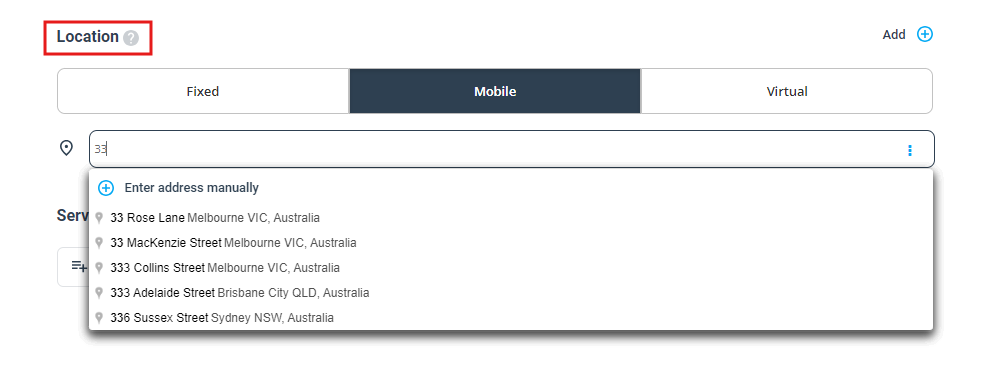
- Use the Google auto-populate feature, which allows you to search and select a matching address instantly.
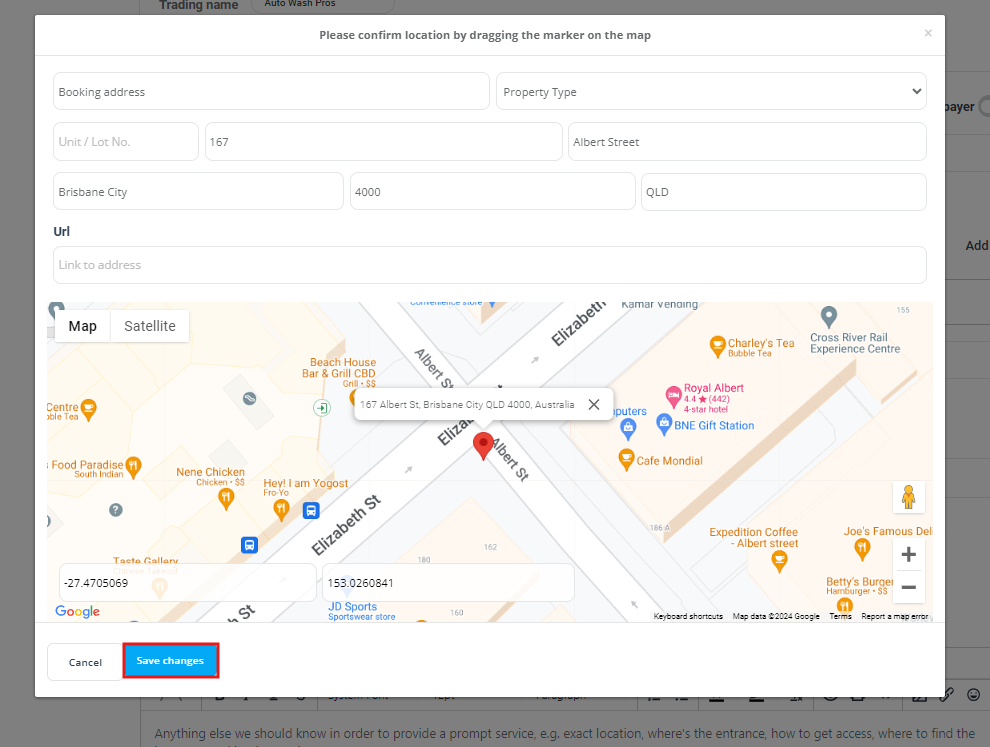
- Click on the actions button located on the right side of the address field to ‘Edit’ address. This opens a popup where you can manually input the address details, select a location on a map, or even enter an address URL or link.
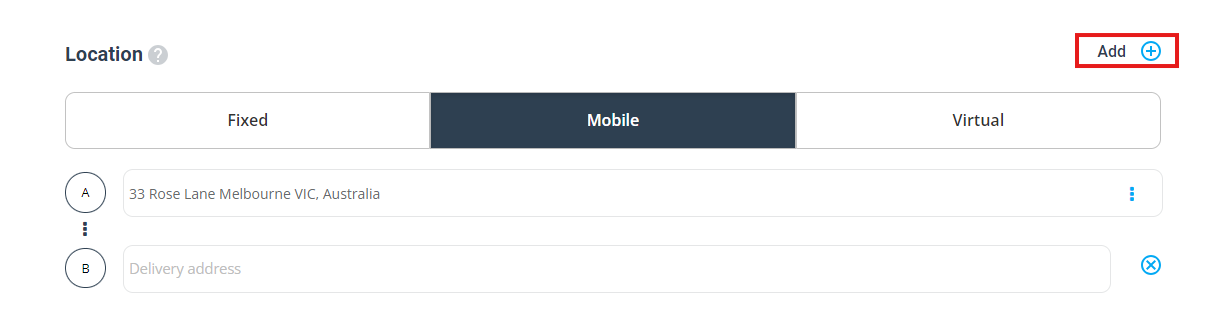
If your booking necessitates additional addresses, press the “Add” button, to add a second address.
- Use the Google auto-populate feature, which allows you to search and select a matching address instantly.
- Click on the actions button located on the right side of the address field to ‘Edit’ address. This opens a popup where you can manually input the address details, select a location on a map, or even enter an address URL or link.
The new address will be assigned to the booking with a marker label of your choosing, allowing you to easily categorize each address based on your business’s specific needs. Whether you need to designate pickup, drop-off, secondary booking addresses, or delivery locations, OctopusPro is tailored to accommodate your requirements.
Step 7: Adding Services and Products
In the updated interface, adding services to your booking is even more streamlined. Follow these steps:
-
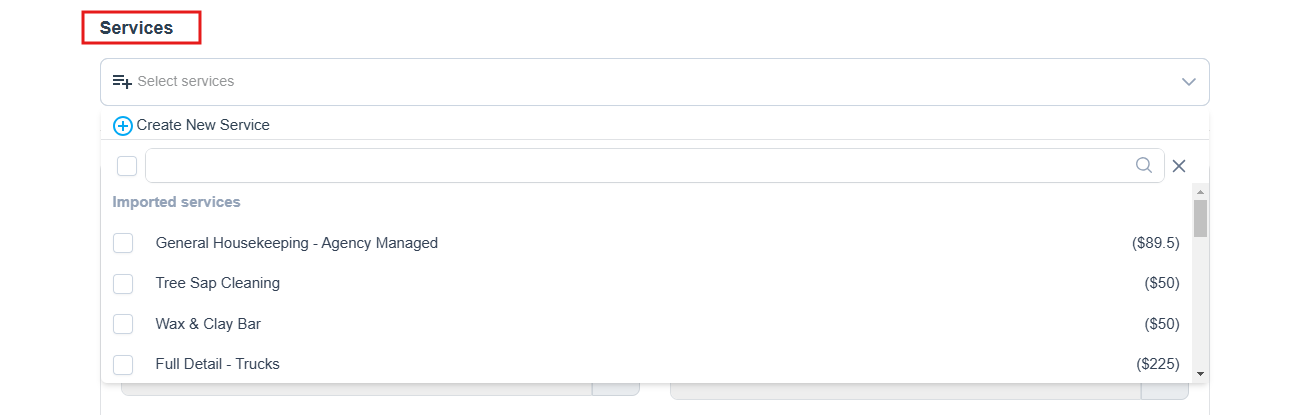
Click into the services search field. A drop-down menu will appear, showing all the services that your business provides.
-
You can either select one of the existing services from this dropdown menu or choose to “Create a new service”.
-
If you select “Create a new service”, you’ll be redirected to a new settings page where you can create a new service and fill in all the necessary details.
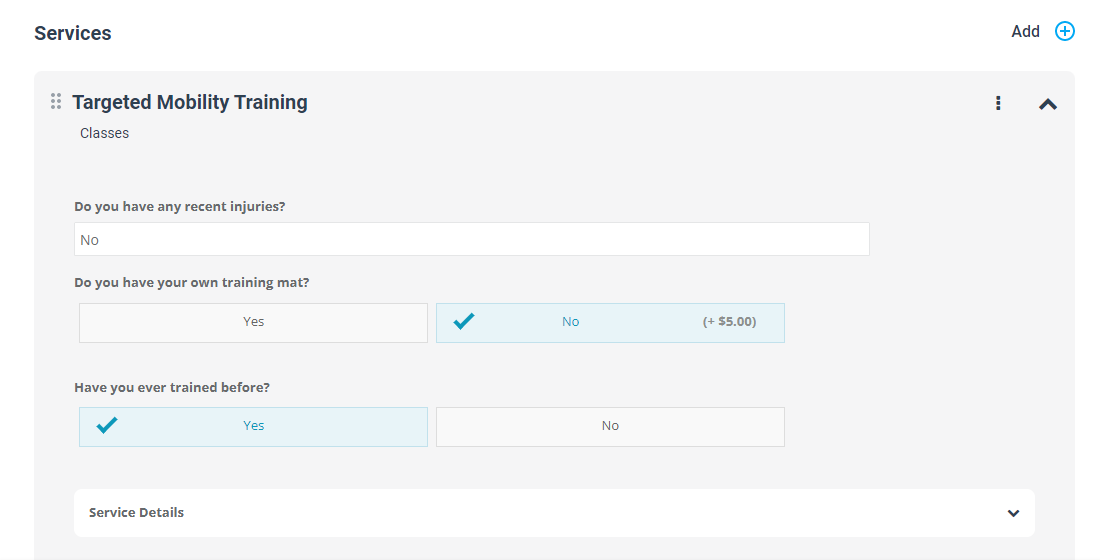
If you’ve created custom fields for your service that influence its price, then it will affect the total pricing of the booking. Fill in the required fields to continue.
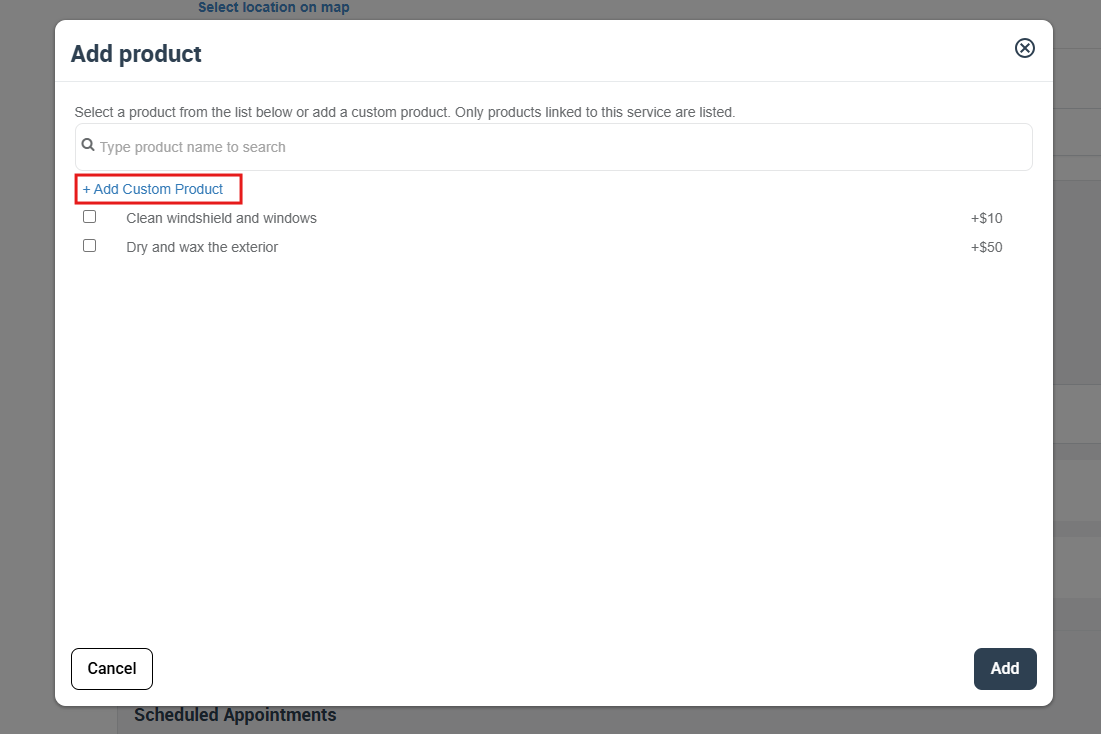
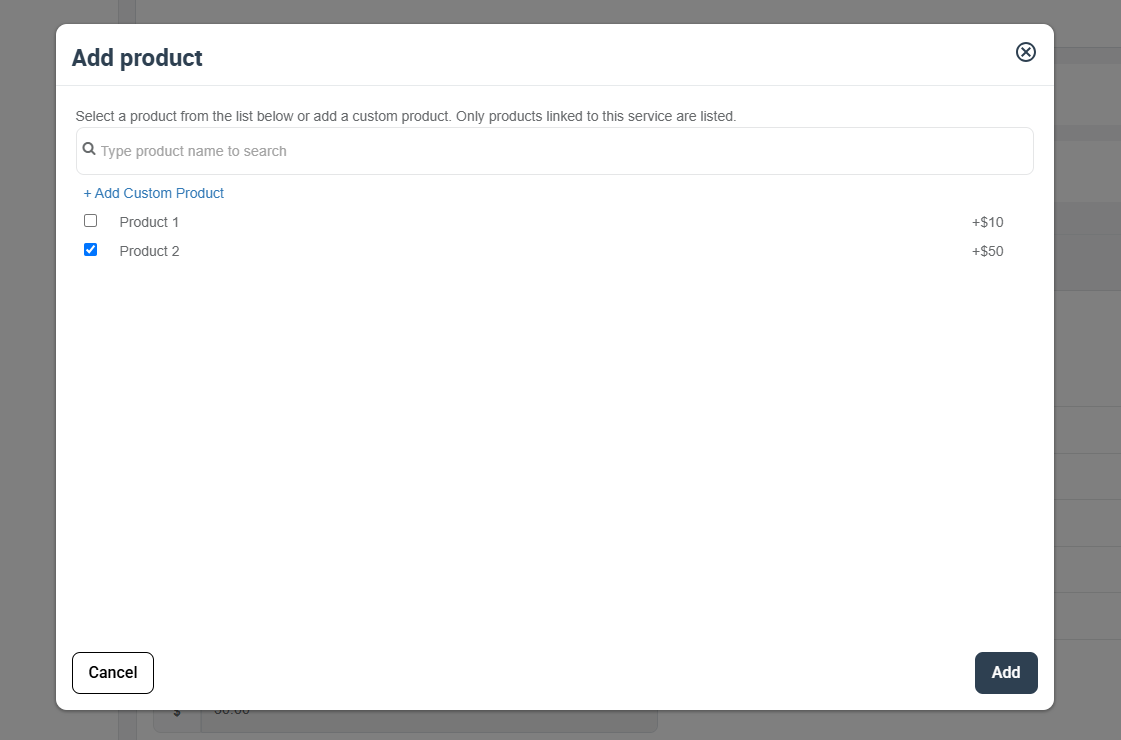
Adding Products: If the ability to add products is enabled in your settings, you can enhance your service with additional products. Click on “Add” in the products container, and a popup will appear. This popup displays a list of your existing products associated with the selected service. From here, you can choose a product from the list or add a new custom product. If you select “Add custom product”, a new container will open where you can fill in details like the product’s description, cost, markup, and the auto-generated subtotal (which includes the cost and the markup).
Remember that admin users can be authorized to add products to a booking during its creation. This can be adjusted in “Settings > Services Settings > Products” in the side menu.
Step 8: Custom Services and Products
After adding or selecting a service for the booking, OctopusPro gives you the flexibility to further customize the service or add additional products that cater to the specific needs of your customer.
-
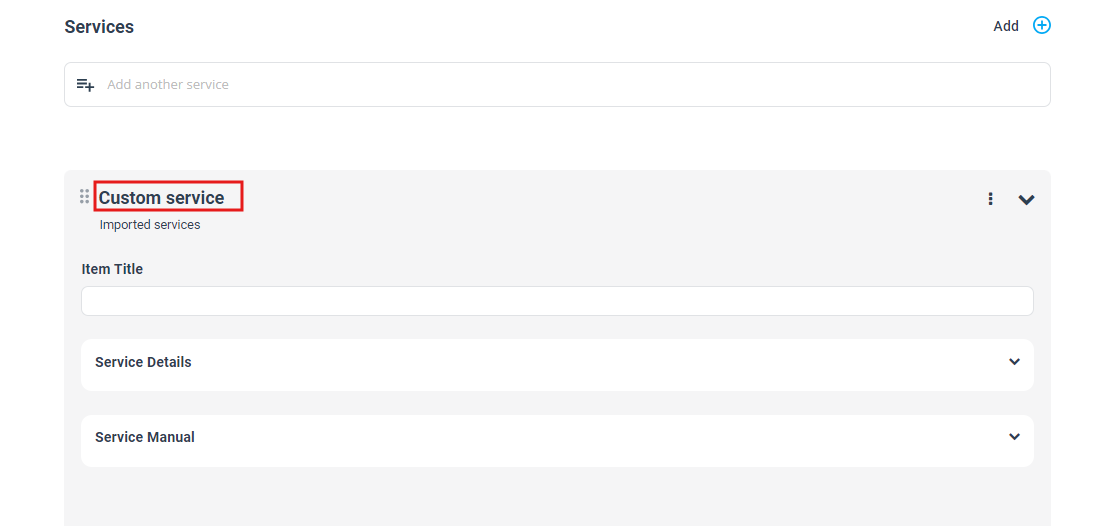
Customizing Services: When you choose a service, the option to “+Add Custom Service” will appear in the dropdown menu. Clicking on this opens a new container where you can enter the details of the custom service:
- Item Title: Insert the name of the service.
- Service details: Write a detailed description of the service.
- Service Manual: This is an internal document visible only to your fieldworkers, providing instructions or guidelines about the service.
Note: The custom service can be replicated or deleted as needed. Click on “Replicate” to make a copy of the custom service, or “Delete” to remove it.
 2- Adding Products: If the addition of products to service is enabled in your settings (this can be managed in “Settings > Services Settings > Products”, you can include one or more products with your service.
Click on “Add” in the products container, and a popup window will display a list of your existing products associated with the chosen service. From here, select a product, or add a new custom product by clicking on “Add custom product”.
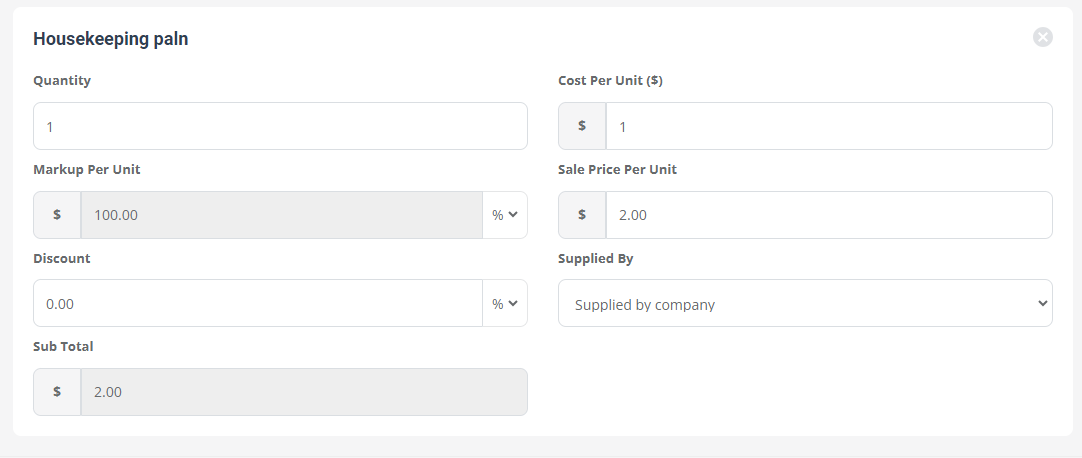
When adding a custom product, you’ll be prompted to fill out the following fields:
-
- Description: Detail the specifics of the customized product.
- Cost: This is the base price for the custom product.
- Markup: This is the amount added to the cost price of the customized product. This can be expressed as a percentage or a dollar amount.
- Subtotal: This field is auto-generated, combining the cost and markup to display the total price the customer should pay for the product.
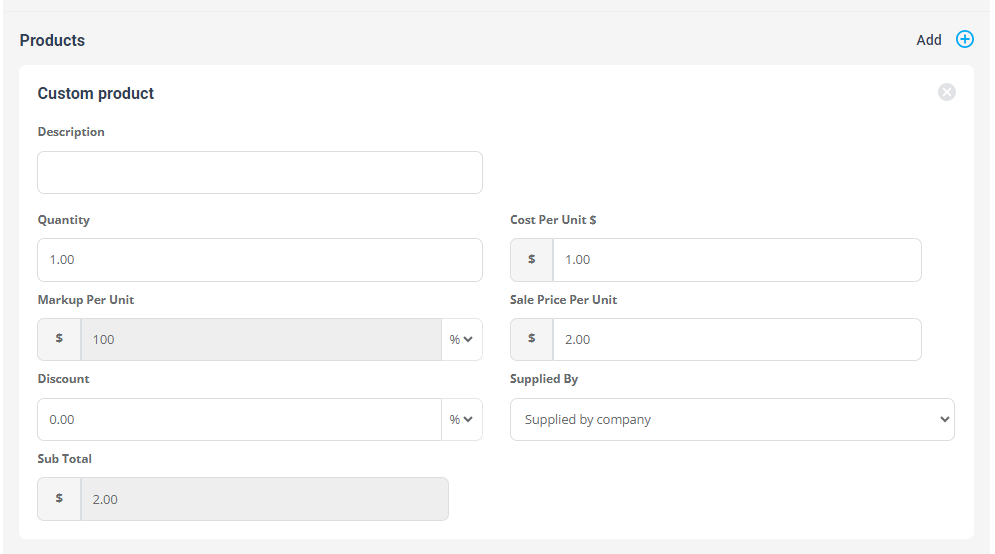
If you need to remove a product, simply click on the delete icon.
Remember, OctopusPro is designed to be flexible and adapt to your specific business needs, providing you the power to modify and enhance your services and products to suit each booking.
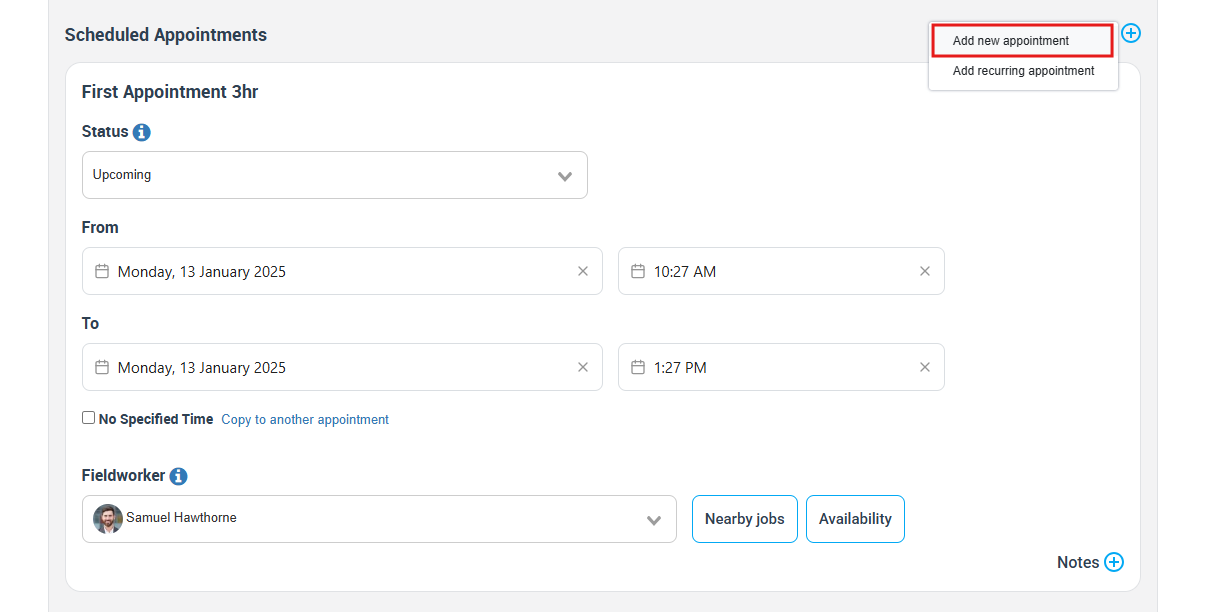
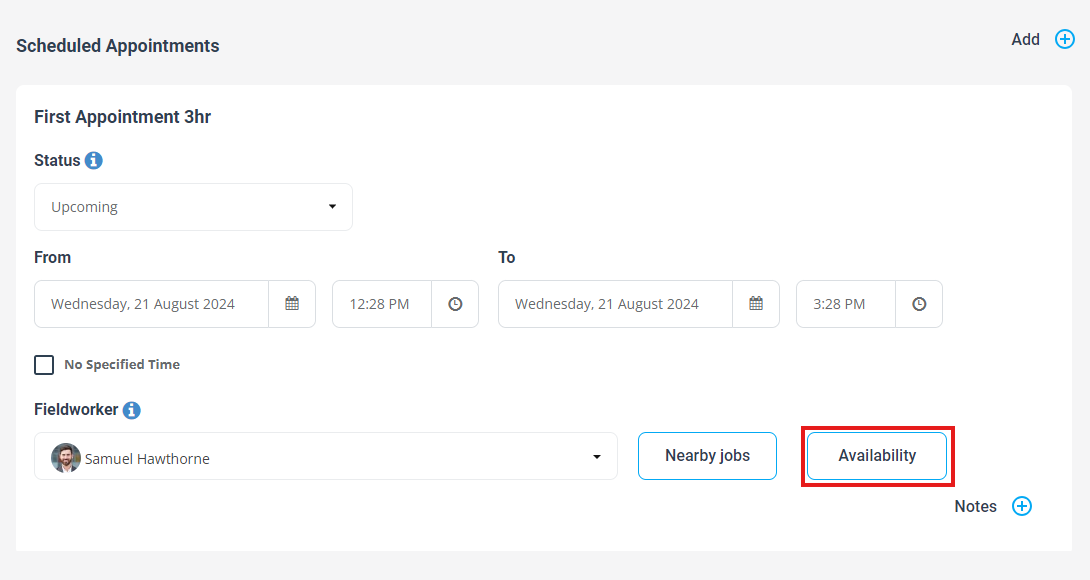
Step 9: Schedule Your Booking
Now it’s time to schedule the booking. You will first determine the duration of the booking by selecting a start and end date via the calendar popup. Subsequently, designate a preferred start and end time for the booking. Alternatively, if there is no specified timing for the booking, select the “No specified time” option. This stage also allows for the inclusion of additional comments regarding the timing of the booking or any specific requirements.
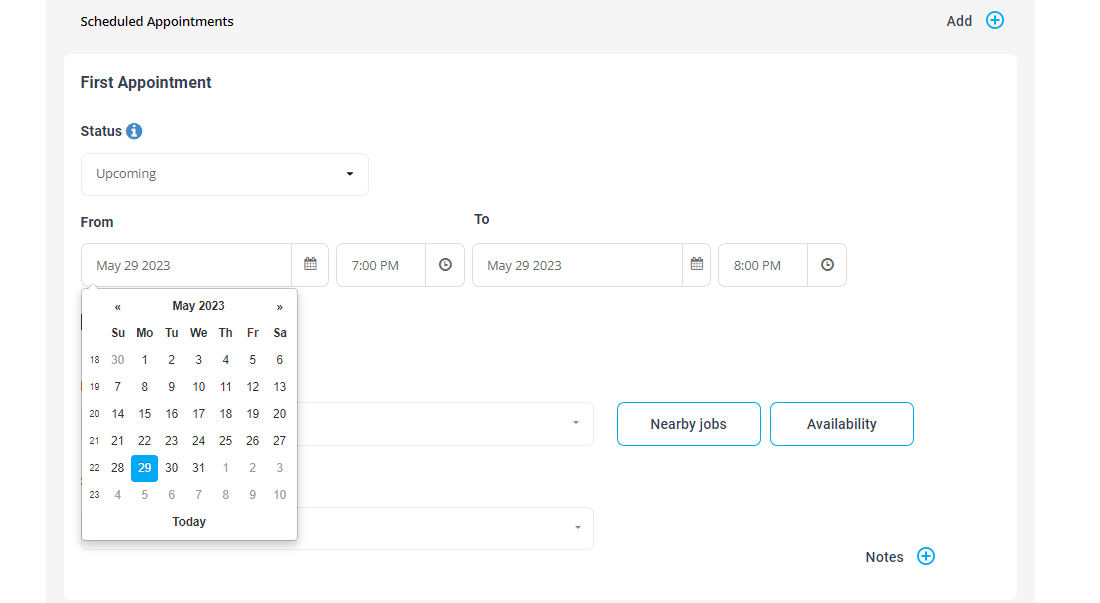
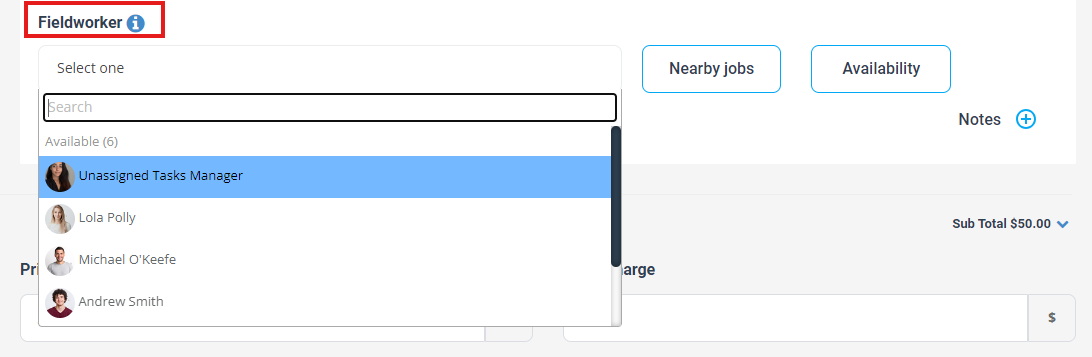
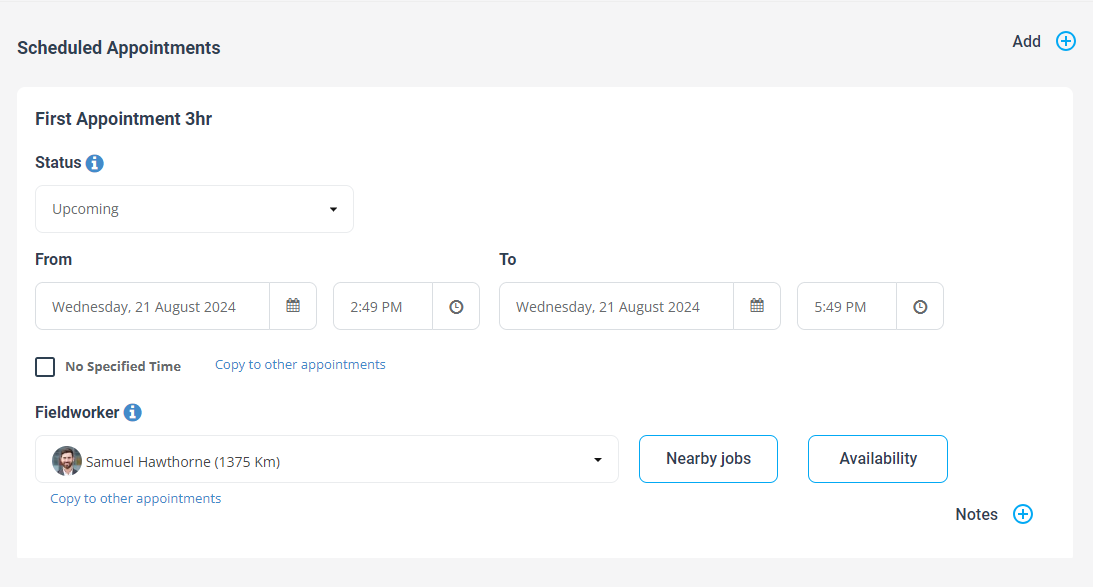
Next, you will assign the booking to a fieldworker. This is done by selecting the appropriate person from the “Fieldworker” drop-down menu. At this point, you have a couple of additional tools at your disposal:
- “Nearby jobs”: This tool allows you to view all bookings in close proximity to the current booking address, providing insight into the existing schedule, including the details of the assigned fieldworker.
- “Availability”: This feature helps streamline the fieldworker selection process by showing all fieldworkers available for the chosen service.
Step 10: Additional Appointments and Fieldworkers
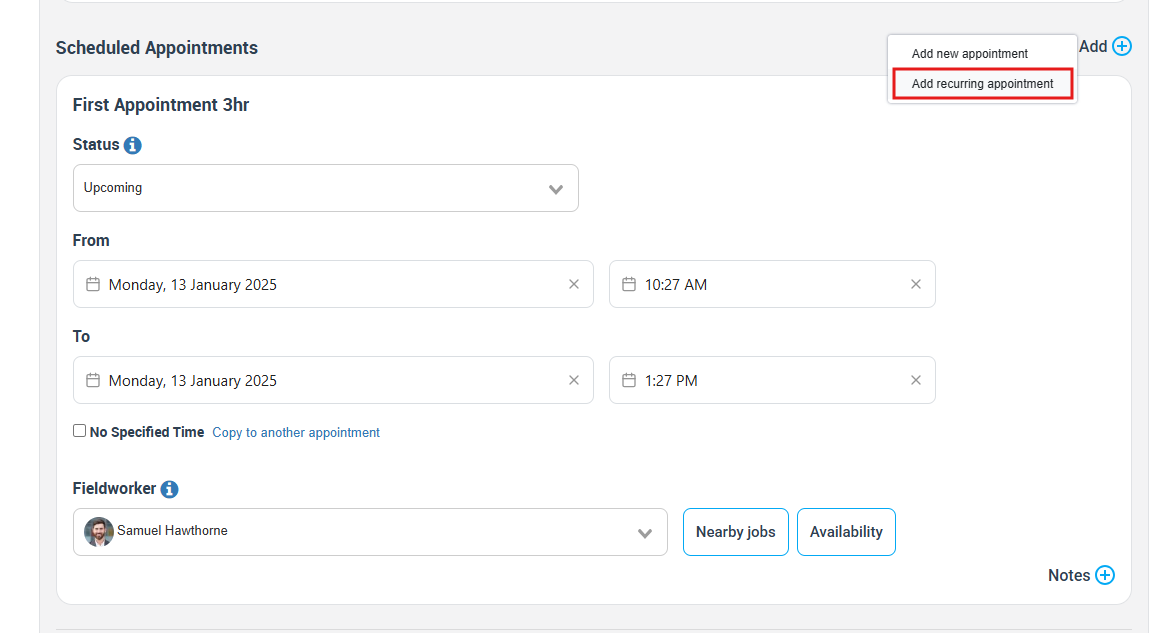
OctopusPro also offers the flexibility to schedule multiple visits per service or assign additional fieldworkers to the same service if necessary. To take advantage of this, click on Add+, then click on “add new appointment” to add an additional appointment, or click on “Recurring Appointment” to add a recurring appointment.
This action will prompt a new container to appear, allowing you to plan future visits if needed. Select the desired date and time and assign either the same or a different fieldworker for the service. This area also provides space to add any extra comments or requirements.
Alternatively, if you require a team of fieldworkers for the same service, simply add the same details (date and time) as the previously entered service, then select a different fieldworker. This way, you can efficiently manage larger bookings requiring more resources.
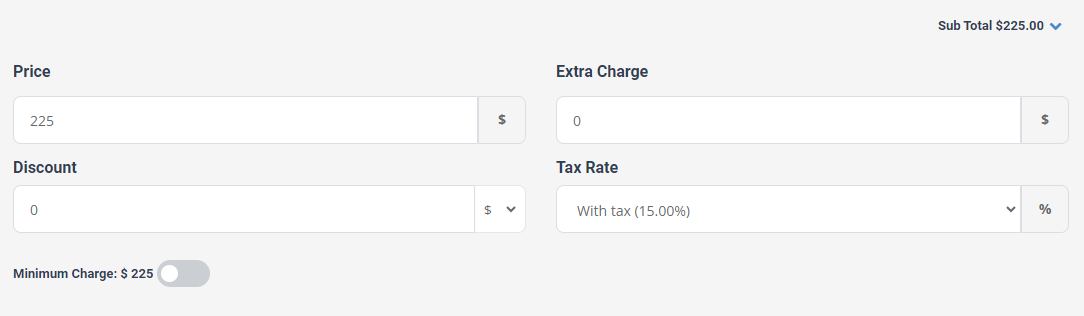
Step 11: Finalize Pricing and Charges
Ensure the total price for the booking is correct, adding an extra charge or discount if necessary. You can also edit your tax rate by clicking on the percentage value in the tax field.
Step 12: Finalizing the Booking
As you reach the final stage of creating the booking, there are a few key steps to ensure all necessary details are included:
- Voucher Code: If a voucher code is available, you can enter it in the designated field at this stage.
- Minimum Charge: The system allows you to apply or disregard a minimum charge if one exists. This is managed through a toggle button for your convenience.
- Notes: Utilize the text box field to add any private notes that may be necessary. These notes are shared only with your administrative users and fieldworkers. Importantly, these notes are not visible to your customers and will not be included in any emails or attachments sent to them.

After these details are added, you will notice that the remaining details are filled out automatically and are non-editable. These details are system-generated based on the information provided in the previous steps and ensure consistency across your bookings.
Once you’ve ensured all necessary information is accurate, click the “Save Booking” button to complete the creation of the booking. With this final step, your booking is officially established and you can proceed to manage it as needed.
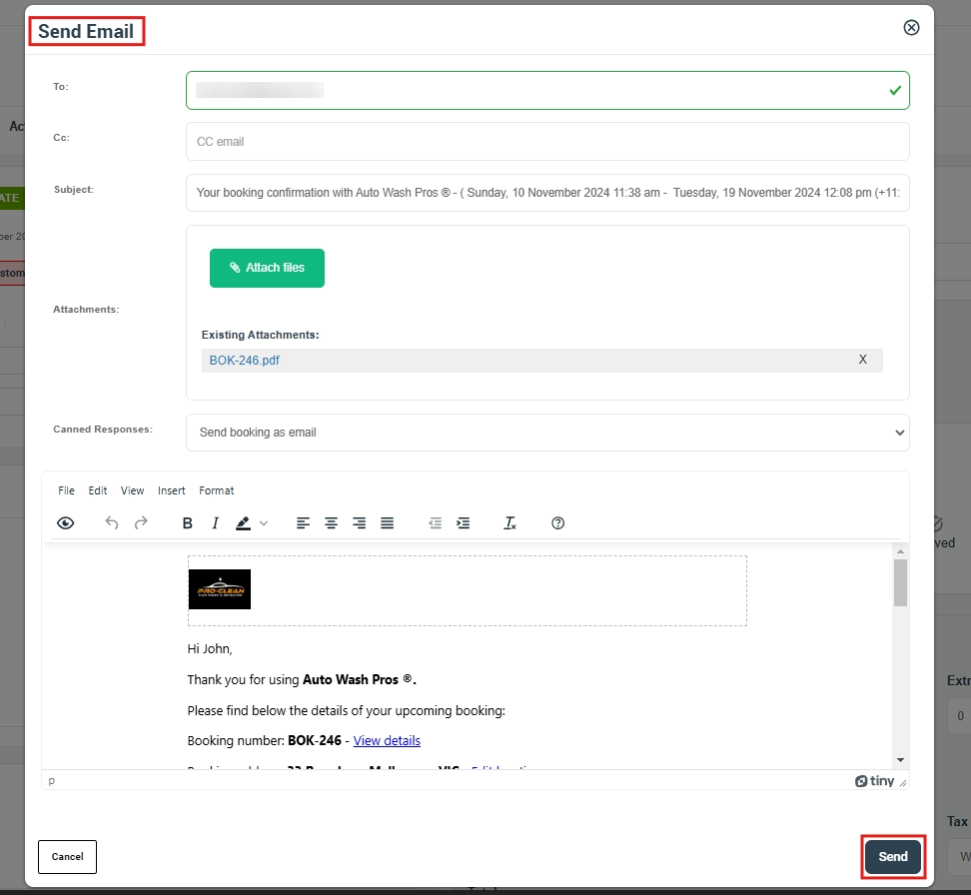
Step 13: Booking Confirmation
After saving changes, you’ll be directed to the Booking page, Where you can send an automated booking confirmation email to your customer. If necessary, edit the email content before sending it. With these steps, you’ve successfully created a manual booking on OctopusPro!
How to edit a booking?
You can easily edit a booking after creating it from the booing list page, go to Bookings, Click on upcoming or past bookings from the spider menu, Then select the booking you want to edit, Click on the actions button, and Edit booking. You will be redirected to the booking form where you can edit all the details.
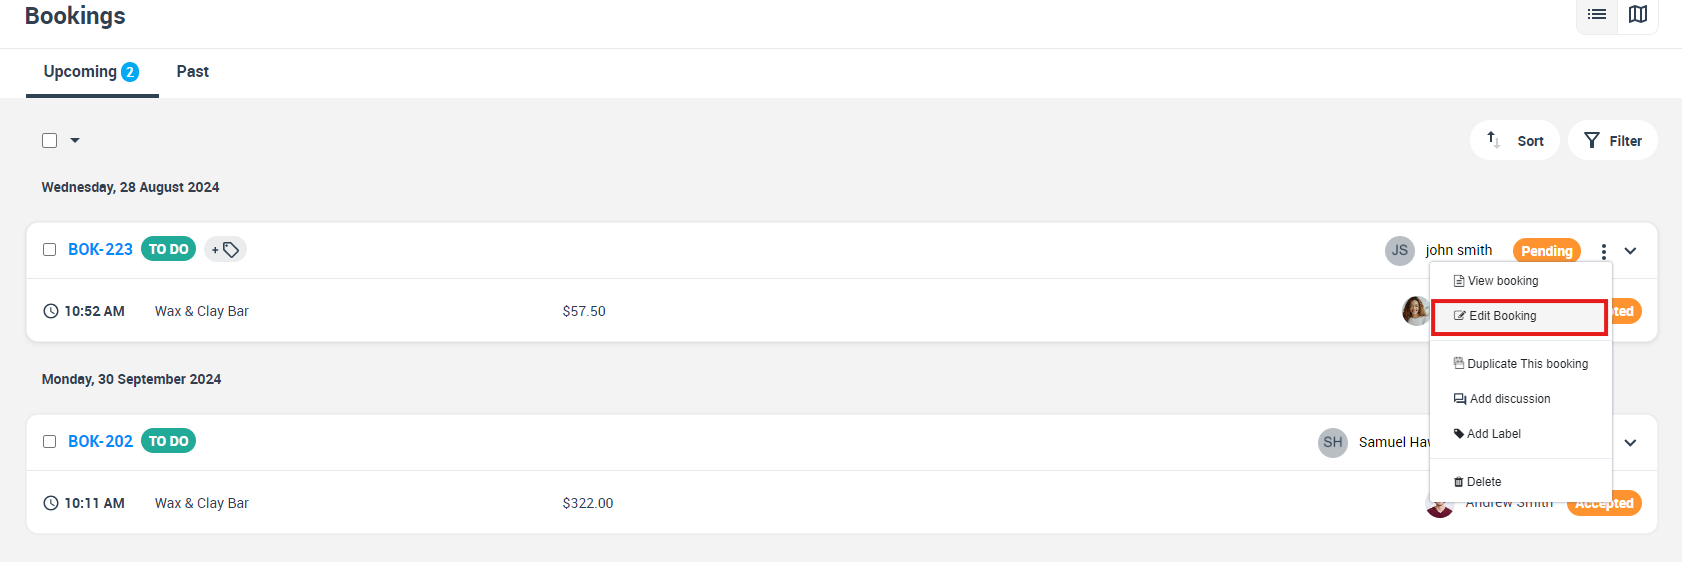
From the top side of the booking overview page, click on the actions button then select “Edit”
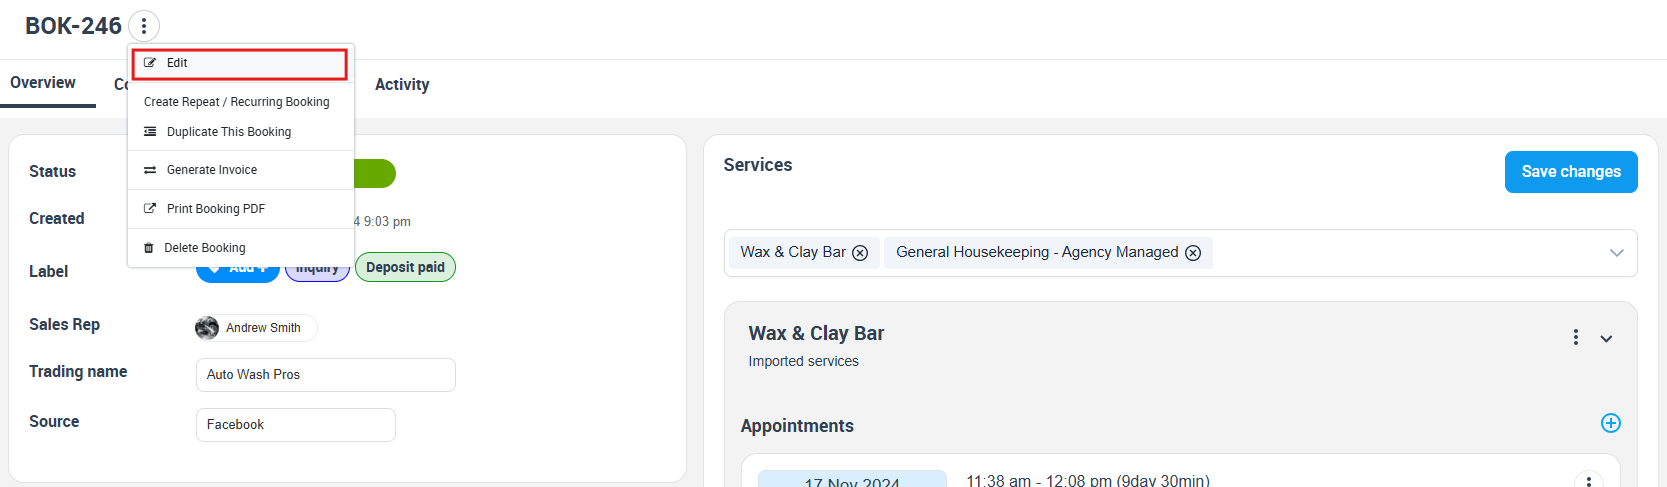
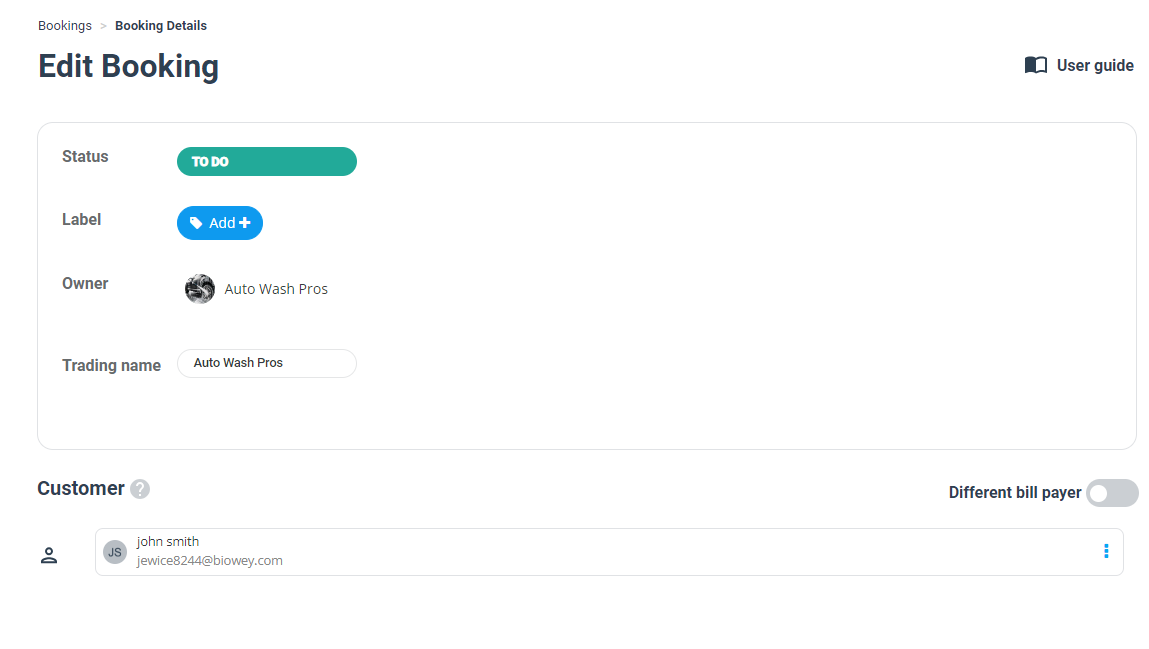
You will be redirected to the booking form where you can edit all booking details such as:
- Booking status.
- Customer information.
- Edit trading name.
- Appointment date and time.
- Booking address.
- Add or remove services.
- Add reminders.
- Change selected or add fieldworkers and subworkers.
- Edit service pricing.
- Add voucher codes.
And much more as explained above.
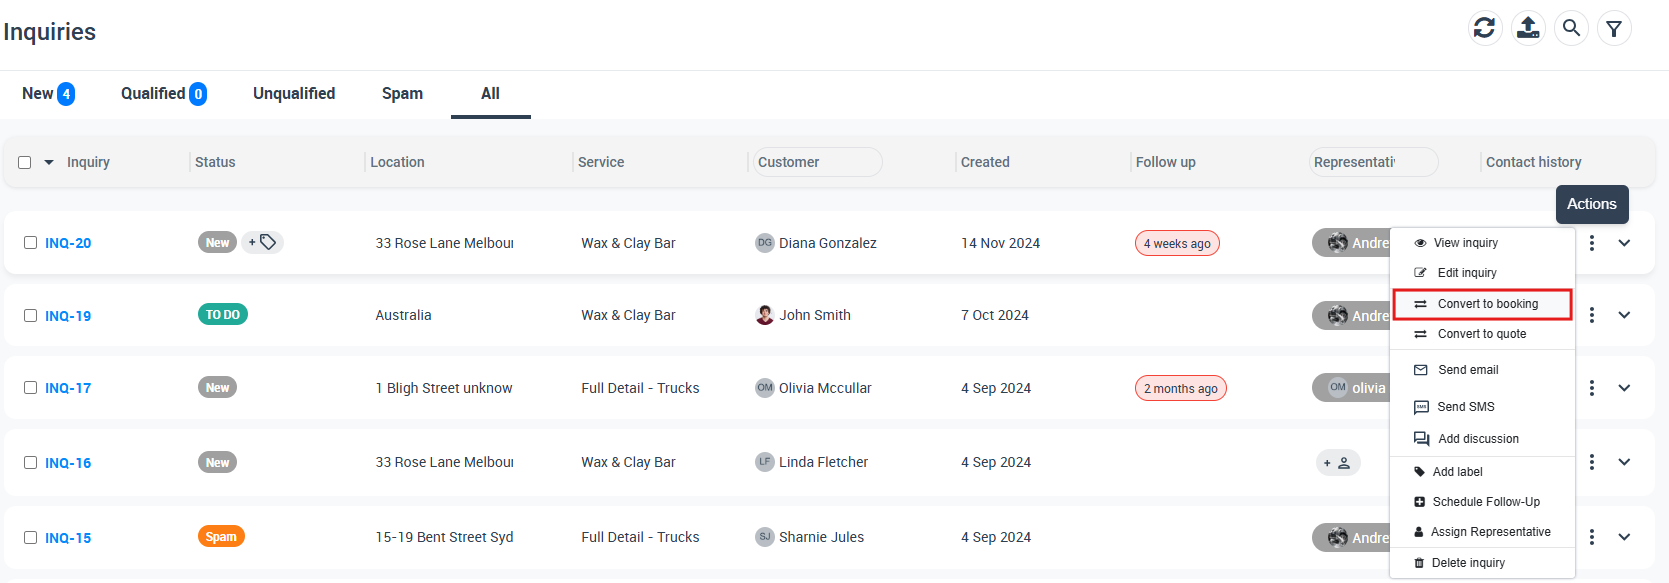
How to convert an inquiry into a booking?
From the inquiries list page, select the inquiry you wish to convert to a booking. Click on the actions button, and select “Convert to booking”.
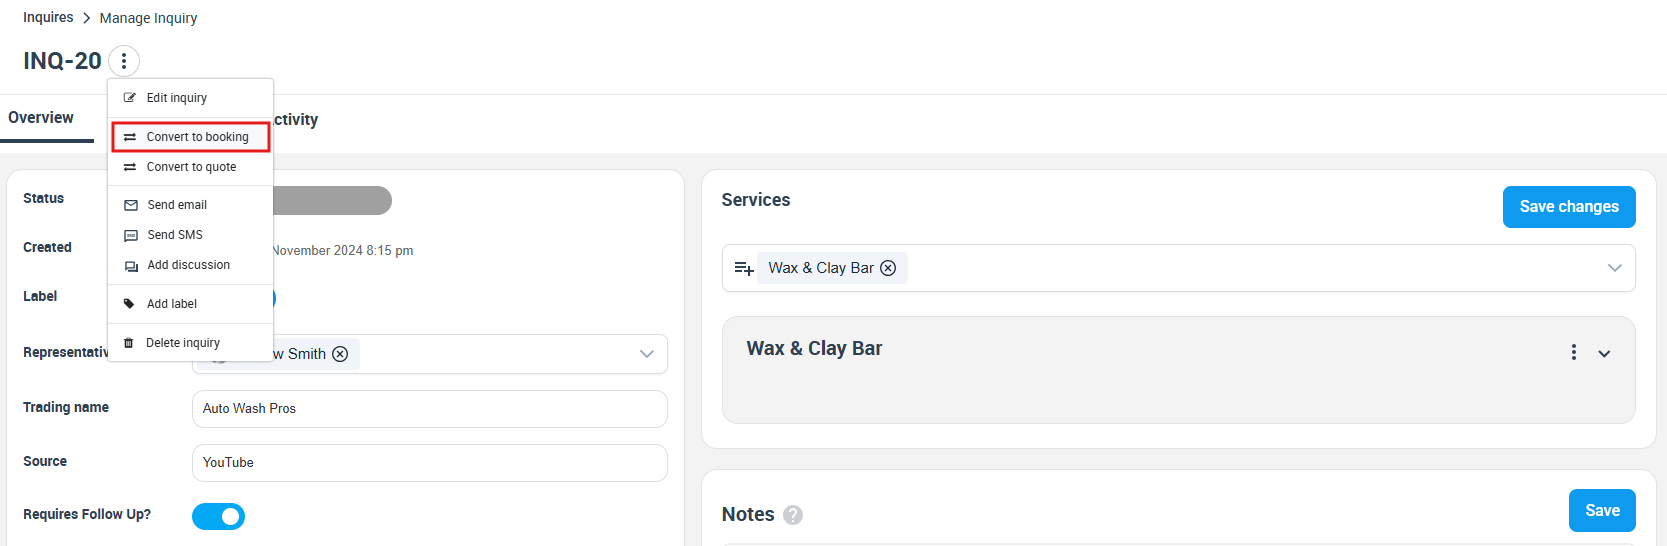
Or, from the actions button, select View inquiry.
You will be redirected to the inquiry view page, on the top right side of the page, click on the actions button and select “Covert To Booking”.
How to convert a quote into a booking?
From the quotes list page, select the quote you wish to convert to a booking. Click on the actions button, and select “Convert to booking”.
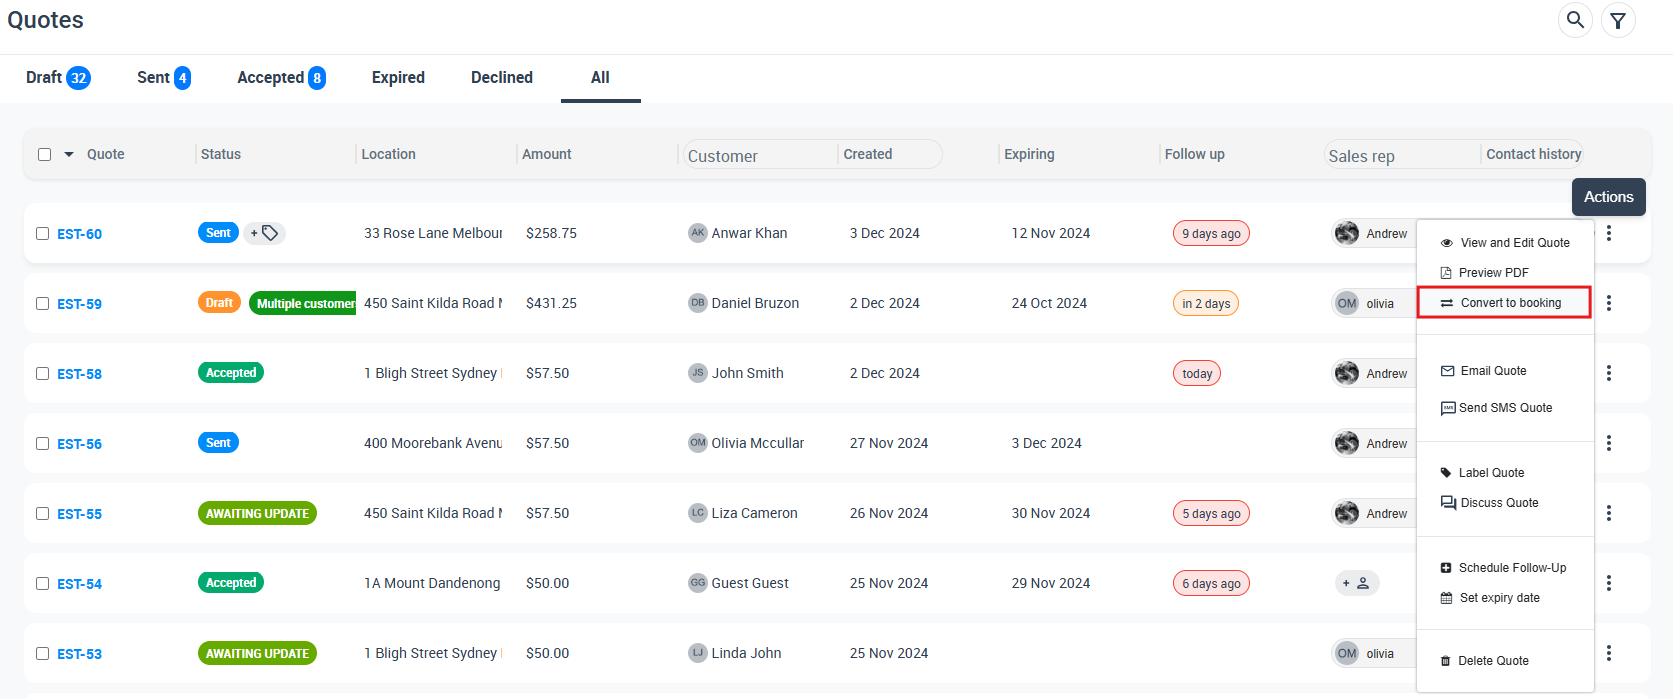
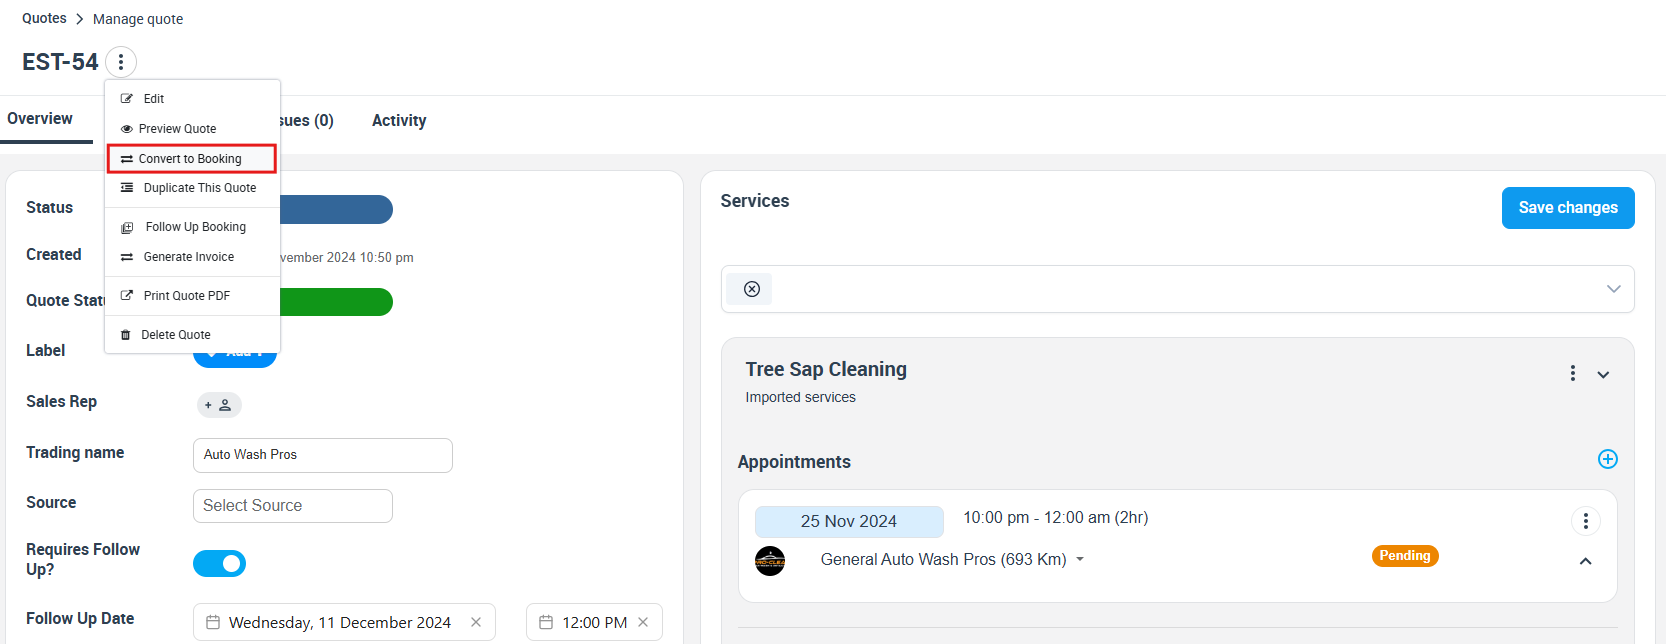
Or, from the actions button, select View Quote.
You will be redirected to the quote view page, on the top right side of the page, click on the actions button, and select “Convert To Booking”.
How to add a Google map address when creating a new booking?
- When creating a new booking, you will be required to add a customer, select a trading name, and choose your preferred booking location, based on the locations you have enabled for your business.
- If you have enabled mobile location for your business, then you will be required to add a booking address.
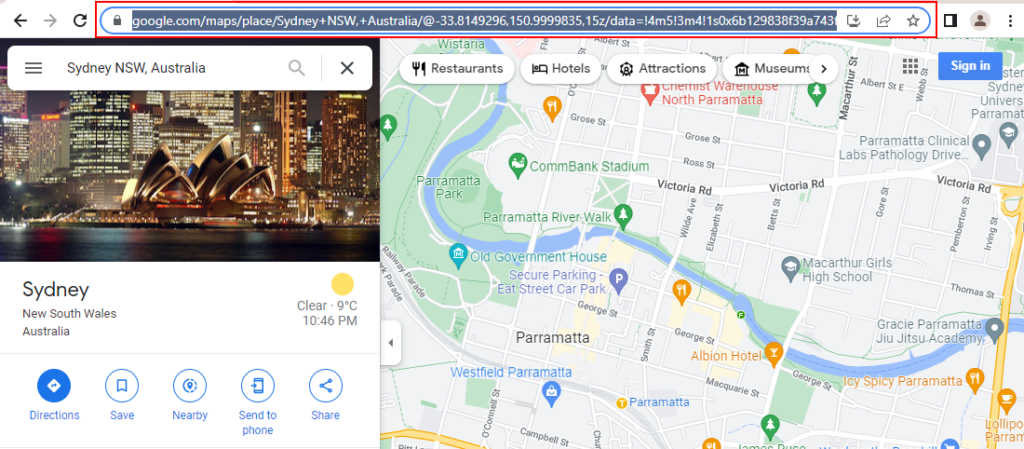
- To add a Google Map address to the booking address field on OctopusPro, simply copy the URL of the Google Map page, and paste it into your address field when creating a new booking, and all the location field details will automatically fill and you won’t have to manually add it.
- First, after detecting the location on Google Maps, click on the page URL, and copy it.
- After copying the page URL, go to your booking form, and click on the address field. After that, click on Enter address manually, and simply paste the URL link you copied earlier into the URL field.
- After pasting the URL, all the location details will be filled in automatically in the empty fields.

- You can also copy the Google Map address link by clicking on Share, then COPY LINK on the popup window. And then follow the same steps.

Adding multiple addresses while creating a new booking
Creating a new booking with multiple addresses on OctopusPro can be accomplished easily by following a few simple steps.
- Choose a Booking Location Type: Based on your business’s operational locations, choose the location that’s most suitable for your booking. If ‘Mobile location’ is selected, the system will prompt you to input the booking address.
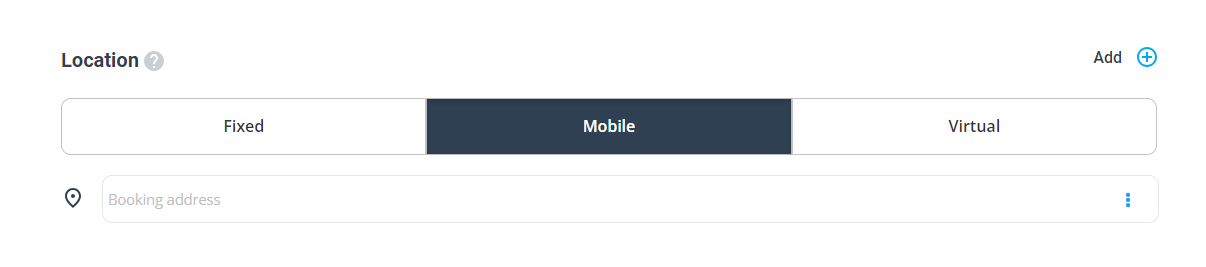 2. Add Your Primary Booking Address: Once you’ve chosen the ‘Mobile location’, you’ll be asked to add a booking address. This is the primary address where the booking services will take place.
-
- Use the Google auto-populate feature, which allows you to search and select a matching address instantly.
- Click on the ‘Edit’ link located on the right side of the address field from the actions button, This opens a popup where you can manually input the address details, select a location on a map, or even enter an address URL or link.

3. Add Multiple Addresses: After adding your primary booking address, you have the option to include additional addresses. To do this, simply click on the “Add+” button.

-
Fill In Additional Address Details: A new section will appear for each additional address you add. In this section, you can input your secondary address. If you wish to delete any additional address, you can click on the “Remove” button. To add more addresses, click on “+Add” again.
Remember, these multiple addresses could be useful for businesses that provide services at multiple locations in one booking. They could represent different sites, stops, or stages of the service delivery process. Following these steps will ensure you accurately capture all relevant booking addresses.
How to remind customers and admin users of future bookings?
When creating a new booking as an admin user, after adding your customer, and selecting your business trading name and booking address, you can set up a next service date reminder, once activated from the forms & checklists settings page.
The service date reminder enables you to send SMS/Email reminders to customers for future bookings, and reminders to fieldworkers and admin users too.
The next service date reminder helps you generate repeat work from existing customers who have already tried your service and can greatly help improve your customer retention rate. If you provide a service that might be required again by your customers, whether that’s in a week, a month, or a year after job completion, then it’s a great idea to set a follow-up date to remind your customers to book your service again just before they might require them in the future.
The intent of setting up a follow-up date is for your customers and admin users to be reminded that your customer’s next service is due soon. You can also encourage customers to rebook your service by including a special offer or suggesting scheduling a recurring booking in your email or SMS templates.
The next service date reminder form is enabled by default. If you don’t want this form to appear, you can disable it from your Settings > General Settings > Forms and Checklists
Your admin users can follow up on due bookings from under Bookings > Next Service Due in your left menu.
The count of bookings due again that need to be followed up will display in your menu next to the Next Service Due link. All bookings that have a past to next service date will be included in that count until they are either converted to another status or their follow-up reminder is disabled. The notes field entered in the reminder section is visible to your admin users only and can be used to add notes that can help your admin users when following up with your customers.
If you have the next service date reminder automated email activated, your customer will also receive a reminder on this date via email or SMS to book your services again, depending on which delivery method you have enabled for the reminder.
- You can activate automatic next service date reminders from Settings > Communications > Automation.
- You can edit your next service date reminder email and SMS templates from Settings > Communications > Templates & Canned Responses.
- Select a follow-up date from the date picker.
- Select the delivery method you wish to send the reminder via. You have two options: SMS and/or Email. So, the reminder can be sent as an SMS/Email, or you can select both options.
- You can add any additional notes to the reminder in the empty field for fieldworkers and admin users.
You can activate automatic next service date reminders from Settings > Communications > Automation.
How to add a customer property when creating a new booking?
- When creating a new booking, you will be required to select a customer. After selecting your customer, a new field will appear to input the customer property for this booking. Visit Customer Properties to learn more.
- If the customer you selected has saved customer properties on their account, you can select it, or create a new from “settings > General settings> customer properties”
How to create recurring appointments?
After creating a new booking, selecting a customer, and trading name, and adding the booking address, select your requested service. Once a new appointment is created, go to the Booking drop-down under Scheduled Appointments, click on ‘Add+’, and select “Recurring Appointment”.
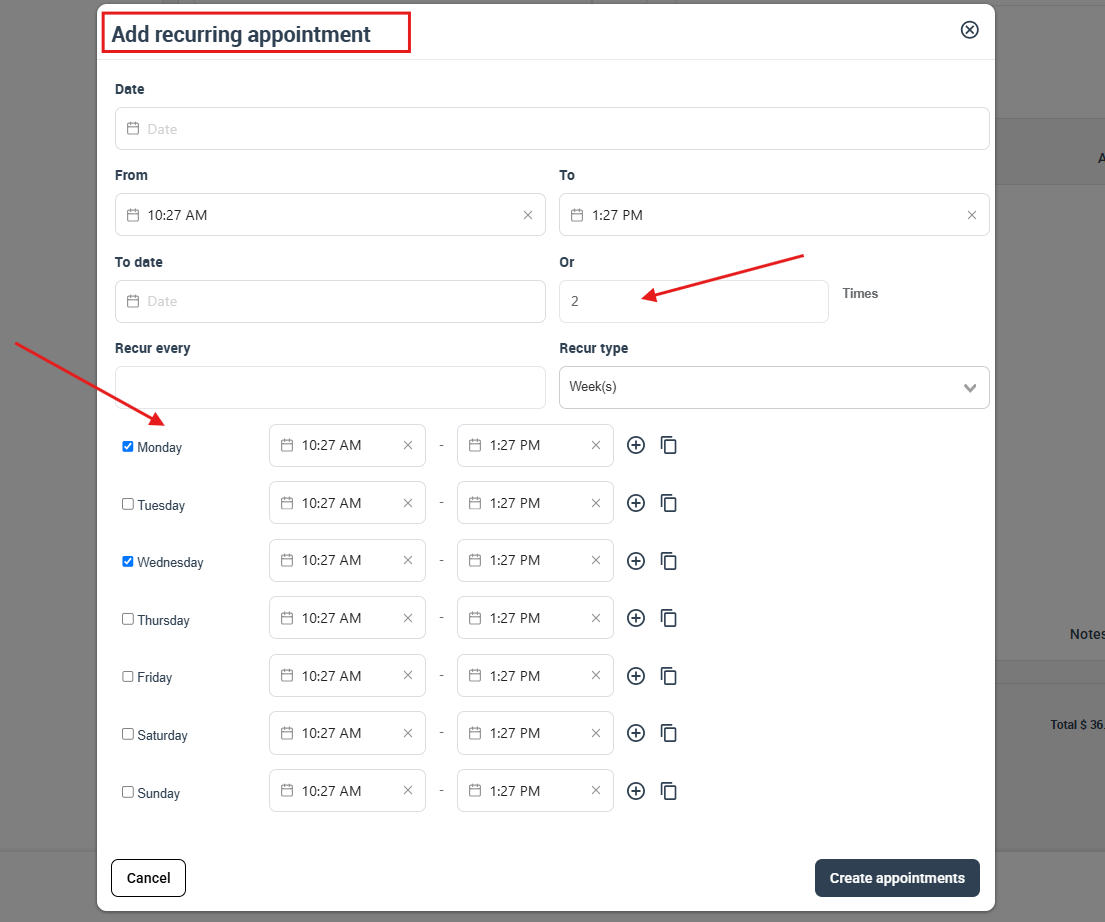
A popup window will appear
- Select your preferred start date for your recurring appointments
- Set your recurring appointment start and end time
You then have two options to select from when setting your recurring bookings. You can either select an end date for your recurring appointments, which means that the appointment will recur every selected time, (day/week/month) until the end selected date. Or, you can recur the appointment for a significant number of Times, every number of days/ weeks/ months..etc..

For example, if you want to recur your appointment 2 times a week, on Monday, or Wednesday, write 2 Times, Recur every 1, select Week(s) from the dropdown, and pick the days of your appointment then click on “Create appointments”.
Your booking appointment will recur for a week on Monday, and Wednesday, at 6 pm.
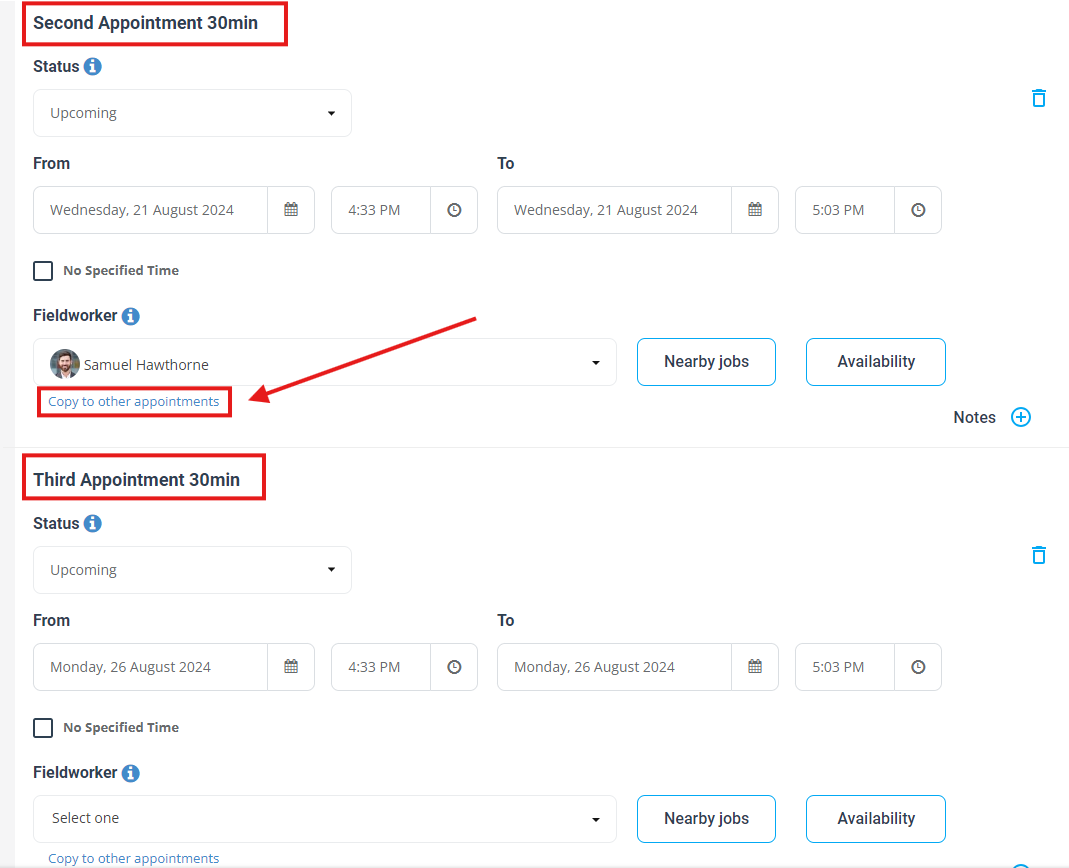
After creating the recurring appointments, you can then assign the preferred fieldworker. If you wish to assign the same fieldworker for all the appointments, after selecting the fieldworker, click on “Copy to other appointments”, and the fieldworker selected will be assigned to all the recurring appointments. But, if you wish to assign a different fieldworker for every appointment, then on every appointment select the preferred fieldworker.
How to create a new booking with multiple services and different fieldworkers assigned?
- You can create a booking with multiple services and different fieldworkers assigned. To create a new booking, from your sidebar menu click on Bookings > Create New.
- You will be redirected to the new booking form page, to add a customer, select a trading name and choose your preferred booking location, based on the locations you have enabled for your business.
- After adding your booking address, selecting your desired service, setting the date and time, and assigning a fieldworker, you can add another service by clicking on +Add or by clicking on +Add another service.
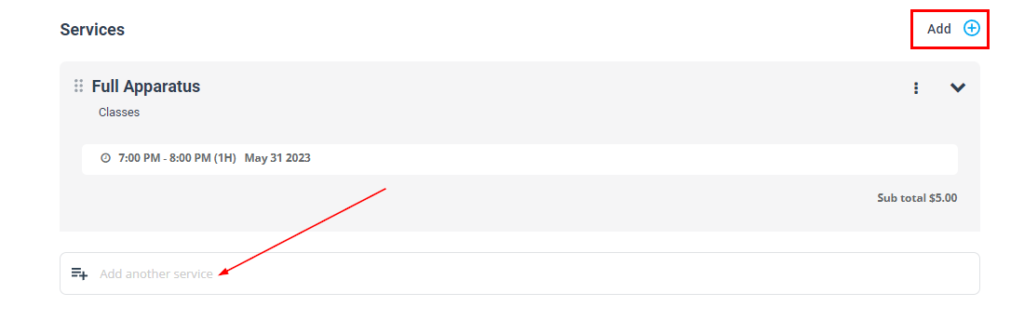
Your second selected service will be added to your booking, with the same date and time you have set for your first appointment, you can then select a different fieldworker from the dropdown list and assign them to the second selected service.
What is the difference between selling products and selling services?
- In the case that your business offers or sells products (products that fieldworkers may additionally need when performing a job or your customers may request), you can sell products without needing to book a service and add a product to it.
- Admin users can add products when creating a new booking using product sales service on the customer’s behalf.
How to display/hide the Product Sales from the services list and why you might need it
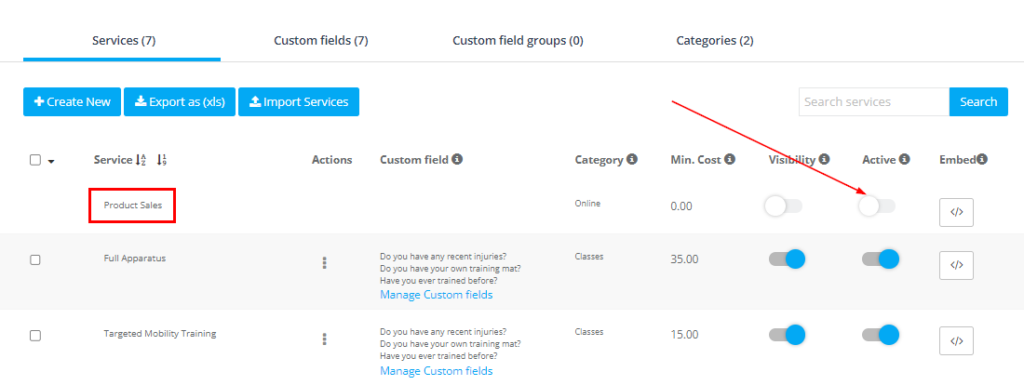
- To display or hide the product sales from the services list, navigate to Settings > Services Settings > Services.
- On the services list page, you will find Product Sales listed, disable the flag to hide it from the services list, or enable the flag to display it.
Why would I need to display the product sales on the service list?
If your business offers or sells products (products that fieldworkers may additionally need when performing a job or your customers may request) you can sell products without needing to book a service and add a product to it using product sales service.
What is the difference between adding products on the booking level and on the service level?
- If you have added products to your business, whether you sell them or add them to your services when booked, you can add products on a booking level and on a service level.
- When creating a new booking, and selecting a service for your booking, you can either add a product to your selected service or just purchase a product on its own, by selecting “product sales” from your services list, a new section will appear, click on Add and select your desired product/s without having to select a service and adding a product to your service.
Adding products on the booking level
- You can add products on a booking level when you just need to purchase a product without booking service and adding a product to it.
- When creating a new booking, from the admin user web view, click on Bookings > Create New.
- After selecting your customer, trading name, and booking address, click on +Add Service then click on Product Sales.
- A new form will appear, click on Add to add your preferred products, then click on Add to add your selected products. If you want to create a custom product for this booking, click on “+Add custom product”.
Adding products on the service level
- You can add products on a service level when you need to create a service and add a product to it.
- When creating a new booking, from the admin user web view, click on Bookings > Create New.
- After selecting your customer, trading name, and booking address, click on +Add Service then select your preferred service.
- After adding your service, click on “Add” on the products field.

- A new form will appear, click on add to add your preferred products, then click on Add to add your selected products. If you want to create a custom product for this booking, click on “+Add custom product”.
How to add a custom form when creating a new booking?
- To add a custom form to the create a new booking form, you must first create it from the forms & checklists page.
- From your sidebar menu, click on Settings > General Settings > Forms & Checklists.
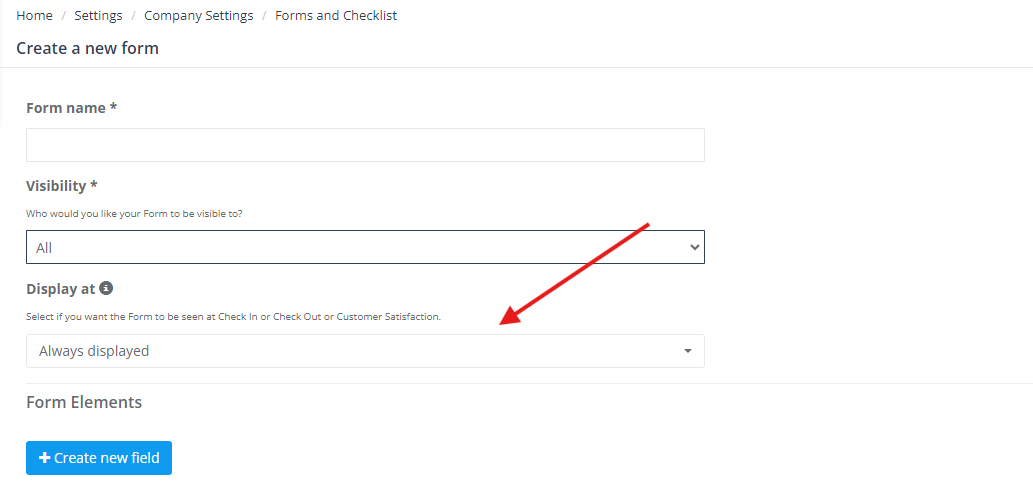
- On the Forms & Checklists settings page, click on +Create new.
- When creating your form, make sure you select “Always displayed” when choosing when to display your form. Click on Save to create your new form.
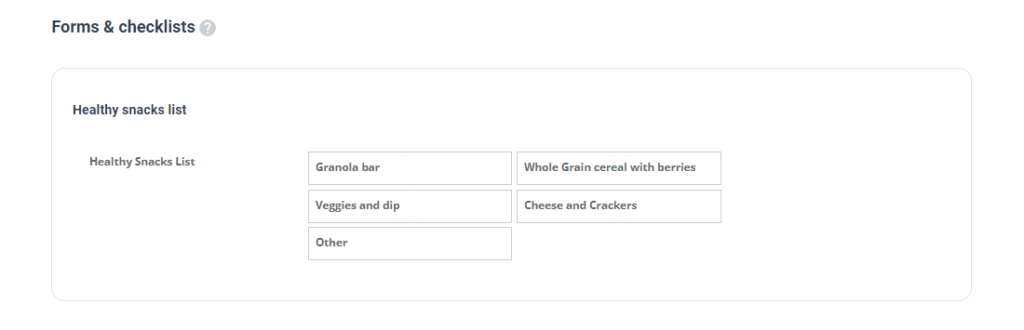
- When creating a new booking, on the booking form, your new custom form will appear in a new field and you can select all your desired options.
- Visit the forms & checklists page to learn more.
How to view nearby bookings when creating a new booking?
- When creating a new booking, you have the ability to view bookings that have been made in the same areas so that users can assign jobs to fieldworkers who will already be in the area.
- The nearby bookings feature helps minimize the travel times required, by helping you schedule bookings near other existing bookings. It helps you reach nearby fieldworkers easily, and respond efficiently to emergency calls and last-minute bookings, to improve the booking experience. Visit the nearby bookings page to learn more.
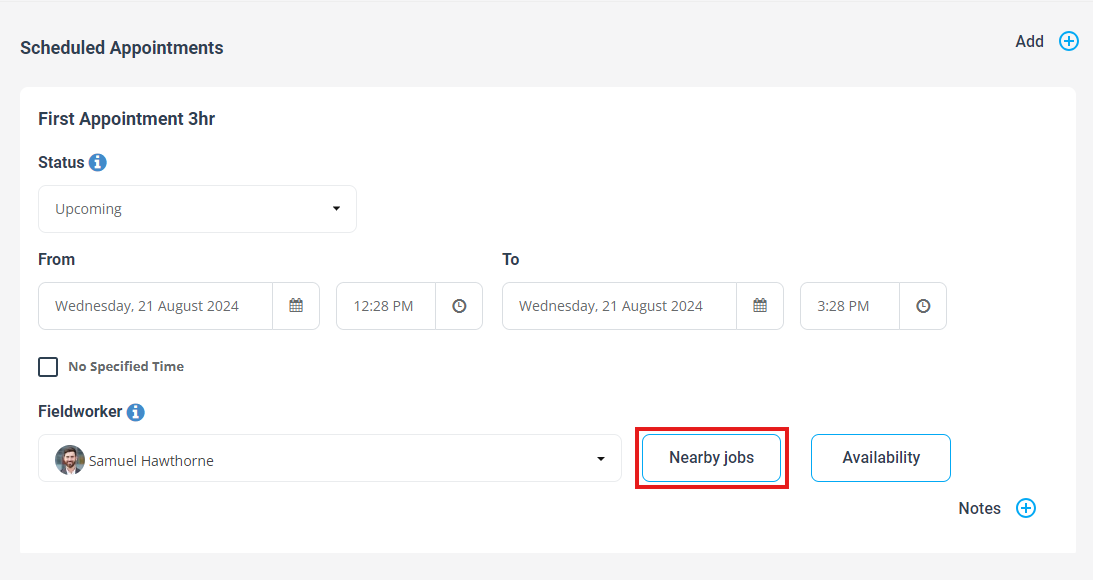
- After creating a new booking, selecting the customer, adding the booking address, selecting the service, and setting the booking date and time, you will be required to select a fieldworker. Click on Nearby Jobs on the right side of the page, to view all the bookings near the booking location, with their assigned fieldworkers, to select a preferable fieldworker for your service.
- When clicking on Nearby bookings, a popup window will appear, viewing a map that includes all the scheduled bookings near the booking location, as pinpoints. You can select any booking to view its details.
How to view available fieldworkers when creating a new booking?
- When creating a new booking, the find availability feature will list all active fieldworkers that match the requested services, selected custom fields, and the location of the booking. It also lists the distance between the fieldworkers’ home locations and the booking location, as well as their calendar for the selected date so you can view their availability. You can view the matching fieldworkers by day by selecting a date from the date field at the top of the popup. You can also send requests to matching fieldworkers and assign them to the booking directly by pressing the Send Request button.
- The find availability feature can help make better scheduling decisions for individual requirements. It makes the response to the booking request faster, hence improving the customer experience. It also helps users easily find available replacements when changing the assigned fieldworker for the scheduled service. Visit the find availability page to learn more.
- After creating a new booking, selecting the customer, adding the booking address, selecting the service, and setting the booking date and time, you will be required to select a fieldworker. Click on Availability on the right side of the page, to view all the available and active fieldworkers for the selected service, and easily assign one to your service.
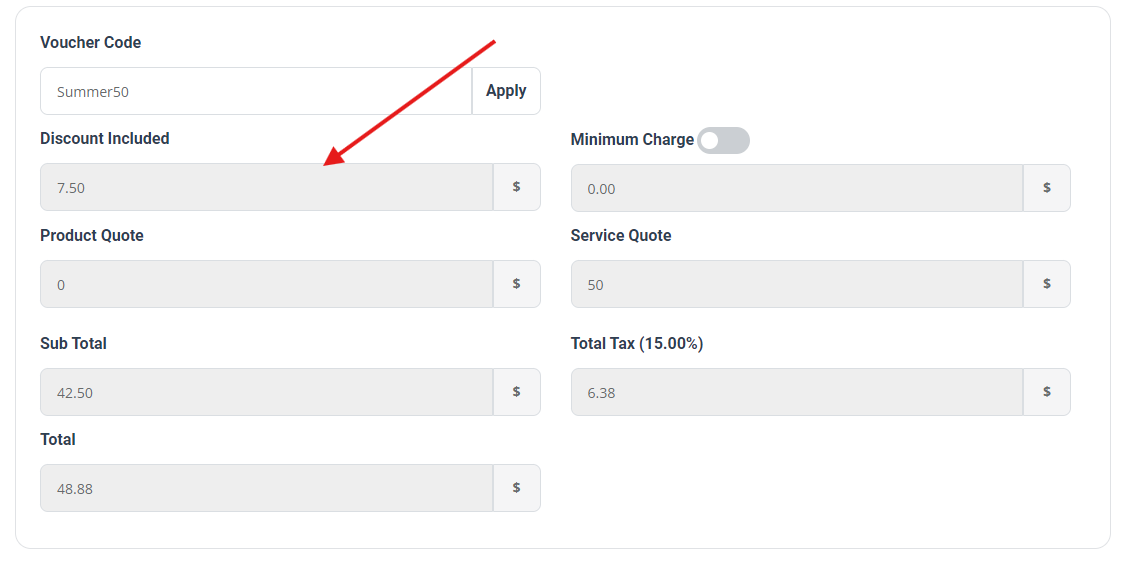
How to add a voucher code when creating a new booking?
- After creating a voucher code, you can add it to your booking to redeem the code and get a discount on the total booking price. Visit the discount voucher code page to learn more.
- When creating a new booking, after entering all your booking details, at the bottom of the page, enter your voucher code here, then click on Validate.
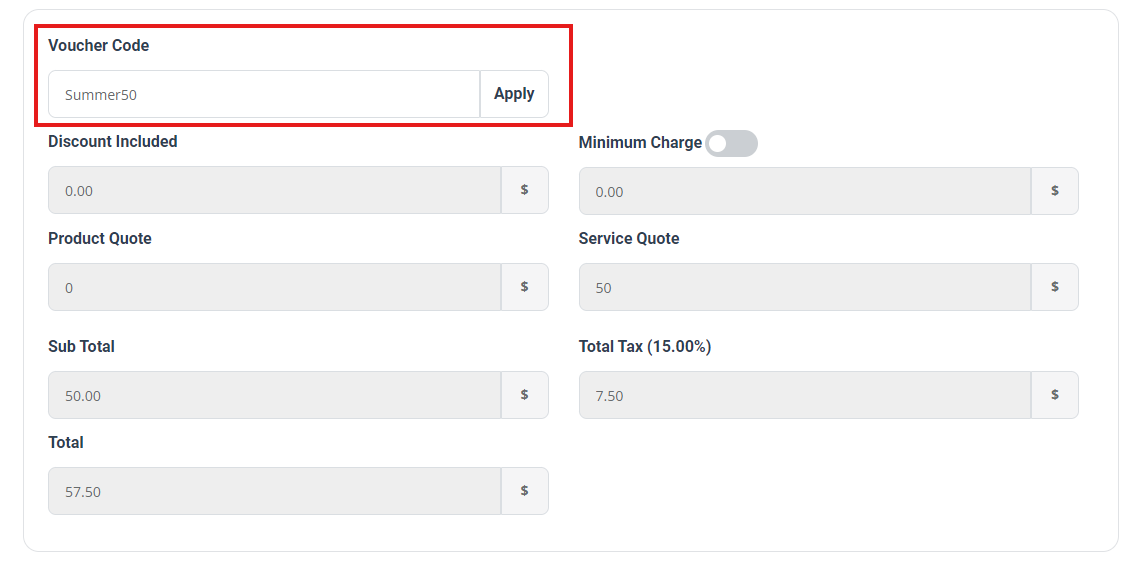
Your voucher will be successfully redeemed and applied to the total price of the booking.
How to add a discount when creating a new booking?
- You can add a discount to bookings, to get a discounted amount on the total price of the booking.
- When creating a new booking, after entering all your booking details, at the bottom of the page under service pricing, enter your discount amount, you can choose whether you want the discount to be an amount or a percentage.
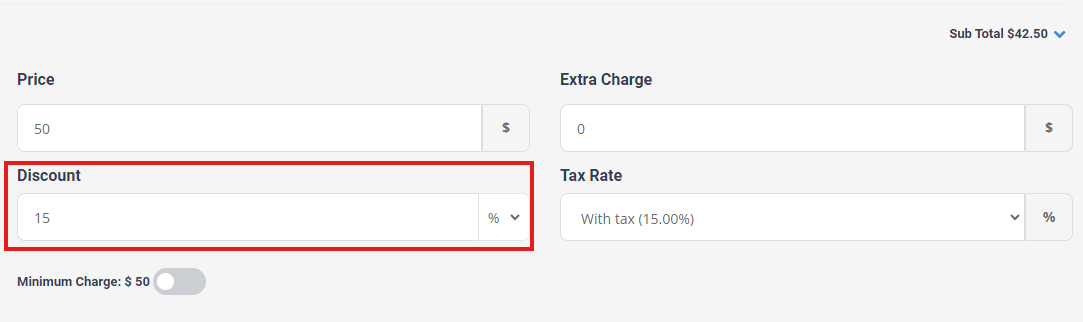
- After entering your discount amount or percentage, it will be deducted from the total booking price.
For more information please visit Octopuspro user guide, and subscribe to our youtube channel.