
Add, Invite, or Import Fieldworkers (Technicians & Subcontractors)

Fieldworkers (also known as technicians, contractors, service providers, or crew members) are the people who deliver your services in the field. Setting up accurate fieldworker profiles is essential for:
- Smart scheduling & dispatch (matching services, service areas, and working hours)
- Operational accuracy (correct time zones, addresses, travel rules, and availability)
- Payroll & compliance (bank details, tax IDs, licenses, and activity logs where applicable)
OctopusPro supports three onboarding pathways. All methods create the same fieldworker profile records—choose the one that best fits your workflow:
- Manual add (admin-created) – best for in-house staff or one-off hires where you already have all details.
- Invite self-registration – best for subcontractors and scaling teams; the fieldworker fills in their own info via a secure signup form.
- Bulk import (CSV/XLS) – best for onboarding large teams quickly (e.g., seasonal ramp-ups or franchise rollouts).

Table of contents
- Before you start
- 1) Manual add (admin-created profiles)
- 2) Required fields (and why they matter)
- 3) Invite fieldworkers to self-register (save admin time)
- 4) Bulk-import fieldworkers via CSV/XLS
- After adding: complete Job Settings (so they can be scheduled)
- FAQ & troubleshooting
Before you start
- Make sure your Services are already set up (so you can assign what the fieldworker can perform).
- Decide whether you want admins to create profiles, or let contractors self-register (recommended at scale).
- If you use the Customer Portal signup promo, confirm your portal is set up: Accept Online Bookings through your website (Customer Portal).
1) Manual add (Admin-created profiles)
Use manual creation when your office/HR team already has the worker’s details and wants full control before the first login. You can add a fieldworker from either:
- Company Settings > Users (general user management), or
- Main Menu > Fieldworkers (faster when you’re already dispatching/managing capacity).
1.1 Add from Company Settings > Users
- Go to Settings > Company Settings > Users.
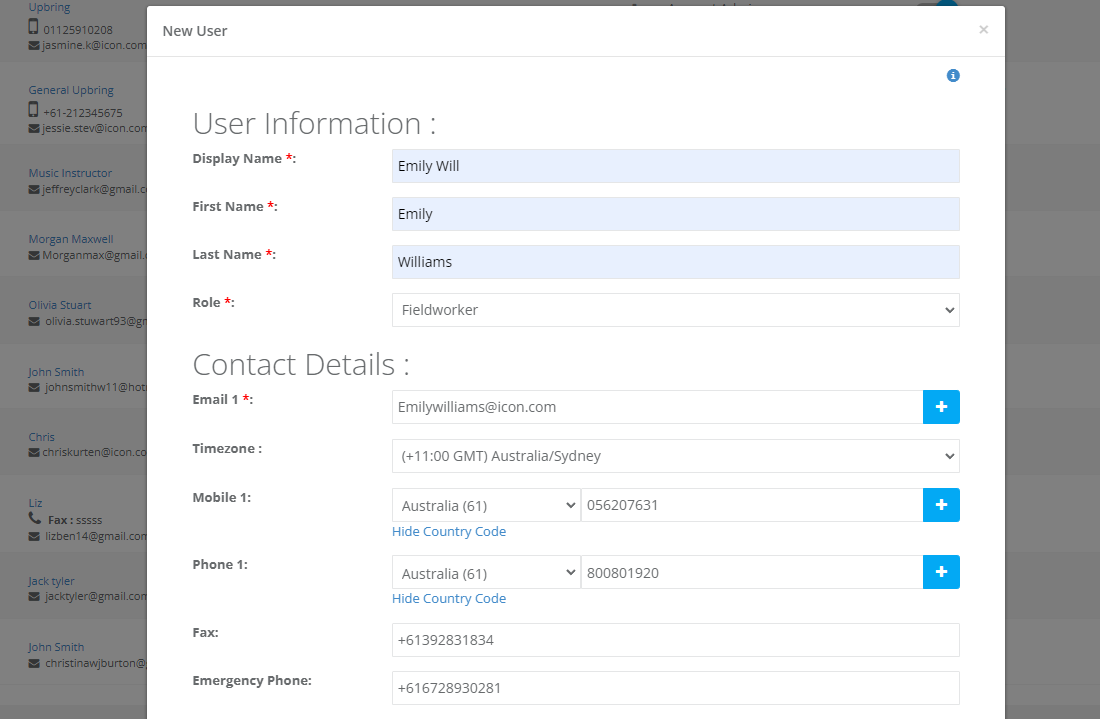
- Click Add User.
- Enter the worker’s name and set Role = Fieldworker (required).
- Add the worker’s Email (recommended—needed for activation and password setup) and any optional contact details.
- Click Save.
Assign services (recommended): After saving, assign what this fieldworker can do. You can assign all services (good for multi-skill workers) or assign later for specialists.

To manage service assignments in more detail, see: Fieldworker Active Services.

1.2 Add from the Fieldworkers list
- Path: Main Menu > Fieldworkers > Add Fieldworker
- What you’ll see: The same add-user form, but pre-filtered for fieldworkers (role is locked to Fieldworker).
- When to use: When you’re reviewing team capacity and want to add someone without leaving the Fieldworkers area.
Activation email: OctopusPro can send a secure “set password / activation” email. You can resend or manage verification if needed: Fieldworker Email Verification.

2) Required fields (and why they matter)
For accurate dispatching, the scheduler typically relies on these core settings. If they’re missing, the worker may not appear in availability searches or may be excluded from assignment rules.
| Field / Setting | Why it matters | Where to set it |
|---|---|---|
| Email + Time zone | Enables activation/login and ensures appointment times display correctly. | Fieldworker profile |
| Services Provided | Used by “Find Availability” and job matching rules. | Fieldworker Active Services |
| Service Areas / Locations | Controls where the worker can be scheduled and supports proximity-based dispatch. | Fieldworker Service Areas |
| Working Hours | Prevents after-hours bookings and powers availability searches. | Fieldworker Working Hours |
| Permissions | Controls what the fieldworker can view/edit (jobs, invoices, customer details, etc.). | Fieldworker Permissions |
| Bank Details (optional) | Needed if you pay contractors through exports/reconciliation workflows. | Fieldworker Bank Details |
Best practice: make these settings part of your onboarding checklist so the fieldworker can be scheduled immediately after activation.
3) Invite fieldworkers to self-register (save admin time)
Self-registration is the fastest way to onboard subcontractors and large teams. Instead of admins typing everything, you send a secure signup link and the fieldworker enters their own contact details (and any required info such as tax/bank/licensing where applicable). You then review their job settings (services, areas, hours) before dispatching jobs.
3.1 Bulk email invite (up to 200 emails per send)
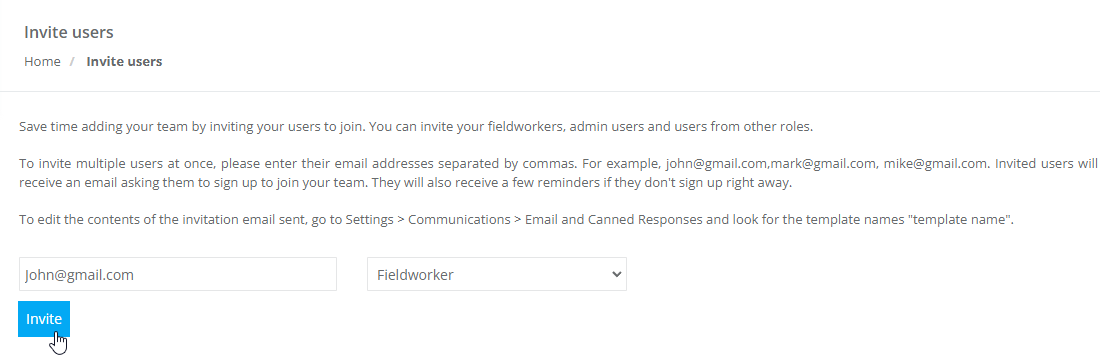
- Go to Fieldworkers > Invite Fieldworkers.
- Paste up to 200 email addresses (comma-separated).
- Send the invite. Invited fieldworkers typically appear as Pending until they complete signup/activation.
- Use the actions menu to Resend or Revoke invitations as needed.
3.2 Customer Portal signup promo (passive recruiting)
If you want applicants to discover your signup form naturally, you can display a Fieldworker Signup Promo card on your Customer Portal homepage.
- Go to Settings > Customer Portal > Homepage Promotions.
- Find the Fieldworker signup promo section.
- Set your headline, description, optional image, and button label (e.g., “Apply now”).
- Save and preview your Customer Portal.
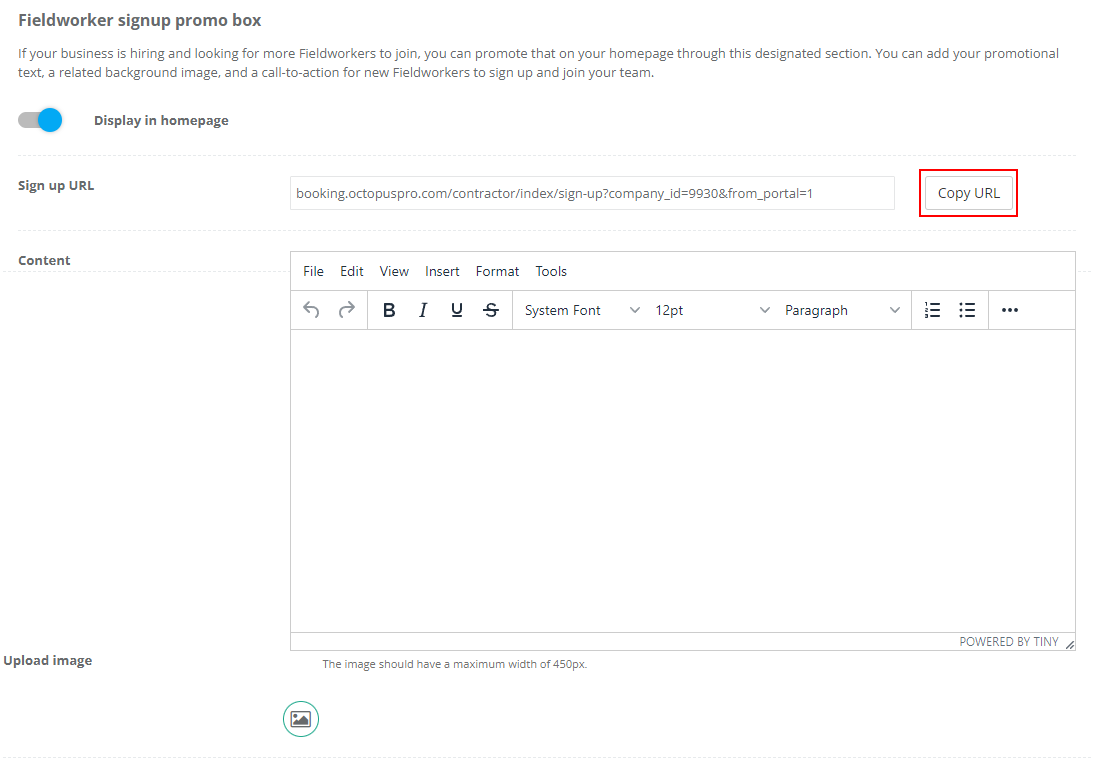

How it looks on your portal:

3.3 Embed the signup link on your own website (Apply Now button)
From the promo settings screen, copy your Signup URL and add it to:
- Your website “Apply Now” button
- Job boards
- Email campaigns
- Social media bio links
- Flyers/printed materials (as a QR code)
Example of the signup form applicants will see:

3.4 QR code / SMS link (optional)
You can paste the Signup URL into an SMS message (or generate a QR code). This is useful for in-person recruiting events or printed materials. (If you send SMS from OctopusPro, you’ll need SMS configured and carrier charges may apply.)
Why self-registration is worth it
- Less admin data entry: applicants enter their own information.
- Better accuracy: the person who owns the data fills it in and can update it later.
- Scales easily: ideal for fast hiring periods or multi-location expansion.
For a detailed walkthrough and best-practice recruiting tips, see: Recruit Fieldworkers with OctopusPro (Fieldworker Signup Promotion).
4) Bulk-import fieldworkers via CSV/XLS
Bulk import is best when you need to create many profiles quickly. You can import up to 2,500 fieldworkers per file (recommended) and then review any failed rows before re-uploading.
Step-by-step
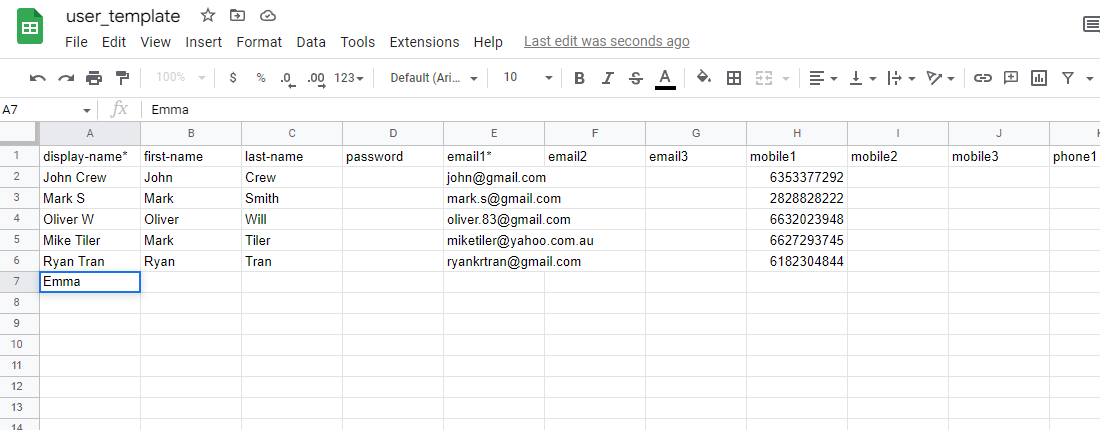
- Download the template: Fieldworkers > Import Fieldworkers > Download sample file.
- Fill the template: add up to 2,500 rows. Keep the role as fieldworker. Add required fields (name + email + city) and any optional data you already have.
- Validate before upload: confirm no duplicates (especially emails) and save as CSV (UTF-8) to reduce encoding issues.
- Upload & preview: Import Fieldworkers > Upload file > preview any missing fields.
- Fix failed rows: download the error list, correct issues, and re-upload only the failed rows.

Common import issues (and how to avoid them):
- Duplicate email: each user must have a unique email address.
- Missing mandatory fields: ensure every row has at least name + email + city (and any fields required by your configuration).
- Invalid location/time zone formats: keep values consistent and avoid unusual abbreviations.
- File size/row limits: keep each file under your limits; split large teams into multiple files.
Security note: If your import template includes passwords, treat the file as sensitive data. Many teams prefer to import basic profile info and then have workers set their own passwords via invitation/verification.
After adding: complete Job Settings (so they can be scheduled)
No matter how the fieldworker was created (manual, invite, or import), you should complete these items to ensure they appear in availability searches and can be assigned jobs:
- Confirm activation/verification: Fieldworker Email Verification
- Assign services: Fieldworker Active Services

- Set service areas/locations: Fieldworker Service Areas

- Set working hours: Fieldworker Working Hours

- Review permissions: Fieldworker Permissions

- Optional payroll setup: Fieldworker Bank Details
- Deactivate workers who shouldn’t be scheduled yet: Activate / Deactivate Fieldworkers
If your fieldworkers operate in teams (crew leaders + helpers), you can also set up subworkers: Manage Fieldworkers & Subworkers (Crew Members).


AQ & troubleshooting
My fieldworker isn’t showing in availability search. Why?
In most cases, one of the core scheduling inputs is missing (services, service areas/locations, working hours, or time zone). Review the “After adding” checklist above.
The fieldworker didn’t receive the activation/invite email. What should I do?
Ask them to check spam/junk, verify the email address is correct, then resend the invitation/verification email. See: Fieldworker Email Verification.
Should I “Add” or “Invite” fieldworkers?
Add is best when admins already have the worker’s full details. Invite is best when you want the worker to self-complete their own profile (faster and more accurate at scale).
Can I onboard office users the same way?
Yes—OctopusPro supports user and role management for admin/staff accounts too: User & Role Management – Adding, Inviting & Importing Users.
To stay updated, please subscribe to our YouTube channel.