
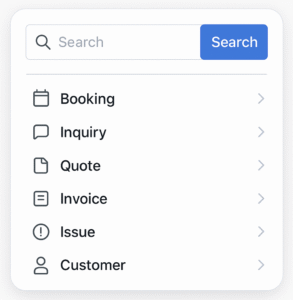
View & Manage Booking Details
The Booking Details page is your central workspace for managing a job from start to finish. From here you can update booking information, contact customers and fieldworkers, track progress, manage invoices and payments, attach files/photos, complete forms & checklists, and review the full activity history.

On this page
- Open the Booking Details page
- Overview tab: core booking info, schedule, pricing & assignments
- Location & addresses
- Schedule timeline & GPS tracking
- Labels (tags)
- Photos & attachments
- Customer panel actions (profile, billing cycle, payment methods, due dates)
- Internal notes
- Communication tab (discussion, SMS, email, call log)
- Invoice & payment actions
- Available fieldworkers (dispatch & assign)
- Fieldworker earnings (commission/pay)
- Forms & checklists
- Issues & activity logs
- Best practices & troubleshooting
1) Open the Booking Details page
You can open a booking from the Bookings list or by searching for a booking number.
Option A: Search by booking number
- Use the global search icon / search menu.
- Select Booking Search.
- Enter the booking number (e.g., BOK-194) then click Go!
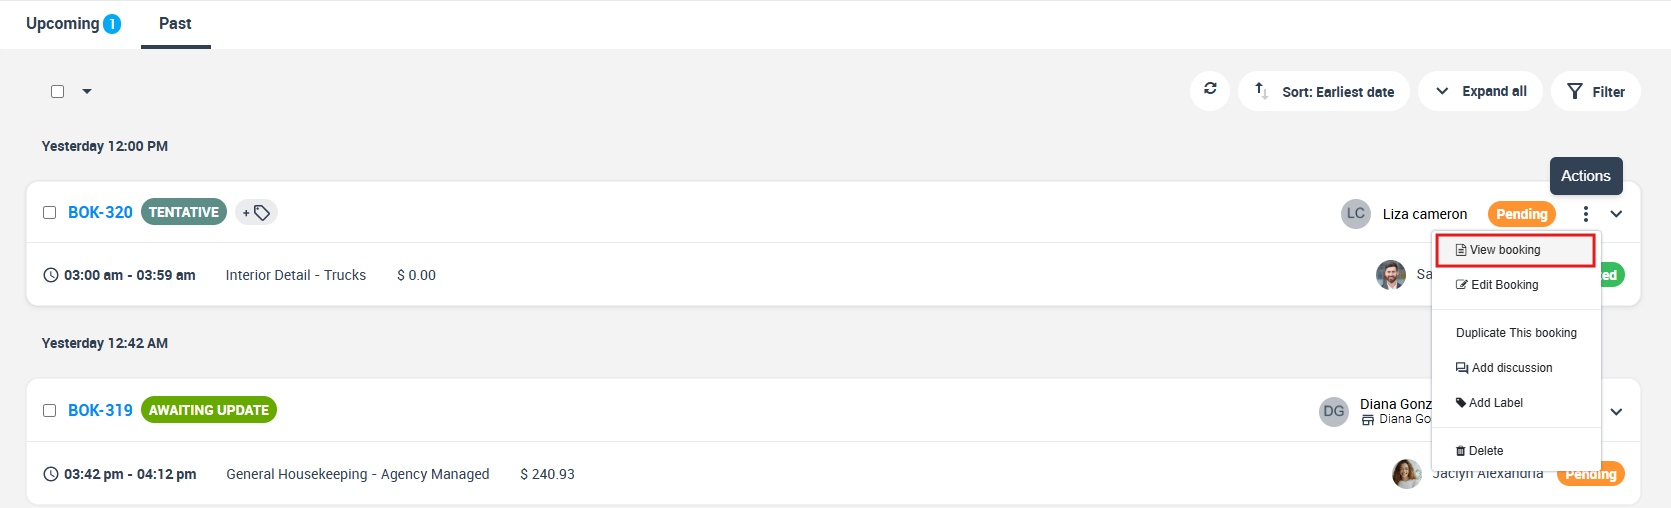
Option B: Open from the Bookings list
- Go to Bookings and open the relevant tab (Upcoming / Past).
- Click the booking’s Actions menu.
- Select View booking.
2) Overview tab: core booking info, schedule, pricing & assignments
The Overview tab is where most day-to-day booking updates happen. Typical sections include:
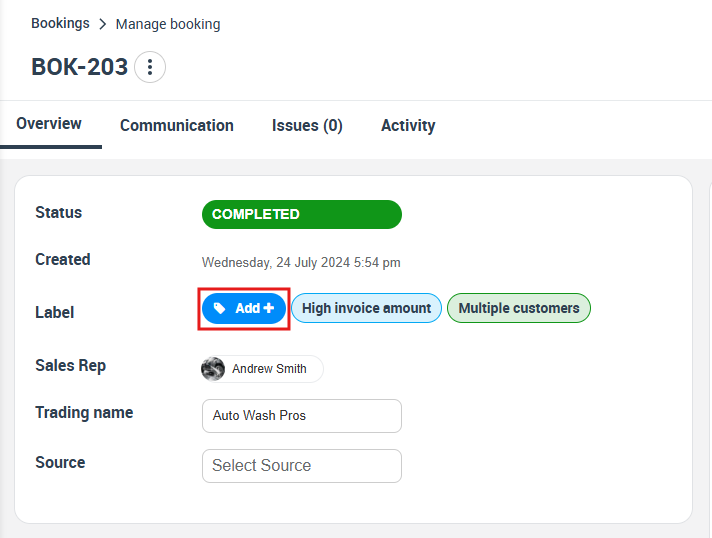
- Status: your internal workflow stage (e.g., New, Confirmed, In Progress, Completed).
- Created: when the booking was created.
- Label (Tags): add labels for filtering and prioritisation (e.g., Urgent, VIP).
- Sales Rep / Owner / Branch: who owns the booking (useful for multi-branch operations).
- Trading Name: which brand appears on customer communications (if applicable).
- Source: where the lead came from (Website, Referral, Google, etc.).
- Customers: view and manage the primary customer and any related contacts/dependents.
- Location: booking address and optional delivery/secondary address.
- Services & Appointments: assigned services, scheduled date/time, fieldworker status timeline, and GPS tracking link (if enabled).
- Price & Extra Charges: service price breakdown, surcharges, adjustments, etc.
- Invoice & Payment: invoice status, totals, deposits, paid/balance, and quick actions.
- Available Fieldworkers: find availability, send job requests, and assign a fieldworker.
- Forms & Checklists: service forms/checklists and completion status.
Important: If you change anything on the booking, click Save changes where shown.

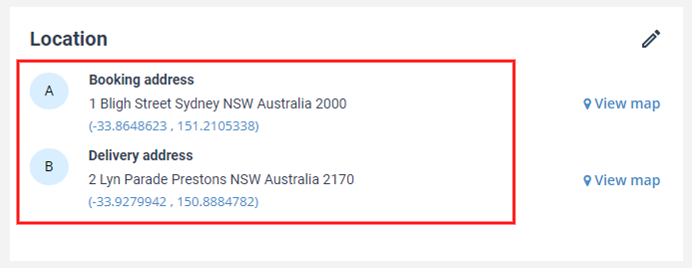
3) Location & addresses (single or multi-address bookings)
In the Location section you can store the booking address and (optionally) a separate delivery/secondary address. This helps when the service location differs from the delivery location.
View the map
Click View map to open a map view of the booking address.

Multi-address example
Some businesses store both a booking address and a delivery address on the same booking.
Related setup: If your business offers multiple delivery types (e.g., mobile/on-site, storefront, remote), configure service delivery types here: Configure Booking Location Types.
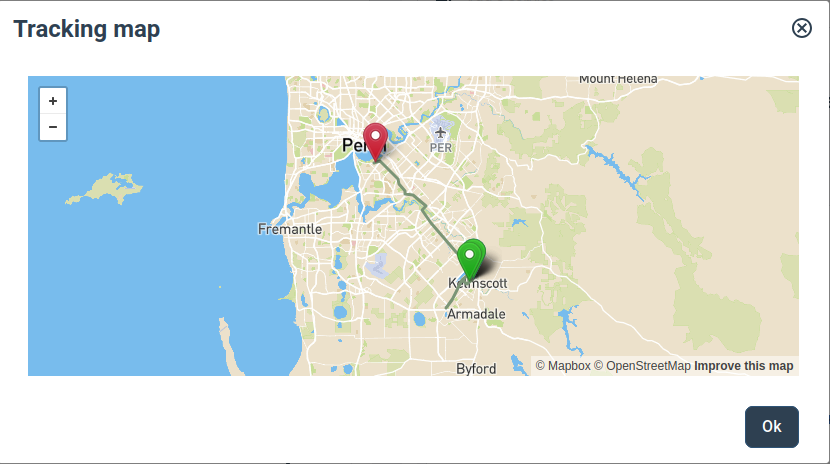
4) Schedule timeline & GPS tracking
In the Services section, each appointment can show a timeline of key job milestones (e.g., accepted, on the way, arrived, started, auto check-out, finished). If GPS tracking is enabled, you can open the tracking map directly from the appointment.
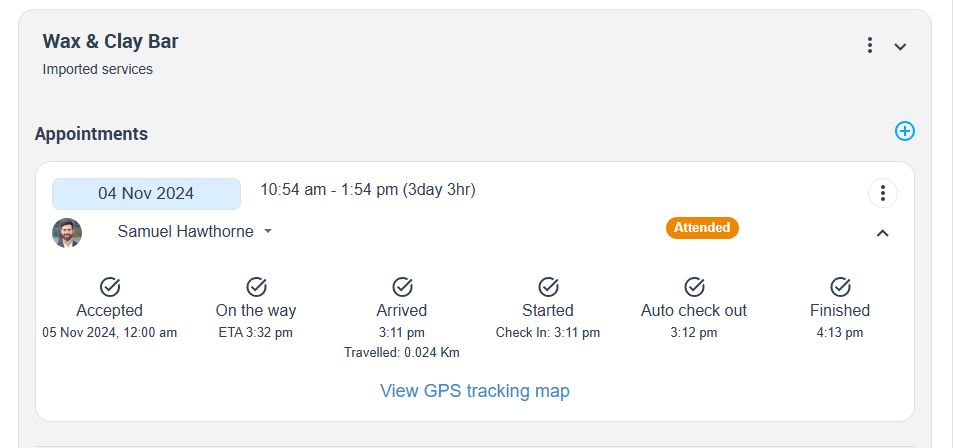
GPS tracking map example:
5) Labels (tags) for quick filtering & prioritisation
Use Labels (tags) to mark bookings for quick filtering and prioritisation (e.g., “VIP”, “Urgent”, “High invoice amount”).
- Click Add+ next to Label.
- Select one or more labels.
- Click Apply.
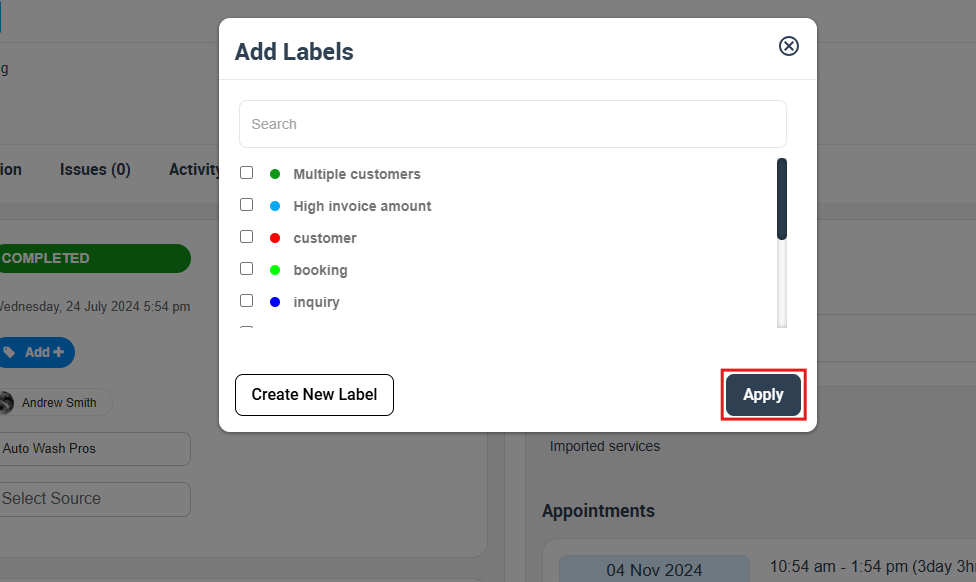
Related: Creating and Managing Labels.

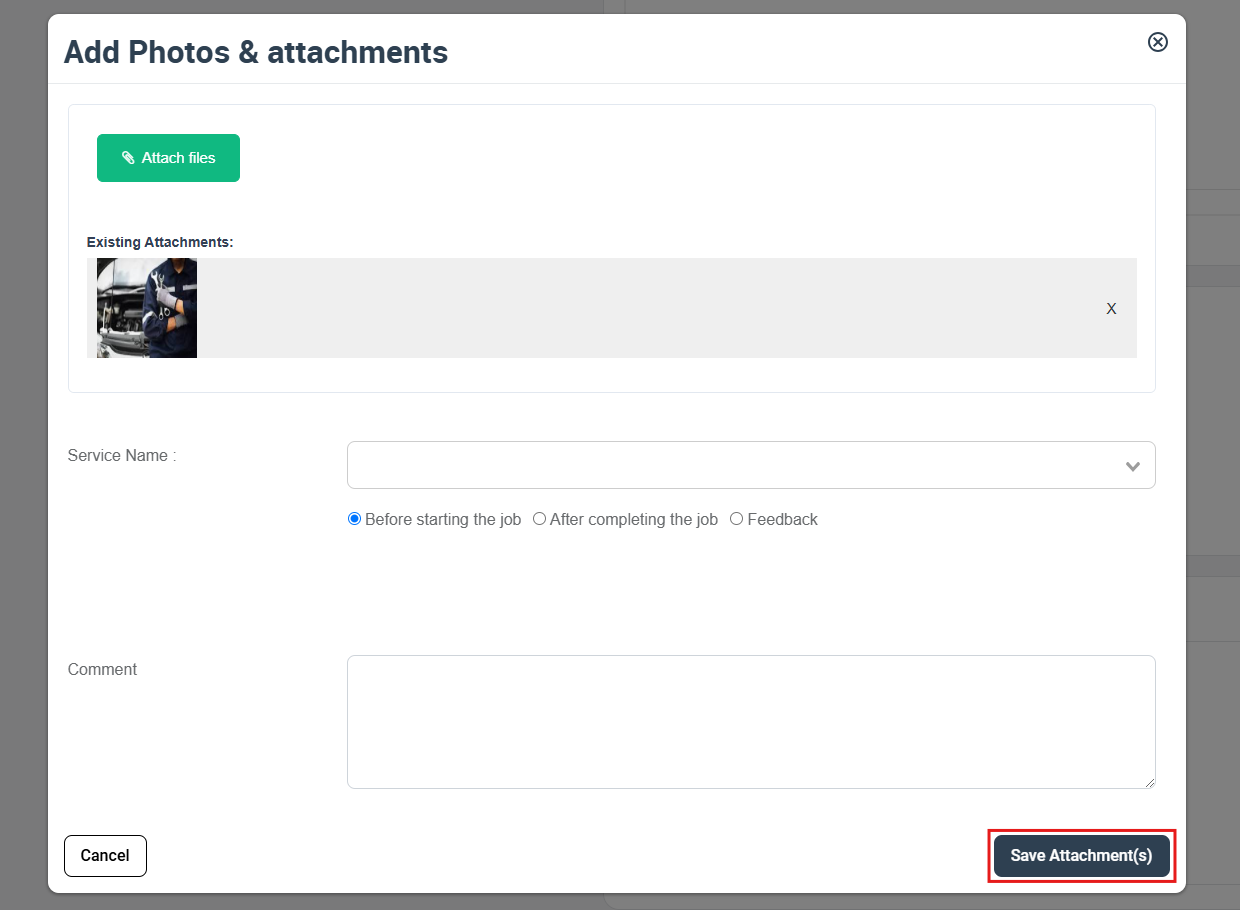
6) Photos & attachments
The Photos & Attachments section is ideal for storing before/after images, site photos, documents, and customer-provided files.
Add photos (or files)
- Open the Photos & Attachments actions menu.
- Choose Add Photos (or Add Attachments).
- Attach files, select the relevant service (optional), choose the category (e.g., before starting / after completing / feedback), and add notes.
- Click Save Attachment(s).
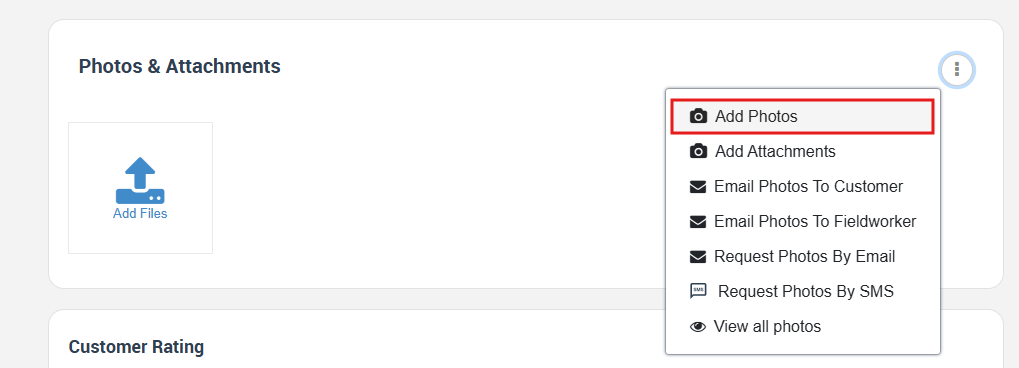
Related: Attach Photos & Files to Bookings.

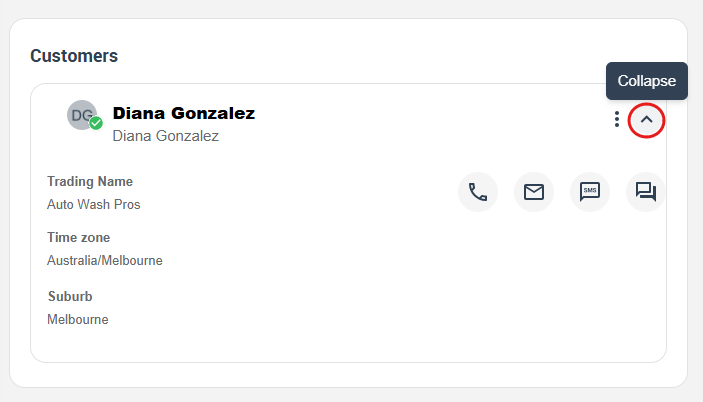
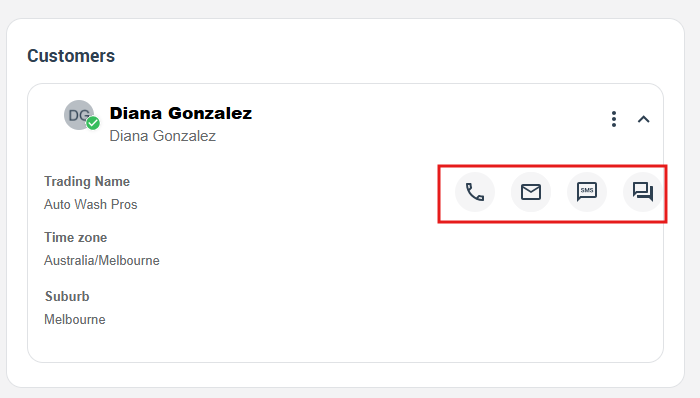
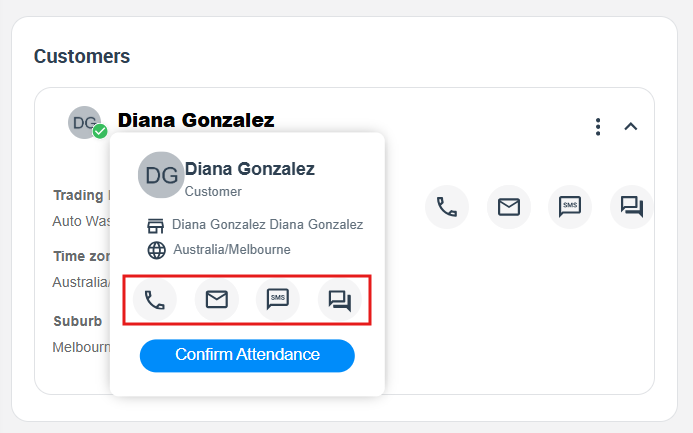
7) Customer panel actions (profile, billing cycle, payment methods, due dates)
The Customers section provides quick access to customer details and key actions without leaving the booking.
Customer quick actions
- Collapse/expand the customer panel to save space.
- Use the icons to call, email, SMS, or open discussion/chat (where enabled).
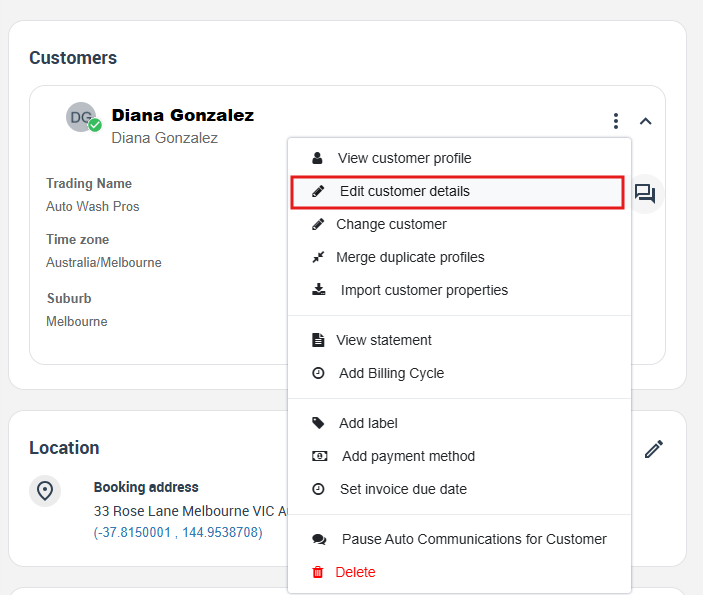
Customer menu actions
From the customer actions menu you can access workflows such as:
- View customer profile / Edit customer details
- Change customer / Merge duplicate profiles
- Import customer properties (e.g., dependents, assets, bill payers)
- View statement
- Add billing cycle (for consolidated invoicing where applicable)
- Add payment method / Set invoice due date
- Pause auto communications for the customer
Related guides:
- Customer Portal & Profile Management
- Customer Dependents / Properties
- Manage Customer Payment Methods
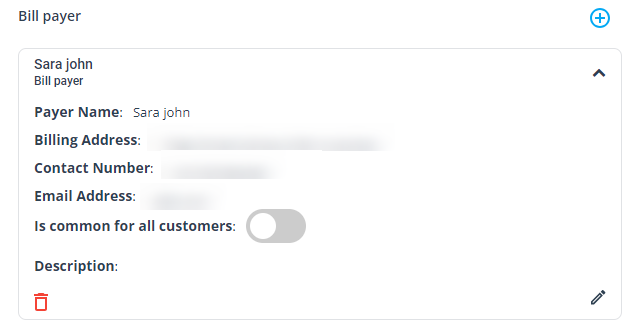
Example: Bill payer property
If a third party pays for the job (e.g., organisation, agency, family member), you can store a Bill payer as a customer property.


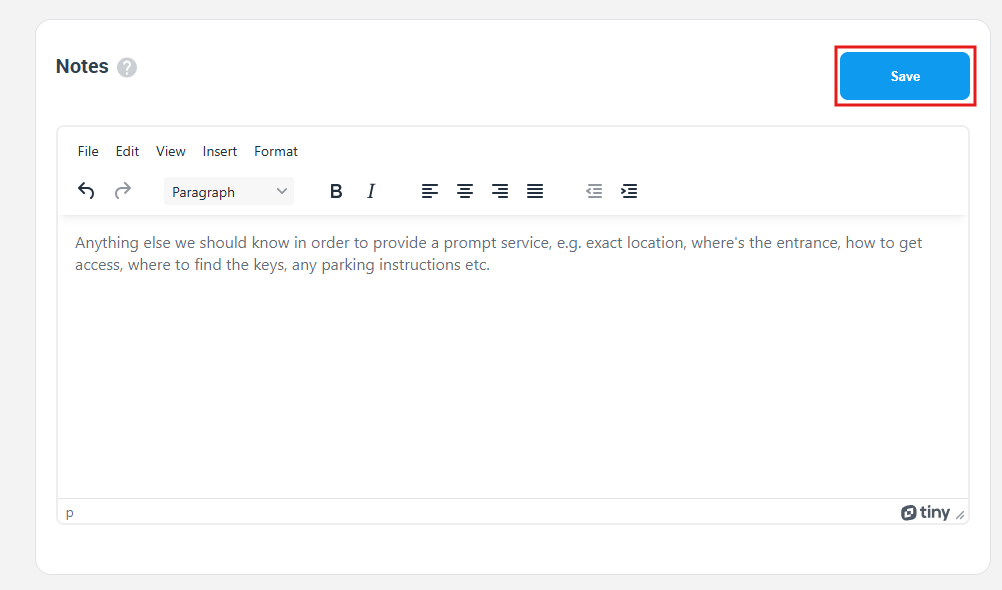
8) Internal notes (office-only operational instructions)
Use Notes for internal instructions like access details, parking notes, special handling requests, or reminders for the assigned team.
Always click Save after updating notes.
9) Communication tab (discussion, SMS, email & call log)
The Communication tab keeps every message tied to the booking so your team has full context and an audit trail.
Start a discussion / chat (recommended for booking-specific conversation)
- Open the Communication tab.
- Click New then choose Add discussion.
- Select an optional template, choose the appropriate visibility, attach files if needed, then post your message.

Discussion visibility (who can see it)
Use Visibility to control who can view the comment:
- Office: internal-only notes (not visible to fieldworkers/customers).
- Office and Fieldworker: shared internally with assigned fieldworkers.
- Everyone: can be visible to customers (depending on portal settings) and your team.
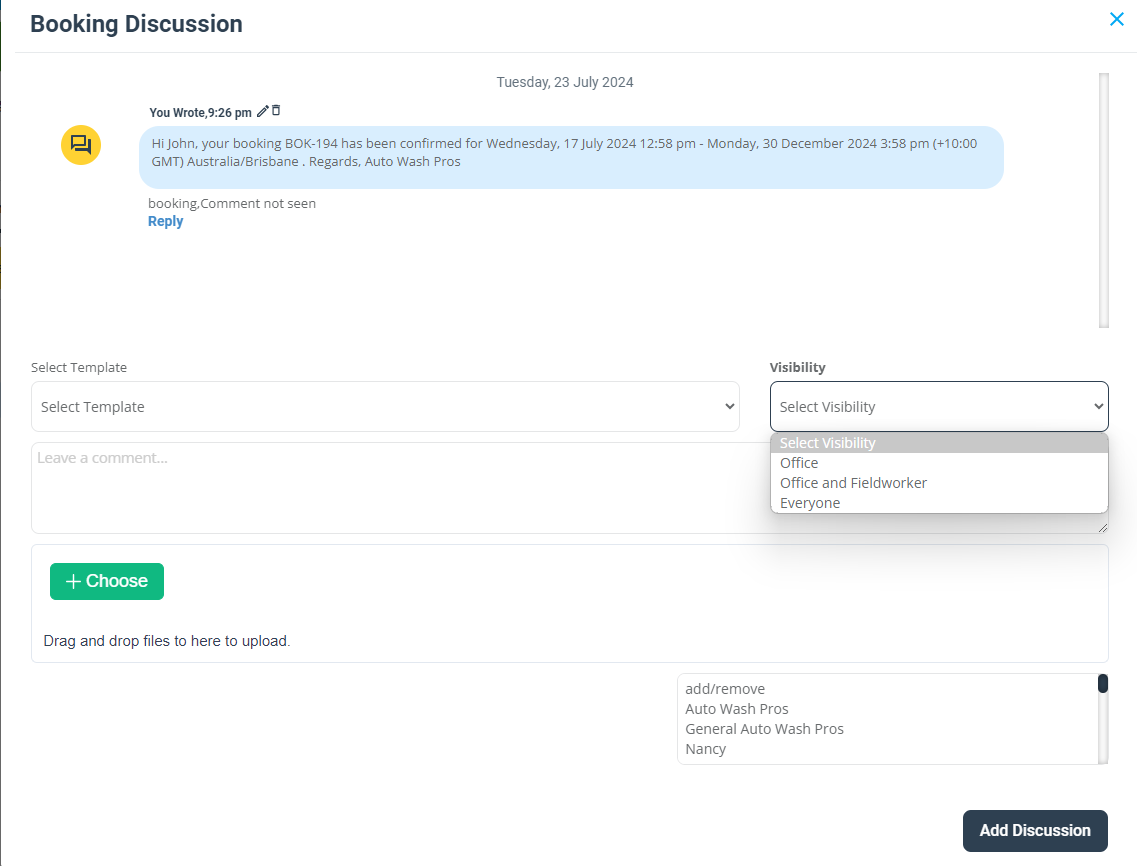
Best way to show the Reply action: Use a clear Reply text link directly under each message (as shown), so it stays discoverable on mobile and does not compete with message actions.
Related: Contact Customers from Bookings (Email, SMS, Call & Chat) and Discussion Board for Bookings, Quotes, Invoices, Inquiries & Issues.

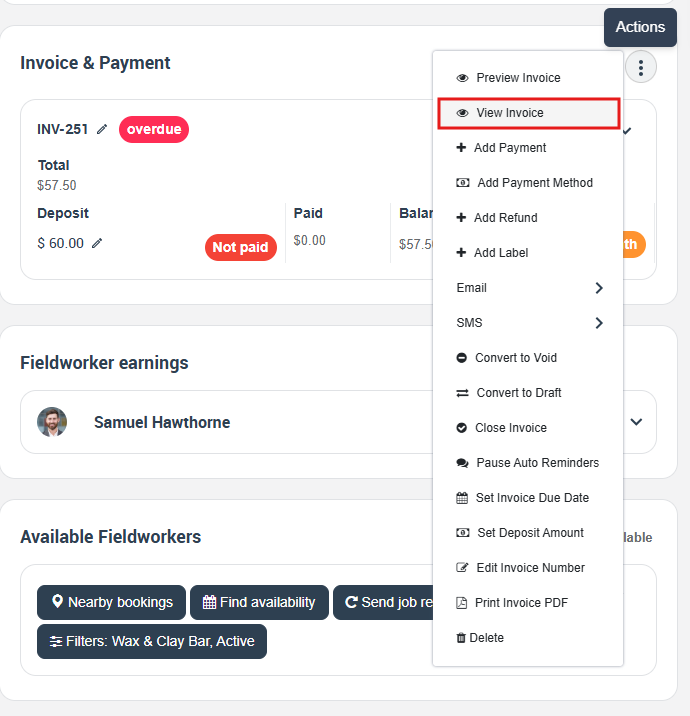
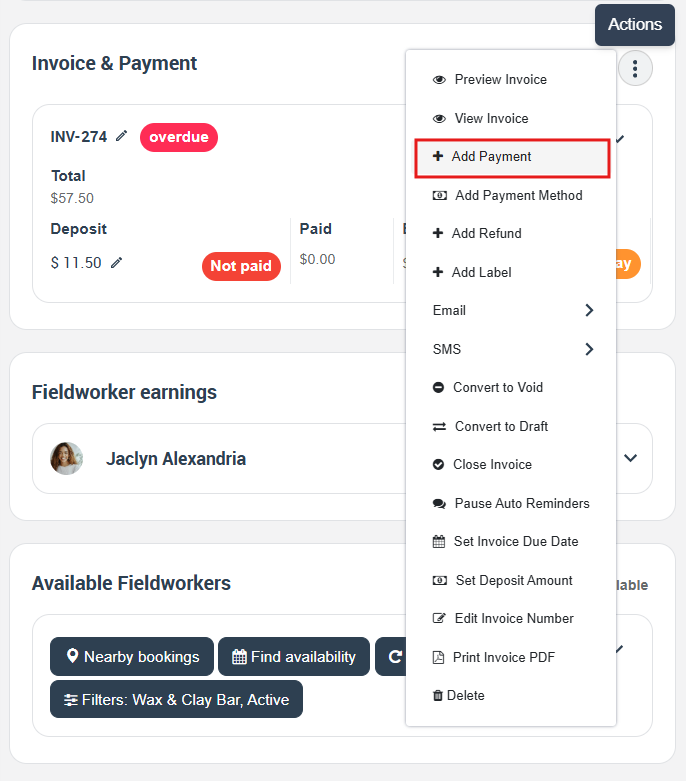
10) Invoice & payment actions (generate invoices, take payments, refunds, due dates)
If invoicing is enabled for your workflow, the booking can display an Invoice & Payment section that summarises totals, deposits, paid amount, and outstanding balance.
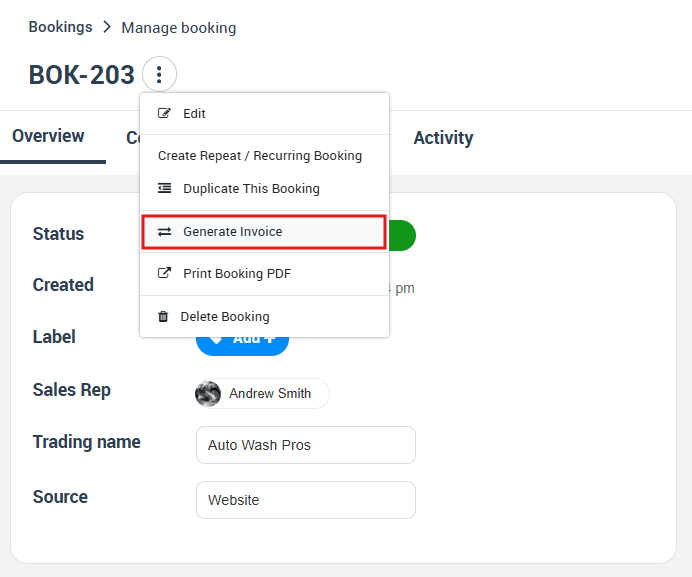
Generate an invoice from the booking
- Open the booking actions menu.
- Select Generate Invoice.
Invoice summary & status
Invoice summary example showing total, deposit, paid, balance, and invoice status:

Invoice actions (view/preview, add payment, refunds, PDF)
Use the invoice actions menu for common tasks such as:
- Preview / View invoice
- Add payment and Add payment method
- Add refund
- Set invoice due date and Set deposit amount
- Print invoice PDF
- Close invoice, or convert to draft/void (as permitted)
Related billing guides:
- Payments & Deposits for Bookings
- Invoice Payments (Admin Portal)
- View Payments
- Auto-create Invoices for Customer Portal Bookings


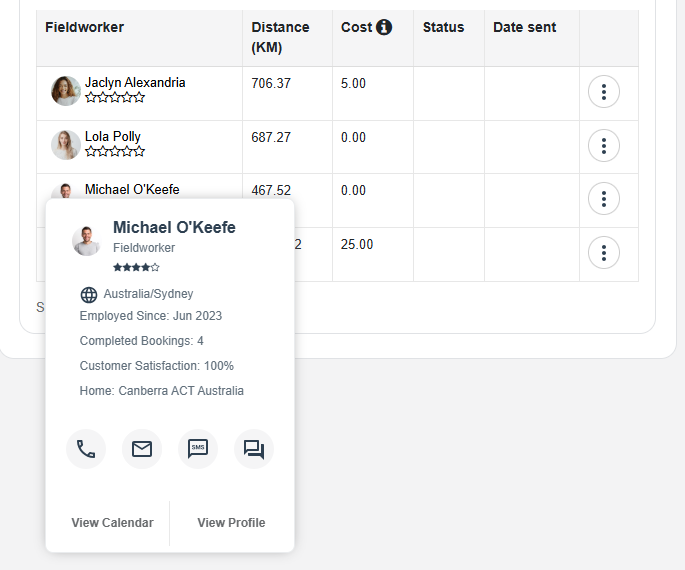
11) Available fieldworkers (dispatch, job requests & assignment)
The Available Fieldworkers section helps you match the right person to the job based on availability, location, service eligibility, and other rules.
- Find availability: check who is available for the scheduled time.
- Send job request: invite one or more fieldworkers to accept the job.
- Assign job: directly assign the booking to a selected fieldworker.
- View calendar: open the fieldworker calendar view for scheduling decisions.

View fieldworker contact card (call/email/SMS/discussion)
Click a fieldworker to open their quick card and contact options.
Related setup & dispatch guides:
- Set Up Address & Service Areas (Fieldworkers)
- Assign Services to a Fieldworker Profile
- Job Assignment & Dispatch
- Message Assigned Fieldworker


12) Fieldworker earnings (commission / pay rates)
If you track fieldworker payroll or commissions, the booking can show Fieldworker earnings including service share, product share, pay rate type, commission percentage, tax settings, and payment status.

Related: Set Commission & Pay Rates.

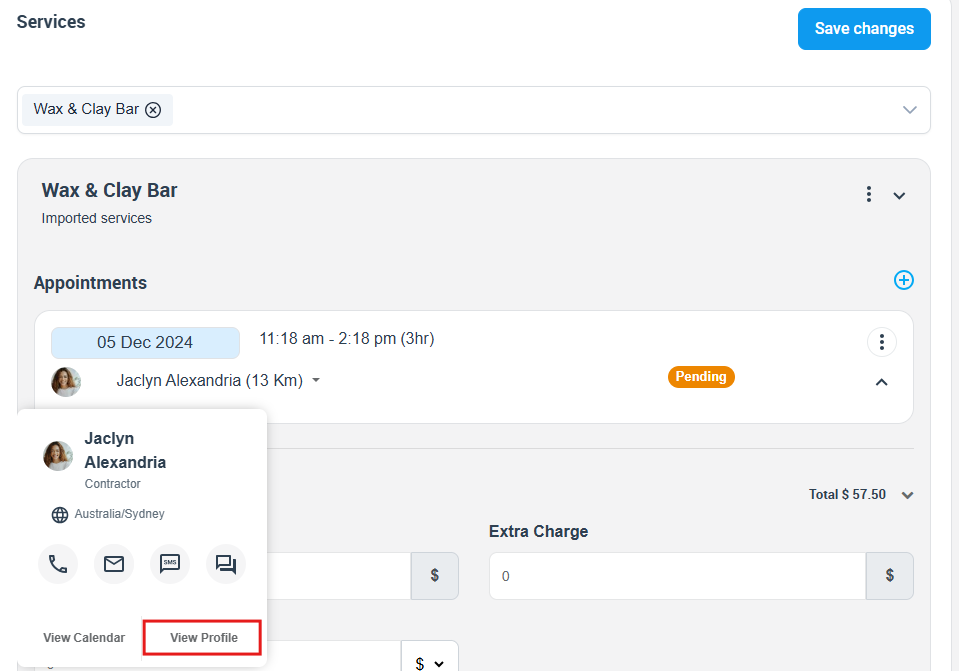
13) View customer/fieldworker profile quickly
For faster workflows, you can open customer and fieldworker profiles directly from the booking.
Customer quick view / profile
Fieldworker profile from the service section
Click the fieldworker in the service appointment, then choose View Profile.
Related: Add/Edit Fieldworker Profile.
14) Forms & checklists
Use Forms & checklists to standardise service delivery and capture required information (e.g., safety checks, site inspection forms, completion checklists, customer satisfaction forms).

Related: Forms & Checklists Introduction.

15) Issues & activity logs (audit trail)
Issues tab
Use the Issues tab to log and manage problems related to the booking (e.g., customer complaint, damage report, service quality dispute). This keeps resolution steps tracked and assigned.

Activity tab
Use the Activity tab for a chronological record of key events and changes (status updates, assignments, invoices created, reminders sent, etc.).


Best practices & troubleshooting
Best practices
- Use labels consistently so your team can filter and prioritise work fast.
- Keep job context in the booking discussion (instead of scattered emails/SMS) so the full team can follow updates.
- Attach before/after photos and key documents directly on the booking for proof and easy handover.
- Use forms/checklists for compliance and consistent service quality.
- Confirm you saved changes after edits to services, pricing, and notes.
Troubleshooting
- Map not loading? Confirm your Google Maps/API setup and permissions, and ensure the booking has a valid address.
- Can’t send SMS/calls? You may need to configure your phone system integration: Set Up Digital Phone System.
- Missing tabs or actions? Your user role/permissions may restrict what you can see or edit.
To stay updated, please subscribe to our YouTube channel.