
Customer Dependents, Assets, Locations & Related Records
Customer Properties let you store and manage repeatable records under a customer profile, such as children, pets, vehicles, properties, service sites, equipment, appliances, rooms, units, or any other dependent, asset, or item you service regularly.

Instead of entering the same details every time a booking is created, you can save them once under the customer, then reuse them in future bookings. This improves accuracy, speeds up repeat bookings, helps fieldworkers prepare properly, and gives you a clearer service history for each dependent, asset, or location.
Customer Properties are especially useful for businesses that work with multiple people, pets, vehicles, service addresses, units, rooms, or assets under the same customer account. They work well alongside Customer Management CRM, View Customer Details, Service Booking Management, Create a New Booking, and View & Manage Booking Details.
Key benefits
- Faster repeat bookings: Select an existing child, pet, vehicle, property, or site instead of re-entering the same details every time.
- Better job preparation: Fieldworkers can see the correct property details before arriving.
- Improved accuracy: Property-specific questions reduce mistakes and missing information.
- Property-level history: Keep a record of what happened for each dependent, asset, or location over time.
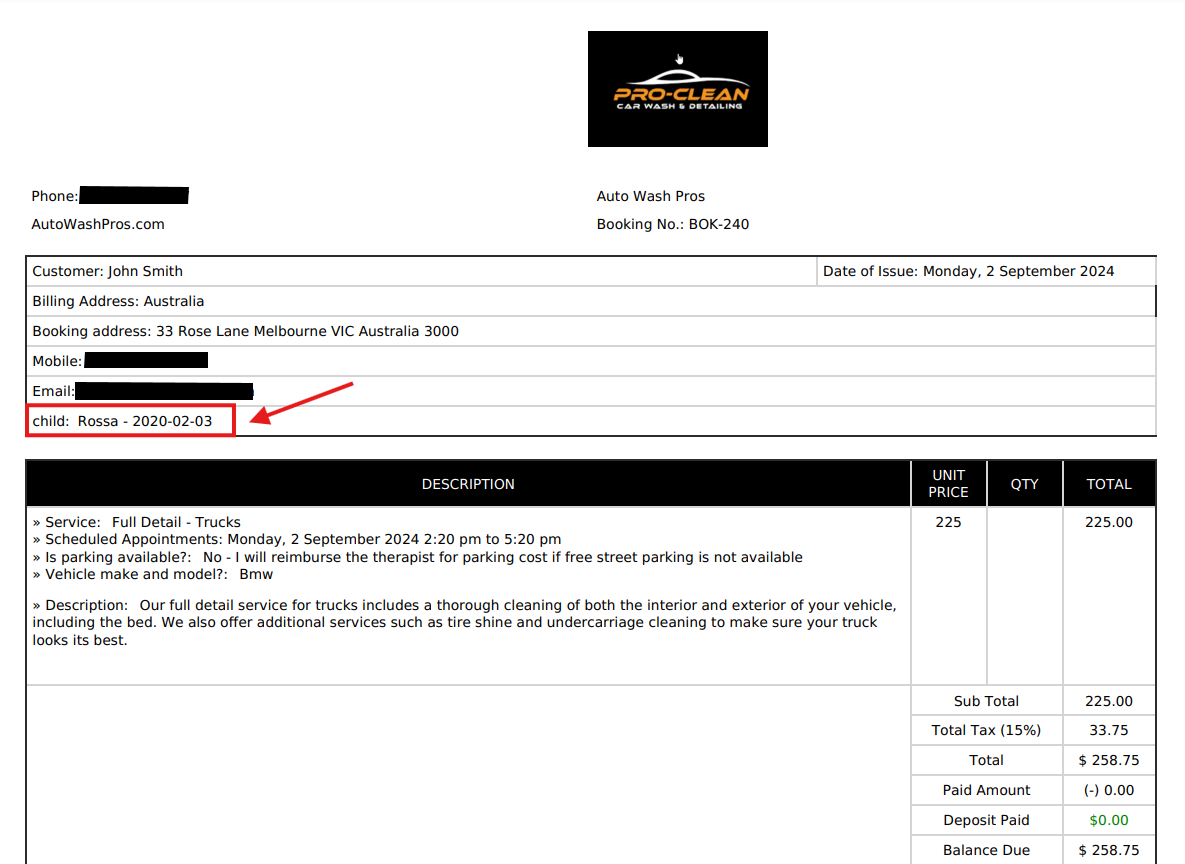
- Professional documentation: Display selected property details in booking PDFs when enabled.
On this page
- What are Customer Properties?
- How Customer Properties work
- Set up Customer Properties
- Optional: Make property selection mandatory during booking
- Enable Customer Properties in the customer portal
- Add Customer Properties as an admin
- Add or select Customer Properties in the fieldworker app
- Add or select Customer Properties in the customer portal
- Where Customer Properties appear
- Property history
- Industry-specific examples
- Use the built-in Saved Service Locations property
- More use cases by industry
- Import Customer Properties (CSV)
- Best practices
- Related guides
What are Customer Properties?
A Customer Property is a record attached to a customer that represents a dependent, asset, site, or item you service. You define:
- Property type (label): for example Child, Pet, Vehicle, Property / Site, Machine, Room, Pool, AC Unit, or Appliance.
- Custom fields: the questions and fields you want to capture for that property type.
- Visibility rules: whether each field is visible to admins, fieldworkers, and customers in the portal.
When a booking is created, the admin, fieldworker, or customer can select the relevant property so the booking is linked to the correct dependent, asset, or location.
How Customer Properties work
- You can create multiple property types, such as Child, Pet, Vehicle, Property / Site, or Asset / Equipment.
- Each customer can have multiple records under each type, such as 3 children, 2 vehicles, or 5 sites.
- During booking, the correct property can be selected so your team sees the right details for that specific job.
- Each property can maintain its own activity and history to help track what was done over time.
Set up Customer Properties
To configure Customer Properties, go to:
Settings > General Settings > Customer Dependents / Properties

From this page, you can:
- Create a customer property type, such as Child, Pet, Vehicle, or Property / Site.
- Create custom fields for each type to capture the details you need.
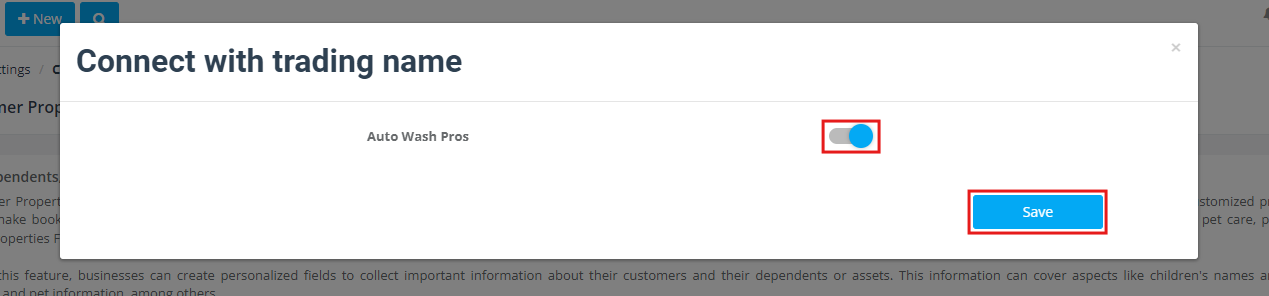
- Choose which trading name or branch the property type applies to.
- Enable or disable each property type.
Step 1: Create a property type
Click Create customer property, enter the property type name, then save it.
Common examples include:
- Child for childcare or education services
- Pet for grooming, veterinary, or pet care services
- Vehicle for detailing, repairs, maintenance, or inspections
- Property / Site for cleaning, maintenance, inspections, or real estate services
- Asset / Equipment for servicing equipment, machines, appliances, or other serviceable items
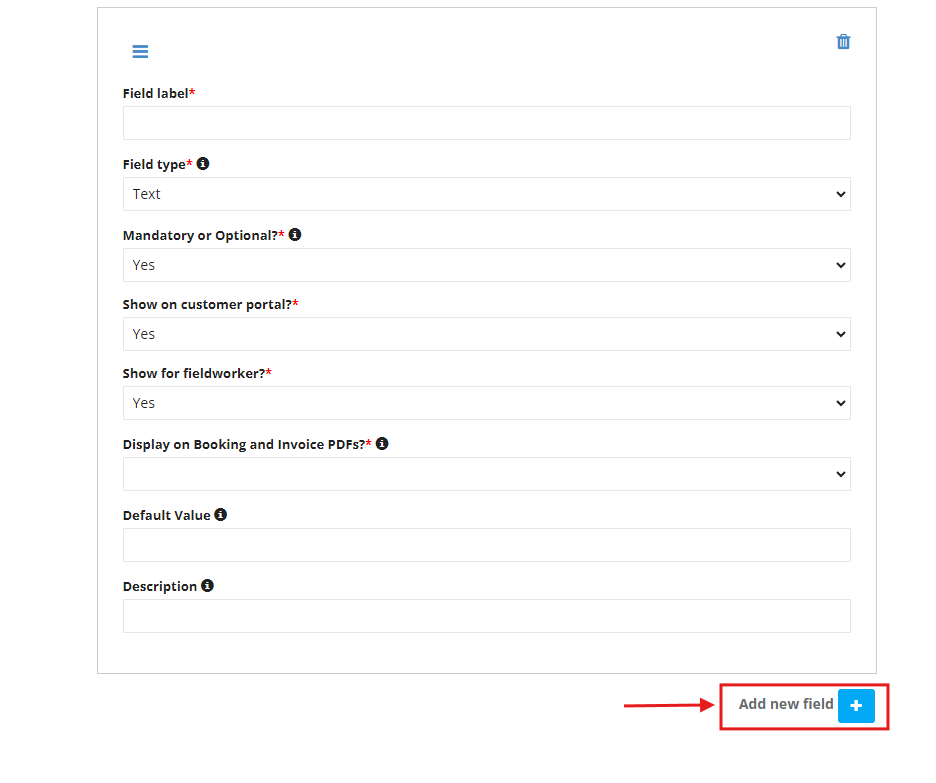
Step 2: Create custom fields
Custom fields define the questions and details you want to capture for each property type.
Click Create Custom Field, or add fields under the property type, then configure:
- Field label – the question users will see
- Field type – text, dropdown, date, number, checkbox, and more
- Required or optional – make the field mandatory if needed
- Visibility – choose whether admins, fieldworkers, and customers can see it
- Where it appears – display the field in booking details, booking PDFs, invoice PDFs, or other relevant views where supported
- Default value and Description if needed
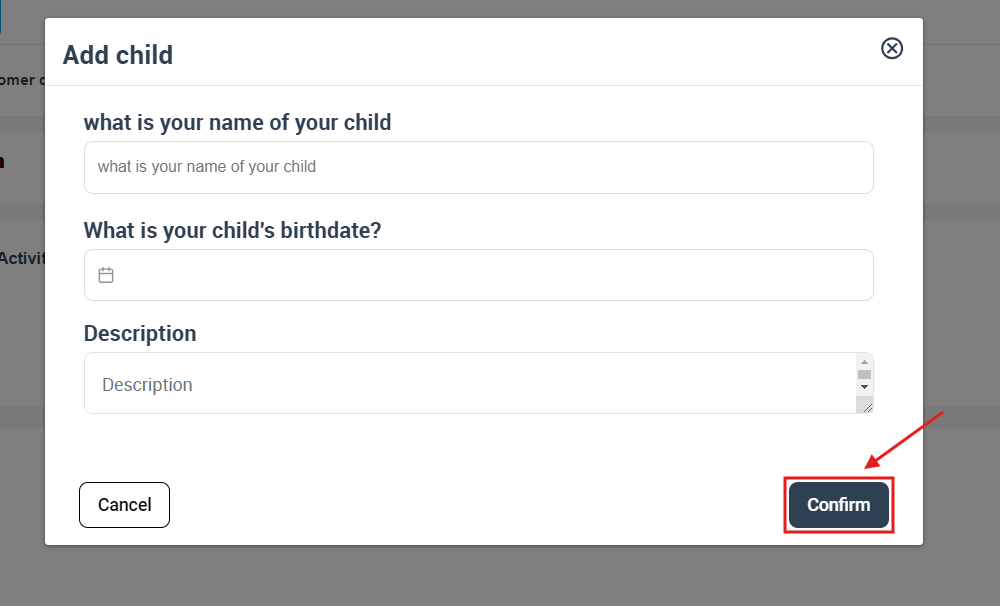
Example for a Child property: Name, Date of birth, Allergies, Notes, Emergency contact.
Example for a Vehicle property: Make, Model, Year, Registration, Colour, Access notes.
Example for a Property / Site property: Unit number, Parking instructions, Access code, Gate or lock details, Special notes.
Optional: Make property selection mandatory during booking
You can require customers to select at least one customer property during online booking. This is useful when your business must know the exact dependent, asset, or site before scheduling the service.


Enable Customer Properties in the customer portal
If you want customers to select a customer property during online booking, or be prompted to add one, enable the following customer portal flag:
Settings > Customer Portal Settings > Booking Flags > Select at least one customer property during booking process
This flag controls whether Customer Properties appear in the booking and checkout flow inside the customer portal. When enabled, customers can:
- Select an existing saved property
- Add a new property during checkout if one has not been saved yet
Related setup guides:
- Require Customer Property Selection During Booking
- Customer Portal Flags & Permissions
- Customer Portal General Settings
- Accept Online Bookings Through Your Website
- Add a Book Online Button to Your Website
- Customer Portal Profile Management
Add Customer Properties as an admin
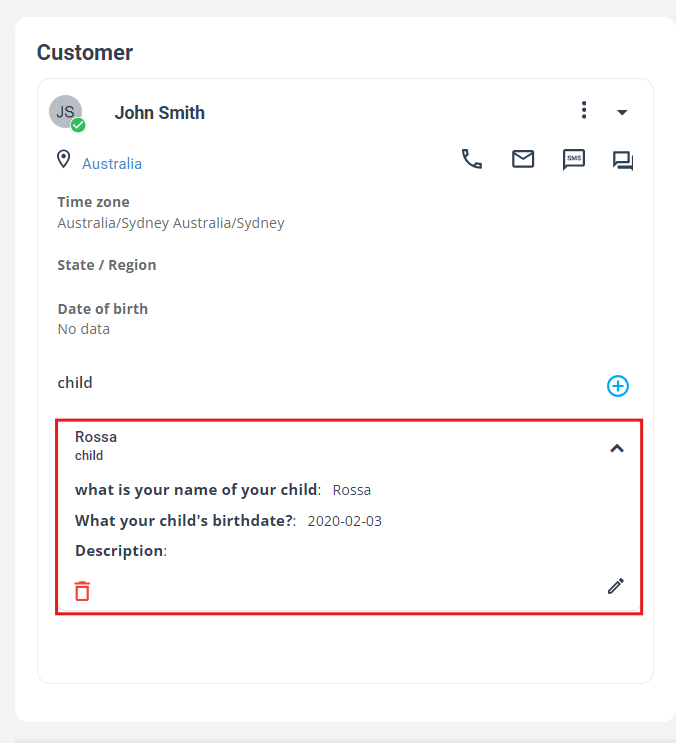
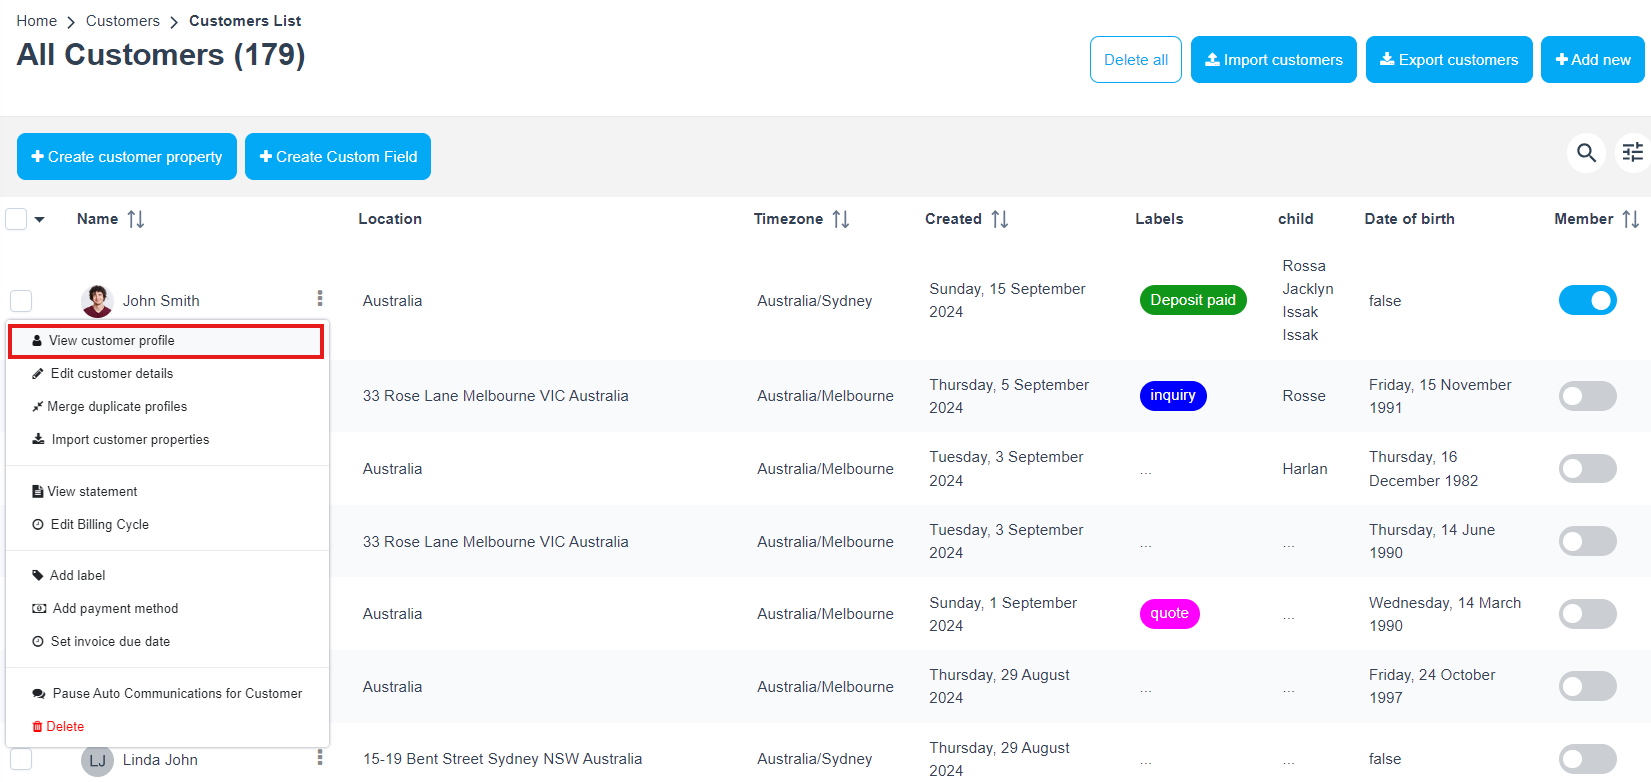
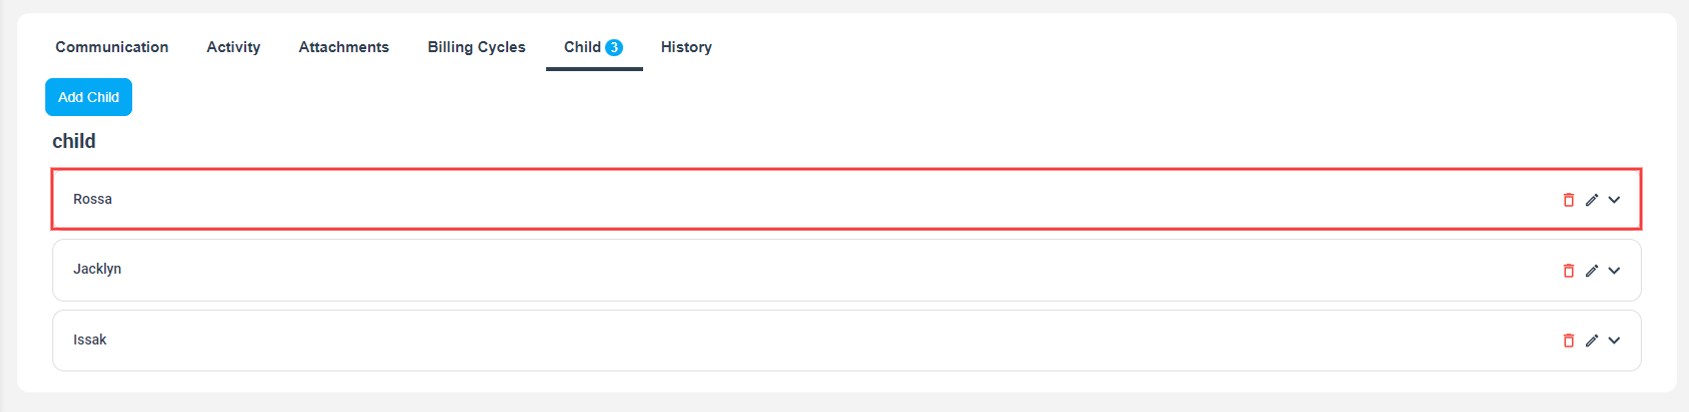
Admins can add and manage properties directly from the customer profile.
- Go to Customers and locate the customer.
- Open the customer menu and select View customer profile.
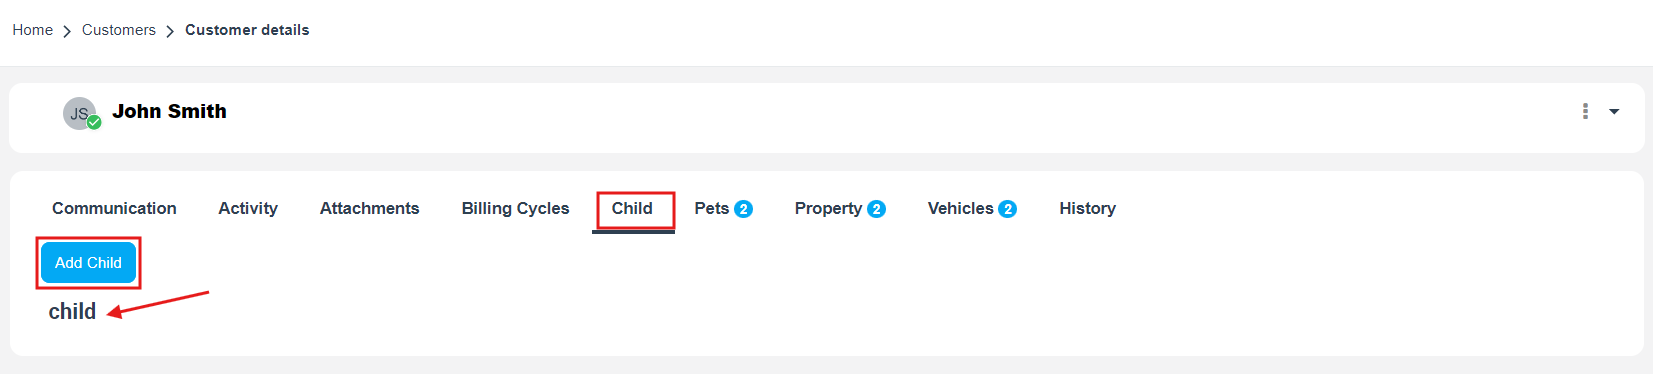
- Open the relevant property tab, such as Child, Pet, Property, or Vehicles.
- Click Add, then enter the details.
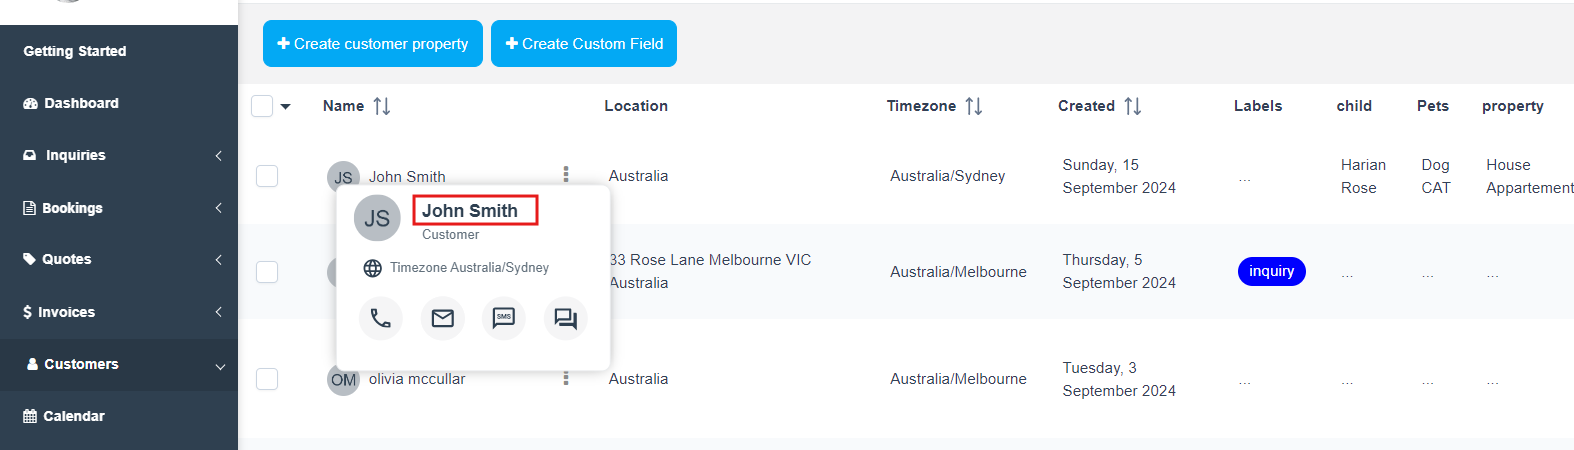
Tip: If you manage multiple property types, such as Child, Vehicles, and Property, customers will see separate sections or tabs for each type in their profile and during booking.
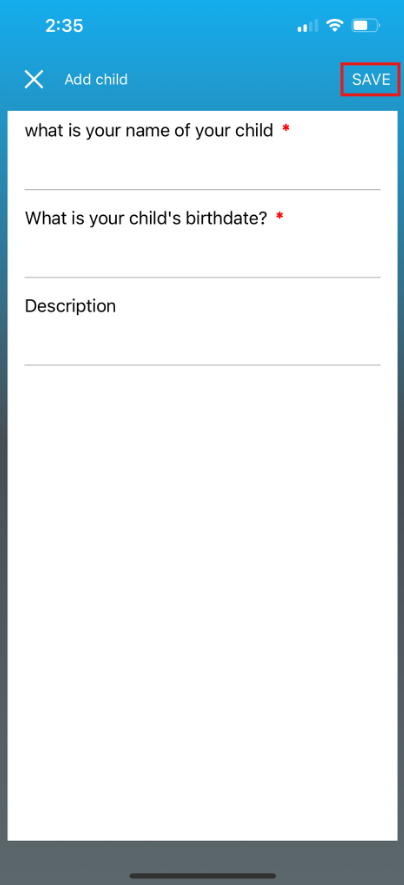
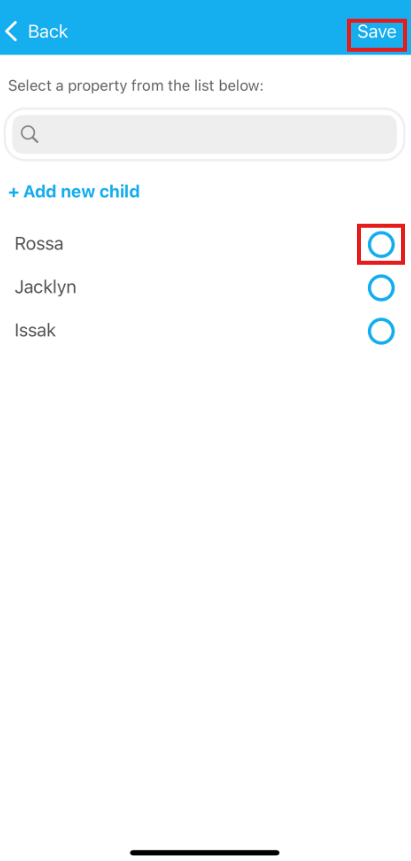
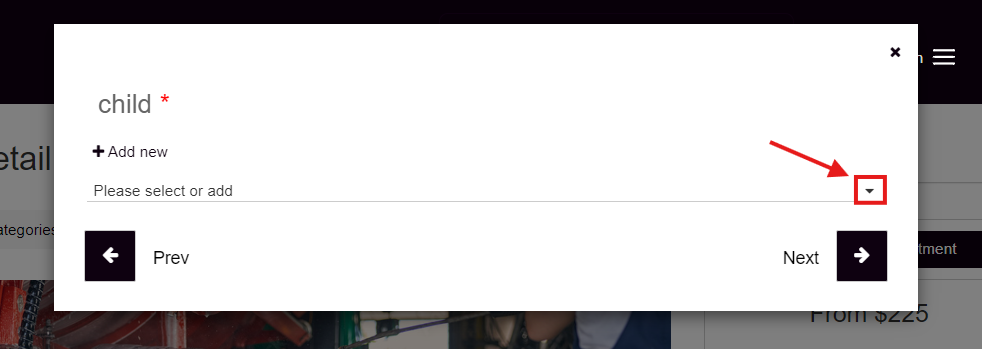
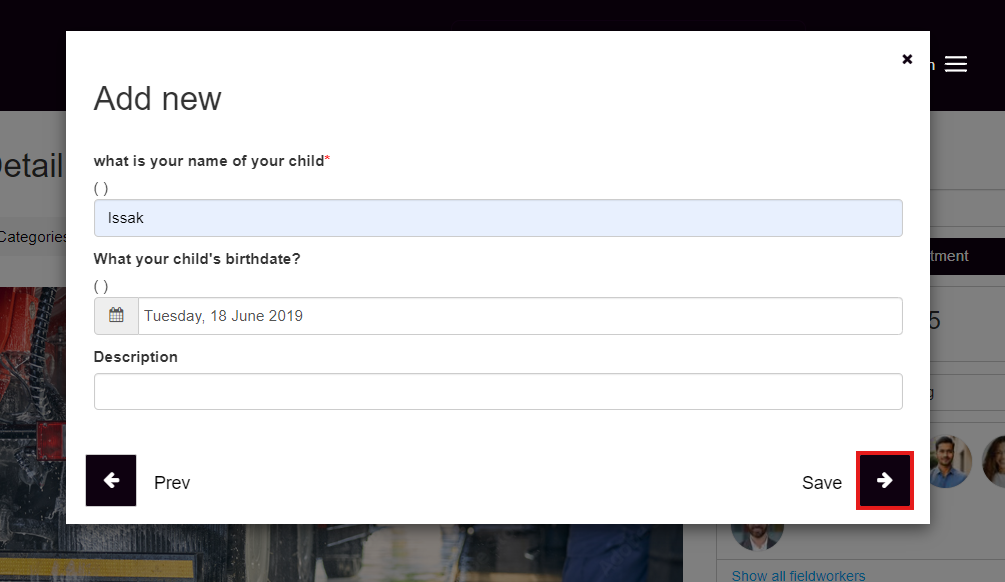
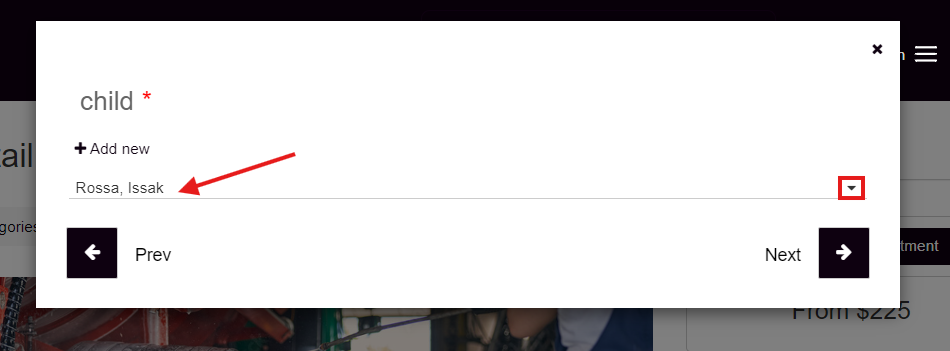
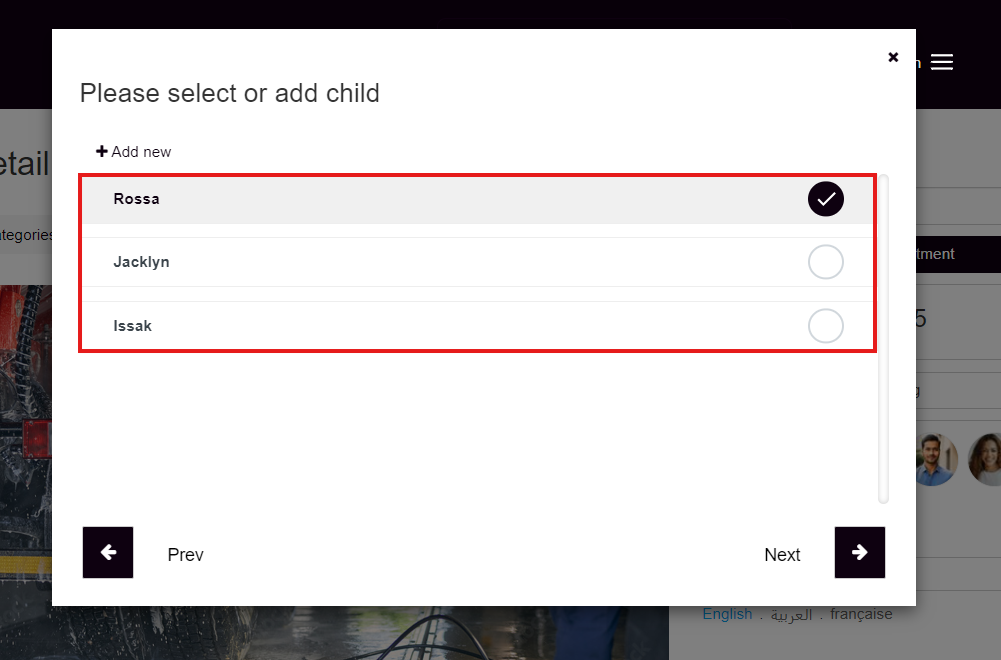
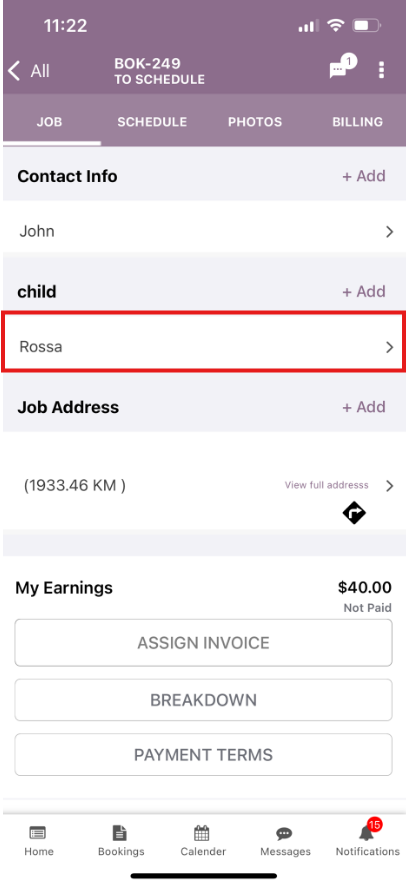
Add or select Customer Properties in the fieldworker app
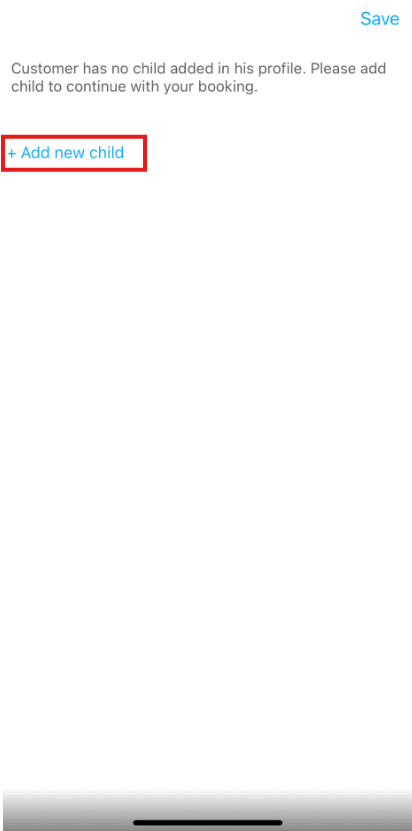
Fieldworkers can select an existing customer property, or add a new one, while creating a booking so the booking is linked to the correct child, asset, or site.
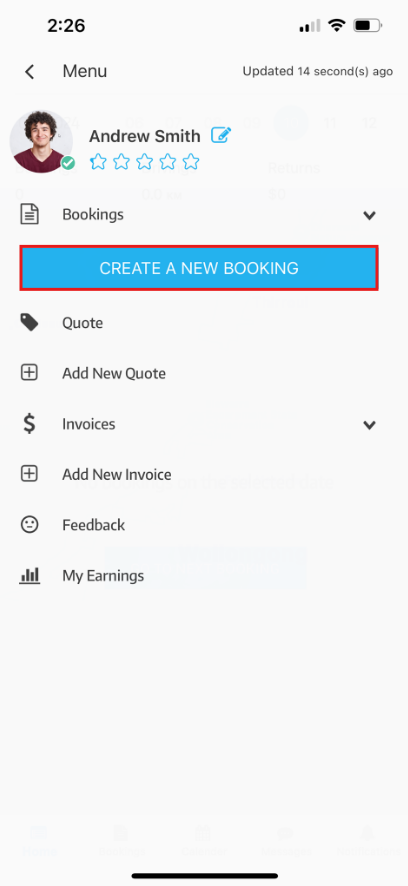
- From the fieldworker app, start creating a new booking.
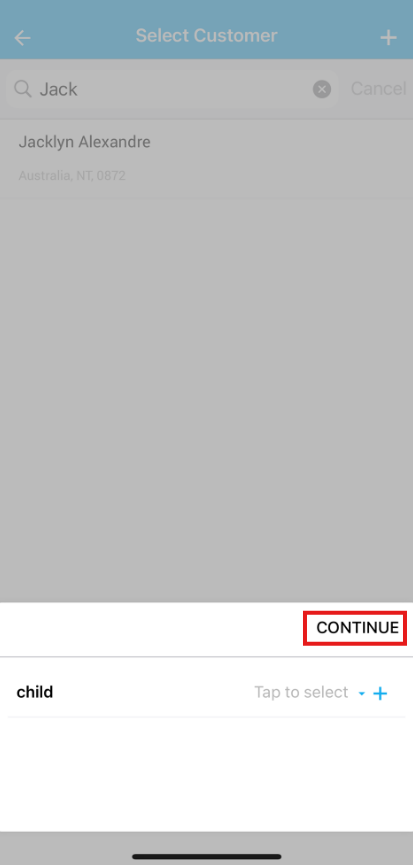
- Select the customer.
- Select an existing property or tap Add new.
- Save, then continue creating the booking.

Add or select Customer Properties in the customer portal
Option 1: Add or select properties during online booking
When the customer portal flag is enabled, customers are prompted to select the relevant property or add a new one during checkout.

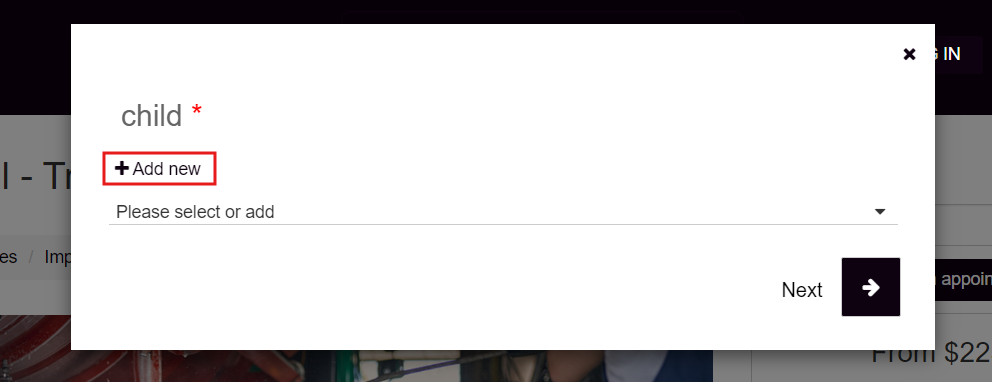
Registered customers: if they already saved properties previously, they can choose from the saved list.
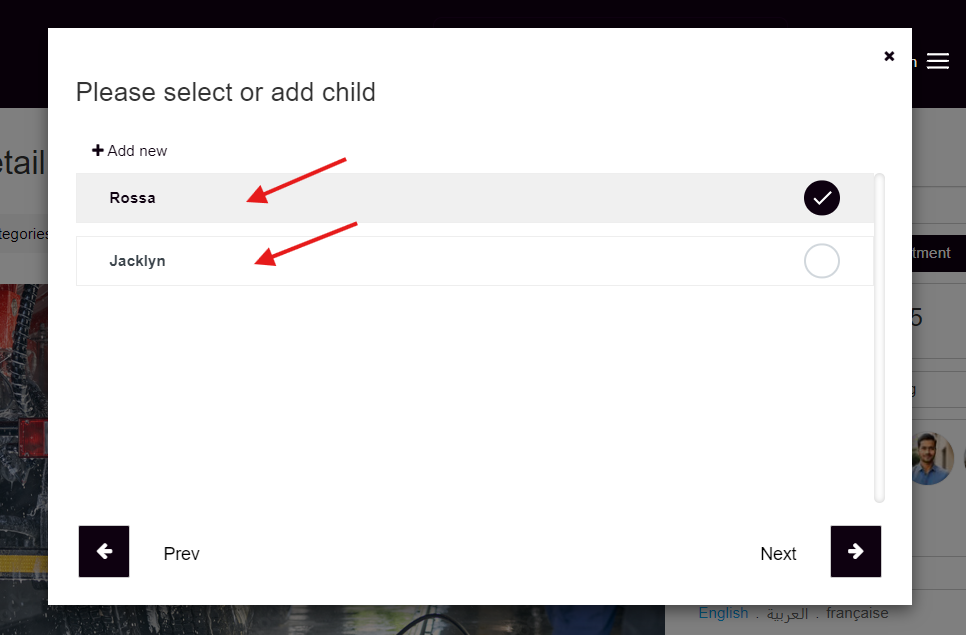
Guest customers: guests can also add properties during checkout. Those properties are saved with the booking details based on the customer contact details, and they can be available again if the customer returns with the same details.
If the customer has multiple properties saved, they can choose the correct one for the booking.
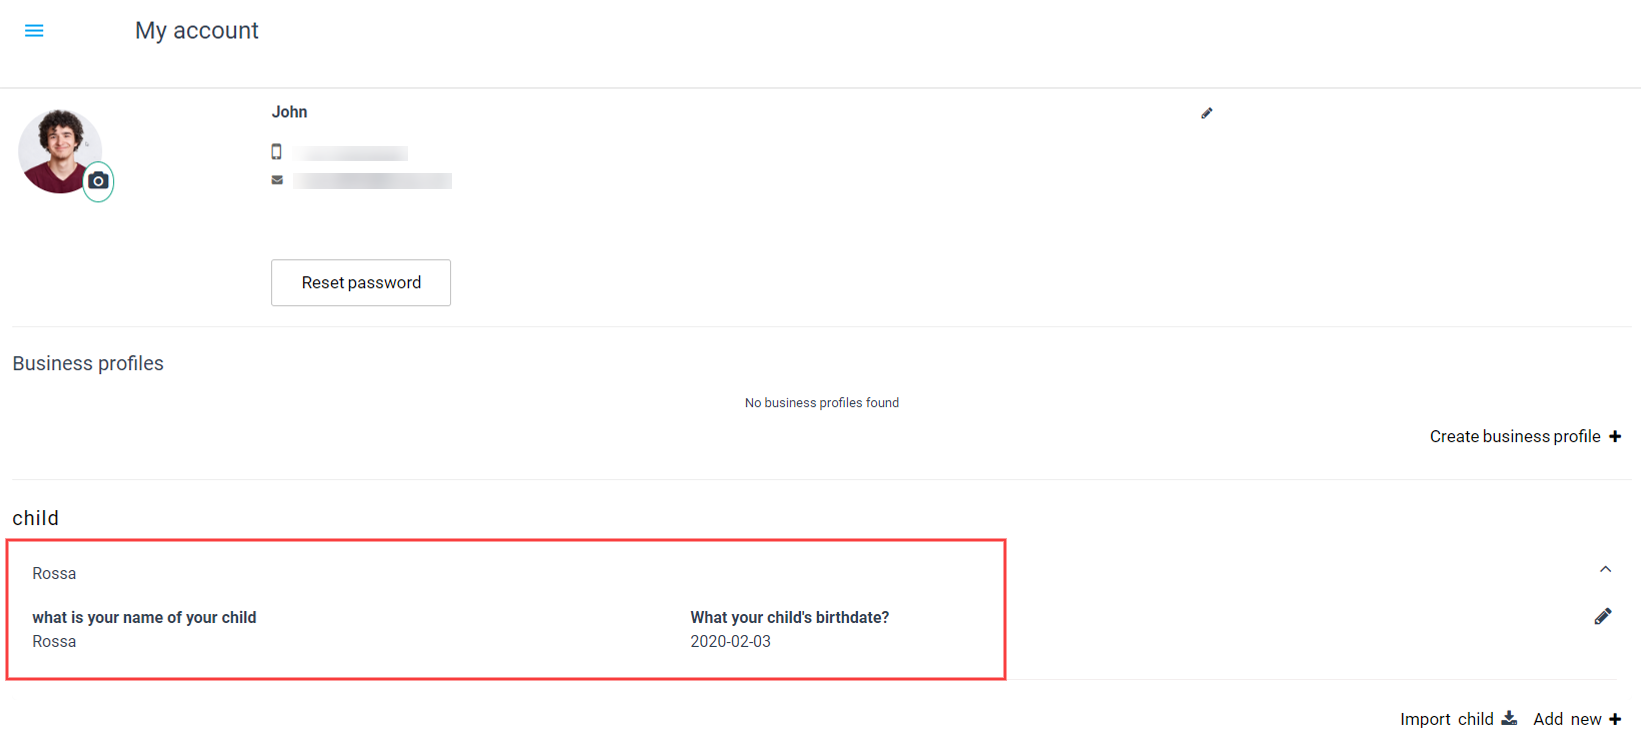
Option 2: View and manage properties from My Profile
Customers can also view and manage saved properties from the customer portal menu:
Customer Portal Menu > My Profile
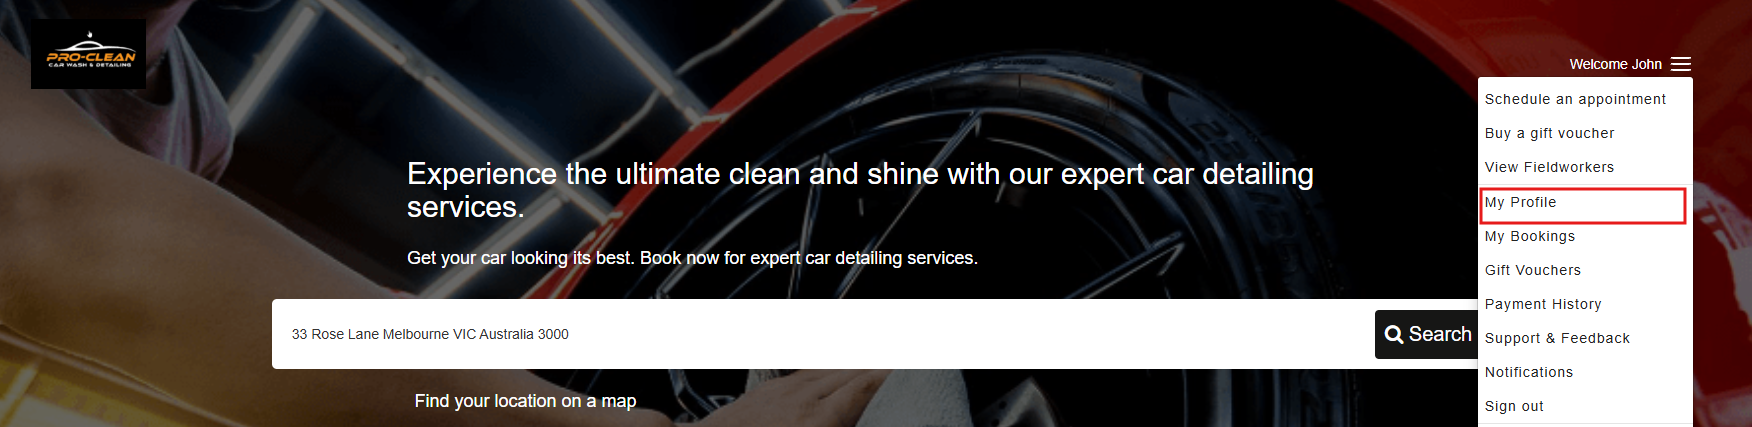
Learn more here: Customer Portal Profile Management.
Where Customer Properties appear
Admin (web app)
Admins can view customer properties in:
- the customer profile
- the booking details page when linked to a booking
- the booking PDF when enabled in your configuration

Fieldworker (mobile app)
Fieldworkers can view the selected property from the booking details page, making it easier to confirm the correct dependent, asset, or site details for the job.
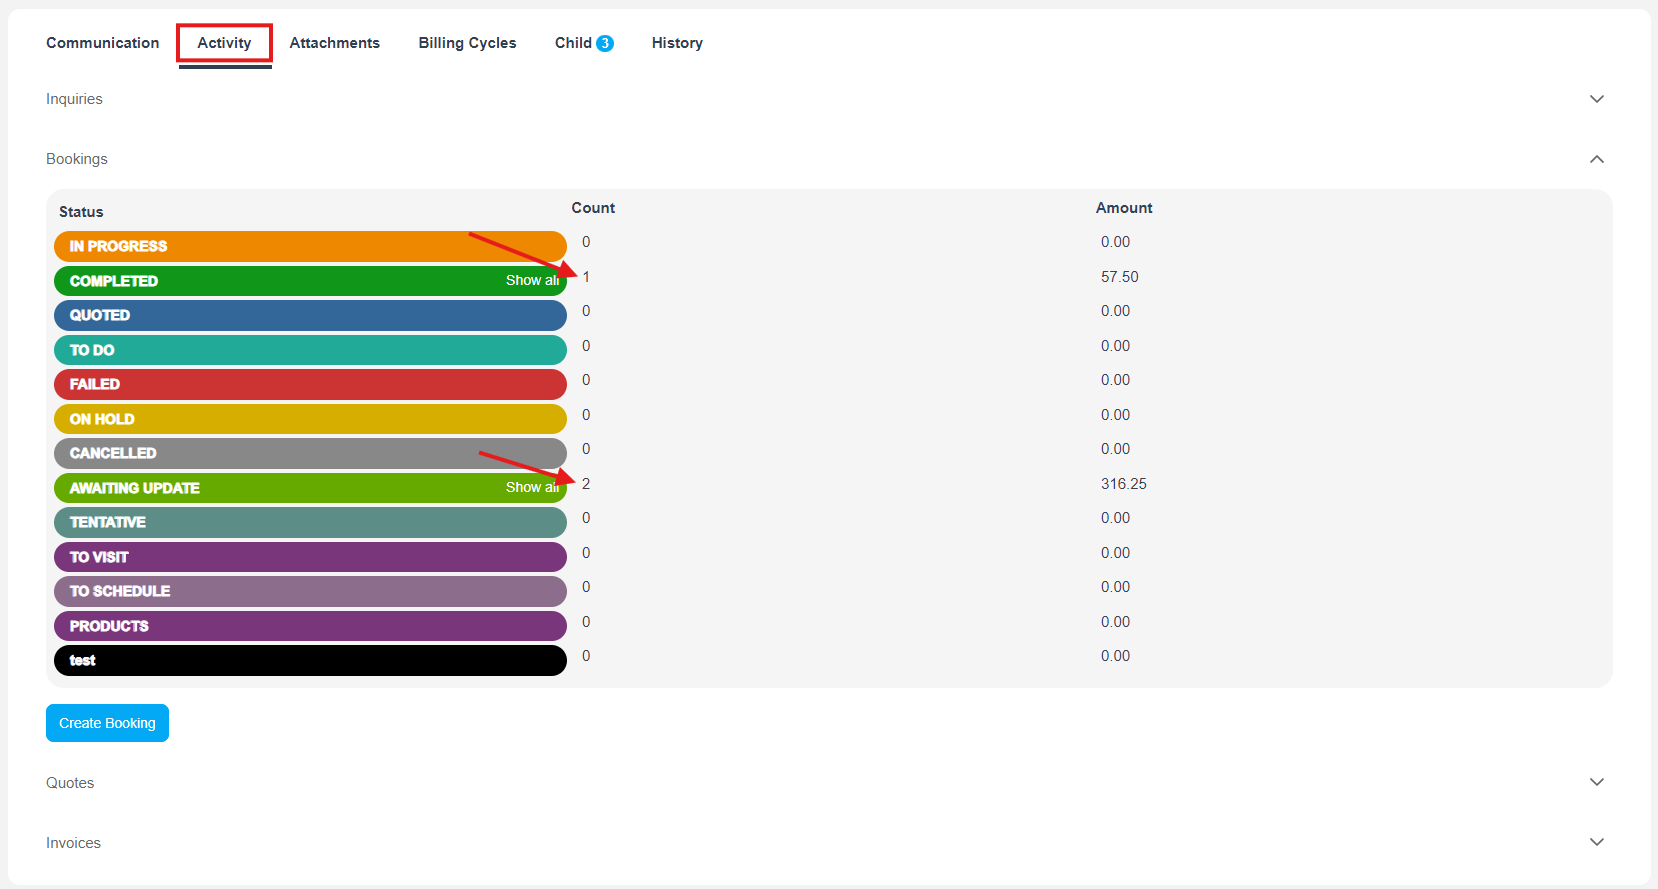
Property history
Customer Properties are designed for repeat service workflows, so you can track what happened for each property over time.
- Admins can open a customer profile and review saved property lists and related activity.
- You can review records and history views to understand what bookings, invoices, quotes, and actions occurred.
From the customer list, open the customer menu and select View customer profile.
Inside the customer profile, open the relevant property tab.
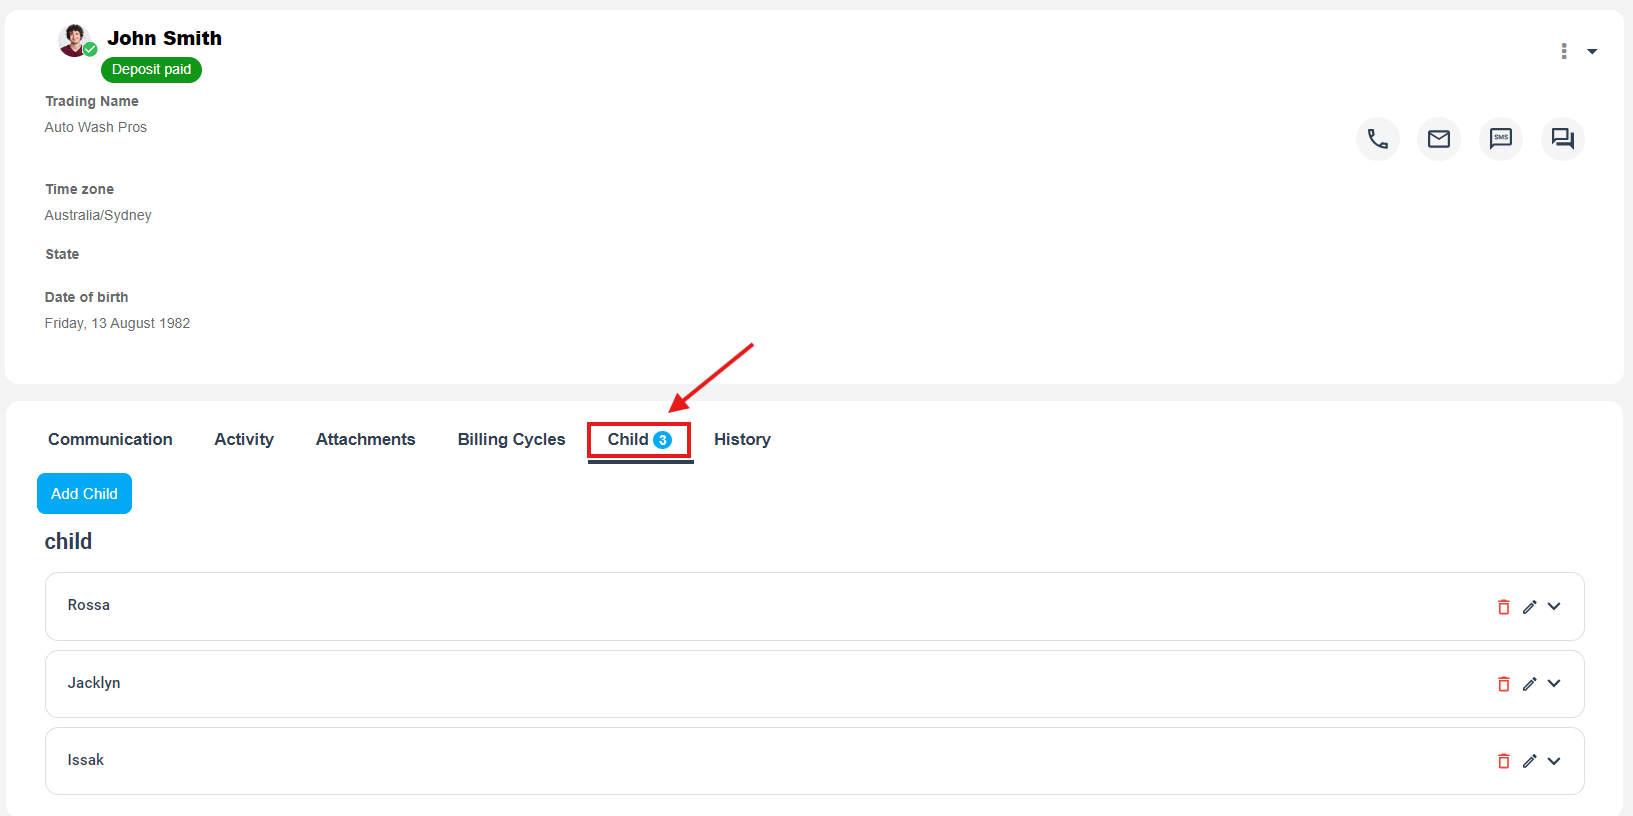
Use the Activity section to view a consolidated snapshot of related activity, statuses, counts, and amounts.
You can also view all recorded properties for the customer within each property tab.
Industry-specific examples
Below are some common ways businesses use Customer Properties.
Childcare / education: Child properties
Create a Child property type and add fields such as child name, date of birth, allergies, medical notes, and pickup permissions.
Pet care: Pet properties
Create a Pet property type and capture breed, age, temperament, vaccination status, special instructions, and notes.
Vehicle services: Vehicle properties
Use a Vehicle property type for detailing, maintenance, repairs, or inspections, with fields like make, model, year, registration, and notes.
Property management / real estate: Property or Site properties
Create a Property or Site property type for sites and units. Add fields like address, access codes, parking, tenant notes, inspection notes, and special requirements.
Asset management: vending machines, appliances, or equipment
Track individual machines or assets with fields such as model, serial number, location, service schedule, and parts notes.

Use the built-in Saved Service Locations property
OctopusPro includes a pre-created customer property called Saved Service Locations. You do not need to create this property from scratch.
This property is designed for businesses that need to save multiple service addresses against the same customer profile for faster repeat bookings. For example, the same customer may regularly book work to different homes, offices, stores, units, branches, facilities, job sites, or other service locations.
Once enabled, Saved Service Locations appears in the booking form between the Customer field and the Location field. Users can select one of the customer’s saved sites, and the standard Location field will automatically populate from the selected Service Address. The Location field can still be edited manually if needed.
To enable it:
- Go to Settings > General Settings > Customer Dependents / Properties.
- Find Saved Service Locations in your customer properties list.
- Enable it for your account.
- Open the customer profile and add one or more saved service locations.
- When creating a booking, select the saved site to auto-fill the booking Location.
The default fields included in Saved Service Locations are:
- Site Name
- Service Address
- On-Site Contact Name
- On-Site Contact Phone
- Access Instructions / Gate Code
- Preferred Parking Instructions
- Default Site
This is especially useful for businesses serving customers across multiple saved locations, such as property managers, landlords, franchise groups, retail chains, campuses, cleaning businesses, lawn care companies, pest control businesses, and any business that rebooks services to more than one address for the same customer.
If you also need one booking to cover multiple stops or multiple addresses, see Multi-Address Bookings.
More use cases by industry
Vehicle and auto care services
- Auto repair and maintenance: vehicle properties with make, model, year, and service history
- Car detailing: vehicles with paint type, interior notes, and special instructions
- Truck and fleet services: multiple vehicles under one customer account with asset-level records
- Motorbikes and specialty vehicles: service notes and equipment-specific variations
Home healthcare
- Patients or dependents with care needs, medications, conditions, and visit history
- Equipment such as wheelchairs or oxygen equipment with service and check schedules
Childcare
- Children with allergies, guardians, pickup permissions, notes, and attendance or service history
Elderly care
- Senior profiles with health notes, mobility considerations, care preferences, and family contacts
Education and tutoring
- Students with subjects, year level, learning needs, and lesson history
Personal training and fitness
- Clients or dependents with goals, injuries, plan notes, and progress tracking references
Sports coaching and training
- Athletes with skill level, goals, medical considerations, and training history
Insurance services
- Policy assets such as vehicles, properties, or equipment with claim or service history links
Asset management
- Equipment and machines with serial numbers, locations, warranties, and maintenance schedules
Property management and real estate
- Sites and units with tenant notes, access details, inspection history, and recurring maintenance workflows
Cleaning and home maintenance
- Rooms, areas, and assets with special requirements, access notes, and preferred products
Pet and animal care
- Pets with breed, temperament, medical needs, grooming preferences, and visit history
Travel and tourism
- Guests with preferences, accessibility needs, and itinerary-linked records where relevant
Sports and recreation facilities
- Members and assets, including equipment hire items, recurring bookings, and notes
Social services and counseling
- Clients or dependents with care plans, notes, and case history structure as appropriate for your privacy policies
Youth and family services
- Family members and dependents with guardian details and service history tracked across visits

Import Customer Properties (CSV)
If you are migrating from another system, or you already have a list of dependents, assets, vehicles, properties, or sites, you can import them in bulk.
Tip: You can use Customer Properties import to bulk upload Saved Service Locations for existing customers. This is useful when migrating a list of customer sites, branches, units, or service addresses into OctopusPro.
Learn more here: Import Customer Properties via CSV.
Best practices
- Use clear property type names: Vehicle is clearer than Item 1.
- Keep fields focused: only capture what your staff actually need to deliver the service.
- Use dropdowns where possible: this reduces typos and keeps records more consistent.
- Make critical fields required: for example site address, child name, vehicle model, or access notes.
- Control visibility carefully: only show sensitive fields to the right roles.
- Standardize data: agree on naming conventions such as Toyota Hilux – ABC123.
- Encourage registration: registered portal customers get the best experience when selecting saved properties for future bookings.
Related guides
- Customer Management CRM
- View Customer Details
- Customer Profile Custom Fields
- Service Booking Management
- Create a New Booking
- View & Manage Booking Details
- Require Customer Property Selection During Booking
- Customer Portal Flags & Permissions
- Customer Portal General Settings
- Accept Online Bookings Through Your Website
- Add a Book Online Button to Your Website
- Customer Portal Profile Management
- Multi-Address Bookings
- Import Customer Properties via CSV
If you would like help setting up Customer Properties for your industry, including the best property types and recommended fields, you can schedule a call with our team.
To stay updated, please subscribe to our YouTube channel.