
Customer Profile Custom Fields (CRM Profile Customization)

Customer Profile Custom Fields let you add extra data points to each customer record—beyond the standard name, phone, and address fields. This helps you build a richer CRM profile so your team can deliver more accurate quotes, reduce back-and-forth, and provide a more personalized service.
Examples include: access instructions, allergies, preferred contact method, building type, parking notes, membership IDs, marketing preferences, “best time to call”, or any industry-specific information you want to store against a customer.
See also: Customer Portal – Profile Management Overview
Table of contents
- What are Customer Profile Custom Fields?
- When to use Customer Profile fields vs Service fields
- How to create a customer profile custom field
- Customer custom field settings explained (toggles & options)
- Supported field types (and when to use each)
- Configure options for selection-based field types
- Manage, edit, activate, hide, and delete fields
- Where customers and staff see these fields
- Can fieldworkers create customers and fill customer custom fields?
- Import customers with custom field values (CSV)
- Best practices (privacy, consistency, reporting)
- Related articles
What are Customer Profile Custom Fields?
Customer Profile Custom Fields are extra fields you configure for your CRM customer record. They are stored against the customer profile and can be updated by:
- Customers (via the Customer Portal profile page), if the field is not hidden from the portal.
- Office/admin users (from the customer record in the admin dashboard).
- Fieldworkers (if your permissions allow them to create/edit customers).
This keeps customer data centralized, consistent, and easy to maintain—especially when you have repeat customers, recurring services, memberships, or long-term relationships.
When to use Customer Profile fields vs Service fields
- Customer Profile Custom Fields = long-lived customer information (e.g., “Gate code”, “Allergies”, “Preferred language”, “Customer type”, “Account manager”).
- Service/Booking Custom Fields = booking-specific questions asked during checkout (e.g., “How many rooms?”, “Add deep clean?”, “Select vehicle type?”). Read more
- Forms & Checklists = operational/compliance steps completed during or after the job (e.g., inspection checklist, risk assessment, QA sign-off). Read more
How to create a customer profile custom field
Method 1 (recommended): Settings → Customer Profile
- Go to Settings → General Settings → Customer Profile.
- Click + Create New.
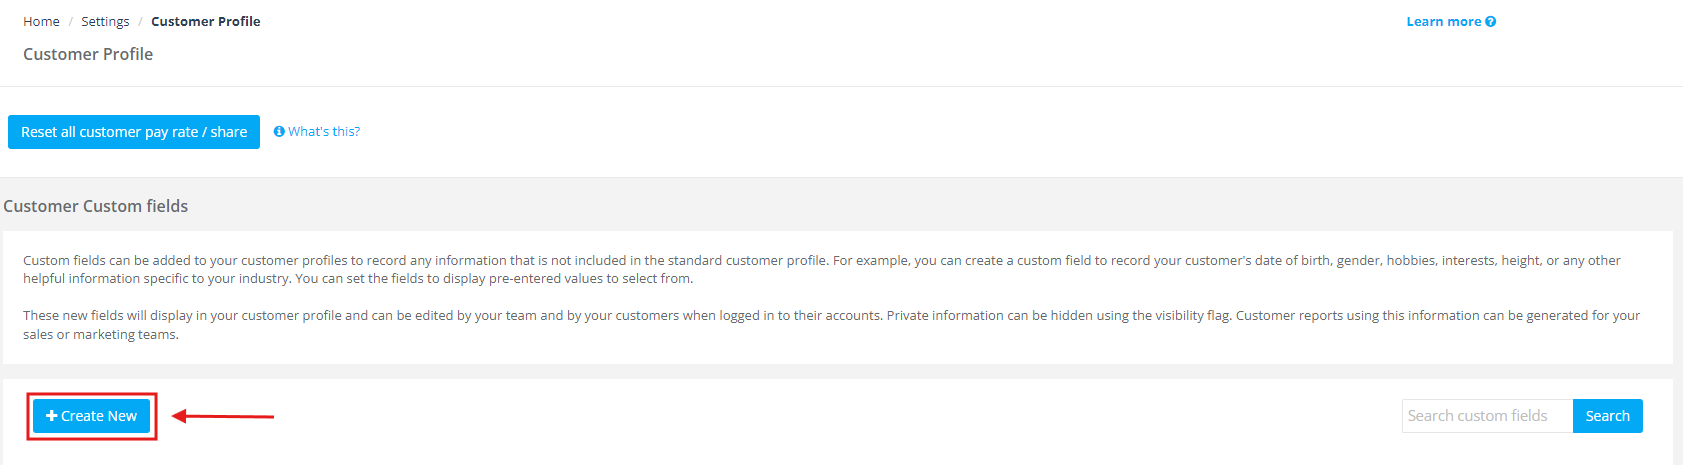
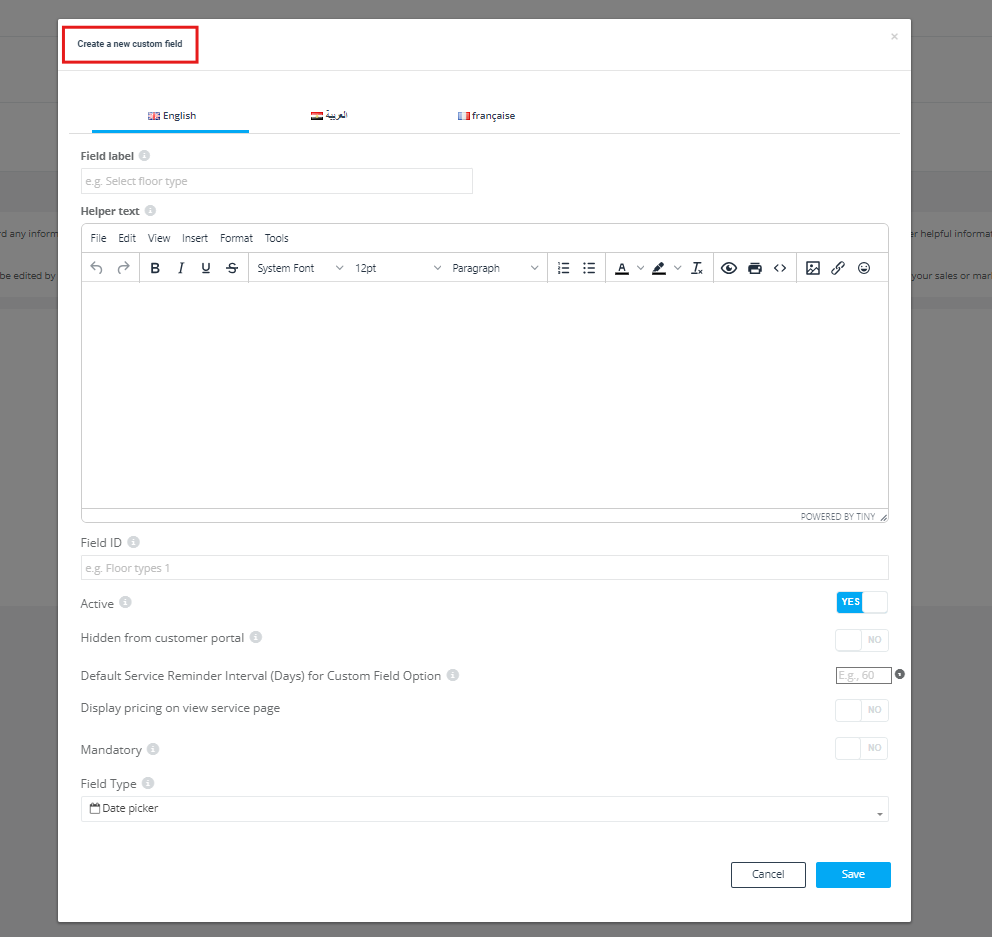
A “Create a new custom field” window will open.
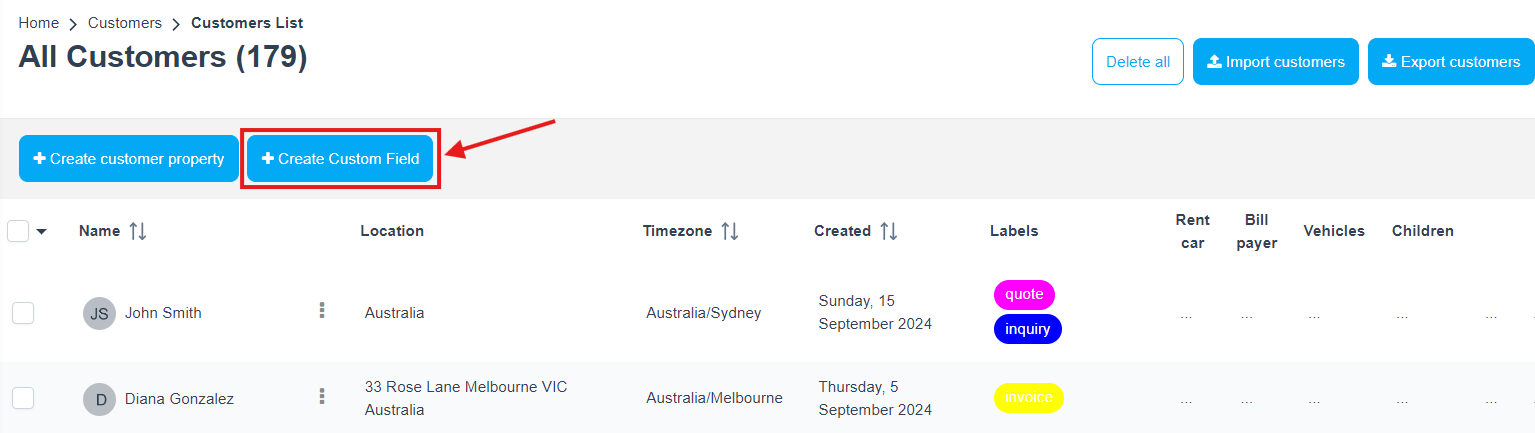
Method 2: Customers list → Create Custom Field
- Go to Customers → All Customers.
- Click + Create Custom Field.
Customer custom field settings explained (toggles & options)
When creating a customer custom field, you’ll configure both the label customers see and how the field behaves (visibility, required/optional, and field type).
1) Field label (display name)
This is the name shown on the customer profile and (if visible) inside the Customer Portal (e.g., “Gate code”, “Allergies”, “Preferred contact method”). Keep it short, clear, and action-oriented.
2) Helper text (optional)
Use helper text to clarify what the customer should enter (e.g., “Include building level and intercom code”, “List any allergies or sensitivities”).
3) Field ID (unique variable / internal identifier)
This is the unique identifier for the field. Use a consistent naming convention (e.g., gate_code, allergies, preferred_contact_method). Avoid spaces and keep it stable—especially if you reference this field in exports, imports, or integrations.
4) Language tabs (multi-language labels)
If your account is configured for multiple languages, use the language tabs to enter translated labels/helper text so the portal displays the right language per customer.
5) Active (enable/disable)
If a field is inactive, it won’t appear on the customer profile for data entry. Keep fields inactive if you are testing or phasing out a field.

6) Hidden from Customer Portal (visibility control)
Turn this ON to keep the field internal-only (customers won’t see it in the portal). Turn it OFF if customers should be able to view and update it themselves.


7) Mandatory (required vs optional)
If set to mandatory, the field must be completed (wherever it appears). Use this carefully: mandatory fields improve data consistency, but too many required fields can reduce portal adoption.
8) Display pricing on the service view page (portal transparency)
If a field (or a selection within it) impacts pricing, you can choose whether to show that pricing on the service view page in the Customer Portal.
- Enabled: customers see add-on pricing before booking (recommended for transparency).
- Disabled: pricing remains hidden until quote/checkout (useful for custom pricing scenarios).


9) Default reminder interval (days) (optional)
Some accounts show a “Default Service Reminder Interval (Days)” option in the field configuration. Use this when you want a default reminder interval associated with a specific field/selection (helpful for recurring reminders, follow-ups, or service reminders).
Supported field types (and when to use each)
Choose a field type based on the data you want to capture and how you want users to enter it:
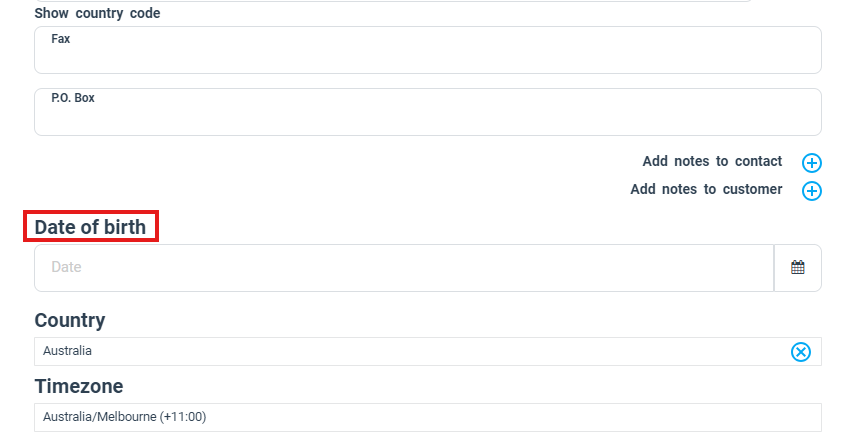
- Date picker: capture a date (e.g., birthday, preferred service date).
- Time picker: capture a time (e.g., preferred callback time).
- Text field (single-line): short text (e.g., membership ID, gate code).
- Text box (multi-line): longer notes (e.g., access instructions, medical notes).
- Toggle (boolean): yes/no fields (e.g., “Do you have pets?”).
- Dropdown (single-select): select one option from a list (e.g., “Customer type”).
- Radio button (single-select): select one option, shown as radio buttons.
- Button: single quick-action choice (best for short, obvious selections).
- Button group: a compact, visual single-select set of options.
- Checkbox: one checkbox (e.g., “Marketing consent”).
- Checkbox button group (multi-select): select multiple options from a grouped list.
- List: list-based selection (useful where you want a clear list UI).
Additional field types you can use
- Number Stepper – A numeric field with +/– controls. Ideal for quantities, counts, or “how many?” inputs (e.g., number of occupants, number of pets, number of rooms). Use when you want controlled increments instead of free typing.
- Toggle Switch – A binary on/off field (Yes/No). Great for consent, preferences, and eligibility checks (e.g., “SMS reminders enabled”, “Has access permission”, “Pet on premises”).
- Multi-Select List Box – Allows selecting multiple values from a list. Useful for preferences, interests, or multi-value attributes.
- Checkbox Selector – A multi-select style input where users can choose any number of options (all/some/none).
- Digital Signature (eSign) – Captures a customer signature for approvals, acknowledgements, or consent.
Important: Any field type with selectable choices (dropdown, radio, button group, checkbox group, list) must have values/options configured.
Configure options for selection-based field types
When you choose a selection-based field type (Dropdown, Radio Button, Button Group, List, Checkbox, or Checkbox Button Group), you’ll configure the options customers can select from.
Option order (Selections Display Order)
- As Entered – Shows options in the exact order you add them.
- Alphabetical (A–Z) – Sorts options alphabetically.
- Lowest Cost First / Highest Cost First – Sorts by additional cost (when cost is configured for options).
Option labels + optional descriptions
- Each option has a Title (the visible label customers select).
- You can add an optional detail/description under the Title to provide extra context (and hide that detail field if you don’t need it).
- Use Edit / Delete to manage existing options, and click Add a new selection + to add more.
Multi-select usability tip (List fields)
For List fields, customers may need to hold Ctrl (Windows) or Cmd (Mac) to select multiple items, depending on the device/browser.
Manage, edit, activate, hide, and delete fields
After saving, your customer fields appear in the Customer Custom Fields list, where you can review and manage them.

What you’ll see in the list
- Custom field row: shows the field name, Variable name / Field ID, and an Edit option.
- Details row: shows whether it’s Mandatory and the selected Field Type.
- Options row: appears only for selection-based fields (e.g., dropdown, radio, button group, list, checkboxes). Text/date/time fields won’t show options.
- Active and Visible toggles: control whether the field is enabled and whether it is visible (based on your account’s visibility rules).
Active vs Visible: “Active” controls whether the field is enabled and available for data entry. “Visible” controls whether the field is displayed where it’s allowed to appear. Portal visibility is additionally controlled by Hidden from Customer Portal.


Search and delete fields
- Use the search box on the Customer Custom Fields page to find a field quickly.
- To delete: tick the checkbox next to the field and use the bulk actions menu.

Where customers and staff see these fields
Customer Portal
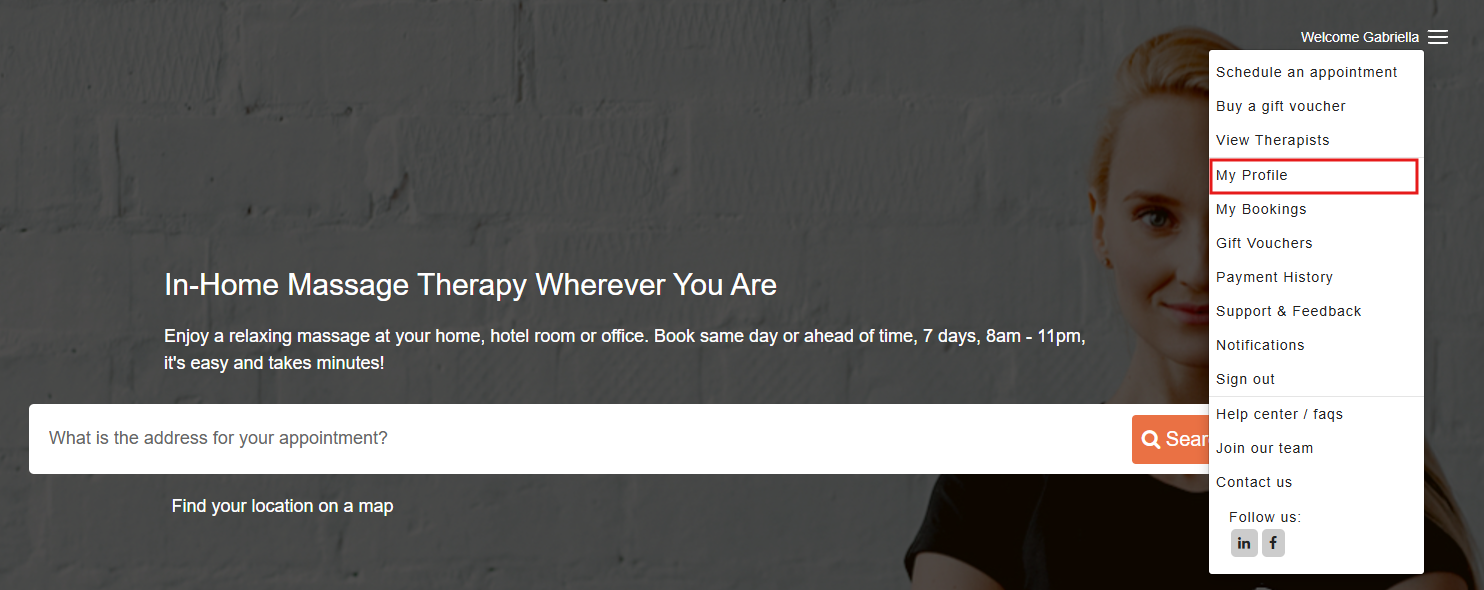
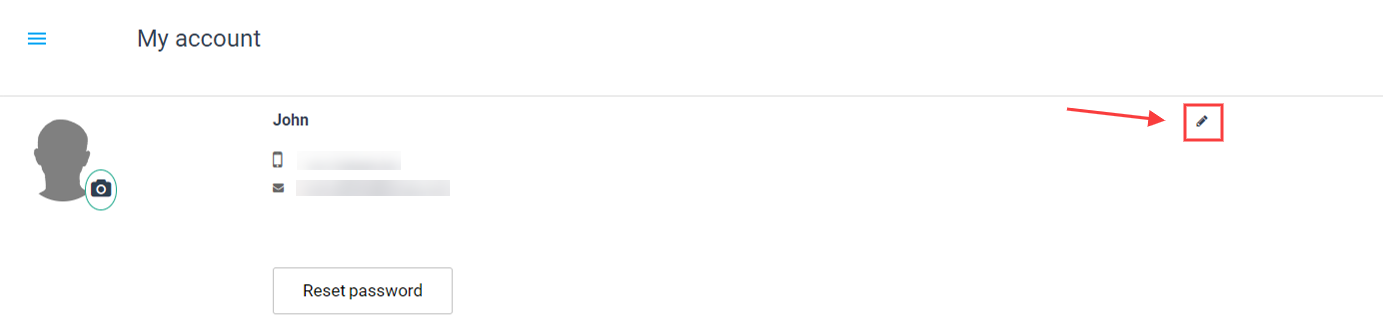
Customers can view/edit their profile fields from the Customer Portal:
- Go to Home.
- Open the portal menu and select My Profile.
- Click the Edit icon.
- Custom fields appear in the profile edit screen (typically after the “Add notes to customer” section).
- After saving, the entered values appear under the customer’s Basic Info section.
Note: If a field is set to Hidden from Customer Portal, customers will not see it—even if it exists on their profile.
Admin dashboard (office users)
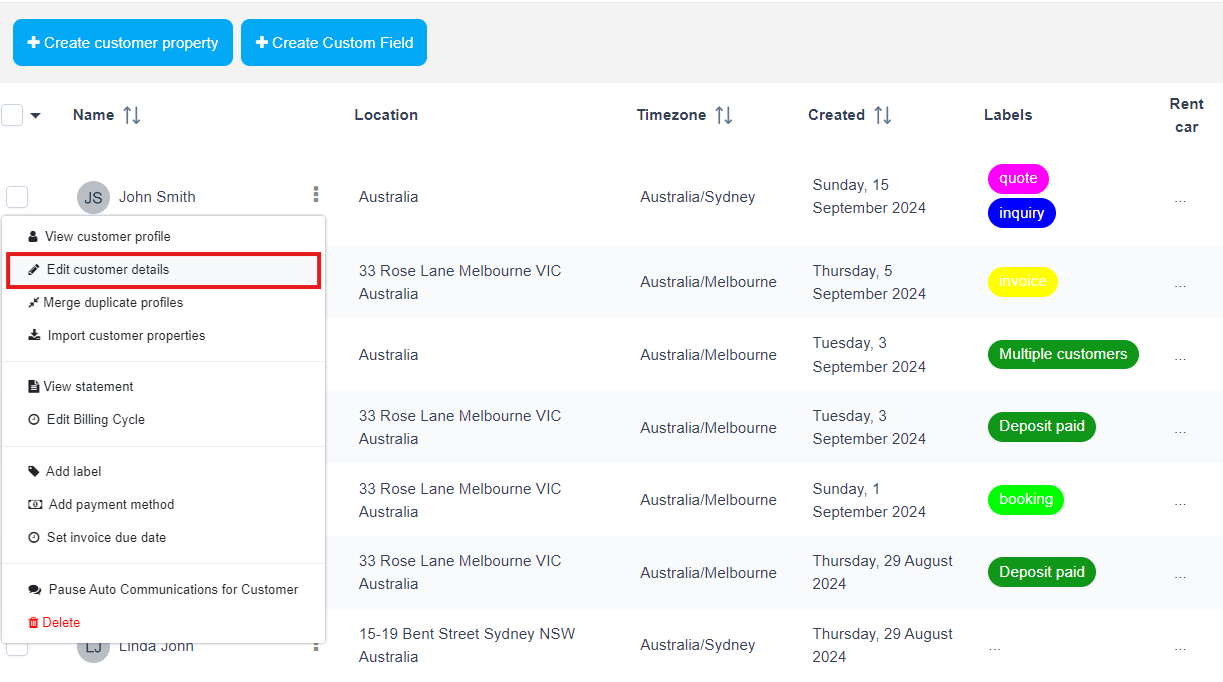
Admin users can fill or update customer profile custom fields from the customer record:
- Go to Customers → All Customers.
- Open the customer actions menu.
- Select Edit customer details.
- Update the custom fields and save.
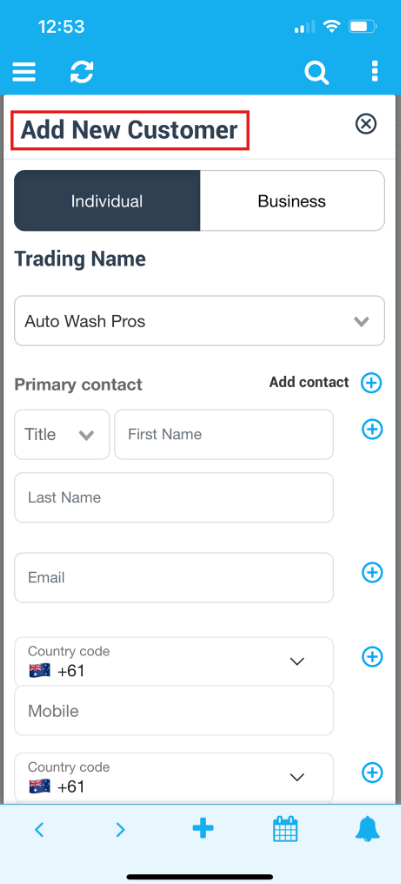
Can fieldworkers create customers and fill customer custom fields?
Yes—fieldworkers can create customers and complete customer profile fields if your Fieldworker Permissions allow it. This is useful when fieldworkers are adding customers on-site or capturing details during service delivery.
Manage this in: Fieldworker Permissions
From the web dashboard (fieldworker role)
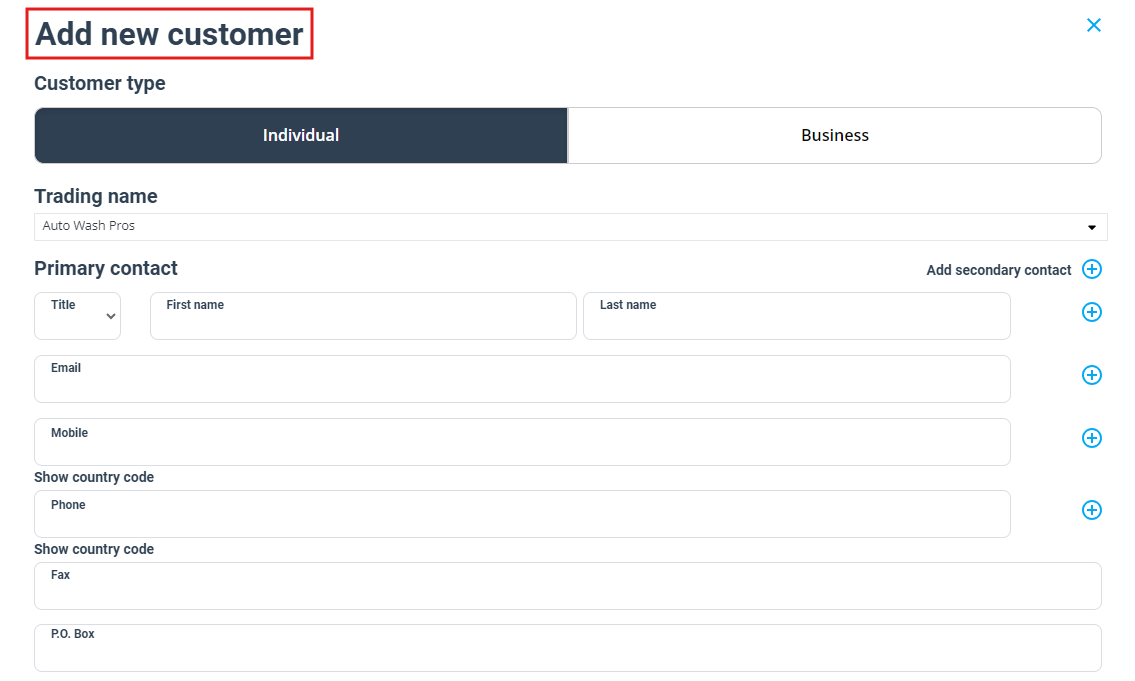
- Click New+.
- Select New customer.
- Complete the customer form (including any custom fields) and save.
From the Fieldworker mobile app
- Open the app menu.
- Tap + Create New Customer.
- Complete the form and save.
Import customers with custom field values (CSV)
If you’re importing customers in bulk and want to include custom field values, create your customer custom fields first. When you then download the customer import template, your custom field titles will be added as new columns in the CSV template. Populate those columns per customer and upload the CSV to import both customers and their custom field values.
Learn more: Import Existing Customers
Best practices (privacy, consistency, reporting)
- Keep it minimal: only add fields you will actually use. Too many fields reduce data quality.
- Use the right field type: dropdowns and toggles standardize answers and improve reporting.
- Be careful with sensitive data: use “Hidden from Customer Portal” for internal-only notes and sensitive fields.
- Use consistent naming: standardize labels (e.g., “Access instructions” not “How to enter?” across different teams).
- Make only key fields mandatory: mandatory fields improve consistency, but too many required fields frustrate users.
- Review quarterly: retire unused fields (disable first, then delete if safe).
Practical examples
- Cleaning: “Pets in home?”, “Parking available?”, “Access instructions”, “Preferred products”.
- Mobile services: “Best time to arrive”, “Gate code”, “Building level”, “Customer language”.
- Healthcare/wellness: “Allergies”, “Medical notes”, “Preferred therapist”, “Consent checkbox”.
- Real estate / property services: “Property type”, “Owner vs tenant”, “Strata/building manager”, “Site induction required”.
Related articles
- Custom Fields (Booking / Lead-Capture / CRM) – Overview
- Customer Portal – Profile Management
- Customer Dependents / Properties (Assets, Sites, Dependents)
- Fieldworker Permissions
- Import Existing Customers
To stay updated, please subscribe to our YouTube channel.