
Add New Bookings from the Calendar (Schedule in One Click)
The OctopusPro Calendar is your scheduling and dispatch board. In addition to viewing your workload, you can also create a new booking directly from the Calendar—perfect for urgent requests, filling gaps, and booking customers while you’re already looking at availability.

On this page
- What this feature is for
- Requirements & permissions
- How to add a booking from the Calendar
- View and edit bookings from the Calendar
- Optimize scheduling with filters
- Best practices & examples
- Troubleshooting
- Related articles
What this feature is for
Adding bookings from the Calendar helps you schedule faster and keep your team aligned—without jumping between multiple screens.
- Speed up dispatch for same-day or last-minute bookings.
- Avoid overlaps by scheduling directly into visible gaps.
- Improve capacity planning by booking while viewing real workloads.
- Keep schedules accurate so office staff and fieldworkers stay on the same page.
This workflow is useful for mobile/on-site services, fixed-site operations (clinics, studios, workshops), and virtual/remote services—the Calendar simply reflects your appointments, regardless of service location type.
Requirements & permissions
- You must have access to Bookings > Calendar.
- Your user role must have permission to create bookings (and optionally assign fieldworkers).
- If you’re using availability rules (working hours, service areas, etc.), ensure fieldworkers are configured correctly so assignment options match real availability.
How to add a booking from the Calendar
Step 1: Open the Calendar
- Go to Bookings > Calendar.
- Select the view that suits your scheduling needs (Month, Week, Day, or List).
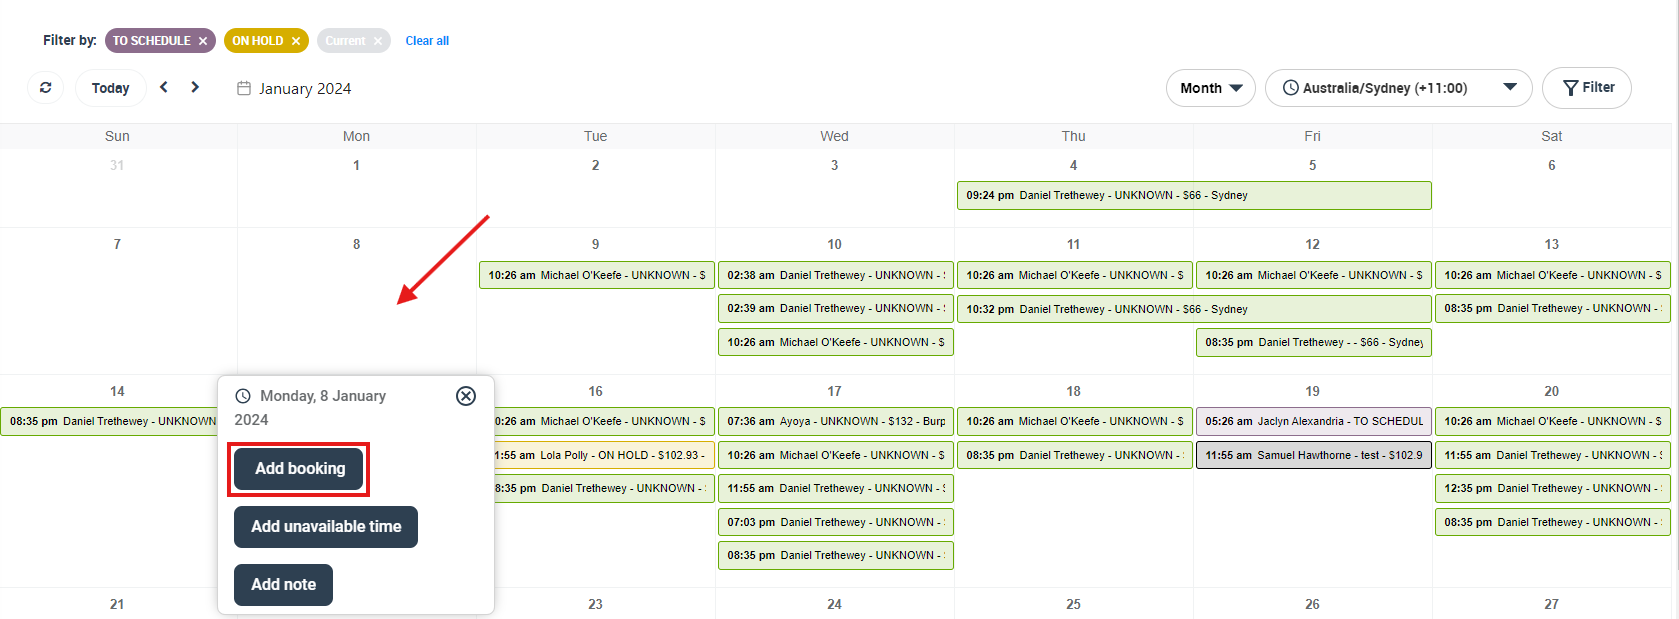
Step 2: Click the date (or time slot)
- Month view: click the date you want.
- Week/Day views: click the time slot (useful for time-based scheduling).
Step 3: Select “Add booking”
A quick action menu will appear. Click Add booking.
Step 4: Complete the booking details
You’ll be redirected to the Create New Booking page to enter the booking information, such as:
- Customer details (select an existing customer or add a new one)
- Service type (and any add-ons/options if applicable)
- Date & time (and duration or time window)
- Assigned fieldworker/technician (if assigning during booking creation)
- Location details (for on-site jobs) or meeting/remote instructions (for virtual services)
Step 5: Save
Click Save / Save Changes. The booking will appear immediately in your Calendar so you can continue scheduling with an up-to-date view.
Tip: If you prefer to dispatch later, you can create the booking first and assign a fieldworker/technician afterward (depending on your workflow and permissions).
If you want a full walkthrough of the booking form, see: Create a New Booking.
View and edit bookings from the Calendar
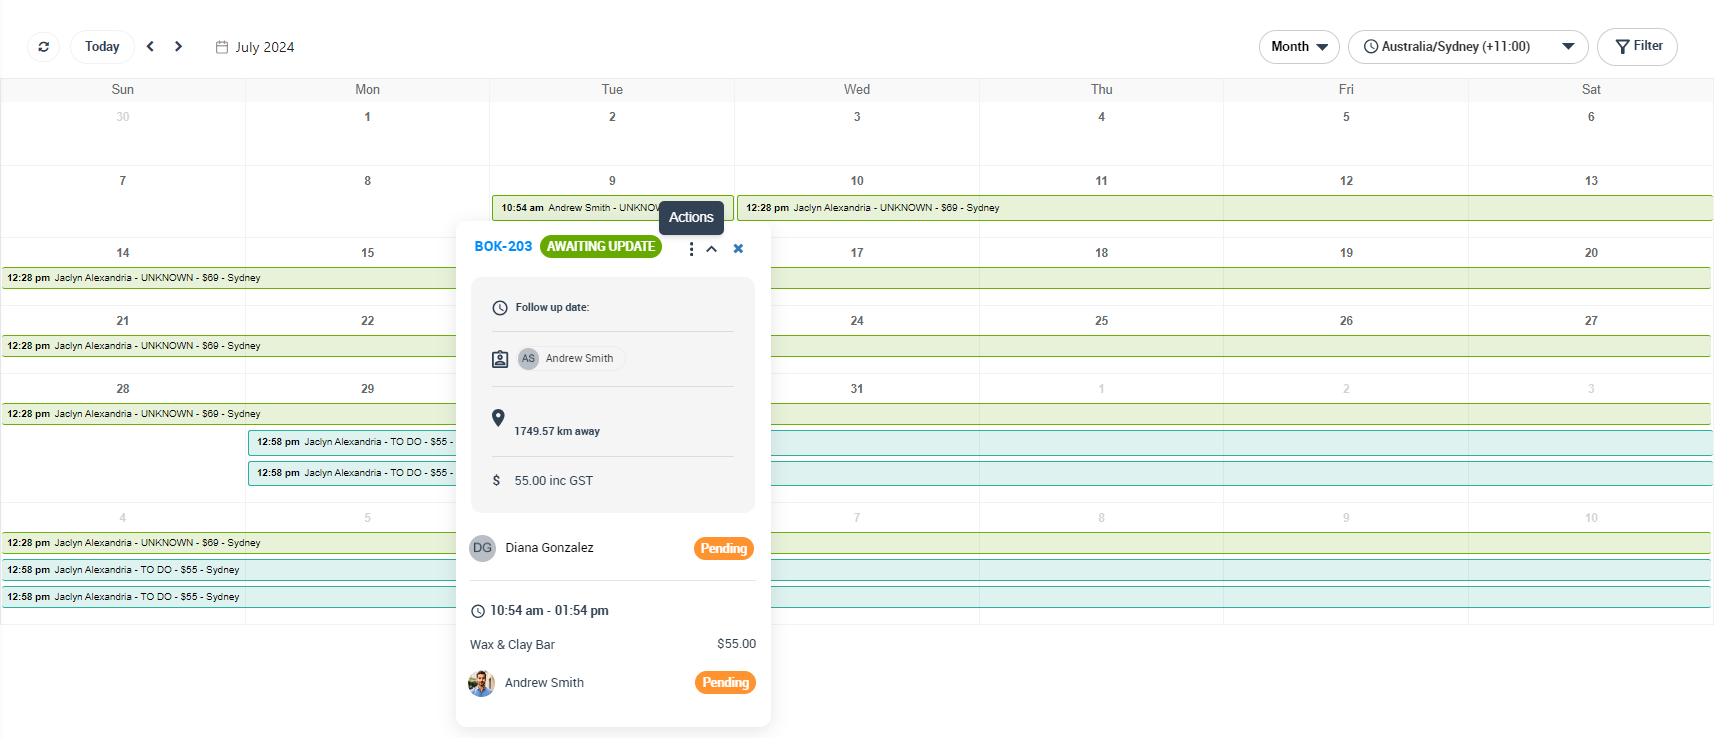
The Calendar isn’t just for visibility—you can also access key booking actions directly from it.
Click any booking on the Calendar to open a popup summary of the booking details. From there, you can typically:
- Click VIEW to open the full booking page (customer contact details, services, assigned fieldworkers/technicians, notes, history, and more).
- Click EDIT to modify booking details if the customer changes timing, service requirements, or other information.
Helpful links:
Optimize scheduling with filters
The Calendar includes powerful filters so you can focus on what matters most—especially if you manage multiple locations, a large team, or a high booking volume.
You can filter your Calendar by location/area, fieldworker/technician, booking status, and more—so your Calendar only shows relevant bookings.
- Filter by fieldworker/technician: quickly check a specific team member’s workload and gaps.
- Filter by location/area: manage scheduling by service region or branch.
- Filter by booking status: focus on scheduled vs in-progress vs completed work.
Learn more:
Best practices & examples
- Urgent customer request: While on the phone, open the Calendar, find the best slot, click it, and create the booking instantly.
- Fixed-site scheduling: Use Week/Day view to book appointments into available time blocks and reduce overbooking.
- Remote services: Add virtual sessions directly into the schedule so online workloads are visible alongside on-site work.
- Prevent overlaps: Block time off (breaks, leave, training) so bookings can’t be scheduled during unavailable periods.
Recommended resources:
Troubleshooting
- I don’t see “Add booking” when I click the Calendar.
Your role may not have permission to create bookings, or you may be viewing a mode where quick actions are restricted. Confirm your access settings. - I saved the booking but can’t find it on the Calendar.
Refresh the page and check whether filters (status, fieldworker, location/area) are hiding it. Also confirm you’re on the correct date range/view. - I can’t assign a fieldworker/technician.
Ensure the fieldworker is active and configured for the selected service (and check service areas/working hours if your account enforces availability rules). - Times don’t look correct.
Check the Calendar timezone selector (if available) and your account’s date/time settings.
Related articles
- Scheduling & Dispatching (Calendar Overview)
- Calendar Month View
- Calendar Week View
- Calendar Day View
- Calendar List View
- Blocking Unavailable Date/Time
- Adding Calendar Notes
- Filter Calendar by Area
- Filter Calendar by Booking Status
- Filter Calendar by Fieldworker
- View Fieldworker Google Calendar
To stay updated, please subscribe to our YouTube channel.