
Enabling Various Payment Methods for Online Bookings
Streamlined Payments for Bookings through your Website
Today’s digital landscape demands convenience at every click. When customers opt for online bookings via a website or customer portal, their next expectation is a smooth payment process. They might be an international client who finds bank transfers most feasible or a local customer who prefers paying through gift cards. By facilitating multiple payment methods for online bookings, businesses not only offer convenience but also exude trustworthiness and professionalism.
OctopusPro’s intuitive system is designed to meet these modern demands. Through this guide, we’ll walk you through the steps to activate diverse payment methods tailored for online bookings. The goal? To ensure that every customer, irrespective of their payment preference, has a seamless booking experience. Whether you’re aiming to reduce booking abandonment rates, appeal to a global audience, or simply make transactions hassle-free, this guide is your roadmap to a refined online booking process.
Dive in and transform the way your customers pay!
Setting Up and Integrating Diverse Payment Methods
To cater to a wide range of customer preferences and ensure that your business operations remain smooth, OctopusPro allows you to integrate and manage multiple payment options. Here’s a step-by-step guide on how to accomplish this:
- Initiating Payment Set-Up for Your Business:
- Path: Navigate to Settings > Financial Settings > Payment Integration.
- Purpose: This section lists all the payment gateways available for integration with your business. Before customers can use any payment method on your portal, it needs to be activated here.
- Details: Each payment gateway might have its unique requirements or API keys. Ensure you have all necessary information handy to enable and set up your desired method.
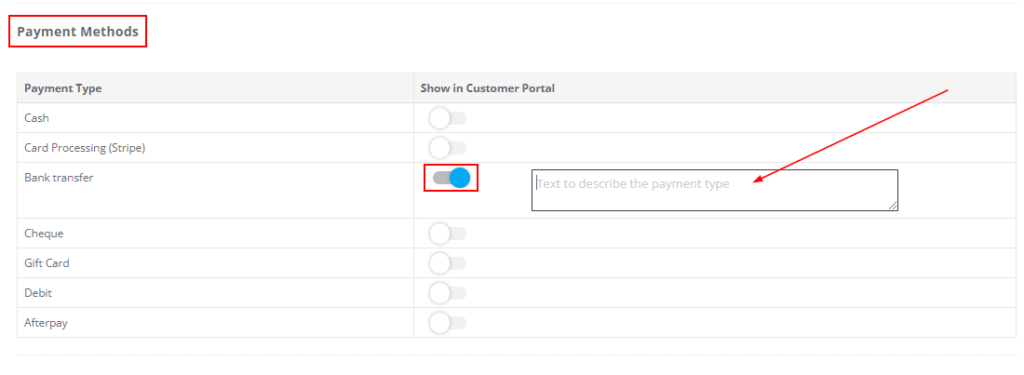
- Activating Business-wide Payment Methods:
- Action: Within the Payment Integration page, you will see toggle switches beside each payment method. Switch on your chosen methods to make them active for your business operations.
- Benefit: Activating diverse payment methods caters to a broader customer base, providing flexibility and enhancing user experience. Moreover, it streamlines your financial tracking and reporting.
- Integrating with the Customer Portal for Online Bookings:
- Path: Move to Settings > Customer Portal > General Settings.
- Purpose: This step ensures that your active payment methods are displayed to customers when they are booking through the portal.
- Details: Only payment methods activated in the Financial Settings will appear here. Toggle on the ones you wish to be available to customers. You might want to enable all or just a subset depending on your business strategy or the nature of the service.
- Benefit: Making diverse payment options visible on the portal reduces booking abandonment rates. Customers are more likely to complete a transaction when they find a payment method they are comfortable with.


Final Note: It’s crucial to remember that a payment method needs to be activated in both the Financial Settings and the Customer Portal to be fully functional for online bookings. This two-step process provides an added layer of control, ensuring businesses have the flexibility to manage internal and customer-facing payment options separately.
How to Enable Specific Methods:
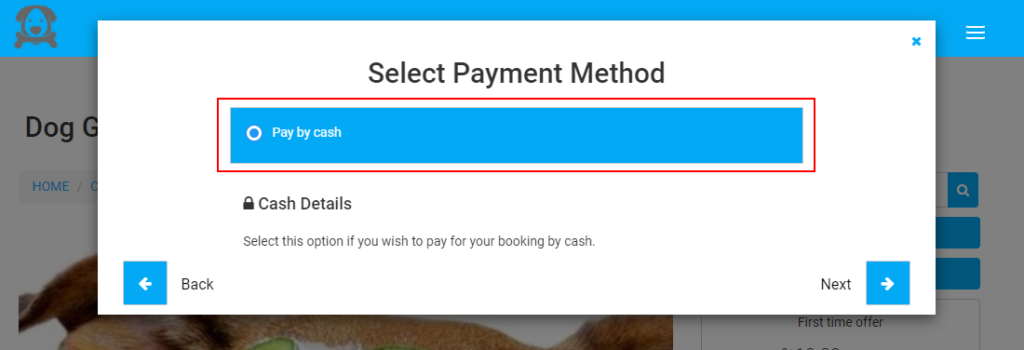
1. Cash Payments:
- To Enable: Activate the ‘Cash’ option.
- On Customer Portal: Upon choosing ‘Pay by Cash’ during checkout, any notes or remarks you’ve set will be displayed, offering guidance on cash transactions.
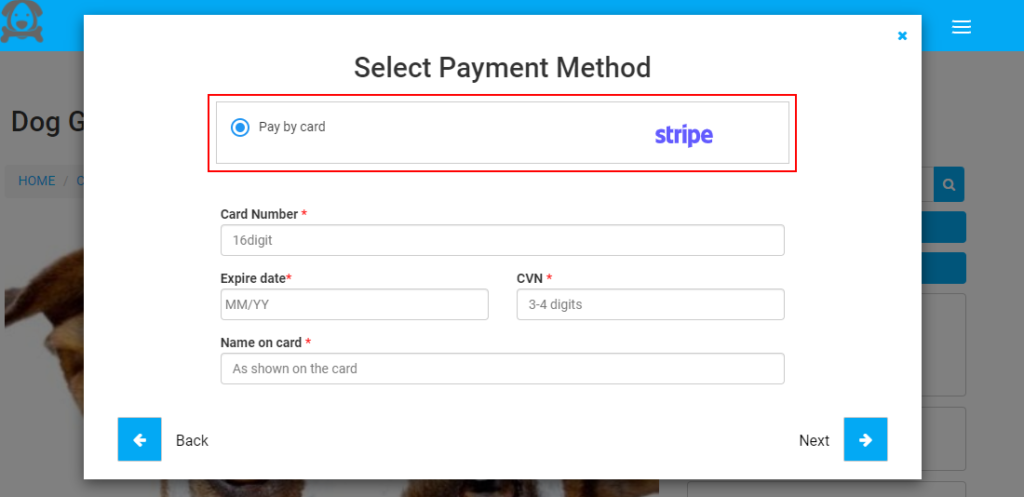
2. Card Payments:
- To Enable: Activate the ‘Card’ method.
- On Customer Portal: Customers can select the card payment option, prompting them to input their card details to finalize the booking.
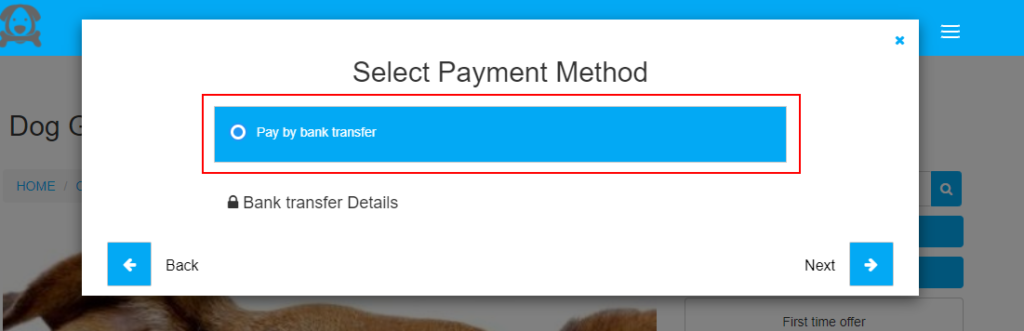
3. Bank Transfers:
- To Enable: Opt for ‘Bank Transfer’ and input any notes or instructions to aid the transaction.
- On Customer Portal: The ‘Bank Transfer’ option will be available. Your added instructions will display when this option is chosen.
4. Debit Payments:
- To Enable: Turn on the ‘Debit’ option and provide any accompanying guidance.
- On Customer Portal: The ‘Debit’ option will be shown. Selected remarks are showcased under ‘Debit Details’.
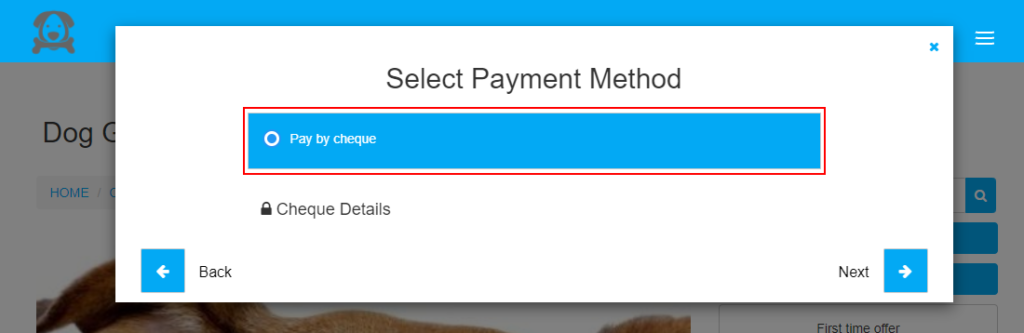
5. Cheque Payments:
- To Enable: Choose ‘Cheque’ and furnish essential remarks.
- On Customer Portal: Customers can select the cheque payment. The guidance you input will be available under ‘Cheque Details’.
6. Gift Card Payments:
- To Enable: Select ‘Gift Card’ and list any particular notes or guidance.
- On Customer Portal: When the gift card is chosen as a payment method, your specified guidance is visible under ‘Gift Card Details’.
Points to Remember:
- Before activating payment methods for the Customer Portal, ensure they are first enabled in Settings > Financial Settings > Payment integration.
- Only payment methods activated in the Financial Settings will be available for activation in the Customer Portal.
- The methods enabled in Financial Settings won’t automatically show in the Customer Portal; they need separate activation there.
To stay updated, please subscribe to our YouTube channel.