
Deleting Invoices (Delete vs Void vs Convert to Draft)
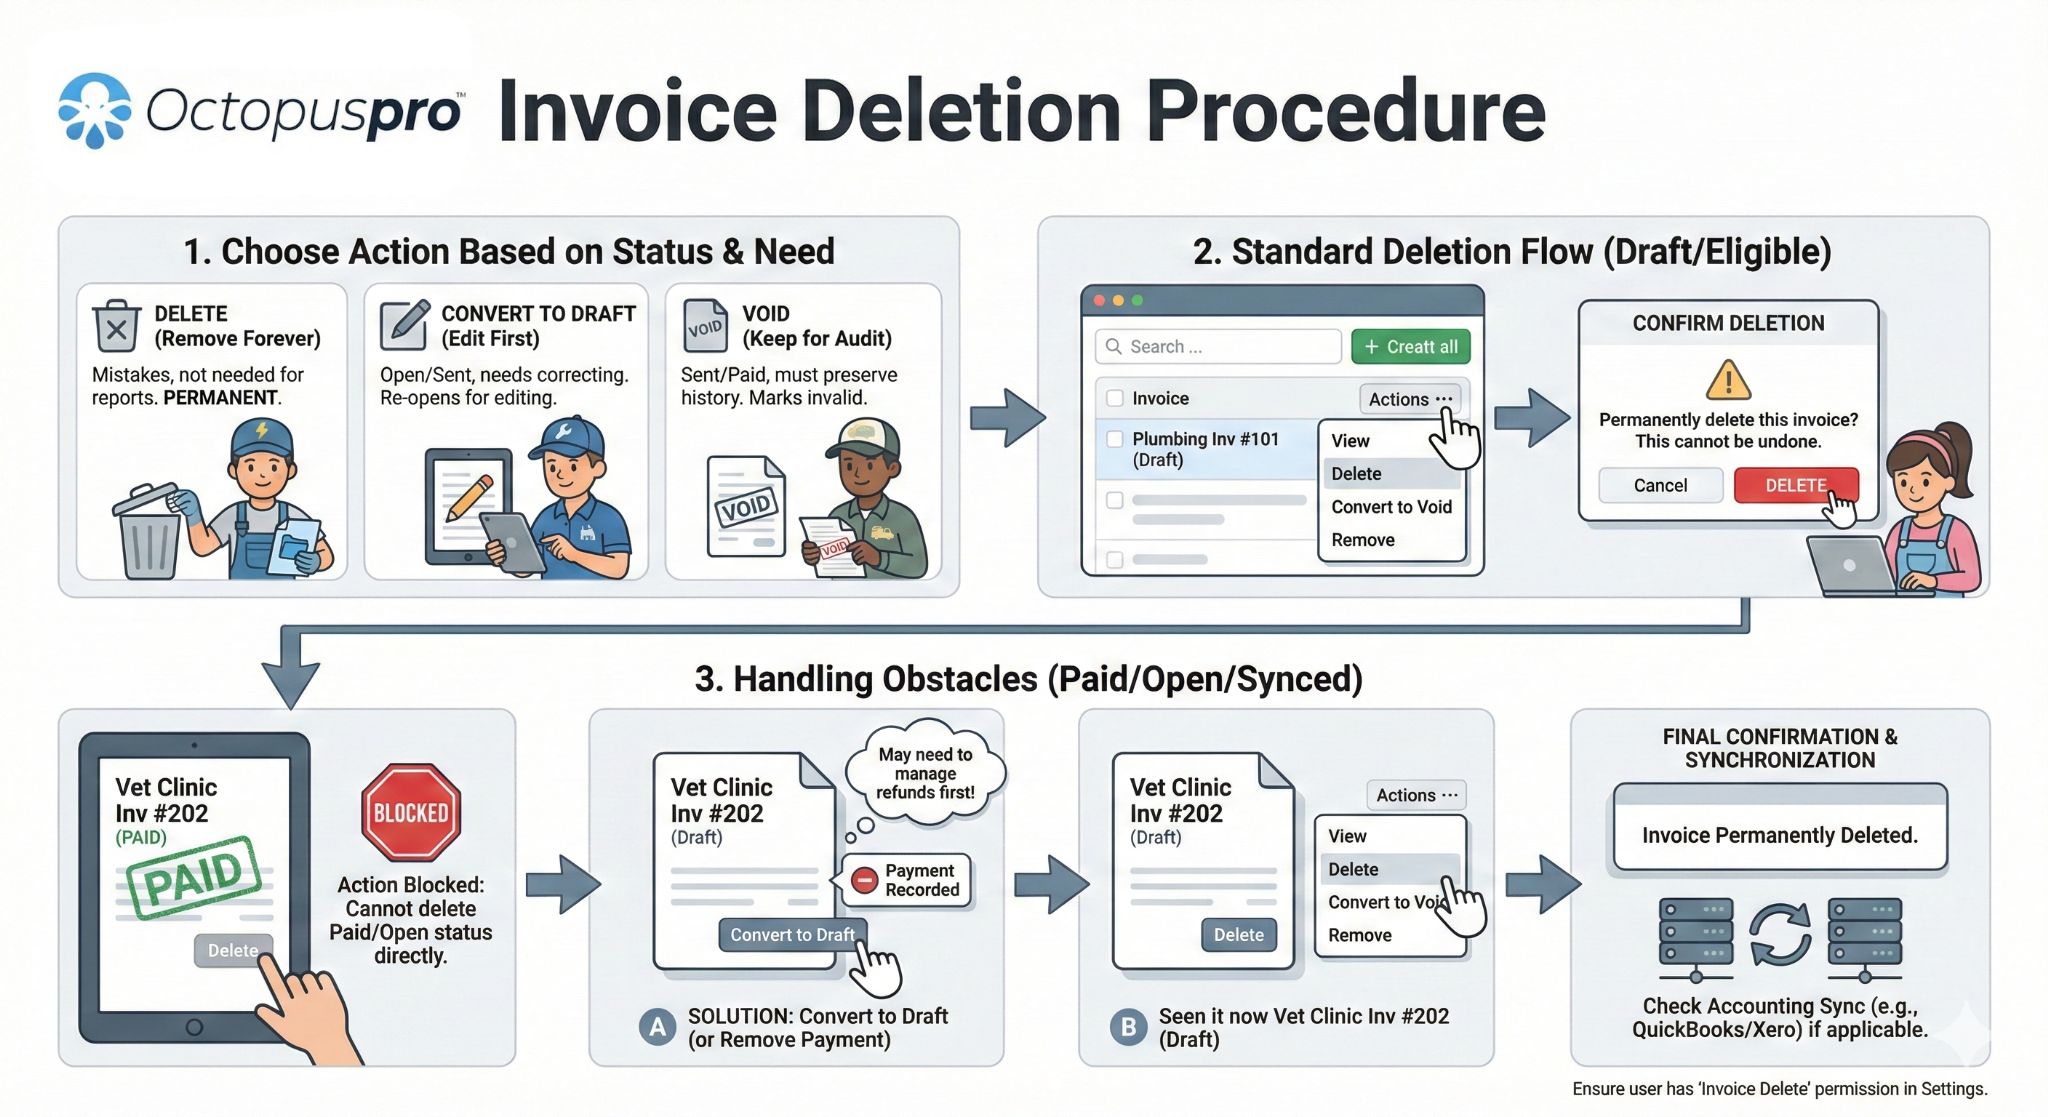
OctopusPro gives you multiple ways to correct invoice mistakes while protecting your financial records. Depending on the invoice status, you can:
- Delete an invoice (removes it from your account).
- Convert to Draft (re-opens editing, then you can delete if needed).
- Void an invoice (keeps it for audit/history, but marks it as no longer valid).
Best practice: If the invoice was already sent, viewed, paid, or synced to accounting software, voiding is often safer than deleting (keeps a clean audit trail). If the invoice was created by mistake and you don’t need a record of it, delete it.
Table of Contents
- Overview: When to Delete vs Void vs Convert to Draft
- Delete a Single Invoice (from the invoice list)
- If You Can’t Delete an Invoice (common reason)
- Delete Draft, Open, or Overdue Invoices
- Delete Paid/Closed Invoices (and invoices with payments)
- Delete a Voided Invoice
- Delete Multiple Invoices in Bulk
- Convert an Invoice to Draft (what it changes)
- Void an Invoice (when you should void instead)
- Deleting Merged Invoices
- Invoices Synced to QuickBooks / Xero
- Granting User Permission to Delete Invoices
- FAQs
- Related Guides
Overview: When to Delete vs Void vs Convert to Draft
- Delete (use when): invoice was created by mistake, is not needed for reporting, or must be fully removed.
- Convert to Draft (use when): invoice is open/overdue/sent and you need to edit or delete it (deletion may require Draft status first).
- Void (use when): invoice was sent, paid, or should remain in history for auditing—voiding preserves the record and marks it invalid.
Before you delete:
- Confirm you’re deleting the correct invoice number/customer (especially if using bulk delete).
- If you need a copy for records, export the invoice as a PDF.
- If it was paid, consider whether you need to refund first (see Refund Management).
- If the invoice is merged/locked, you may need to revert the merge first (see the Merged Invoices section).
- If the invoice is synced to accounting software, review Accounting Sync guidance first.
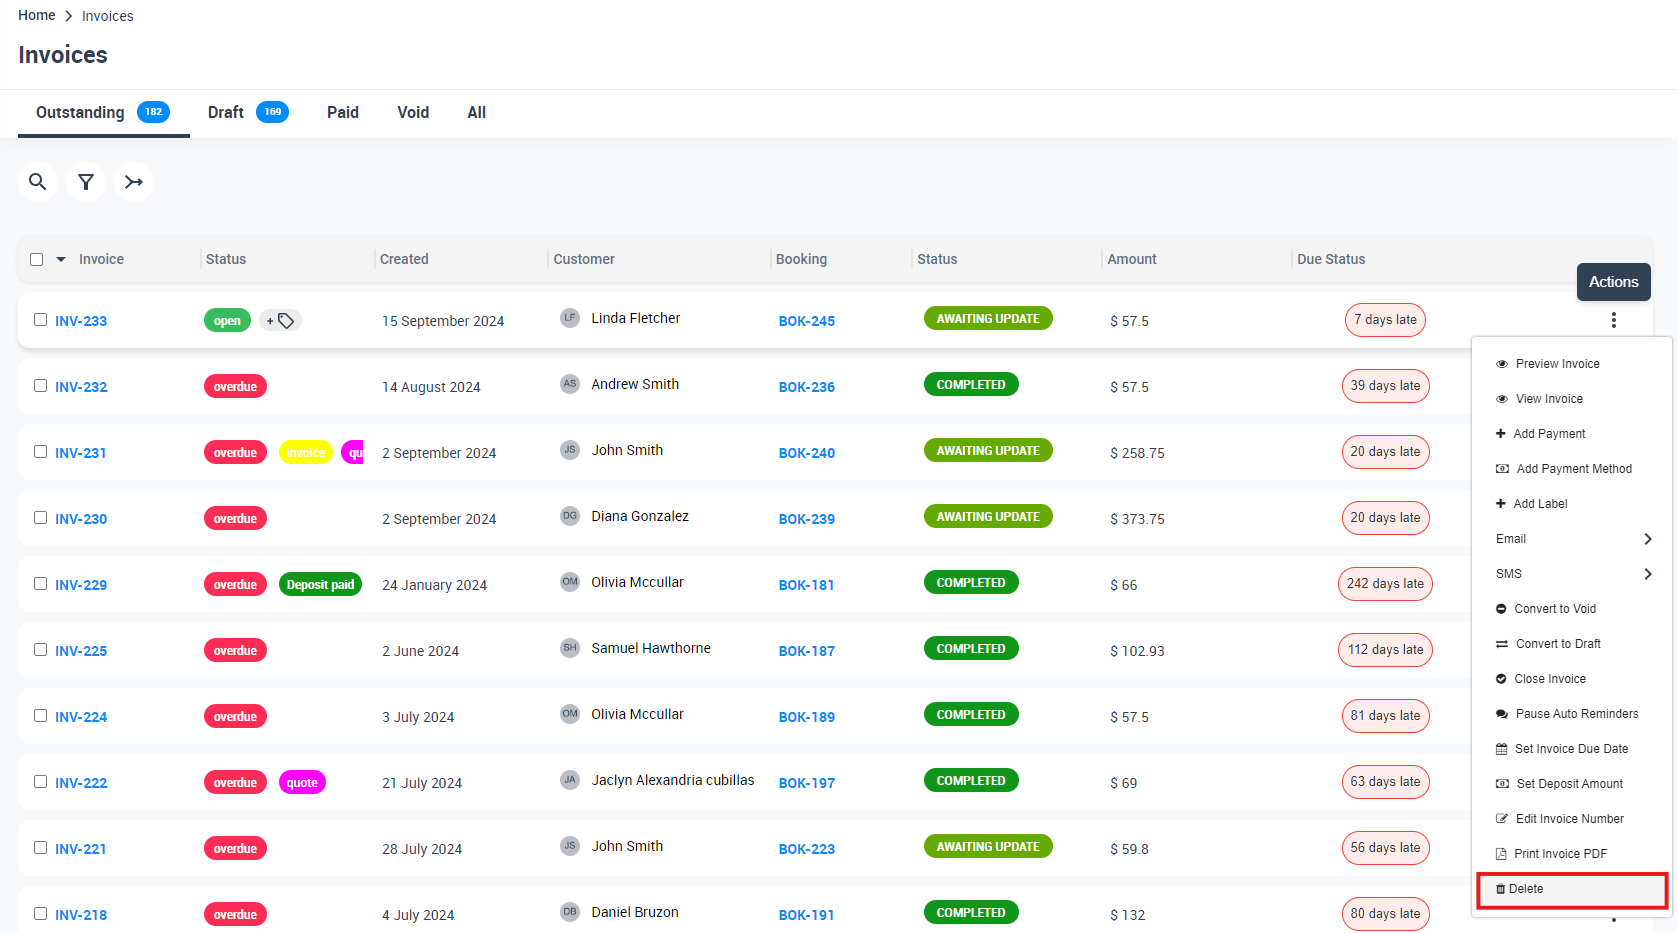
Delete a Single Invoice (from the invoice list)
To delete an invoice from the invoice list:
- Go to Invoices.
- Locate the invoice you want to delete.
- Click Actions (three dots) → select Delete.
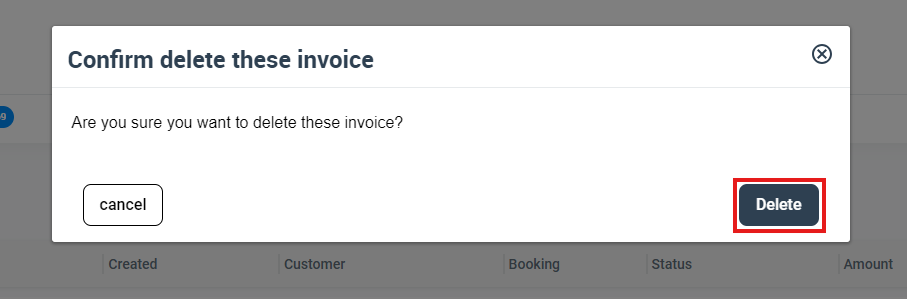
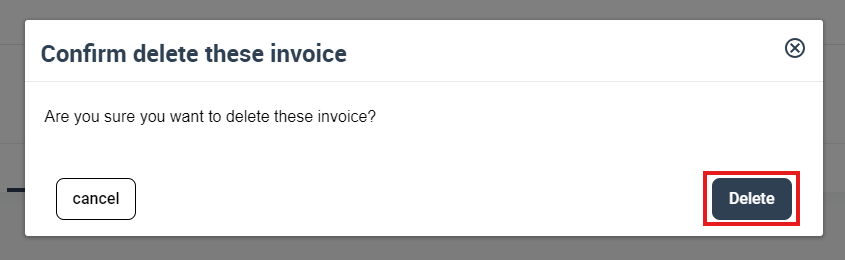
- Confirm the deletion.
If You Can’t Delete an Invoice (common reason)
In many cases, invoices must be in Draft status before they can be deleted. If you try to delete an invoice that isn’t eligible, you may see an error message prompting you to convert it to draft first.

Fix: Convert the invoice to draft (if available), then delete it. See: Delete Draft/Open/Overdue or Convert to Draft.
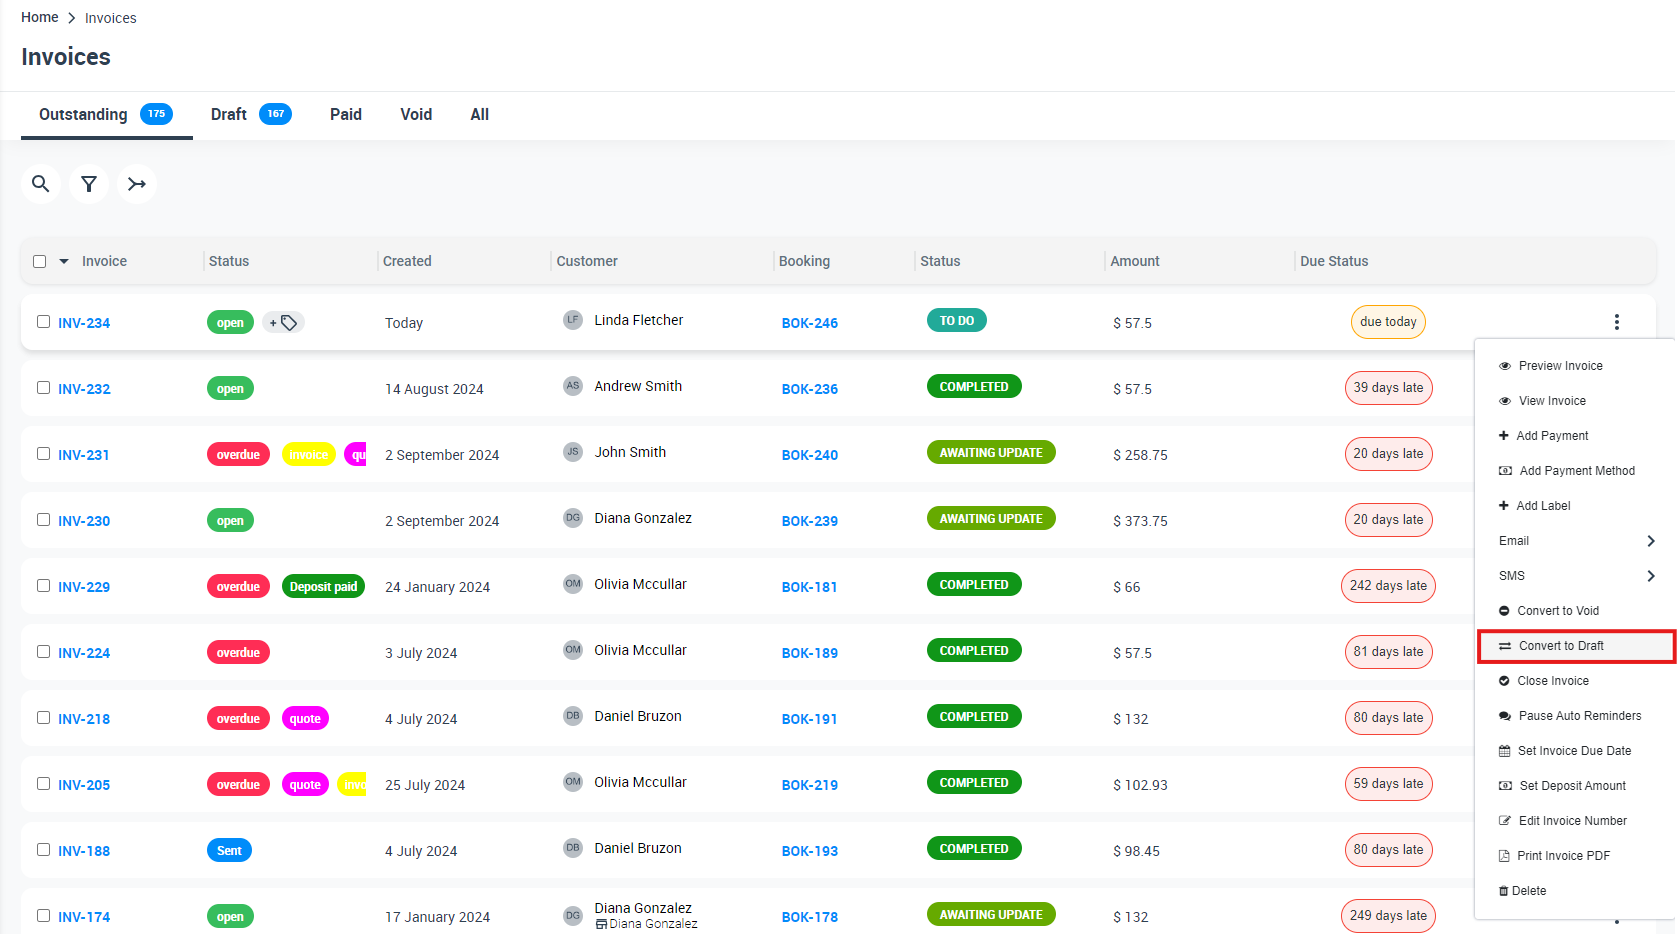
Delete Draft, Open, or Overdue Invoices
If the invoice is Open or Overdue, convert it to Draft first, then delete it.
- Go to Invoices → find the invoice.
- Click Actions → select Convert to Draft.
- Once it becomes Draft, click Actions → Delete.

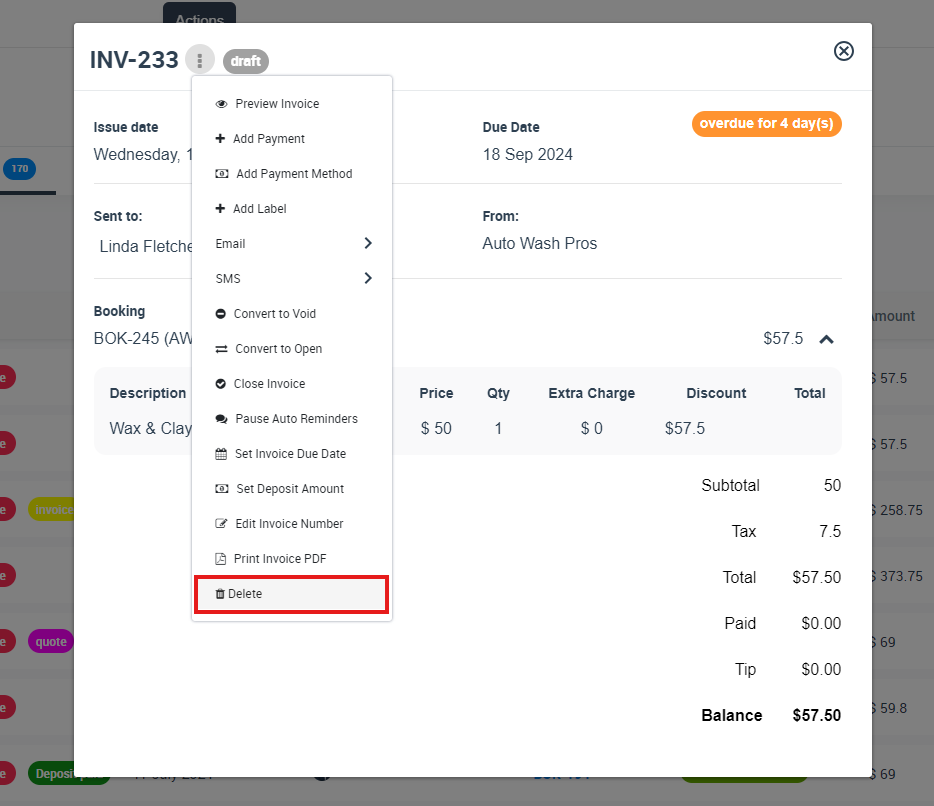
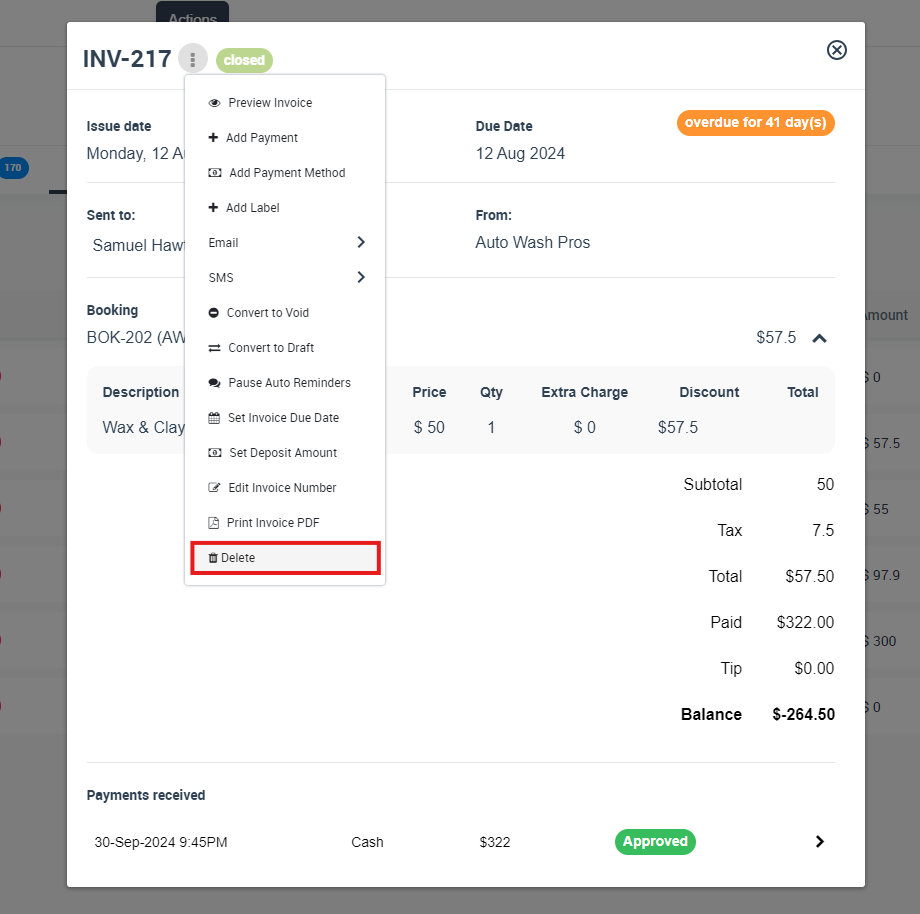
After converting to Draft, you can delete from the invoice details screen as well:
Once deleted successfully, you may see a confirmation message:

Delete Paid/Closed Invoices (and invoices with payments)
If you need to delete a Paid/Closed invoice (or an invoice that already has payments added), you may be able to delete it directly, or you may need to convert it to Draft first (depending on the invoice and your account rules).
- Go to Invoices → open the Paid tab (or locate the invoice from All invoices).
- Select the invoice.
- Click Actions → Delete (or convert to Draft first if required).
- Confirm deletion.
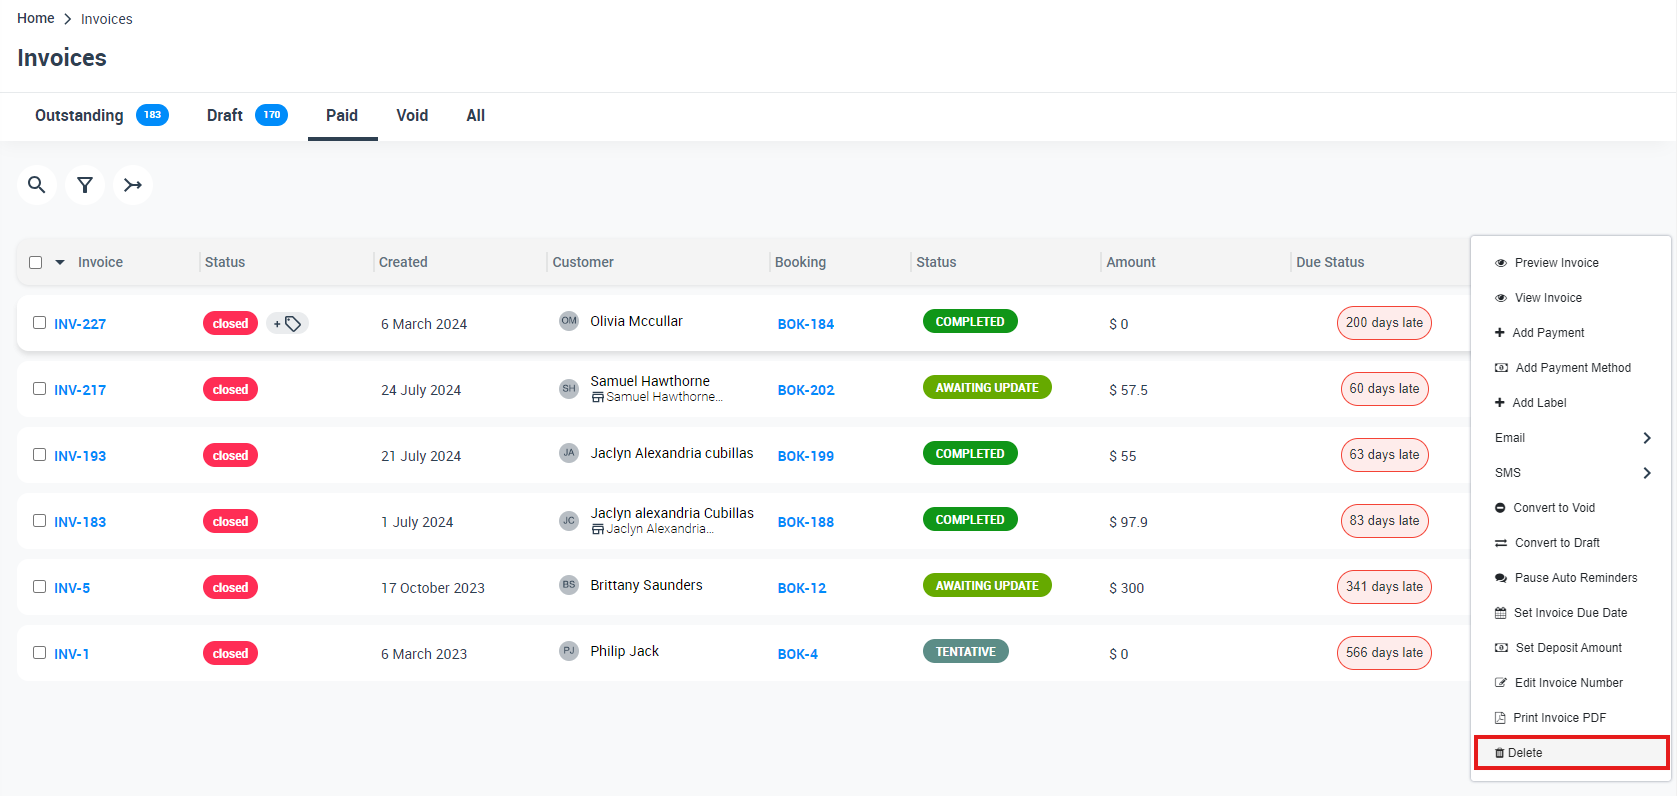
You can also delete from the invoice details page (if the option is available):
Important: Deleting paid invoices can affect reporting and payment history. If you need an audit trail (or the invoice was already shared with the customer), consider voiding instead and managing any refund via Refund Management.
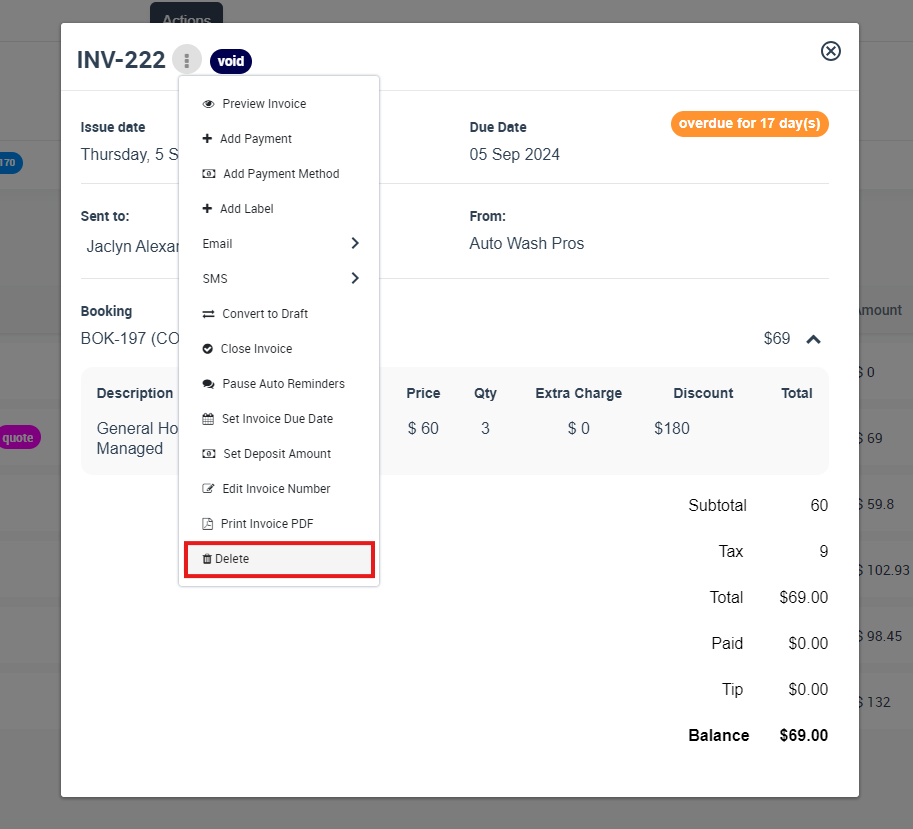
Delete a Voided Invoice
To delete a Voided invoice:
- Go to Invoices → open the Void tab.
- Select the invoice.
- Click Actions → Delete.
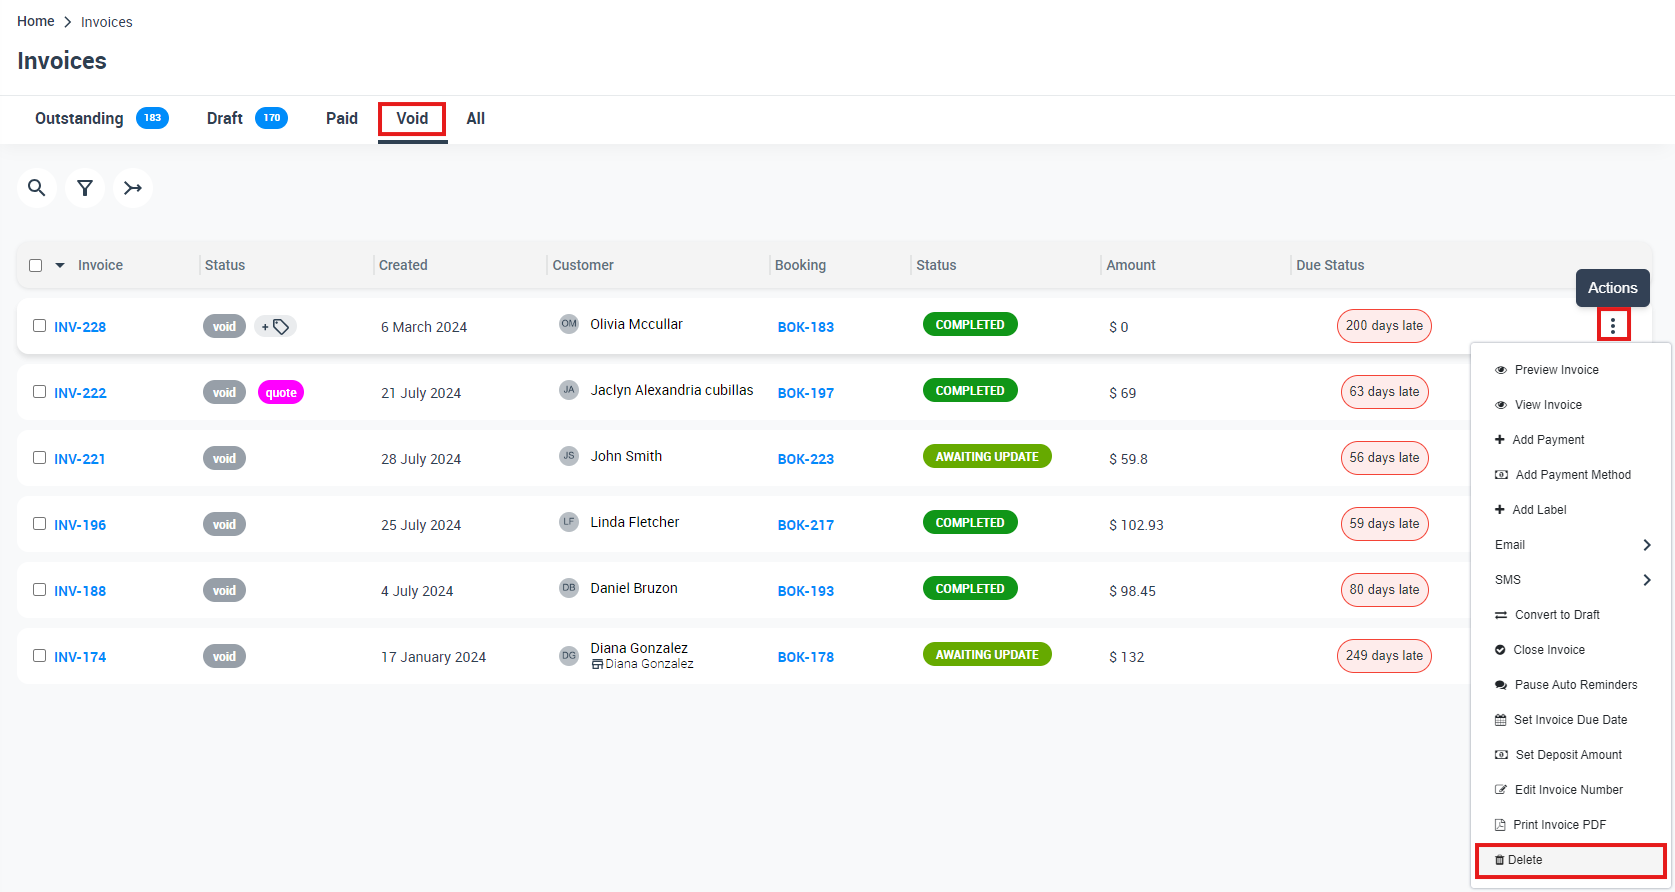
You can also delete a voided invoice from the invoice details page:
Note for synced invoices: If the invoice was synced to QuickBooks/Xero, there may be restrictions. Review Accounting Sync before deleting.
Delete Multiple Invoices in Bulk
OctopusPro supports bulk actions for faster cleanup. In most cases, only Draft invoices can be deleted, so you may need to bulk convert invoices to Draft first.
- Go to Invoices → All invoices.
- Select multiple invoices (or use the “Select All” checkbox dropdown).
- Choose Convert to Draft (if needed).
- Select the invoices again → choose Delete.
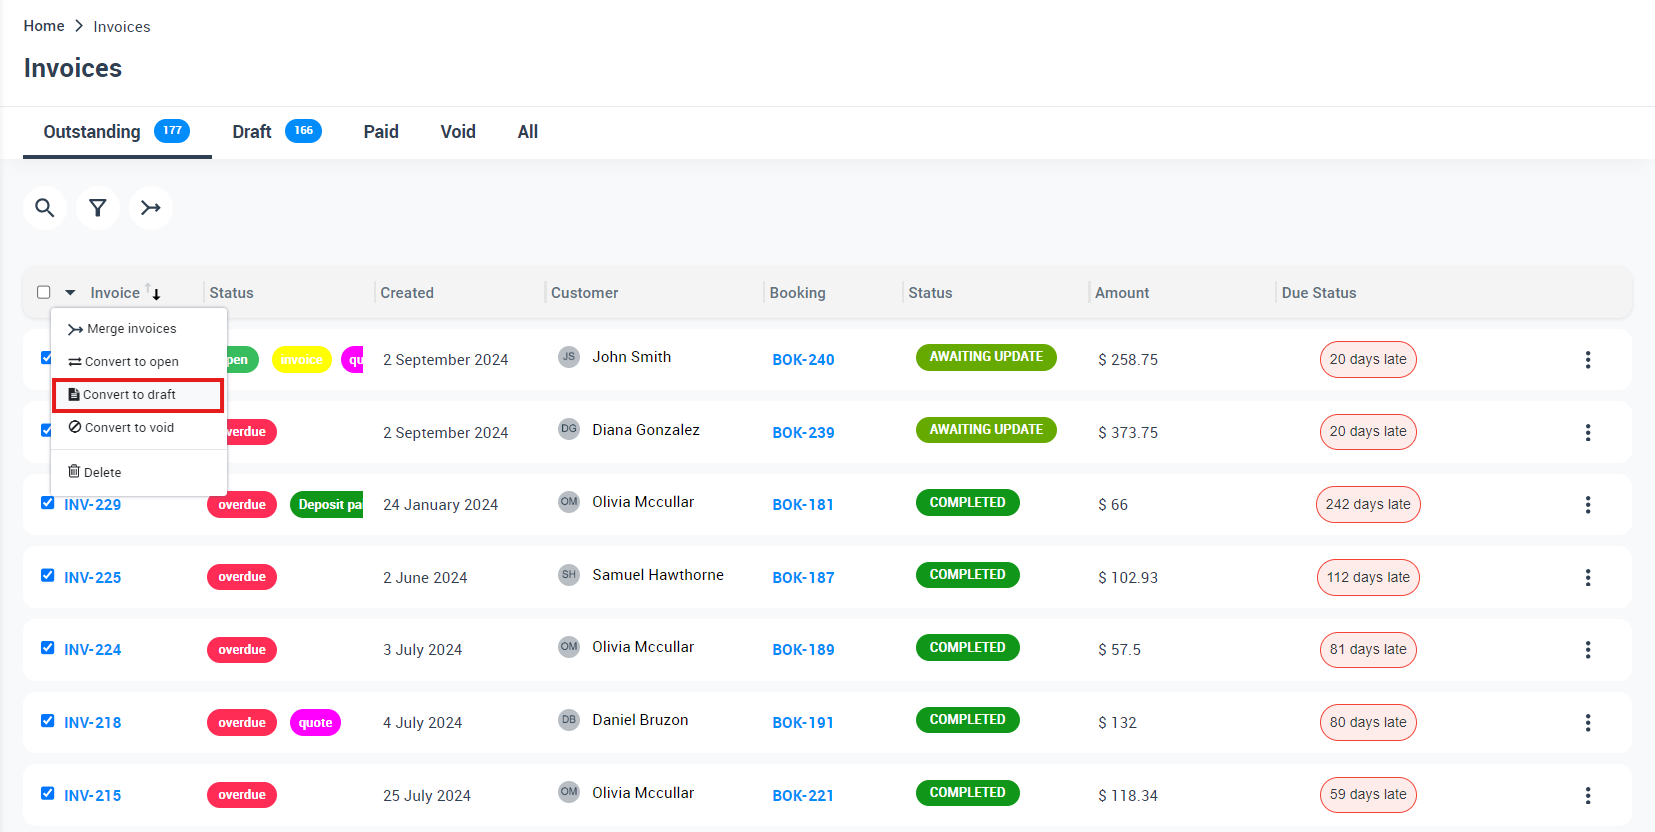
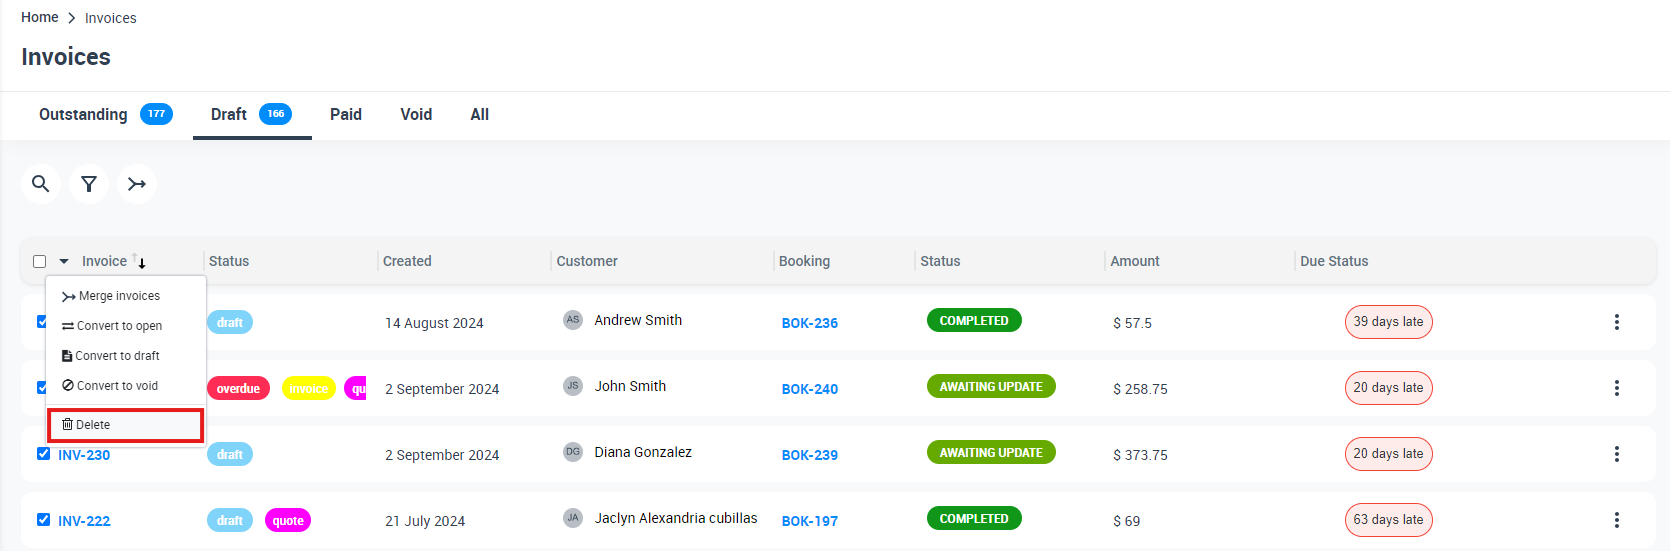
Bulk deletion tip: Double-check your selection before deleting. Bulk actions are powerful and can permanently remove invoices you didn’t intend to delete.
Convert an Invoice to Draft (what it changes)
Converting an invoice to Draft is useful when you need to edit an invoice that was previously open/overdue or already shared. After converting to draft, you can update it and resend, or delete it if needed.
Important: Converting an invoice to Draft may remove the “sent/viewed” history and can impact associated payments or credits. Use this action carefully—especially if the invoice was already paid.
Learn more: How to Convert an Invoice to Draft
Void an Invoice (when you should void instead)
Voiding an invoice keeps the record for reporting and auditing, but marks the invoice as no longer valid. This is often the best option when the invoice was already sent to the customer or was paid and you need to keep a traceable history.
Common examples:
- You sent the invoice, but the job was canceled.
- You need to correct the invoice and want to preserve the original record.
- The invoice was paid and you need to invalidate it while keeping clean accounting history.
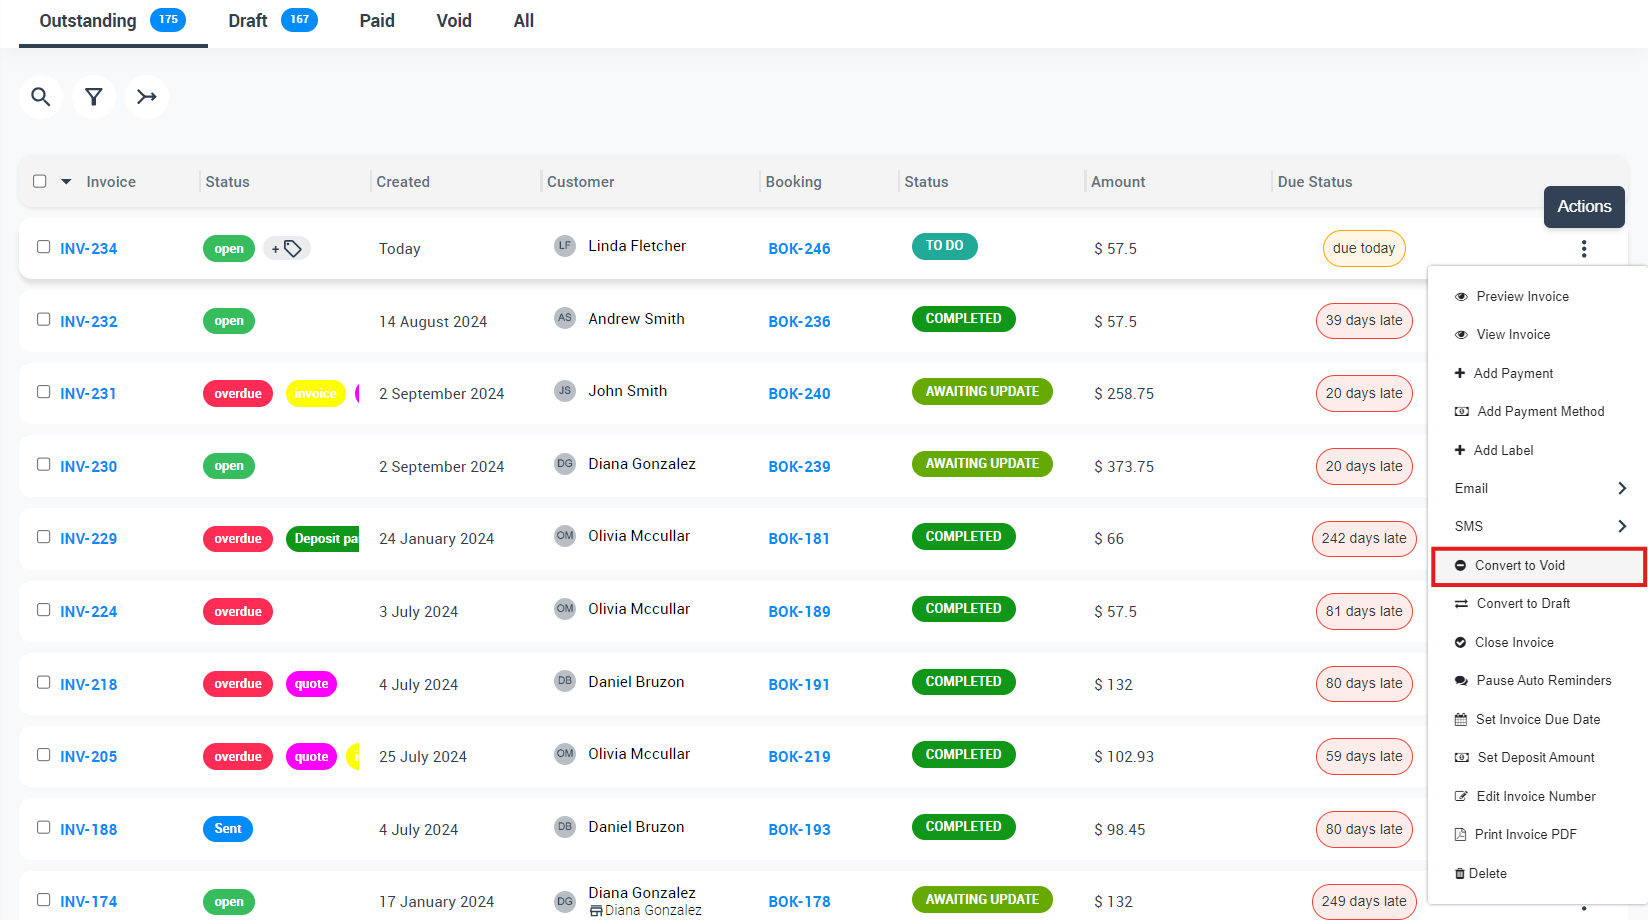
To void an invoice:
- Go to Invoices → locate the invoice.
- Click Actions → Convert to Void.
- Confirm the action.
After voiding, the invoice will show as void in the invoice details view:
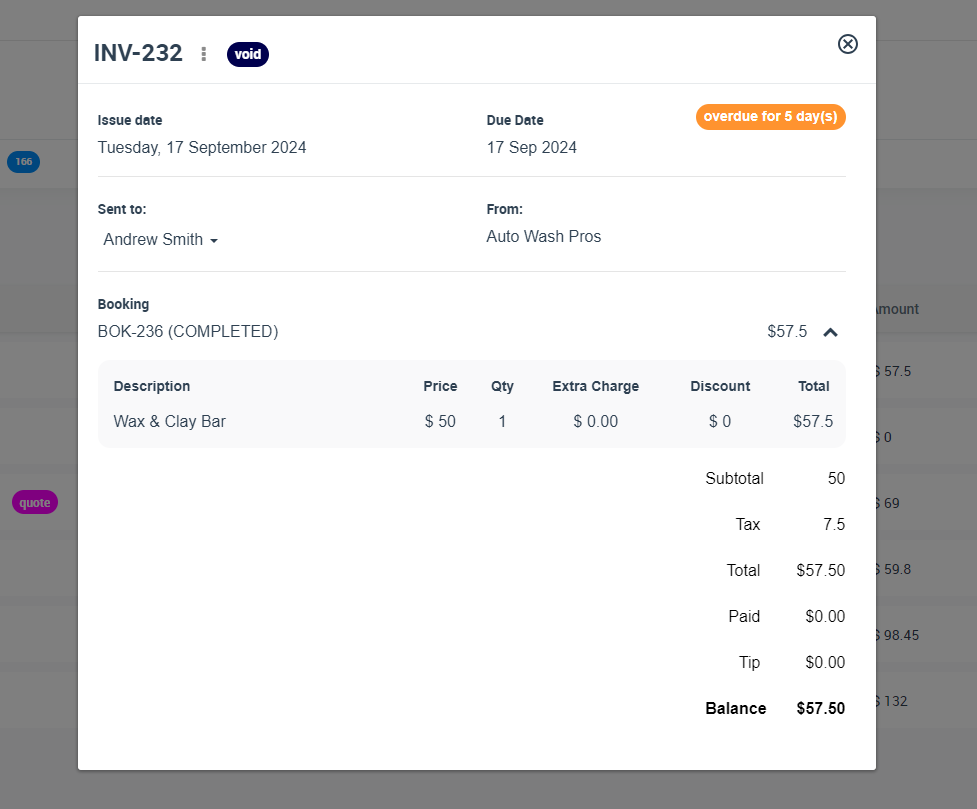
Payments & refunds: After voiding, the invoice becomes non-editable and you generally can’t add new payments. If the invoice was paid and a refund is required, use Refund Management and follow your accounting process.
Learn more: How to Void an Invoice
Deleting Merged Invoices
If an invoice has been merged (consolidated) into a group invoice, you usually can’t delete individual merged invoices until the merge is reverted.
How to revert the merge, then delete:
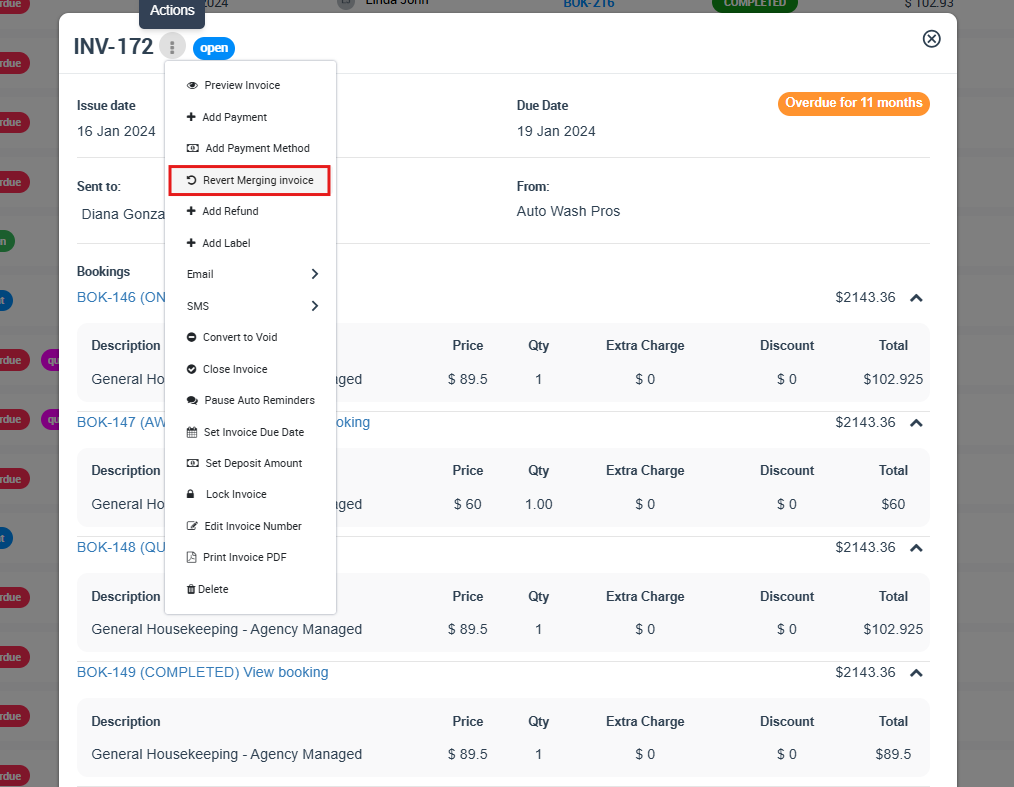
- Open the merged/group invoice.
- Click Actions → select Revert Merging invoice.
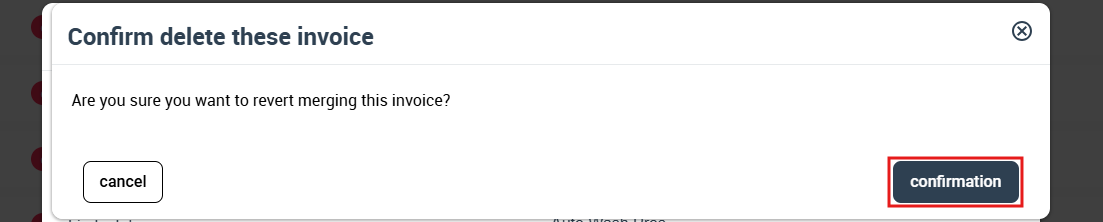
- Confirm the revert action.
- Once invoices are separated, locate the individual invoice and delete it (or re-merge later if needed).

Helpful references:
Invoices Synced to QuickBooks / Xero
If invoices are synced to accounting software (e.g., QuickBooks or Xero), be cautious when deleting or voiding. Depending on the sync rules, deleting in one system may not always mirror perfectly in the other.
- Best practice: Prefer voiding over deleting for synced invoices when you need an audit trail.
- If you must delete a synced invoice, you may need to remove it in the accounting platform first, then re-sync so both systems match.
- If your accountant requires a clean audit trail, keep the invoice and void it instead.
For stronger traceability, you can also review invoice actions via the Invoice History Log.
Granting User Permission to Delete Invoices
If a user can’t see the Delete option, they likely don’t have invoice deletion permission.
How to enable invoice delete permission:
- Go to Settings → Users.
- Edit the user (or role/profile) you want to update.
- Find Permissions for Invoices.
- Enable Invoice Delete (or the equivalent delete permission).
- Save changes.


Learn more: Role-Based Access Control & User Permissions
FAQs
Can I restore a deleted invoice?
Deleted invoices are generally permanent. If you need to keep history, consider voiding instead.
Why doesn’t the Delete option show for some invoices?
Common reasons include: the invoice status must be Draft first, the invoice is merged/locked, the invoice is synced to accounting software, or the user lacks permissions.
Should I delete or void if the customer already received the invoice?
In most cases, voiding is better because it preserves the audit trail and shows the invoice is no longer valid.
Related Guides
- Invoice, Billing, Payment, and Refund Management
- How to View and Manage an Invoice
- How to Edit or Update an Invoice
- Sending Invoices to Customers (Email/SMS)
- Export an Invoice as a PDF
- Convert Invoice to Draft
- Void an Invoice
- Add a Payment to an Invoice
- View Invoice Payments
- Refund Management
- Invoice History Log
To stay updated, please subscribe to our YouTube channel.