
Filter Calendar by Booking Status
Filtering your Calendar by Booking Status (also called Job Status or Work Order Status) helps you focus on the right jobs—without changing any booking details. This is ideal for dispatching, daily workload reviews, and keeping your schedule clean and easy to manage.
Use this when you want to:
- Show only Upcoming work (e.g., Scheduled / To Do).
- Review only In Progress jobs for today.
- Hide completed/cancelled bookings and focus only on active work.
- Audit what was Completed this week before invoicing or payroll.
- Combine status filtering with other Calendar filters (fieldworker, labels, area, location type, etc.).
On this page
- What this filter does
- Key terms (booking status vs assignment status)
- How to filter the Calendar by booking status
- Optional filters (assignment status & payment status)
- Tips & best practices
- Troubleshooting & FAQs
- Related articles
What this filter does
The Booking Status filter controls which bookings appear on your Calendar. It does not change any booking data (status, assigned fieldworker, invoice, payments, or customer details). It only changes what you see on-screen.
Benefits:
- Faster dispatching: reduce clutter and focus on jobs that need action.
- Cleaner schedule: hide completed/cancelled work while planning.
- Better visibility: quickly review what’s pending vs in progress vs completed.
Need to change or customize booking statuses? Status names and workflow stages can be configured for your business here: Managing Booking Statuses.

Key terms (booking status vs assignment status)
- Booking Status: your internal workflow stage (e.g., Scheduled, In Progress, Completed, Cancelled). This is the main filter covered in this guide.
- Assignment Status: the job request response state (e.g., Accepted, Pending, Declined) when your workflow uses job requests for fieldworkers.
Simple rule: Booking Status = workflow stage, while Assignment Status = who accepted (or hasn’t accepted) the job request.
How to filter the Calendar by booking status
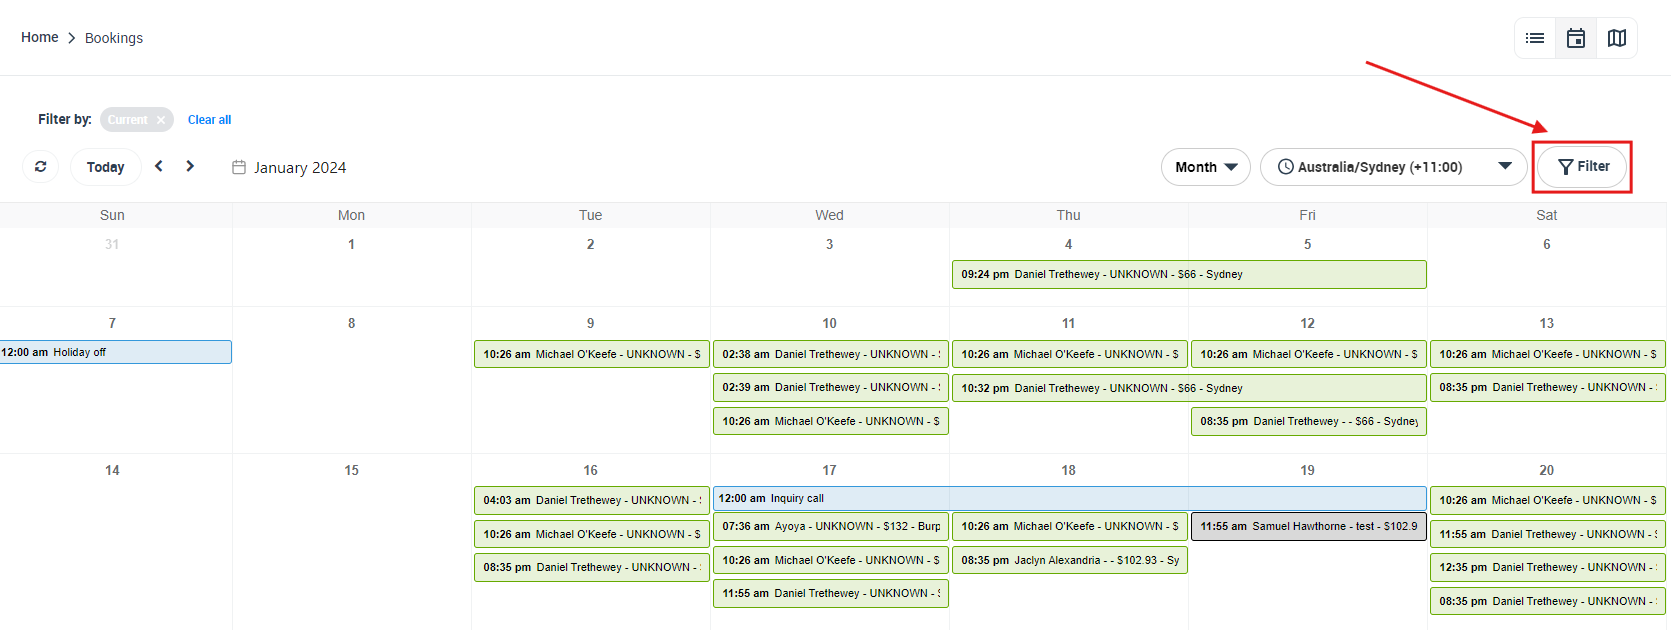
1) Open the Calendar filters
- Go to Bookings > Calendar.
- Click Filters (top-right) to open the filter panel.
2) Select one or more booking statuses
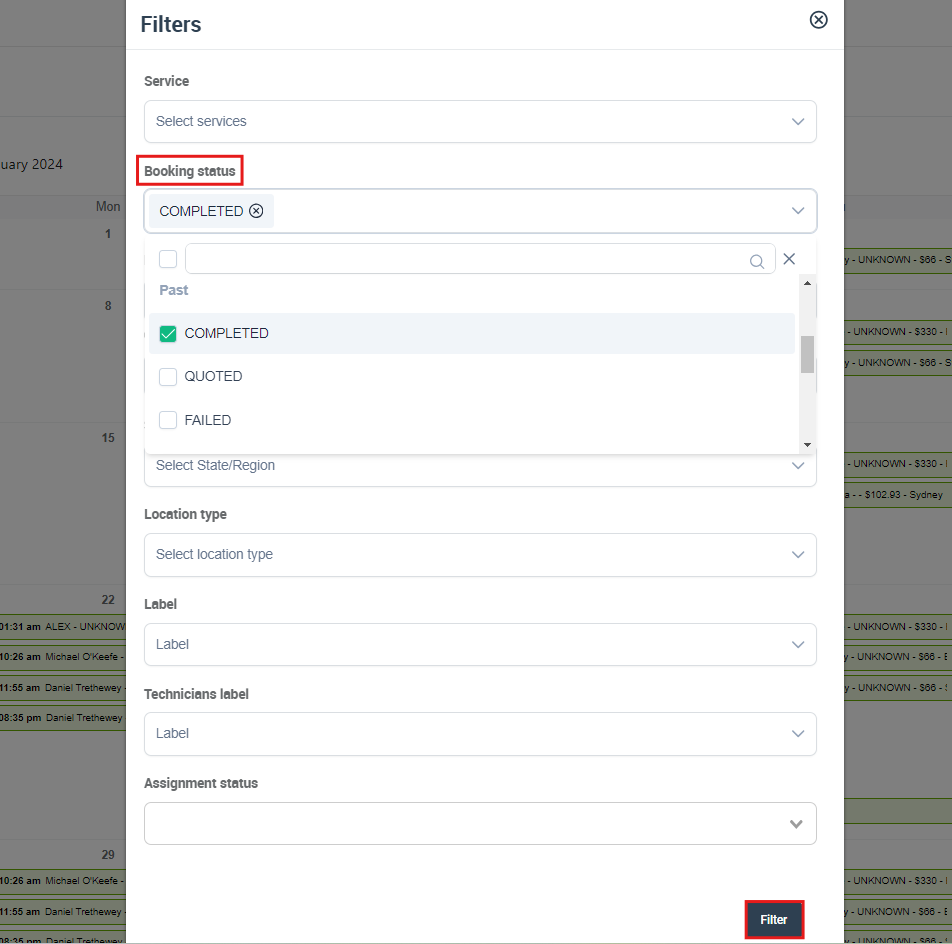
- In the filter panel, open the Booking status dropdown.
- Select one status (e.g., Completed) or multiple statuses (e.g., Scheduled + In Progress).
- Click Filter to apply.
3) Review the filtered Calendar view
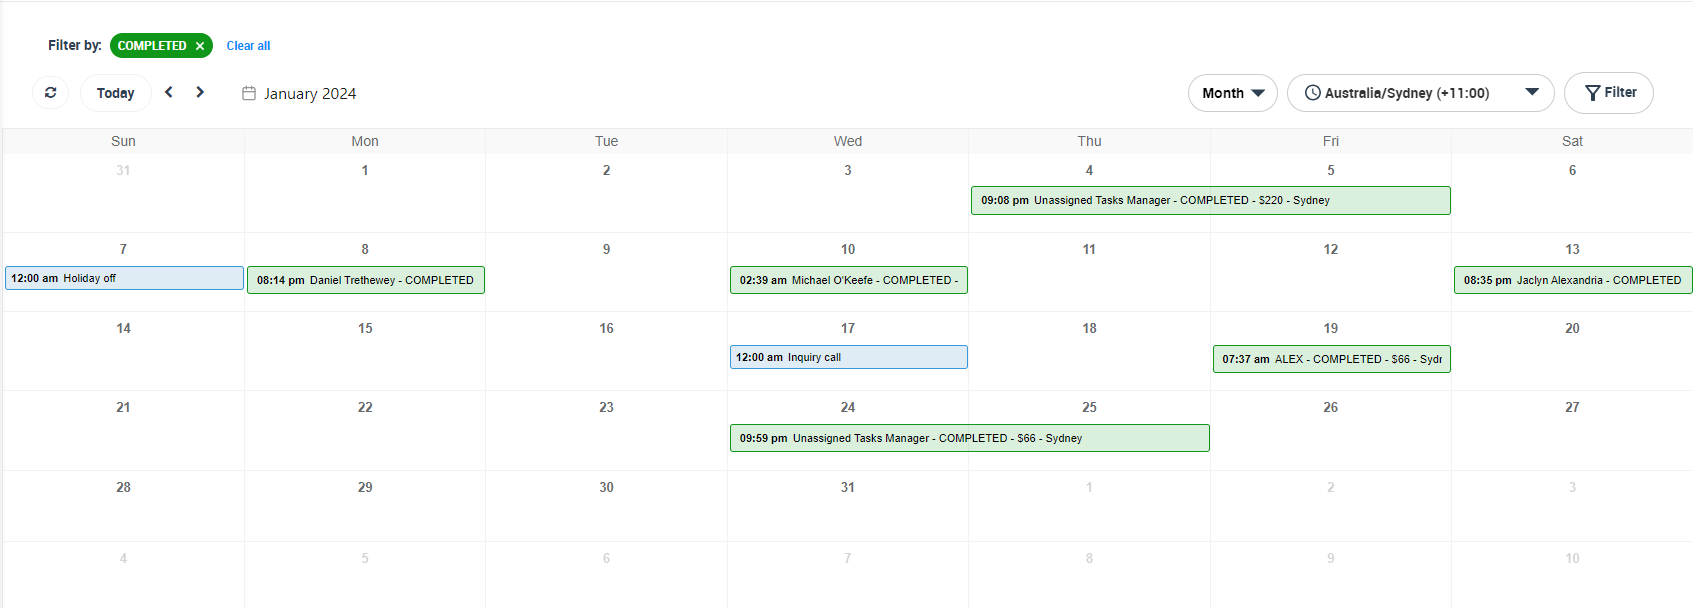
Your Calendar will now show only bookings that match the selected status(es). You can still switch Calendar views (Month/Week/Day/List) while the filter remains active.
4) Review booking details while filtered (optional)
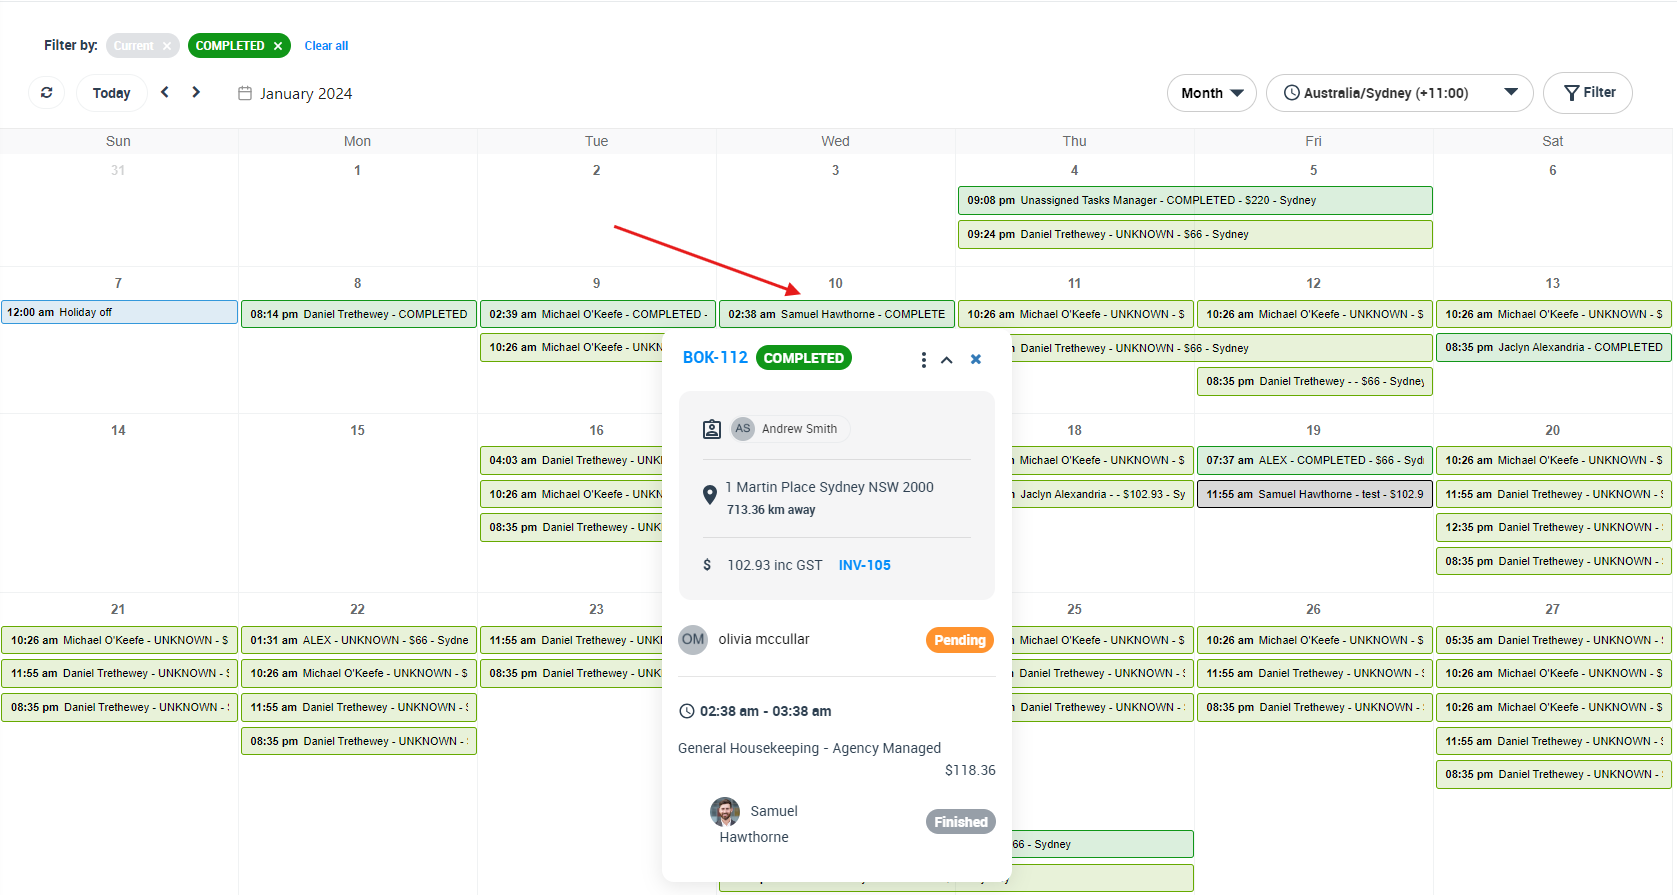
Click any booking to view key details and take actions (depending on your permissions) without removing the filter.
5) Change or clear your filters
- To adjust results, reopen Filters, change your selected statuses, then click Filter again.
- To return to the full view, use Clear all (where available) or remove the selected filter values, then re-apply.
Note: Filters only affect your current Calendar view and do not change booking data.
Optional filters (assignment status & payment status)
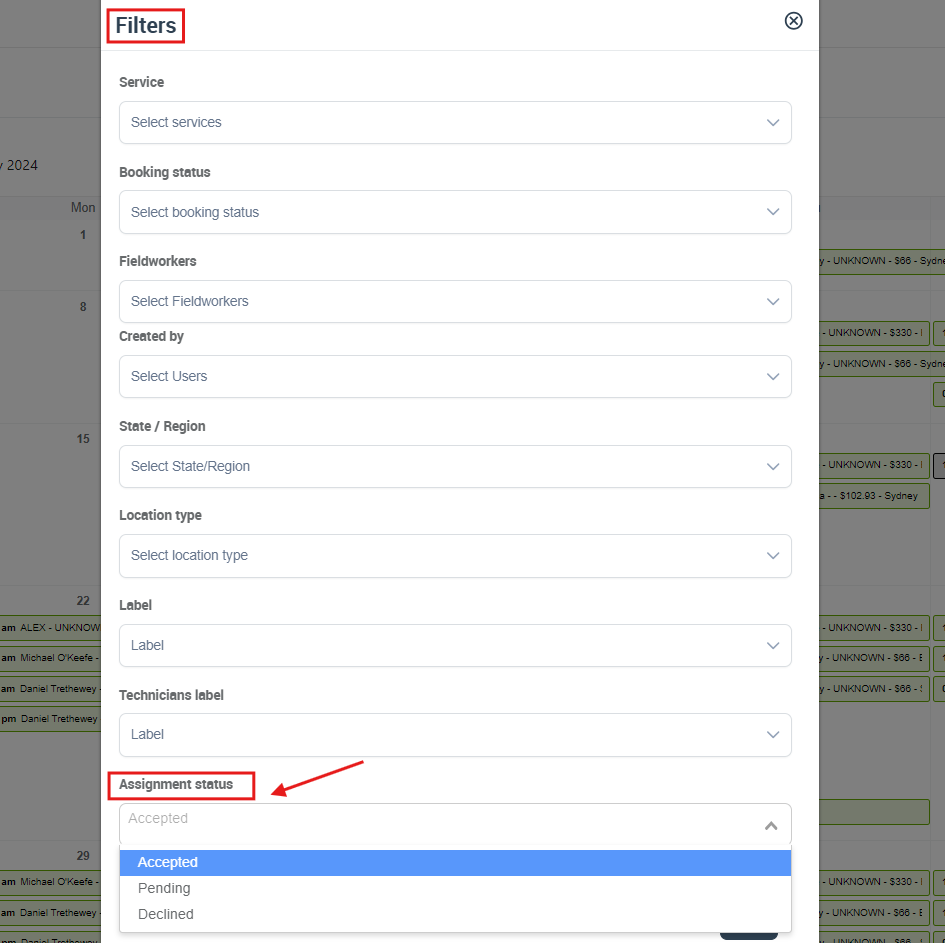
Filter by assignment status (job requests)
If your workflow uses job requests, you may also see an Assignment status filter. This helps you quickly find bookings that are still awaiting a fieldworker response (Pending), already accepted (Accepted), or declined (Declined).
- Pending: follow up or re-send requests to ensure the job is accepted.
- Accepted: confirmed jobs for dispatch and route planning.
- Declined: bookings that may need re-dispatching or manual assignment.
Filter by payment status (if enabled)
Depending on your account configuration, you may also have a Payment status filter. This can help you separate bookings that are paid vs unpaid, so you can prioritize follow-ups, invoicing, or reconciliation. Payment status options may vary based on your payment and invoicing setup (for example: Paid, Unpaid, Partially Paid).
Tips & best practices
- Create a clean workflow: keep booking statuses simple and operational (e.g., Scheduled, In Progress, Completed, Cancelled).
- Use multiple statuses as a “work queue”: filter by Scheduled + In Progress to manage only active work.
- Combine filters for precision: filter by Booking status + Fieldworker + Area to manage a specific team or region.
- Use labels for operational flags: labels can complement statuses (e.g., “VIP”, “Call before arrival”, “Needs parts”).
- Standardize your status rules: define when staff should move a booking from Scheduled → In Progress → Completed to keep reporting accurate.
Troubleshooting & FAQs
My Calendar is empty after filtering—why?
- There may be no bookings in the selected date range with the status(es) you chose.
- Another filter (fieldworker, area, label, location type, etc.) may also be applied—try clearing all filters and applying only Booking status.
Does filtering change the booking status?
No. Filtering only changes what you see on the Calendar screen. To change a booking’s status, update the booking itself.
Can I select multiple booking statuses?
Yes. Selecting multiple statuses is a great way to create a focused view (for example: Scheduled + In Progress) and reduce Calendar clutter.
Why can’t I see some filter fields (assignment status, payment status, etc.)?
- Some filters depend on enabled features (e.g., job requests, invoicing/payments) and your account configuration.
- Your user role and permissions may restrict what you can view or manage.
Related articles
- Calendar – Scheduling and Dispatching
- Managing Booking Statuses
- Filter Calendar by Area
- Filter Calendar by Fieldworker
- Calendar Month View
- Calendar Week View
- Calendar Day View
- Calendar List View
- Add a New Booking from Calendar
- Block Unavailable Date/Time
- Add Calendar Notes
- View Fieldworker Google Calendar
To stay updated, please subscribe to our YouTube channel.