
Time Picker (Clock) Custom Field
The Time Picker (Clock) custom field lets users select a specific time using a clean clock/spinner input (instead of typing free-text like “9:30am”). It’s ideal for capturing a preferred arrival time, best callback time, access window, or time-based instructions with fewer errors and clearer formatting.
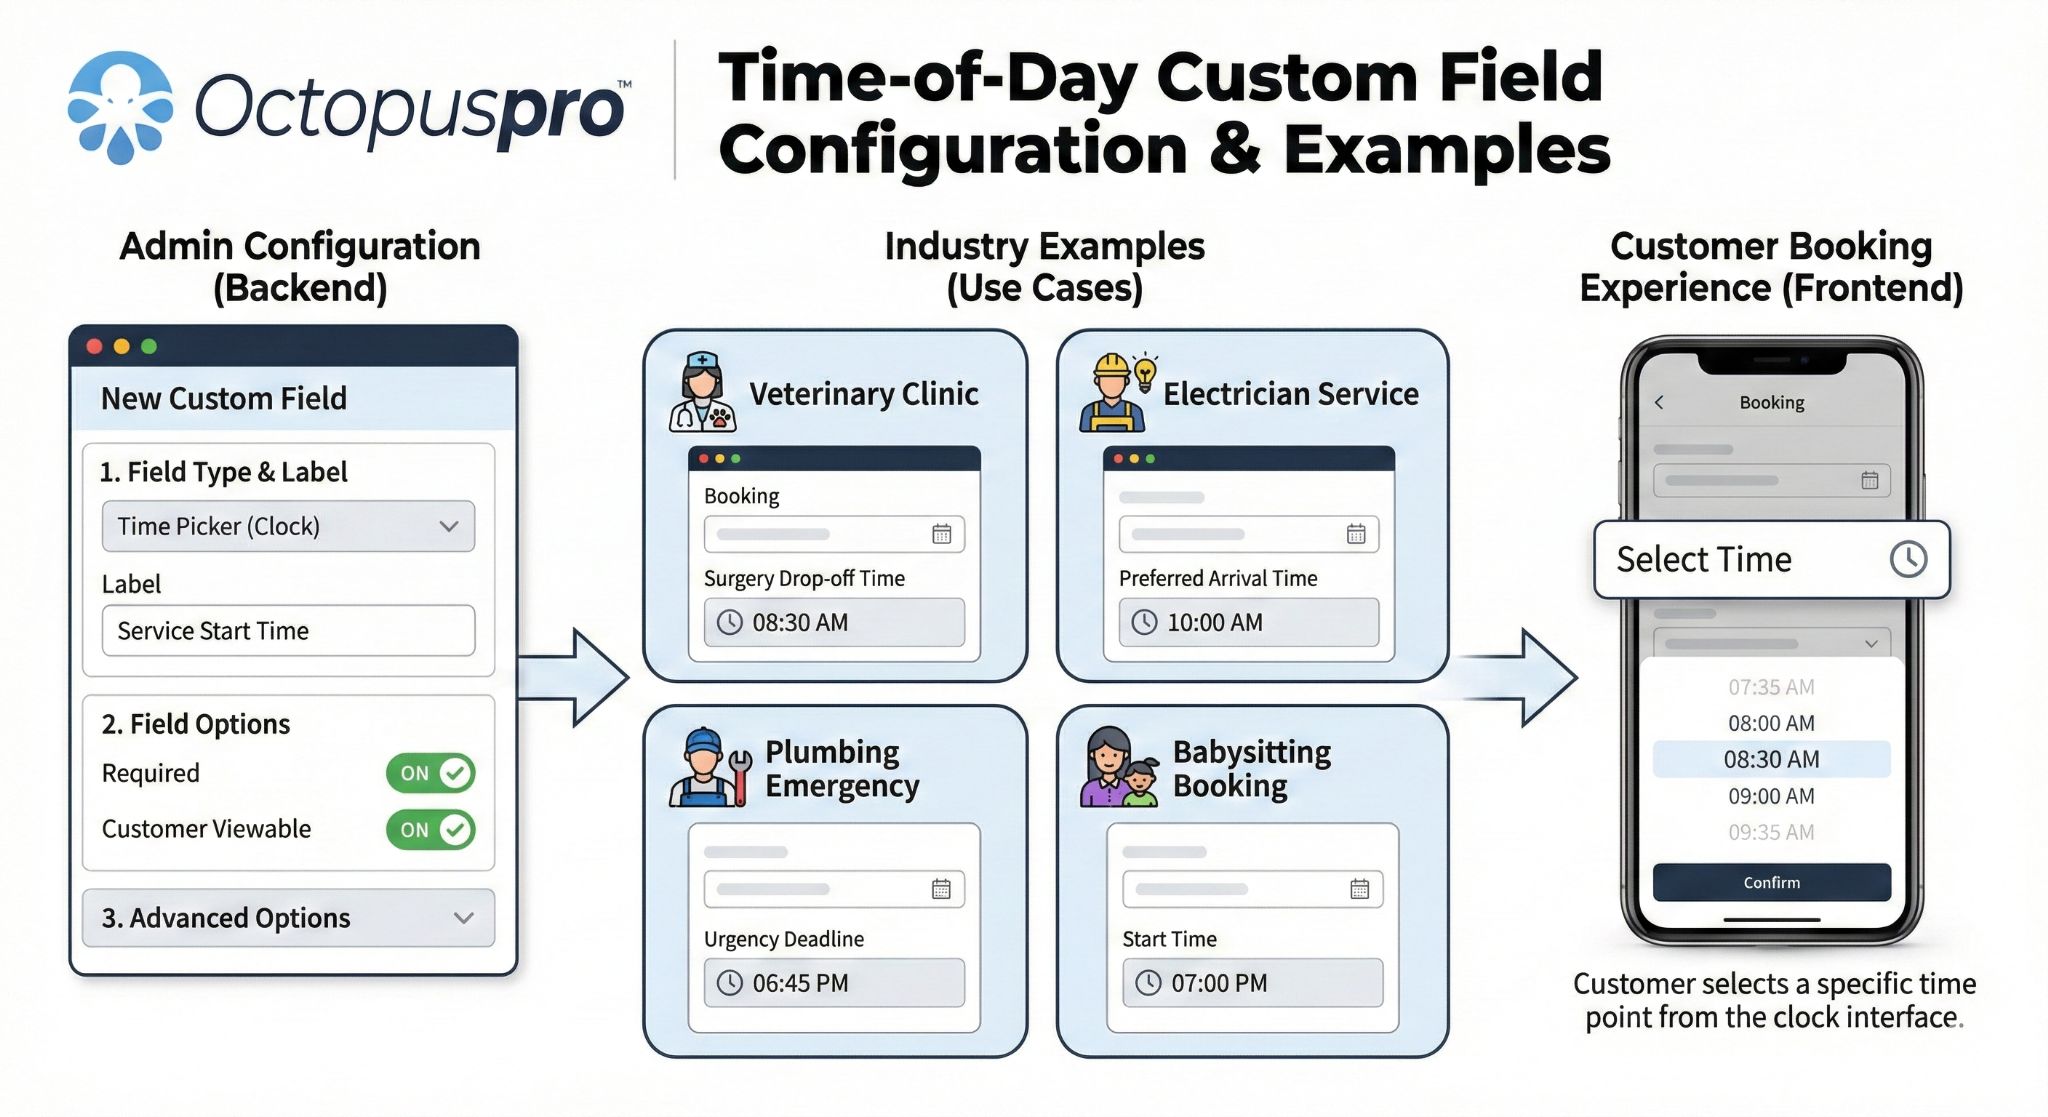
Important: This custom field captures information only. It does not automatically change the booking’s scheduled appointment time, service duration, or pricing.
Quick navigation
- Where you can use a Time Picker
- What the Time Picker field does
- Step-by-step setup
- Assign the field to services
- How admins, fieldworkers, and customers use it
- Examples & benefits
- Reporting & automations
- Best practices
- Troubleshooting
- Related guides
Where you can use a Time Picker
You can add a Time Picker custom field across multiple areas of OctopusPro, depending on your workflow:
- Services → Inquiries / Quotes / Bookings: capture “Preferred arrival time” or “Access time”.
- Embedded Lead Capture / Inquiry Widget: capture “Best time to call you back”.
- Customer profile (CRM): store “Preferred contact time window”.
- Fieldworker profile: store time-based internal details (where relevant).
- Forms & Checklists: record operational timestamps like “Inspection completed at”.

For a broader overview of custom fields across booking flows, lead capture, and CRM, see: Custom Fields (Booking, Lead Capture & CRM).
What the Time Picker field does
A Time Picker field provides a structured time input (hours/minutes). On most devices it appears as a clock selector or spinner, helping users select a valid time quickly and consistently. Time format (12-hour vs 24-hour) typically follows your account/device locale settings.
Key advantages:
- Cleaner input: reduces inconsistent formats like “930”, “9.30”, “9:30am”.
- Faster entry: users pick a time instead of typing it.
- More reliable data: better for searching, reporting, and follow-ups.
Pricing note: Time Picker fields don’t affect price or duration. If you need selections to adjust totals, use pricing-enabled fields like Number Stepper (Quantity) or option fields such as Toggle Switch.
To standardize how time formats display across your system (where applicable), see: Date & Time Configuration.
Step-by-step setup
To create a Time Picker custom field:
- Go to Settings → Service Settings → Custom Fields.
- Click Create New.
- Enter a clear Field label, e.g., “What is your preferred appointment time?”
- (Optional) Add Helper text, e.g., “Select your preferred time. We’ll confirm the final appointment time after review.”
- Confirm the field is Active.
- Select Field Type: Time picker.
- Configure visibility settings (where available), such as showing the field in the customer portal, lead capture, exports, or search.
- Click Save.
Tip: If you only accept requests within specific business hours, you can state the acceptable range in the helper text (e.g., “08:00–18:00”). Some environments may also support additional constraints depending on configuration and device behavior.
Assign the field to services
If you want this Time Picker to appear when a specific service is selected (during inquiry, quote, or booking creation and online checkout), you must assign it to that service. Creating the field alone won’t display it unless it’s linked to the relevant service(s).
Follow: Attach Custom Fields to Services.

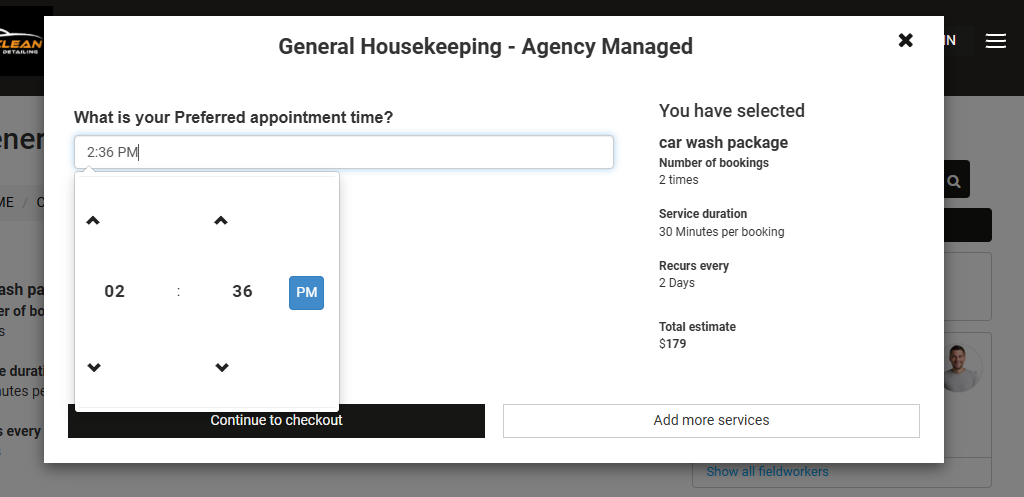
How admins, fieldworkers, and customers use it
Admins (web dashboard)
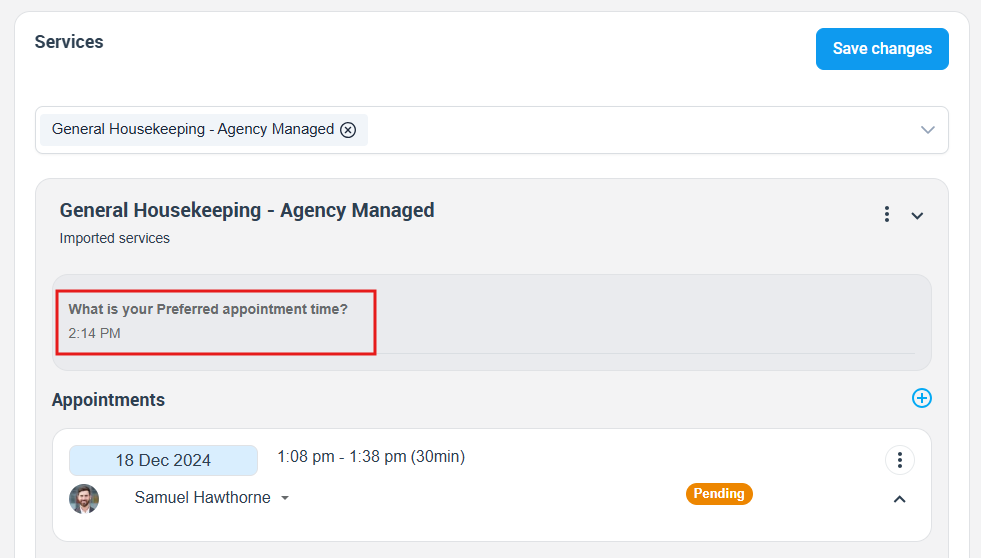
Admins can select a time while creating a booking (or editing booking/service details, depending on where the field is used).
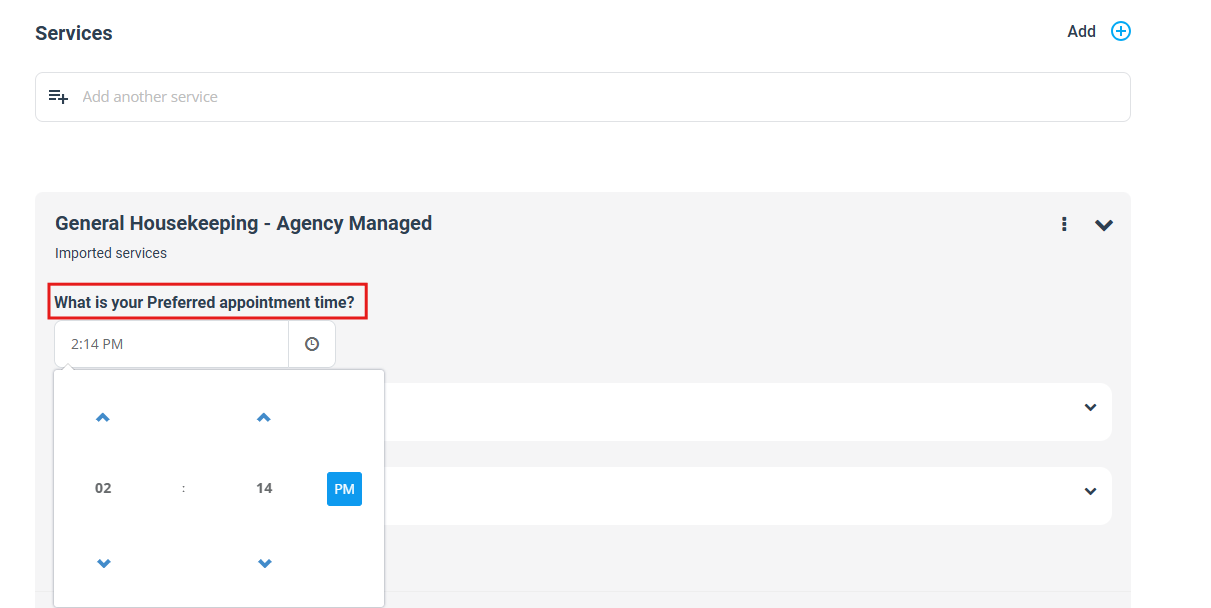
After saving, the selected time is stored and can be reviewed anytime from the booking details screen:
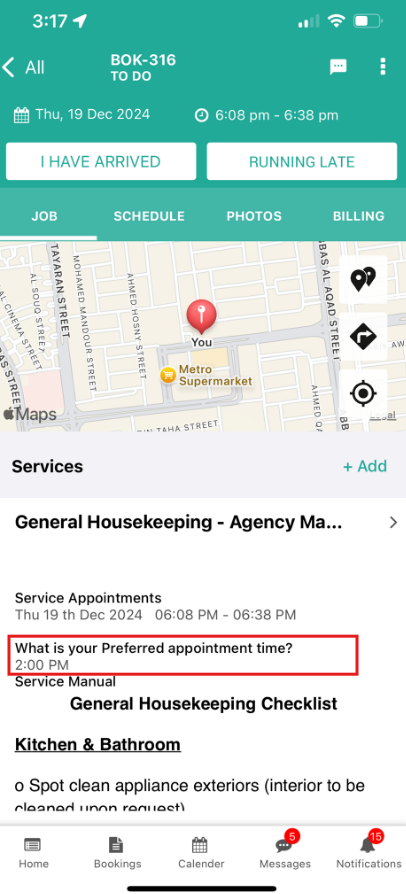
Fieldworkers (mobile app)
Fieldworkers can view the selected time within job details. If your permissions allow editing custom field values, fieldworkers may also update the field.
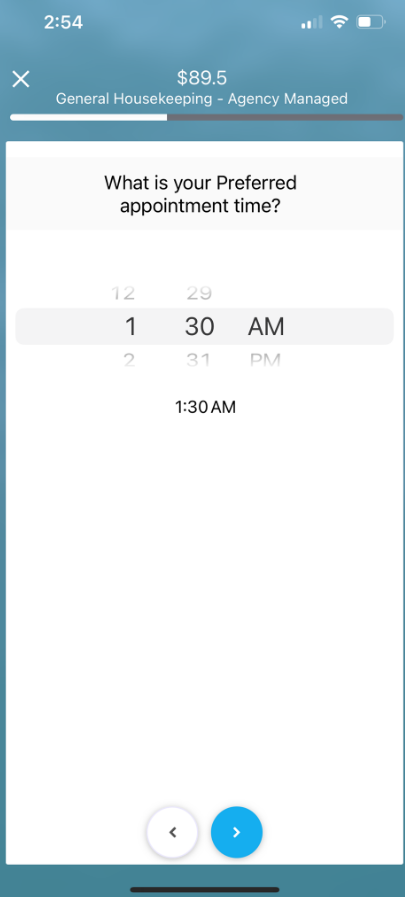
Customers (Customer Portal / Online Booking Widget)
When enabled in customer-facing flows, customers can select a time during online booking/checkout.
Desktop / web:
Mobile:
Examples & benefits
Here are common ways businesses use Time Picker fields to reduce confusion and improve planning:
- Cleaning: “Earliest access time” so crews don’t arrive before someone is home.
- Catering: “Serve appetisers at” to coordinate prep and dispatch.
- Transportation: “Preferred pickup time” for more accurate dispatch windows.
- Healthcare: “Medication reminder time” to support time-based notifications.
Business benefits:
- Fewer reschedules: clearer time expectations reduce misunderstandings.
- Better planning: teams can prepare based on accurate customer/staff time inputs.
- Cleaner data: easier searching, filtering, and reporting than free-text time notes.
Reporting & automations
Because a Time Picker stores time in a consistent format, it can be useful for workflows like:
- Searching & filtering: find jobs with time preferences (e.g., “after 5pm”) depending on your search/reporting tools.
- Exports: include the selected time in exports for analysis or auditing (where supported).
- Automations: use the captured time as a reference for notifications (e.g., reminder messages tied to a preferred time) depending on your automation setup.
Note: This is different from customers choosing an actual appointment slot in the booking calendar. The Time Picker custom field stores a value; it does not change the booking’s scheduled appointment time automatically.
Best practices
- Use specific labels: “Preferred arrival time” is clearer than “Time”.
- Clarify expectations in helper text: state whether it’s a preference and whether you will confirm the final appointment time.
- Capture time ranges using two fields: e.g., “Preferred start time” + “Preferred end time”.
- Use conditional logic if needed: show the Time Picker only when relevant (e.g., only when a toggle is set to “Not flexible”). See: Dependent Custom Fields (Conditional Logic).

- Keep booking forms clean: group related questions into steps when you have multiple fields. See: Custom Field Groups.

Troubleshooting
The field doesn’t appear on bookings/quotes/inquiries
- Confirm the field is Active.
- Make sure it’s assigned to the service. See: Attach Custom Fields to Services.
- If you use custom field groups, confirm the group is enabled and visible. See: Custom Field Groups.
The field doesn’t show in the Customer Portal
- Check the field’s customer visibility setting (e.g., not hidden from the customer portal/online booking flow).
- Confirm the service is available in your portal/checkout flow, if you are testing online booking.
Customers assume the selected time is guaranteed
- Update the field label/helper text to clearly state it’s a preference and that your team will confirm the final time.
Related guides
- Custom Fields (Booking, Lead Capture & CRM)
- Attach Custom Fields to Services
- Date Picker (Calendar) Custom Field
- Lead Capture Form (Website Inquiry Form)
- Customer Profile Custom Fields
- Fieldworker Profile Custom Fields
- Dependent Custom Fields (Conditional Logic)
- Custom Field Groups
- Date & Time Configuration
- Number Stepper (Quantity) Custom Field
- Toggle Switch (Yes/No) Custom Field
To stay updated, please subscribe to our YouTube channel.