
Creating a New Inquiry (Lead Management)
An Inquiry (also called a lead) is a customer request that hasn’t been confirmed as a booking yet. Inquiries help you capture “I’m interested, but I’m not ready to book” requests, qualify the job, follow up consistently, and then convert the inquiry into a Quote/Estimate or a Booking when ready.

In OctopusPro, inquiries can be created in three common ways:
- Customer Portal “Contact Us” (customers submit an inquiry from their portal menu)
- Website Lead Capture Form (embed an inquiry form on your website)
- Manual entry by your team (phone calls, emails, walk-ins, social DMs, etc.)
On this page
- What you can do with inquiries
- Create a new inquiry manually (admin)
- Customer Portal & website lead capture setup (recommended)
- Set follow-up reminders (don’t let leads slip)
- Collect photos & files (for faster quoting)
- Automated inquiry emails (auto-responder, FAQs, photo requests)
- Manage & convert inquiries (quote/booking)
- Inquiry notifications (push + optional email alerts)
- Best practices & examples
- Related articles
What you can do with inquiries
The Inquiries section works like a lightweight CRM pipeline for new leads. Your team can:
- Track status (e.g., New / Qualified / Unqualified / Resolved / Spam)
- Assign a representative (ownership so someone is accountable for follow-up)
- Schedule follow-ups with a date/time reminder
- Record internal notes (call outcomes, access instructions, special requirements)
- Store photos/files (site photos, PDFs, plans, reference images)
- Convert the inquiry into a Quote/Estimate or Booking when qualified

Create a new inquiry manually (admin)
Use manual inquiries when the lead comes from phone, email, walk-ins, social media messages, or any channel outside your portal/website forms.
- Go to Inquiries from the left menu.
- Click Create New (or the + New button, depending on your interface).
- Select/confirm key details (Trading name, Source, Customer details, Service request).
- Add follow-up (optional but recommended).
- Save the inquiry.
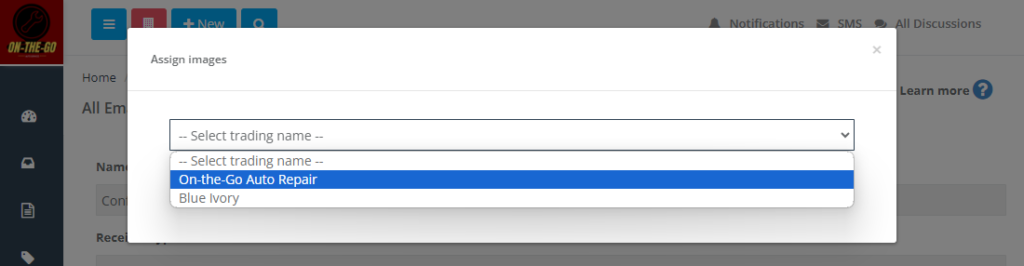
Tip: If you operate multiple brands, select the correct Trading name so the inquiry uses the correct branding, contact details, and assets.

Learn more about trading names (sub-brands): Manage Multiple Trading Names / Sub-Brands
Customer Portal & website lead capture setup (recommended)
For the best results, enable inquiry capture from both your Customer Portal and your website. This lets customers submit questions or quote requests 24/7—without committing to an online booking.
- Customer Portal “Contact Us”: best for existing customers who already have portal access
- Website Lead Capture Form: best for new visitors on your website who want to ask questions first
Customer Portal “Contact Us” guide: Customer Portal Contact Us Form & Lead Capture

Website Lead Capture Form guide: Lead Capture Form (Embed Inquiry Form on Your Website)

Set follow-up reminders (don’t let leads slip)
Follow-up reminders help you stay consistent and prevent leads from falling through the cracks. Use them when:
- You couldn’t reach the customer
- You’re waiting on photos/details
- The customer asked you to call back later
- You sent a quote and want to reconfirm next steps (or convert the inquiry first, then follow up from the quote)

Follow-up reminders guide: Follow-Up Reminders for Inquiries (Lead Follow-Up)
Collect photos & files (for faster quoting)
Collecting photos and documents early helps you qualify and price faster—especially for complex jobs, site-based work, or services that require visual inspection.
- Photos: damage/condition, access, measurements, scope examples
- PDFs/docs: plans, specifications, reports, quotes from competitors, compliance documents

Attachments guide: Attach Files & Photos to Inquiries
Automated inquiry emails (auto-responder, FAQs, photo requests)
OctopusPro can automatically send helpful emails after an inquiry is submitted—reducing back-and-forth and improving conversion speed.
1) Auto-responder (confirmation email)
Send an immediate confirmation letting the customer know you received their inquiry and what happens next.
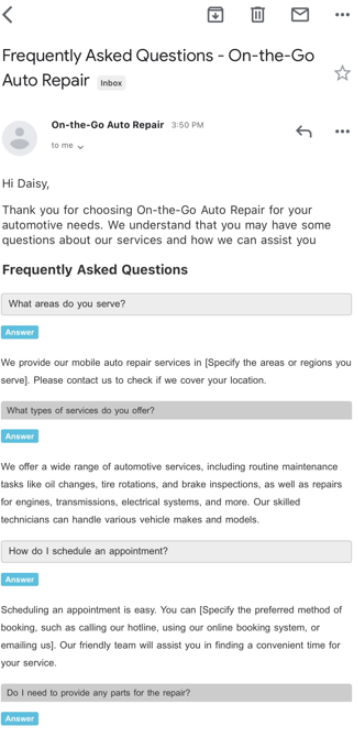
2) Automated FAQ emails (reduce repetitive questions)
If customers commonly ask the same questions (service areas, pricing approach, availability, what’s included, etc.), you can automatically send an FAQ email after inquiry submission.
3) Automated photo upload request (get what you need to quote)
If quoting depends on site condition or visuals, automatically request photos after the inquiry is submitted. Customers can upload images using the button/link in the email.

Optional: Thank-you page after submission
You can show a branded confirmation message (and optionally include next steps) after the customer submits the inquiry form.

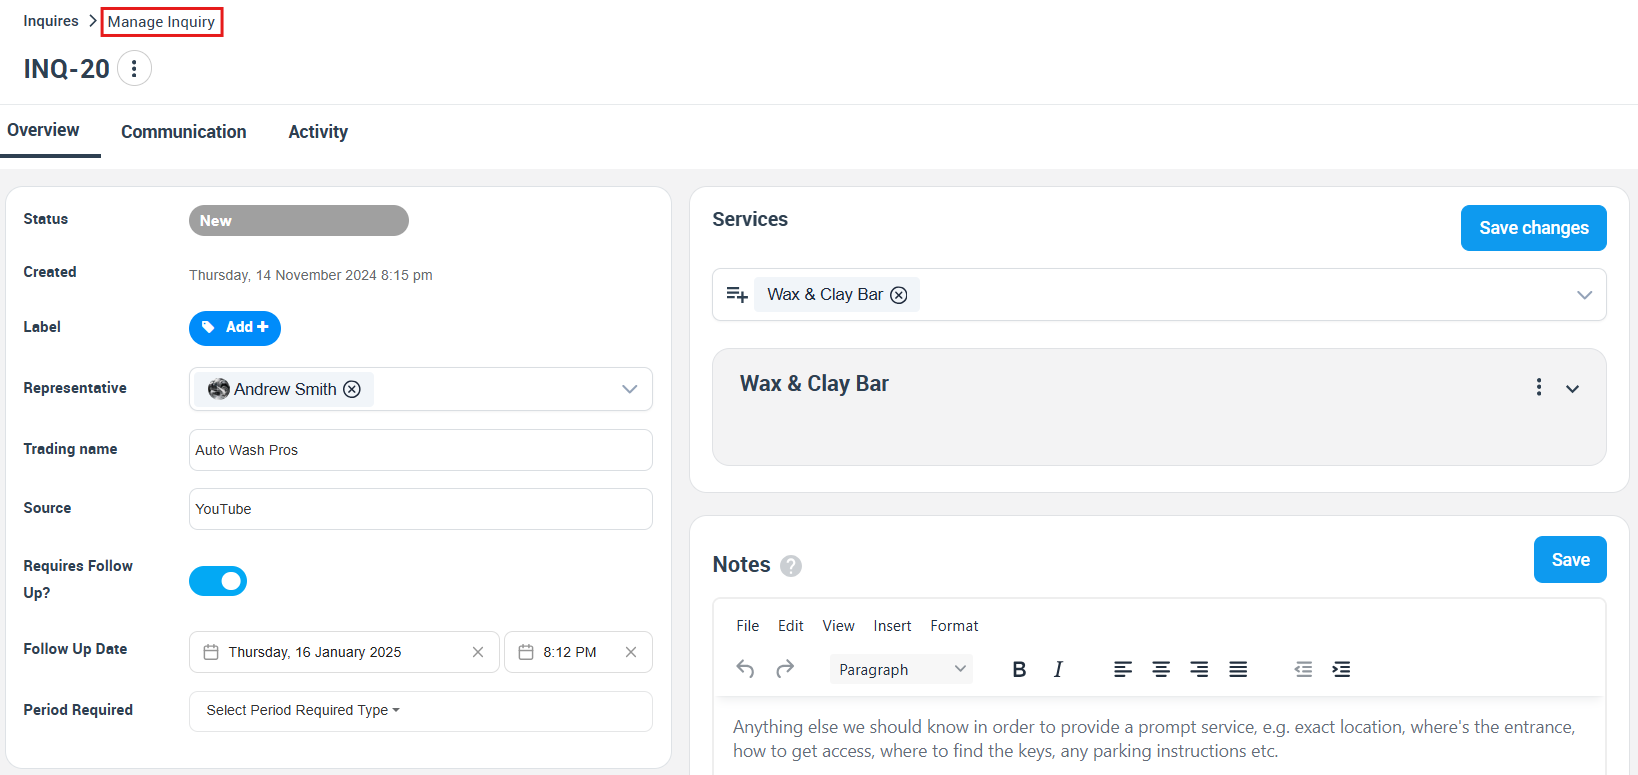
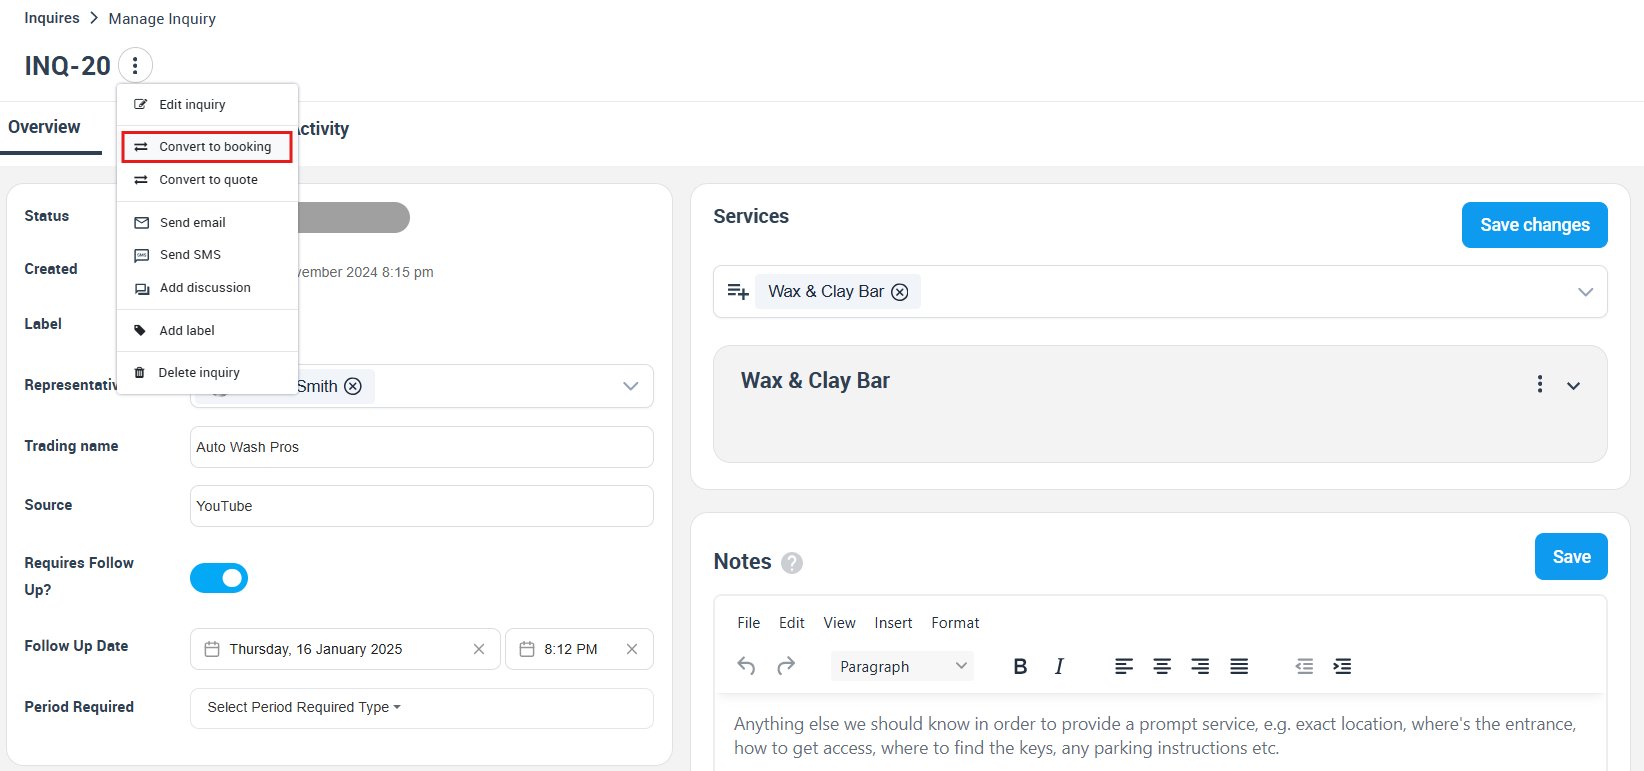
Manage & convert inquiries (quote/booking)
Once an inquiry is created, open it to review details, update fields, add notes, and take action.
Typical workflow:
- Review the inquiry details (scope, service, location, urgency)
- Assign a representative (owner)
- Contact the customer and log what happened (notes + follow-up)
- Request missing info (photos, address, access details)
- Convert to a Quote/Estimate or Booking when qualified
Convert to Quote / Estimate
Use this when you need to price the work first (or the customer requested a quote before booking).
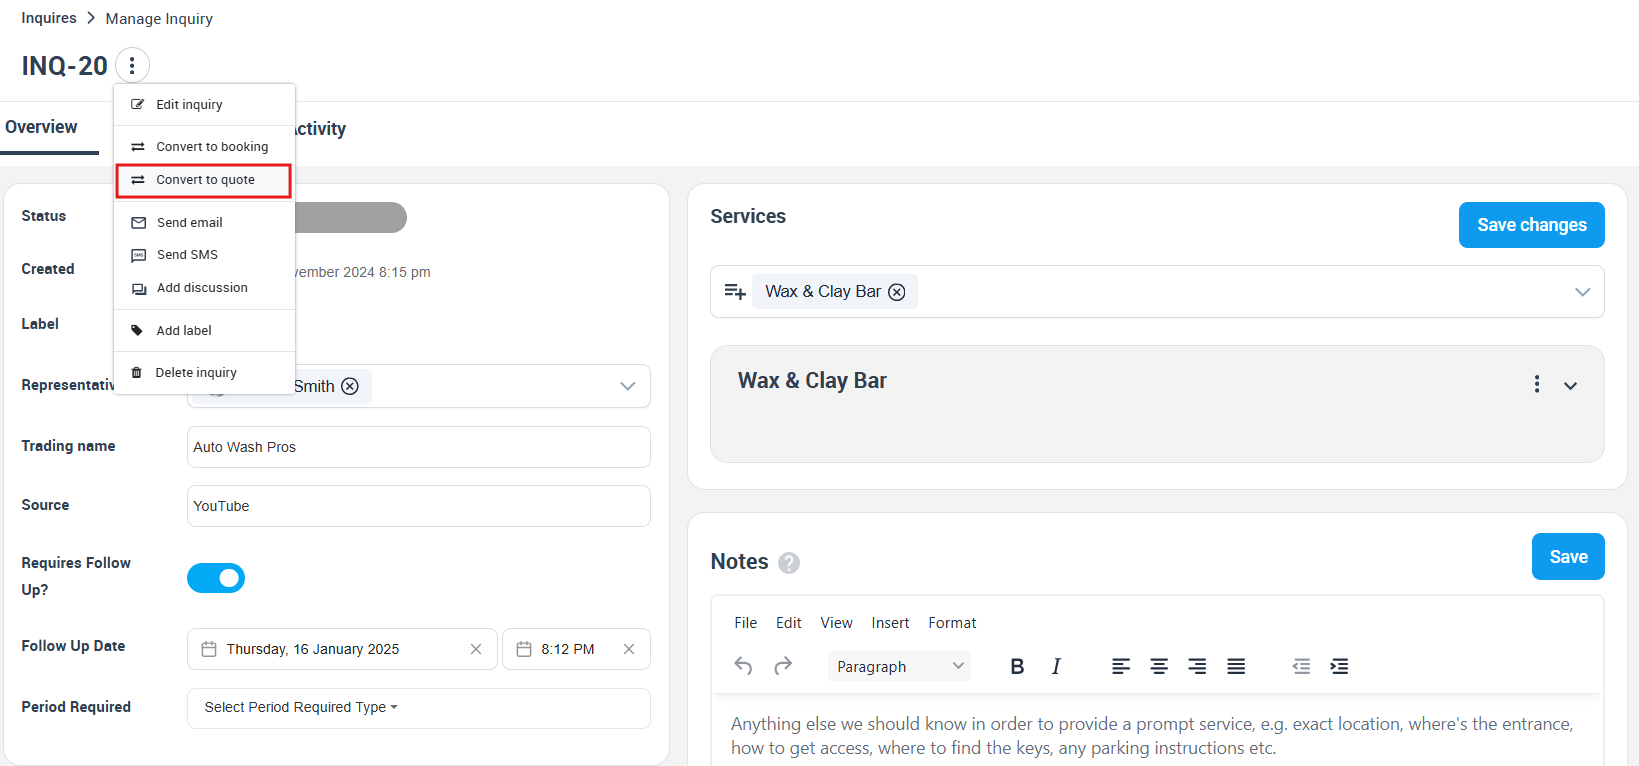
Convert to Booking
Use this when the job is confirmed and you’re ready to schedule/dispatch.
Need to change inquiry details later? See: Edit Inquiry Details
Inquiry notifications (push + optional email alerts)
OctopusPro can notify your team when new inquiries are received so you can respond quickly:
- In-app notifications inside OctopusPro
- Push notifications (when supported on your device/app setup)
- Optional email alerts (configurable; useful for teams monitoring a shared inbox)

Best practices & examples
- Respond fast: speed-to-lead is one of the biggest drivers of conversion (especially for urgent services).
- Always set the next action: after every call/email/SMS attempt, set a follow-up date/time so the inquiry never goes cold.
- Collect photos early: for visual jobs, ask for images up front to avoid delays and reduce site visits.
- Use “Period Required” for urgency: capture the customer’s timeframe (ASAP / this week / next month) so your team can prioritise correctly. Learn more: Period Required (Preferred Timeframe) Field

- Standardise your questions with Custom Fields: ask the same qualifying questions every time for consistent quoting and smoother handover. Learn more: Custom Fields (Booking, Lead Capture & CRM)

- Convert as soon as it’s qualified: once the lead is real, move it into a quote/booking so the rest of your workflow (pricing, scheduling, dispatch, invoicing) runs normally.
Related articles
- Inquiries & Lead Management (Overview)
- Customer Portal Contact Us Form & Lead Capture
- Lead Capture Form (Embed Inquiry Form on Your Website)
- Follow-Up Reminders for Inquiries
- Edit Inquiry Details
- Attach Files & Photos to Inquiries
- Manage Multiple Trading Names / Sub-Brands
- Custom Fields (Booking, Lead Capture & CRM)
To stay updated, please subscribe to our YouTube channel.