
Importing Customers
Make your transition to OctopusPro easy by importing your existing data. OctopusPro allows you to easily import your existing customers onto the system, using one file with a few simple steps by downloading a template that is easily customized from the settings.
If you have set up customer properties for your account, you can also easily import your customers and their properties onto the system by following the same steps.
Table of Contents
- How to import existing customers?
- Importing customers and their customer properties
- What happens when you import customers that already exist in your database?
- How to import customers that have custom fields added?
- What happens if the list you are importing has duplicate customers?
- Importing customers by syncing your QuickBooks account
- Importing customers by syncing your Xero account
How to import existing customers?
- To import existing customers, go to Customers > All Customers
- From the customers’ list page, click on Import customers

- A pop-up window will appear, follow the instructions for importing your customer’s file.

Before uploading the CSV file, make sure all the below requirements are met:
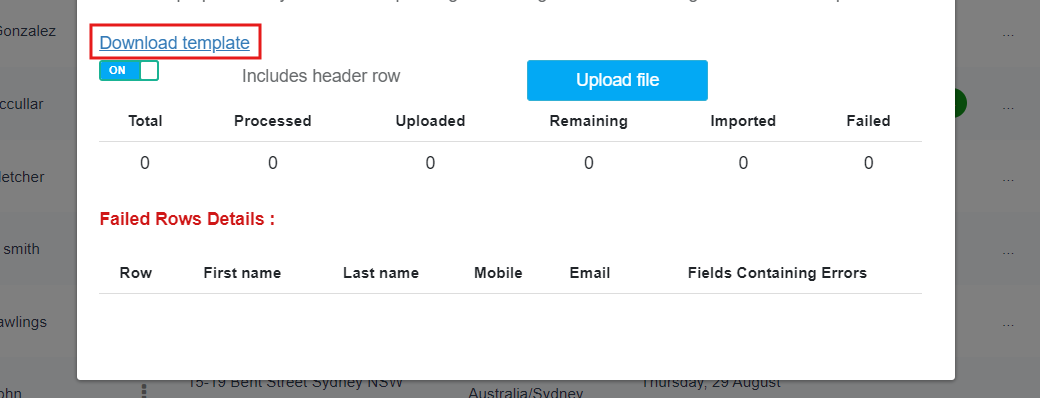
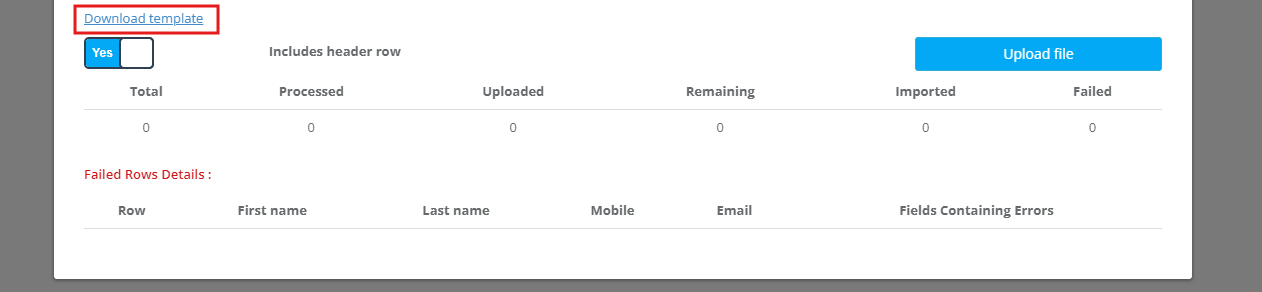
First, click on “Download template” and fill in the information you want to import.
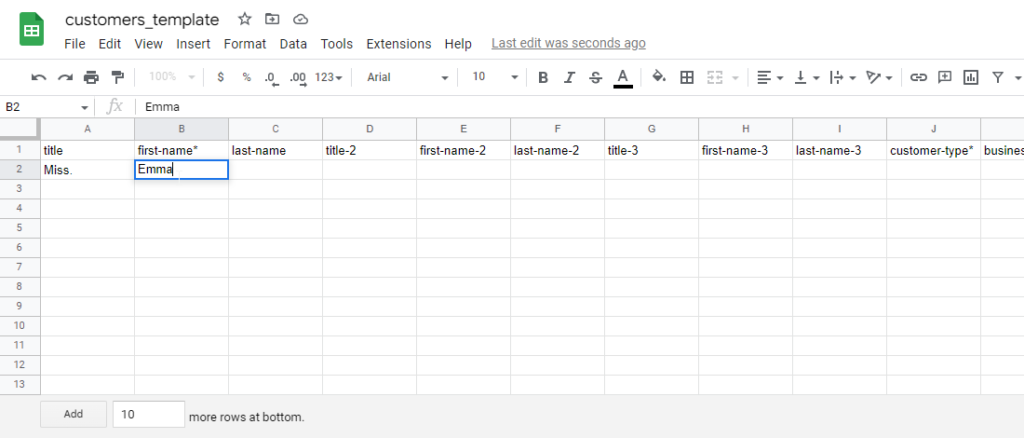
- All fields with ( * ) are required fields and can’t be empty
- The password field in the file should not be encrypted, so enter the actual password text and it will be encrypted during the import
- The “Customer title” field can be only one of the following: Dr, Mr, Mrs, Miss or Ms
- The fields “first_name2”, “last_name2”, “first_name3” and “last_name3” fields are secondary values for the same contact
- The fields “mobile2”, “email2”, “phone2”, “mobile3”, “email3” and “phone3” fields are secondary values for the same contact
- The “Date joined” field must be in the date format “YYYY/MM/DD” e.g. “2018/05/12”
- The “Customer type” field value can be either “Personal” or “Business”
- The business name field should be used to enter the business name of the customer when the customer type is business
- Your file may contain some states with different spelling, so you can check the list of states in your country to make sure that the states are matched.
- The city is a required field so if you leave it empty in the file, we will take the city of your company as a default one, in case you entered the state but the city is empty we will take the first city in this state.
- The maximum allowed number of rows in the CSV file is 2500. If your list is longer than this, break it into multiple files and upload them separately
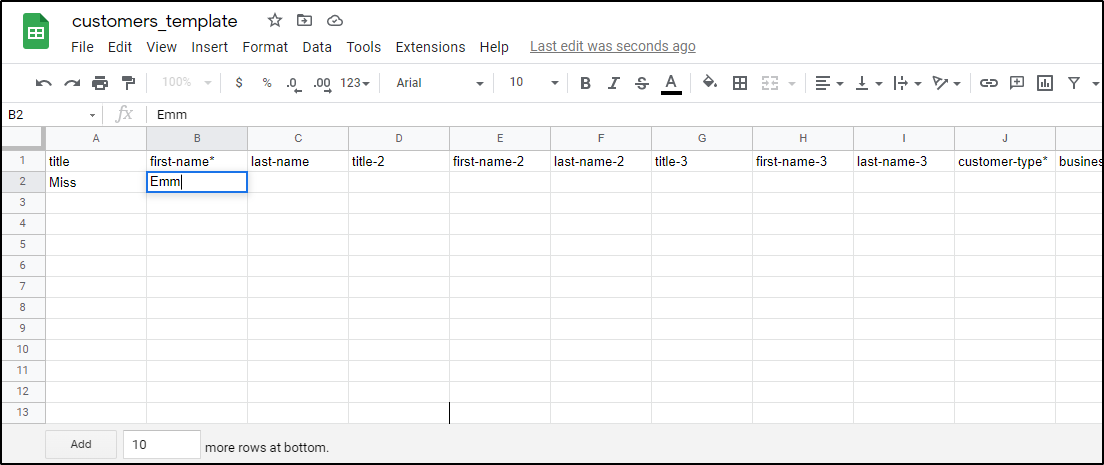
- After downloading the template, log into your Google Drive account and upload the file. You can then edit the template by adding the required customer information in the cells.
- After filling in the template, click on “Upload file” to upload your customers onto the system. Make sure the file is saved as CSV to upload it successfully.
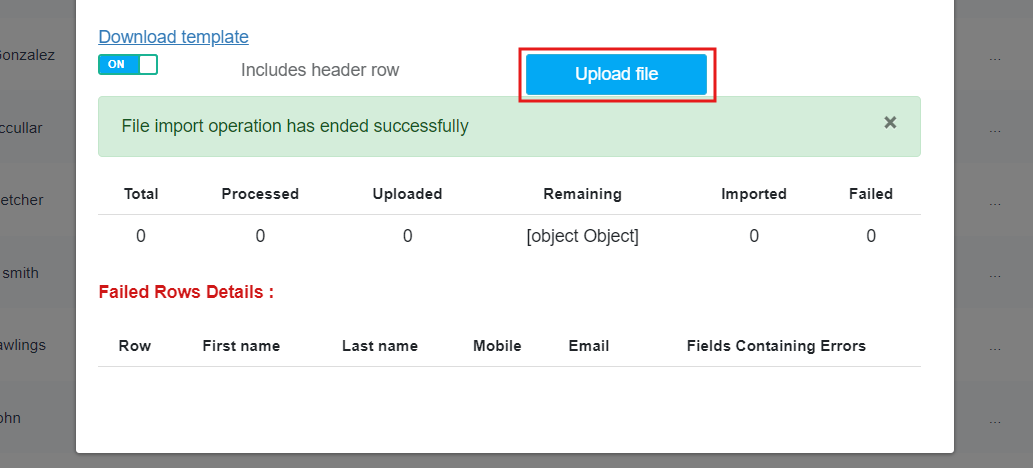
- After uploading the file, a message will appear confirming that the file has been imported successfully and you will be able to see how many rows have been imported. If there are any fields that failed to be imported, they will be shown in the section ‘Failed Rows Details’, so you can edit them and re-upload the file.
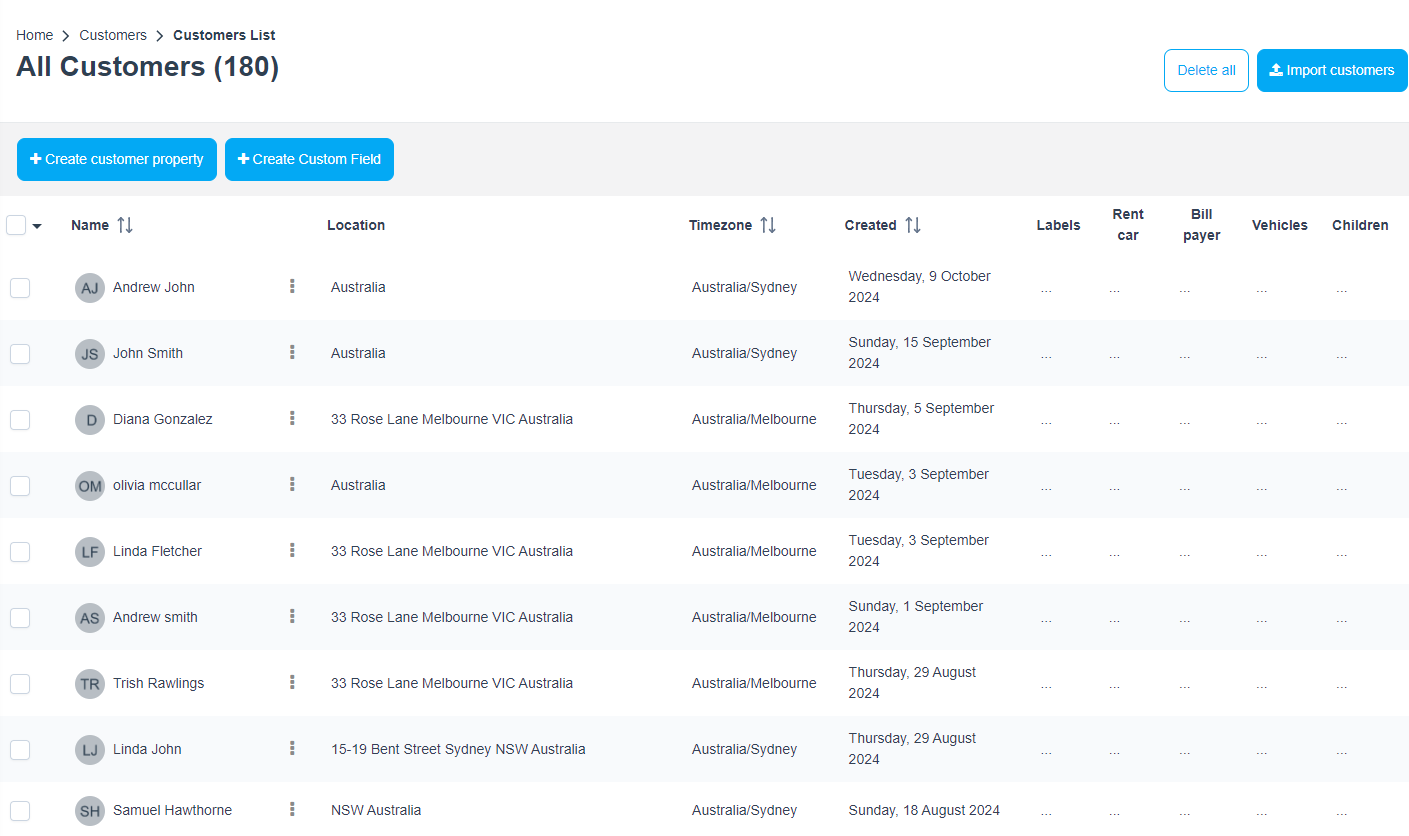
- After importing the file, your customers will be imported into the system on the customer list page and you can search, view, or edit them easily.
Alternatively,
- You can also import customers by navigating to Settings > Company Settings > Import Data
- Click on “Import Customers”.
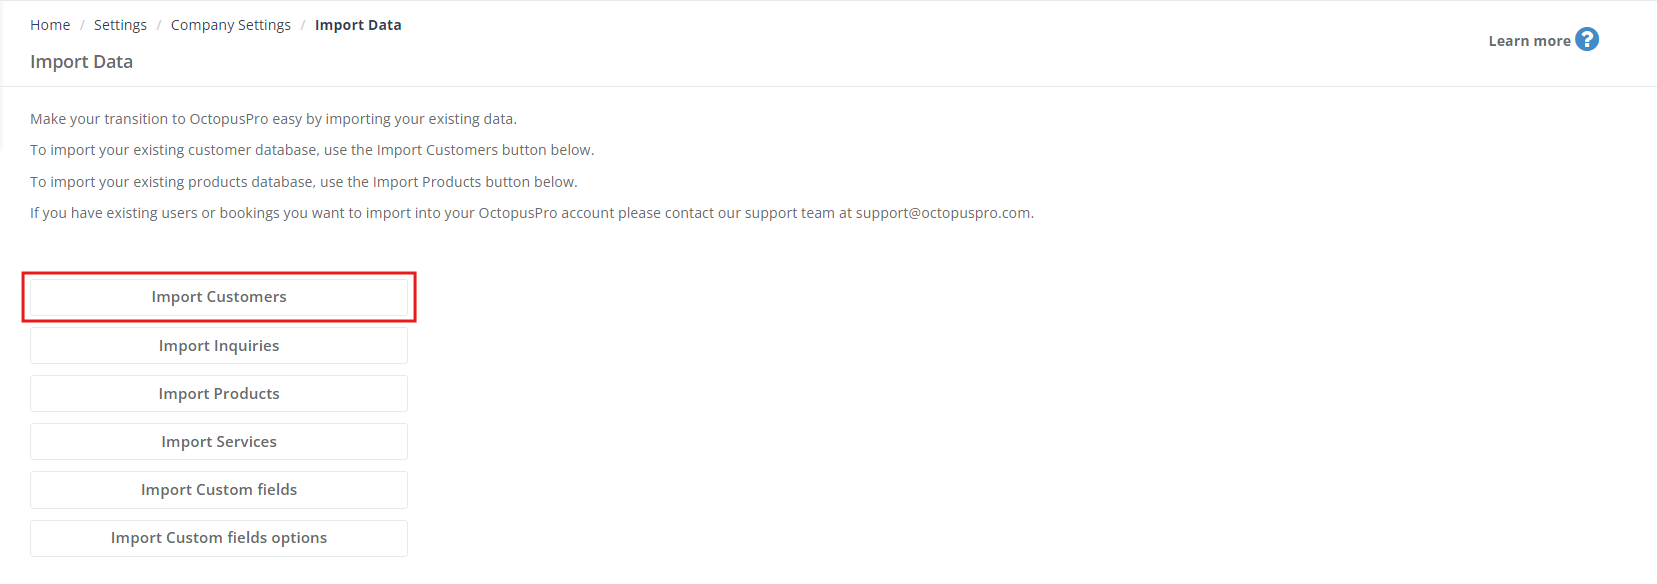
- A popup window will appear, click on “Download template”.
- After downloading the template, log into your Google Drive account and upload the file. You can then edit the template by adding the required customer information in the cells.
- After filling in the template, click on “Upload file” to upload your customers to the system. Make sure the file is saved as CSV to upload it successfully.
- After uploading the file, a message will appear confirming that the file has been imported successfully and you will be able to see how many rows have been imported. If there are any fields that failed to be imported, they will be shown in the section ‘Failed Rows Details’, so you can edit them and re-upload the file.
- After importing the file, your customers will be imported into the system on the customer’s list page and you can search, view, or edit them easily.

Importing customers and their customer properties
- In the case that you have set up customer properties on your account, you can import them while importing your customers. To learn more about setting up customer properties, click here.
- To import your customers and their customer properties, go to Customers > All Customers
- From the customers’ list page, click on “Import customers”.
- A pop-up window will appear, follow the instructions for importing your customer’s information file.
- First, click on “Download template” and fill in the information you want to import.
After downloading the template, log into your Google Drive account and upload the file on Excel Sheets. You can then edit the template by adding the required customer information in the cells.
When adding your customer’s details, make sure all the below requirements are met:
- All fields with ( * ) are required fields and can’t be empty
- The password field in the file should not be encrypted, so enter the actual password text and it will be encrypted during the import
- The “Customer title” field can be only one of the following: Dr, Mr, Mrs, Miss, or Ms
- The fields “first_name2”, “last_name2”, “first_name3” and “last_name3” fields are secondary values for the same contact
- The fields “mobile2”, “email2”, “phone2”, “mobile3”, “email3”, and “phone3” fields are secondary values for the same contact
- The “Date joined” field must be in the date format “YYYY/MM/DD” e.g. “2018/05/12”
- The “Customer type” field value can be either “Personal” or “Business”
- The business name field should be used to enter the business name of the customer when the customer type is business
- Your file may contain some states with different spelling, so you can check the list of states in your country to make sure that the states are matched.
- The city is a required field so if you leave it empty in the file, we will take the city of your company as a default one, in case you entered the state but the city is empty we will take the first city in this state.
- The maximum allowed number of rows in the CSV file is 2500. If your list is longer than this, break it into multiple files and upload them separately
- Do not leave any empty rows between rows, as it will be considered the end of the file.
You can then edit the template by adding the required customer information in the cells.
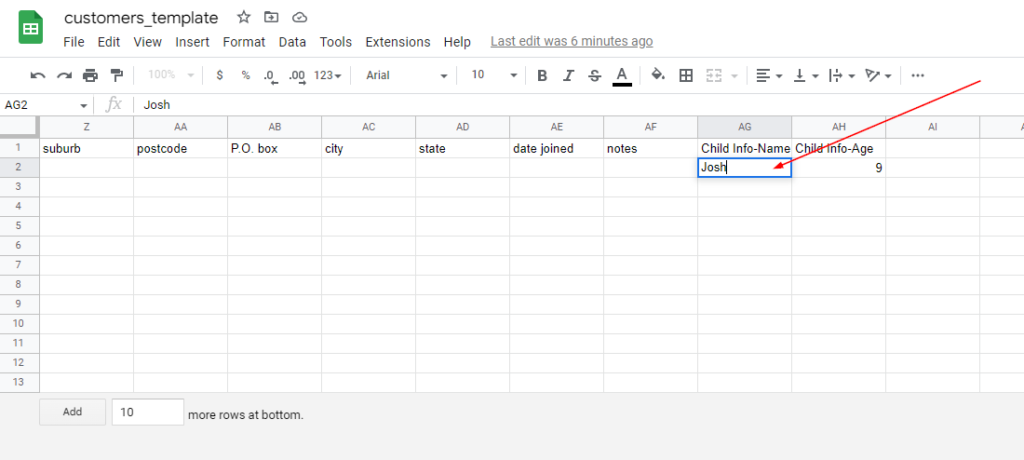
Once you have set up customer properties for your account, the customer properties field labels will be added as fields on the sheet, which you can fill in with your customer properties input.
- After filling in the template, download the file and click on “Upload file” to upload your customers and their customer properties onto the system. Make sure the file is saved as CSV to upload it successfully.
- After uploading the file, a message will appear confirming that the file has been imported successfully and you will be able to see how many rows have been imported. If there are any fields that failed to be imported, they will be shown in the section ‘Failed Rows Details’, so you can edit them and re-upload the file.
- After importing the file, your customers and their customer properties will be imported into the system on the customer list page and you can search, view, or edit them easily.
What happens when you import customers that already exist in your database?
If you try to import a file that includes customers that already exist in your database, the rows of these customers will fail to upload, and they will be listed for you under Failed Rows Details.

How to import customers that have custom fields added?
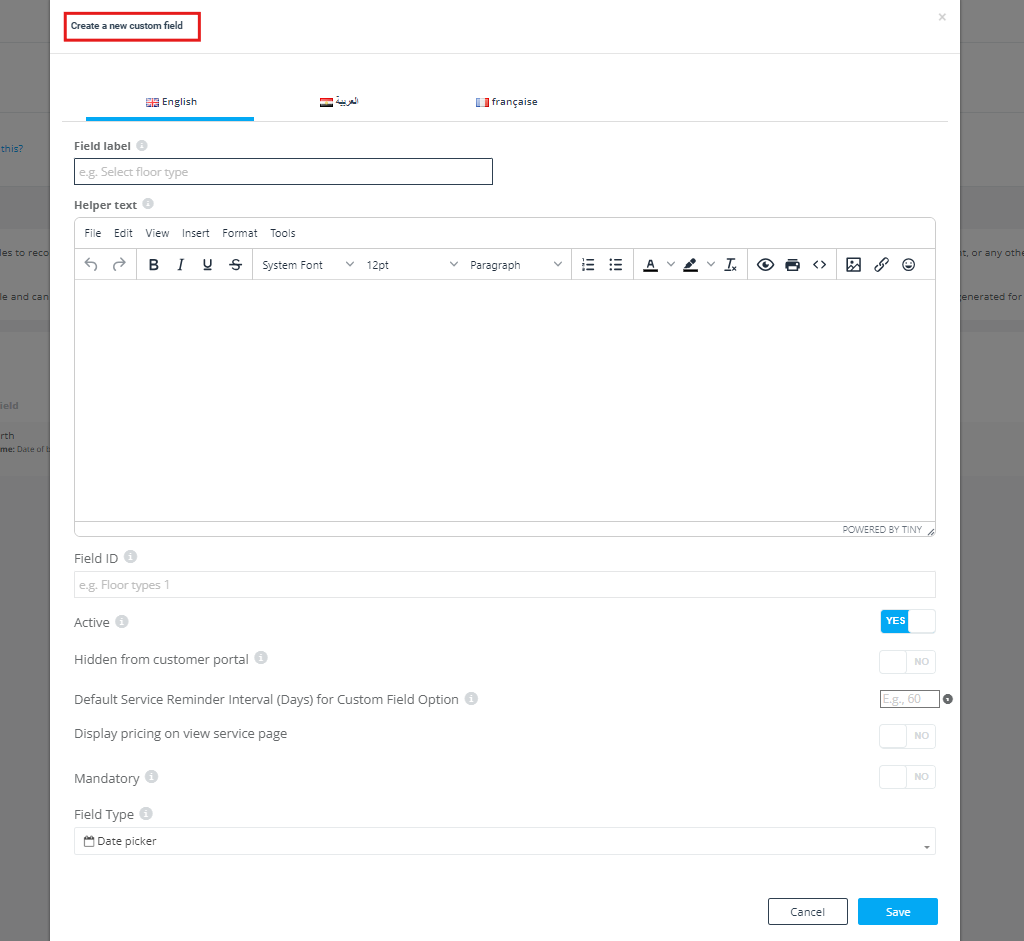
- If you want to import customers that have custom fields added:
- First, you have to make sure that you have custom fields added to your account.
- To add a new custom field, navigate to Settings > General Settings > Customer Profile
- Click on “+Create New”.
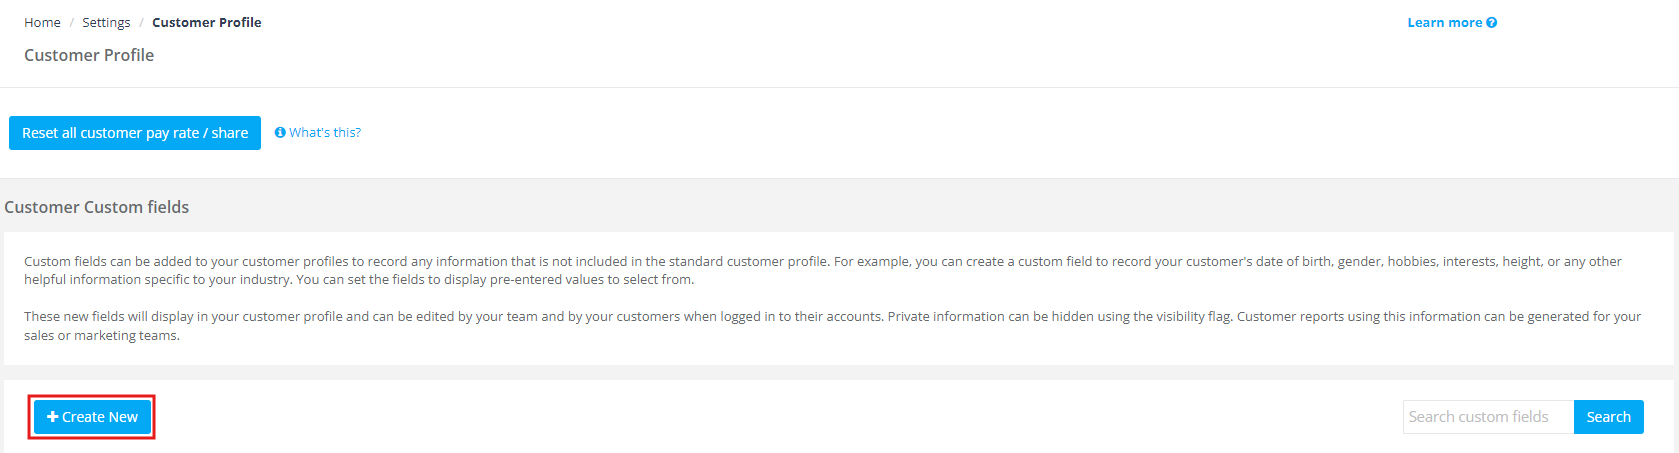
- Enter the Field label and Field ID then click “Save”. To learn more about customer custom fields click here.
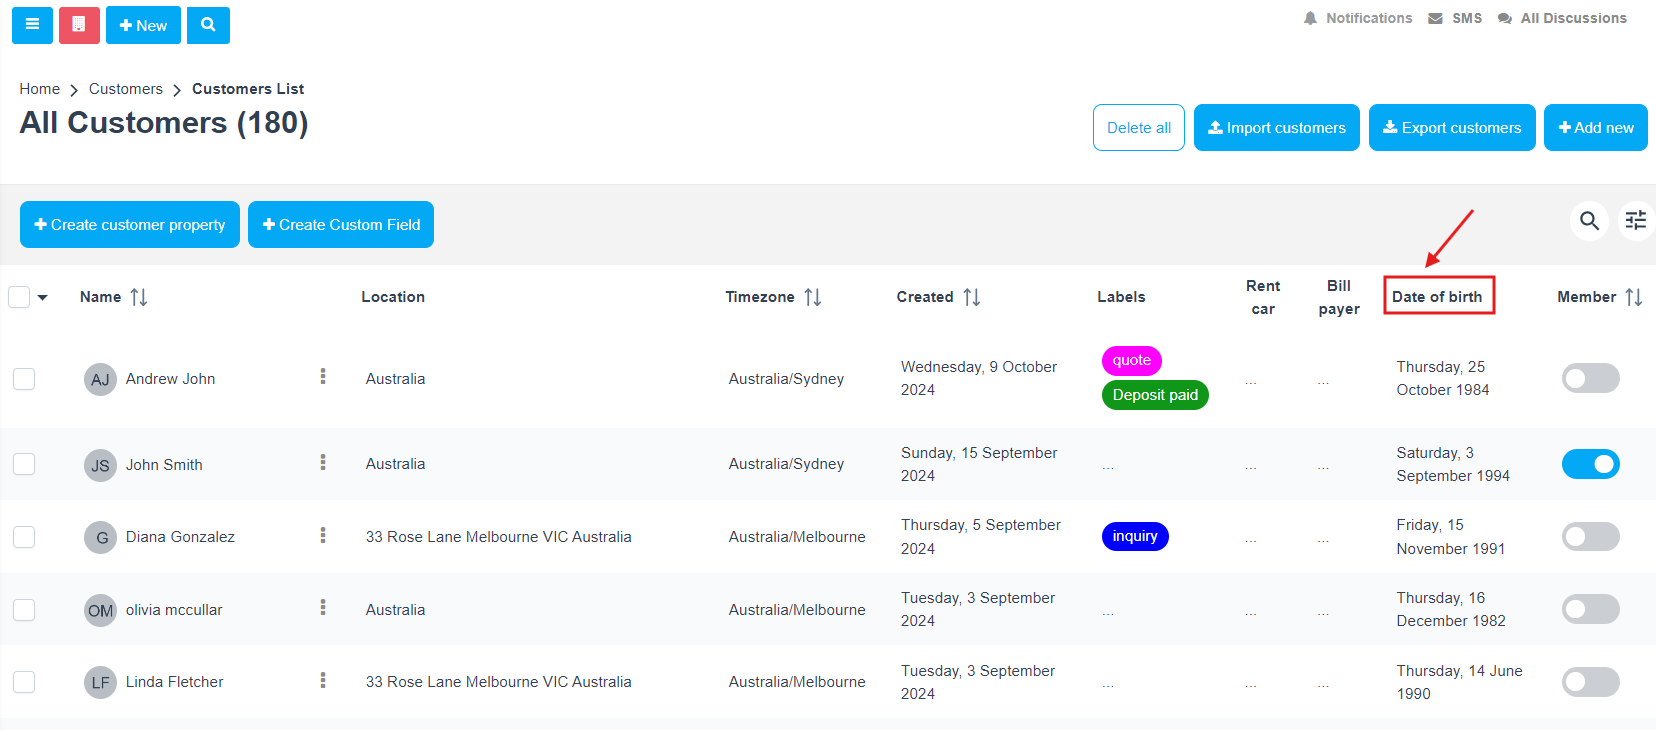
- After adding a new custom field, go to Customers > All customers
- From the customer’s list page, click on “Import customers”
- On the bottom of the popup window, click on “Download template”.
- After downloading the template, your custom field/s title will be added as a new column, where you can add the customer custom field related to each customer.

- After filling in the template, click on “Upload file” to upload your customers and their custom fields on the system. Make sure the file is saved as CSV to upload it successfully.
- After uploading the file, a message will appear confirming that the file has been imported successfully and you will be able to see how many rows have been imported.
- If there are any fields that failed to be imported, they will be shown in the section ‘Failed Rows Details’, so you can edit them and re-upload the file.
- After importing your file, your customers will successfully be imported on the customer’s list page including their custom field/s.
What happens if the list you are importing has duplicate customers?
If the list you are importing has duplicate customers, the duplicate customers will not be imported and they will be listed under Failed Rows Details.

Importing customers by syncing your QuickBooks account
- You can easily import your existing customers to your OctopusPro account by syncing your QuickBooks account.
- To do that: Navigate to Settings > Financial Settings > QuickBooks Integration
- After syncing your QuickBooks account, click on “Pull from QuickBooks”.

- After syncing, your customers will be imported onto OctopusPro and you will be able to see how many customers have been synced and how many have not been synced. You can then view all your synced customers from your customer list page.
Importing customers by syncing your Xero account
- You can easily import your existing customers to your OctopusPro account by syncing your Xero account. To do that: Navigate to Settings > Financial Settings > Xero Integration
- After syncing your Xero account, click on “Pull from Xero”.
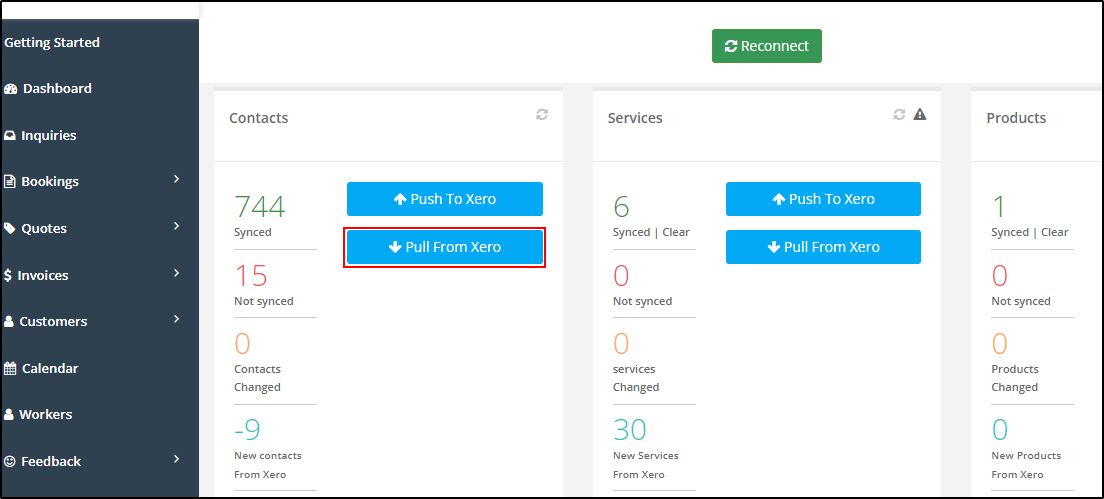
- After syncing, your customers will be imported onto OctopusPro and you will be able to see how many customers have been synced and how many have not been synced. You can then view all your synced customers from your customer list page.