
Change / Edit Invoice Number (Invoice Reference ID)
OctopusPro automatically generates invoice numbers (also known as an invoice reference ID) in a sequential format (for example: INV-233) to keep your billing records consistent and easy to track.
In some situations, you may need to:
- Update the numbering for future invoices (e.g., after migrating from another system), or
- Edit the invoice number on a specific invoice (e.g., to correct a mistake or align with your finance process).
On this page
- What is an invoice number in OctopusPro?
- When should you change an invoice number?
- Before you start (important notes)
- Option 1: Set starting numbers for future invoices (recommended for migrations)
- Option 2: Edit an existing invoice number
- Impact on Xero / QuickBooks sync
- Troubleshooting & FAQs
- Related guides
What is an invoice number in OctopusPro?
The invoice number (invoice reference ID) is the customer-facing identifier used to reference an invoice in emails, PDFs, reports, and conversations with customers. It helps your team and your customers quickly identify the correct invoice, especially when multiple invoices exist for the same customer.
When should you change an invoice number?
This feature is not commonly used day-to-day, but it’s helpful in these scenarios:
- Migration / switching systems: Continue your existing invoice sequence so your next invoice number matches what your business is already using.
- Error correction: Fix an incorrect invoice reference number entered or generated in error.
- Finance process changes: Align invoice numbering with a new internal convention or accounting workflow.
- Multiple business entities / operations changes: Adjust numbering to reduce confusion after operational changes (e.g., mergers or restructuring).
Before you start (important notes)
- Invoice numbers must be unique: Don’t reuse an invoice number that already exists in your OctopusPro account.
- Consider compliance requirements: Some regions require invoice numbers to be sequential and auditable. If you’re unsure, confirm with your accountant/bookkeeper before renumbering.
- Resend the invoice if needed: If the customer already received the invoice (email/SMS/PDF), resend the updated invoice so they reference the correct number.
- Permissions: If you can’t see this option, your user role may not have access to edit invoices (see troubleshooting below).
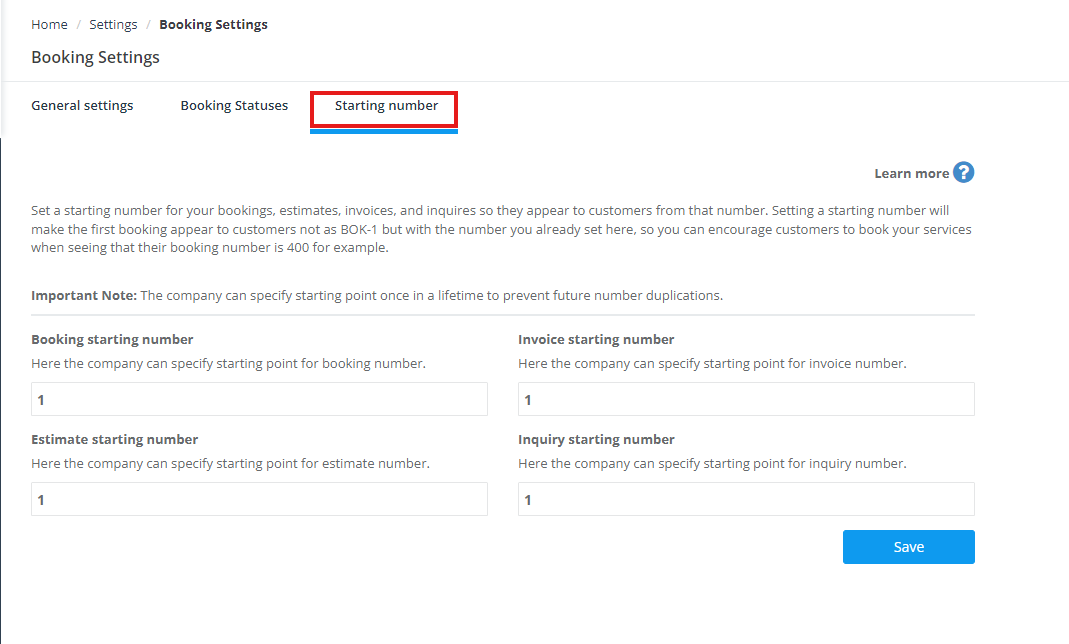
Option 1: Set starting numbers for future invoices (recommended for migrations)
If your goal is to change invoice numbering going forward (without editing past invoices), set a starting number. This is ideal when migrating from another platform, or if you want your invoice references to begin from a higher number.
What starting numbers affect: You can set starting numbers for Bookings, Quotes/Estimates, Invoices, and Inquiries. Existing records are not renumbered.
Important: The system notes that the company can typically set the starting point once to help prevent future number duplication. Choose your starting numbers carefully.
Steps:
- Go to Settings > General Settings.
- Select Booking Settings.
- Open the Starting number tab/page.
- Enter your preferred starting numbers (including Invoice starting number).
- Click Save.
Full guide: Set Starting Numbers for Bookings, Quotes/Estimates, Invoices & Inquiries.

Option 2: Edit an existing invoice number
Use this option when you need to change the invoice number on a specific existing invoice (for example, to correct a reference number or align with a customer’s purchase order process).
- Open the invoice you want to update:
- Go to Invoices and open the relevant invoice, or
- Open it from the related booking/customer record (depending on your workflow).
- Click Actions.
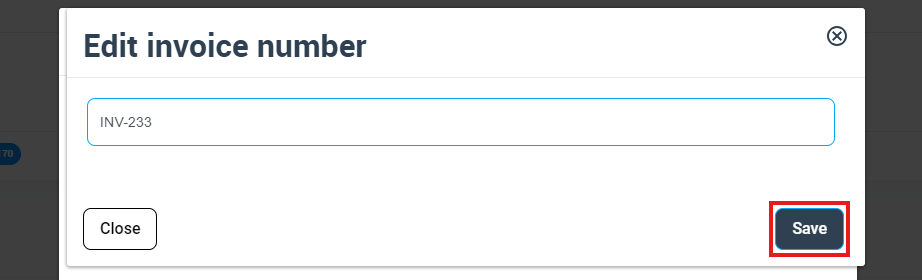
- Select Edit Invoice Number.
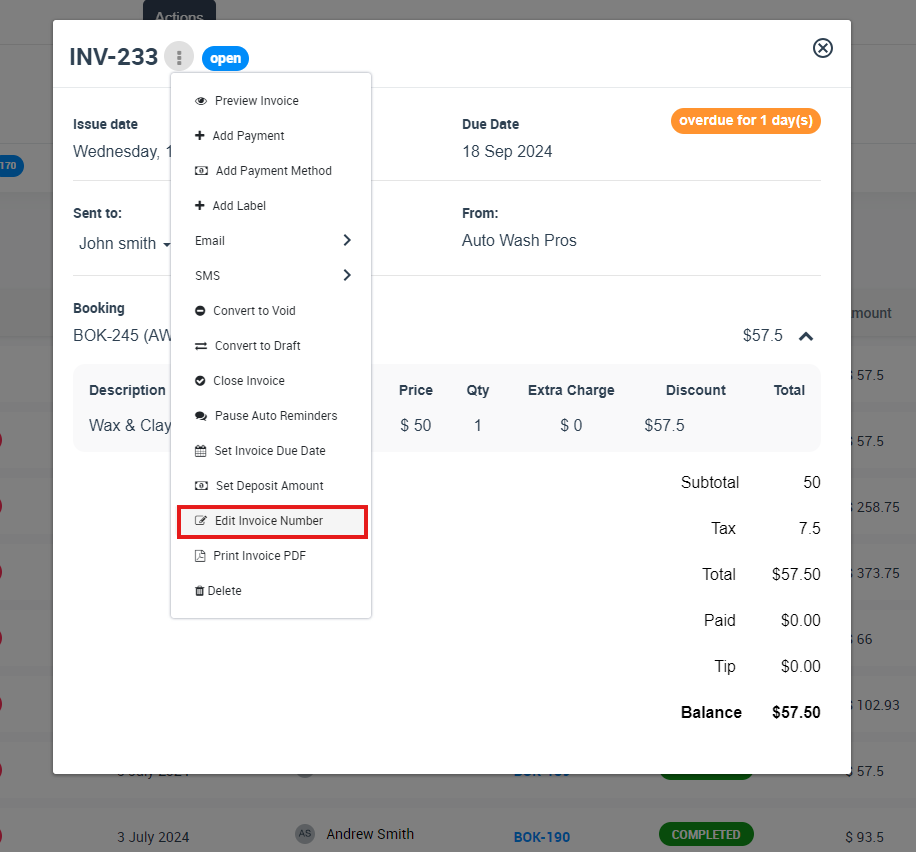
- Enter the new invoice number (make sure it does not match any existing invoice number).
- Click Save.
Best practice: If customers reference invoice numbers when paying (bank transfers, PO matching, email threads, etc.), notify them of the updated number and resend the invoice PDF/email.
Impact on Xero / QuickBooks sync
If your OctopusPro account is synced with Xero or QuickBooks, invoice number updates may not appear instantly in your accounting platform. In most cases, the change becomes visible after the next synchronization.
Example: If an invoice is INV-001 in OctopusPro and you change it to INV-001A, Xero/QuickBooks will typically reflect the new number after the next sync.
If you’re also updating invoice content (items, prices, taxes), see: How to Edit or Update an Invoice.
Troubleshooting & FAQs
I can’t see “Edit Invoice Number” in the Actions menu.
- Make sure you’re logged in as an Admin/Office user (or a user role with permission to manage invoices).
- If you’re a fieldworker, access depends on your permissions: Fieldworker Permissions & Access Control.
The system won’t let me save the new number.
- Confirm the invoice number is unique (not already used by another invoice).
- Use a clear, consistent format (e.g., INV-####) to avoid confusion for staff and customers.
Will changing the invoice number change totals, items, payments, or the linked booking?
No. Editing the invoice number changes the invoice reference ID only. All invoice content, totals, payments, and links remain the same.
How can I confirm who changed an invoice number?
- Check the invoice’s internal history/audit trail from the invoice details screen: How to View and Manage an Invoice.
- For reporting and investigations, you can also use logs/reports such as: Recent Invoices – History Log Report and User Activity Log.
I need to find an invoice quickly by its number (INV-###).
Use OctopusPro’s global search and advanced filters: Universal Search & Advanced Filters.
Related guides
- Invoice, Billing, Payment, and Refund Management
- How to View and Manage an Invoice
- How to Edit or Update an Invoice
- How to Convert an Invoice to Draft
- Invoice & Quote PDF Template Customization
- Set Starting Numbers for Bookings, Quotes/Estimates, Invoices & Inquiries
To stay updated, please subscribe to our YouTube channel.