
Navigate to Customer Locations: Directions, ETA, Multi-Stop Routing & Geofence Auto Check-Out

Mobile services live or die by punctual arrivals and clear communication. The OctopusPro Fieldworker App gives your team built-in navigation, customer ETA updates, support for multi-stop pickup/drop-off bookings, and optional geofence automation—so every visit starts on time, at the right address, with accurate timesheets for payroll, compliance, and customer reporting.
Applies to: jobs delivered at the customer’s location (including multi-address / multi-stop bookings). Remote or virtual bookings typically don’t use the map workflow.
Quick Admin Setup Checklist (Recommended)
If any of these features are missing in the Fieldworker App, ask your admin to confirm the setup below:
- Google Maps API: required for reliable maps, distance tools, and location workflows. Integrate Google Maps API
- Address visibility rules: choose whether fieldworkers see the full address immediately or only after tapping On the Way (address masking).
- Multi-address bookings: enable pickup/drop-off and multi-stop support when your workflow needs more than one address per booking. Multi-Address Bookings
- Arrival distance (Suggested Arrival Distance): controls when a fieldworker can tap I have arrived (default often 500m).
- Geofence Auto-Checkout: automatically checks out fieldworkers when they leave the job radius (default 500m). Booking Settings
- ETA alerts & reminders: optional “Running Late” and other customer notifications (varies by account configuration). Alarms, ETA Alerts & Reminders
Table of contents
- Address visibility & the “On the Way” workflow
- How “On the Way” works (step-by-step)
- ETA updates: Running Late & No Longer Attending
- Multi-address bookings (pickup, drop-off & multi-stop routes)
- Retrieving turn-by-turn directions
- Automatic check-in & auto check-out (background geofence)
- Arrival radius / “I have arrived” distance (Suggested Arrival Distance)
- Nearby bookings tool (work smarter between jobs)
- Maintaining a high acceptance rate
- Maximising job assignment opportunities
- Quick reference: mobile job lifecycle
- FAQ
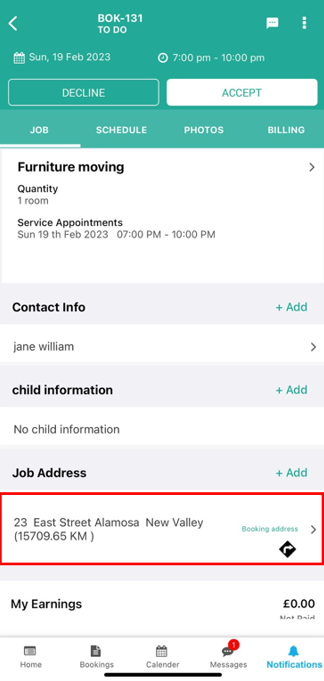
Address Visibility & the “On the Way” Workflow
Many businesses choose to mask the full street address until the fieldworker explicitly confirms they are travelling. This encourages consistent ETA communication, reduces unauthorised early arrivals, and supports customer privacy.
| Feature | Admin setting | What the fieldworker sees | Business benefit |
|---|---|---|---|
| Always show full address | Toggle ON (typically under Settings → General Settings → Fieldworker Permissions) | Full street/unit address, map preview and directions are visible as soon as the job is assigned.
|
Best for low-risk or urgent dispatch (e.g., emergency call-outs) where speed matters more than address masking. |
| Hide until “On the Way” (common default) | Toggle OFF / address masking enabled (same permissions area) | Only suburb/postcode and a general pin appear until the fieldworker taps On the Way. | Encourages the correct workflow (On the Way → Arrived → Start → Finish), improves ETA updates, and supports privacy. |
Tip for dispatch teams: If you run both emergency and scheduled work, consider enabling “Always show full address” only for specific roles (e.g., senior technicians), while keeping address masking enabled for large field teams.
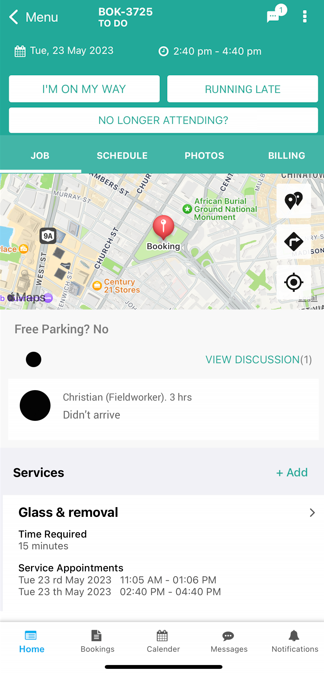
How “On the Way” Works (Step-by-Step)
- Open the booking card in the Fieldworker App (from your schedule / bookings list).
- Tap On the Way (or I’m On My Way, depending on your app version).
- If address masking is enabled, the app reveals the full street/unit address after you tap On the Way.
- Multi-address bookings: if the booking includes pickup/drop-off or multiple stops, the app reveals all addresses at once after tapping On the Way, so you can select the correct stop and navigate.
- GPS tracking and ETA workflows can begin from this point (depending on your settings and permissions).
- If address masking is enabled, the app reveals the full street/unit address after you tap On the Way.
- The customer and office may receive an update (push/SMS/email depending on configuration) with ETA and/or a tracking link.
- The booking status updates to an en-route state, reducing “Where are you?” calls and setting expectations.
Example outcome: Teams often see fewer missed appointments when they consistently use “On the Way” because customers receive clearer ETA signals and are ready for access on arrival.
ETA Updates: Running Late & No Longer Attending
Depending on your company settings, the Fieldworker App may show quick actions such as Running Late and No Longer Attending. These help customers and the office get proactive updates—so dispatch can reassign, reschedule, or communicate next steps quickly.
- Running Late: use when traffic, overruns, or access issues delay arrival.
- No Longer Attending: use when you cannot attend (e.g., breakdown, emergency) so the office can act immediately.
Learn more: Alarms, ETA Alerts & Reminders | Managing Booking Statuses
Multi-Address Bookings (Pickup, Drop-off & Multi-Stop Routes)
Some bookings include more than one location, such as Pickup → Drop-off, a delivery route with multiple customer stops, or a service run with intermediate waypoints (e.g., collect keys → job site → disposal/drop-off).
Key behaviour: when you tap On the Way, the app reveals all addresses/stops at once for multi-address bookings. This makes it easy to choose the correct destination for the current leg of the job.
How to navigate a multi-stop booking
- Open the booking and tap On the Way.
- Review the labeled stops (e.g., Pickup, Drop-off, Stop 1, Stop 2).
- Select the stop you’re travelling to now, then tap Directions / Navigate to launch your navigation app.
- After completing that stop, repeat the directions step for the next address.
Tip: Always confirm the stop label (Pickup vs Drop-off) before launching directions—multi-stop bookings can include several valid addresses.
Learn more: Multi-Address Bookings (Pickup/Drop-off & Multi-Stop Jobs)
Retrieving Turn-by-Turn Directions
Once a booking has a valid address (or you’ve selected the correct stop in a multi-address booking), the Fieldworker App can hand off navigation to Google Maps (or your device’s default navigation app).
- Open the booking.
- At the top of the booking, locate the map preview.
- Tap the Directions option (this may appear as a Navigate button or a directions / road-sign icon depending on your app version).
- Your navigation app opens with the destination pre-filled. Follow the route as normal.

Multi-address note: if the booking contains multiple stops, confirm the correct stop is selected before opening directions.
Tip: If the signal drops, Google Maps often caches the last route. For rural areas, download offline maps before departing.

Automatic Check-In & Auto Check-Out (Background Geofence)
OctopusPro can run a background GPS geofence around the job site to automate attendance tracking and prevent forgotten check-outs. This ensures accurate timesheets for payroll, compliance, and customer reporting—without relying on manual check-out every time.
Auto-Checkout Fieldworker via Geofence (500m Default Radius)
When enabled, fieldworkers can be automatically checked out when their device moves outside the configured job-site radius (default 500m) after they have checked in (manually or via automatic check-in). This prevents forgotten check-outs and produces a clear, auditable record of site activity.
- Re-entry behaviour: if the fieldworker re-enters the geofence after auto check-out, the app can prompt them to check in again.
- Best use case: acts as a safety net when a fieldworker leaves a job site without completing a manual check-out step.
Where admins enable it
- Go to Settings → General Settings → Booking Settings.
- Enable Auto-Checkout Fieldworker via Geofence.
- Confirm the radius (default often 500 meters; adjust for site size and GPS reliability).
Requirements & best practices
- GPS tracking must be enabled: geofence check-out depends on reliable GPS location updates.
- Location permissions: best practice is “Allow all the time” (where policy permits) for consistent background geofence events.
- Works best with: address masking + On the Way, and late-arrival alarms/ETA alerts (so customers and the office are updated early).
- Still coach manual Finish Job: Auto check-out is a safety net. Fieldworkers should still tap Finish Job so completion steps (photos, forms, signatures, customer notifications) trigger immediately.
Related guides: Booking Settings | Fieldworker GPS Tracking, ETA & Geofencing
Arrival Radius / “I have arrived” Distance (Suggested Arrival Distance)
Admins can control how close a fieldworker must be to the job site before they can tap “I have arrived”. This setting is commonly labeled Suggested Arrival Distance (meters) and often defaults to 500m.
- Increase the distance for large sites (campuses, warehouses, industrial parks) where the entry point is far from the service area.
- Reduce the distance for dense urban areas to avoid premature “Arrived” events caused by GPS drift.
- Align with your geofence: for best results, keep Suggested Arrival Distance consistent with (or slightly smaller than) your geofence radius.
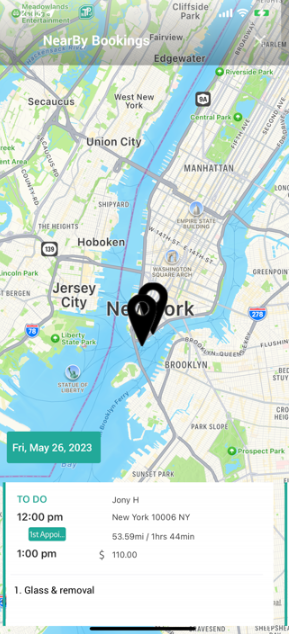
Nearby Bookings Tool
Need to squeeze in a follow-up, group jobs in the same suburb, or recover forgotten items? Use Nearby Bookings to see jobs closest to your current location, helping reduce travel time and improve route efficiency.
How to use it
- Open a booking and locate the map preview.
- Tap the pin icon next to the map.
- Review the list of nearby bookings (sorted by distance), then open a booking to view its details or start navigation.
Common real-world uses
- Pest control: revisiting a property for a second treatment while already in the area.
- Pool / lawn routes: grouping properties suburb-by-suburb to reduce fuel costs.
- Trades: dropping off parts at a nearby job after a supplier run.
Learn more: Nearby Bookings: Proximity-Based Scheduling for Fieldworkers
Maintaining a High Acceptance Rate
Your acceptance rate and reliability signals help dispatch allocate work faster and more accurately—especially in automated assignment modes. Here are the biggest levers that improve your ranking and job opportunities.
| Best practice | Why it matters | Quick how-to |
|---|---|---|
| Respond fast (target < 15 minutes) | Fast responses help dispatch confirm jobs sooner and reduce customer churn. | Open the notification → tap Accept or Decline promptly. |
| Use the ETA workflow | Proactive updates reduce cancellations and complaints. | Tap On the Way early. Use Running Late as soon as a delay is known. |
| Keep your profile accurate | Skills + address = smarter matching and fewer unsuitable job offers. | Profile → Edit → update address/service areas, licences/certifications. |
| Improve ratings | Higher rating often leads to more invites and higher-value jobs. | Arrive on time, follow checklists, take required photos, and collect signatures when requested. |
Maximising Job Assignment Opportunities
- Verify your address & service areasDistance rules and proximity-based matching depend on your saved address/service coverage. If you move suburbs or change your base location, update your profile.
- Update skills & certificationsAdd capabilities relevant to your industry (e.g., working at heights, first aid, specialist equipment). Better data means better matching and fewer declines.
- Calendar hygieneKeep your availability accurate. Remove obsolete “Unavailable” blocks and record leave/sick days promptly to avoid being offered jobs you can’t take.
- Professional profile photoA clear headshot increases customer trust and can reduce last-minute cancellations, especially for in-home services.
- Prompt, professional messagingGood communication reduces misunderstandings about access, parking, gate codes, pets, and special instructions.
Quick Reference: Mobile Job Lifecycle
This lifecycle combines navigation, job milestones, multi-stop routing, and optional background geofencing. Your exact steps may vary based on your company’s workflow (forms, checklists, required photos, and customer notifications).

| Stage | In-app action | Embedded form / checklist (optional) | Outcome |
|---|---|---|---|
| Alarm / notification | Push/SMS/email on assignment | — | No missed jobs and faster confirmations. |
| Accept / Reject | One-tap (if enabled) | Optional licence / tool check | Instant capacity visibility for dispatch. |
| On the Way | Tap On the Way → ETA sent | — | Address revealed if hidden; all stops revealed for multi-address bookings; tracking can start. |
| Running Late / No Longer Attending (optional) | Tap the relevant quick action | Delay / reason fields (optional) | Customer & office notified early; faster reschedule/reassign. |
| Arrived / Check-in | Tap I have arrived (or automatic check-in if enabled) |
Arrival photo / site-access notes (optional) | Proof-of-arrival; accurate on-site record. |
| Start Job | Tap Start Job | Pre-start checklist (PPE, before photos, safety) | Compliance and job analytics; labour time captured accurately. |
| Unable to Start | Tap Unable to Start → choose reason | Incident / access issue form | Office alerted; SLA paused; clear audit trail for no-shows or site issues. |
| Finish Job | Tap Finish Job → capture signature/photos | Post-work checklist / customer sign-off | Proof of completion; customer notified; automation/invoicing can trigger. |
| Auto check-out (optional) | Background (device exits geofence) | — | Prevents forgotten check-outs; improves payroll and compliance accuracy. |
Related guides (open in a new tab):
- View & Manage Booking Details
- Edit Booking Details
- Booking Settings
- Fieldworker Check-In/Out Tracking & GPS Time Logs
- Start/Finish Job Workflow (Fieldworker App)
- Managing Booking Statuses
- Booking Location Types (Mobile vs Storefront vs Remote)
- Multi-Address Bookings (Pickup/Drop-off & Multi-Stop Jobs)
- Nearby Bookings (Proximity-Based Scheduling)
- Fieldworker GPS Tracking, ETA & Geofencing
- Real-Time Field Worker Location Tracking
- Integrate Google Maps API
- Alarms, ETA Alerts & Reminders
FAQ
Will hiding the address delay me?
No. In most setups, suburb/postcode and a general pin are still visible for planning. The full door number appears instantly once you tap On the Way.
Why do I see multiple addresses after tapping “On the Way”?
The booking uses multi-address stops (e.g., pickup/drop-off or multiple route stops). The app reveals all stops at once so you can choose the correct destination.
My directions opened to the wrong place — what should I check?
Confirm you selected the correct stop (Pickup vs Drop-off) and ensure the booking address is correct. If it’s wrong or incomplete, notify the office so the booking location can be updated.
Why can’t I tap “I have arrived”?
Most accounts require the device to be within the configured arrival radius (commonly 500m) before “Arrived” can be recorded. If you’re clearly on site but the button won’t activate, check: (1) location permission, (2) GPS is enabled, and (3) the booking address/stop is correct.
Will auto check-out finish the job for me?
Auto check-out prevents forgotten check-outs and keeps timestamps accurate. Fieldworkers should still tap Finish Job so completion checklists, signatures, and customer notifications trigger immediately.
I can’t see the map or directions option — what’s the usual cause?
Most commonly: (1) device location permission is off, (2) Google Maps API isn’t configured for the account, or (3) the booking address is missing/incomplete. Ask your admin to check Google Maps API Integration.
When does GPS tracking start and stop?
In most configurations, tracking begins when the fieldworker taps On the Way (or when the tracking workflow begins), and ends when the job is finished or when the device leaves the job-site geofence (if auto check-out is enabled).
Leverage navigation, ETA updates, multi-stop routing, and geofence automation to arrive on time, reduce no-shows, and keep timesheets accurate.
To stay updated, please subscribe to our YouTube channel.