
Set Up the Digital Phone System (Twilio) in OctopusPro

OctopusPro’s Digital Phone System lets you connect Twilio to handle in-app phone calls and text messaging with your customers and fieldworkers. Once enabled, your team can make and receive calls from the web app and the mobile app, track call activity, manage voicemail, and send SMS/MMS—without using personal phone numbers.
- What this phone system can do
- Before you start
- Step 1: Connect Twilio to OctopusPro
- Step 2: Add and assign phone numbers
- Step 3: Configure call & messaging settings
- Making and receiving calls (web + app)
- Voicemail and missed-call workflows
- SMS and MMS messaging
- WhatsApp messaging (important clarification)
- Reports and analytics
- Call transcription
- Roles and permissions
- Deleting unnecessary call recordings
- Customizing your SMS templates
- Setting up automated SMS notifications
- Possible issues and their solutions
- Advantages for admins, fieldworkers, and customers
- Troubleshooting
What this phone system can do
This guide explains how to connect Twilio to OctopusPro and configure in-app calling, SMS/MMS, voicemail, call recording, routing, reporting, and user permissions—so your team can communicate through business numbers and keep a complete communication history on the relevant records.
Key features
- Multiple business phone numbers: Connect one or more Twilio phone numbers to your OctopusPro account and configure each number separately. If you use multiple numbers, you can also choose a primary/default company number.
- Branch-based call routing: Assign phone numbers to specific branches or business locations so inbound calls are routed only to users linked to that branch.
- Simultaneous ring across web and mobile: Incoming calls can ring all eligible users at the same time on the browser and mobile app. The first user to answer is connected to the caller, and the call stops ringing for the other users, who then receive a notification showing who answered the call.
- Devices receiving calls: View and manage the registered browser and mobile devices that are allowed to receive inbound calls for your account.
- Outbound caller ID selection: Choose which company number is used as the caller ID for outbound calls and SMS. Where configured, OctopusPro can also automatically choose the most suitable sender number based on the customer’s country.
- Welcome Prompt, voicemail, and VM Drop: Play a greeting before routing the call, configure voicemail greetings and voicemail messages, and use VM Drop to leave a pre-recorded voicemail quickly during outbound calling.
- Call recording, pause/resume, and transcription: Enable call recording, temporarily pause and resume recording during sensitive parts of a conversation, and review written call transcripts where transcription is enabled.
- Automations, templates, and role-based permissions: Use OctopusPro automations, templates, canned responses, and role-based access control to standardize communication and control which users can access calling and messaging features.
What you’ll learn in this guide
This guide shows you how to connect one or more Twilio numbers, assign them to branches, configure forwarding, timeouts, voicemail, recording, call transfers, app/web calling, SMS/MMS messaging, automations, templates, permissions, reporting, and common troubleshooting scenarios.
When you connect Twilio, you can enable a full business phone workflow inside OctopusPro, including:
Calls Make and receive calls in-app
- Web calling and mobile calling
- Call transfer, hold, and (optionally) hold music
- Internal calls between users and (optional) conference calling
- Privacy-preserving “customer-to-agent” calls (masking numbers)
Recordings Call recording + voicemail
- Record calls (with compliance controls)
- Pause/resume recordings when needed (e.g., sensitive payment details)
- Voicemail inbox with notifications and assignment workflows
SMS/MMS Text messages and media
- Send SMS from customers, bookings, invoices, and lists
- Receive and reply to customer messages in OctopusPro
- MMS support (subject to Twilio availability per country/number type)
Routing Number routing by branch / location
- Assign different Twilio numbers per branch or business location
- Choose the best outgoing number automatically (e.g., based on customer country)
- Forward calls to mobiles when needed (fallback routing)
Before you start
- Twilio account: You need a Twilio account and at least one phone number capable of Voice and/or SMS.
- Compliance: Check local laws for call recording consent and SMS rules (opt-in/opt-out). Your business is responsible for compliance.
- Permissions: Ensure user roles have access to make calls / send SMS (see Roles and permissions).
Step 1: Connect Twilio to OctopusPro
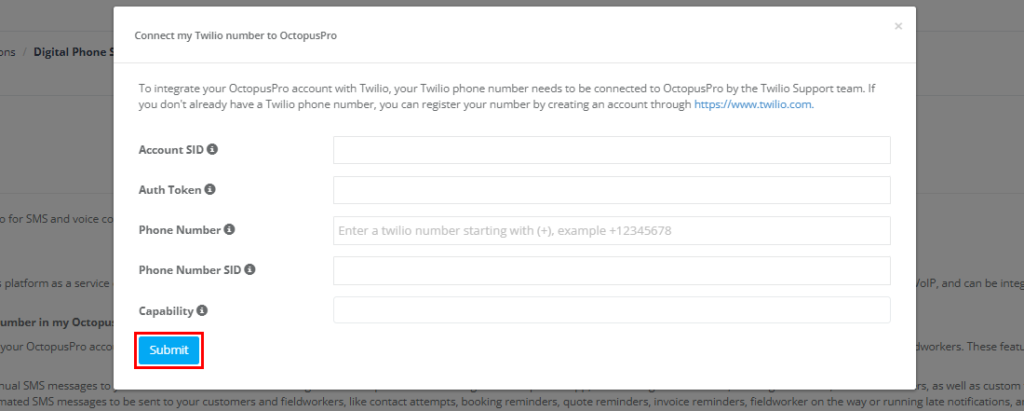
To connect Twilio, OctopusPro requires 4 values from your Twilio Console: Account SID, Auth Token, Twilio Phone Number, and Phone Number SID. These come from two different locations in Twilio (Dashboard + Active Numbers).
A) Create your Twilio account and enable billing
- Create a Twilio account or sign in to your existing Twilio Console.
- Add billing details so you can purchase phone numbers and use Voice/SMS services.
B) Buy or port a Twilio phone number
- Buy a new number: Fastest option. Choose a number with the capabilities you need (Voice, SMS, MMS).
- Port an existing business number: Use this if you want to keep your current business number and move it to Twilio.
- Tip: Capabilities vary by country and number type—confirm Voice/SMS/MMS availability before purchasing.
C) Get the 4 required Twilio values (step-by-step)
1) Find your Account SID (Twilio Dashboard)
- Open your Twilio Console.
- Go to Dashboard (home page of the Console).
- In the Account Info area, copy your Account SID (usually starts with AC).
2) Find your Auth Token (Twilio Dashboard)
- On the same Dashboard page, locate Auth Token under Account Info.
- Click the eye/reveal icon if it is hidden.
- Copy the Auth Token.
3) Find your Twilio Phone Number (Active Numbers)
- In Twilio Console, go to Phone Numbers → Manage → Active Numbers.
- Click the phone number you want to connect to OctopusPro.
- Copy the phone number value (use the full international format, e.g. +61… or +1…).
4) Find your Phone Number SID (Active Numbers)
- Stay on the same phone number details page you opened in the previous step.
- Find the Phone Number SID and copy it.
- Tip: A Twilio Phone Number SID typically starts with PN.
D) Connect Twilio inside OctopusPro
- In OctopusPro, go to Settings → Communications → Digital Phone System.
- Click Connect my Twilio number to OctopusPro.
- Enter the 4 values you copied from Twilio:
- Account SID (AC…)
- Auth Token
- Twilio Phone Number (+CountryCode…)
- Phone Number SID (PN…)
- Save your changes.

Tip: Multiple Twilio accounts
If you manage multiple brands or regions, you may be able to connect multiple Twilio accounts and/or multiple Twilio numbers (depending on your OctopusPro plan and setup). Just make sure you copy the Account SID/Auth Token from the same Twilio account that owns the phone number you’re connecting.
Step 2: Add and assign phone numbers
You can connect one or more Twilio phone numbers (DIDs) to OctopusPro and assign them by branch/location (and optionally by business unit such as Sales vs Support). This helps you route inbound calls to the right team, present the correct local caller ID, and automatically use the most suitable outbound number for customers in different regions.
If you connect multiple numbers, set a Primary / Default Number. This is the number OctopusPro will use as the fallback when there isn’t a more specific match (for example, no branch number is assigned, or there is no country-matching number available).
Assign numbers by branch / business location (inbound routing)
Assign a dedicated number to each branch/location so inbound calls to that number ring only the users linked to that branch (your branch ring group). This keeps calls local and prevents other branches from being notified unnecessarily.

Include General Fieldworker (toggle): When enabled for a number, the General Fieldworker user is added to that number’s ring group. This can be useful for shared coverage, overflow, or after-hours handling where you want a general fieldworker profile to receive inbound calls alongside branch-linked users.
Outbound caller ID and sender selection
OctopusPro can select which number is used as the outbound caller ID (for calls) and sender number (for SMS) based on your routing rules:
- Branch-based caller ID: When users place a call or send an SMS, the system can use the number assigned to their branch/location (where configured).
- Automatic number selection by destination country (calls): If you have multiple country numbers connected, OctopusPro can automatically choose the outbound call number based on the customer’s country code.
Example: If you have an Australian number and a US number, calls to a US customer can automatically use the US number. - Automatic number selection by destination country (SMS): The same logic can apply to SMS so messages are sent from a local/appropriate sender number where available.
Example: If both AU and US numbers exist, SMS to a US recipient can be sent from the US number automatically.
Step 3: Configure call & messaging settings
After connecting Twilio, configure the settings that control how calls and messages are handled in OctopusPro. These settings include call routing, voicemail, call recording, forwarding, transfers, and number-specific communication options.
Phone number settings example

Welcome Prompt
The Welcome Prompt plays a greeting at the start of a call before the next action happens. Depending on your configuration, this can be a pre-recorded audio message or a written message converted into speech using Text-to-Speech (TTS).
- Typical uses: greet callers, explain next steps, share after-hours information, announce promotions, or play a recording consent notice before the call continues.
- Call routing after the greeting: after the Welcome Prompt plays, the call can continue to a ring group, forwarding rule, menu-style call option, or live user.
- Menu-style routing: where supported, the Welcome Prompt can present callers with simple options before routing the call to the correct department, service team, or next step.
- Easy to update: TTS-based prompts are useful when you want to change the message quickly without re-recording audio.
Call recording
Enable call recording if you need a record of conversations for training, quality assurance, dispute resolution, or compliance.
- Recording Off: calls are not recorded.
- Record when ringing starts: recording begins as soon as the call starts ringing.
- Record when the call is answered: recording starts only once the call is connected.
- Separate audio channels: where supported, caller and user audio can be recorded on separate channels for clearer review and analysis.
Always follow local consent and privacy requirements before enabling call recording.
Pause and resume recording during sensitive data collection
If this feature is enabled, users can temporarily pause call recording while collecting sensitive information such as payment card details, then resume the same recording afterwards. This helps protect private data while preserving the rest of the conversation for quality assurance and record-keeping.
- Pause Recording: temporarily stops recording the sensitive part of the conversation.
- Resume Recording: continues the same recording once the sensitive information has been collected.
- Optional muted-audio workflow: depending on configuration, the call can remain active while the sensitive section is excluded from the final recording.
- Compliance benefit: this can support privacy-focused workflows such as PCI-sensitive payment collection.
Voicemail
You can enable voicemail for missed or unanswered calls, set a voicemail greeting, and control how voicemail messages are handled.
- Enable or disable voicemail for the selected number.
- Set or update the voicemail greeting.
- Choose which users should receive voicemail notifications and follow-up responsibility.
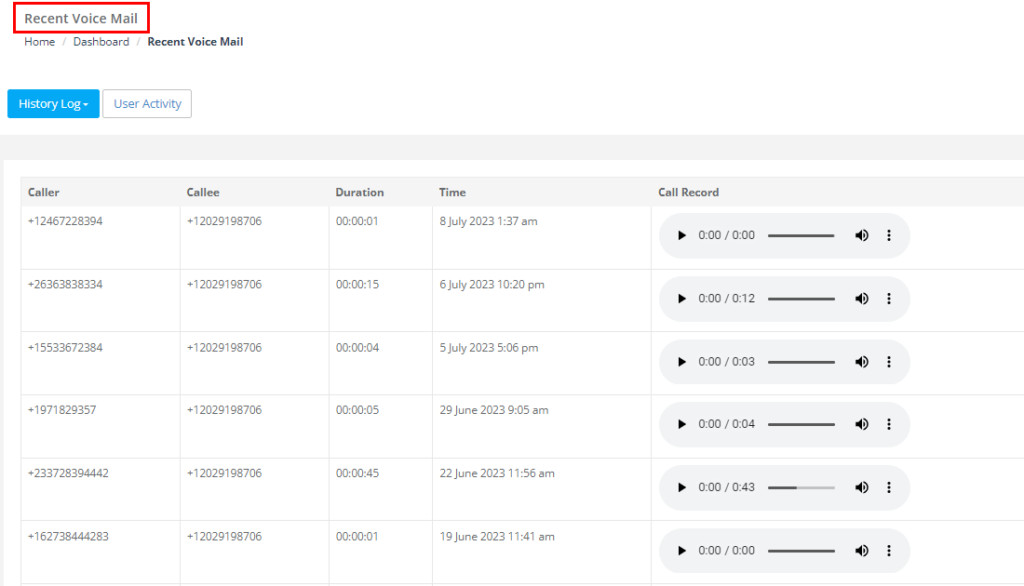
Voicemail notifications
- Enable voicemail notifications so the right users are alerted when a new voicemail is received.
- Review voicemail history from notifications and voicemail/call logs.
- After changing voicemail settings, place a test call to confirm the greeting plays correctly and voicemail messages are captured as expected.
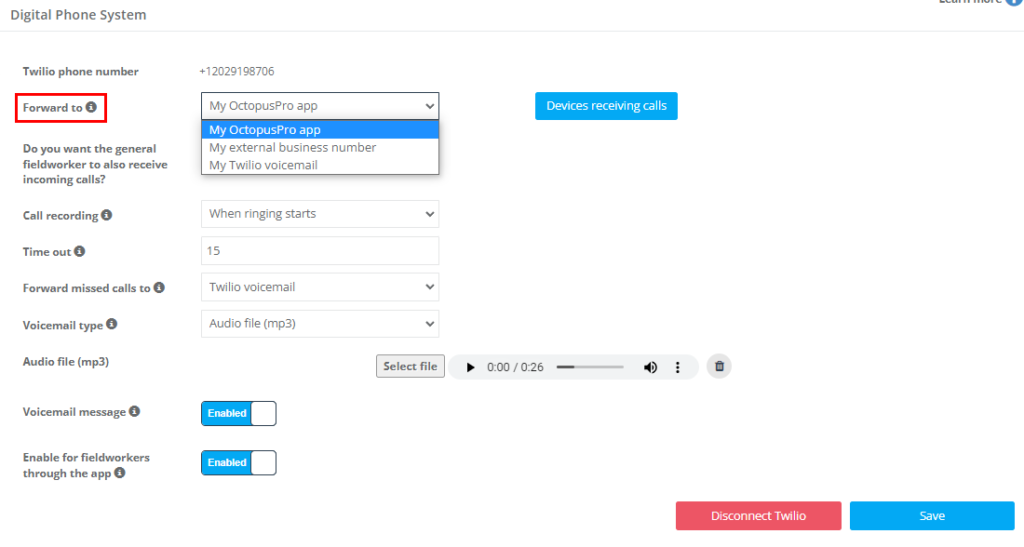
Call forwarding
If an inbound call cannot be answered in OctopusPro, you can forward it to one or more external numbers, such as a branch line, manager phone, or after-hours number.
Call transfer
Enable Allow call transfers to other users if you want staff to transfer an active call to another team member, such as a manager, dispatcher, or the correct branch/contact person.


Disconnecting a Twilio number
If you disconnect a Twilio number from the OctopusPro Digital Phone System, that number will stop routing calls and messages through OctopusPro. However, the phone number itself remains in your Twilio account unless you separately remove, release, or reconfigure it inside Twilio.
Quick test checklist (recommended)
- Inbound call test: Call your Twilio number and confirm eligible users ring on web/mobile (simultaneous ring).
- First-answer test: Answer from one device/user and confirm the call stops ringing for others and they see an “answered by …” notification.
- Voicemail test: Let a call go to voicemail and confirm the greeting plays, the message is saved, and the right users are notified.
- SMS test: Send an SMS to a mobile number, reply from the phone, and confirm the reply appears in the SMS Inbox and SMS log.
- Outbound caller ID test: Place an outbound call/SMS and confirm the expected sender number is used (branch/country/default rules).
Making and receiving calls in the web app and mobile app
Devices receiving calls
The Devices Receiving Calls section shows all registered devices that are currently able to receive incoming calls for your account, including supported browser sessions and mobile devices. Use this screen to review which devices are active and remove devices that should no longer ring.
- View device details: See the device type, platform (Web, iOS, or Android), and registration time.
- Control which devices can ring: Remove old, unused, or unapproved devices so incoming calls are sent only to the correct users and devices.
- Best practice: Review this list when a user changes phones, signs in on a shared computer, or reports duplicate ringing.
Receiving calls across web and mobile
OctopusPro can deliver incoming calls to eligible users across multiple platforms, including the web browser, iPhone/iPad (iOS), and Android. This allows office staff and field teams to answer calls from the device that is most convenient for them.
- Web app: Users can receive and manage calls directly in a supported browser, without needing a separate desktop softphone.
- Mobile app: Users can receive and manage calls in the OctopusPro app on iOS and Android.
- Simultaneous ring: Incoming calls can ring all eligible users at the same time across web and mobile.
- First-answer wins: The first user to answer is connected to the caller. The call then stops ringing for the other users, and they receive a notification showing who answered the call.
- Consistent call controls: Users can answer, end, hold, and transfer calls from any supported platform, depending on permissions and configuration.
Receiving calls in the web app
When an incoming call is delivered to the web app, a call window appears so the user can answer the call, place it on hold, transfer it, resume it, or end it. If hold music is configured, the caller can hear music while waiting.

Making calls from OctopusPro
Users can place outbound calls directly from OctopusPro using the customer profile, fieldworker profile, booking, quote, invoice, or other supported records. This helps keep communication centralized and logged against the relevant record.
Tip: Calls are typically logged against the related record, such as the customer, booking, quote, invoice, or fieldworker, so your team can review the full communication history in one place.

Mobile calling for fieldworkers and admins
Where permissions allow, users can also make and receive business calls from the OctopusPro mobile app using the connected Twilio number.

Note: Call quality depends on microphone permissions, network stability, and any firewall or VPN restrictions affecting voice traffic.
Internal calls and conference calling
- Internal calls: Users can call other users inside OctopusPro for dispatch, coordination, and internal communication, including calls between office staff, managers, and fieldworkers.
- Call logging: Internal calls can also be logged, depending on your configuration.
- Conference calling: If enabled, you can connect multiple participants in the same call, such as a customer, office admin, and assigned fieldworker.
- Additional charges may apply: Conference calls can increase usage costs because multiple call legs may be billed.
Privacy-preserving customer-to-fieldworker calls
When enabled, OctopusPro can protect the personal phone numbers of both customers and fieldworkers by routing calls through your company’s Twilio number. This is sometimes referred to as number masking or privacy-preserving call routing.
- Number masking: Calls are routed through the company number instead of exposing personal numbers.
- Assigned fieldworker routing: A customer can be connected to the fieldworker assigned to the booking while the call remains linked to the correct records in OctopusPro.
- Recording and audit trail: Calls routed through the Twilio/OctopusPro workflow can still be recorded and logged, subject to your recording settings.
- Configurable option: The setting Allow customers to call the assigned fieldworker directly controls whether customers can bypass number masking and contact the fieldworker directly.
- Important warning: If privacy-preserving routing is disabled and customer contact details remain visible, communication may fall back to personal phone numbers. In that case, personal numbers can be exposed, and the interaction may not be logged or recorded in the same controlled way.
Call logs, call history, and recordings
Inbound calls, outbound calls, missed calls, voicemails, call recordings, and—if enabled—call transcripts can be logged against the relevant customer and related records such as bookings, quotes, invoices, and fieldworkers. This gives your team a complete, searchable communication history in one place.


Voicemail and missed-call follow-up
OctopusPro can notify your team when a call is missed or when a caller leaves a voicemail, making it easier to follow up quickly and keep communication organized. Depending on your setup, admins can assign missed calls and voicemail items to a specific user and track the outcome using fields such as Status (Resolved, Pending, No Action Required), Outcome / Result, and Notes.

- Missed call notifications: Alert users when an inbound call was not answered.
- Answered-by-another-user notifications: Inform other eligible users when another team member answers the call, helping prevent duplicate follow-up.
- Voicemail notifications: Alert users when a caller leaves a voicemail message.

VM Drop for high-volume outbound calling
VM Drop lets users leave a pre-recorded voicemail message with a single click when an outbound call reaches voicemail. This helps teams move to the next call faster without repeating the same message manually.
- One-click voicemail drop: Play a saved voicemail message as soon as voicemail is detected.
- Consistent messaging: Use the same approved message across users and teams.
- Higher efficiency for outbound campaigns: Useful for reminder calls, follow-up campaigns, and other high-volume outbound calling workflows.
Deleting old call recordings
To reduce storage costs and keep your communication data aligned with your retention policy, you can delete call recordings you no longer need. This can be done automatically through OctopusPro retention rules or manually in Twilio when required.
Automatically delete old recordings
- Go to Settings → Communications → Automations.
- Enable the automatic call recording deletion rule.
- Select your preferred retention period, such as 30, 60, or 90 days.
Delete recordings manually
For one-off cleanup, you can delete specific recordings directly from Twilio logs or the relevant recording view. Because deletion is permanent, export or archive any recordings you may need before removing them.
Recording deletion FAQs and important notes
- Only authorized account admins can delete recordings: Twilio Support cannot delete recordings on your behalf. Recording deletion must be done by the Twilio account owner or an authorized admin.
- Recording deletion is permanent: Once a recording is deleted, it should be treated as permanently removed. Export or archive anything you may need before deletion.
- Bulk deletion is available, but not as one global “delete all” action: Large-scale cleanup can be done in batches, but recordings are still removed as individual records.
- Recordings and transcriptions are separate records: Deleting a call recording does not delete its transcription. If call transcription is enabled, transcript data must be managed separately.
- Transcriptions require their own cleanup process: Transcript records may need to be deleted through a separate API-based or automated cleanup workflow rather than through the same process used for audio recordings. In OctopusPro, this is handled through a separate automation/retention workflow for transcript data.
- Review your retention policy before deleting historical data: Before running automatic or bulk deletion, confirm that the retention period matches your business, compliance, and record-keeping requirements.
Customizing your SMS templates
Customize SMS templates and canned responses to match your brand voice and speed up repetitive replies. You can manage them from Settings → Communications → Templates & Canned Responses.
Use templates for confirmations, reminders, service updates, invoice messages, and common support replies. Where supported, merge fields/placeholders help personalize messages at scale.
Learn more:
- SMS Templates (create and manage reusable SMS scripts)
- Canned Responses & Templates (reusable email/SMS messages for fast replies)
- Template Placeholders (Merge Fields) (insert customer/booking/invoice details automatically)
- Automated Reminders & Confirmations (how automations use templates)
Setting up automated SMS notifications
OctopusPro can automatically send SMS messages when specific events occur in your workflow. You can configure these automated SMS notifications from Settings → Communications → Automations.
Common examples include:
- Failed contact attempt notifications
- Quote reminders
- Booking reminders
- Next service due reminders
- Outstanding invoice reminders
- On-the-way notifications
- Running late notifications
- Arrival notifications
- Job acceptance and confirmation updates
Twilio charges apply when automated SMS messages are sent. Message cost can vary depending on the recipient’s location, message length, and destination-specific rules.
SMS and MMS messaging
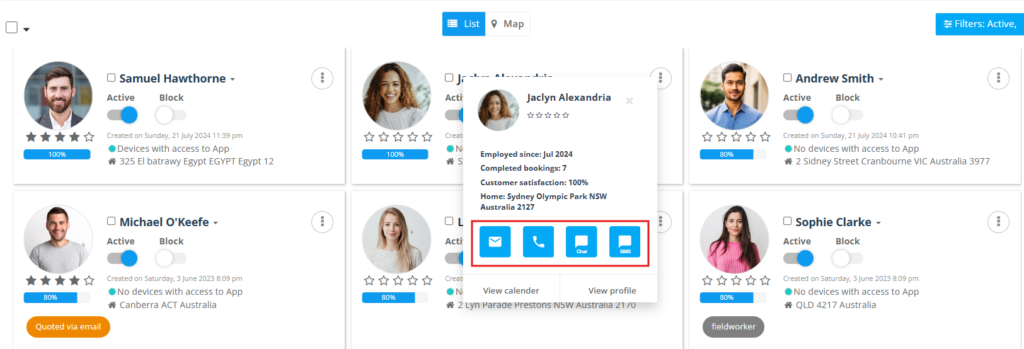
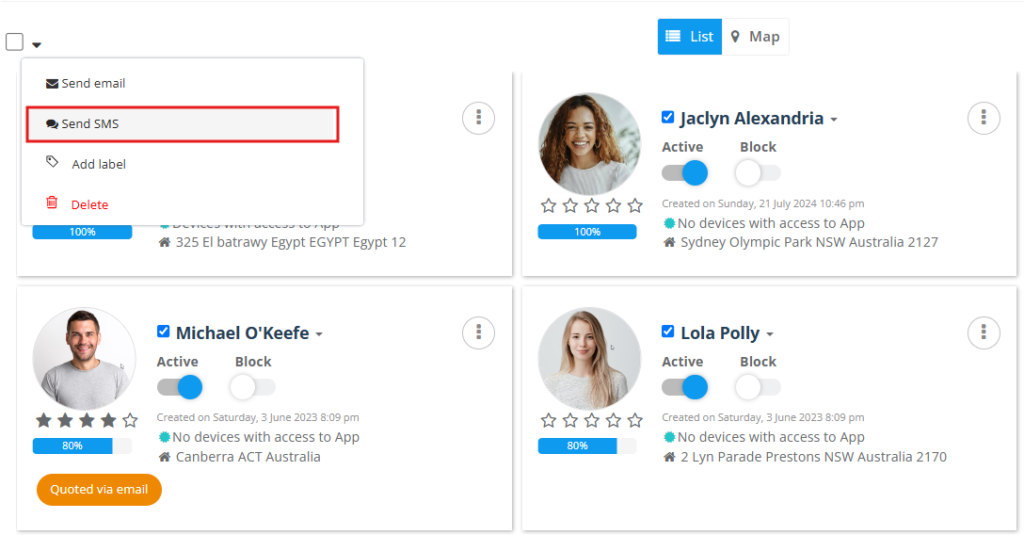
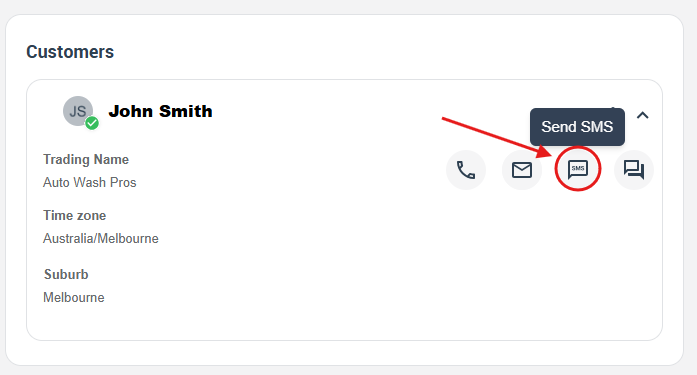
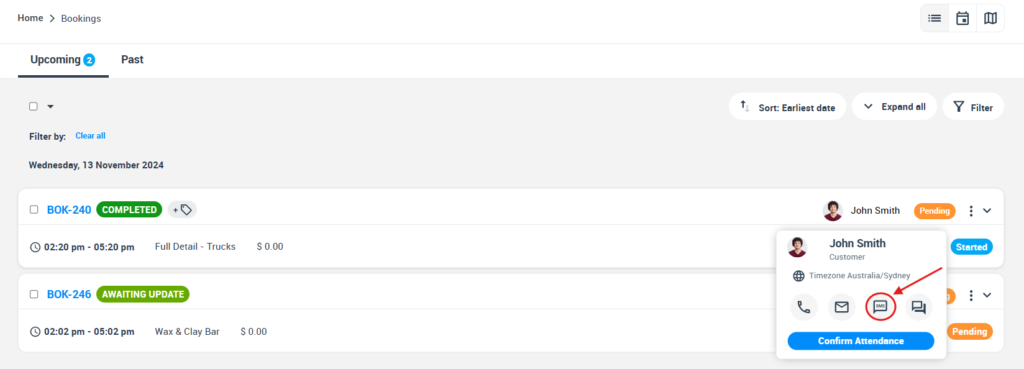
OctopusPro lets you send and receive SMS from the web app and mobile app using your connected Twilio number(s). Messages can be sent from customer and fieldworker profiles, operational records such as bookings, quotes, invoices, complaints, and inquiries, as well as from list views throughout the system.
Start SMS conversations from across OctopusPro
You can start an SMS conversation from list views, profile pages, and individual records throughout OctopusPro. Supported entry points include customers, fieldworkers, bookings, quotes, invoices, complaints, and inquiries. You can also use filters such as status, tag, service, or location to create a targeted recipient list before sending a message.
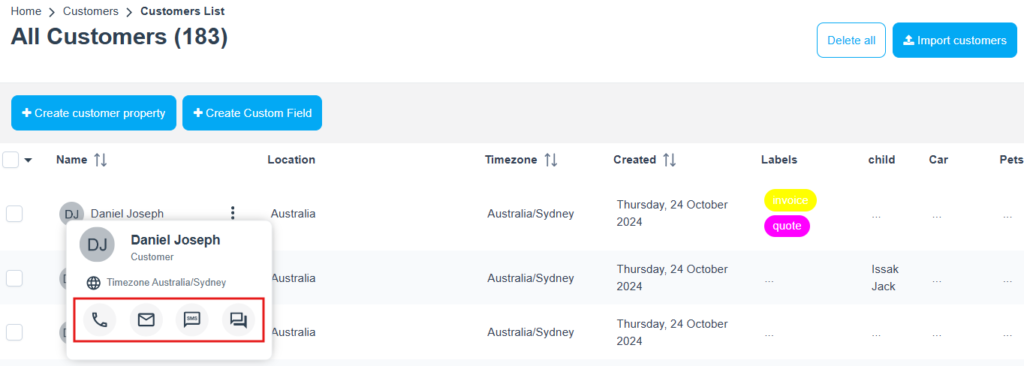
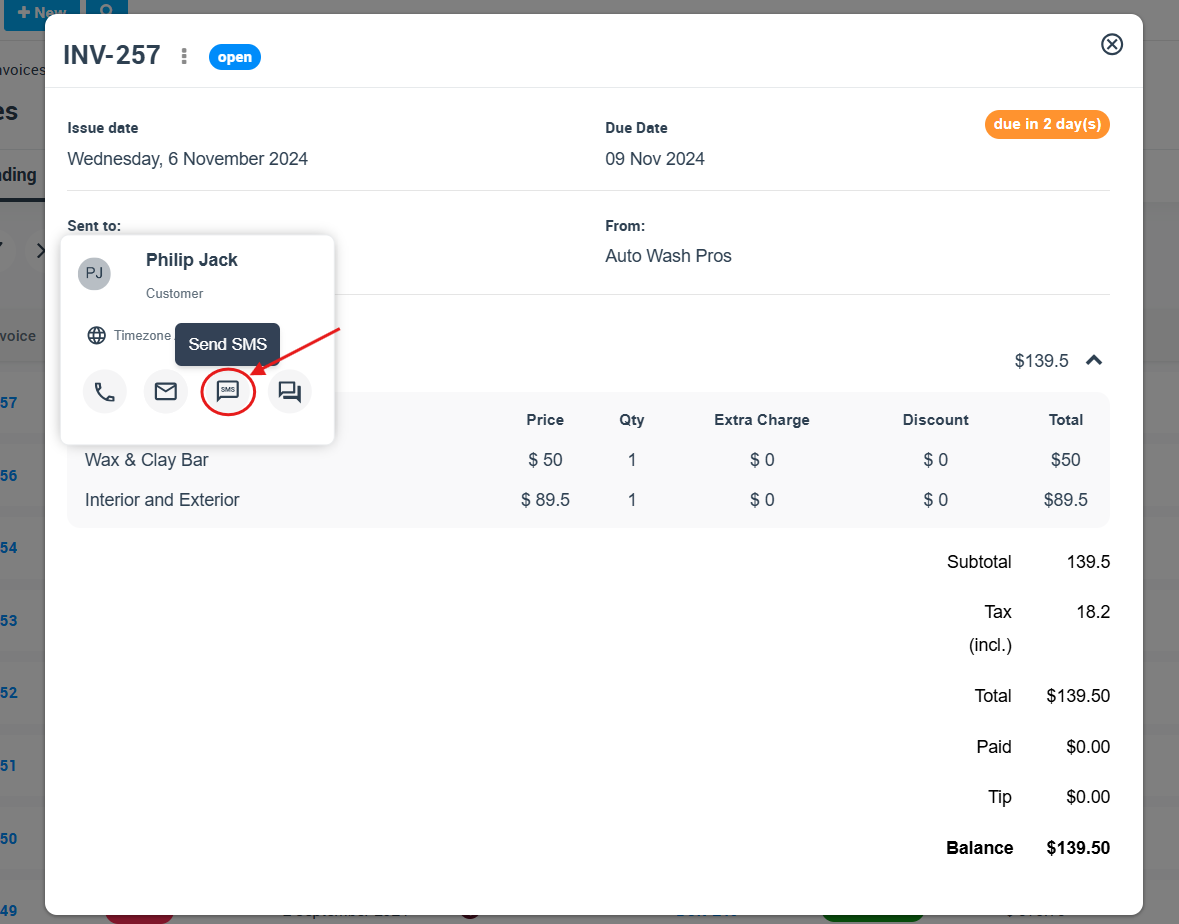
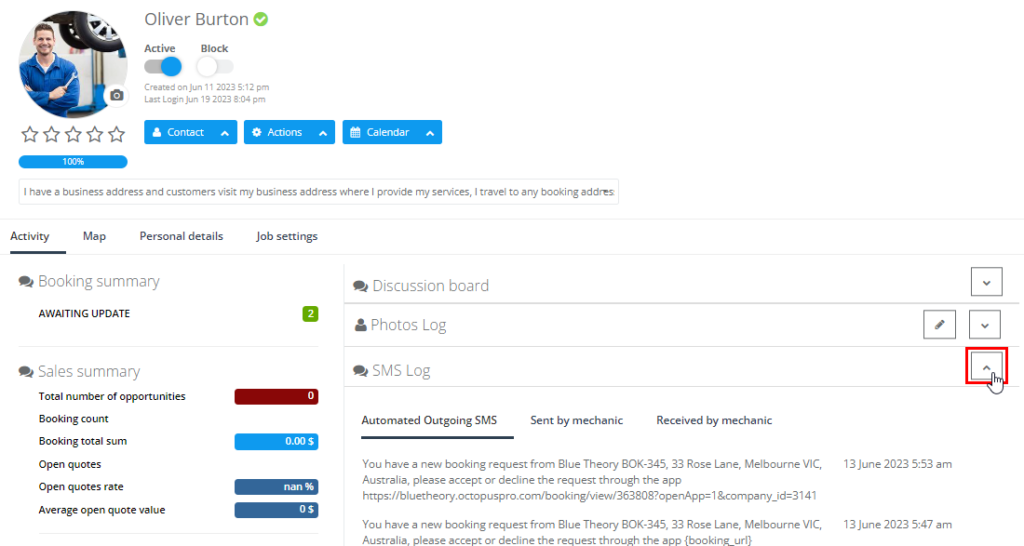
SMS compose window
When composing an SMS, you can choose the sender number and, where available, use templates or canned responses to speed up common replies.

View and reply to messages
SMS activity can be viewed from the relevant customer or fieldworker record, making it easier to review previous conversations and reply in context.
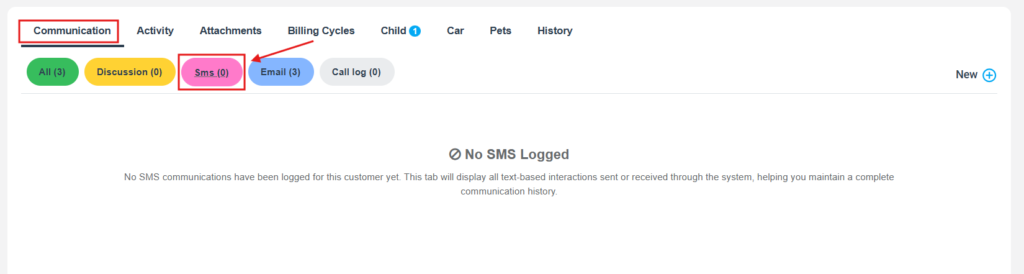

SMS Inbox
The SMS Inbox gives your team a shared view of incoming replies and active SMS conversations, helping office staff stay aligned on live customer and fieldworker messaging.

SMS History Log
The SMS History Log provides a chronological record of inbound and outbound messages for auditing and follow-up. If a message is linked to the wrong record, admins can manually match it to the correct customer, booking, quote, invoice, inquiry, complaint, or fieldworker record.

SMS compliance and delivery considerations
- Availability varies by country: Two-way SMS, sender number types, and alphanumeric sender IDs are not available in every country and may vary by destination.
- Alphanumeric Sender IDs are usually one-way only: If you use an alphanumeric sender name instead of a phone number, recipients generally cannot reply. Use a reply-capable phone number when you need two-way messaging.
- Some messaging routes require registration: In some countries, sender numbers or branded messaging routes may need registration or approval before messages can be delivered reliably.
- US business messaging may require A2P 10DLC registration: If you send business SMS or MMS to US recipients using a US long code, additional registration may be required.
- Follow opt-out requirements: Make sure your messaging workflow supports standard keywords such as STOP, HELP, and opt-back-in keywords such as START, where applicable.
- Long messages may be split into multiple parts: This can affect both delivery and message cost. Emojis and special characters can reduce the number of characters that fit in each message part.
- Use Twilio Message Logs for deeper troubleshooting: If you need more detail than the OctopusPro log view, Twilio Message Logs and related metadata can help with delivery troubleshooting and audit history.
MMS messaging
If your Twilio number supports MMS, OctopusPro can also send and receive picture and media messages. MMS availability depends on the country, phone number type, carrier support, and Twilio rules, so it is not available in every market. In some cases, multiple images may be supported, but allowed file types, attachment limits, and message size limits can vary by carrier and destination.
WhatsApp messaging
Reports and analytics
Track call and message activity to measure performance and improve responsiveness. Depending on your configuration, reports can include answered-by user, call duration, recording links, voicemail events, and outcomes.
Where to find call and SMS reports
- Call Log: Reports → Call Log
- SMS Log: Reports → SMS Log
- Live reporting dashboards: Reports → Live Reports & Analytics (where available)
Note: Menu labels can vary by plan and enabled modules. If you don’t see a report, confirm your permissions and enabled features.
Call transcription
If call transcription is enabled, recorded voice calls can be converted into written text automatically. This makes it easier to review conversations, search for important details, identify trends, and support quality assurance, coaching, compliance, and internal follow-up workflows.
- Automatic speech-to-text conversion: Recorded calls can be processed by a supported speech-to-text service, such as Google Cloud Speech-to-Text, Twilio speech services, or another provider configured for your account.
- Transcript review: Transcripts can be highly accurate, but they should still be reviewed and corrected where needed, especially for names, technical terms, and industry-specific language.
- Notes and categorization: Teams can review transcripts, add notes, correct recognition errors, flag important discussion points, and organize calls by customer, user, subject, or call record.
- Reporting and follow-up: Transcript data can support analytics, reporting, CRM follow-up, task management, and other connected workflows, depending on your setup.
- Privacy and retention: Call recordings and transcript data should be managed according to your organization’s privacy, security, encryption, and retention policies.
Call reports and monitoring
The Live Calls Report lets authorized users monitor calls that are currently in progress. OctopusPro also provides call activity reports that help you review team performance, missed communications, and historical call records.
- Live Calls Report: View active calls in real time.
- Call activity reports: Review missed calls, received calls, and outgoing calls.
- Call recordings report: Review recorded calls where recording is enabled.
- Answered-by reporting: See which user answered each call.


Call report exports
Call history can be exported to CSV or Excel for reconciliation, auditing, reporting, and further analysis outside OctopusPro.
If deeper investigation is needed, Twilio-side call logs, message logs, and related metadata can help troubleshoot routing, delivery, or carrier-level issues alongside the OctopusPro reports.
Where enabled, reporting can also include transcript-based insights such as common enquiry themes, repeated issues, and notes captured during transcript review.
Roles and permissions
OctopusPro uses two layers of access control for calling and messaging workflows:
- User Role Credentials (role-based permissions): These are configured from Settings → Company Settings → Users → Roles → Assign Credentials. This is where you control the core permissions for each user role in your account—not just fieldworkers, but also admin users, office staff, dispatchers, sales users, and any custom roles you create.
- Fieldworker Permissions: These are configured from Settings → General Settings → Fieldworker Permissions. These settings apply specifically to fieldworker behavior in the app, such as whether they can see customer contact details, contact customers before the booking start time, receive access to the wider customer database, or trigger customer-facing SMS updates when they go on the way.
Think of it this way: Assign Credentials controls whether a role is allowed to use calls/SMS at all, while Fieldworker Permissions control how those communication features behave for fieldworkers.
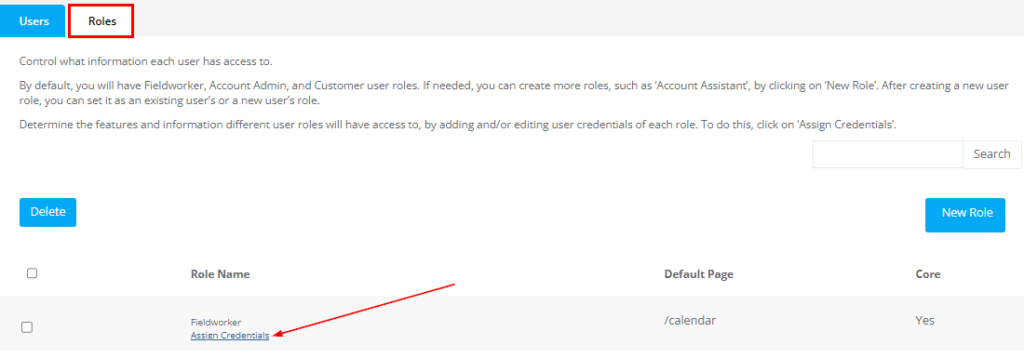
How these two settings areas work together
- Step 1 — Allow the role to use the feature: First, enable the required call and/or SMS permissions in Assign Credentials for the relevant role.
- Step 2 — Refine fieldworker behavior: Then use Fieldworker Permissions to control what fieldworkers can see or do with those allowed features.
- Example: If the Fieldworker role does not have permission to use SMS in Assign Credentials, enabling an SMS-related fieldworker setting will not allow fieldworkers to send SMS.
- Example: If the Fieldworker role is allowed to call customers, you can still restrict when or how they do it using Fieldworker Permissions such as hiding customer contact details or limiting communication before the booking start time.
Examples of relevant fieldworker permissions are listed below. These are just examples, not the full list. For all available fieldworker controls, go to Settings → General Settings → Fieldworker Permissions.
Notify customers by SMS when fieldworkers are on the way to their bookings
If this permission is enabled, customers can receive an SMS with the fieldworker’s ETA and, where configured, a live tracking link when the fieldworker is on the way to the booking. This setting is managed from Settings → General Settings → Fieldworker Permissions.
Display customer contact details to fieldworkers at all times
This permission controls whether fieldworkers can always see customer phone and contact details in the app. Disable it if you need stricter privacy controls or want communication centralized through the office. This setting is managed from Settings → General Settings → Fieldworker Permissions.
Calling customers
Fieldworkers can call customers from the app only when their role has the necessary calling permission in Assign Credentials. After that, additional fieldworker settings can still affect how and when they can contact customers.
- Restrict Fieldworker Communication with Customers Prior to Booking Start Time: If enabled, fieldworkers may not be able to call or message the customer until the booking has started (subject to certain workflow exceptions). This is managed from Settings → General Settings → Fieldworker Permissions.
- Allow fieldworkers to view your entire customer database when making new bookings: If enabled, fieldworkers may be able to access a wider set of customer records when creating bookings, quotes, or invoices. If disabled, access can remain limited to customers they created themselves. This is also managed from Settings → General Settings → Fieldworker Permissions.
Calling admins
With the appropriate role permissions enabled, fieldworkers can also call office admins directly from the app for coordination and support. This depends on the role’s call permissions in Assign Credentials.
Sending invoices via SMS
If permitted by the role credentials, fieldworkers can send invoices to customers via SMS from the invoice view in OctopusPro. This is controlled at the role level first, and then shaped by your broader fieldworker/customer communication settings.
Two-way SMS communication with customers
When enabled, fieldworkers can send SMS updates to customers and receive replies back inside OctopusPro. If this feature is disabled at the role level, fieldworkers will not be able to use in-app SMS even if related fieldworker options are enabled. If customer contact details are still visible, some fieldworkers may then fall back to personal phone communication instead, which will not be logged or recorded in the same way.
Important warning: Communication that happens outside the Twilio/OctopusPro channel can expose personal phone numbers and reduce your ability to keep a complete audit trail, apply recording controls, or maintain privacy masking.
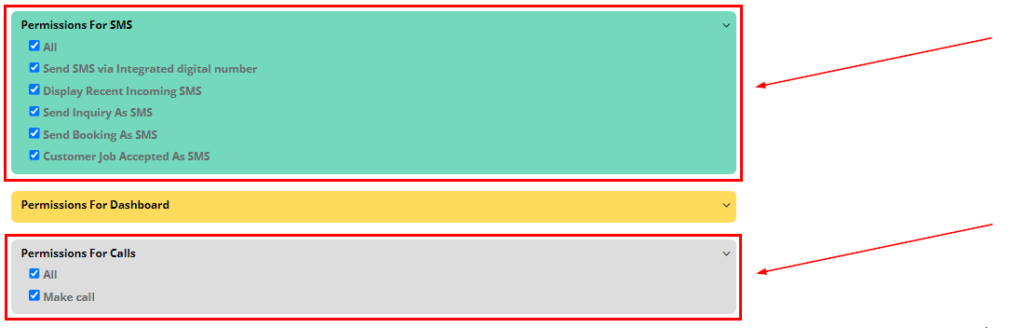
Customizing user role permissions for the Digital Phone System
- Go to Settings → Company Settings → Users.
- Open the Roles tab.
- Select Assign Credentials for the relevant role.
- Enable or disable the required Permissions for SMS and Permissions for Calls.
- Save your changes.
Common issues
- Twilio number is not working: Check that the Account SID, Auth Token, Twilio phone number, and Phone Number SID entered in OctopusPro are correct. Also confirm that the phone number is active in Twilio and that your call routing settings are configured correctly.
- You’re using a Twilio trial account: Trial accounts can have limitations (for example, requiring verified recipient numbers or restricting certain destinations). If calls/SMS work only in limited scenarios, verify your Twilio trial restrictions and upgrade the account if needed.
- SMS is not sending or receiving: Make sure SMS is enabled for the connected Twilio number and that the destination country, sender type, and carrier requirements are supported. If needed, review Twilio Message Logs and related message metadata for more detailed delivery diagnostics.
- Call recording is not working: Confirm that call recording is enabled for the selected number and that recording is permitted in your location and workflow. Also check that the call flow you are using supports recording.
- Automated SMS is not sending: Review the automation rule, trigger conditions, recipient settings, and SMS template configuration to make sure the automation is set up correctly.
Benefits for admins, fieldworkers, and customers
Benefits for admin users
- Make calls and send SMS directly from OctopusPro using your business phone number.
- View call history, message history, recordings, voicemail, and reports in one centralized system.
- Improve privacy and communication control by routing calls and messages through business numbers instead of personal phone numbers.
- Reduce manual follow-up using automations, templates, and canned responses.
Benefits for fieldworkers
- Communicate with customers using the company’s business number instead of a personal mobile number.
- Receive booking-related updates and customer replies directly in the app.
- Coordinate more easily with office staff and other team members through internal calling and logged communication.
- Keep customers informed with ETA updates, delay notifications, and arrival messages.
Benefits for customers
- Receive calls and text messages from recognizable business numbers.
- Get timely updates about bookings, delays, arrival times, and invoices.
- Reply to messages or call back the business number so communication stays simple, professional, and easy to track.
Troubleshooting checklist
Inbound calls are not ringing on web or mobile
- Number assignment: Confirm the Twilio number is connected and assigned correctly (branch / business location / default number) so the correct ring group is targeted.
- Role permissions: Confirm the user role has permission to receive and answer calls (Assign Credentials).
- Device readiness: On web, allow microphone access in the browser. On mobile, enable microphone and notifications for the OctopusPro app.
- Network restrictions: Test off VPN / restrictive networks. Firewalls or network policies can block VoIP signaling and audio.
Customers can’t reply to SMS (or replies don’t appear)
- Sender type: Make sure you’re sending from a reply-capable phone number. (Alphanumeric sender IDs are typically one-way.)
- Country support: Confirm two-way SMS is supported for your sender number type and the recipient’s destination country.
- Opt-out status: Check whether the recipient previously opted out (STOP), and ensure your workflow supports opt-back-in where applicable.
- Diagnostics: If needed, check Twilio Message Logs/metadata to confirm whether replies were received by Twilio and whether any filtering/blocks occurred.
Learn more:
- Role-Based Access Control (RBAC) & User Permissions
- Fieldworker Permissions & Access Control
- On-the-Way SMS Notifications (ETA & Tracking)
- Restrict Fieldworker Communication with Customers Prior to Booking Start Time
- Allow Fieldworkers to View the Customer Database
- Fieldworker App Login & Access
To stay updated, please subscribe to our YouTube channel.