
Converting Inquiries to Bookings (Convert Inquiry to Booking)

Turning a customer inquiry into a confirmed booking is a key step in lead management. Instead of re-entering customer details, service requirements, and notes, OctopusPro lets you convert an inquiry into a booking and continue the workflow (scheduling, assigning fieldworkers, sending confirmations, and tracking updates) from a single record.
Table of contents
- What this feature does
- Benefits and common use cases
- How to convert an inquiry to a booking
- What happens after converting
- Schedule smarter (Nearby Bookings + Availability Finder)
- Send confirmations & automate follow-ups
- Use templates (canned responses) & placeholders
- Best practices
- Troubleshooting
- Related guides
What this feature does
When you convert an inquiry to a booking, OctopusPro creates a new booking from the inquiry and keeps the records connected. This gives you end-to-end traceability from first contact (inquiry) to scheduled service (booking), while keeping your lead pipeline clean and up to date.
Benefits and common use cases
- Faster conversion: move from lead to scheduled job without retyping details.
- Better lead tracking: keep a clear audit trail and know exactly which inquiries became bookings.
- Improved customer experience: respond quickly and confirm appointments sooner.
- Smarter scheduling: use proximity-based scheduling and availability tools to reduce travel and avoid conflicts.
Common scenarios include: phone/email/web inquiries you want to schedule immediately, urgent service requests, repeat customers requesting a visit, or any inquiry where pricing is already agreed and you’re ready to lock in a date/time.
How to convert an inquiry to a booking
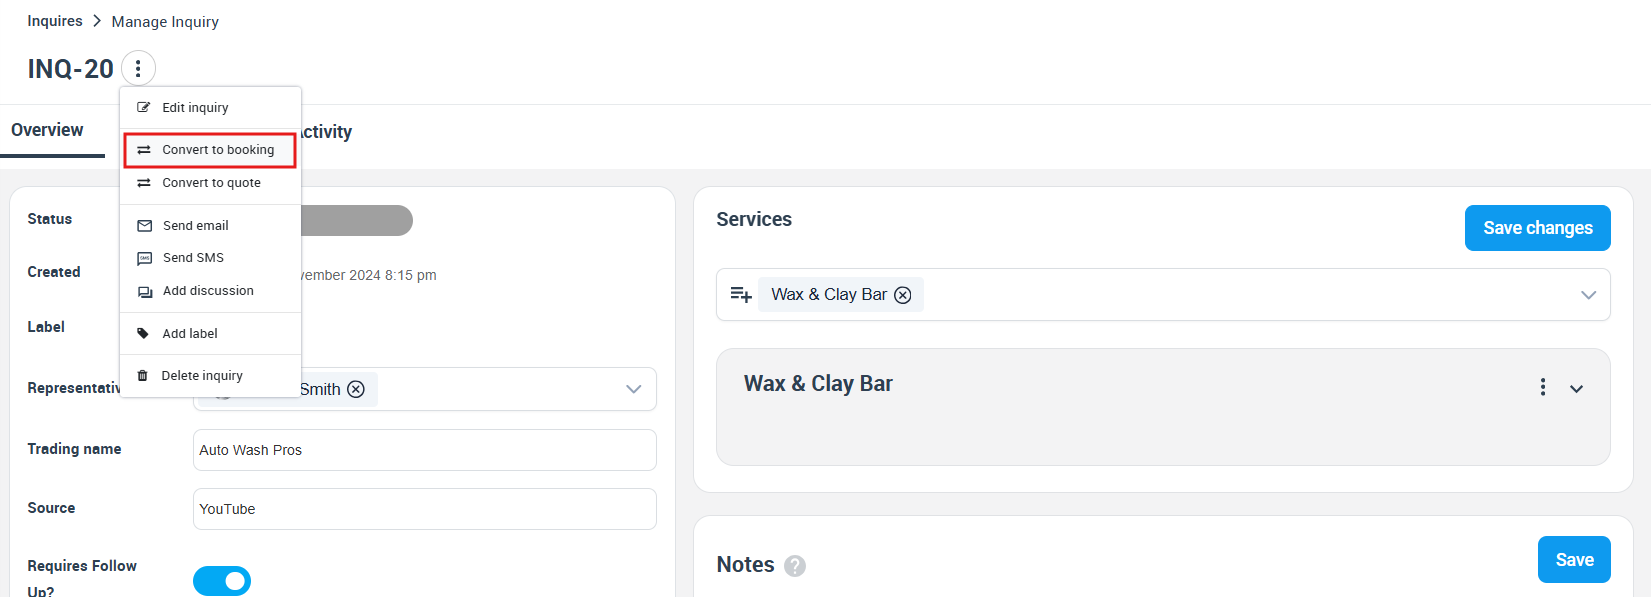
Method A: Convert from the Inquiries list
- Go to Inquiries from the admin dashboard.
- Locate the inquiry you want to convert.
- Click Actions next to that inquiry.
- Select Convert to booking.
Method B: Convert from the inquiry details page
- Open the inquiry (e.g., Actions > View inquiry).
- Click the Actions menu on the inquiry.
- Select Convert to booking.
After you click Convert to booking, the booking form opens. Review and complete key details such as:
- Service(s)/line items: what will be delivered and any quantities or options
- Date & time: appointment start time (and duration, if applicable)
- Location details: address / service location type (mobile, storefront, or remote where enabled)
- Assigned fieldworker(s): if you assign during booking creation
- Status: requested / pending / confirmed (depending on your workflow)
- Internal notes & customer instructions: access notes, job requirements, attachments
Click Save changes to create the booking.
What happens after converting
1) The inquiry and booking stay linked
Once converted, the inquiry will show a direct link to the created booking, and you can navigate between the inquiry and the booking for full context and follow-up.
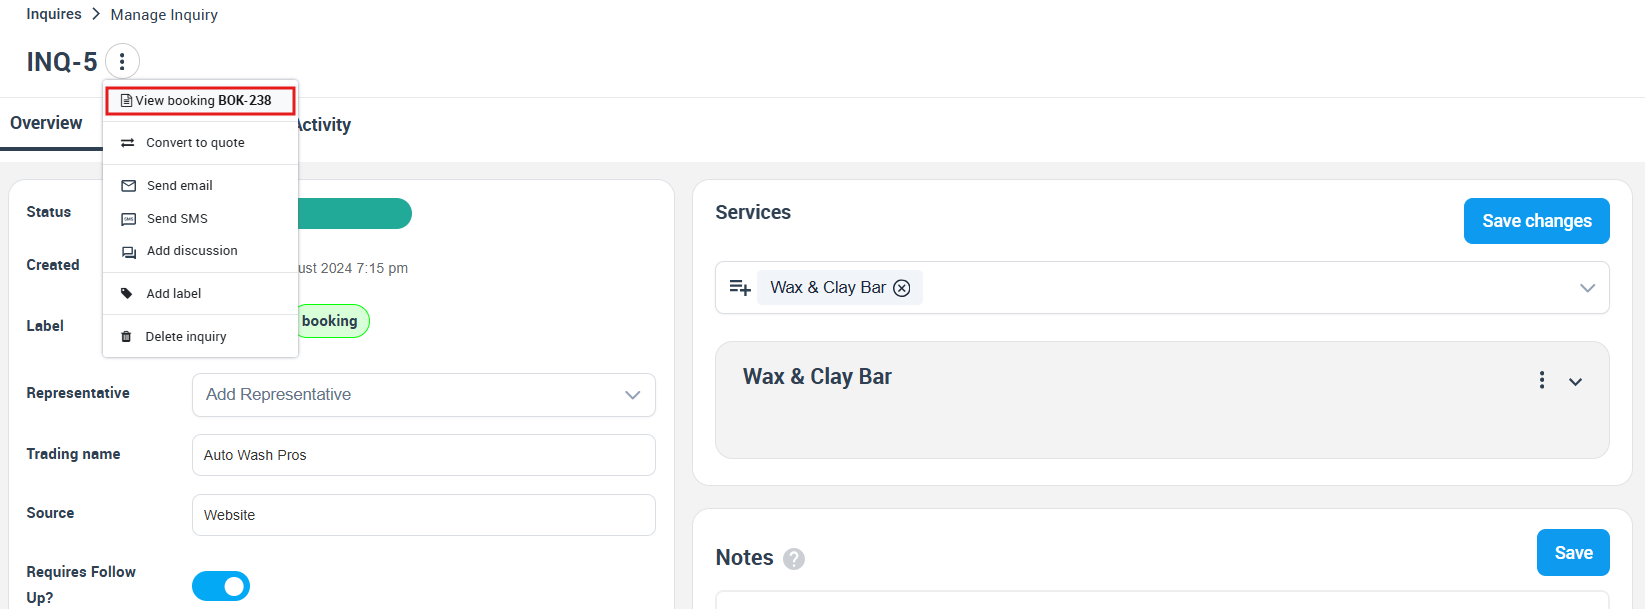
2) The inquiry status is updated
After converting, the inquiry is typically no longer treated as “new” and will show as converted (helping keep your new-inquiries queue focused on untouched leads).
Schedule smarter (Nearby Bookings + Availability Finder)
Nearby Bookings (proximity-based scheduling)
Use Nearby Bookings to view scheduled jobs near the booking’s location so you can reduce travel time, group work by area, and make better dispatch decisions.

Learn more: Nearby Bookings (Proximity Scheduling)
Fieldworker Availability Finder
Use the Availability Finder to quickly compare fieldworker schedules and identify who is available for the selected time window—helping you avoid double-bookings and balance workloads.

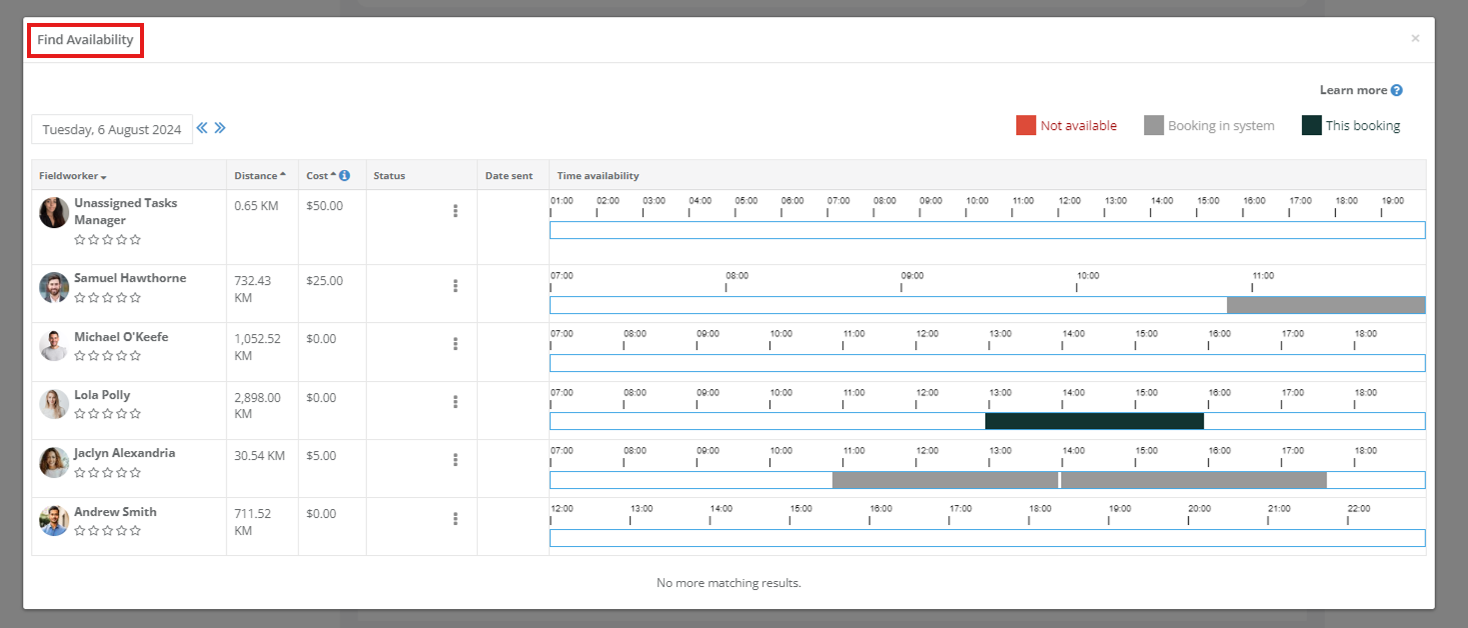
Learn more: Fieldworker Availability Finder
Send confirmations & automate follow-ups
After the booking is created, you can send booking confirmations to the customer (and assigned fieldworker) via Email, SMS, and WhatsApp (where enabled). Depending on your workflow, OctopusPro may prompt you to send a confirmation when the booking is created, and you can also send or resend confirmations anytime later.

Tip: If you allow customers to cancel/reschedule via the Customer Portal, those links can also appear in confirmation/reminder templates. If you don’t want customers to cancel/reschedule, disable the portal setting and remove the links from the relevant templates.

Use templates (canned responses) & placeholders
To keep customer communication consistent and fast, use:
- Templates (default Email/SMS templates you can edit)
- Canned responses (saved, reusable messages you can quickly select when sending)
- Placeholders (dynamic fields) to auto-insert data like customer name, booking reference, service details, location, and date/time
Manage these under Settings > Communications > Templates & Canned Responses.
Best practices
- Convert only when you’re ready to schedule: if you need to price first, convert the inquiry to a quote instead.
- Confirm availability first: use the Availability Finder, then assign the best-fit fieldworker.
- Reduce travel time: use Nearby Bookings to group jobs by area.
- Standardize confirmations: keep Email/SMS/WhatsApp templates aligned, and use placeholders to avoid missing details.
- Document requirements: add internal notes, customer instructions, and attachments before confirming.
Troubleshooting
- “Convert to booking” is missing: confirm your user role has permission to manage inquiries/bookings.
- Can’t find a suitable time slot: review fieldworker working hours/blocks and try a different date/time, service, or assigned fieldworker.
- Confirmation messages won’t send: check the customer’s email/mobile details and confirm messaging channels (SMS/WhatsApp) are enabled where required.
Related guides
- View Inquiry Details
- Convert Inquiry to Quote (Estimate)
- Create a New Booking
- Send Booking Confirmation
- Nearby Bookings (Proximity Scheduling)
- Fieldworker Availability Finder
- Automations (Automated Procedures)
To stay updated, please subscribe to our YouTube channel.