
Contact Customers (Email, SMS, Calls, WhatsApp & Communication Log)

OctopusPro makes it easy for office staff (and authorised fieldworkers) to contact customers from the Customer Profile or directly from a related record such as an Inquiry, Quote/Estimate, Booking, Invoice, or Complaint.
Every interaction can be kept in one place so your team has full context before following up, and you can maintain a clear audit trail of customer communications.
Table of contents
- Where you can contact customers from
- Before you start (requirements)
- Contact customers from the Customer Profile
- Send an email
- Send an SMS
- Send a WhatsApp message
- Post a discussion / chat message (with attachments)
- Call a customer (desktop & mobile app)
- Contact customers from records (Invoices, Bookings, Inquiries, Quotes, Complaints)
- View the full Communication Log (Email/SMS/Discussions/Calls)
- View history via Reports (Recent Emails/SMS/Calls)
- Pause automated communications for a customer
- Best-practice tips & troubleshooting
- Related guides
Where you can contact customers from
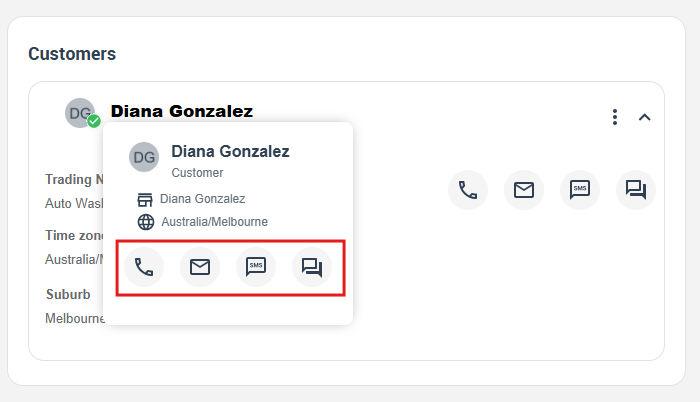
- Customers list: hover over a customer name (or open the customer row menu) to access contact shortcuts.
- Customer Profile: use the contact icons (Email / SMS / Call / Chat) and the Communication tab.
- Any record: hover/click the customer name inside an Inquiry, Quote/Estimate, Booking, Invoice, or Complaint to contact them in context.
Before you start (requirements)
- Make sure customer details are saved: at least one email address for email, and a valid mobile number for SMS/calls.
- SMS, VoIP calls and WhatsApp require the Digital Phone System: connect a Twilio number in Settings → Communications → Digital Phone System. (Regular calls may still work using your device/OS dialler, depending on your setup.)
- Permissions matter: use role-based permissions to control who can send messages, place calls, view call logs/recordings, and post customer-visible discussions.
Tip: Create reusable Email/SMS Templates and Canned Responses for faster, consistent messaging (e.g., quote follow-ups, booking confirmations, invoice reminders, running-late updates).
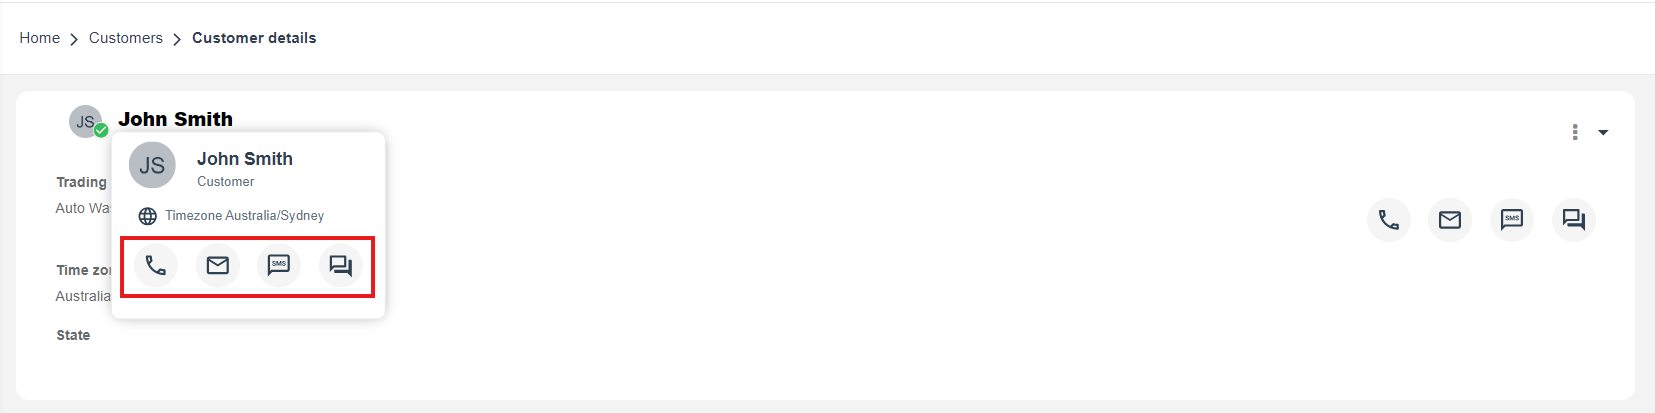
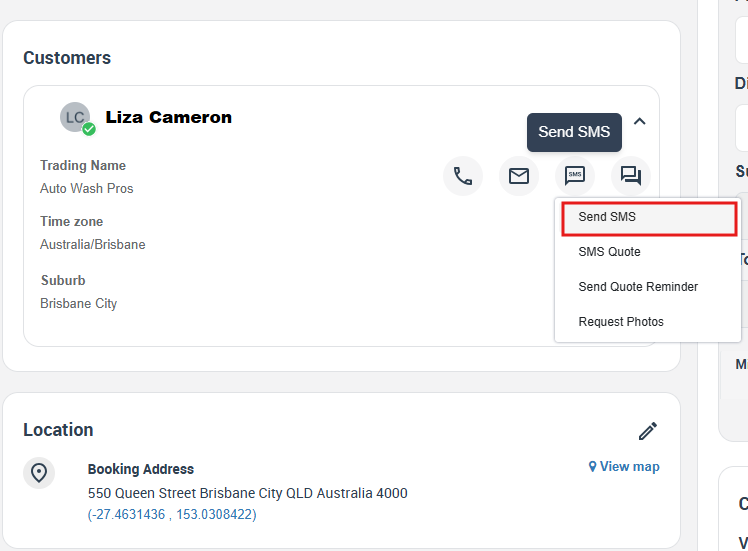
Contact customers from the Customer Profile
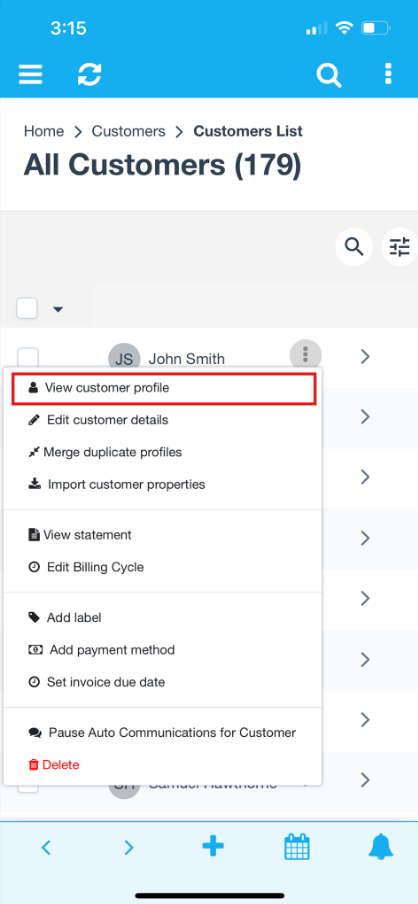
- Go to Customers → All Customers.
- Hover over the customer name (or open the customer row/menu) to access quick contact icons.

- Alternatively, click the customer name to open the Customer Profile, then use the contact icons and the Communication tab.
Send an email
- Open the customer profile, then click the Email icon.
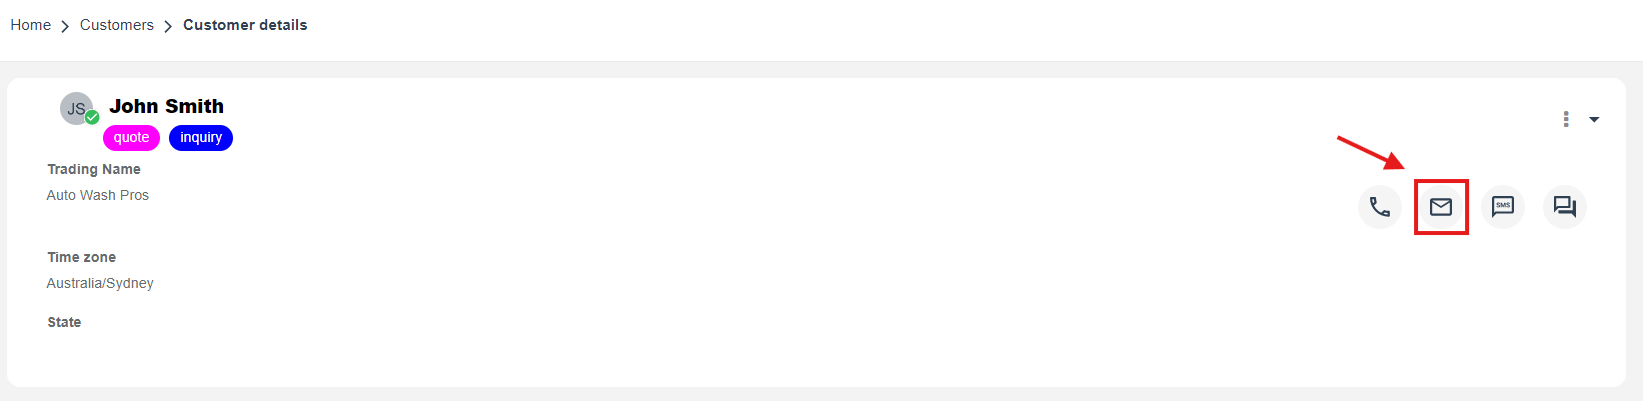
- Choose the recipient email address (if multiple exist).
- Enter a clear Subject (use record references where relevant, e.g., “Quote EST-12345 Follow-up”).
- Attach files if needed (e.g., PDFs, photos, documents).
- Select a Canned Response (optional), then personalise the message body.
- Click Send.
Common examples:
- Send a booking confirmation or reschedule update
- Follow up a quote/estimate with extra details
- Send an invoice payment link or request a deposit
- Resolve a complaint with attachments and a written summary
Send an SMS
- Open the customer profile, then click the SMS icon.
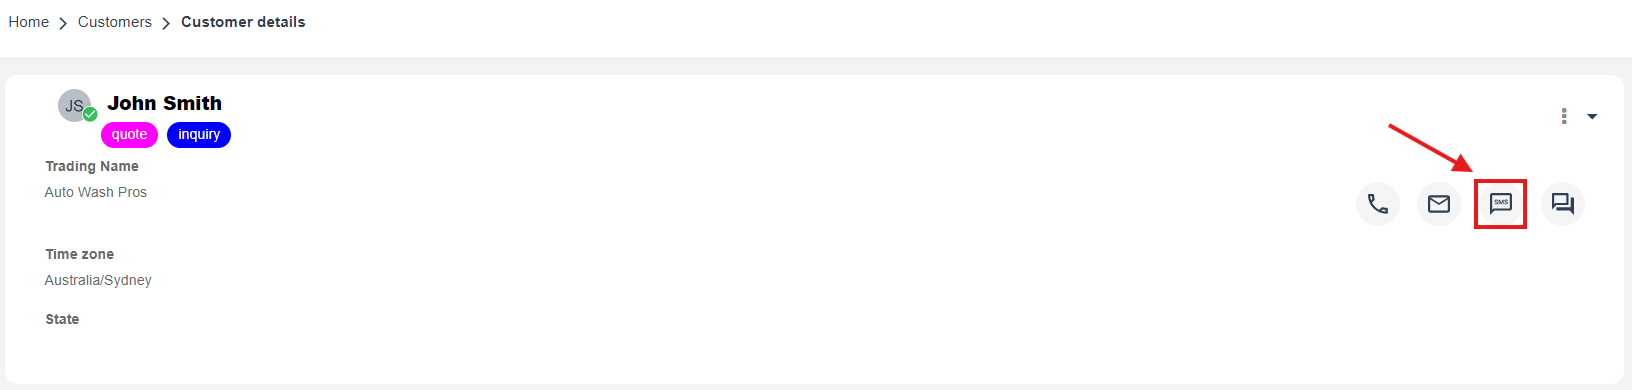
- Select a Canned Response (optional) or type a custom message.
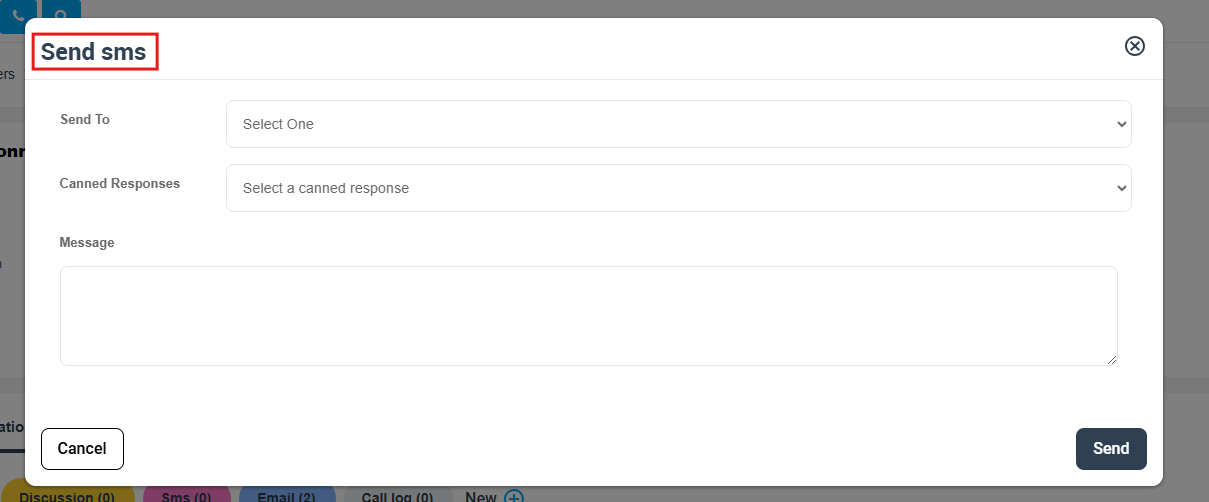
- Send the SMS (and attach an image if your setup/channel supports it).
Important: To send SMS from OctopusPro you typically need a connected Twilio number via the Digital Phone System (Settings → Communications → Digital Phone System).
Great SMS use-cases:
- “On the way” / ETA updates
- Quick confirmations and reminders
- Request missing info (access notes, parking, photos)
- Payment nudges for overdue invoices (where permitted)
Send a WhatsApp message
WhatsApp messaging is an optional channel. If your Twilio number is onboarded for WhatsApp Business, you can send and receive WhatsApp messages through your existing OctopusPro workflows.
Note: WhatsApp availability depends on your Twilio configuration and WhatsApp Business requirements/approvals.
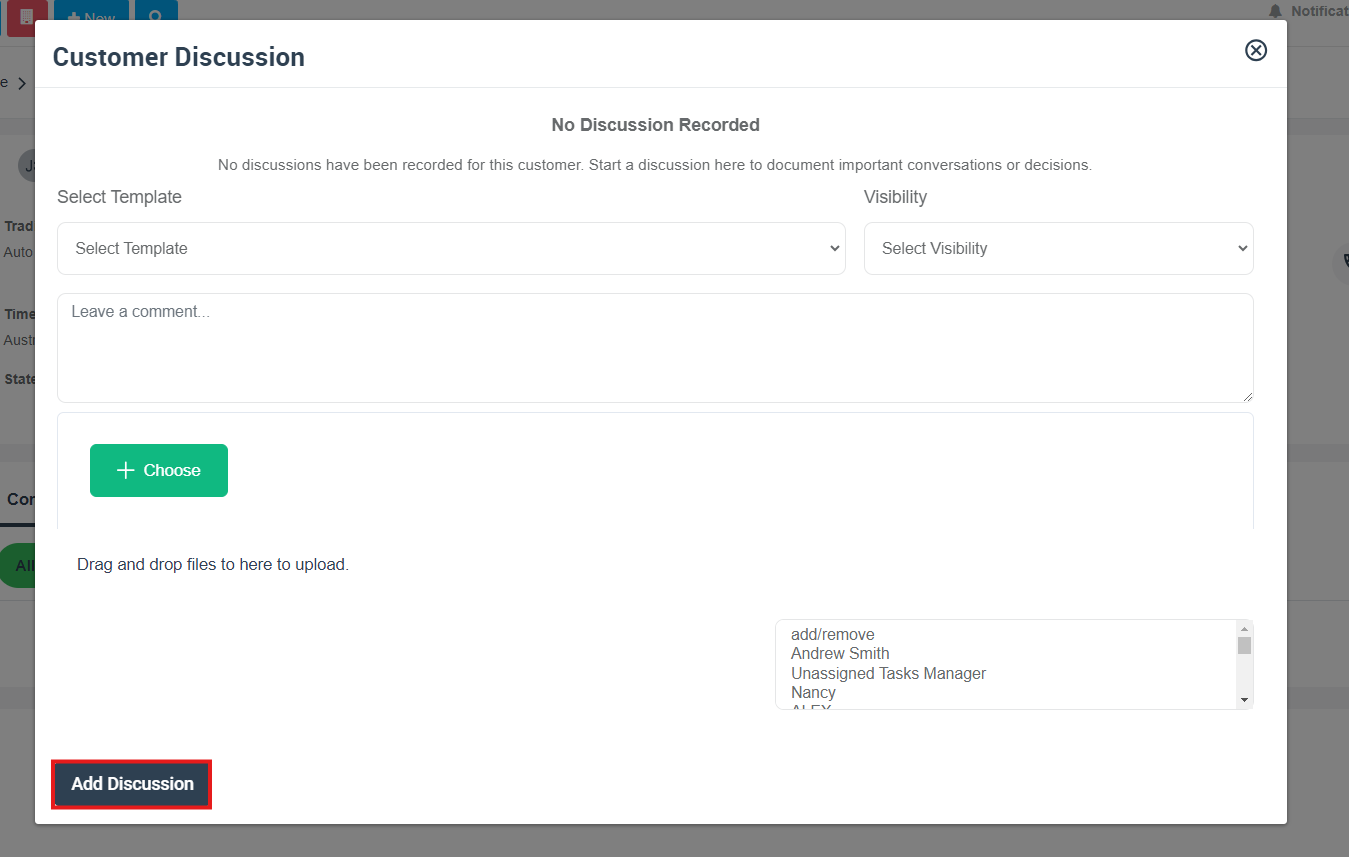
Post a discussion / chat message (with attachments)
Use discussions to keep a shared conversation thread with full context. Discussions can be internal-only or customer-visible, depending on the Visibility option you select.
- Open the Customer Profile (or a related record such as Booking/Quote/Invoice).
- Go to the Communication section, then choose Discussion.
- Click + New, choose the appropriate Visibility, write your message, and attach files if needed.
- Click Add discussion.
Customer experience: customer-visible comments can appear in the Customer Portal (e.g., via notifications), helping reduce back-and-forth across channels.
Call a customer (desktop & mobile app)
Calling from the desktop
- Regular call: uses your standard calling method/device integration.
- VoIP call (Twilio): places calls through your connected business number (softphone experience).
- Go to Customers → All Customers.
- Hover over the customer name and click the Call icon.

- Select Regular Call or VoIP (if enabled), then place the call.
Calling from the mobile app
- Open the customer list in the OctopusPro app and view the customer profile.
- Tap the phone number and choose Regular or Twilio/VoIP (if enabled).
- Complete the call. The interaction can be logged against the customer record.
Optional: If enabled in your Digital Phone System settings, call recording and voicemail can be used for QA/training and dispute resolution. Always follow local consent and privacy rules.
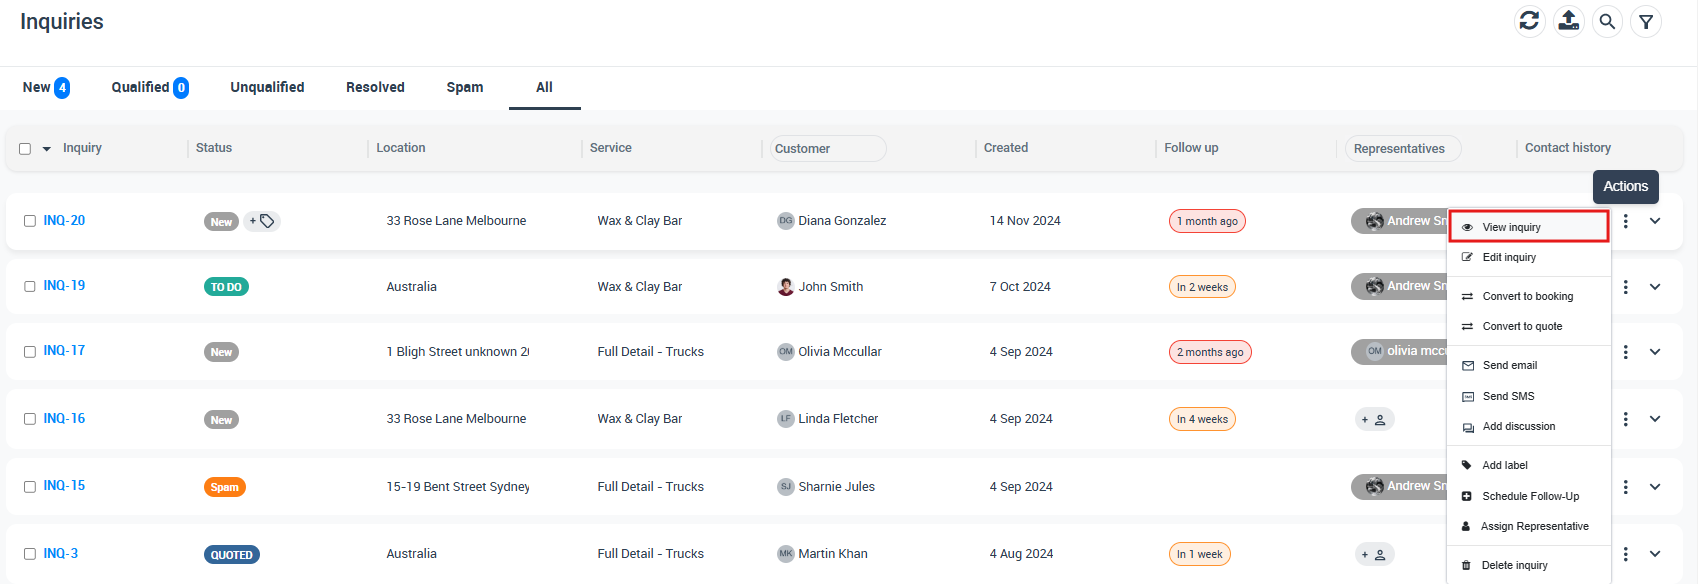
Contact customers from records (Invoices, Bookings, Inquiries, Quotes, Complaints)
You can contact a customer in context from the record you’re working on—ideal for faster support and accurate follow-ups.
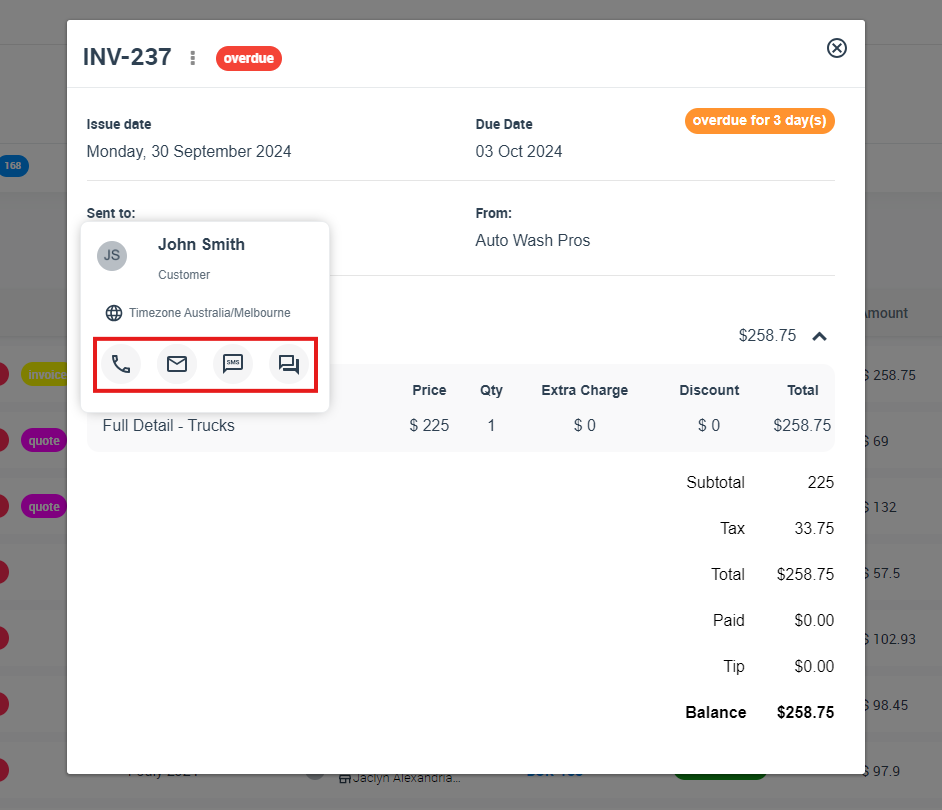
Invoices
- From Invoices → All Invoices, hover over the customer name to access contact icons.
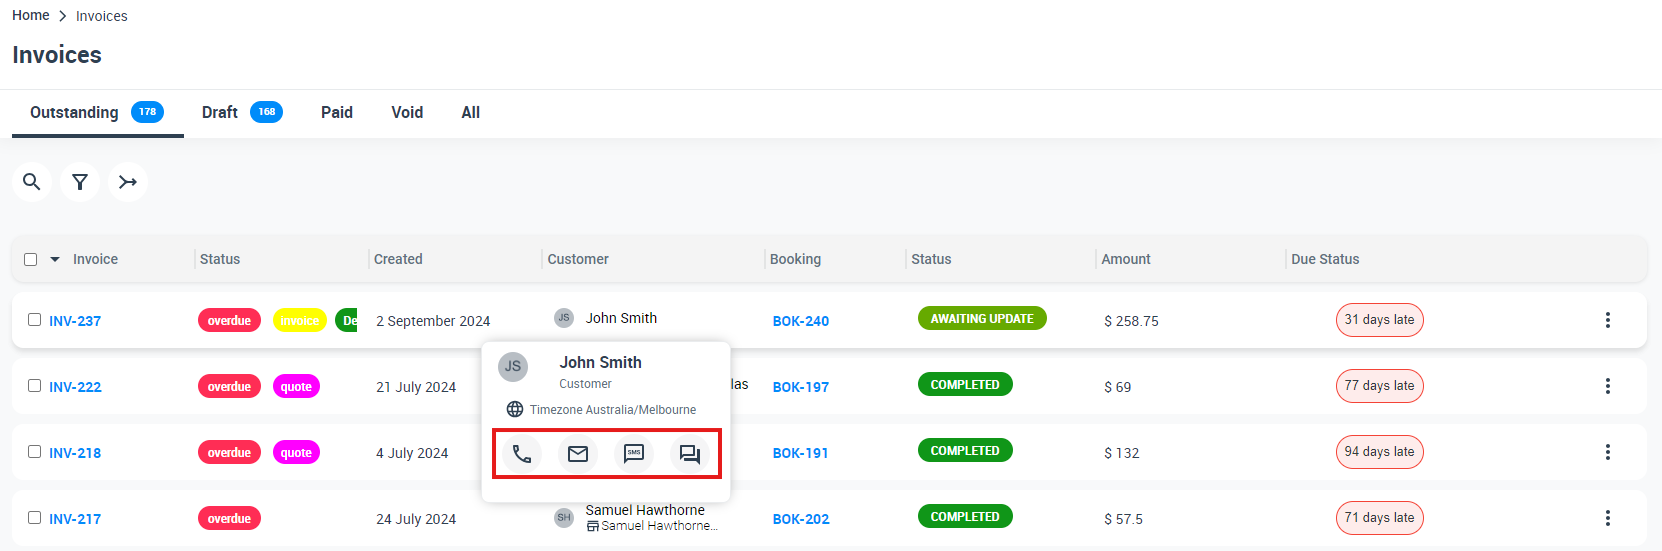
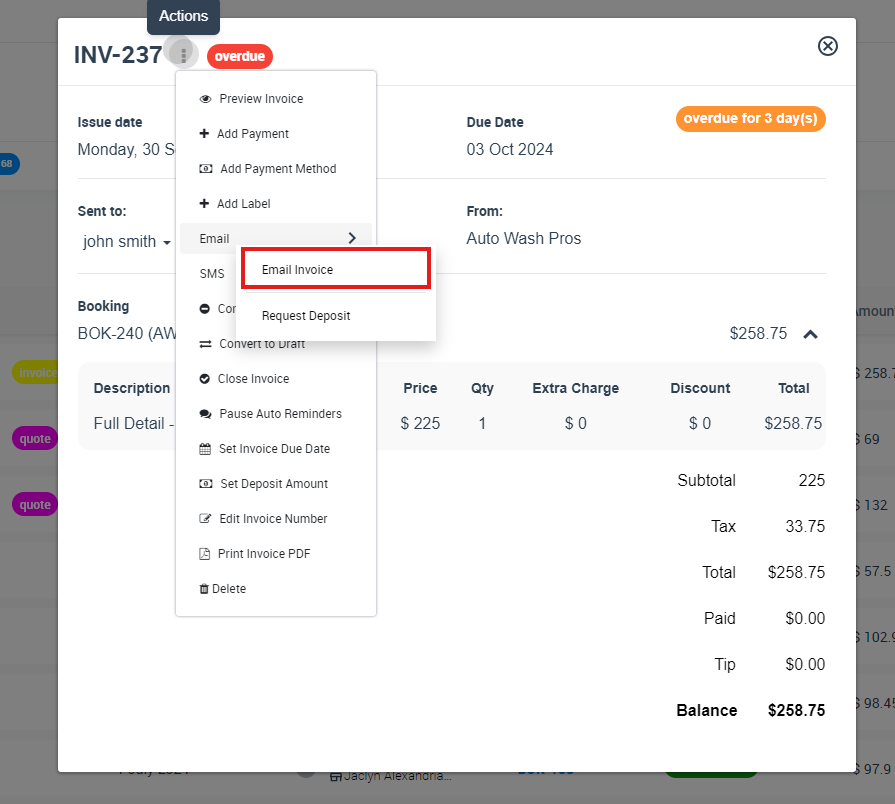
- From the Invoice Details page, use the customer info area (hover name) or use Actions to send invoice emails/SMS (including deposit requests where available).

Bookings
- From Bookings lists, hover over the customer name to contact them.

- From the Booking Details page, use the customer info section or contact icons.
Inquiries
- From Inquiries → All Inquiries, hover over the customer name to contact them.
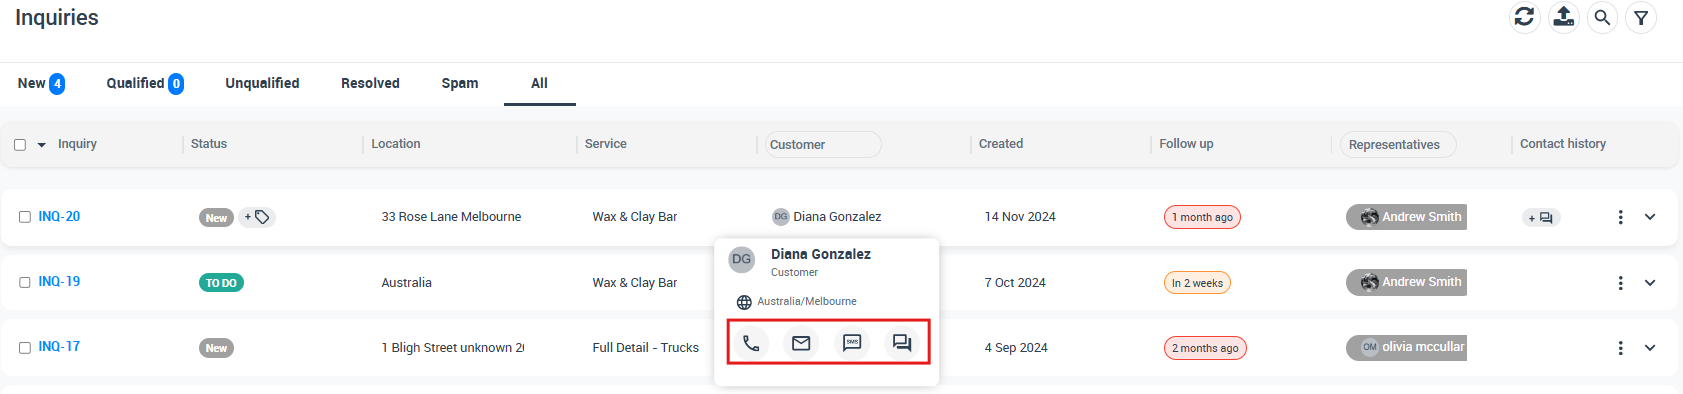
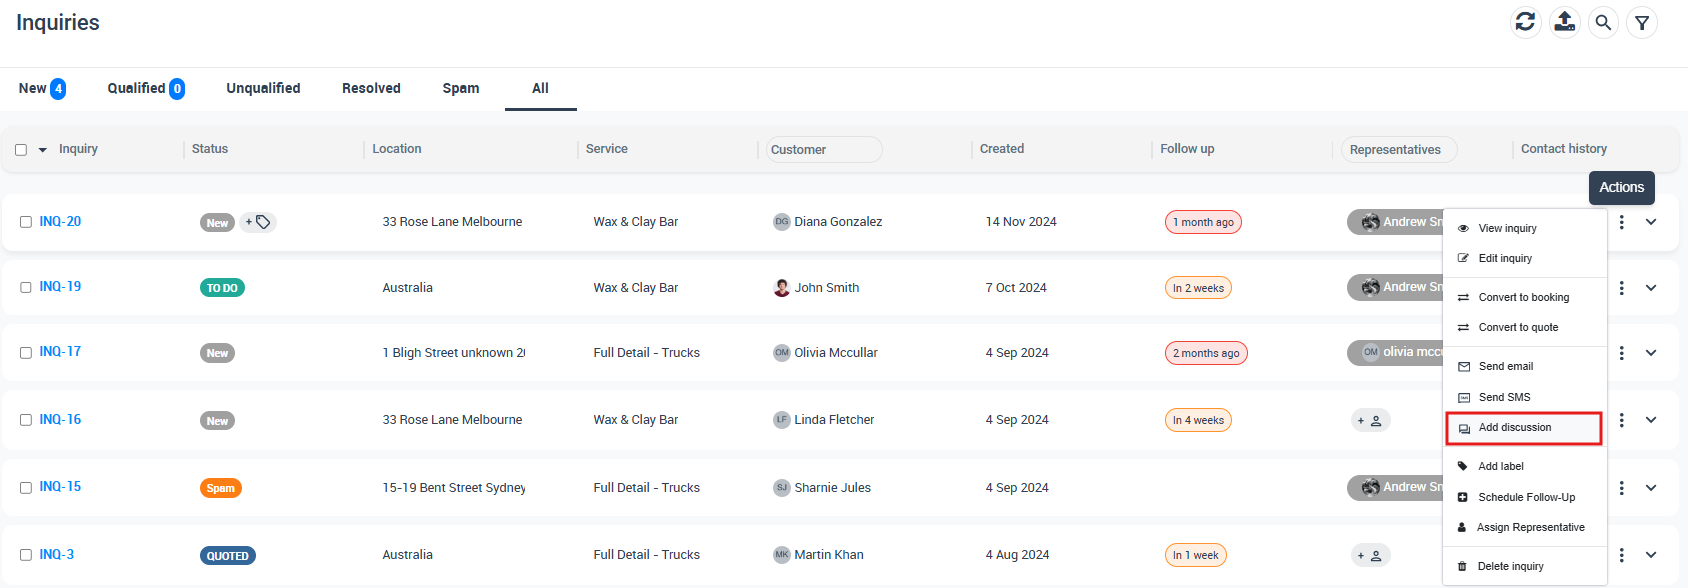
- From the Inquiry Details page, use the Email/SMS actions available in the customer info section.
Quotes / Estimates
- From Quotes → All Quotes, hover over the customer name to contact them.

- From the Quote Details page, use the customer info section to send SMS, send an email quote, or send a quote reminder.
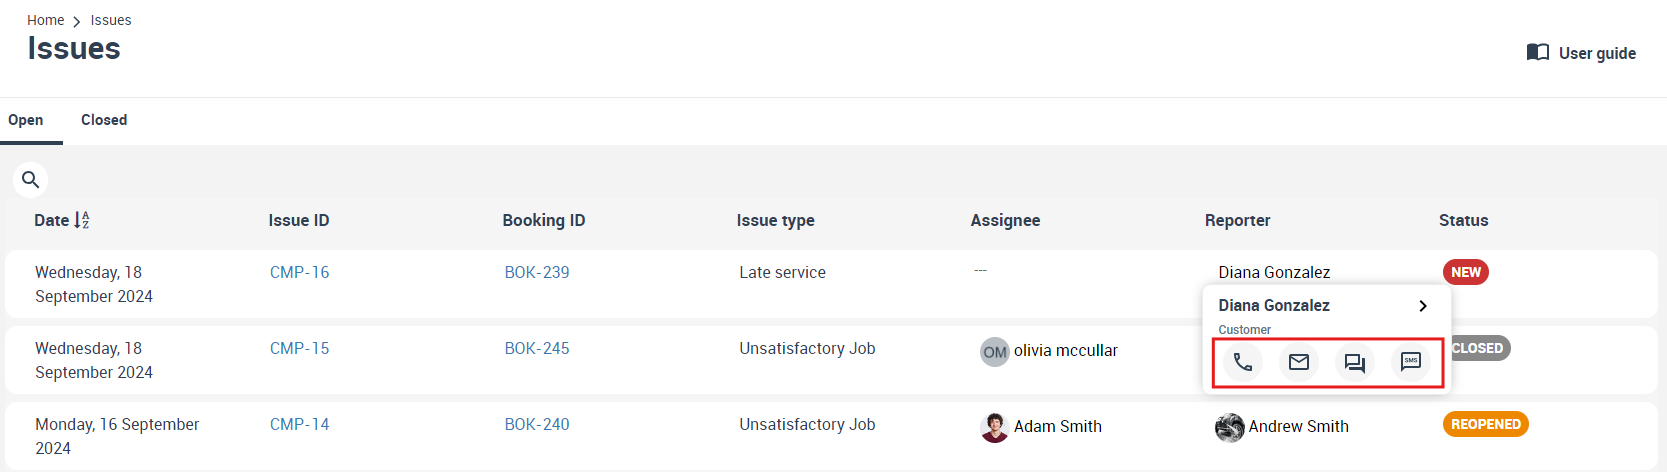
Complaints / Feedback
- From Feedback/Complaints, use the contact icons next to the customer to email, call, or start a discussion thread.
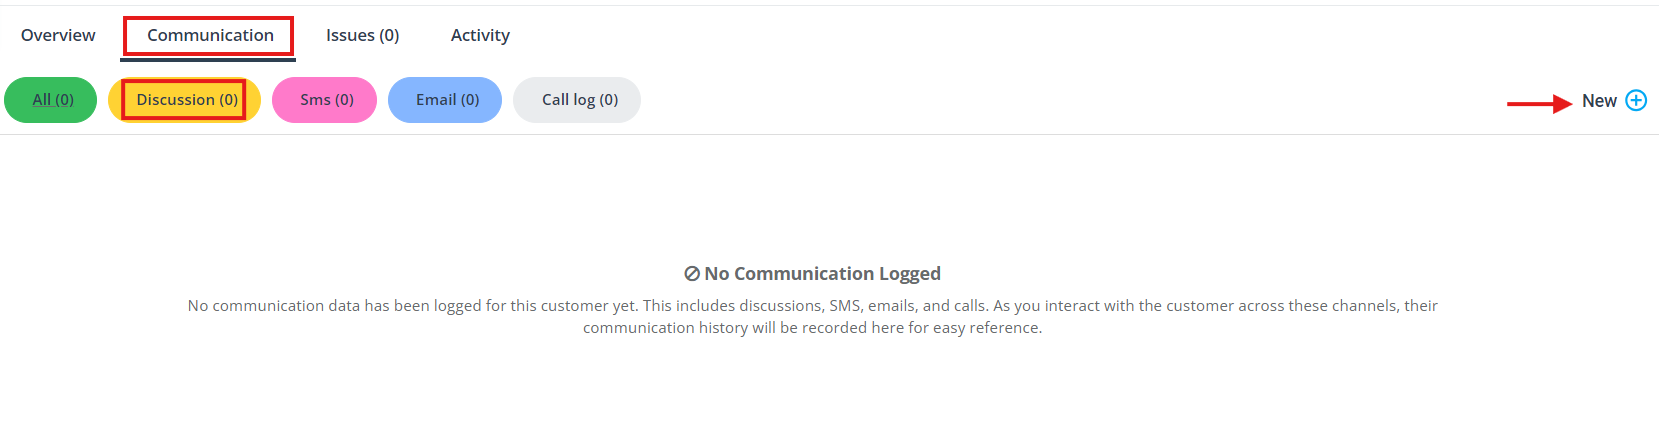
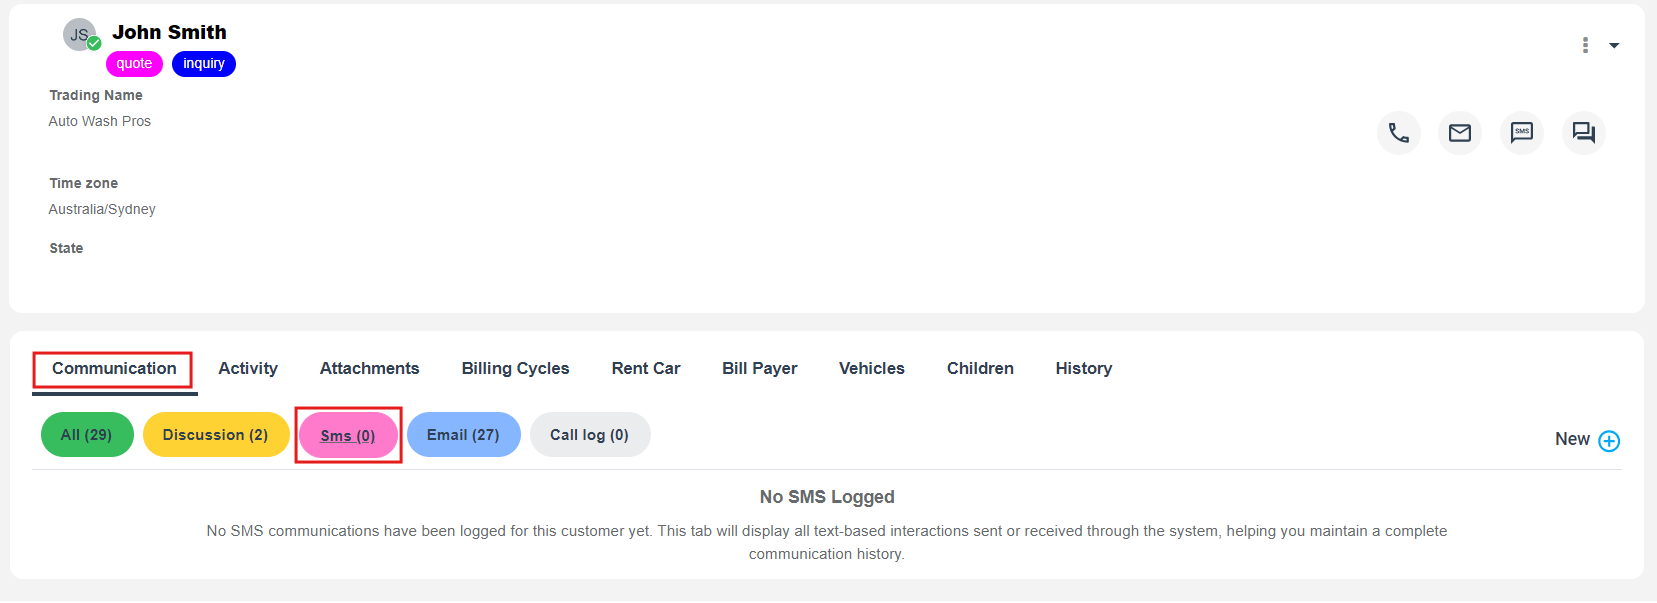
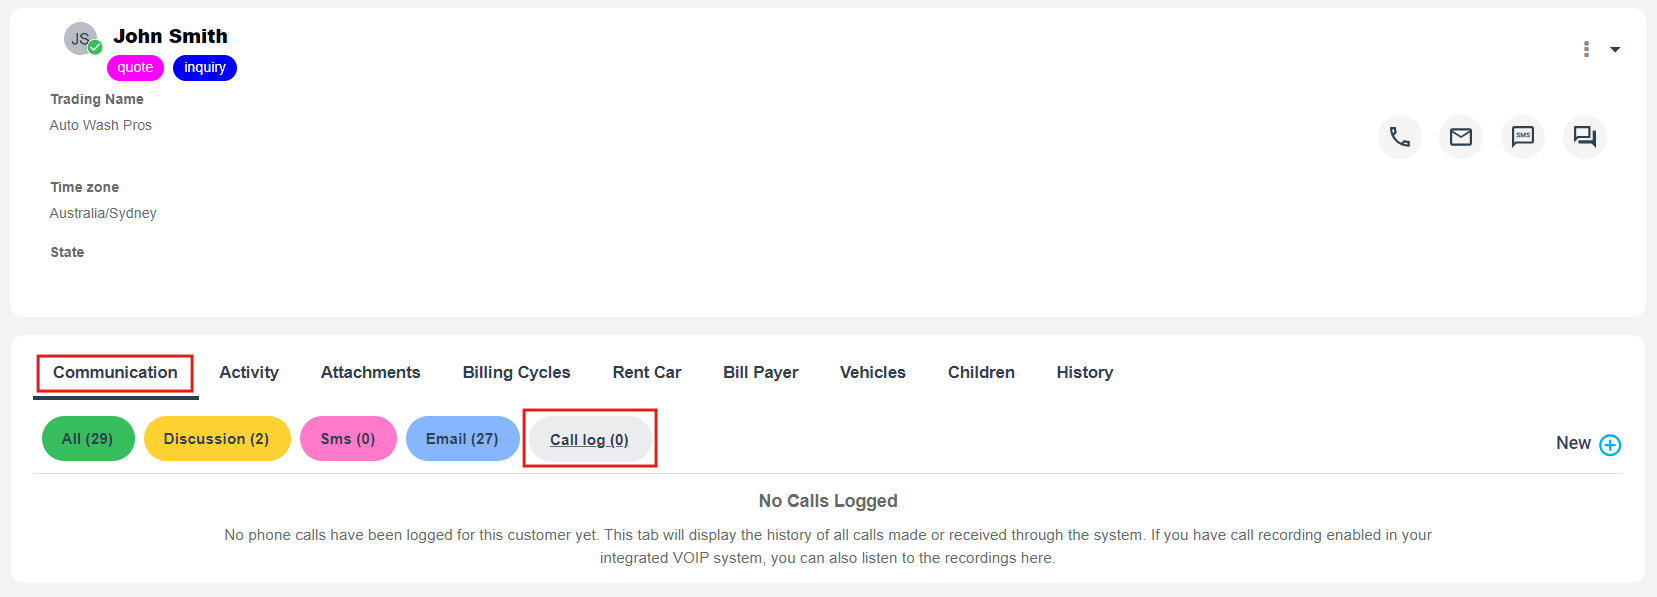
View the full Communication Log (Email/SMS/Discussions/Calls)
The Communication tab on the Customer Profile provides a chronological timeline of your interactions with that customer. Use filters to quickly switch between All, Discussion, SMS, Email, and Call Log.
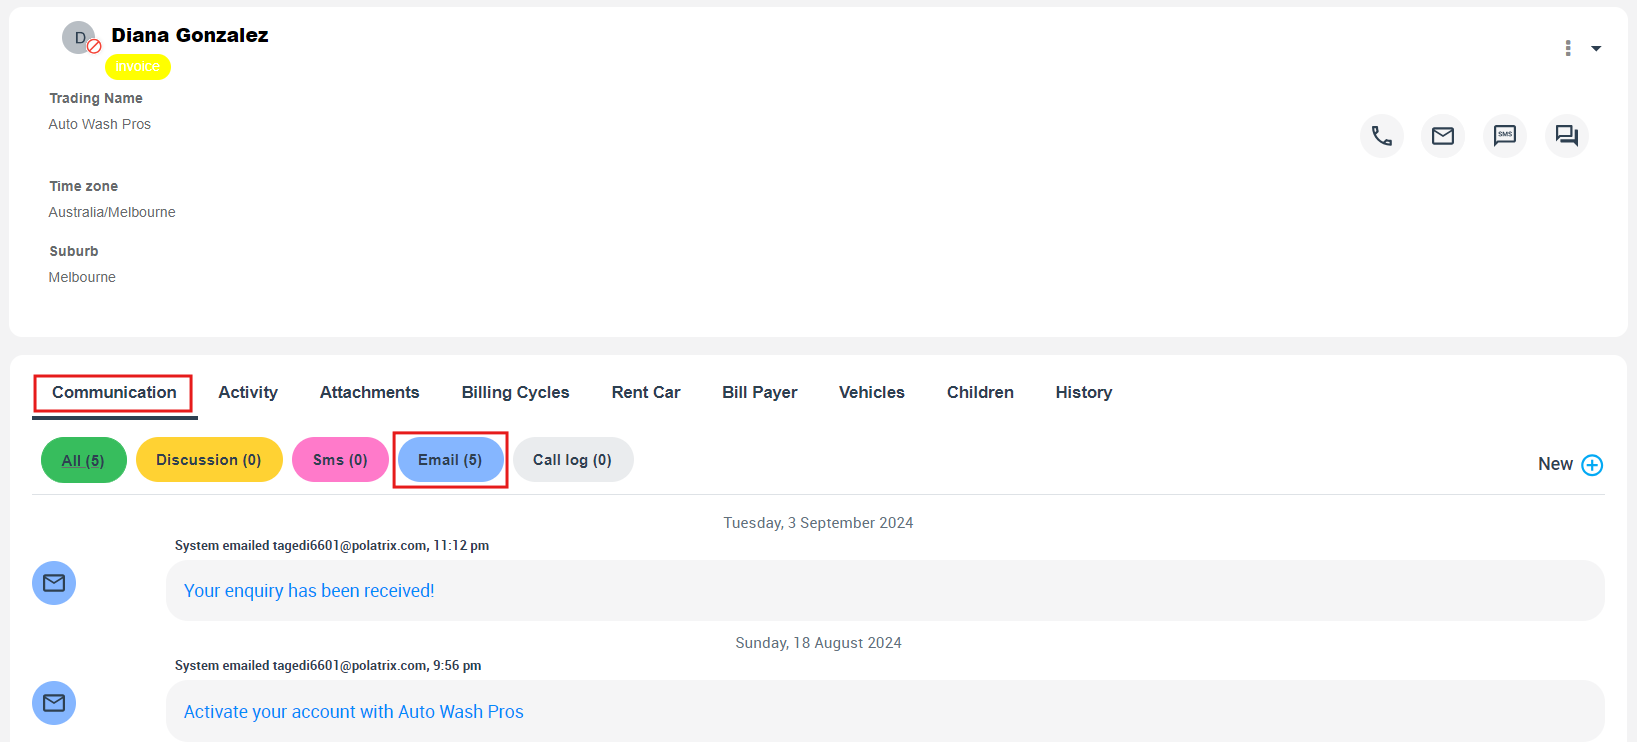
Emails may show the sender as System (automated) or a staff member, and attachments can be indicated and opened from the timeline. When enabled, email-open tracking can also appear on the email entry.
Typical use-cases:
- Customer says they didn’t receive an invoice → locate the email entry, resend, and confirm timestamps
- Sales follow-up → review the latest quote email thread before calling
- Account handover → new staff can read the last communications and continue seamlessly
View history via Reports (Recent Emails/SMS/Calls)
In addition to viewing communications inside each customer profile, you can access central logs:
- Reports → History Log → Recent Emails
- Reports → History Log → Recent SMS
- Reports → History Log → Recent Calls
These logs are useful for auditing, troubleshooting, and quickly finding messages across all customers.
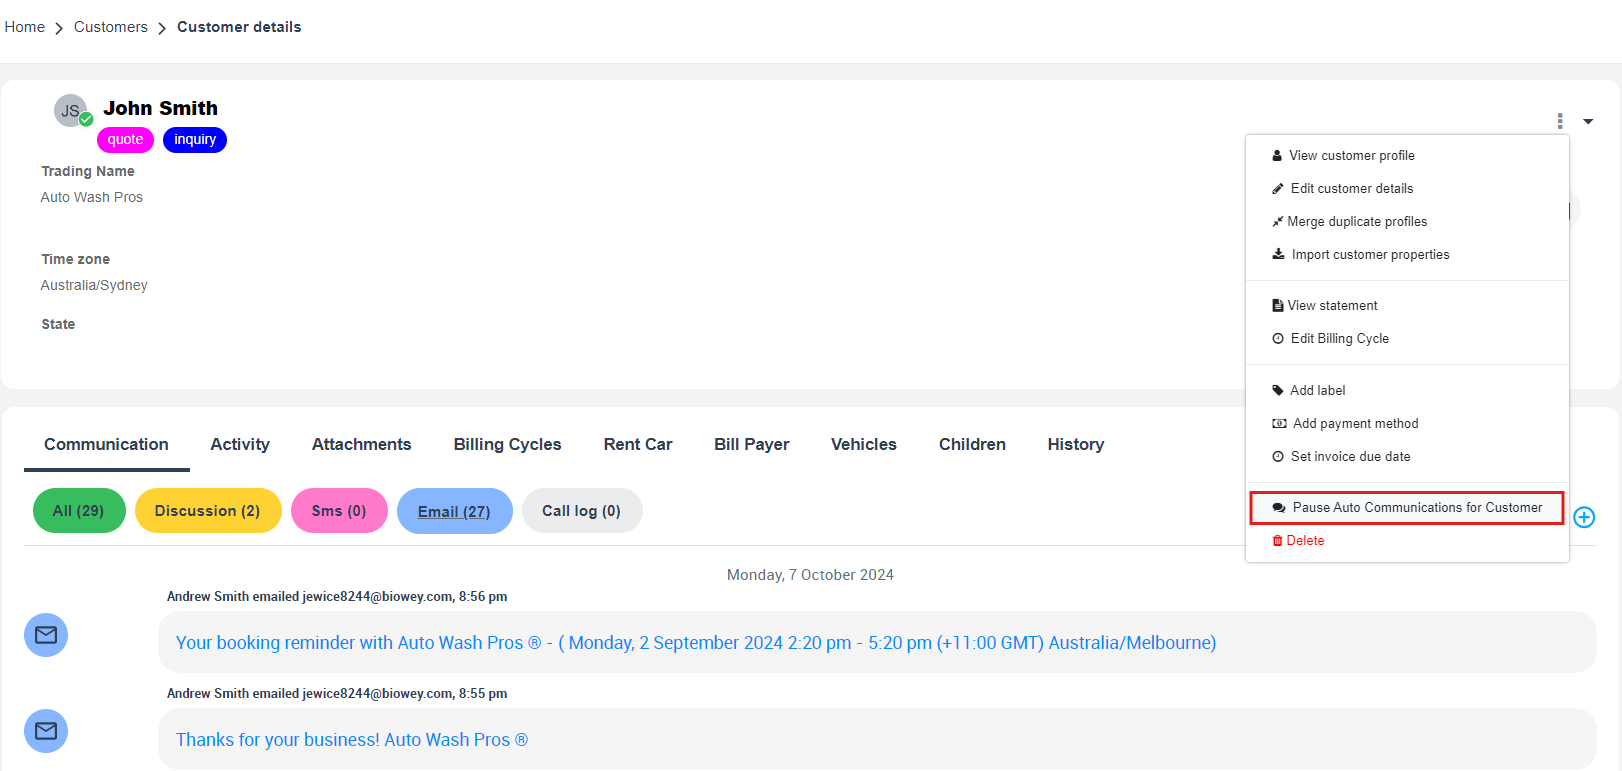
Pause automated communications for a customer
If you need to temporarily stop automated messages (e.g., booking reminders, invoice reminders, quote follow-ups) for a specific customer, you can pause auto communications at the customer level.
Pause from a record (Booking / Quote / Invoice / Inquiry / Complaint)
- Open the record.
- In the Customer Info section, click Actions.
- Select Pause Auto communications for customer.
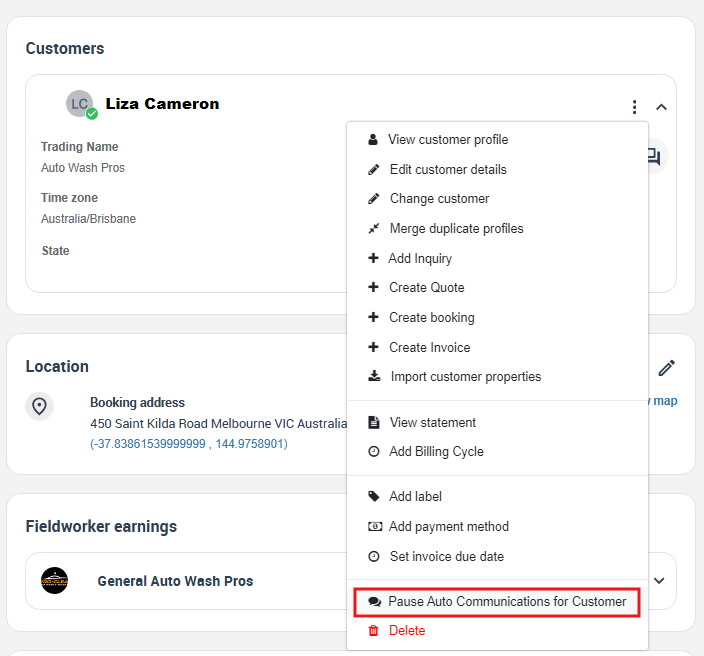
Pause from the Customer Profile
- Go to Customers → All Customers and open the customer profile.
- Click Actions (top-right).
- Select Pause Auto communications for customer.
Tip: If you only need to stop reminders for a single job/record (not the entire customer), pause reminders at the record level instead (where available).
Best-practice tips & troubleshooting
- Use searchable subjects: include record references like INV-##### / EST-##### / BOK-#####.
- Use verified sending domains: helps deliverability and reduces spam/junk placement.
- Shorten SMS templates: long texts may split into multiple segments (affects cost and readability).
- Two-way SMS vs branded sender IDs: in some countries you can use an Alphanumeric Sender ID for one-way alerts, but replies won’t work—use a phone number for two-way messaging.
- Call recording consent: laws vary (one-party vs all-party consent). Configure your policy accordingly.
Related guides
- View Every Email & SMS Sent to a Customer (Communication Log)
- Set Up Digital Phone System (Twilio: Voice, SMS, WhatsApp, Call Logs & Recording)
- Contact a Customer from a Booking
- Canned Responses
- Email Templates
- SMS Templates
To stay updated, please subscribe to our YouTube channel.