
Send Invoices to Customers (Email & SMS)

Sending invoices fast (and to the right recipient) helps you get paid sooner and keeps your billing process consistent. In OctopusPro, invoices can be sent:
- Manually from the Admin Dashboard (email)
- On-site from the Fieldworker App (email or SMS)
- Automatically using Automated Procedures (based on rules like Job Completed or Invoice Overdue)
- To a third-party bill payer (when the service recipient isn’t the payer)

Before you start
- Confirm the invoice is accurate (services, quantities, taxes, discounts, totals).
- Make sure the customer has a valid email address and/or mobile number.
- If you want customers to pay online, configure payment terms and your payment methods first.
Service Payment Terms & Deposit Settings | Online & Offline Invoice Payments

On this page: Send from Admin Dashboard | Send from Fieldworker App | Automate invoice sending | Third-party billing (Bill Payer) | Customer Portal invoice access | Customize invoice email/SMS templates | Best practices | Troubleshooting & FAQs | Related invoicing guides
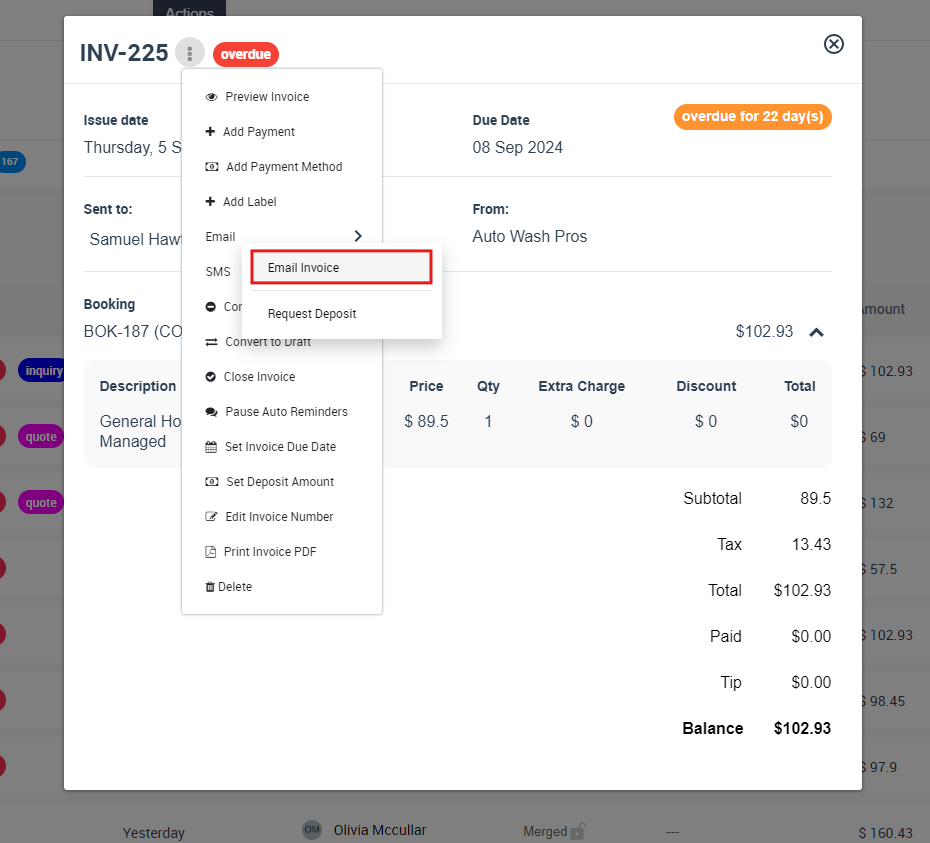
1) Send Invoices via the Admin Dashboard (Email)
Admin users can email invoices directly from the invoice record. This is ideal when invoices are reviewed by office staff before being sent.
- Go to Invoices and open the invoice you want to send.
- Click Actions (top-right).
- Select Email Invoice.
- Confirm the recipient email address, optionally add a message, then click Send.
Tip: If you need to review invoice details, status, history, and available actions, see How to View and Manage an Invoice.
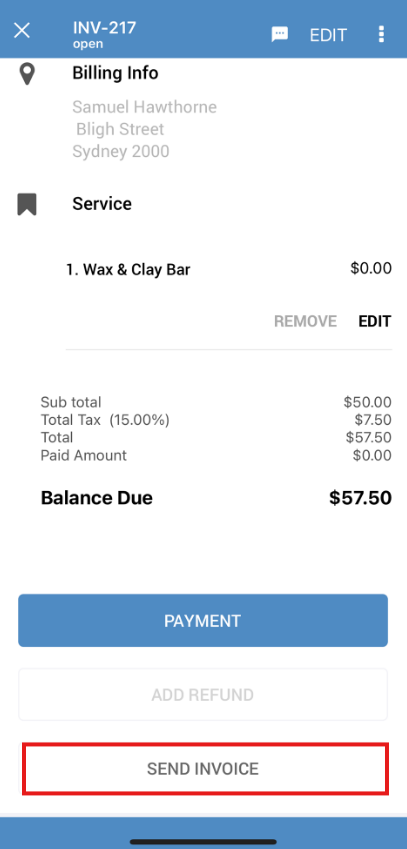
2) Send Invoices using the Fieldworker App (Email or SMS)
Fieldworkers can send invoices immediately after a job is completed, which is perfect for on-site services and faster payment collection.
- Open the booking/job in the Fieldworker App.
- Open the related invoice.
- Tap Send Invoice.
- Select Send via email or Send SMS.
When to use SMS vs Email
- SMS: best for quick “pay now” prompts and high open rates.
- Email: best when you want longer instructions, a full invoice PDF, or additional details.
Note: SMS sending may require your SMS settings/credits to be configured in your account.
3) Automated Invoice Sending (Email/SMS)
Automate invoice delivery to reduce admin work and ensure invoices are sent consistently. Common examples include:
- Send an invoice when a job is marked Completed
- Send reminders when an invoice becomes Overdue
- Send invoices based on other criteria configured in your automated procedures
- Go to Settings → Communications → Automation.
- Locate Automated Invoice Sending.
- Configure the rules (triggers/criteria), and choose delivery method (Email, SMS, or both).
- Save your changes.
Learn more: Automated Reminders & Confirmations (Automated Procedures Overview).

Control tip: Need to temporarily stop reminders for a specific invoice/record? Use: Pause & Resume Invoice, Quote & Booking Notifications.
4) Bill the Right Person: Third-Party Billing (Bill Payer)
In many businesses, the service recipient isn’t the person or entity responsible for payment (e.g., agencies, property managers, insurance claims, corporate accounts). OctopusPro supports this with a Third-party Billing Contact workflow so invoices and reminders go to the correct payer.

How to activate and use Third-party Billing
- Enable and configure Customer Properties to store third-party contacts (bill payer details). Use email/phone field types for reliable communications.
- Go to Settings → Communications → Automation and enable Communicate with third-party contacts added through customer properties.
- Choose whether to notify:
- Both the service recipient and bill payer, or
- Only the bill payer
- When invoicing, ensure the invoice is directed to the appropriate billing contact based on your configured workflow.
Common real-world examples
- Property management: tenant receives service updates; agency pays.
- Insurance claims: policyholder receives appointment notifications; insurer pays.
- Corporate billing: employee receives service notifications; company finance team pays.
- Event planning: event organizer coordinates; client receives the invoice.
Related guide: Manage Customer Dependents, Assets and Properties (Customer Properties).
5) Customers Accessing Invoices via the Customer Portal
Customers can view invoices anytime through the Customer Portal, reducing “please resend the invoice” requests and improving transparency.
Customer steps:
- Open their booking link in the Customer Portal.
- View the invoice linked to that booking.
Optional: If you want invoices to be auto-created when customers book online, see Auto-Create Invoices on Customer Portal Bookings.

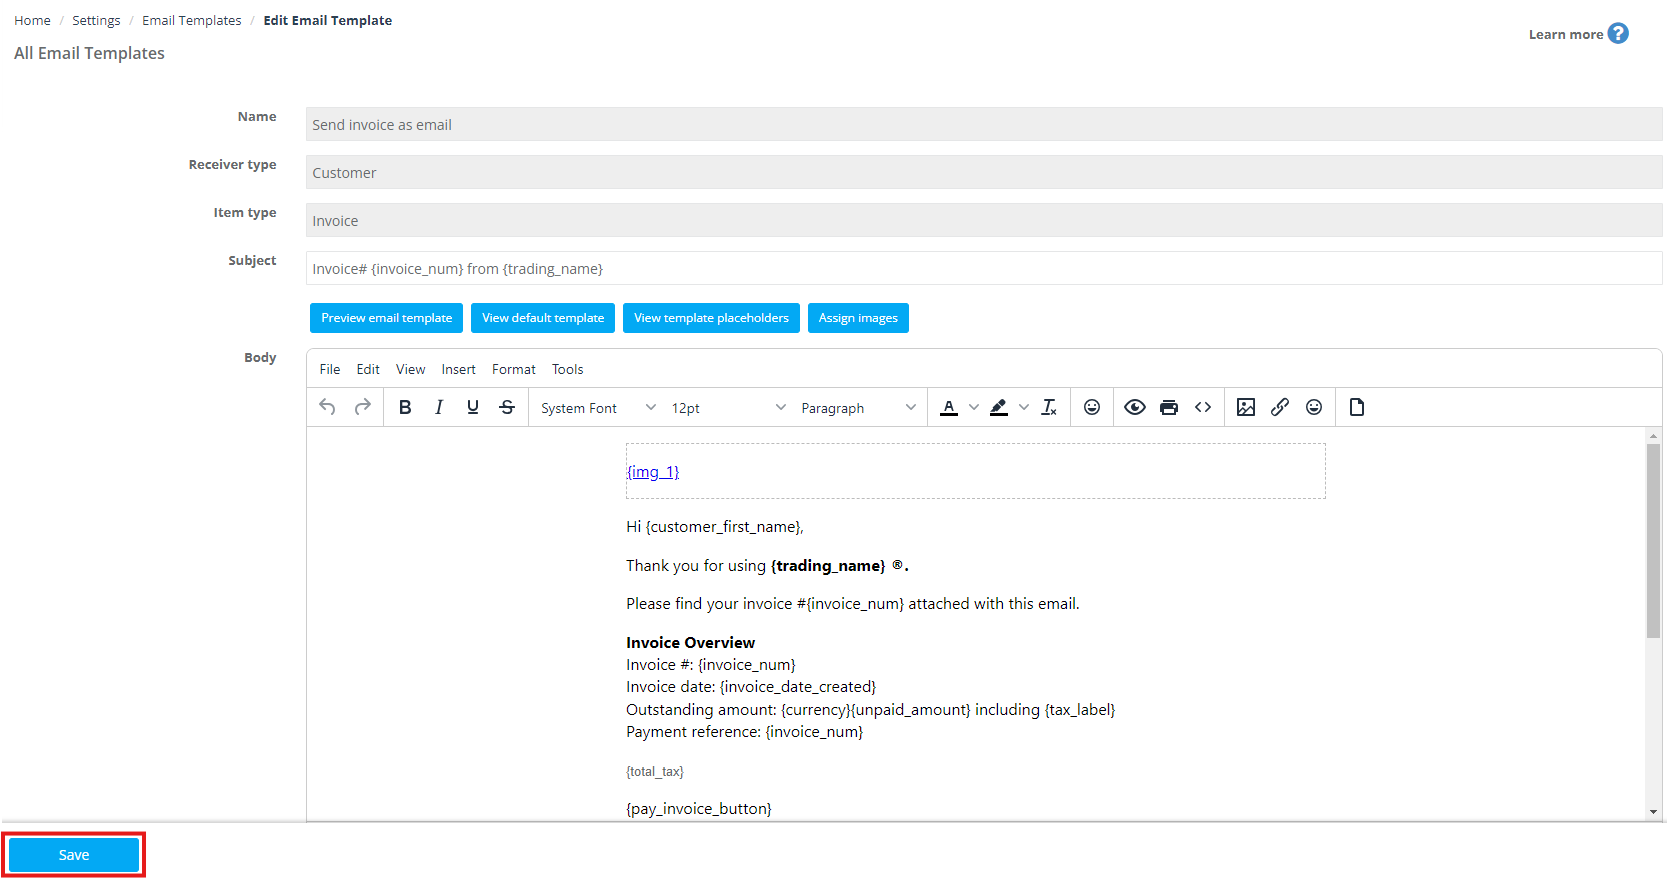
6) Customizing Invoice Email and SMS Templates
Custom templates help you stay on-brand and improve payment conversion by providing clear instructions, due dates, and payment options. You can also insert dynamic placeholders (merge fields) so each invoice message is automatically personalized.
How to customize templates:
- Go to Settings → Communications → Templates & Canned Responses.
- Open the Invoice Email or Invoice SMS template.
- Edit the content (tone, instructions, payment reminders, etc.).
- Insert placeholders where relevant (customer name, invoice number, amount due, payment link).
- Click Save.
Template guides:
Best Practices to Get Paid Faster
- Use clear payment terms (deposit, pay-in-full, pay-later) and keep them consistent across invoices. Learn how.
- Automate invoice sending & overdue reminders so follow-ups happen on time. See automated procedures.
- Invoice immediately after completion (fieldworker sends on-site) to reduce payment delays.
- Attach supporting evidence (before/after photos, receipts, signed approvals) to reduce disputes. Attach files to invoices.
- Offer multiple payment methods and record offline payments (cash/bank transfer/cheque) accurately. Payments overview.
- Use the Bill Payer workflow whenever the payer differs from the service recipient, to avoid delays and confusion.
Troubleshooting & FAQs
1) The invoice wasn’t received
- Confirm the customer email/mobile number is correct.
- If you’re using automation, confirm the automation is enabled and the invoice meets the trigger criteria.
- Check if communications were paused for the record: Pause / Resume Notifications.
- If you need an audit trail of sent emails, review your outbound email log: Outbound Email Log.
2) I need to add or review payments
- Add a payment: Adding and Processing Payments to Invoices.
- View payment history: Managing and Viewing Invoice Payments.
- Booking-level payment tracking: Field Service Payment Tracking & Reconciliation.
3) I need to export the invoice PDF
4) I want to track invoice changes or recent invoices
Related Invoicing Guides
- Invoice, Billing, Payment, and Refund Management (Overview)
- How to View and Manage an Invoice
- Invoice Attachments & Document Management
- How to Convert an Invoice to Draft
- Customize Your Invoice and Quote PDF Templates
- Setting Invoice Due Dates and Default Payment Terms
To stay updated, please subscribe to our YouTube channel.