
Managing Invoice Due Dates
Define your default invoice due date so that every new invoice automatically displays your standard payment terms (for example, “Payment Terms: 7 days”). Once this period has passed, the invoice status automatically changes to “Overdue,” triggering follow-up actions. For instance, if you set a 3-day due date, any unpaid invoice will be marked “Overdue” at the start of the fourth day after creation.
OctopusPro offers extensive customization options to suit your unique billing needs:
-
Invoice-Level Customization:
Set unique due dates for individual invoices, allowing you to cater to specific circumstances or bespoke payment terms. -
Customer-Level Customization:
Define default due dates for individual customers directly from their customer profiles to align with their payment habits or contractual agreements. -
Preset Interval Options:
Choose from options such as a fixed number of days after invoice creation, a designated day of the month, or a custom interval. While the default setting applies to all new invoices, you can override it on a per-invoice or per-customer basis when necessary. -
Automated Overdue Reminders:
Enable email and SMS reminders to automatically notify customers when invoices become overdue, reducing manual follow-ups and improving cash flow.
By configuring these invoice due date settings, you streamline your billing process, improve financial tracking, and ensure timely payments. These features enhance cash flow management, lower the risk of late payments, and help you maintain a professional, consistent invoicing process. Whether you’re setting unique due dates for individual invoices, customizing payment terms for specific customers, or updating company-wide defaults, this guide provides step-by-step instructions to help you optimize your setup. Leverage OctopusPro’s capabilities to boost financial health, cultivate customer trust, and simplify your billing operations. Let’s get started!
List of contents:
- Why are invoice due dates essential?
- What is the difference between invoice date and due date?
- Determining Due Date levels for invoices
- What do these levels refer to?
- The effect of different due date settings
- How to set a due date for a specific invoice
- What are the available options for the invoice due dates?
- How to customize a new due date
Understanding Invoice Due Dates
An invoice due date specifies the final deadline by which payment must be received before the invoice is marked as overdue. This date is printed on every invoice, ensuring customers clearly understand when payment is expected. If the payment isn’t received by the due date, the invoice automatically shifts to an “Overdue” status, prompting follow-up actions.
Why Invoice Due Dates Matter:
- Encourages Timely Payments: Setting a due date motivates customers to pay promptly—typically within 30 days or upon service completion—reducing the risk of delayed payments.
- Clear Communication: Clearly stating the due date on invoices eliminates any ambiguity, helping prevent disputes over payment deadlines.
- Enhanced Financial Management: Organizing invoices by due date allows you to efficiently track incoming payments and manage overdue accounts, which improves cash flow and financial forecasting.
- Industry Standards: Many industries require deposits or have strict payment schedules; clearly defined due dates help align with these practices.
Invoice Date vs. Invoice Due Date:
The invoice date is the day the invoice is created, while the invoice due date is the deadline for payment.
Understanding Due Date Levels
OctopusPro lets you set invoice due dates at various levels, each with its own priority:
-
Company Level:
This is your default due date that applies to all new invoices across your organization, ensuring a uniform payment term unless overridden. -
Customer Level:
Set a default due date for each customer directly from their profile. This customization is useful for accommodating unique payment habits or contractual terms. When an invoice is generated for a customer, it will use their specified due date unless an invoice-specific due date is set. -
Invoice Level:
For individual cases, you can specify a unique due date for a specific invoice. This setting takes precedence over both customer and company-level due dates and applies solely to that invoice.
Due Date Hierarchy:
- Invoice-level due dates override all other settings.
- Customer-level due dates apply when no invoice-specific due date is provided.
- Company-level due dates act as the default fallback for all invoices.
This hierarchy ensures that the most specific due date is always applied, allowing you to tailor payment terms precisely to your business needs while maintaining consistency across your billing process.
Modifying Invoice Due Dates: A Step-by-Step Guide
Our system lets you tailor payment terms by setting invoice due dates at three distinct levels. These levels work in a hierarchy where:
Invoice-Level Customization:
To modify the due date for an individual invoice, navigate to the Invoices section, select the invoice, click on “Actions,” and choose “Set Invoice Due Date.” Here you can pick a new due date (or choose “Custom Due Date” to select a specific calendar date) which will override the default settings for that invoice only. For example, if your default is 15 days but you need a 2-day due date for a particular invoice created on October 10, you can update it to October 12. This change is isolated and won’t affect other invoices.
Customer-Level Customization:
You can adjust the default due date for all invoices issued to a particular customer by updating their profile. In the Customer profile, press the actions button and choose “Set Invoice Due Date.” The selected due date will apply to all future invoices for that customer. When prompted, you can choose to update existing outstanding invoices that are set with the current customer-level default. This customization is useful for accommodating specific payment habits or contractual terms.
Company-Level Customization:
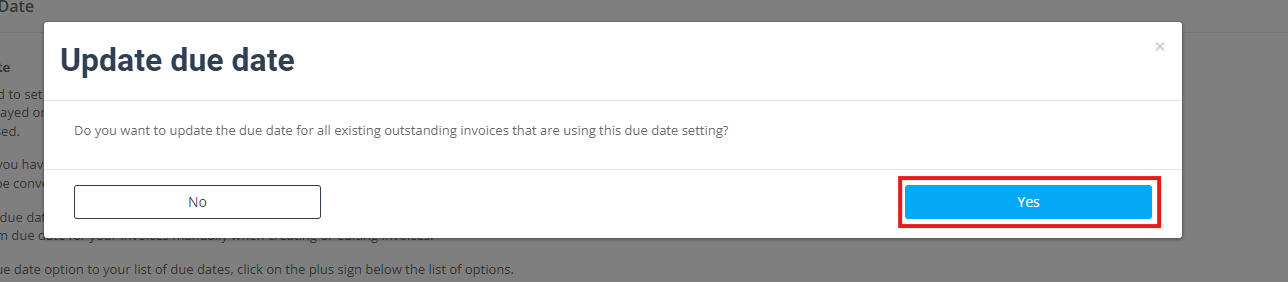
To establish a default due date for your entire organization, go to Financial Settings > Invoice Due Date. Here, select your preferred default option (for example, “Payment Terms: 7 days”). This setting applies to all new invoices that don’t have a customer-level or invoice-level due date. When you make changes at this level, an automated prompt will ask whether to update existing outstanding invoices that follow the company default. If you choose “Yes,” those invoices will be updated; if “No,” only future invoices will adopt the new due date.
Let’s check the steps required to set the different due dates on the invoice level, customer level, and company level.
How to set a due date for a specific invoice
- From the side menu select Invoices
- Select the type of invoice you wish to view or select All Invoices
- On the invoice overview click on the “Actions” button
- Select “Set invoice due date” from the popup menu
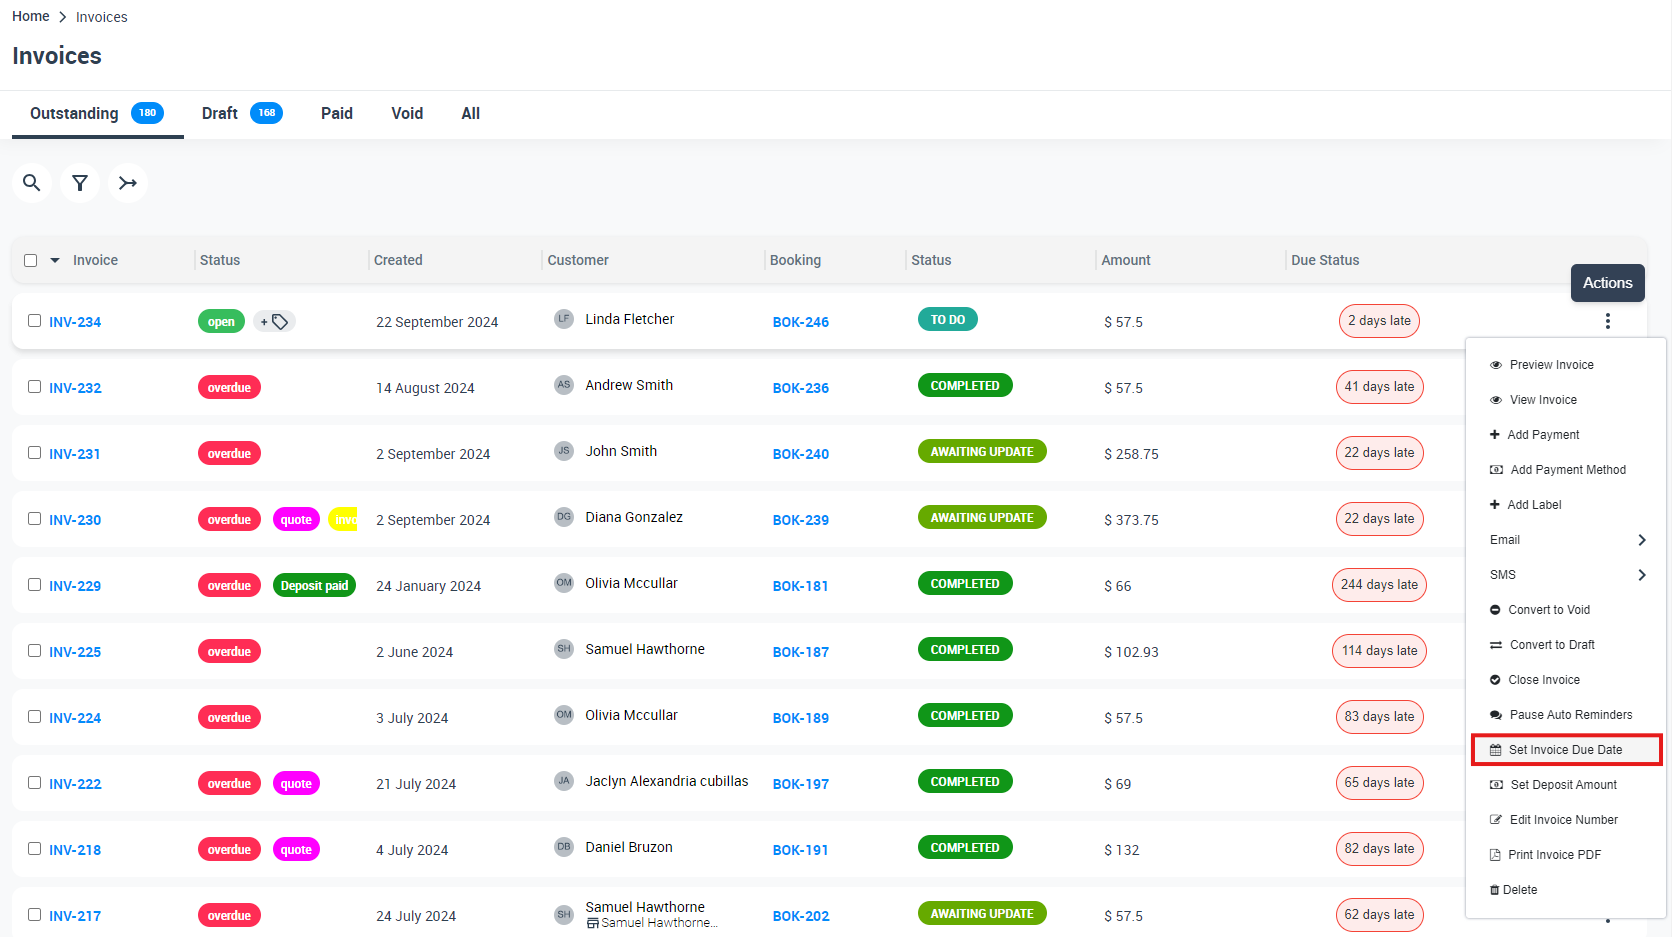
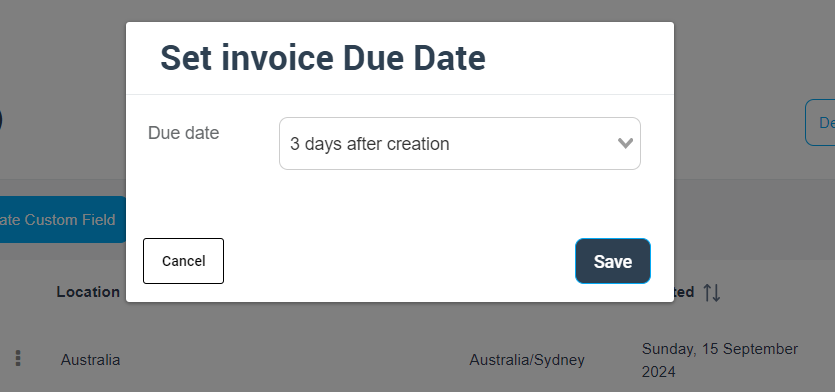
- Select the ‘due date’ you want to set for the invoice
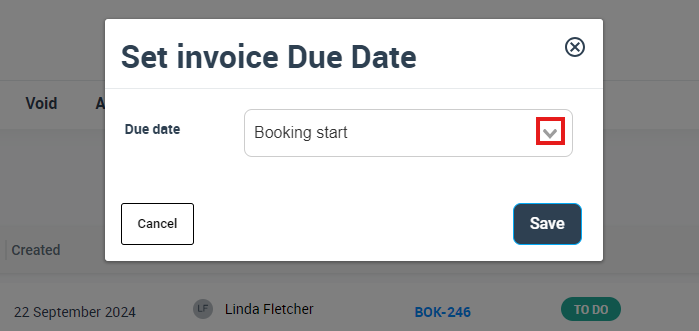
- Please note that you will have an option from the ‘due date’ dropdown menu to select “Custom due date” where you can add a specific date from the calendar to be the due date for this invoice*
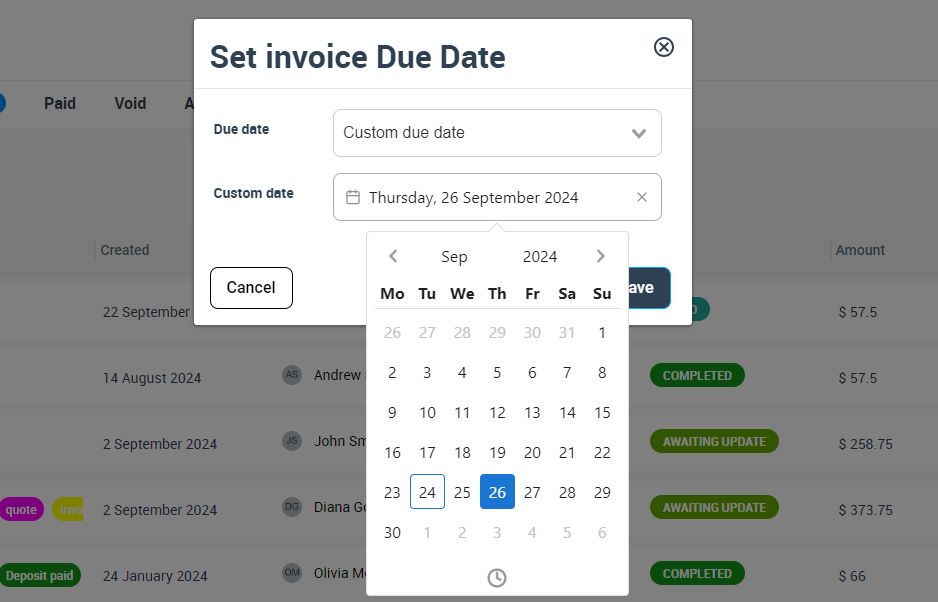
Then click “Save”.
To set the default due date for a specific customer, please follow the following instructions:
- From the side menu select Customers
- Select “All Customers” to view the customer’s list.
- Find the customer you need to set the due date for, and on the customer overview click on the “Actions” button
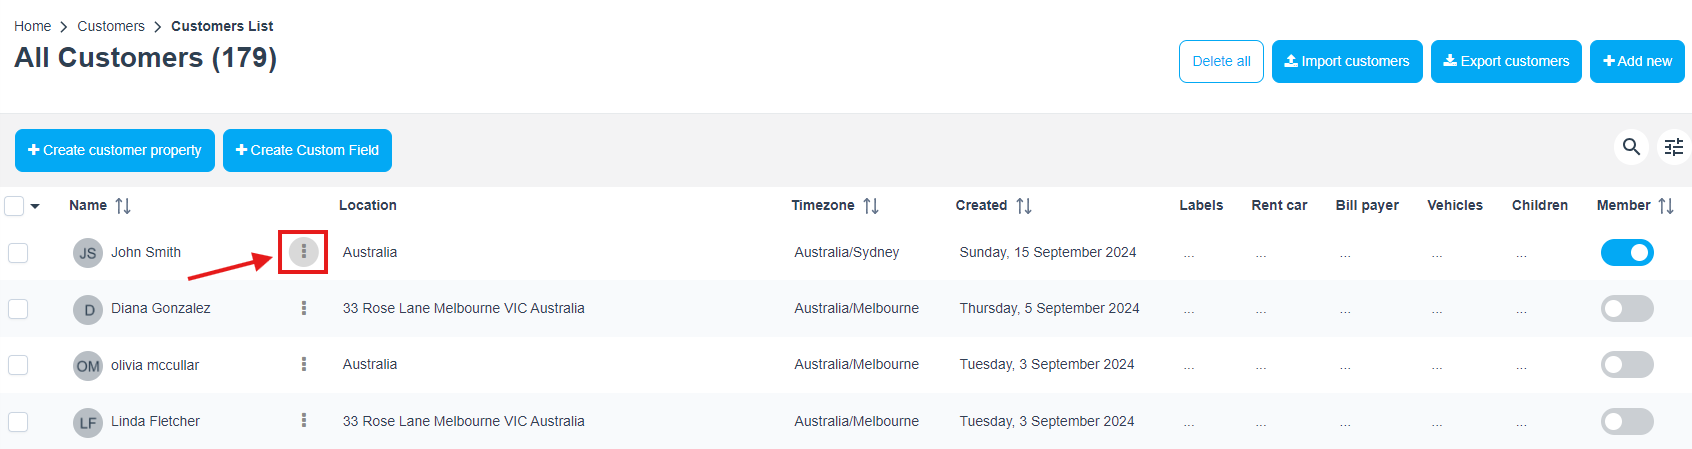
4. Click on the “Set invoice due date” from from the dropdown list, you can also do the same from the customer profile page.
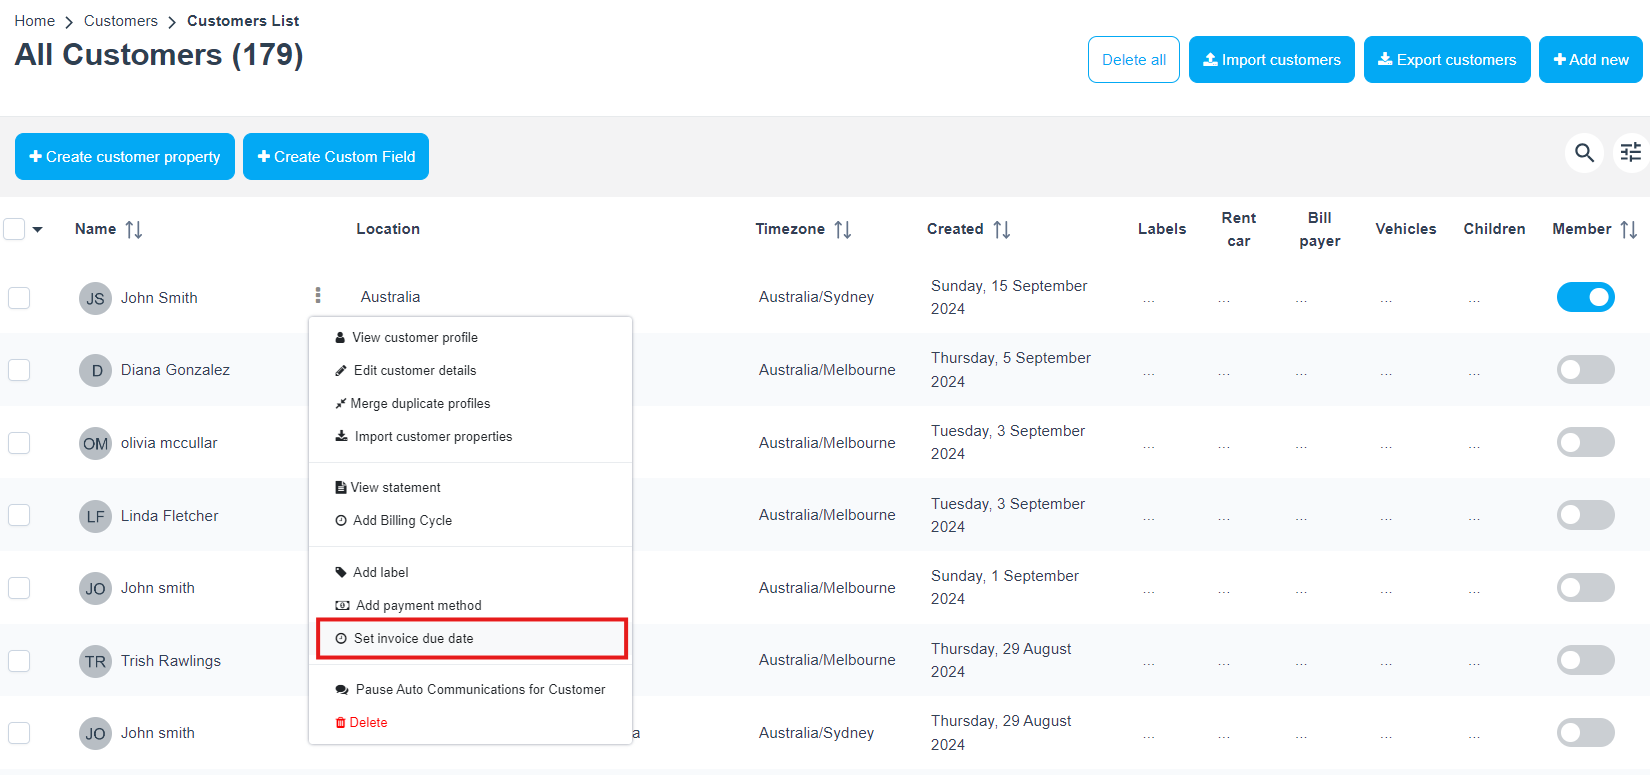
5. Set the preferred due date from the dropdown menu and click save
- Please note that you will only be able to select the due dates from the available options and you won’t have the chance to add a new number of days to be due after, but you can do that from Settings > Financial settings > Invoice Due Date > Add new +
- After clicking save, you will get an automated message “Do you want to update the due date for all existing outstanding invoices for this customer that are using this due date setting?”
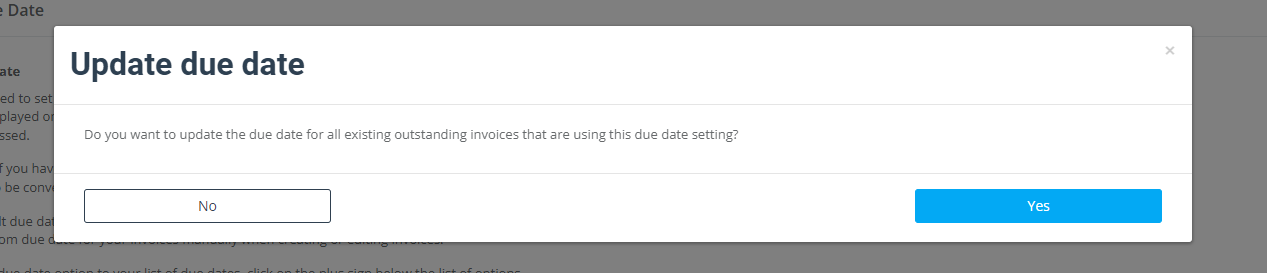
- No: The new due date will be applied only to all future invoices of this customer.
- Yes: The new due date will be applied to both the customer’s future invoices and the current invoices that have a company due date or customer due date.
To set the company due date, please follow the following instructions:
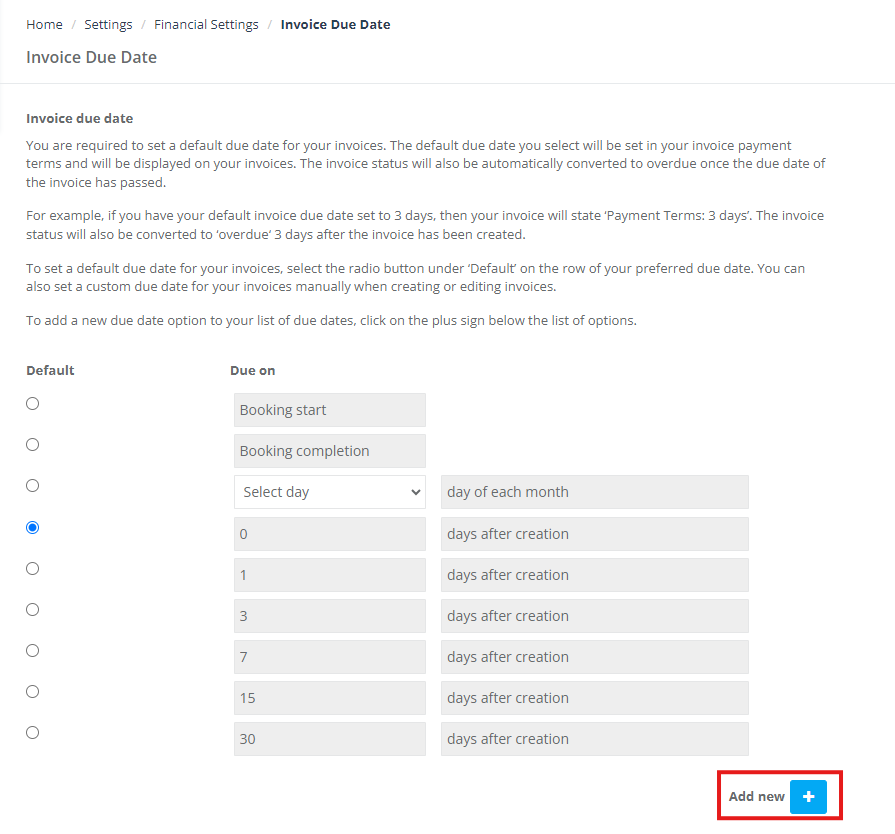
- From Settings > Select Financial Settings > Invoice Due Date
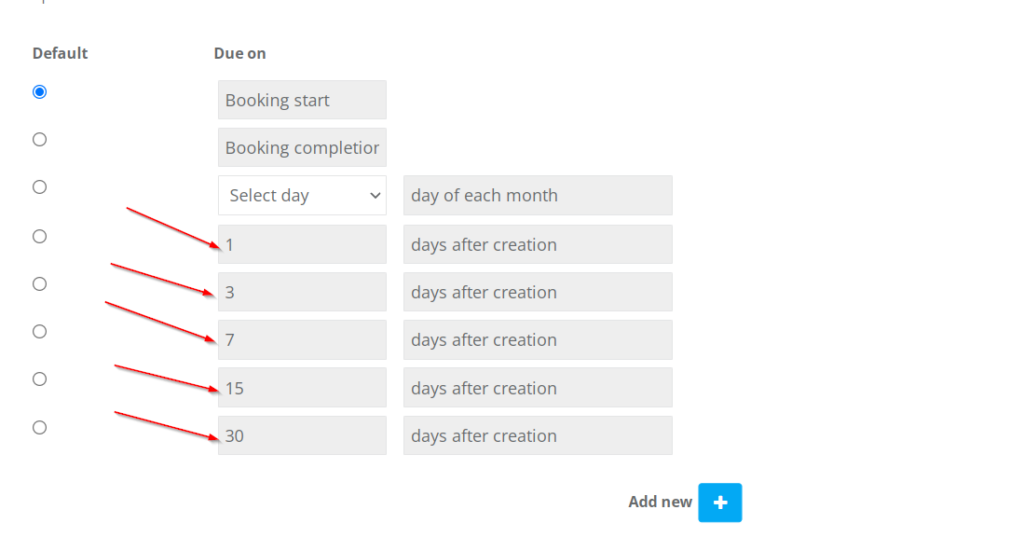
- Select the radio button under the “Default” row to match the preferred “Due on” in the next row.
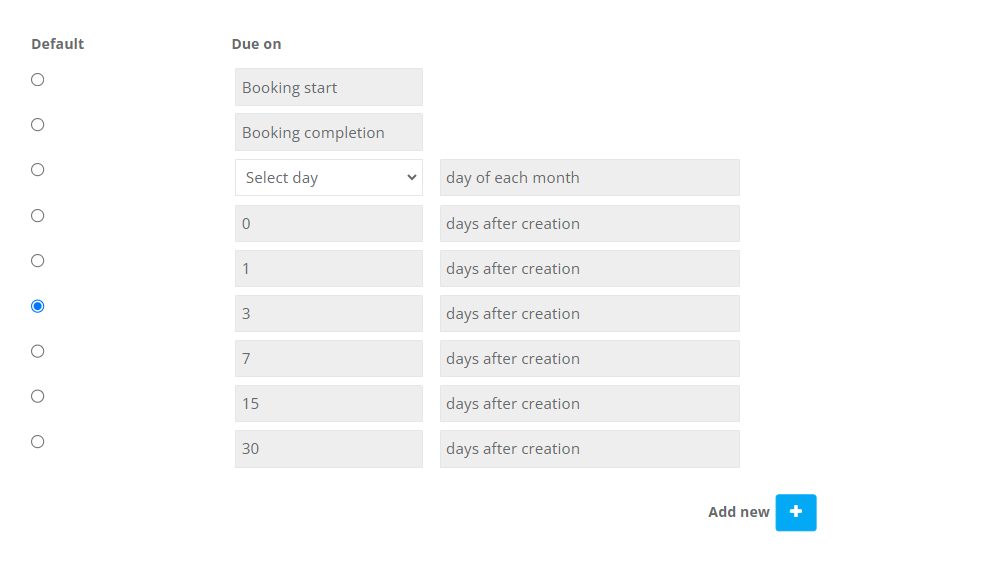
Available Invoice Due Date Options
Our system provides several options to customize invoice due dates, ensuring your billing terms align with your business practices and customer expectations. You can choose one of the following methods:
Booking Start:
Set the due date based on the first scheduled start time of the service. Payment is expected when the service commences.
Booking Completion:
Define the due date based on when the entire service is completed. In this case, the invoice becomes due only after the booking status is marked as “Completed.”
Select Day:
Choose a specific day of the month (from 1 to 28) to serve as the due date for all invoices. This ensures uniform due dates regardless of when the invoice is created.
Days After Creation:
Select from preset intervals (such as 1, 3, 7, 15, or 30 days) to add to the invoice creation date. For example, if an invoice is created on October 6th and you select “3 days,” the due date will be October 9th.
Important Note:
When using either the Booking Start or Booking Completion option at the company level, invoices for customers without a customer-specific due date will appear under the “Open Invoices” tab with “0 days” remaining.

Customizing a New Invoice Due Date
If you require a due date option beyond the preset choices (1, 3, 7, 15, or 30 days), you can create a custom payment period.
To do this, click the “Add new +” button under the “Due on” list.
A “New Payment Period” window will appear, where you can specify the number of days in the “Due after” field. Next, select whether you want this new due date to be set as the default option by choosing “Yes” (which will make it the default for future invoices) or “No” (adding it as an additional selectable option).
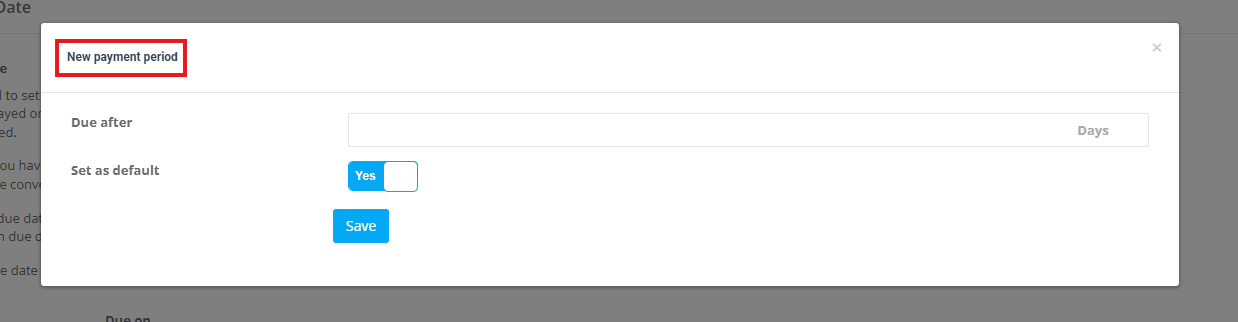
After saving your changes, you will receive a confirmation prompt asking if you want to update the due date for all existing outstanding invoices that currently use this setting. Choose accordingly.

For more information please visit Octopuspro user guide, and subscribe to our YouTube channel.