
Refund Management (Bookings & Invoices) — Add, Process, Approve & Track Refunds

Refunds are a normal part of service businesses—cancellations, changes, overpayments, and billing errors happen. OctopusPro provides a structured refund workflow that helps you record or process refunds, route them for approval, and maintain a clear audit trail across both bookings and invoices.
This guide combines everything you need into one place—so you can manage refunds without jumping between multiple pages.
Table of Contents
- Overview (What refunds do in OctopusPro)
- Key concept: “Add” vs “Process” a refund
- Benefits of refund management
- Role-based access (Admin, Fieldworker, Client)
- Before you start (requirements & rules)
- Add a refund to a booking (Admin/Office)
- View booking refunds
- View invoice refunds
- Add a refund to an invoice (record an external refund)
- Process a refund (return funds for card/online payments)
- Refund approval workflow (approve, unapprove, delete)
- Fieldworker refund requests (mobile app)
- Best practices (controls, reconciliation & reporting)
- Open API & Webhooks (automation & integrations)
- Industry examples
- FAQ
Overview (What refunds do in OctopusPro)
- Refunds are tied to payments so you can track exactly what was refunded and why.
- You can manage refunds from within a booking, within an invoice, or from a central approvals queue.
- Refunds support operational oversight: staff can submit refunds, while managers/accountants can approve them to ensure policy compliance and financial accuracy.
Key concept: “Add” vs “Process” a refund
OctopusPro supports two refund actions. Understanding the difference is essential for accurate records and correct money movement.
1) Adding a refund (recording an external refund)
When you Add Refund, you are recording a refund that happened outside OctopusPro—such as cash, bank transfer, cheque, manual card terminal, or any external payment platform. This does not move money; it logs the refund details for tracking, reporting, and auditing.
2) Processing a refund (returning funds within the system)
When you Refund payment (Process Refund), OctopusPro triggers an actual return of funds to the customer for eligible online/card payments that were originally taken through OctopusPro (depending on your configured payment gateway and payment method).
Benefits of refund management
- Enhanced customer trust: transparent refunds build confidence and reduce disputes.
- Financial oversight: approval workflows help prevent mistakes and fraud.
- Operational efficiency: refunds are easy to find and tied to the correct booking/invoice.
- Compliance & audit trail: reasons, references, and notes support proper recordkeeping.
Role-based access (Admin, Fieldworker, Client)
- Administrators / Office users: full access to view refunds, create refunds, and approve/unapprove refunds (subject to permissions).
- Fieldworkers: may be allowed to view and initiate refunds related to their work, depending on role permissions.
- Clients: can view refund history (where enabled) for transparency and trust.
Before you start (requirements & rules)
- Approved payments required: refunds can only be added against payments that are already approved.
- One refund per payment: each individual payment can have one associated refund record. If a booking/invoice has multiple payments, you can add a refund for each payment as needed.
- Delete rule: refunds must be unapproved before they can be deleted. If a refund is approved, unapprove it first.
- Deposit indicator: if a deposit is refunded, the “Deposit Paid” label/indicator is automatically removed (where applicable).
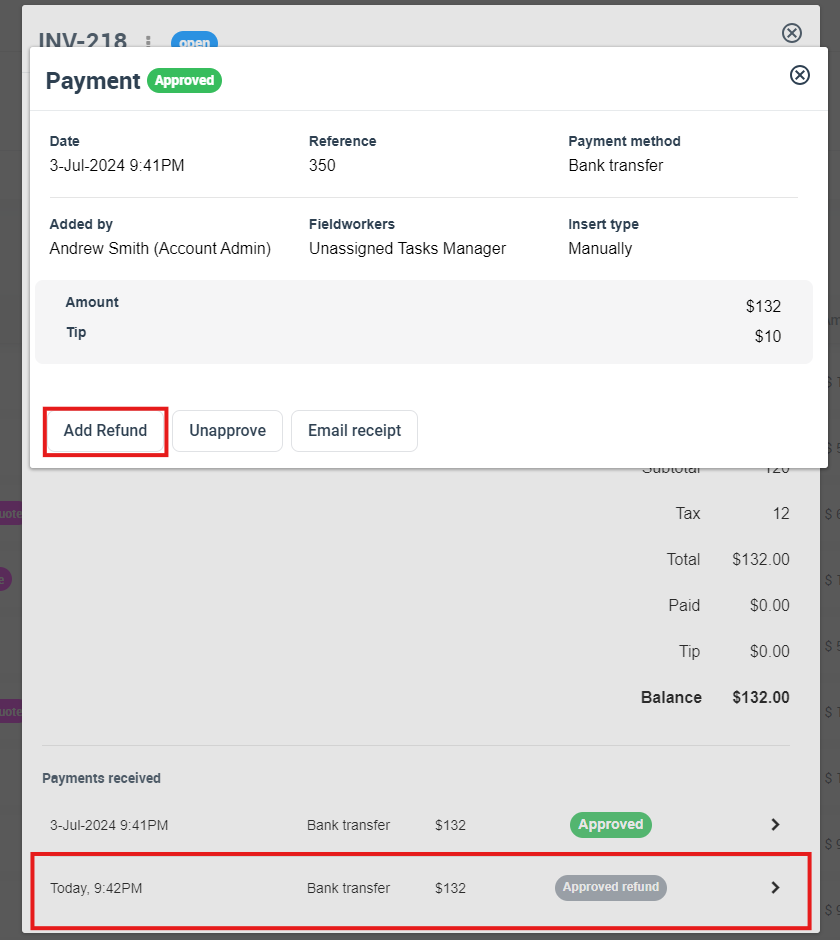
Add a refund to a booking (Admin/Office)
Use this method when you want to record a refund directly from a booking.
- Go to Bookings > All Bookings.
- Open the booking you want to refund.
- Scroll to Invoice & Payment.
- Click Actions and select + Add Refund.
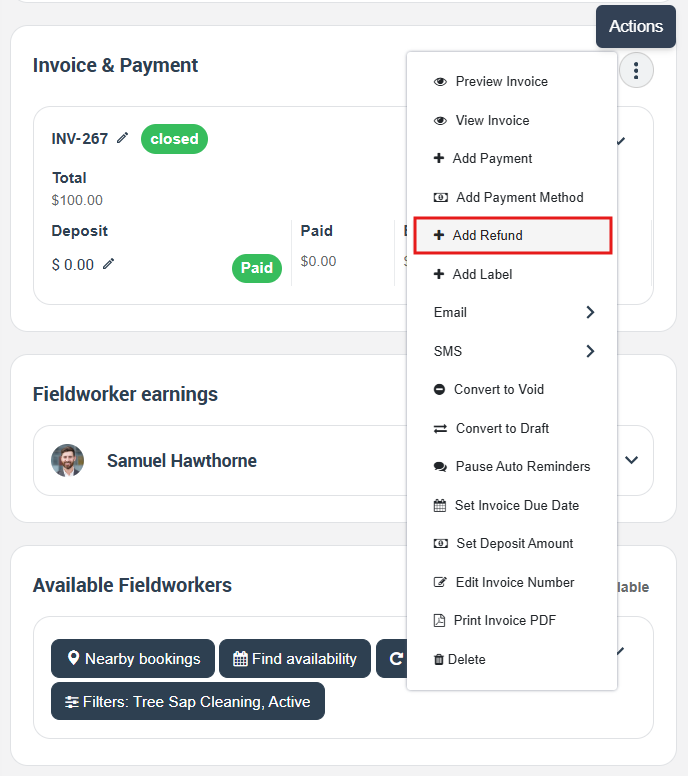
On the Add Refund screen, enter the refund details and click Save:
- Refund date (the date the refund was issued/recorded)
- Refund method (cash, bank transfer, cheque, etc.)
- Assigned fieldworker (if applicable)
- Refund amount
- Refund reference number (unique identifier for this refund)
- Refund reason (why the refund is being issued)
- Description/notes (optional internal context)
View booking refunds
You can view refunds attached to a booking in a couple of ways:
Option A: From the booking overview
- Open the booking.
- Scroll to Invoice & Payment.
- Use Actions or the available refund/payment links to open refund details.
Option B: From “Payment details” (pop-up/details view)
- Open the booking.
- In Invoice & Payment, click payment details.
- A pop-up/details view will display refunds and related amounts for that booking.
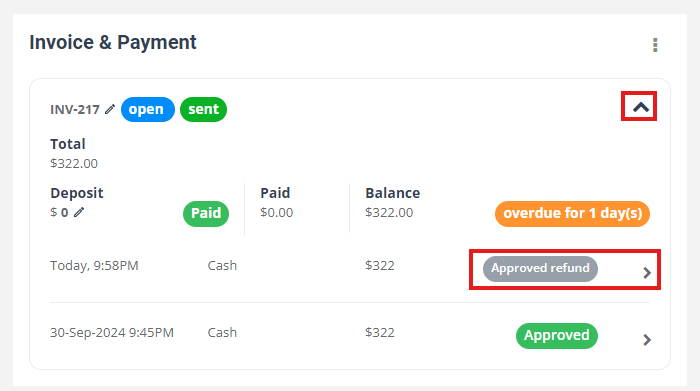
View invoice refunds
You can view invoice refunds either from inside the invoice or from the invoice dashboard.
Option A: From within an invoice
- Navigate to the invoice you want.
- Scroll to the Payment received section.
- Click the Refund/Refunds details link to view all related refunds.
If you need to initiate a new refund from the payment details, open Payments and choose Add Refund (to record an external refund) or Refund payment (to process a gateway/card refund where supported).
Option B: From the invoice dashboard
- Go to Invoices.
- Select a category (or choose All Invoices).
- Find the invoice, click Actions, then choose View Invoice.
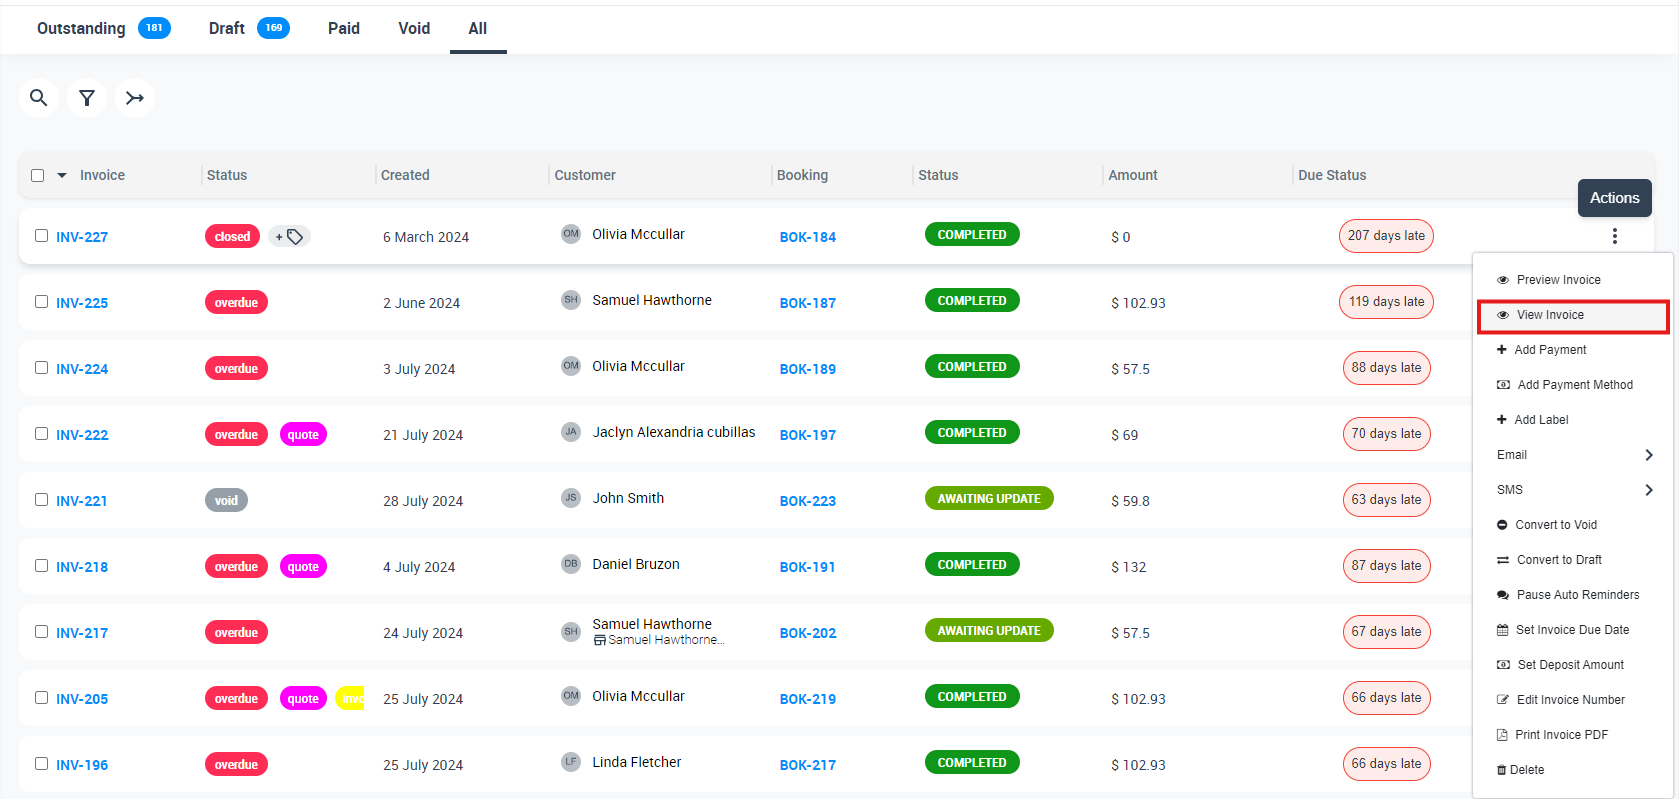
- In the invoice, scroll to Payment received and click Refunds.
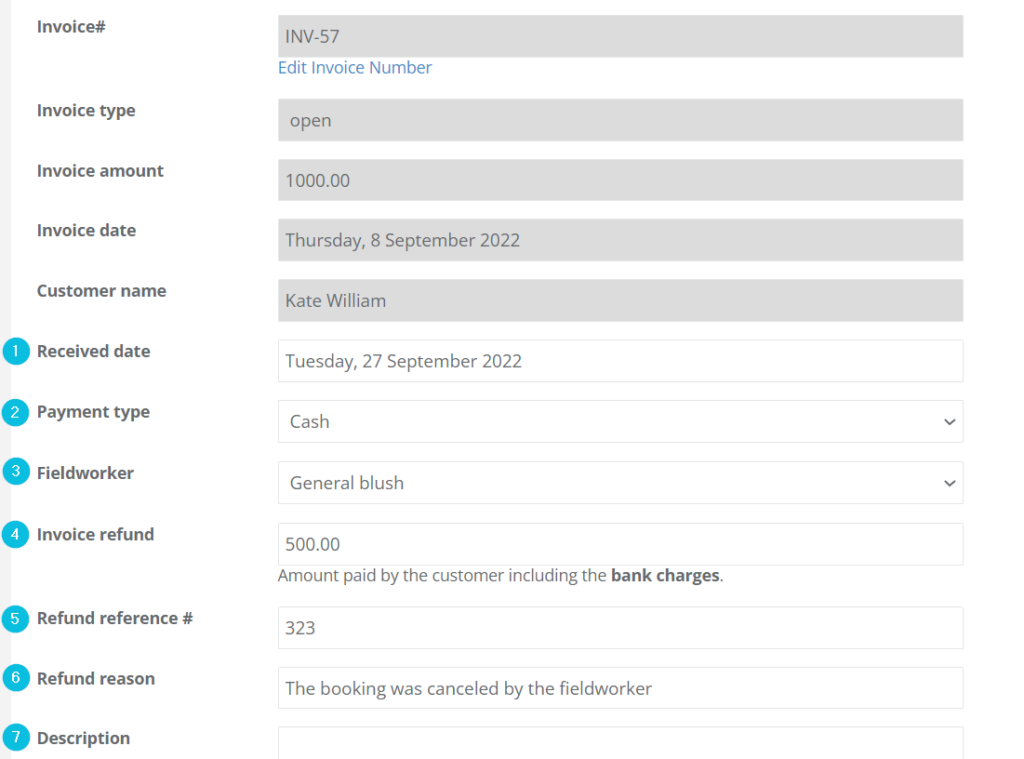
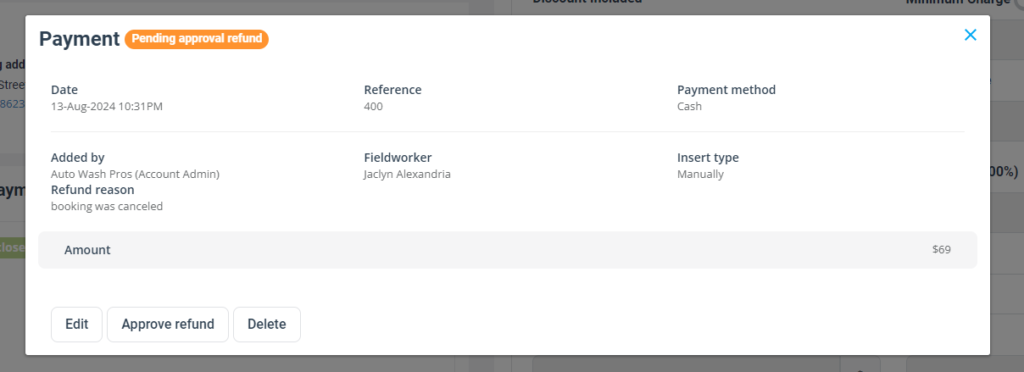
Add a refund to an invoice (record an external refund)
Use Add Refund when the refund was issued outside OctopusPro (cash, bank transfer, cheque, external processor, etc.) and you want to log it against the invoice for accurate records.
- Go to Invoices > All Invoices.
- Open the target paid invoice.
- Scroll to the Payment received section and click Payments.
- In the payment details pop-up, click Add Refund.
On the Add Refund page, complete the fields and then Save:
- Invoice type (where applicable)
- Refund reference (unique refund identifier)
- Refund reason
- Refund description (optional extra details)
- Email option (optional): tick to thank/notify your customer via email, if enabled in your workflow
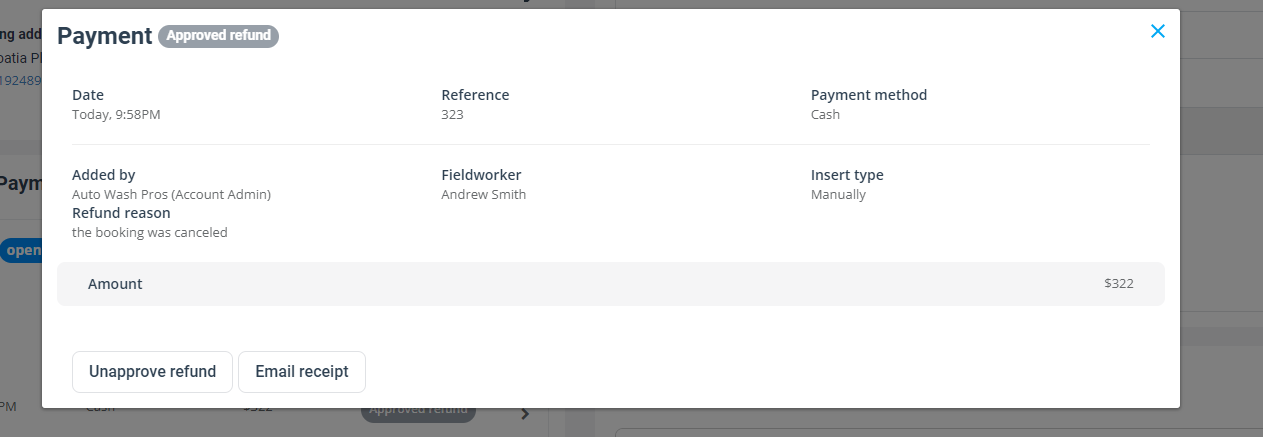
View an added refund on an invoice
- Go to Invoices > All Invoices and open the invoice.
- In Payment received, open Refunds to view, modify (if unapproved), or remove the refund.
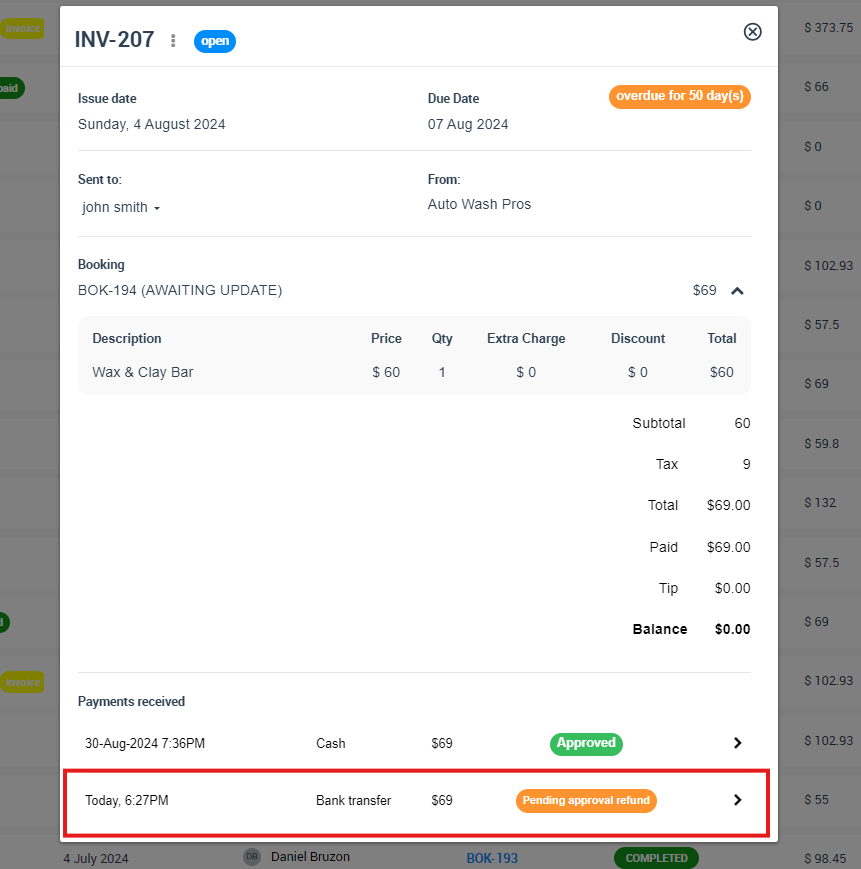
Process a refund (return funds for card/online payments)
Use Refund payment (Process Refund) when the original payment was taken within OctopusPro through an eligible online/card payment method and you want OctopusPro to return the funds (where supported by your payment gateway setup).
Processing credit card / online refunds
- Go to Invoices > All Invoices.
- Open the relevant invoice.
- Scroll to Payment received and click Payments.
- In the payment details pop-up, click Refund payment.
- Verify the payment details on the next page.
- Enter the Refund reason.
- Optional: tick to notify the customer by email (if enabled).
- Click Save to confirm.
Processing refunds for external payments
If the payment method was external (bank transfer, cash, cheque, external POS terminal), you typically do not process the refund through OctopusPro. Instead, issue the refund externally, then Add Refund to record it against the invoice/payment for accurate tracking.
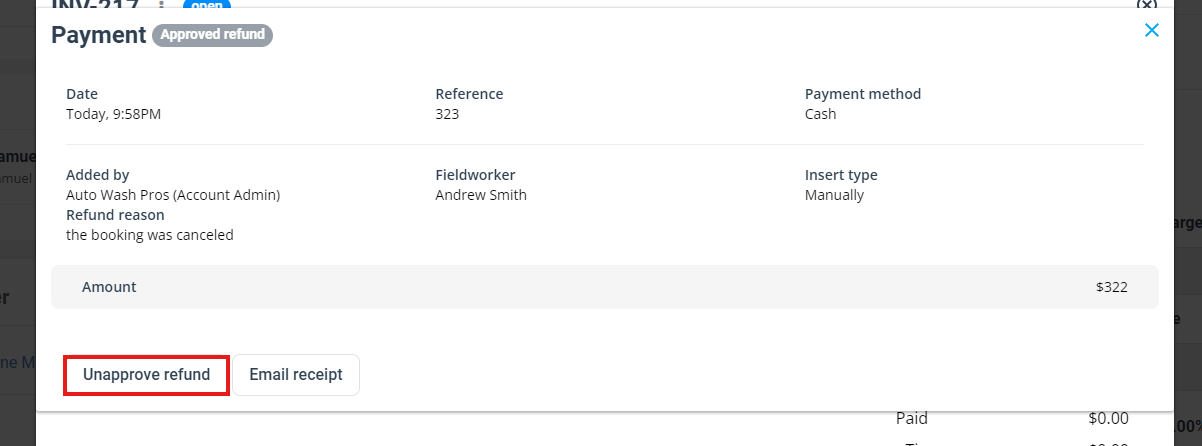
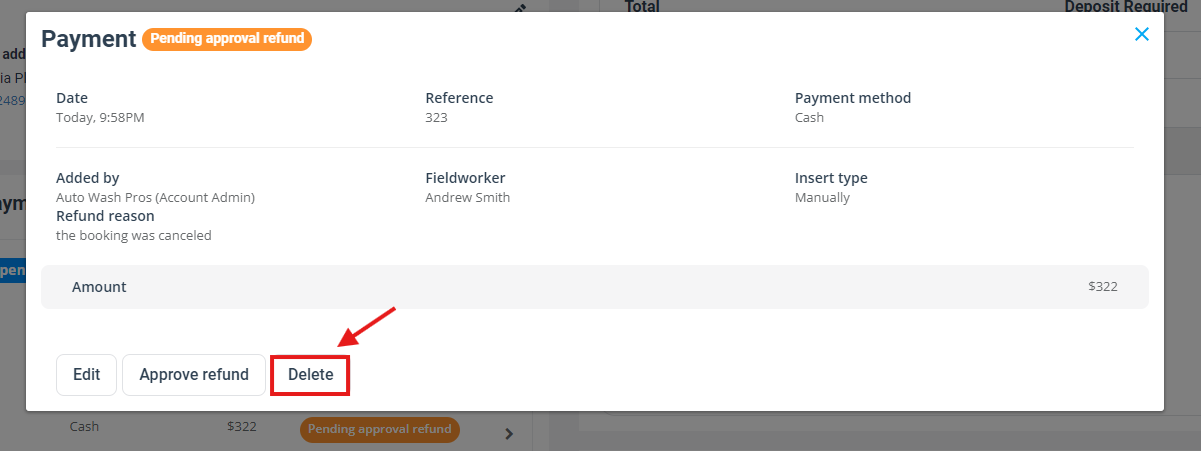
Refund approval workflow (approve, unapprove, delete)
OctopusPro supports a refund approval workflow so refunds align with company policy and remain auditable. Depending on your account/version, the menu label may appear as Refund Approval or Refunds Approval.
Approve a refund
- Go to Invoices > Refund Approval (or Refunds Approval).
- Locate the refund record.

- Click Approve.
Tip: Refunds can usually be edited or deleted before approval (subject to permissions).
Unapprove a refund
- Go to Invoices > Refund Approval (or Refunds Approval).
- Find the refund.
- Click Unapprove / Unapproved.
Delete a refund
Refunds can only be deleted when they are unapproved.
- If the refund is approved, an admin must unapprove it first.
- Delete it from the approvals list, or from the booking/invoice refund details view (where available).
Fieldworker refund requests (mobile app)
If enabled via role permissions, fieldworkers can submit refunds from the app. Many businesses allow initiation but still require office approval.
Fieldworker: add a refund to an invoice
- Log in to the fieldworker app.
- Go to Invoices > All Invoices.
- Open the paid invoice that requires a refund.
- Scroll down and tap Add Refund.
- Tap the amount/number field to enter the refund amount.
- Select the refund type/method.
- Adjust the refund date if required.
- Add any comments.
- Tap Submit.
Fieldworker: add a refund to a booking (where available)
- Open the booking.
- Go to Billing.
- Tap Add Refund and complete the refund details.
- Submit for approval if your workflow requires it.
Best practices (controls, reconciliation & reporting)
- Always include a reference number: Enter a real identifier such as a bank reference, payment-gateway transaction ID, receipt number, or internal support/ticket number. This makes reconciliation fast and defensible.
- Use clear refund reasons: Keep reasons specific and standardized (e.g., “Duplicate payment”, “Cancellation”, “Overcharge correction”, “Service not delivered”, “Change of scope”). Clear reasons reduce disputes and speed up approvals.
- Add helpful internal notes: Capture the context that matters—who requested the refund, who approved it (and why), and any policy exceptions (especially for partial refunds). Good notes protect your team during audits and customer disputes.
- Apply segregation of duties: If fieldworkers can initiate refunds, require an office manager/accountant to approve them before the refund is treated as final in your records. This reduces fraud risk and prevents costly mistakes.
- Refund the correct payment entry: Refunds are tied to individual payments. If a customer paid multiple instalments, apply the refund to the correct instalment/payment so your balances and reports remain accurate.
- Plan partial refunds properly: Remember the rule: one refund per payment. If you anticipate multiple refunds over time, structure the original charges as multiple payments so each payment can be refunded once.
- Reconcile regularly: Match OctopusPro refund records to your bank statements and payment-gateway reports. This ensures your revenue, payments, refunds, and outstanding balances remain accurate.
- Record refunds promptly: Enter refunds as soon as they happen (or as soon as they are approved) so reporting stays accurate and your team always sees the true customer balance.
- Restrict approval permissions: Limit refund approval to trusted roles (e.g., managers/accountants). This strengthens financial controls, improves compliance, and reduces errors.
Open API & Webhooks (Automation & Integrations)
OctopusPro supports built-in integrations plus an Open API (REST) and webhooks, so you can connect OctopusPro to accounting platforms (e.g., Xero/QuickBooks), BI dashboards, middleware (Zapier/Make/custom workflows), or your own apps. This enables secure data sync and real-time automation across bookings, invoices, payments, and refunds.
What to use when
- Open API (REST): Use when your system needs to read or write data on demand (e.g., fetch invoices, create/update records, pull refund details for reporting).
- Webhooks: Use when you want OctopusPro to notify your system instantly when something changes (e.g., a refund is created, approved, or unapproved), so you can trigger follow-up actions automatically.
Common automation ideas
- Finance notifications (internal approvals): Notify a finance Slack/Teams channel when a refund is created and awaiting approval, and again when it’s approved or unapproved.
- Accounting & reporting sync: Sync invoices, payments, and refund activity into Xero/QuickBooks, your ERP, or a data warehouse for accurate revenue and reconciliation reporting.
- Customer communications: Send an automatic confirmation email/SMS when a refund is approved (and optionally a “refund received” follow-up if your business policy requires it).
- Audit & compliance trail: Store refund reference numbers, reasons, and approval metadata in your compliance system or analytics platform for dispute handling and audits.
Getting API access (high level)
- Go to Settings → API & Webhooks Integrations.
- Under API Key Management, click Generate API Key, name it, and generate it.
- Use the API key in your integration to securely access OctopusPro data (REST API).
- Add webhooks to receive real-time event notifications (for example: refund created/approved/unapproved) and trigger actions in your external systems.
Practical examples (real-world workflows)
- Plumber (deposit refund): Customer cancels. Office records the deposit refund with the bank reference. A webhook notifies finance for approval, and once approved, the refund is synced to accounting.
- Electrician (duplicate payment): Customer pays twice. A refund is processed and approved, then the accounting system is updated automatically and the customer receives a confirmation message.
- Vet clinic (partial refund): Treatment plan changes. Office logs a partial refund with a clear reason. The BI dashboard updates profitability and refund rates in real time.
- Babysitting agency (service not delivered): A sitter becomes unavailable. Office issues a refund, adds QA notes, and triggers an internal follow-up task for customer care.
- Mobile mechanic (wrong part): Customer prepaid for a part no longer needed. Refund is recorded and synced to the ledger, and inventory/ordering systems are updated via API.
FAQ
Why can’t I add a refund?
- The payment must be approved first: Refunds can only be added against payments that are already approved (including booking and invoice payments).
- One refund per payment: Each payment can have only one refund record. If you need multiple refunds over time, split the original charge into multiple payment entries so each payment can be refunded once.
Why can’t I add a refund to a booking?
- The booking must have at least one approved payment.
- Each payment supports one refund. If you need more than one refund, restructure the charges as multiple payments first.
Why can’t I delete a refund?
Refunds can only be deleted when they are unapproved. If the refund is already approved, unapprove it first, then delete it.
Where can I see all refunds in one place?
Go to Invoices > Refund Approval (or Refunds Approval, depending on your account/version) to view all refunds, amounts, and approval status across your business.
Should I use “Add Refund” or “Refund payment”?
- Add Refund: Use this to record a refund that was issued outside OctopusPro (cash, bank transfer, cheque, external processor). This logs the refund for reporting and reconciliation.
- Refund payment: Use this to process eligible card/online refunds that were originally taken through OctopusPro (where supported by your payment gateway and payment method). This action returns funds to the customer.
Can fieldworkers issue refunds?
Yes—if enabled by role permissions. Many businesses allow fieldworkers to initiate refunds while requiring office users (manager/accountant) to approve them before the refund is treated as final in your records.
Does OctopusPro send money back to the customer?
It depends on the refund type:
- Refund payment (Process Refund): This can return funds for eligible payments taken through OctopusPro (subject to gateway/payment method support).
- Add Refund (Record Refund): This logs a refund that you processed externally (bank/cash/cheque/external terminal). In this case, OctopusPro records the refund details for your operational and financial records, and you should enter the external reference number for reconciliation.
To stay updated, please subscribe to our YouTube channel.