
Role-Based Access Control (RBAC) & User Permissions
Role-Based Access Control (RBAC) helps you control exactly what each user can see and do in OctopusPro based on their job function. Instead of giving everyone full access, you assign each user a Role (e.g., Admin, Manager, Dispatcher, Accountant, Support, Fieldworker, Sub-worker) and then enable only the required Credentials (Permissions) for that role.

RBAC is essential for:
- Protecting sensitive data (pricing, invoices, payments, customer info, internal notes)
- Reducing errors by limiting risky actions (delete, refunds, settings changes)
- Streamlining work by showing each team member only what they need
- Scaling safely across teams, branches, franchises, and contractors
Quick navigation
- Where to manage roles & permissions
- Roles vs. permissions (credentials)
- Common roles (examples)
- Core roles vs custom roles
- Create a custom role (step-by-step)
- Assign credentials (permissions) to a role
- Assign roles to users
- How access is evaluated (important)
- Fieldworker App + Sub-workers + Customer Portal permissions
- Best-practice checklist
- Real-world permission examples
- Deleting roles safely
- Offboarding & account security actions
- FAQs
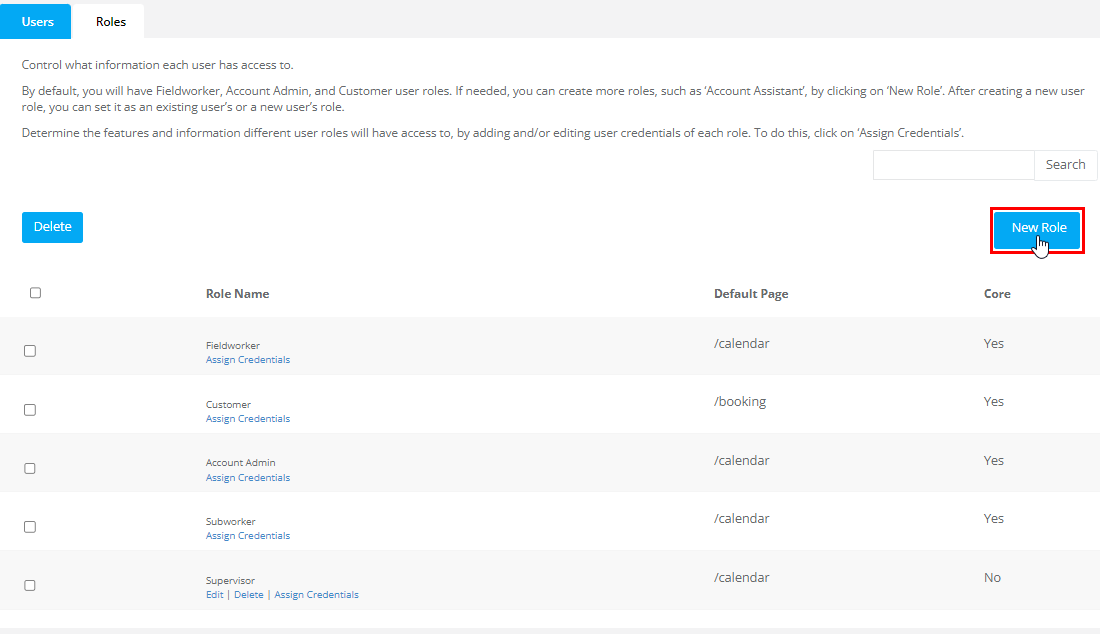
Where to manage roles & permissions
Path: Settings → Company Settings → Users → Roles
From the Roles page you can:
- Create roles (via New Role)
- Set each role’s Default Page (landing page after login)
- Assign credentials (permissions) per system area (Customers, Inquiries, Bookings, Quotes/Estimates, Invoices, Reports, Settings, Emails, etc.)
- Search roles and manage which roles are custom vs core
Roles vs. permissions (credentials)
Role: A named access profile for a job function (e.g., “Dispatcher”, “Accounts Receivable”, “Branch Manager”).
Credentials (Permissions): The specific access rules inside that role (e.g., view bookings, edit invoices, export reports, approve refunds).
Most permissions follow common access patterns such as:
- View / Read (can see records)
- Create (can add new records)
- Edit / Update (can modify records)
- Delete (high-risk: restrict to trusted roles)
- Approval / restricted actions (e.g., approve edits, approve refunds, unlock locked items)
Common roles (examples)
Most companies use a mix of office roles and field roles. Typical examples include:
| Role | Typical access | Good fit for |
|---|---|---|
| Admin / Account Admin | Company settings, integrations, billing, full management | Owner, system administrator |
| Manager | Operations, scheduling, approvals, limited settings | Ops manager, team lead |
| Dispatcher | Schedule board, job assignment, communications | Dispatch / call center |
| Fieldworker | Assigned jobs, onsite updates, photos, notes, status updates | Technician, contractor |
| Sub-worker | Limited job participation (assist/crew) | Apprentice, helper, assistant |
| Accountant | Invoices, payments, reconciliation, exports | Finance / bookkeeping |
| Support | Customer records, communication logs, limited edits | Customer success, support agents |
Core roles vs custom roles
On the Roles page you may notice a Core indicator. Core roles are system default roles. Custom roles are roles you create for your business. Depending on your account configuration:
- Some core roles may be protected (not deletable), but you can usually adjust permissions as needed.
- Custom roles can be created, edited, and deleted (recommended to keep a small, clean set of roles).
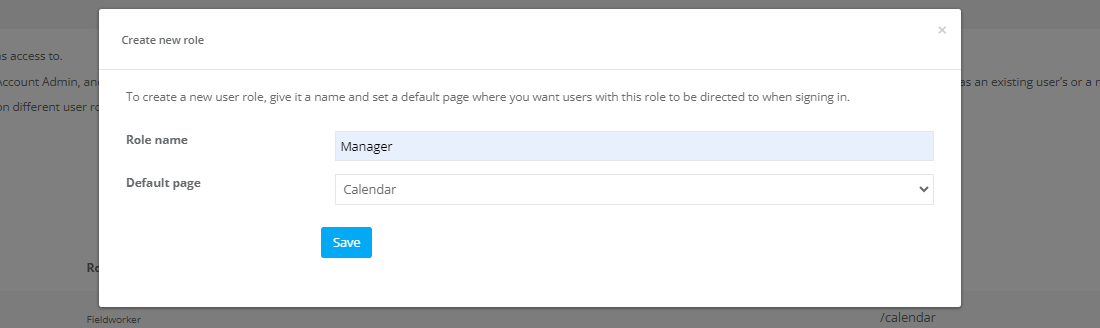
Create a custom role (step-by-step)
- Go to Settings → Company Settings → Users → Roles.
- Click New Role.
- Enter a clear Role name (best practice: task-based names such as “Dispatch – View Only”, “Accounts – Refund Approver”, “Branch Manager”).
- Select the Default page (where users with this role land after login).
- Click Save.
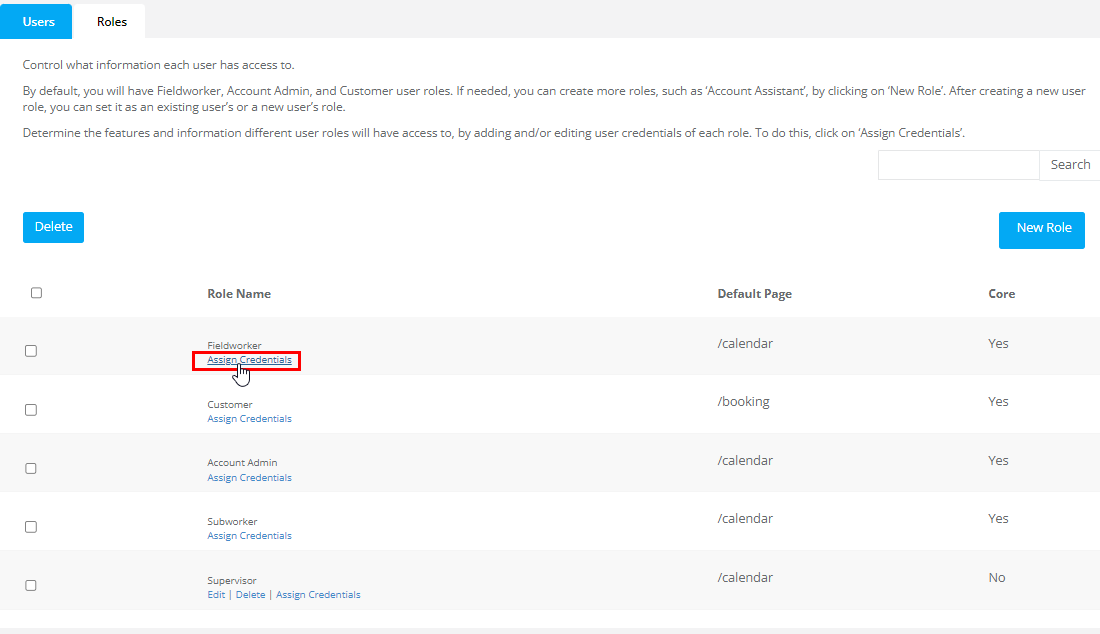
Assign credentials (permissions) to a role
After creating the role, configure what it can access by assigning Credentials (Permissions).
- On the Roles list, find the role you want to configure.
- Click Assign Credentials next to that role.
Permissions are grouped by feature area. You can use:
- Open All to expand every permissions group
- Close All to collapse the list
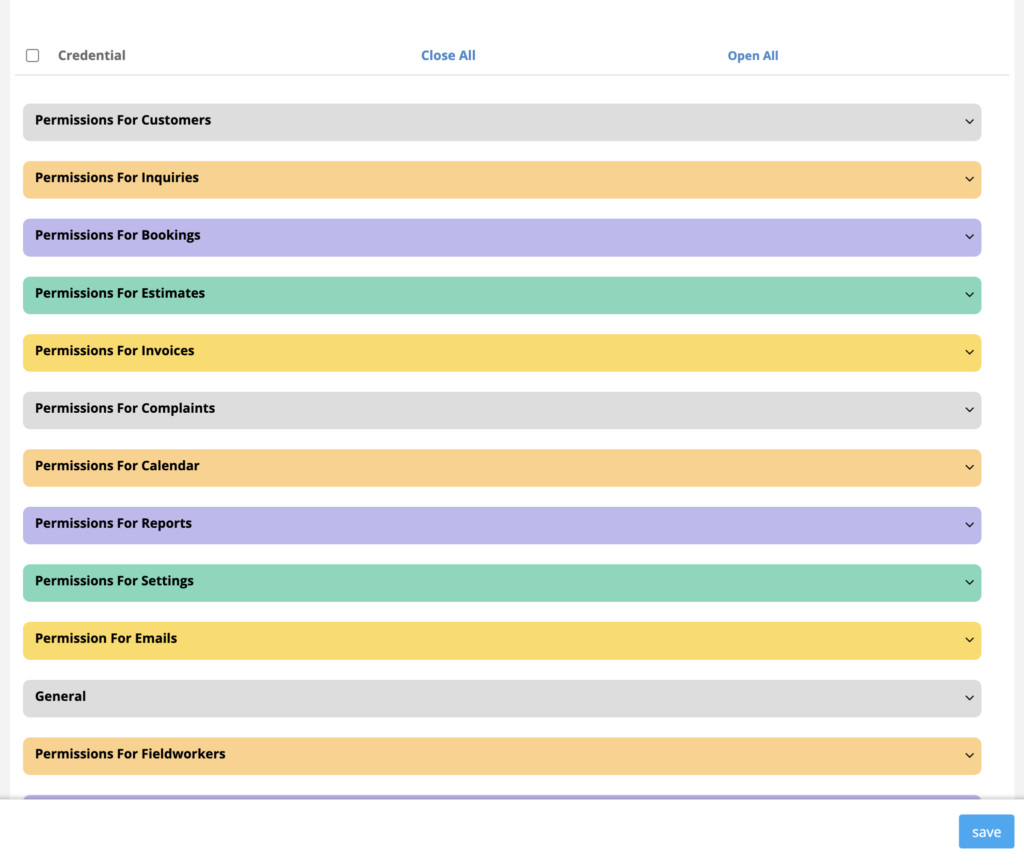
Expand a group and tick only the permissions this role needs. Start with view-only, then add create/edit permissions only where required.
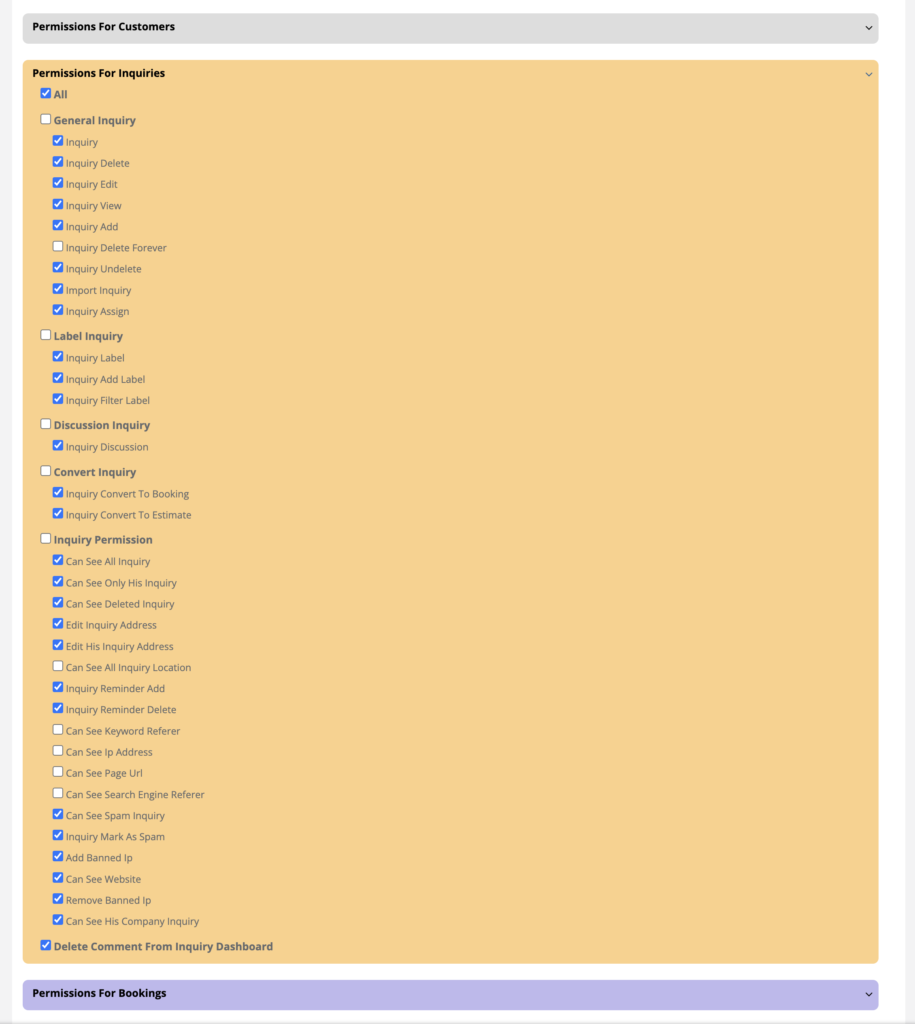
Important notes:
- Role updates apply to all users assigned to that role.
- Changes typically take effect immediately (often on refresh or next login depending on the screen).
- For safety, test using a non-admin user or impersonation before rolling changes to a wider team.
Assign roles to users
Once roles are configured, assign them to users so their access matches their responsibilities.
- Go to Settings → Company Settings → Users.
- Edit the user you want to update.
- Select the correct Role.
- Save.
Related guides:

How access is evaluated (important)
- A user should typically have one primary role aligned to their responsibilities (best practice).
- If your setup allows overlapping permissions, keep in mind that when permissions conflict, access may be evaluated in a way that results in the more permissive outcome.
- To avoid unexpected access, keep roles clean and avoid stacking multiple roles for the same person.
Fieldworker App + Sub-workers + Customer Portal permissions
RBAC controls internal user access, but some areas have additional permission layers:
- Fieldworker App permissions: Control what field staff can do inside the Fieldworker App (job actions, visibility, approvals, GPS tracking visibility, etc.).
Fieldworker Permissions & Access Control
- Sub-workers / crew members: Add assistants/apprentices to jobs with the right visibility and accountability.
Manage Fieldworkers & Subworkers

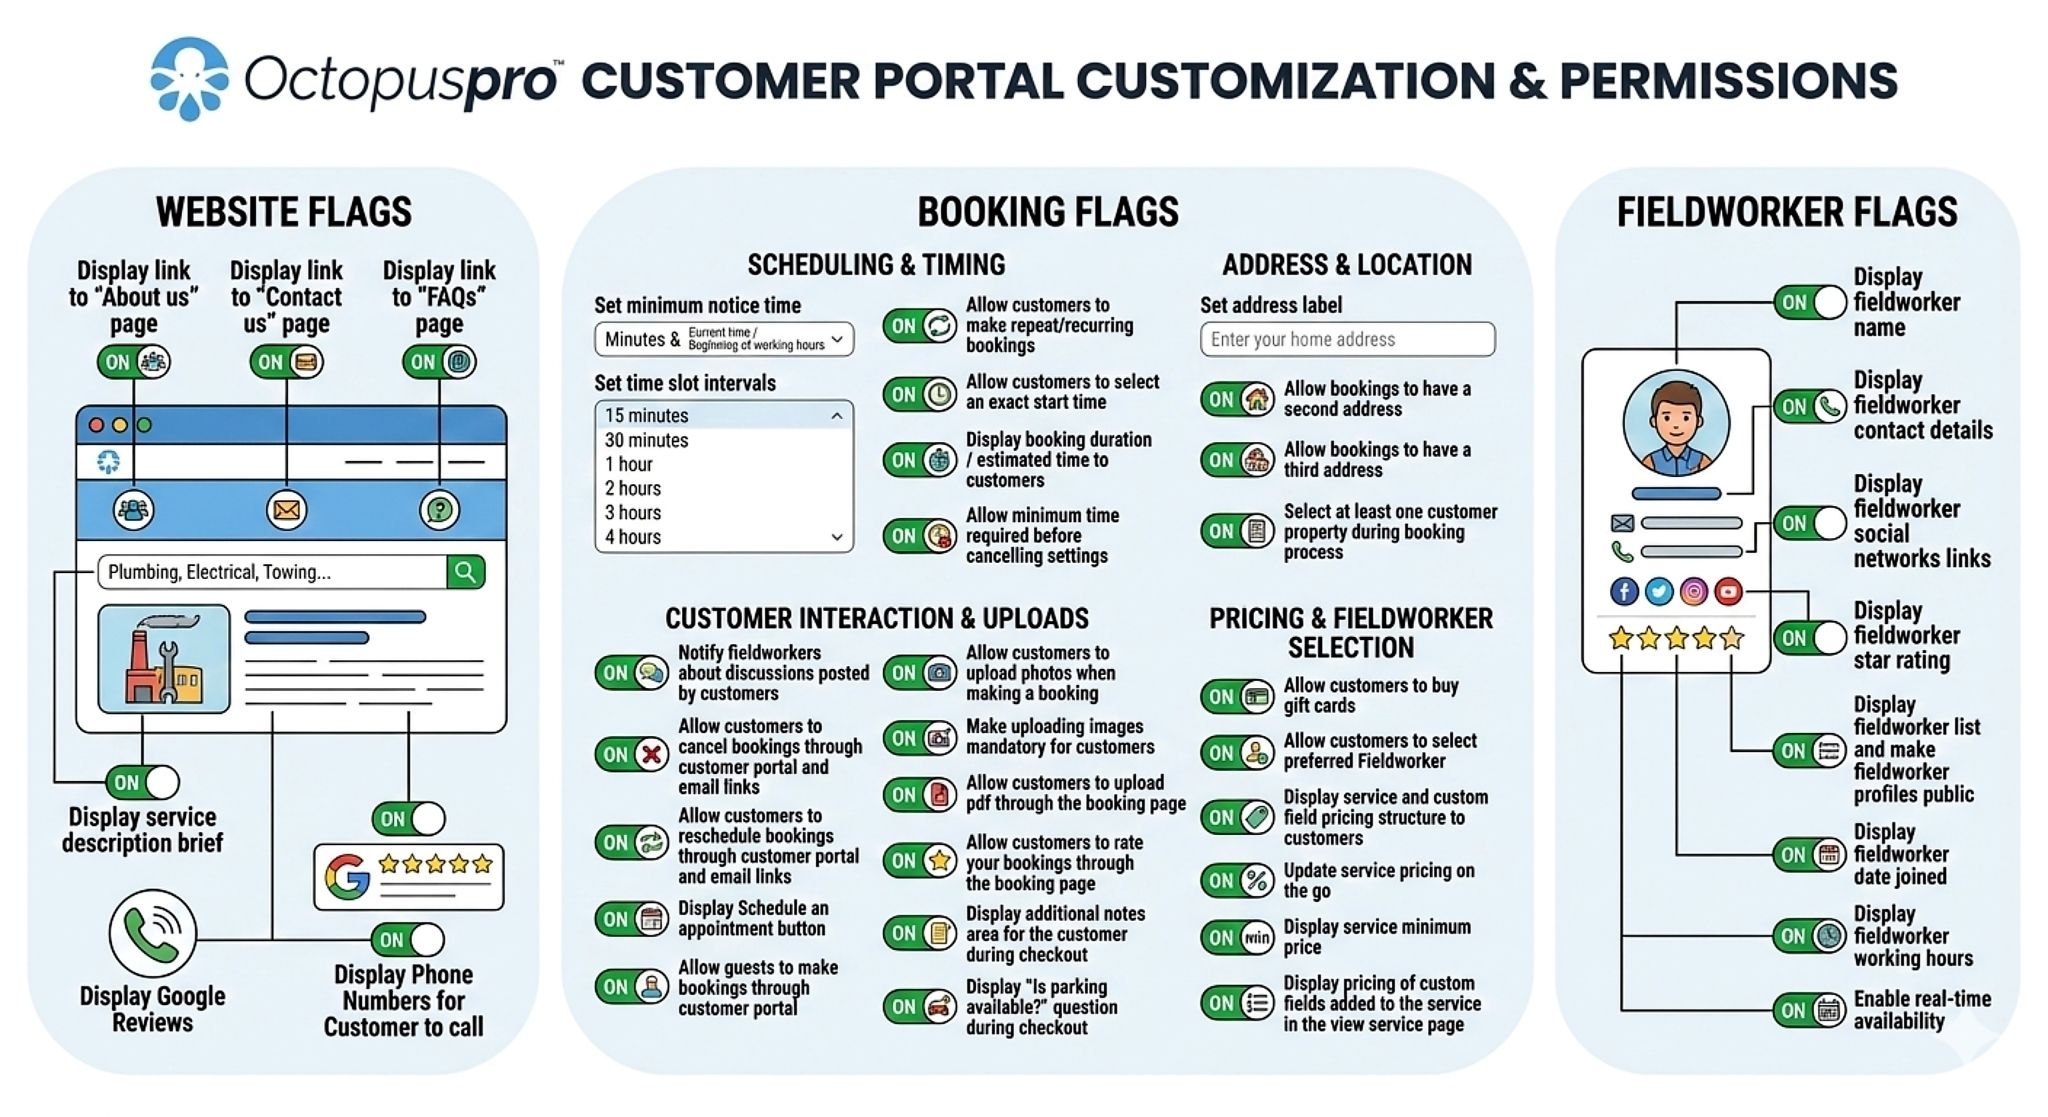
- Customer Portal permissions: Customer logins do not use internal user roles. Portal access is controlled separately (what customers can view/upload/pay/reschedule, etc.).
Customer Portal Flags & Permissions
Best-practice checklist
- Least privilege: enable the minimum permissions required to perform the job.
- Separate duties: for example, the person creating invoices shouldn’t automatically approve refunds.
- Restrict exports: only allow data exports to trusted roles.
- Limit delete permissions: reserve delete/void/unlock actions for senior roles.
- Audit access regularly: review roles and user assignments when staff responsibilities change.
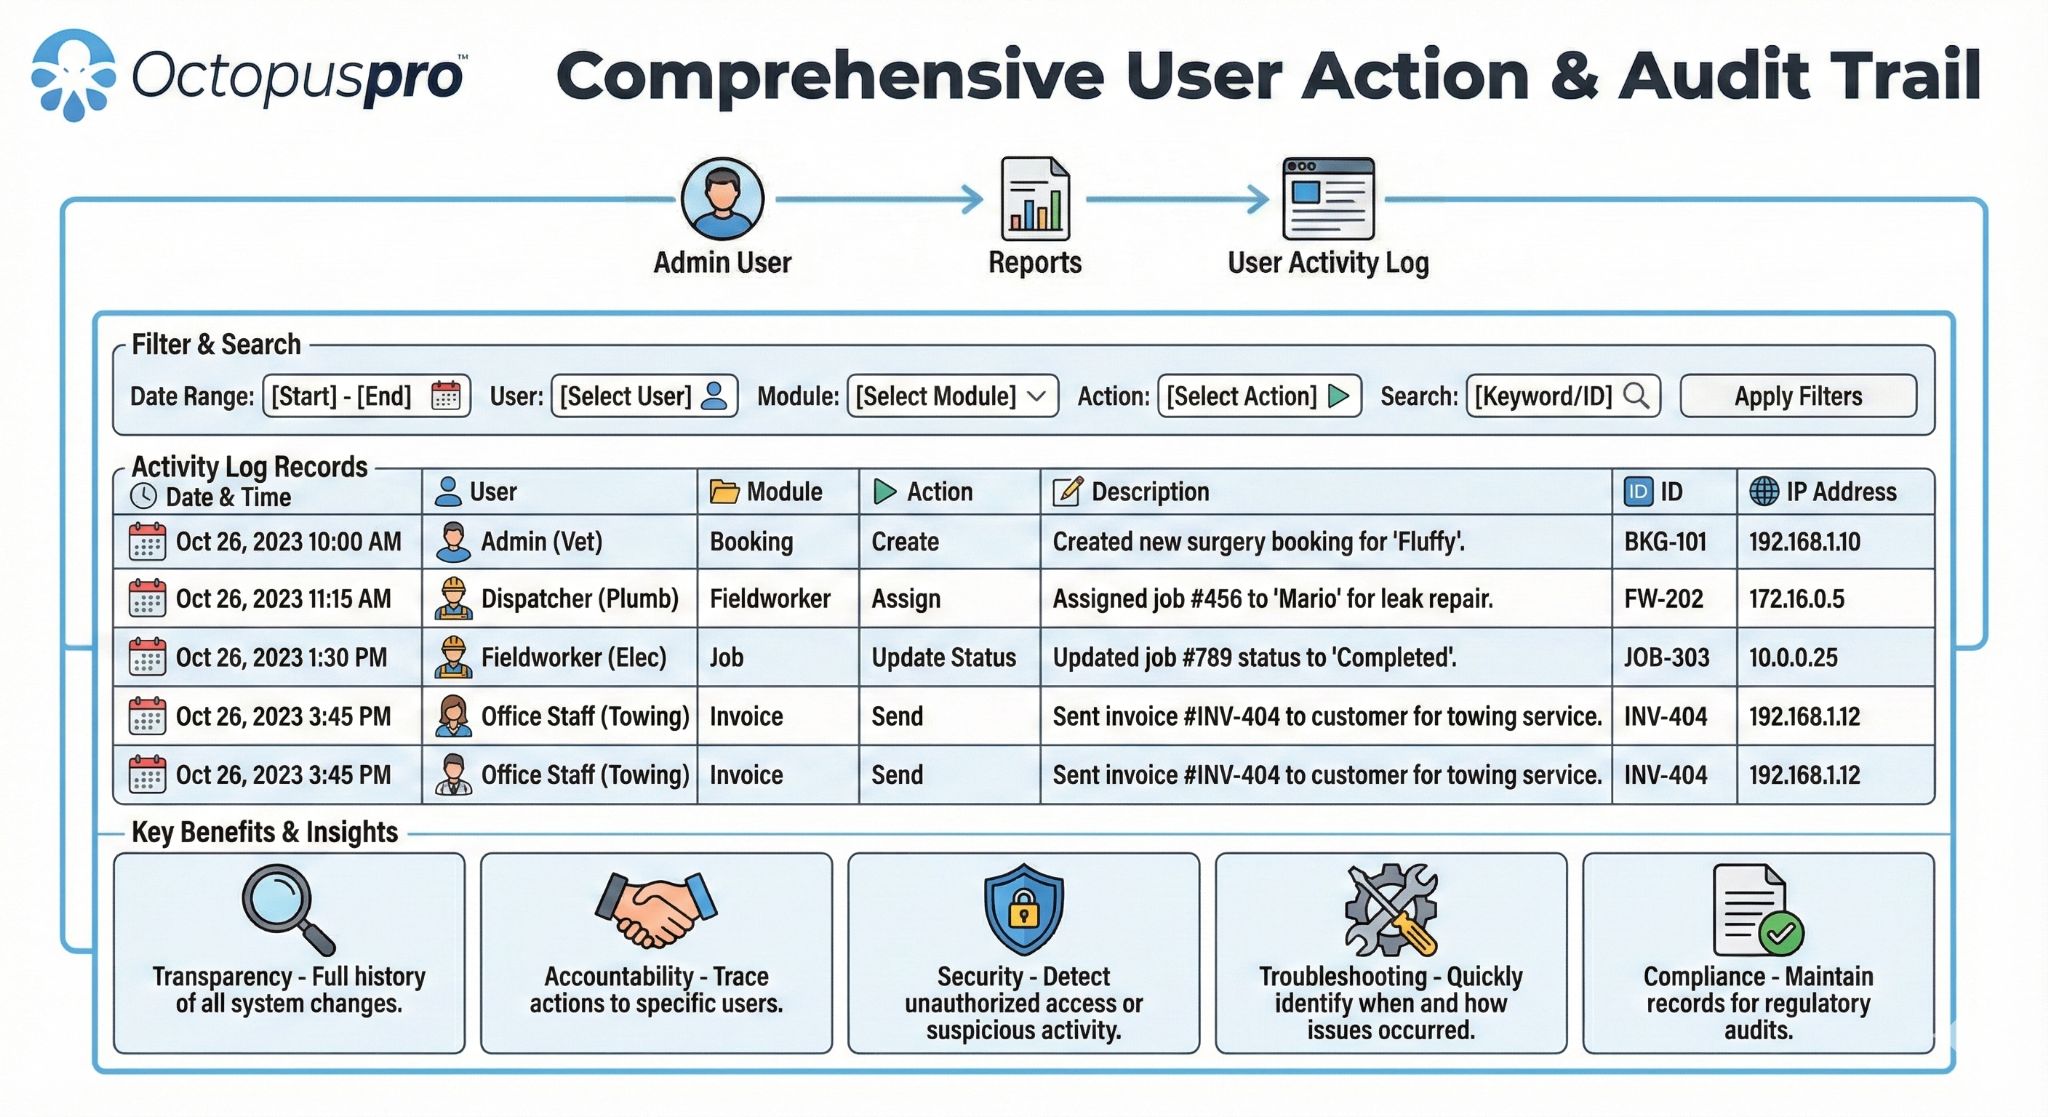
- Use audit logs: track what changed, who changed it, and when.
User Activity Log – Track Every Click & Change
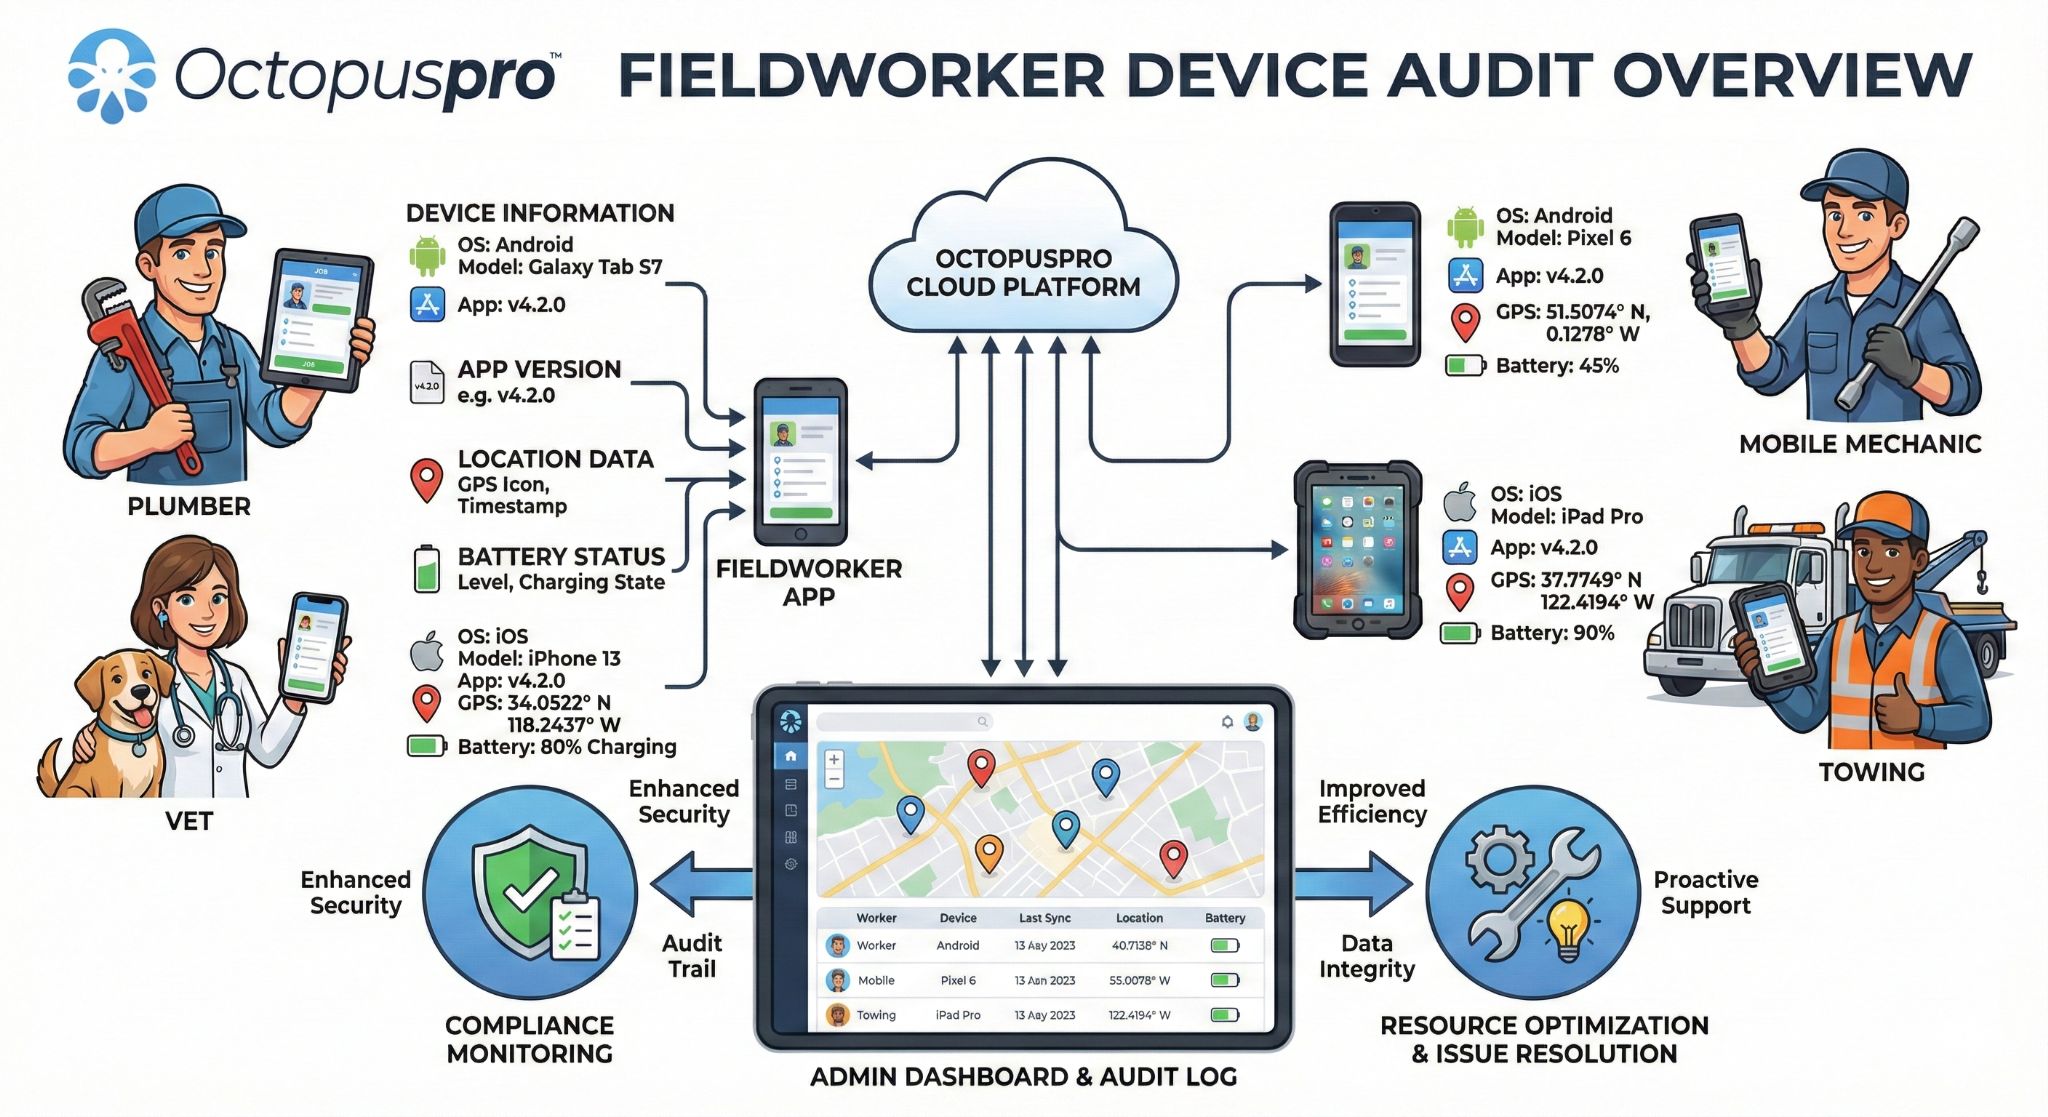
- Monitor mobile access: maintain visibility over logged-in field devices.
Fieldworker Device Audit
Real-world permission examples
Example 1: Dispatcher (scheduling + communication only)
- ✅ View bookings, assign/dispatch fieldworkers, send SMS/email
- ✅ View customer contact details needed for coordination
- ❌ No access to invoice editing, refunds, payment settings, payroll, or integrations
Example 2: Accounts Receivable (invoices + payments)
- ✅ Create/edit invoices, record payments, export reports
- ✅ View bookings (read-only) for billing context
- ❌ No permission to reschedule jobs or manage fieldworker pay rates
Example 3: QA / Inspector (read-only + notes)
- ✅ View completed jobs, photos, checklists, job notes
- ✅ Add internal comments / discussion notes
- ❌ No ability to edit pricing, invoices, or delete records
Deleting roles safely
If you need to remove a role, follow these best practices to avoid access issues:
- Reassign users first: move any users currently on that role to another role.
- Avoid deleting core roles: if a role is marked as Core, it may be protected or required by the system.
- Prefer “Disable access” for leavers: when staff leave, block/deactivate the user instead of deleting roles or users.
Offboarding & account security actions
When staff leave or change responsibilities, use these tools to secure access while keeping history and audit trails:
- Activate / Deactivate Users
- Block a User
- Force Logout Users
- Change or Reset User Passwords
- Login as Another User (Impersonation) (great for testing roles)
- Deleting Users vs. Deactivating/Blocking Users
FAQs
Do portal customers count as “users”?
No. Customer Portal access is controlled separately and is limited to the customer’s own records based on your portal settings.
Can I create unlimited roles?
Yes—create as many roles as needed to match your structure (dispatch, accounts, QA, branch managers, contractors, etc.).
What’s the fastest way to verify a role works as intended?
Assign the role to a test user, or use impersonation to confirm menus, screens, and actions match your intended workflow.
What happens when a role is changed?
All users assigned to that role inherit the updated permissions. Plan changes carefully and test before applying to a wide group.
To stay updated, please subscribe to our YouTube channel.