
Viewing & Managing Fieldworker Lists
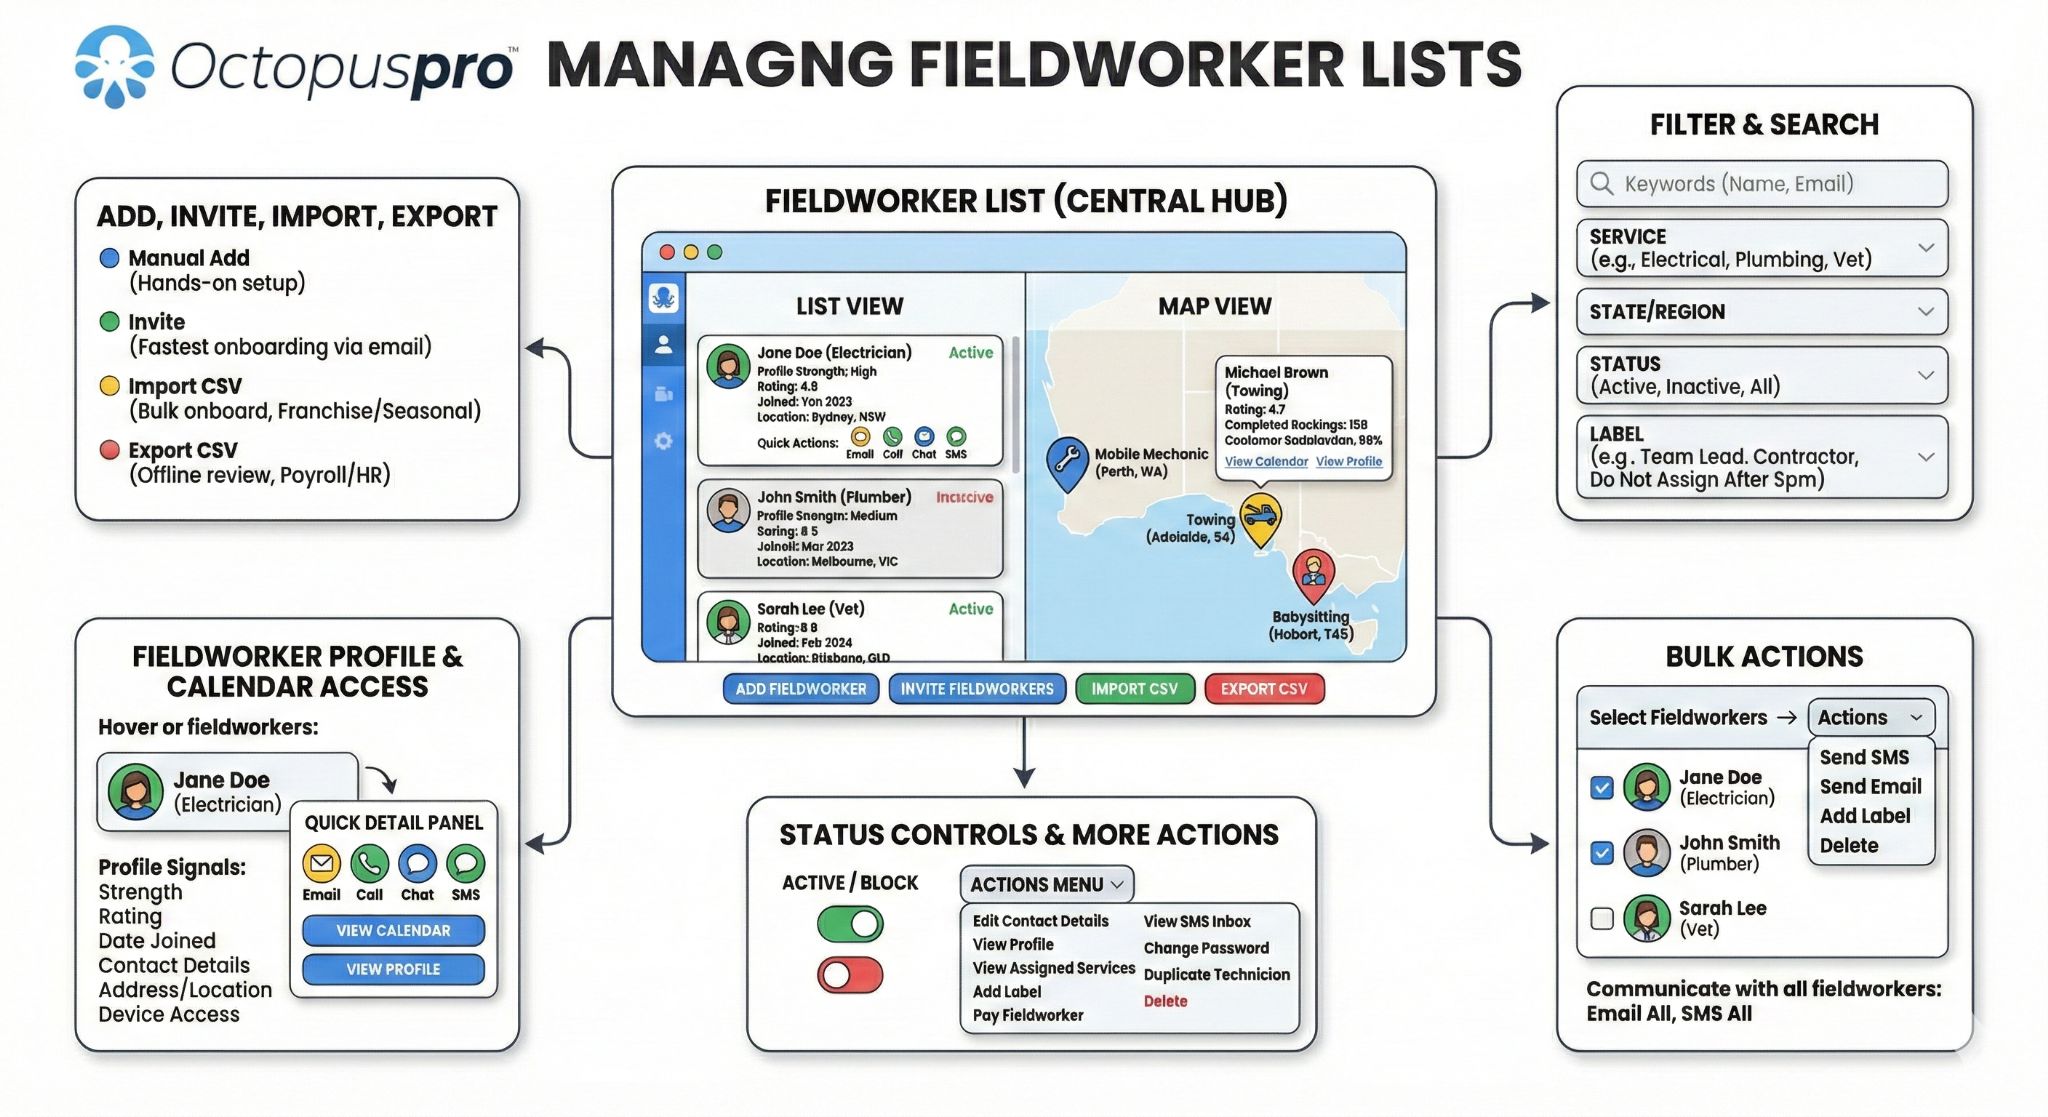
The Fieldworkers list is your central hub for managing your workforce (employees, subcontractors, or contractors). From this page, you can:
- View key profile signals (profile strength, rating, date joined, contact details, address/location, and device access).
- Switch between List and Map views to understand coverage and availability by geography.
- Filter and search to find the right person faster (by keywords, services, state/region, status, and labels).
- Open a fieldworker’s profile or calendar directly from the list.
- Contact fieldworkers instantly (email, call, SMS, chat/discussion tools where available).
- Add, invite, import, export fieldworkers in bulk.
- Perform group actions like sending SMS/email, applying labels, or deleting multiple profiles.
Note: Depending on your account settings and industry terminology, “Fieldworker” may appear as Technician in some screens.
Table of contents
- View all fieldworkers (list overview)
- List view vs map view
- View fieldworker detail tags
- Filter and search fieldworkers
- Open a fieldworker profile from the list
- Open a fieldworker calendar from the list
- Contact a fieldworker from the list
- Add, invite, or import fieldworkers
- Export fieldworkers (CSV)
- Group actions (bulk SMS/email, labels, delete)
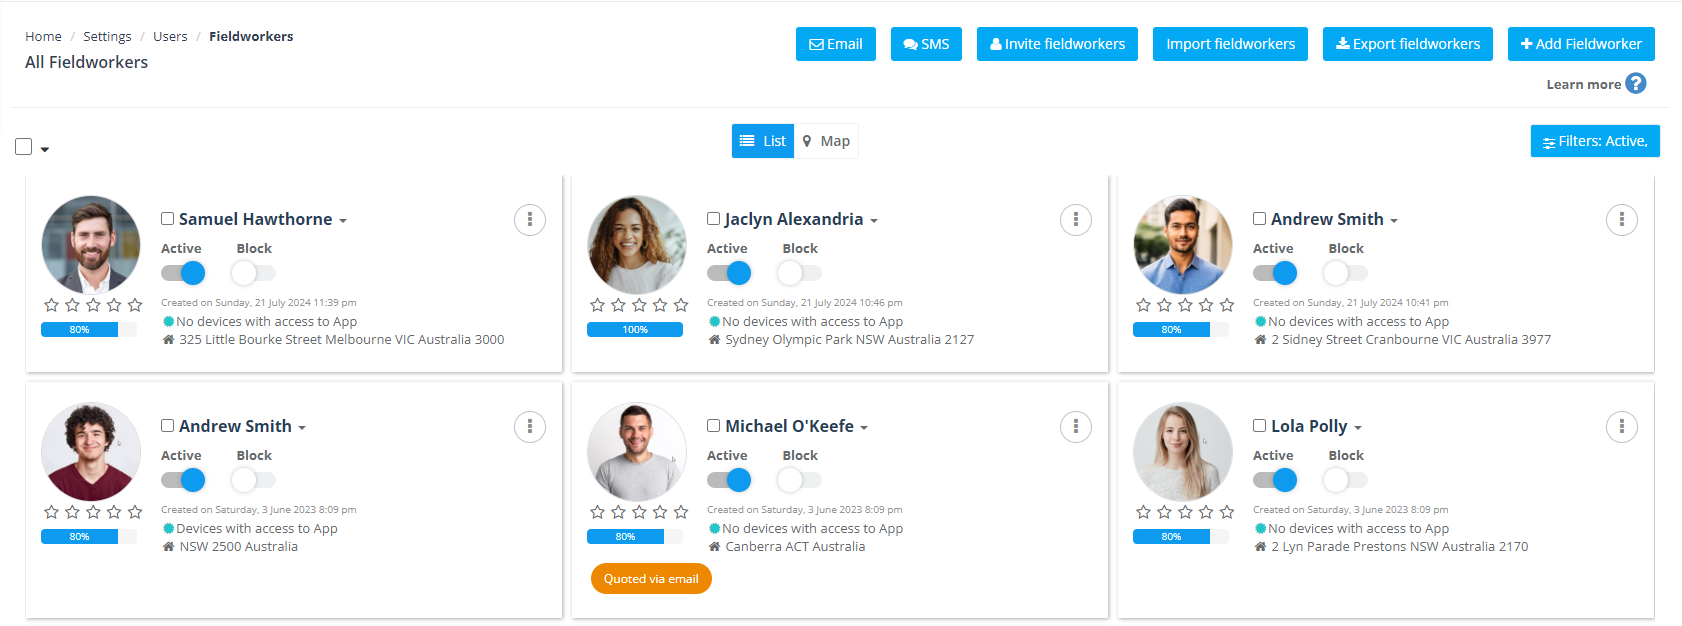
View all fieldworkers (list overview)
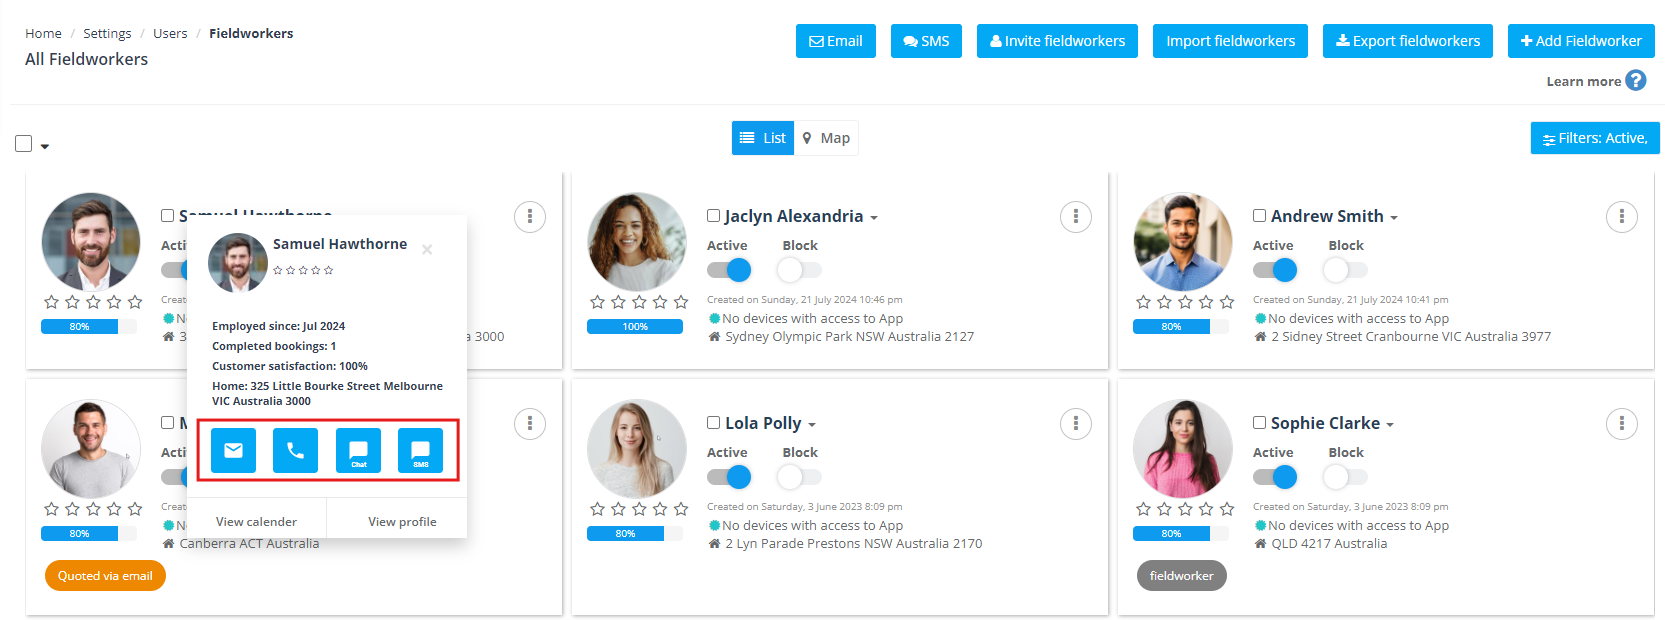
To access your fieldworker list, go to Fieldworkers from the left-side menu. This opens the main list page where you can see important details at a glance, including:
- Profile strength (completion indicator) to help you spot incomplete profiles that may affect scheduling, payroll, or customer communications.
- Name & profile photo
- Rating (where enabled)
- Date joined
- Device/app access indicators (useful for onboarding and security checks)
- Address / location
- Email & phone with quick actions
You can also use the quick buttons across the top (for example, emailing or texting all fieldworkers, inviting, importing, exporting, and adding new fieldworkers).
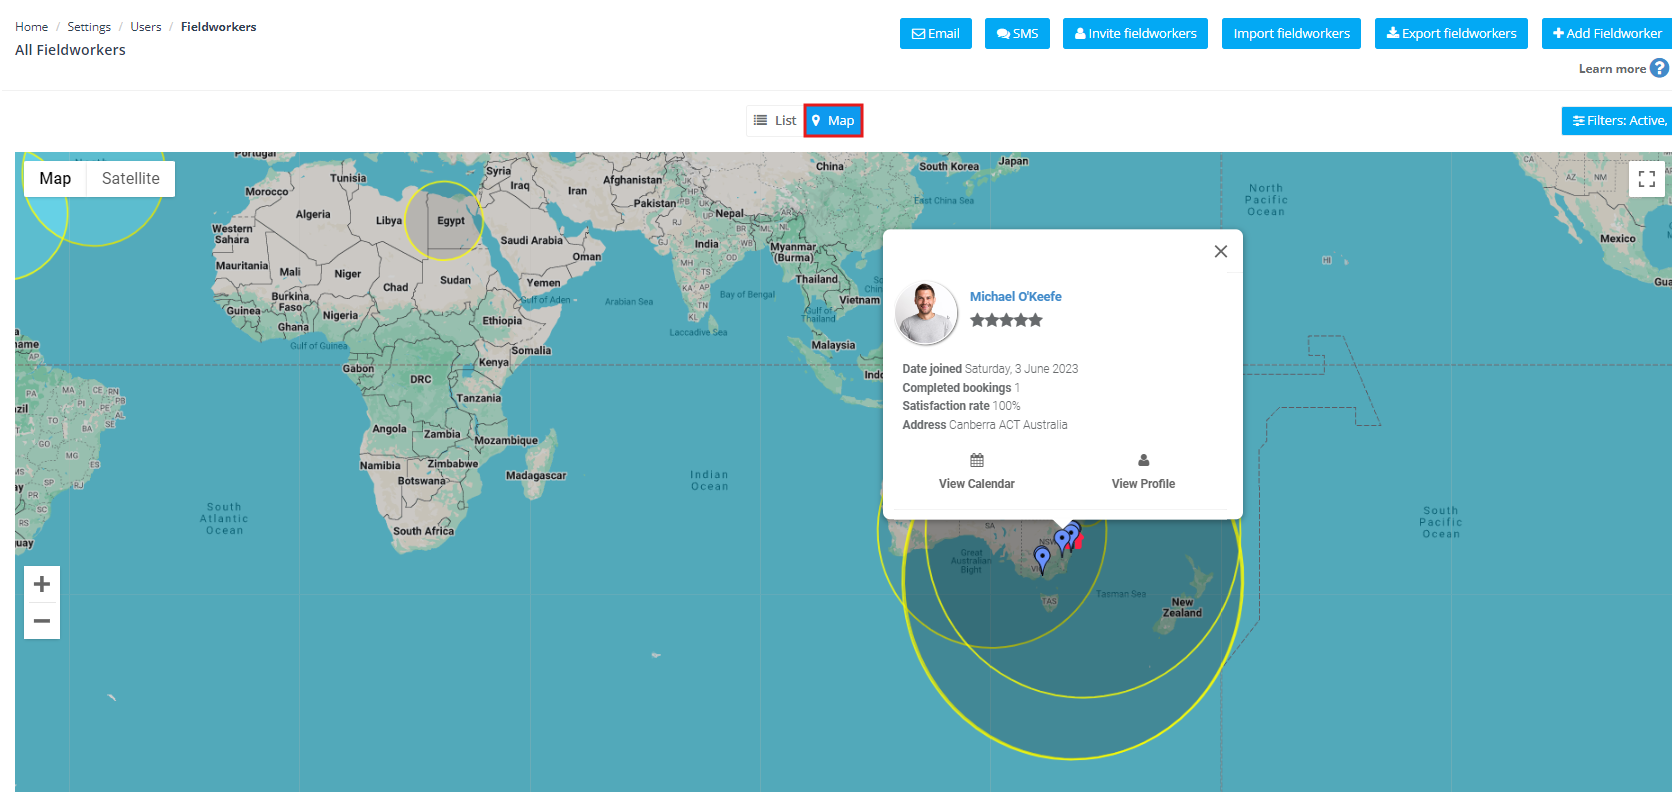
List view vs map view
List view is best when you’re managing details, onboarding, and bulk actions. It’s the default view and shows fieldworkers in a structured card/list layout.
Map view is best for dispatch planning and understanding geographic coverage. Click Map to view fieldworkers as pins based on their saved location/address information.
- Click a pin to open a summary card (typically showing the fieldworker’s rating, date joined, completed bookings, and customer satisfaction where available).
- Use View Calendar or View Profile from the card to drill into details.
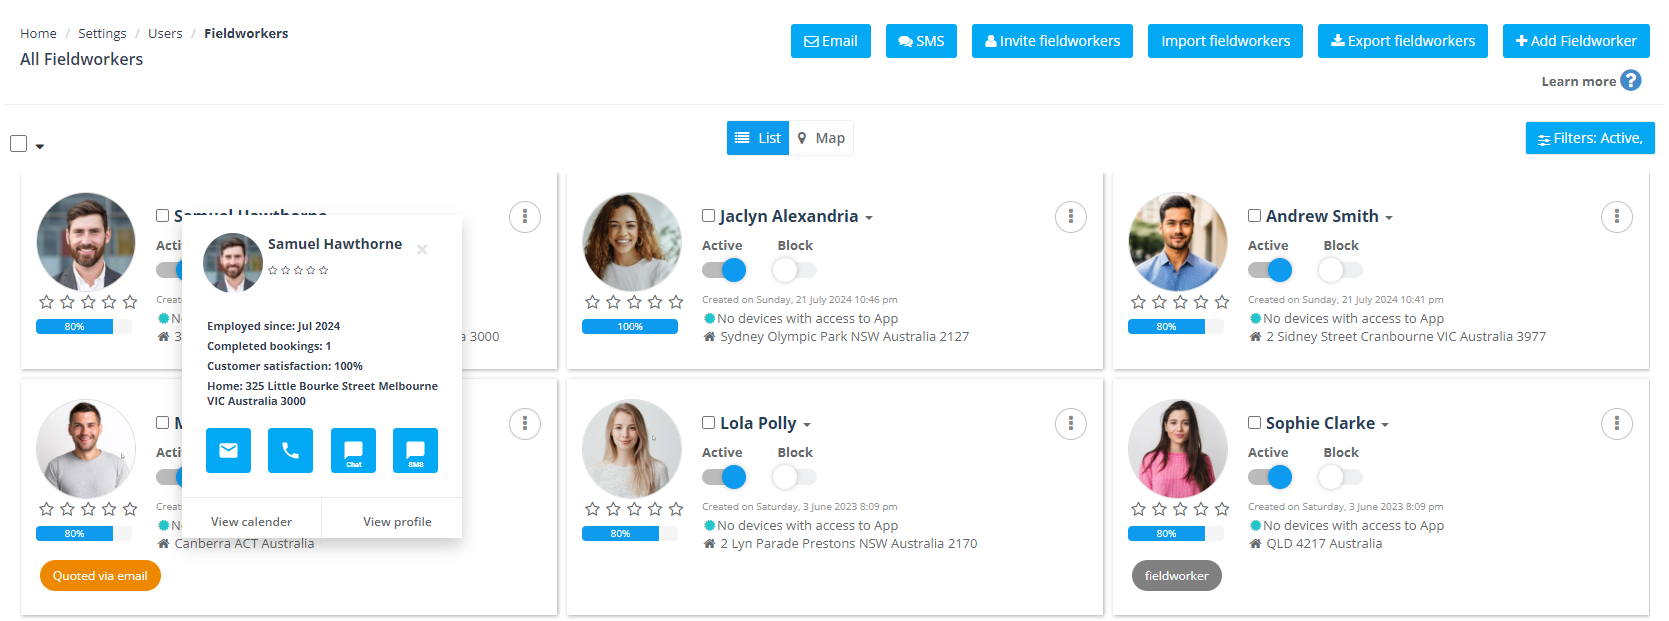
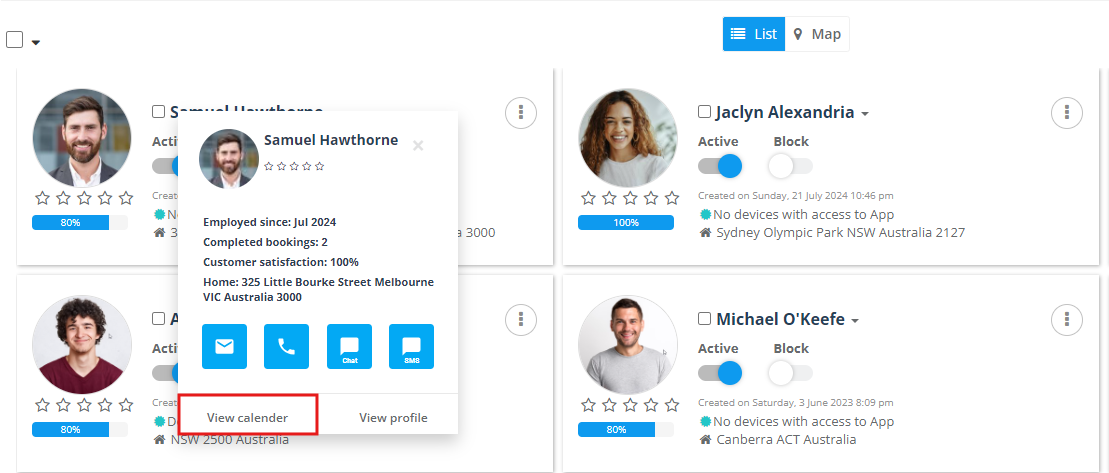
View fieldworker detail tags
From the list page, hover over a fieldworker’s name to reveal a quick detail panel. This panel helps you make fast dispatch decisions without opening the full profile.
- Common details shown include employment date, completed bookings, and customer satisfaction (where enabled).
- Use the quick icons to contact the fieldworker (email, call, chat/discussion, SMS).
- Jump to View calendar or View profile in one click.
Each card may also include Status controls such as Active and Block. Use these to control whether a fieldworker can access the system and/or be assigned work (exact behavior can vary by permissions and account settings).
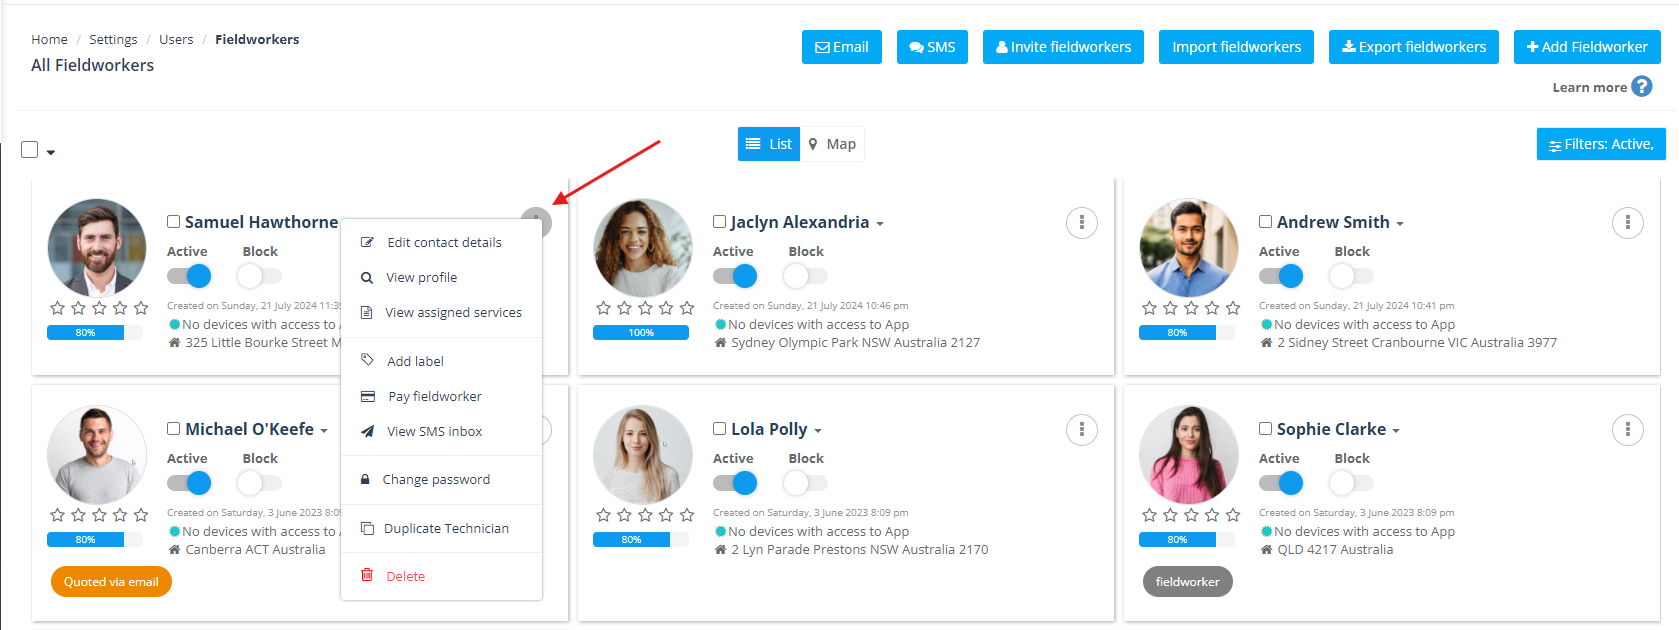
More actions: Click the Actions menu on a fieldworker card for advanced options such as:
- Edit contact details
- View profile
- View assigned services
- Add label
- Pay fieldworker (where enabled)
- View SMS inbox (where enabled)
- Change password
- Duplicate (e.g., “Duplicate Technician” depending on your terminology)
- Delete
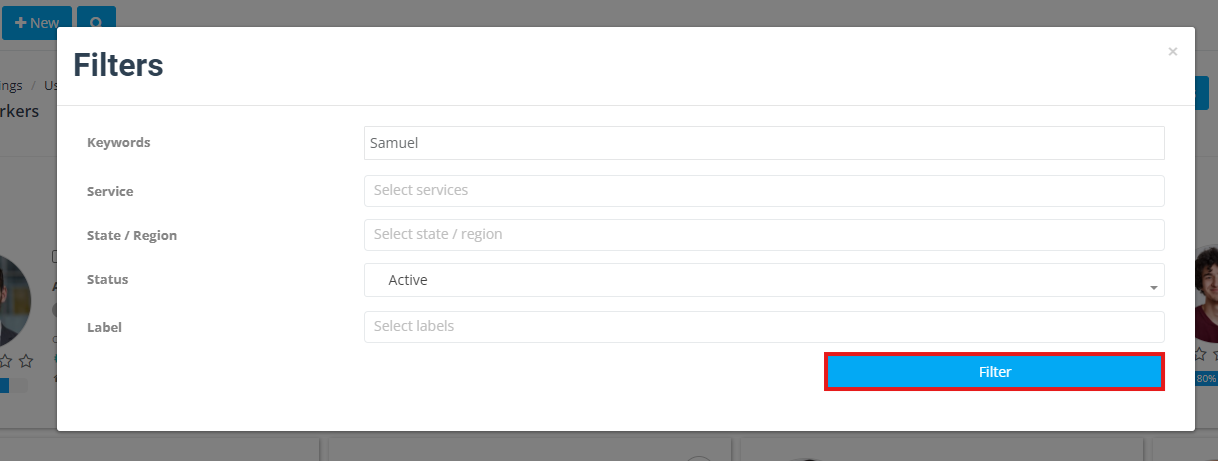
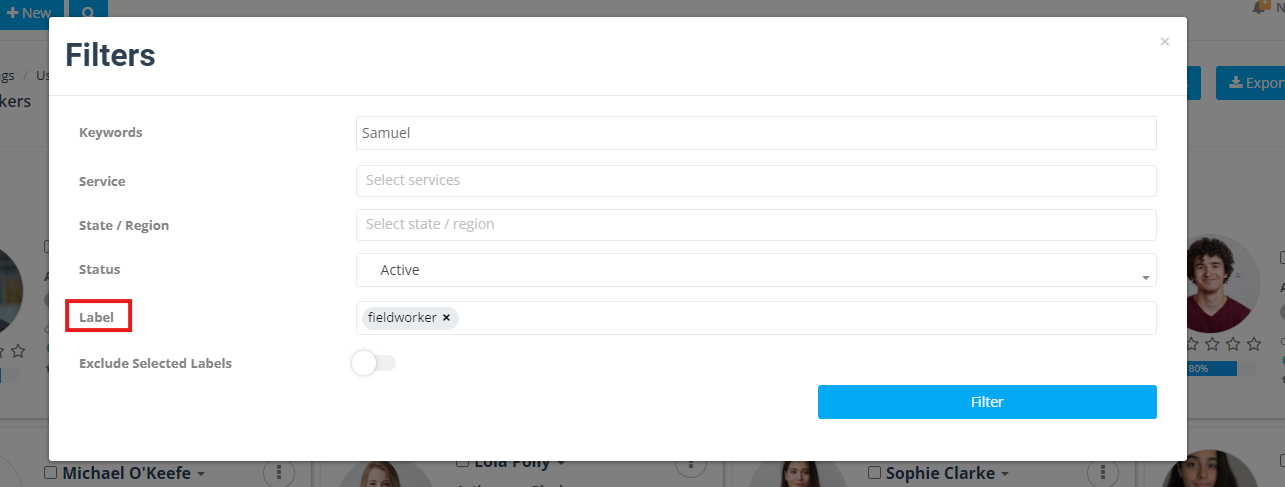
Filter and search fieldworkers
Use Filters (top-right) to find specific fieldworkers quickly. Filters are especially helpful when you have a large team or multiple service areas.
Filter by keywords
Search by keywords such as the fieldworker’s name or email address.
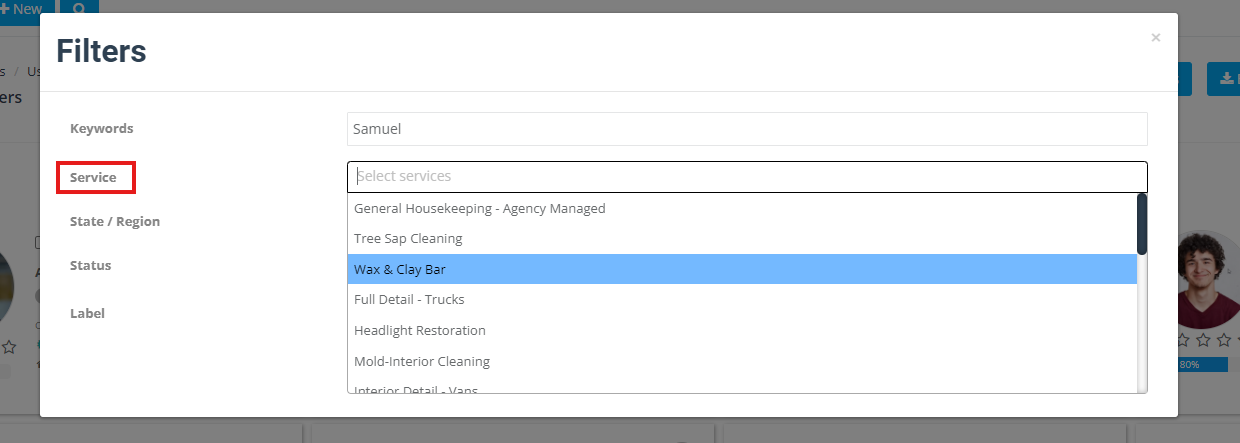
Filter by service
Show only fieldworkers who provide specific services (useful for skills-based dispatch and availability matching).
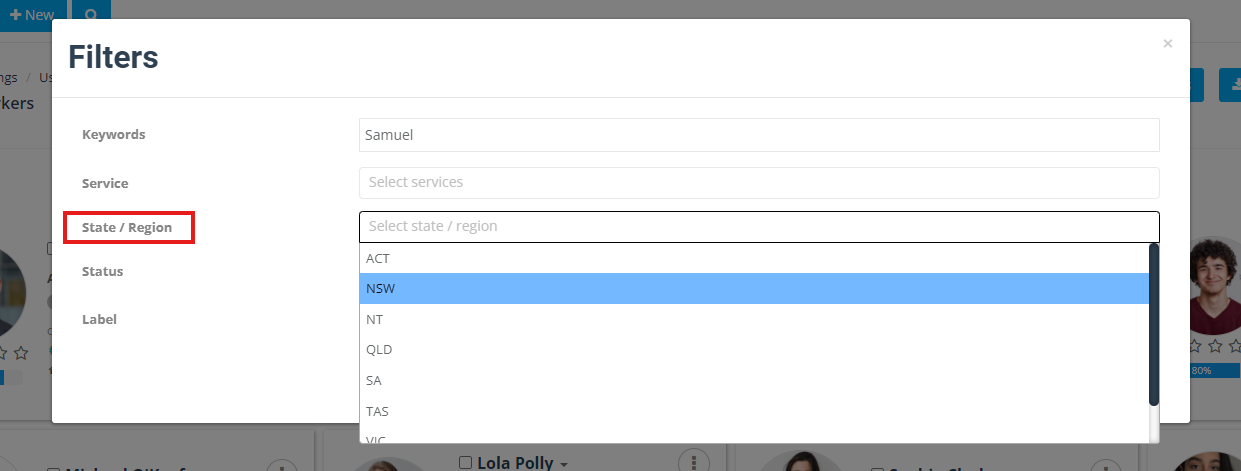
Filter by state/region
Filter your list by location to dispatch faster and reduce travel time.
Filter by status
Filter by account status such as Active, Inactive, or All (options may vary by account configuration).
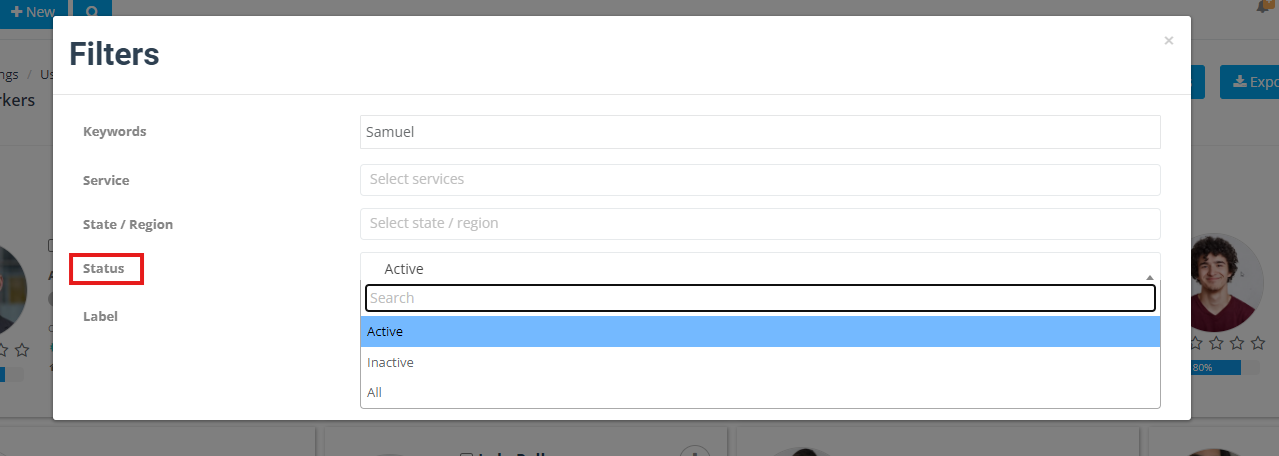
Filter by label
Labels help you segment fieldworkers (for example: “Contractor”, “Team Lead”, “External Washes Only”, “Do Not Assign After 5pm”). You can filter by one or multiple labels to quickly find the right group.
In some accounts, you can also use Exclude Selected Labels to show everyone except the selected label group (useful for excluding “On Leave” or “Do Not Assign”).
Open a fieldworker profile from the list
To view a full profile, hover over the fieldworker name and click View profile (or use the Actions menu).

Alternatively, open Actions and select View profile.
Open a fieldworker calendar from the list
Hover over the fieldworker name and click View calendar to open their calendar and availability view. This is ideal when you’re dispatching and need to confirm availability quickly.
Contact a fieldworker from the list
From the hover panel, use the contact icons to send an email, place a call, start a chat/discussion (where enabled), or send an SMS (where enabled).
Add, invite, or import fieldworkers
Add a fieldworker manually (one-by-one)
Use Add Fieldworker when you want a hands-on setup (for example, creating a profile for a contractor, setting services, and confirming details before sending access).
Tip: For smoother scheduling and dispatch, make sure each profile includes services, service areas, and working hours.
Related guide: Add Fieldworkers
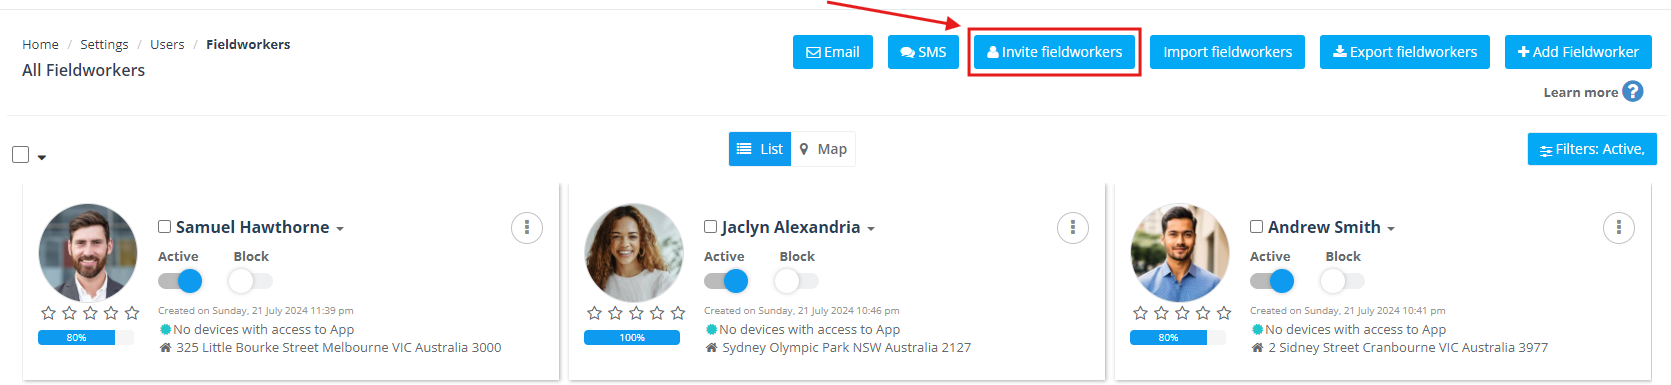
Invite fieldworkers
Inviting fieldworkers is the fastest onboarding method. Click Invite fieldworkers, enter one or more email addresses (separated by commas), and send invitations.
- Example: john@gmail.com, mark@gmail.com, mike@gmail.com
- Invite emails are sent immediately, and the system can send reminders if the user doesn’t complete sign-up.
- You can edit the invitation messaging/templates from Settings > Communications > Templates & Canned Responses.
Related guides:
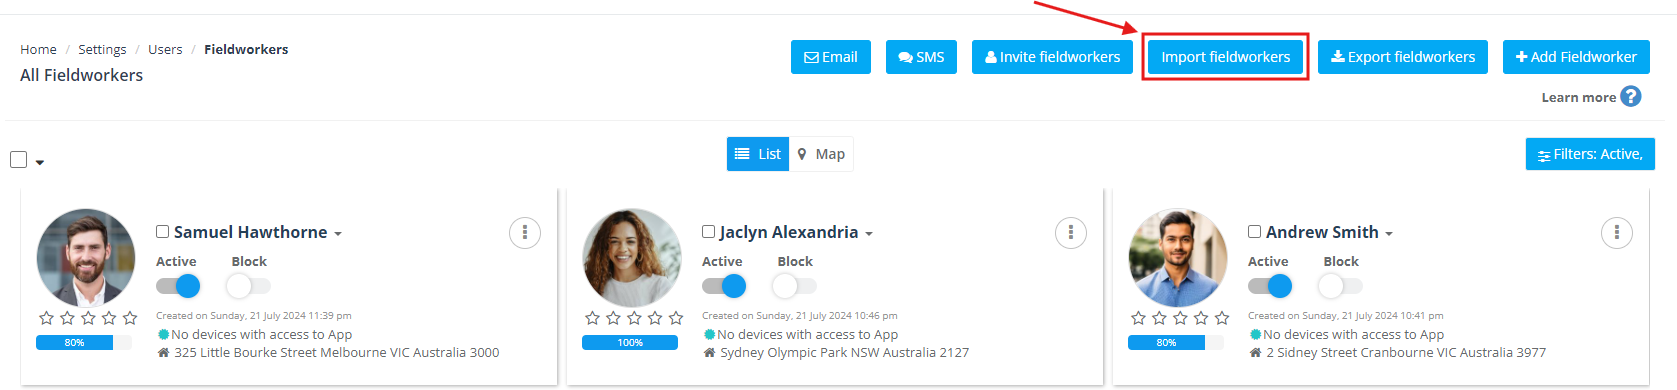
Import fieldworkers (CSV)
Use Import fieldworkers to onboard in bulk using a CSV file. This is ideal for franchises, seasonal hiring, or migrating from another system.
Before importing, make sure you meet these requirements:
- Download the CSV template and fill in the required information.
- Fields marked with (*) are mandatory and must not be blank.
- Passwords should be entered in plain text (they will be encrypted during import).
- Check your file for state/region naming mismatches (to prevent assignment or filtering issues).
- The maximum number of rows allowed per CSV file is 2500. For larger lists, split into multiple files.
- Optionally, you can send invitation emails to imported users so they can activate their accounts.
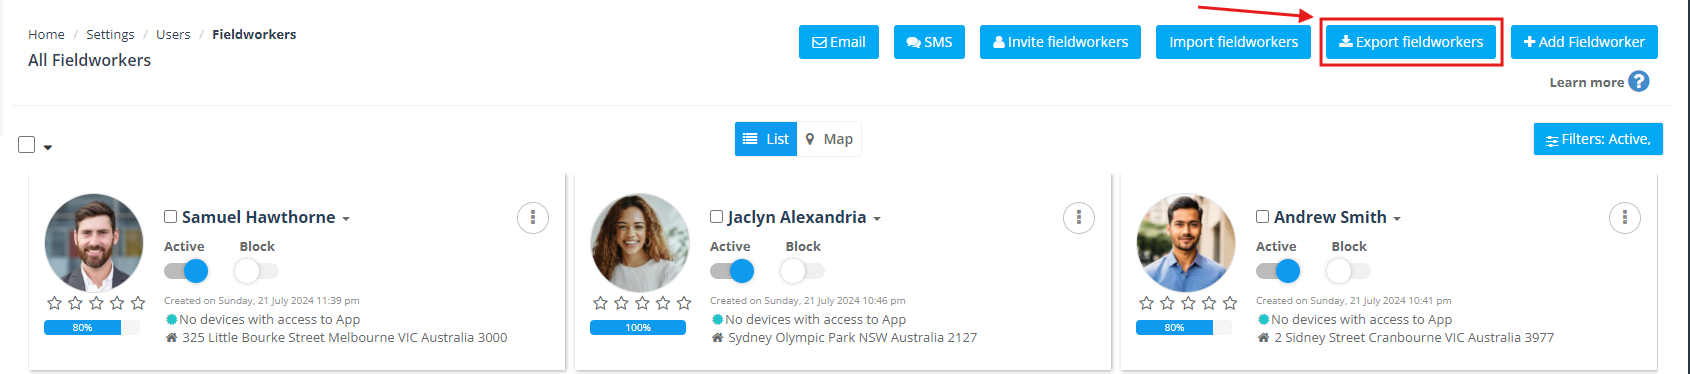
Export fieldworkers (CSV)
Use Export fieldworkers to download your fieldworker list as a CSV file for offline review, auditing, payroll/HR checks, or external analysis.
Group actions (bulk SMS/email, labels, delete)
OctopusPro supports bulk actions so you can manage multiple fieldworkers at once—perfect for operational announcements, onboarding follow-ups, and admin clean-up.
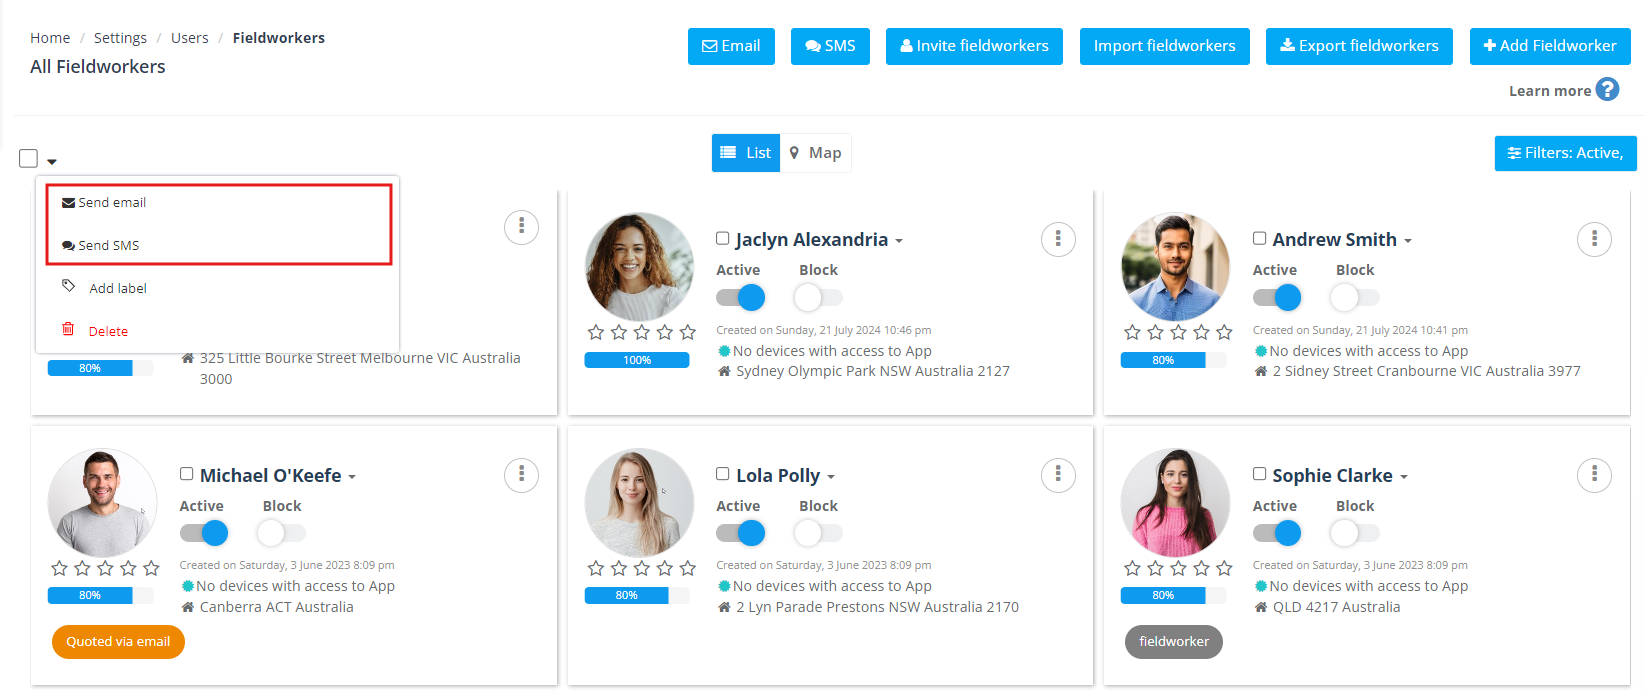
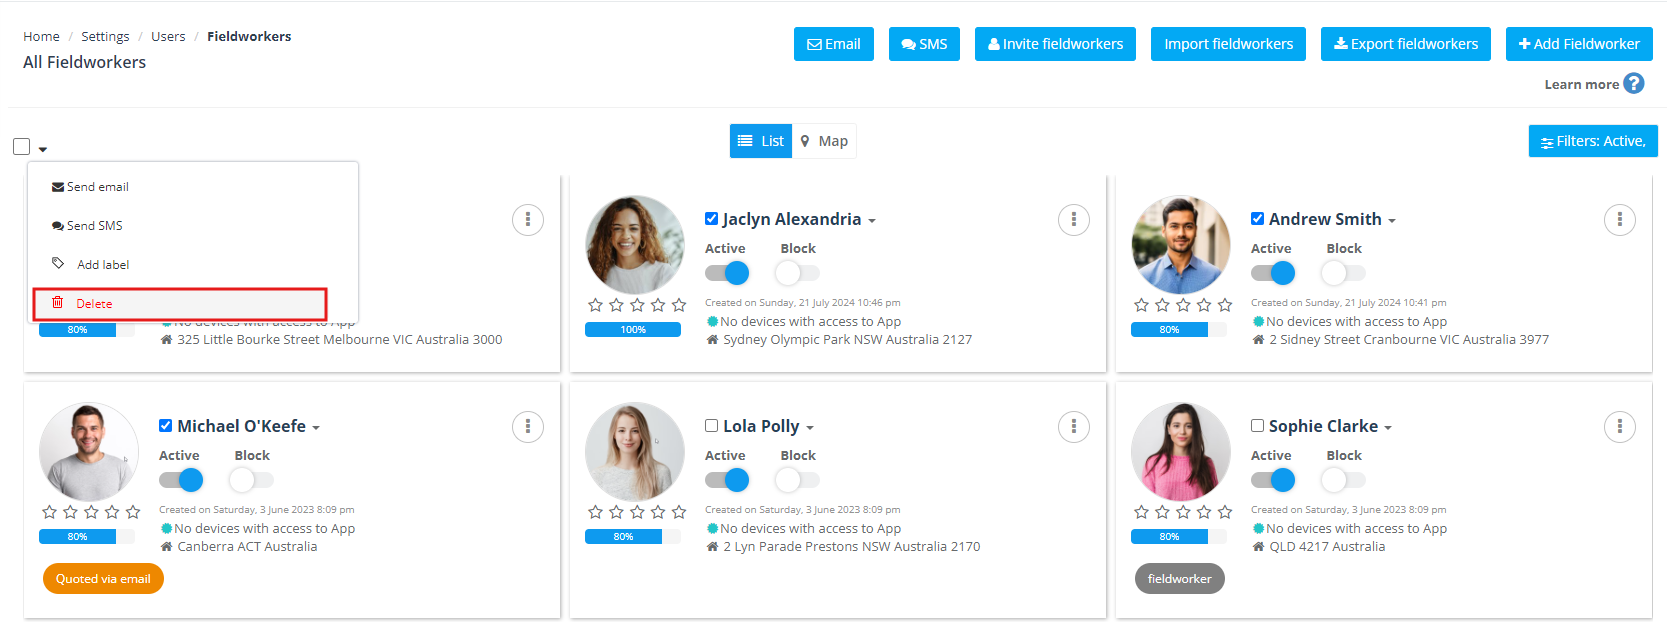
Open the bulk actions menu
Select one or more fieldworkers using the checkboxes, then open the bulk actions dropdown (arrow next to the checkbox selector).
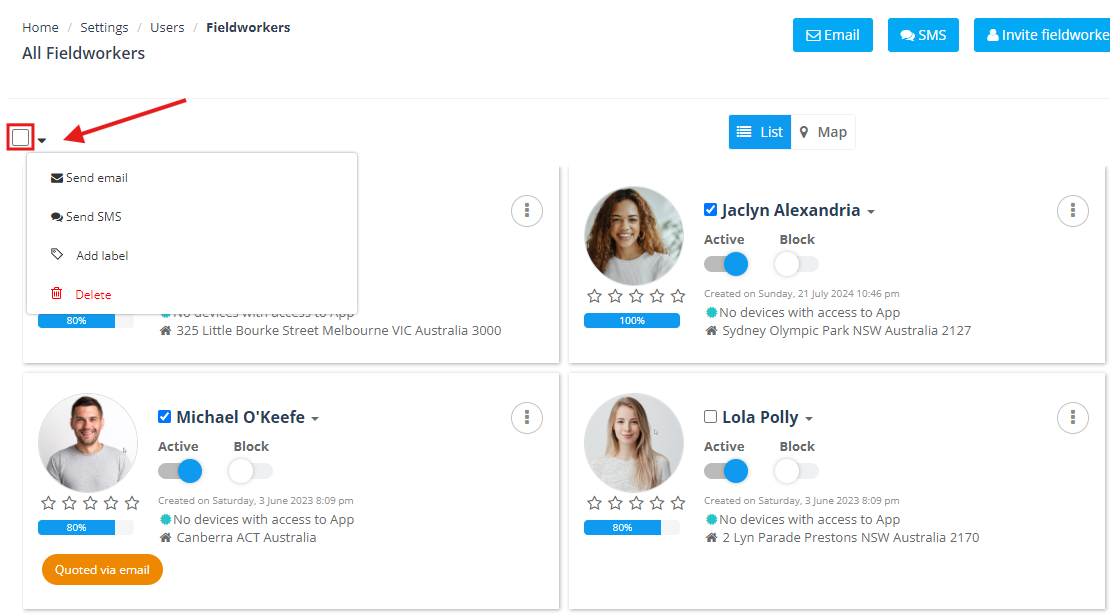
Communicate with all fieldworkers at once
Use the Email or SMS buttons at the top of the Fieldworkers page to message all fieldworkers in one go. This is useful for service updates, policy changes, emergency announcements, and system-wide reminders.

Group SMS / Email (selected fieldworkers)
To contact a subset of fieldworkers:
- Select the fieldworkers you want to message.
- Open the bulk actions dropdown.
- Choose Send email or Send SMS.
Add labels to multiple fieldworkers
Labels are a powerful way to segment your team for scheduling and reporting. To add labels in bulk:
- Select the fieldworkers.
- Open the bulk actions dropdown.
- Select Add label and choose the label(s) to apply.
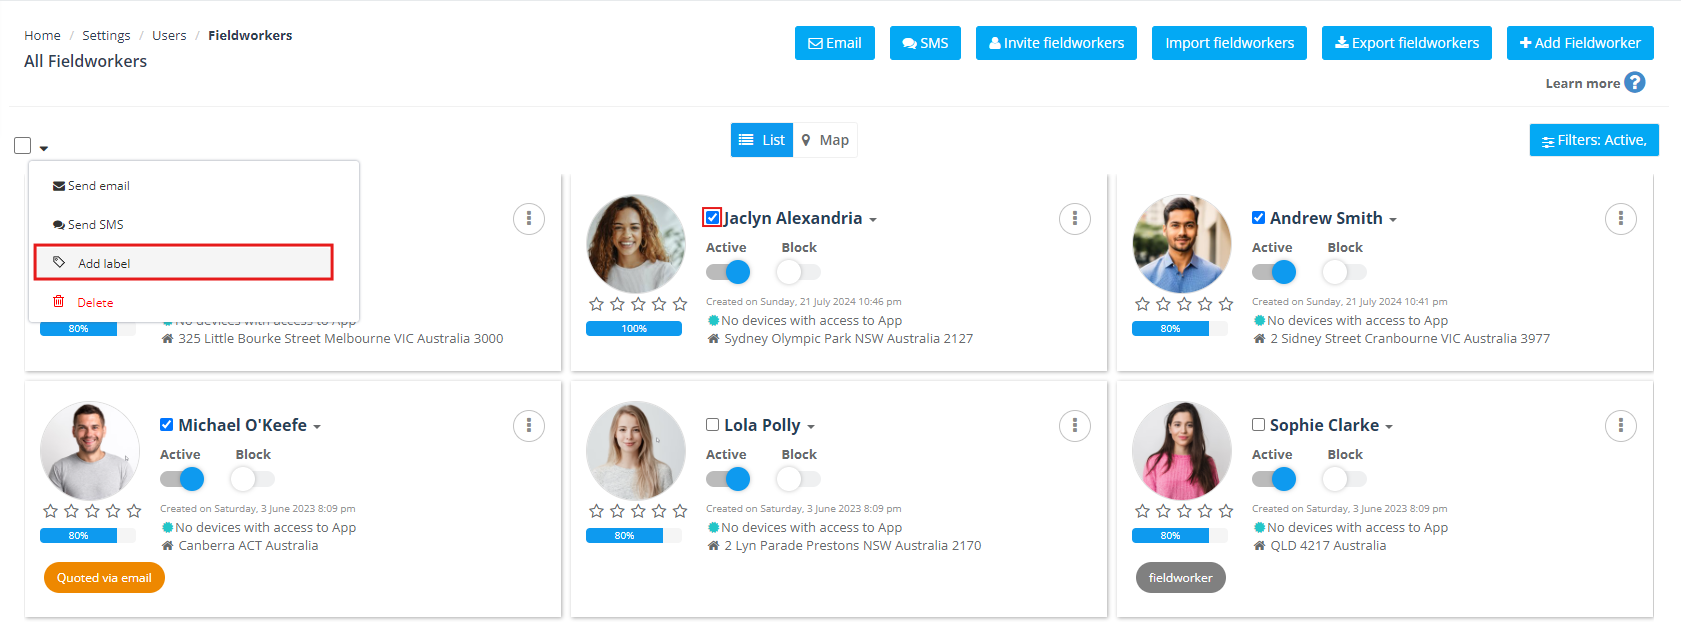
Related guide: Creating and Managing Labels
Delete multiple fieldworkers
To remove multiple fieldworker profiles:
- Select the fieldworkers.
- Open the bulk actions dropdown.
- Choose Delete.
Best practice: If you need to preserve history (bookings, logs, payroll records), consider deactivating or blocking access instead of deleting.
Related guide: Activate or Deactivate Users
Related guides
- Fieldworker Profile Management
- Fieldworker Permissions
- Assign Services to Fieldworkers
- Fieldworker Working Hours
- Fieldworker Email Verification
- Fieldworker Login
- User & Role Management
- Role-Based Access Control (Permissions)
- Contacting Fieldworkers
To stay updated, please subscribe to our YouTube channel.