
Customer Portal Additional Notes at Checkout (Booking Instructions Field)

OctopusPro lets you control what customers see in your online booking experience (Customer Portal), including whether customers can add extra instructions before confirming a booking.
When enabled, an Additional Notes text area appears during checkout so customers can add special requirements or instructions (for example: access notes, allergies, parking details, or anything they want you to know). The submitted text is saved against the booking and is visible to your team in the admin dashboard.
Why enable the Additional Notes field?
- Reduce back-and-forth: customers can provide key info upfront during checkout.
- Fewer mistakes on-site: technicians see the customer’s instructions before delivering the service.
- Better customer experience: customers feel heard and can highlight important requirements.
- Cleaner operations: important details are stored on the booking record (not buried in email threads).
Table of contents
- How to enable the Additional Notes field
- Where customers see it (during checkout)
- Where your team sees it (admin dashboard)
- Examples of what customers may write
- Best-practice prompts you can use
- Using notes in emails/SMS (optional)
- If you need structured or mandatory questions
- Troubleshooting
- Related guides
How to enable the Additional Notes field
- In your admin portal, go to Settings > Customer Portal > Flags & Permissions.
- Find the toggle named: “Display additional notes area for the customer during checkout”.
- Turn the toggle ON.
- Save your changes (if required), then refresh your Customer Portal and test the checkout flow.

Tip: You can review other portal toggles on the Customer Portal Flags & Permissions page.
Where customers see it (during checkout)
Once enabled, customers will see a “Leave a note” area on the Booking Overview pop-up during checkout. The field typically includes a helpful prompt such as: “Anything you would like us to know?”
Customers can use this field to add any extra requirements, questions, or instructions that weren’t captured elsewhere in the booking flow.

Where your team sees it (admin dashboard)
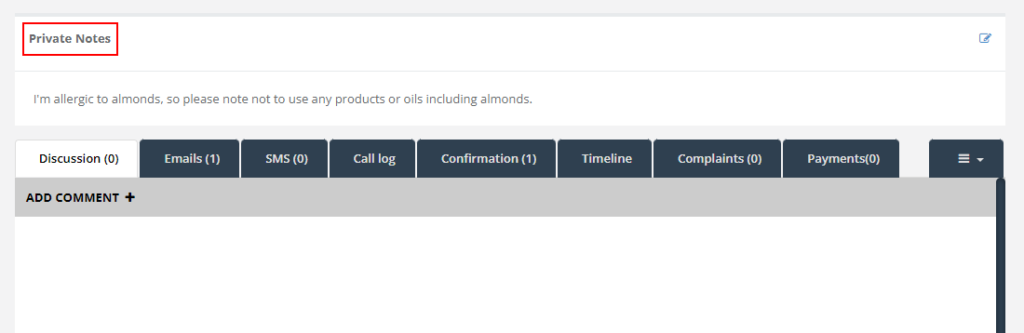
Notes entered by customers are saved on the booking record and can be viewed by your team in the admin dashboard under Private Notes on the booking overview page.
Examples of what customers may write
- Access instructions: “Please use the side gate. Call me when you arrive.”
- Parking notes: “Visitor parking is in basement level 2. Enter via Smith St.”
- Safety / pets: “We have a dog—please knock before entering.”
- Allergies / sensitivities: “I’m allergic to almond oils—please avoid using them.”
- Job requirements: “Please focus on the grout near the shower and bring protective covers.”
- Preferred timing: “Baby naps 12–2pm—please avoid loud tools during that window if possible.”
Best-practice prompts you can use
The portal field includes a standard prompt, but operationally you can train customers (and your staff) to use it for the most helpful information. Examples:
- “Access details (gate codes, intercom, parking)?”
- “Any allergies, sensitivities, injuries, or special handling instructions?”
- “Anything we should prepare before we arrive?”
Using notes in emails/SMS (optional)
By default, booking notes are stored on the booking record for your team. If you want the notes to appear in certain messages (for example, internal notifications to staff), you can use the Template Placeholders feature and insert:
- {private_notes} – outputs the booking’s private notes text (including the customer’s additional notes).
Best practice: Only include notes in messages where it’s operationally necessary. Avoid sending sensitive details to recipients who don’t need them.
If you need structured or mandatory questions
The Additional Notes field is ideal for free-text instructions. If you need structured or mandatory data capture (e.g., checkboxes, dropdowns, required consent questions), use one of these:
- Custom Fields – capture structured data during the booking flow (service-level, inquiry, booking, customer, etc.).
- Forms & Checklists – collect data at specific workflow stages (check-in, check-out, completion) with richer validation and control.
Troubleshooting
- Field not showing: confirm the flag is enabled under Settings > Customer Portal > Flags & Permissions, then refresh the portal (try an incognito/private window).
- Notes not found in admin: open the booking in the admin dashboard and check the Private Notes area on the booking overview.
- Need the notes in notifications: add {private_notes} to the relevant email/SMS template(s).
Related guides
- Customer Portal Flags & Permissions
- Template Placeholders
- Create & Edit Bookings
- Custom Fields
- Forms & Checklists Overview
To stay updated, please subscribe to our YouTube channel.