
Customer Portal Booking Cancellation (Portal + Email Links)
OctopusPro lets customers cancel their own bookings online through your Customer Portal. You can also allow cancellations from a Cancel booking link in your booking confirmation/reminder emails (when included in the template). This reduces admin workload, improves customer experience, and ensures your team and assigned fieldworkers are notified immediately.
What this feature does
- Shows a “Cancel booking” action on eligible bookings in the Customer Portal.
- Prompts the customer for a cancellation note/comment (reason/details) during the confirmation step.
- Updates the booking status to “Cancelled” and reflects the change in the portal.
- Notifies the assigned fieldworker via push notification (and in-app Notifications).
- Supports cancellation from email links (when your email template includes the cancel link).
How to enable customer cancellations (Admin)
To allow customers to cancel bookings through the Customer Portal and via portal/email links:
- Go to Settings > Customer Portal > Flags & Permissions.
- Under Booking Flags, enable: Allow customers to cancel bookings through customer portal and email links.
- Click Save (if shown).

How customers cancel from the Customer Portal
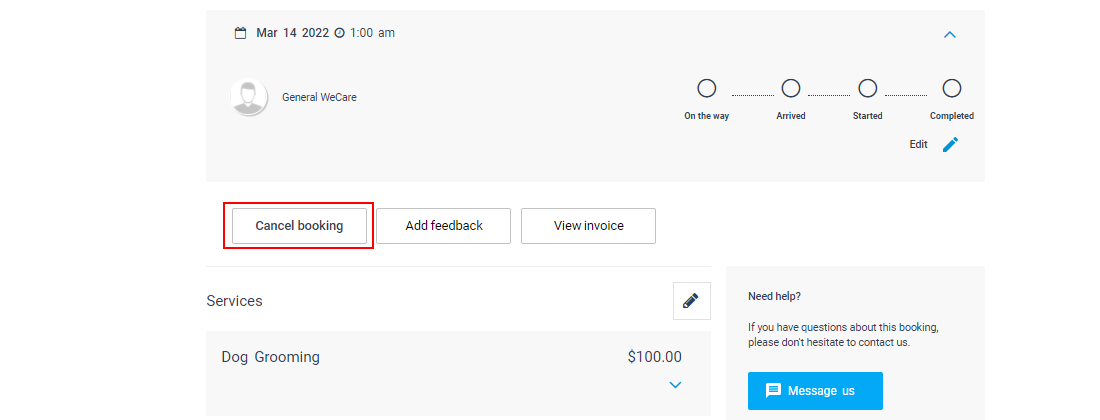
- Customer logs in to the Customer Portal and opens the booking.
- Customer clicks Cancel booking.
- Customer enters a cancellation note/comment, then confirms the cancellation.

After cancellation, the booking status updates to Cancelled. The “Cancel booking” button may be replaced with Schedule an appointment, allowing the customer to book a new visit (if online bookings are enabled for them).

How customers cancel from an email link
If your booking confirmation or reminder emails include a Cancel booking link, customers can cancel by clicking it. The link opens the booking page in the Customer Portal, so the same rules apply (permissions, notice windows, etc.).


How admins (or permitted fieldworkers) cancel a booking
Admin Portal (web)
- Go to Bookings > All bookings.
- Open the booking you want to cancel, then click Edit booking.
- Change the booking Status to Cancelled, then save.
Note: Fieldworkers can only cancel bookings if their role permissions allow them to edit booking status.
Optional: apply a cancellation fee
When an admin cancels a booking, OctopusPro can display a prompt asking whether to add the default cancellation fee to the invoice (if configured).

To set up the default cancellation fee, go to: Settings > Financial Settings > Tax & Fees, then set the Cancellation fee.

Learn more: Managing Booking Cancellation Fees
Payments, deposits, and refunds (recommended)
- If the customer already paid a deposit or full amount: decide whether you will refund, partially refund, or keep a fee based on your cancellation policy.
- If you add a cancellation fee: it’s typically added as a line item to the invoice (so it can be charged or retained).
- Refund workflow: use OctopusPro’s refund management process for auditability and approvals (especially if refunds are processed manually via bank or require admin approval).
Learn more: Refund Management (Bookings & Invoices)
Notifications and where cancellation notes are stored
Customer notification (email)
After a booking is cancelled (by staff or by the customer), the customer can receive a cancellation notification email with a link to view the booking.

Booking status shown to the customer

Assigned fieldworker notification
When a booking is cancelled, the assigned fieldworker receives a push notification on the mobile app and can also view it under the Notifications section on the app.

Where the customer’s cancellation note goes
- The cancellation comment is stored against the booking so your team can understand why the customer cancelled.
- It can also appear in your booking communication/audit areas (e.g., booking activity/history logs), depending on your setup.
Useful references: Booking Activity (Audit Trail) | Booking History & Change Log
Best practices (recommended settings)
1) Set a minimum cancellation notice time (cut-off window)
If you want to prevent last-minute cancellations, configure a minimum cancellation notice time (e.g., 24/48/72 hours). Once the booking is inside the cut-off window, customers won’t be able to cancel online and will see your blocked-action message.
Learn more: Minimum Cancellation Notice Time (Customer Portal)
2) Keep email templates aligned with portal permissions
By default, customers may cancel/reschedule via the portal and via links in confirmation/reminder emails (when included). If you disable cancellations, remove cancel/reschedule links from your email templates to avoid confusion.
Learn more: Send Booking Confirmations (Email, SMS & WhatsApp)
3) Use cancellation fees for short-notice cancellations (optional)
If your business charges for late cancellations or no-shows, configure cancellation fees and apply them consistently. Consider combining this with refund approvals (so staff can record what happened and who approved the refund/fee decision).
Learn more: Managing Booking Cancellation Fees
How to disable customer cancellations
To stop customers from cancelling bookings via the Customer Portal and portal/email links:
- Go to Settings > Customer Portal > Flags & Permissions.
- Disable: Allow customers to cancel bookings through customer portal and email links.
- Save (if shown), then remove cancel/reschedule links from your booking confirmation/reminder templates.

Troubleshooting
- “Cancel booking” button isn’t visible: confirm the cancellation flag is enabled and the booking is in a cancellable status (not already Cancelled/Completed).
- Customer can’t cancel even though it’s enabled: check the minimum cancellation notice time (cut-off window) and whether the booking is now inside the restricted period.
- Email cancel link still appears after disabling: remove cancel/reschedule links from your email templates and ensure the cancellation flag is disabled.
- No cancellation fee prompt: confirm a default cancellation fee is configured in Financial Settings and that you’re cancelling via the flow that triggers the prompt.
Related guides
- Minimum Cancellation Notice Time (Customer Portal)
- Managing Booking Cancellation Fees
- Send Booking Confirmations (Email, SMS & WhatsApp)
- Refund Management (Bookings & Invoices)
- Booking Activity (Audit Trail)
- Booking History & Change Log
To stay updated, please subscribe to our YouTube channel.