
Customer Portal Payment Methods (Checkout Options for Online Bookings)
When customers book online through your website or Customer Portal, the checkout experience can make or break conversions. By offering the right payment methods (card, bank transfer, cash, cheque, gift card, etc.), you make it easier for customers to complete bookings, reduce booking abandonment, and set clear expectations about how and when payment is collected.

On this page
- What this is for
- How payment methods work in OctopusPro
- Before you start
- Step 1: Enable payment methods (Financial Settings)
- Step 2: Show payment methods on the Customer Portal checkout
- Add customer instructions (notes/remarks) for offline methods
- Payment methods customers can use at checkout
- Practical examples
- Points to remember
- Troubleshooting
- Related guides
What this is for
This guide explains how to control which payment options appear during Customer Portal checkout (online bookings). Use it to:
- Increase completed bookings by offering familiar checkout options.
- Reduce “how do I pay?” support questions with clear instructions for offline methods.
- Support online payments (via a connected payment gateway) and offline payments (pay on arrival / pay later).
- Align checkout with your payment terms (deposit vs pay-in-full vs pay later).
How payment methods work in OctopusPro
Payment methods control how customers can pay (Cash, Bank Transfer, Card, Cheque, Gift Card, Debit, etc.). Your payment terms control when and how much is collected (deposit vs full amount vs pay later).
Two-step activation is required: a payment method must be enabled in Financial Settings first, then turned on in Customer Portal settings to appear at checkout.
- Online methods (e.g., card) are processed through a connected payment gateway (Stripe, Square, PayPal/Braintree, Checkout.com, Authorize.Net, eWAY, WePay, Tap, etc.).
- Offline methods (e.g., cash, bank transfer, cheque, gift card, debit) display your instructions so customers know what to do next.
Note: Depending on your account configuration and region, you may also see additional payment types (for example Afterpay, Zip Pay, and others) in your available list.
Before you start
- Confirm online bookings are enabled and working: Accept Online Bookings Through Your Website
- Know your Customer Portal link so you can run a test booking: Customer Portal URL
- If you want to accept card payments, ensure at least one payment gateway is connected under Payment Integration (you’ll usually need API keys / credentials).
Step 1: Enable payment methods (Financial Settings)
First, enable the payment methods (and any online payment gateways) you want your business to support:
- Go to Settings > Financial Settings > Payment Integration.
- Select the payment methods and/or payment gateways you want to use.
- Click Save.

Important: If a payment method is not enabled here, it cannot be shown on your Customer Portal checkout.
For a full overview of system-wide payment method setup, see: Payment Methods Configuration.
Step 2: Show payment methods on the Customer Portal checkout
Next, choose which enabled payment methods should be visible to customers during online checkout:
- Go to Settings > Customer Portal > General Settings.
- Scroll to the Payment Methods section.
- Toggle ON the payment methods you want to show on checkout.
- Click Save, then run a quick test booking in your portal to confirm the checkout screen looks correct.
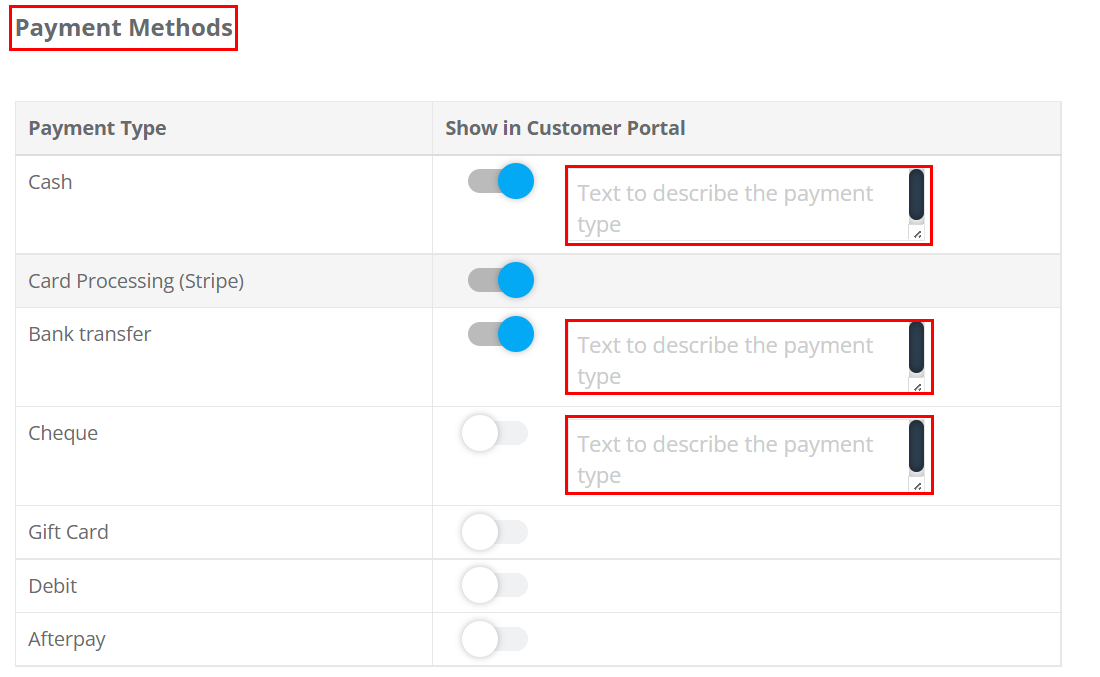
Final note: Enabling a method in Financial Settings does not automatically make it visible in the Customer Portal. You must enable it in both places.
Add customer instructions (notes/remarks) for offline methods
For offline payment methods (such as Cash, Bank Transfer, Cheque, Gift Card, and Debit), OctopusPro lets you add notes/remarks that appear to customers during checkout under the selected payment method.
Examples of useful instructions:
- Bank Transfer: bank name, account name, BSB/account (or IBAN/SWIFT), and what reference to use (e.g., booking/invoice number).
- Cash: “Pay on arrival” / “Pay on completion”, whether change is available, and whether you provide receipts.
- Cheque: payee name, where/how cheque is handed over or posted, and when it’s due.
- Gift Card: how customers provide the gift card/voucher code and what happens if there is a remaining balance.
- Debit: clarify how debit is taken (e.g., EFTPOS terminal on arrival / in-store debit terminal).
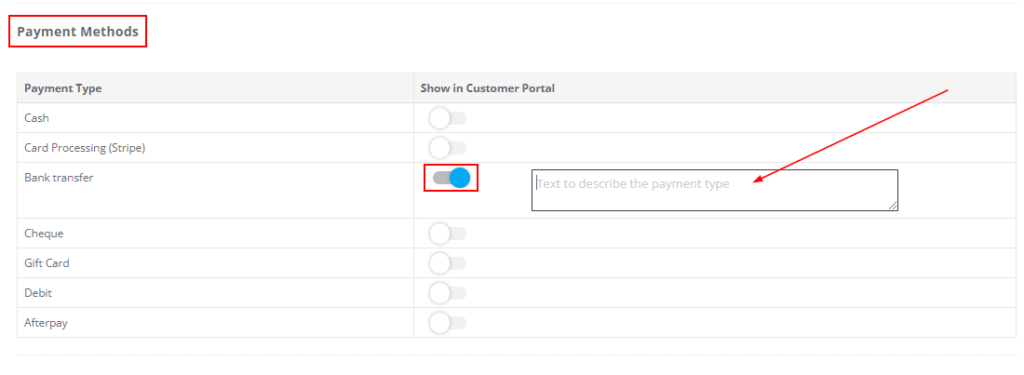
Bank transfer details: If you want customers to pay by bank transfer, make sure your bank account details are configured so your team and customers have the correct information. See: Bank Details Setup.
Payment methods customers can use at checkout
Below are the most common payment methods customers may see at the Select Payment Method step (based on what you enabled in Financial Settings and Customer Portal settings).
1) Cash
- Enable: Turn on Cash (Financial Settings + Customer Portal).
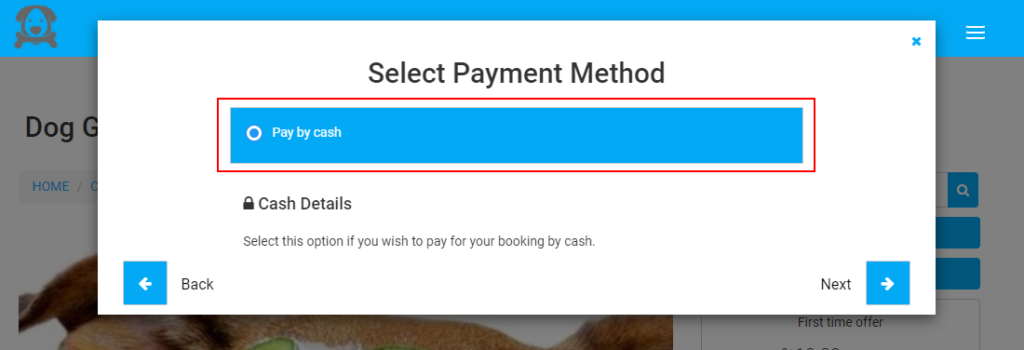
- What customers see: Customers can select Pay by cash and view any cash instructions you added.
- Best practice: Add clear instructions such as “Pay on arrival” and whether change/receipts are available.
2) Card (Online payment gateway)
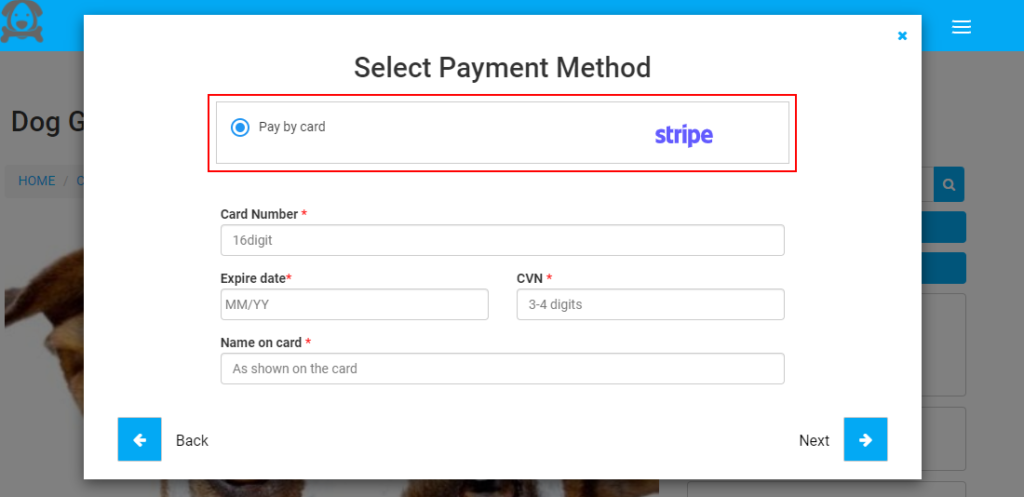
- Enable: Turn on Card and ensure at least one payment gateway is configured in Settings > Financial Settings > Payment Integration.
- What customers see: Customers can enter card details and complete checkout (processed securely by your connected gateway).
- Best practice: Run an end-to-end test booking after enabling card payments to confirm the gateway connection is working.
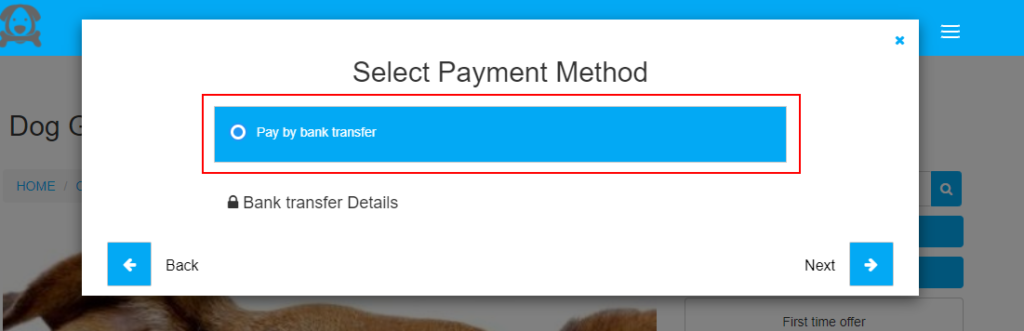
3) Bank Transfer
- Enable: Turn on Bank Transfer and add clear notes/instructions (bank details + required reference).
- What customers see: Customers select Bank Transfer and your instructions appear under Bank transfer Details.
- Best practice: Include a payment reference (for example: “Use your booking/invoice number as the reference”).
4) Debit
- Enable: Turn on Debit (where available in your account) and add guidance notes.
- What customers see: Customers can select Debit and your instructions appear under Debit Details.
- Best practice: Clarify how debit is taken (for example: “Debit is processed on arrival via our EFTPOS terminal”).
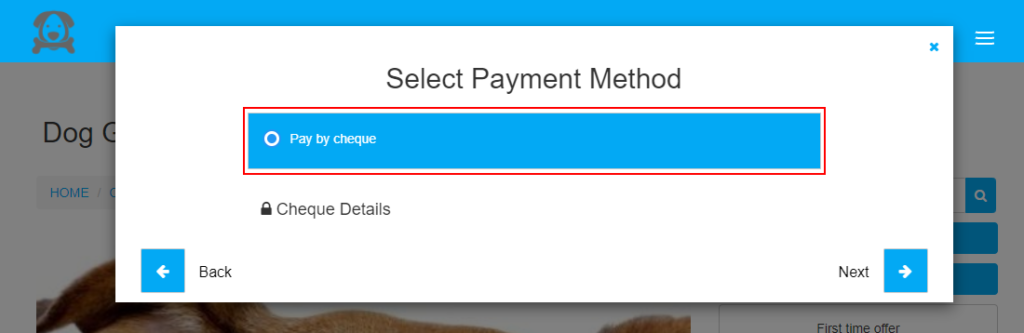
5) Cheque
- Enable: Turn on Cheque and add essential remarks.
- What customers see: Customers select Cheque and your instructions appear under Cheque Details.
- Best practice: Include the payee name, delivery address (if applicable), and timing requirements.
6) Gift Card
- Enable: Turn on Gift Card and add any notes/guidance.
- What customers see: Customers can choose Gift Card and your instructions appear under Gift Card Details.
- Best practice: Add a short note explaining how gift cards are applied (for example: “Enter your gift voucher code at checkout”) and what happens if there is a remaining balance (based on your payment terms).
Practical examples
- Deposit online, balance on arrival: Enable Card + Cash and set your deposit rule in Service Payment Terms.
- Tradies / home services: Offer Card + Bank Transfer + Cash so customers can choose how they prefer to pay.
- Commercial maintenance: Offer Bank Transfer with clear reference instructions for finance teams, plus Card for urgent work orders.
- Selling gift vouchers: Enable gift voucher sales and let customers pay online during purchase/redemption. See: Sell Gift Vouchers Online.
Points to remember
- Enable payment methods in Settings > Financial Settings > Payment Integration first.
- Then enable the same methods in Settings > Customer Portal > General Settings to show them at checkout.
- If a method is enabled in Financial Settings, it still won’t appear on the Customer Portal until you activate it there too.
- Use Service Payment Terms to control deposit vs pay-in-full vs pay later.

Troubleshooting
- A payment method isn’t showing at checkout: Confirm it’s enabled in both Payment Integration and Customer Portal > General Settings, then Save and retest.
- Card payments are failing: Re-check your gateway configuration in Payment Integration (API keys/account details) and run a test booking. Also confirm your payment terms are set correctly for online payments.
- Customers are confused about offline methods: Add clearer notes (bank details, cheque payee, when/where to pay, and what reference to use) so customers know the next step immediately.
- You want to add card surcharges: If applicable in your region and compliant with local rules, you can configure surcharges. See: Credit Card Payments Surcharge.

Related guides
- Customer Portal General Settings
- Accept Online Bookings Through Your Website
- Customer Portal URL
- Payment Methods Configuration
- Service Payment Terms
- Bank Details Setup
Popular payment gateway setup guides:
- Stripe API Integration
- Square API Integration
- PayPal API Integration
- Checkout.com API Integration
- Authorize.Net API Integration
- eWAY API Integration
- WePay API Integration
- Tap API Integration
To stay updated, please subscribe to our YouTube channel.