
Invoice Labels (Tags): Color-Code & Filter Your Invoices
Invoice labels (also known as tags) are color-coded identifiers you can apply to invoices to organize internal workflows—without changing the invoice’s official status (e.g., Draft / Unpaid / Paid / Void).

Use labels to quickly flag invoices that need attention (for example: To Review, Disputed, Manual Payment Required, VIP, Insurance). Once applied, you can filter and segment your invoice list by label for faster follow-ups.
Table of contents
- Why use invoice labels?
- Prerequisites & permissions
- Where labels appear
- Create labels (Settings)
- Add labels from the invoices list
- Add labels from invoice details
- Bulk label multiple invoices
- Apply multiple labels to one invoice
- Use nested labels (parent/child)
- Filter invoices by labels (AND/OR)
- Exclude invoices with specific labels
- Remove (de-assign) labels from an invoice
- Edit or delete labels (global)
- Best practices
- Troubleshooting
- FAQ
- Related guides
Why use invoice labels?
- Instant visibility: spot invoices needing action at a glance (e.g., “To Review”, “Disputed”).
- Faster filtering: pull up targeted invoice groups without spreadsheets or long notes.
- Consistent internal workflow: everyone uses the same tags across finance and operations.
- Better follow-up: segment invoices for collections, approvals, audits, or special handling.
Note: Labels are for internal organization. They don’t automatically change invoice status or customer notifications unless you intentionally use them in your workflow.
Prerequisites & permissions
- To apply labels to invoices: you need access to the Invoices module and permission to edit/manage invoices (permission names can vary by role setup).
- To create, edit, or delete labels: you typically need admin/settings access to Settings > General Settings > Labels.
Important: Labels are shared across OctopusPro. Renaming or deleting a label affects everywhere that label is used (invoices, bookings, quotes, inquiries, customers, etc.).
Where labels appear
- Invoices list: labels show as colored tags on the invoice row, making priority invoices easy to spot.
- Invoice details: you can add/remove labels from the invoice’s Actions menu.
- Filters: the invoice filter panel lets you filter by labels using AND/OR logic and also exclude labels.
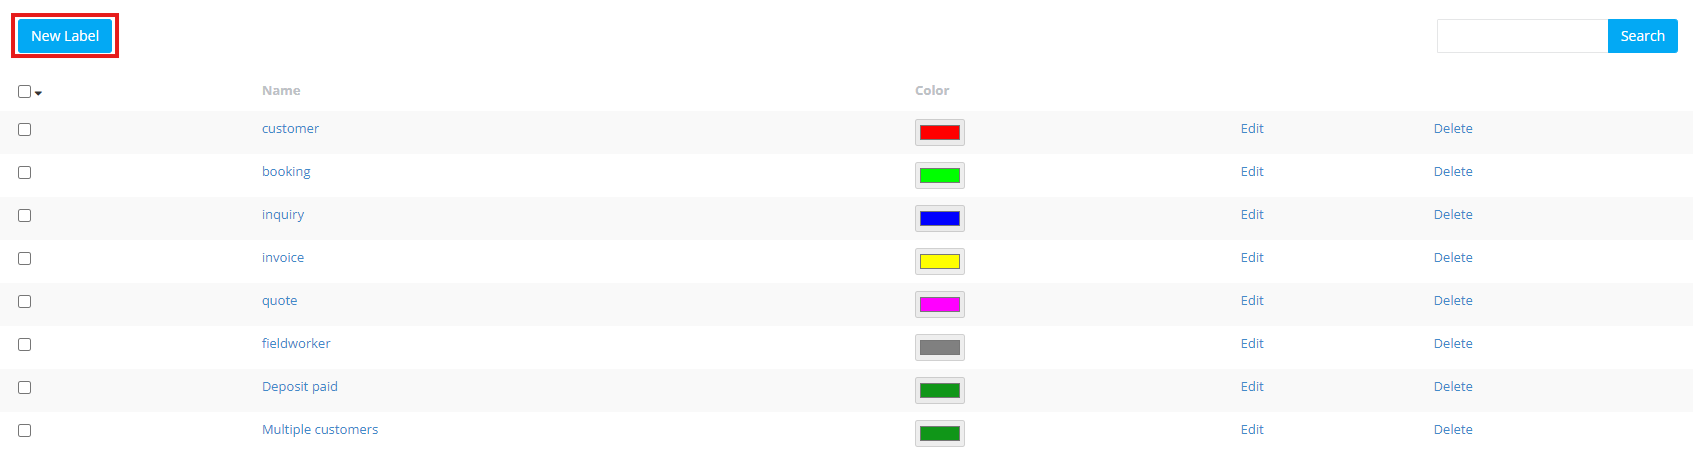
Create labels from Settings (recommended)
Create and standardize your label library first—especially if multiple team members will use the same naming conventions.
- Go to Settings > General Settings > Labels.
- Click New Label.
- Enter a clear label name (e.g., “To Review”, “Manual Payment”, “Disputed”).
- Choose a color.
- Click Save.
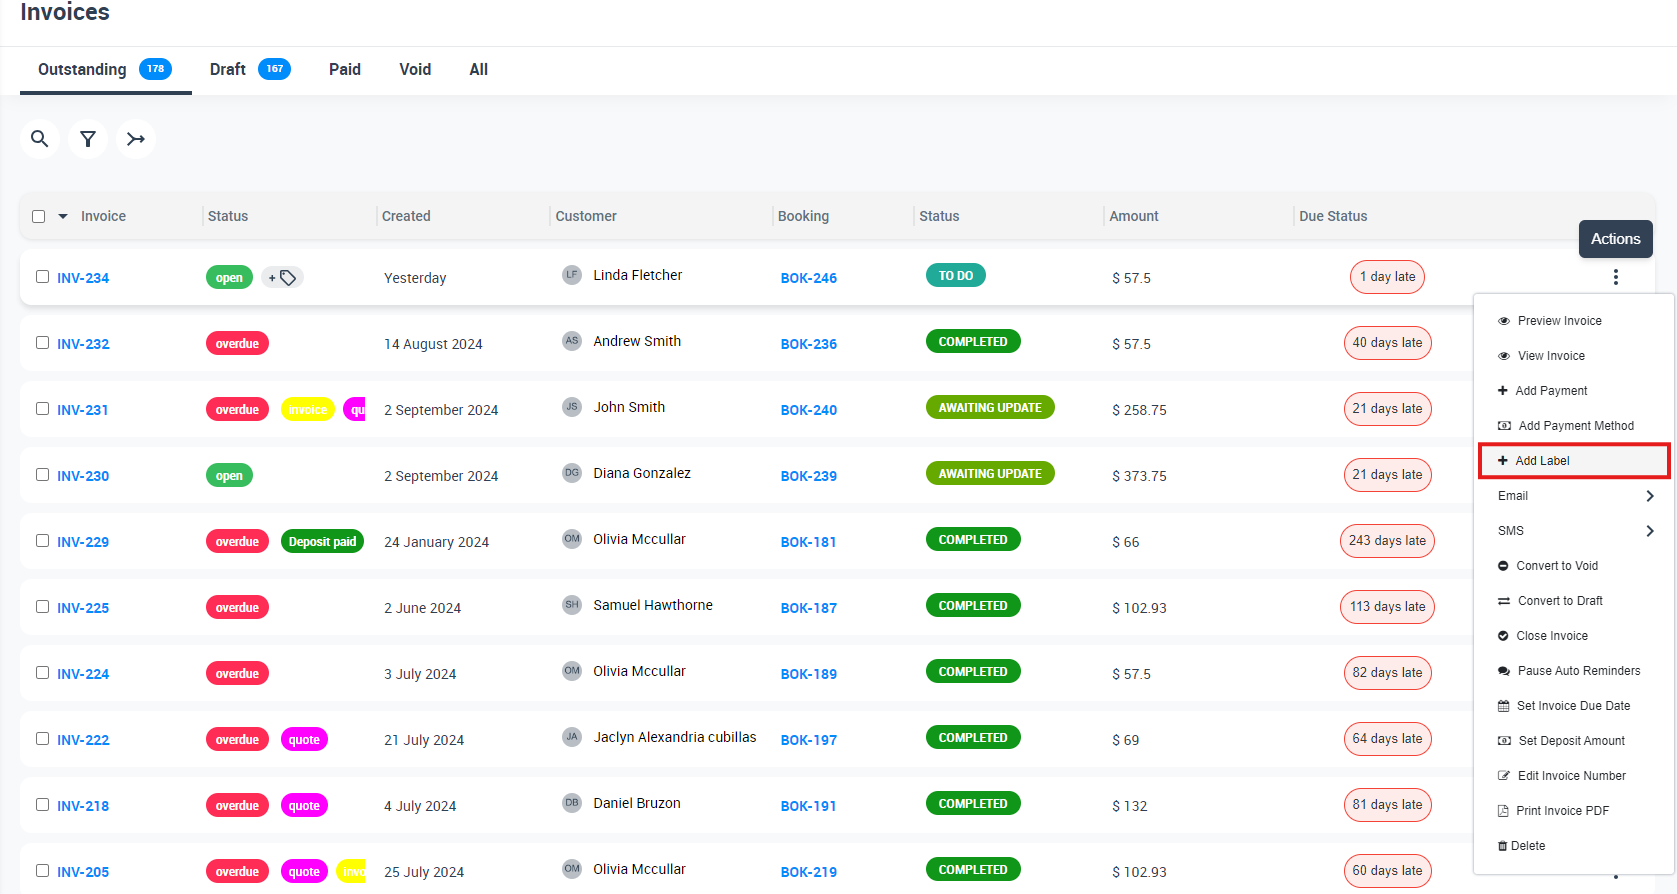
Add a label from the invoices list (All Invoices)
This is the quickest method when you’re working through your invoice list.
- Go to Invoices > All Invoices.
- Find the invoice you want to tag, then click Actions.
- Select Add Label.
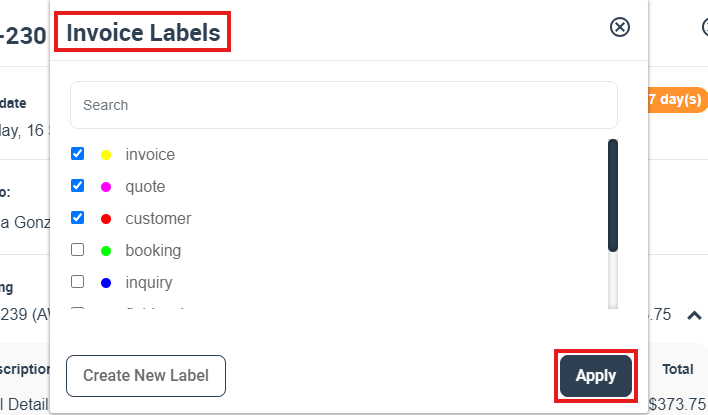
- In the popup, search and tick one or more labels.
- Click Apply.
Tip: If you don’t see the label you need, click Create New Label in the popup, name it, choose a color, then save and apply it immediately.
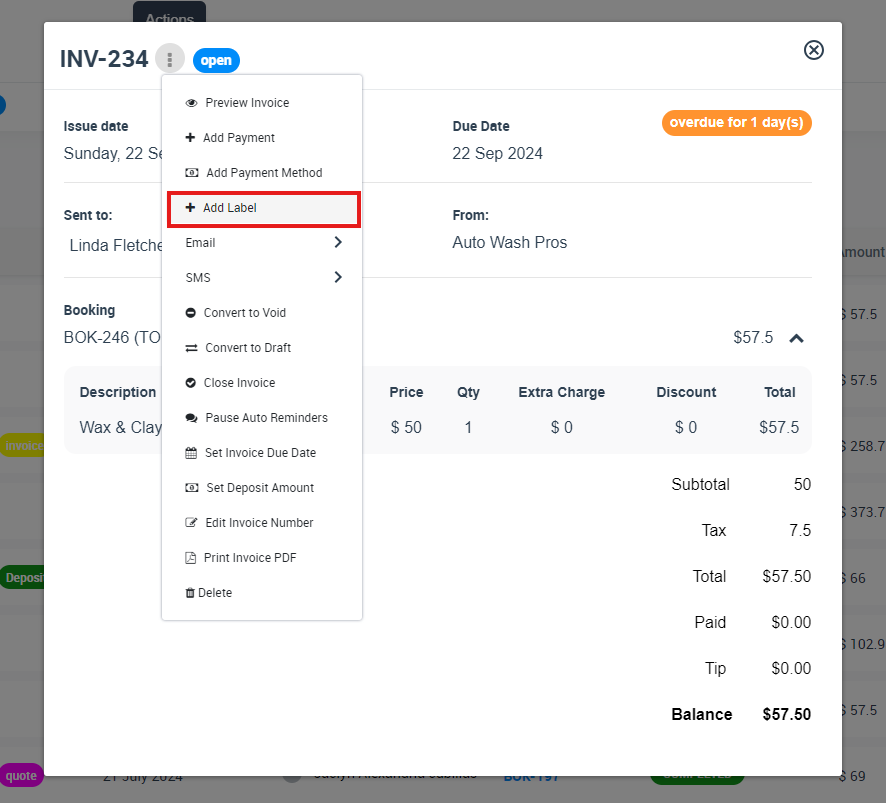
Add a label from the invoice details page
Use this method when you’re already reviewing an invoice and want to tag it without returning to the list.
- Open the invoice.
- Click Actions.
- Select Add Label.
- Select your label(s), then click Apply.
Bulk label multiple invoices (batch update)
If you need to apply the same label to many invoices (e.g., “End of Month Review”), use bulk selection.
- Go to Invoices > All Invoices.
- Select multiple invoices using the checkboxes.
- Click Actions (bulk actions).
- Select Add Label, choose your label(s), then click Apply.
Apply multiple labels to a single invoice
You can add multiple labels to reflect different internal categories at the same time (e.g., “VIP” + “Manual Payment” + “To Review”).
- Open the invoice (or use the invoice list Actions menu).
- Click Add Label.
- Select multiple labels in the list.
- Click Apply.
Use nested labels (parent/child) for invoice workflows
Nested labels let you build a hierarchy (similar to Gmail labels). This keeps large label libraries organized and easier to scan.
Example hierarchy:
- Finance
- To Review
- Disputed
- Manual Payment
- Customer Type
- VIP
- Wholesale
To create nested labels:
- Go to Settings > General Settings > Labels.
- Click New Label.
- Enter the label name and choose a color.
- Select a Parent Label (if available) to nest it under a category.
- Click Save.
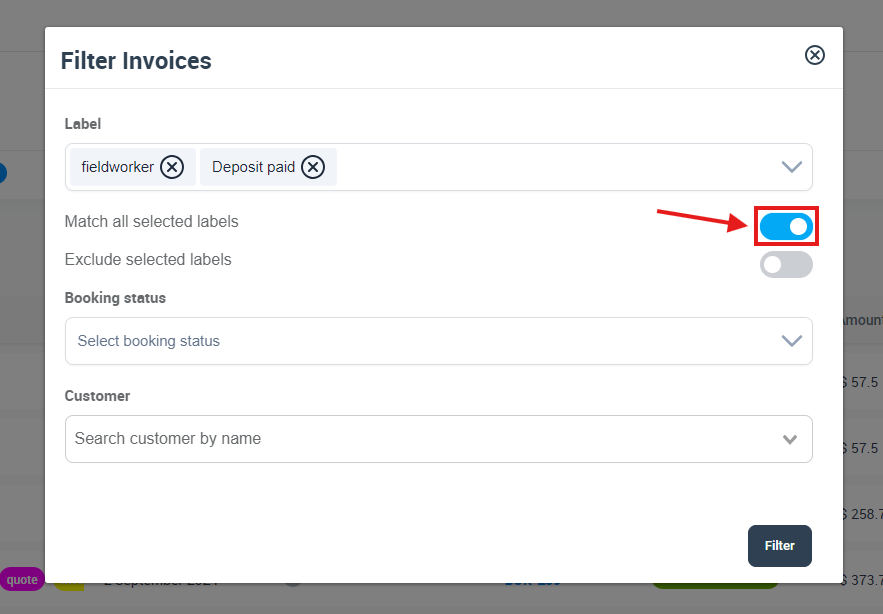
Filter invoices by labels (AND/OR logic)
Filter your invoice list to show only invoices that match selected labels.
- Go to Invoices > All Invoices.
- Click the Filter icon.

- In the filter popup, open the Label field and select one or more labels.
- OR logic (default): shows invoices that match any selected label.
- AND logic: toggle Match all selected labels ON to show invoices that match all selected labels.
- Click Filter to apply.
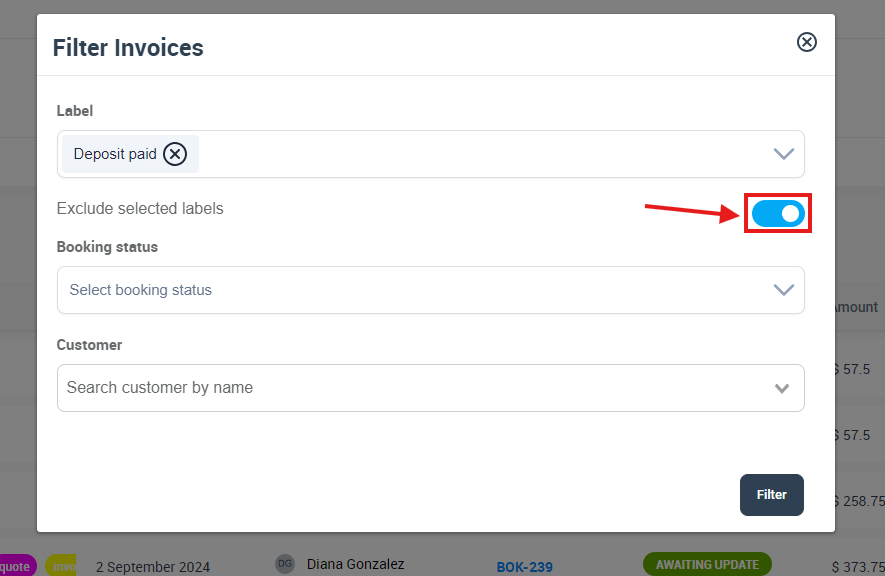
Exclude invoices with specific labels
Use this when you want to hide invoices that contain certain labels (e.g., exclude “Resolved”, “Paid Manually”, or “No Action Needed”).
- Open Invoices > All Invoices and click Filter.
- Select the label(s) you want to exclude.
- Toggle Exclude selected labels ON.
- Click Filter.
Remove (de-assign) labels from an invoice
To remove a label from a single invoice, open the invoice’s labels popup, untick the label(s), then apply the update.
- Open the invoice (or use Actions > Add Label from the list).
- Untick the label(s) you want to remove.
- Click Apply.
Edit or delete labels (global label library)
Edit (rename or change color)
- Go to Settings > General Settings > Labels.
- Find the label (or use search).
- Click the label name (or Edit).
- Update the label name and/or color, then click Save.

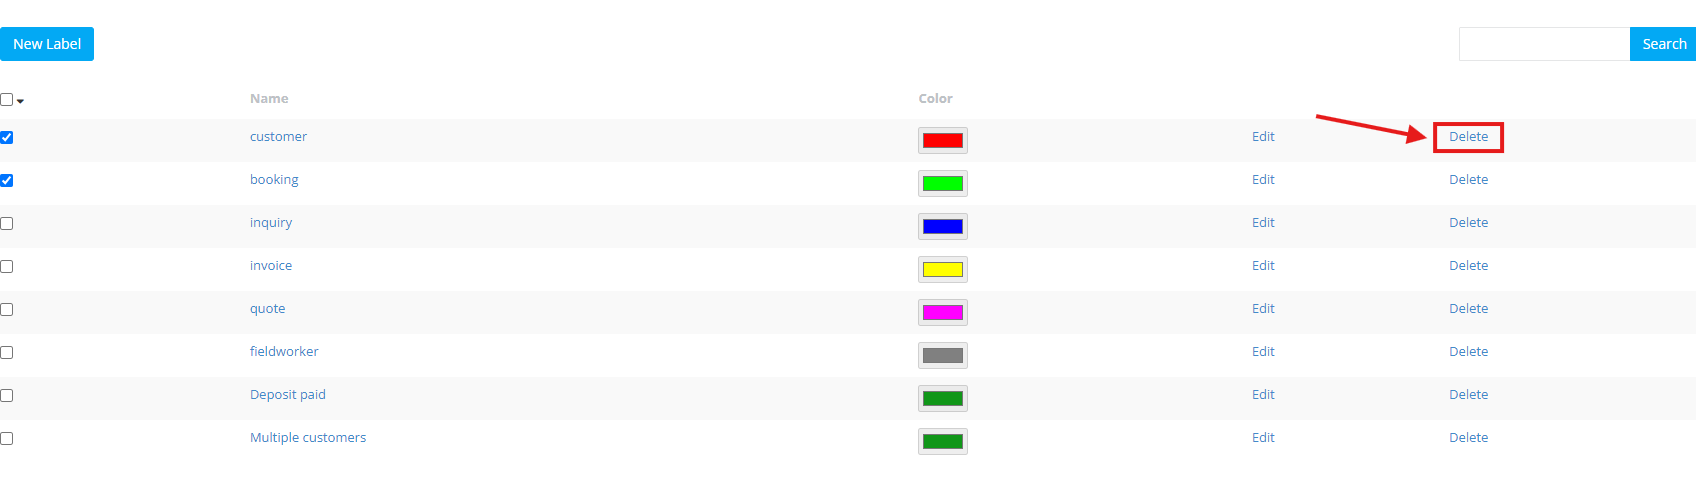
Delete (remove from all records)
Important: Deleting a label removes it from your system and from any records it was applied to. If you still need it for historical reporting, consider renaming it instead of deleting.
- Go to Settings > General Settings > Labels.
- Select one or more labels using the checkbox.
- Click Delete to remove them.
Best practices
- Use labels for internal workflow (review states, exceptions, customer type), not as a replacement for invoice statuses.
- Keep names short and consistent so they display neatly in list views.
- Standardize colors (e.g., red = urgent, yellow = review, green = cleared).
- Use parent labels if your label list grows (Finance, Customer Type, Internal Stage).
- Avoid duplicates (e.g., don’t create “To Review” and “Review Needed” unless they mean different things).
Troubleshooting
I can’t see “Add Label”.
This is usually permission-related. Confirm your role has access to invoices and invoice editing/management permissions, and that you’re viewing an invoice screen where Actions are available.
I created a label but can’t find it in the picker.
Use the search bar in the label picker. Labels are commonly listed alphabetically, and nested labels may appear under their parent.
I renamed a label and it changed in other places.
That’s expected—labels are shared across modules. Renaming updates the label everywhere it’s used.
FAQ
Can I label multiple invoices at once?
Yes. Select multiple invoices from Invoices > All Invoices, then use Actions > Add Label.
What’s the difference between invoice labels and invoice statuses?
Status represents the invoice lifecycle (e.g., Draft, Unpaid, Paid, Void). Labels are flexible internal tags (e.g., “Disputed”, “Manual Payment”, “To Review”) used for categorization and filtering.
Will customers see invoice labels?
Labels are designed for internal use in the admin workflow.
Related guides
- Label Management (Tags): Create, Color-Code & Organize Records
- Booking & Quote Labels (Tags)
- Inquiry Labels & Tags for Lead Management
- How to View and Manage an Invoice in OctopusPro
To stay updated, please subscribe to our YouTube channel.