
Inquiry Autoresponder Email for Lead Capture & Customer Portal Inquiries
The inquiry autoresponder email lets OctopusPro automatically send a confirmation email to customers immediately after they submit an inquiry through your website lead capture form or the Contact Us page in your customer portal.
This helps you acknowledge the inquiry straight away, reassure the customer that their request was received, set expectations for what happens next, and keep the lead engaged while your team reviews the inquiry and follows up.
This feature is especially useful when your workflow starts with an inquiry rather than an instant booking. For example, customers may need to request a quote first, ask a service question, request a callback, submit a complex job, or provide more details before your team can create a quote or booking.
Jump to: What this feature does | Before you start | How it works | How to set it up | Customize the autoresponder email | Optional enhancements | Best practices | What happens after submission | Troubleshooting | Related articles
What this feature does
When enabled, OctopusPro can automatically send a confirmation email after a customer submits an inquiry. The email can be used to:
- Confirm that the inquiry was received successfully
- Thank the customer for contacting your business
- Explain what happens next
- Set expectations for response times
- Provide an inquiry reference number if used in your workflow
- Request additional details such as photos or documents
- Include relevant FAQs using template placeholders
This is different from a booking confirmation email or quote email. The inquiry autoresponder is the first acknowledgment sent after an inquiry is submitted, before the inquiry is qualified and converted into a quote, estimate, or booking.
Before you start
Before setting up the inquiry autoresponder, make sure you have:
- A lead capture channel enabled, such as the website lead capture form or the customer portal Contact Us form
- Your lead handling workflow defined, including who reviews inquiries and how quickly your team follows up
- Your email template settings reviewed if you want to personalize the confirmation email
Helpful setup guides:
- Lead Capture Form (Embed Inquiry Form on Your Website)
- Contact Us Form & Lead Capture (Customer Portal)
- Managing Email Templates & Canned Responses
- Template Placeholders for Personalized Communications
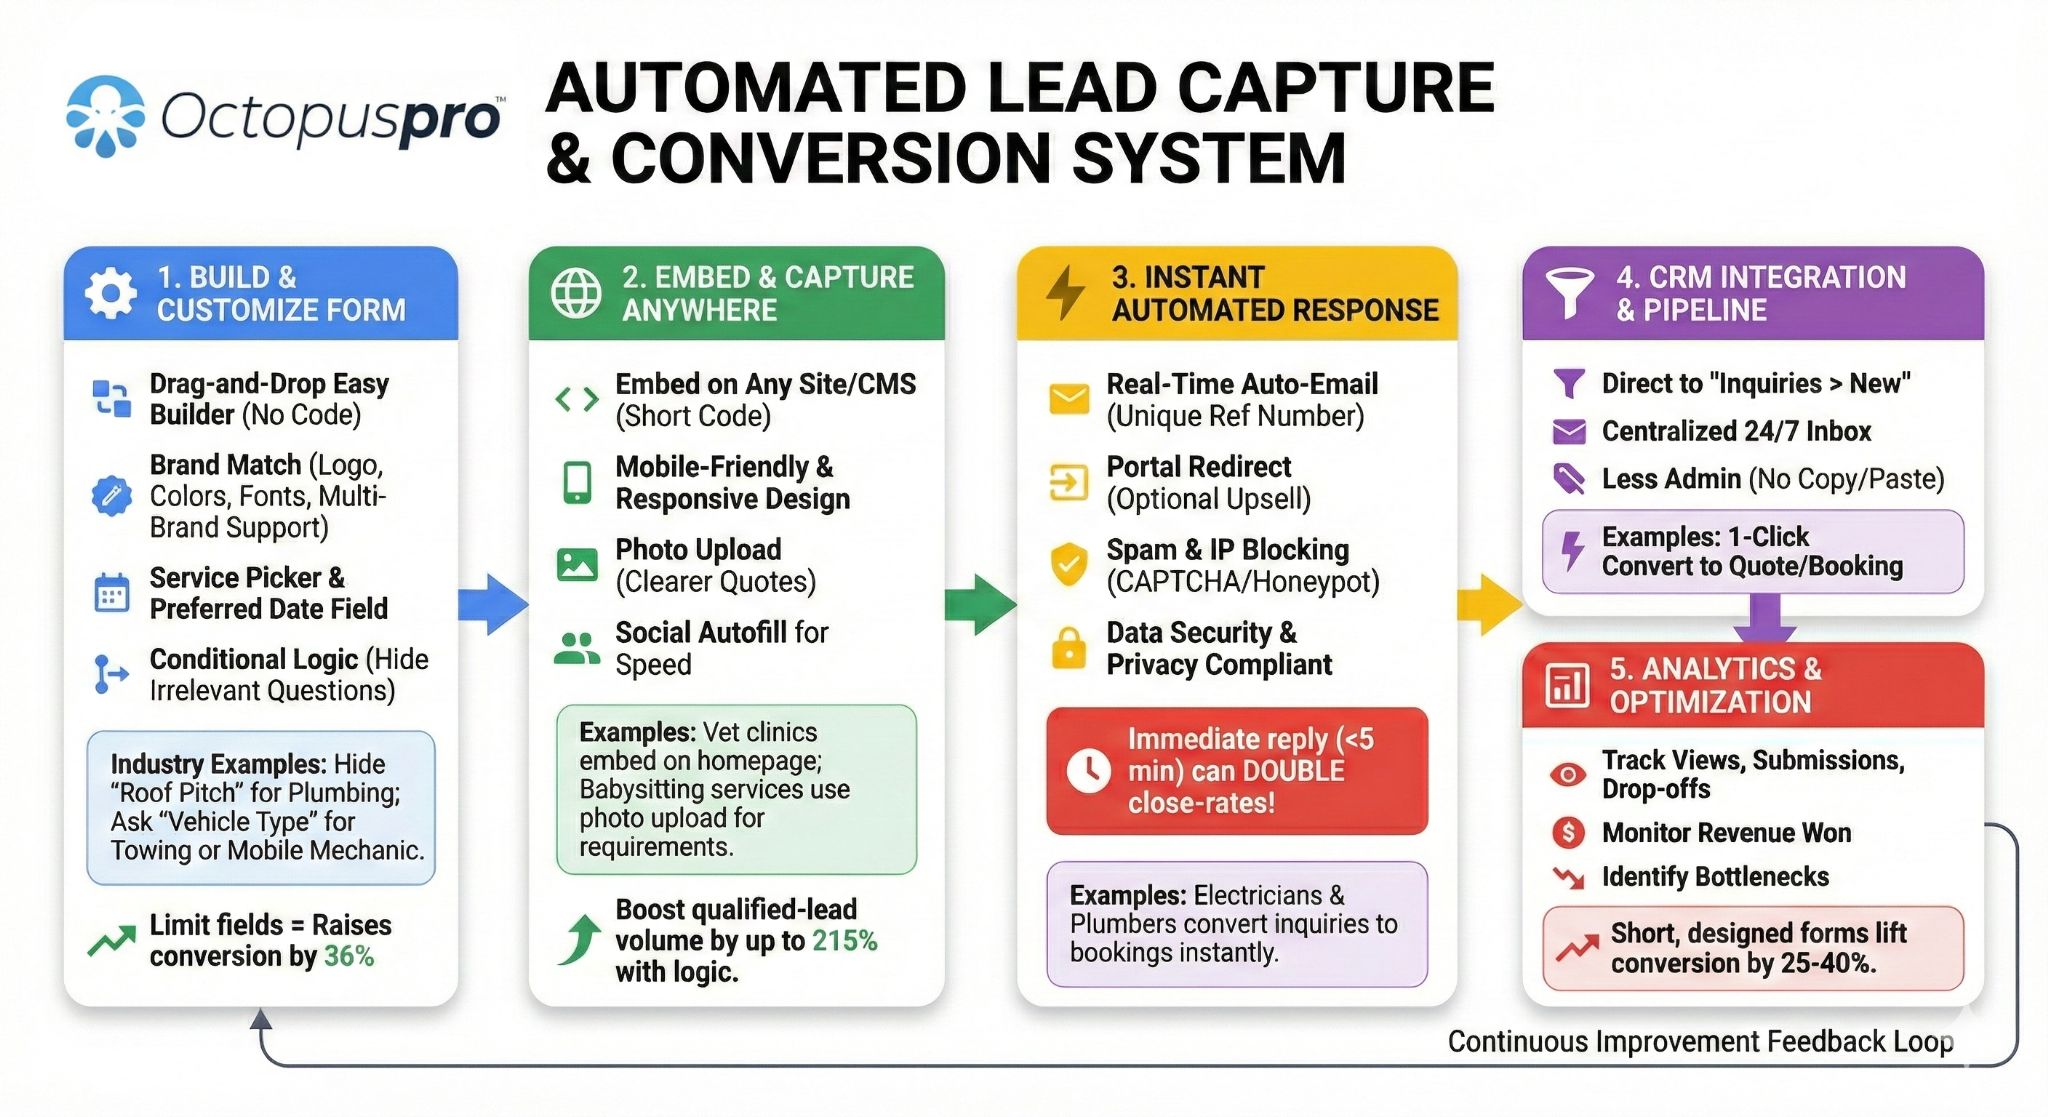
How it works
The inquiry autoresponder works as part of the lead capture and inquiry management workflow.
- A customer submits an inquiry through your website lead capture form or through the Contact Us page in the customer portal.
- OctopusPro creates a new inquiry record in your Inquiries / Lead Management area.
- The system sends a confirmation email automatically.
- Your team reviews the inquiry, follows up, and logs communication.
- Once qualified, the inquiry can be converted into a quote/estimate or a booking.
This improves response times and helps customers feel confident that their request has been received, even if your office is closed or your team has not followed up yet.
How to set it up
1) Choose where customers will submit inquiries
Most businesses use one or both of these inquiry capture methods:
- Website lead capture form: suitable for collecting new leads directly from your website
- Customer portal Contact Us form: suitable for customers who want to make an inquiry before booking
Use these guides to configure the form your customers will use:
2) Enable the confirmation email after inquiry submission
In your lead capture settings, enable the option to send a confirmation email automatically after an inquiry is submitted. This is what triggers the inquiry autoresponder email.
Depending on your configuration, you can also control related options such as:
- Whether customers are asked to upload photos after submitting the inquiry
- Whether customers are asked to upload PDFs after submitting the inquiry
- Whether customers are redirected to your customer portal after submission
- The message shown to customers after successfully submitting the inquiry
3) Save and test the workflow
After enabling the autoresponder, submit a test inquiry so you can confirm that:
- The inquiry form works correctly
- The inquiry is created in your system
- The confirmation email is sent
- The wording, formatting, and branding are correct
- Any placeholders used in the template are displaying properly
Customize the autoresponder email
To edit the inquiry autoresponder email template:
- Go to Settings → Communications → Templates & Canned Responses
- Open the Emails tab
- Select the Inquiry autoresponder email template
- Edit the subject line and body
- Save your changes
You can use template placeholders to personalize the message with dynamic information. Only use placeholders that are available for the specific template you are editing.
Helpful guides:
What to include in the autoresponder email
A good inquiry autoresponder email is short, clear, and useful. It should usually include:
- A thank-you message
- Confirmation that the inquiry was received
- Your expected response timeframe
- A short explanation of the next step
- A request for more details if needed
- Your business name and contact details
Example:
Thank you for contacting us. We have received your inquiry and a member of our team will review it shortly. If we need more information before preparing your quote or scheduling your job, we will contact you directly.
Optional enhancements
Include service FAQs in the autoresponder
If customers often ask the same pre-sale questions, you can include the {faq} placeholder in the template so relevant FAQs are inserted automatically into the email.
Request photos after inquiry submission
If your team needs images to qualify the lead or prepare a quote, you can ask customers to upload photos after submitting the inquiry. This is useful for damage reports, site inspections, measurements, cleaning scope, and other visual requirements.
Show a success message after form submission
You can also configure a custom message that customers see immediately after successfully submitting an inquiry. This is useful for setting expectations such as your response time or your next step.
For example, you may show a message such as: Your inquiry has been submitted successfully. Our support team will contact you within the next few working hours.
Best practices
- Keep the message concise: customers should understand it quickly, especially on mobile devices
- Set realistic expectations: only promise response times your team can consistently meet
- Use plain language: avoid technical or internal wording that customers may not understand
- Ask for supporting details only when needed: request photos or documents if they will help your team qualify or quote faster
- Use placeholders carefully: make sure the template only contains placeholders supported by that inquiry template
- Test after editing: send a test inquiry whenever you make major template or workflow changes
- Review it regularly: update the wording whenever your services, response times, or inquiry process changes
What happens after submission
After the autoresponder email is sent, the inquiry remains fully manageable inside OctopusPro.
Your team can then:
- Review the inquiry details
- Assign a representative or owner
- Log contact attempts and outcomes
- Set follow-up reminders
- Add notes, attachments, and labels
- Convert the inquiry into a quote/estimate or a booking when qualified
- Mark spam inquiries where required

Helpful guides for the next stage of the workflow:
- Create and manage inquiries
- Manage inquiry follow-up reminders
- Attach files and photos to inquiries
- Convert an inquiry to a quote / estimate
- Convert an inquiry to a booking
Troubleshooting
The confirmation email is not being sent
- Check that the confirmation email option is enabled in your lead capture settings
- Make sure the customer entered a valid email address
- Review the inquiry autoresponder email template to ensure it is active and properly configured
- Check your email sending setup if your account uses custom email sending requirements
The email content looks incorrect
- Open the template and review the subject and body
- Check whether unsupported placeholders were added
- Use the preview option in the email template editor where available
Customers need to upload more details before quoting
- Enable the photo upload prompt after inquiry submission
- Update the autoresponder wording so customers know what information to provide
- Consider adding relevant FAQs to reduce back-and-forth questions
I want inquiries to come from the customer portal instead of the website
- Enable the Contact Us page in the customer portal from Settings → Customer Portal → Flags & Permissions
- Use the customer portal inquiry workflow instead of, or in addition to, the website lead capture form
Related articles
- Lead Capture Form (Embed Inquiry Form on Your Website)
- Contact Us Form & Lead Capture (Customer Portal)
- Managing Email Templates & Canned Responses
- Template Placeholders for Personalized Communications
- Service FAQs Management
- Follow-Up Reminders for Inquiries
- Convert Inquiries to Quotes (Estimates)
- Convert Inquiry to Booking
To stay updated, please subscribe to our YouTube channel.