
Custom Fields for Bookings, Lead Capture & CRM Profiles

Custom Fields are additional questions and inputs you can add to OctopusPro to capture the exact details you need for quoting, scheduling, and service delivery—without creating multiple near-identical services. They can be used across your Booking/Quote flow, Lead Capture (Website Inquiry) form, and CRM profiles so your team collects consistent, structured data every time.
Related setup: Accept Online Bookings Through Your Website (Customer Portal) | Lead Capture Form (Website Inquiry Form)
Jump to
- What are Custom Fields?
- Where you can use Custom Fields
- When should you use Custom Fields?
- Custom Fields vs Forms & Checklists
- Key benefits
- Create a new Custom Field
- How field labels appear (Admin, App, Portal)
- Internal ID (Field ID)
- Helper Text (tooltips)
- Visibility & behaviour settings
- Using Custom Fields in Lead Capture (Inquiry widget)
- Custom Field types
- Values/options, pricing & time adjustments
- Dependent Custom Fields (Conditional Logic)
- Assign Custom Fields to Services
- Reorder Custom Fields (drag & drop)
- Bulk tools (Import/Export/Groups)
- Related articles
What are Custom Fields?
Custom Fields are extra form inputs—text boxes, dropdowns, toggles, checkboxes, date/time pickers, signature fields, and more—that you attach to a service, inquiry form, or profile. Customers and staff complete these fields so you capture the details needed to quote accurately, schedule correctly, and deliver the job with minimal back-and-forth.

Where you can use Custom Fields
- Bookings & Quotes: service-specific questions shown during booking/quote creation and online checkout.
- Lead Capture (Inquiry form): collect structured requirements before the customer books.
- CRM Profiles: store customer or fieldworker data that should persist for future jobs.
CRM Custom Fields: Customer Profile Custom Fields | Fieldworker Profile Custom Fields


When should you use Custom Fields?
Add Custom Fields whenever a service has variable options or requirements (scope, access, add-ons, preferences, eligibility rules). Instead of listing multiple versions of the same service (e.g., “Car Detailing – Sedan / SUV / Truck”), create one service and use a Custom Field like “Vehicle type”.
- Variable scope: rooms, items, area (m²), number of attendees
- Add-ons: extra treatments, after-hours, premium materials
- Access details: parking, gate code, pets on-site
- Lead qualification: urgency, preferred date/time, location suitability
- Compliance: signature at booking time (where required)
Custom Fields vs Forms & Checklists
Both collect information—but they’re designed for different stages of your workflow. Custom Fields are primarily for intake (quoting/booking), while Forms & Checklists are primarily for job execution (operations & compliance).
| Feature | Custom Fields | Forms & Checklists |
|---|---|---|
| When used | During quoting, booking, and lead capture (intake stage). | Before/during/after the job (operations, compliance, proof-of-work). |
| Best for | Service options, job requirements, add-ons, quoting accuracy, and booking qualification questions. | Check-in/out steps, inspections, QA, job reports, photos/signatures, and completion standards. |
| Pricing impact | Can adjust price (and/or duration) based on selected options when configured. | Typically does not adjust pricing (it documents work rather than pricing it). |
| Availability / assignment impact | Can affect who is eligible and what time slots are available. If you use capability matching, you can enable/disable specific custom field options per fieldworker (per service), so selecting an option can automatically limit the job to only suitable fieldworkers. Options can also add extra duration, which changes scheduling availability. | Usually does not control eligibility or scheduling availability. Forms/checklists are mainly used after a booking is created/assigned to standardize execution and capture proof/compliance. |
| Customer-facing experience | Commonly visible to customers in the Customer Portal / online booking flow (service page & checkout). | Usually internal (staff/fieldworkers), unless you explicitly share them as part of your workflow. |
| Automation & workflow impact | Can trigger rules and downstream decisions (pricing/time changes, eligibility matching, internal notes, routing). | Enforces execution steps (proof, compliance, QA) and standardizes job delivery. |
Tip: If you use Custom Fields to route jobs to the right technician (e.g., “Concrete type”, “Equipment required”, “High access”), make sure fieldworker profiles are configured with matching skills/options for each relevant service.


Learn more: Forms & Checklists Setup
Key benefits
- Accurate quotes: option selections can add extra cost (and in many setups, extra time) on top of your base service price.
- Cleaner service list: fewer duplicate services—use one service with structured options.
- Less back-and-forth: capture job-critical details upfront.
- Consistent handover: admins and fieldworkers see the same requirements on the job record.
Transparency tip: You can choose to show option pricing on the service view page before checkout. Customer Portal Flags & Permissions
Advanced custom field option settings (pricing, duration & packages)
Each custom field option can do more than collect information. Depending on your settings, an option can change price, add extra time, apply location-based pricing, unlock quantity discounts, or even create booking packages. This is ideal when your final total and duration depend on what the customer selects.
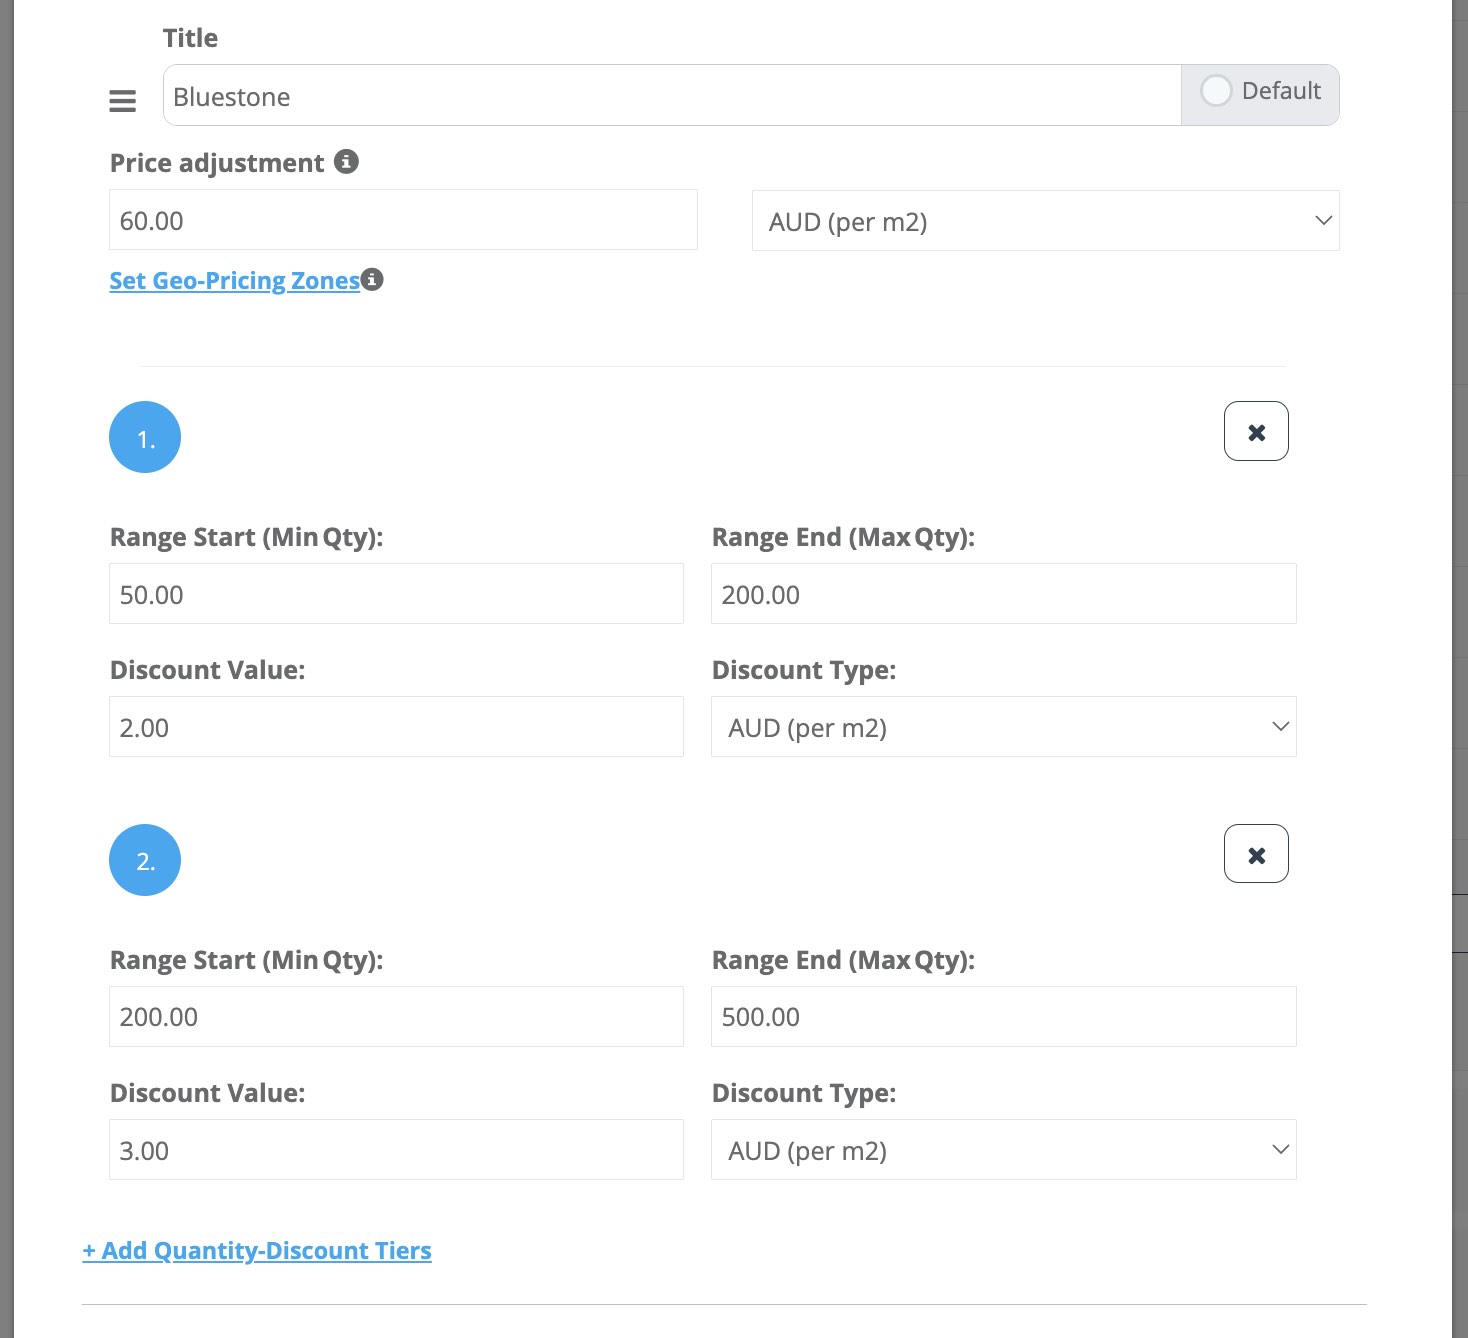
1) Custom Field Option Price Adjustment
Add a surcharge (or discount) when a specific option is selected. Price adjustments can be configured as a fixed amount or as a per-unit rate (e.g., per m²), depending on how the service is priced.
- Use cases: premium materials, add-on treatments, difficult access, after-hours add-ons.
- Customer impact: customers can see exactly why totals change when they select upgrades or extras.
2) Custom Field Option Service Duration Adjustment (Extra Duration)
Increase the estimated duration when an option requires extra time. This keeps scheduling accurate, because longer jobs block more time on the calendar (and can affect which time slots are available).
- Use cases: deep clean upgrade (+30 mins), second coat (+45 mins), heavy stain removal (+60 mins).
- Scheduling impact: reduces overbooking and helps customers choose realistic time slots.
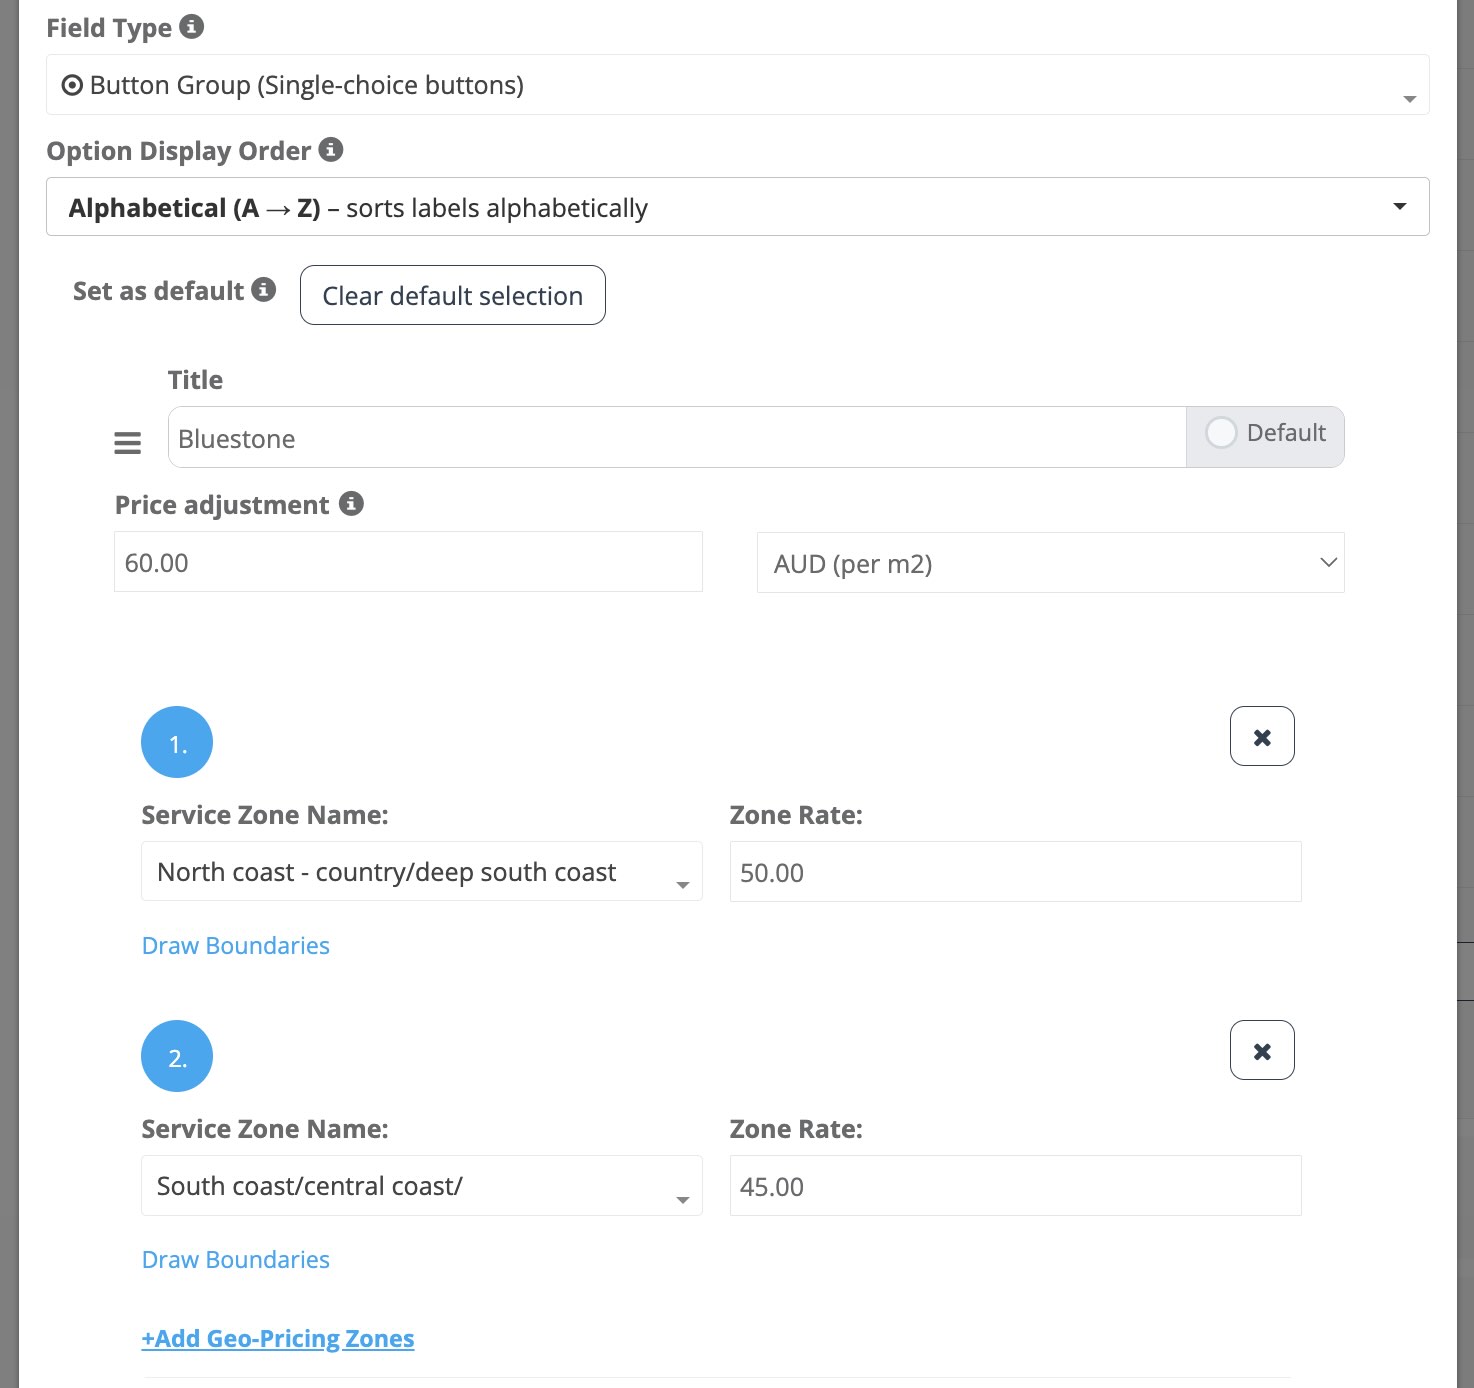
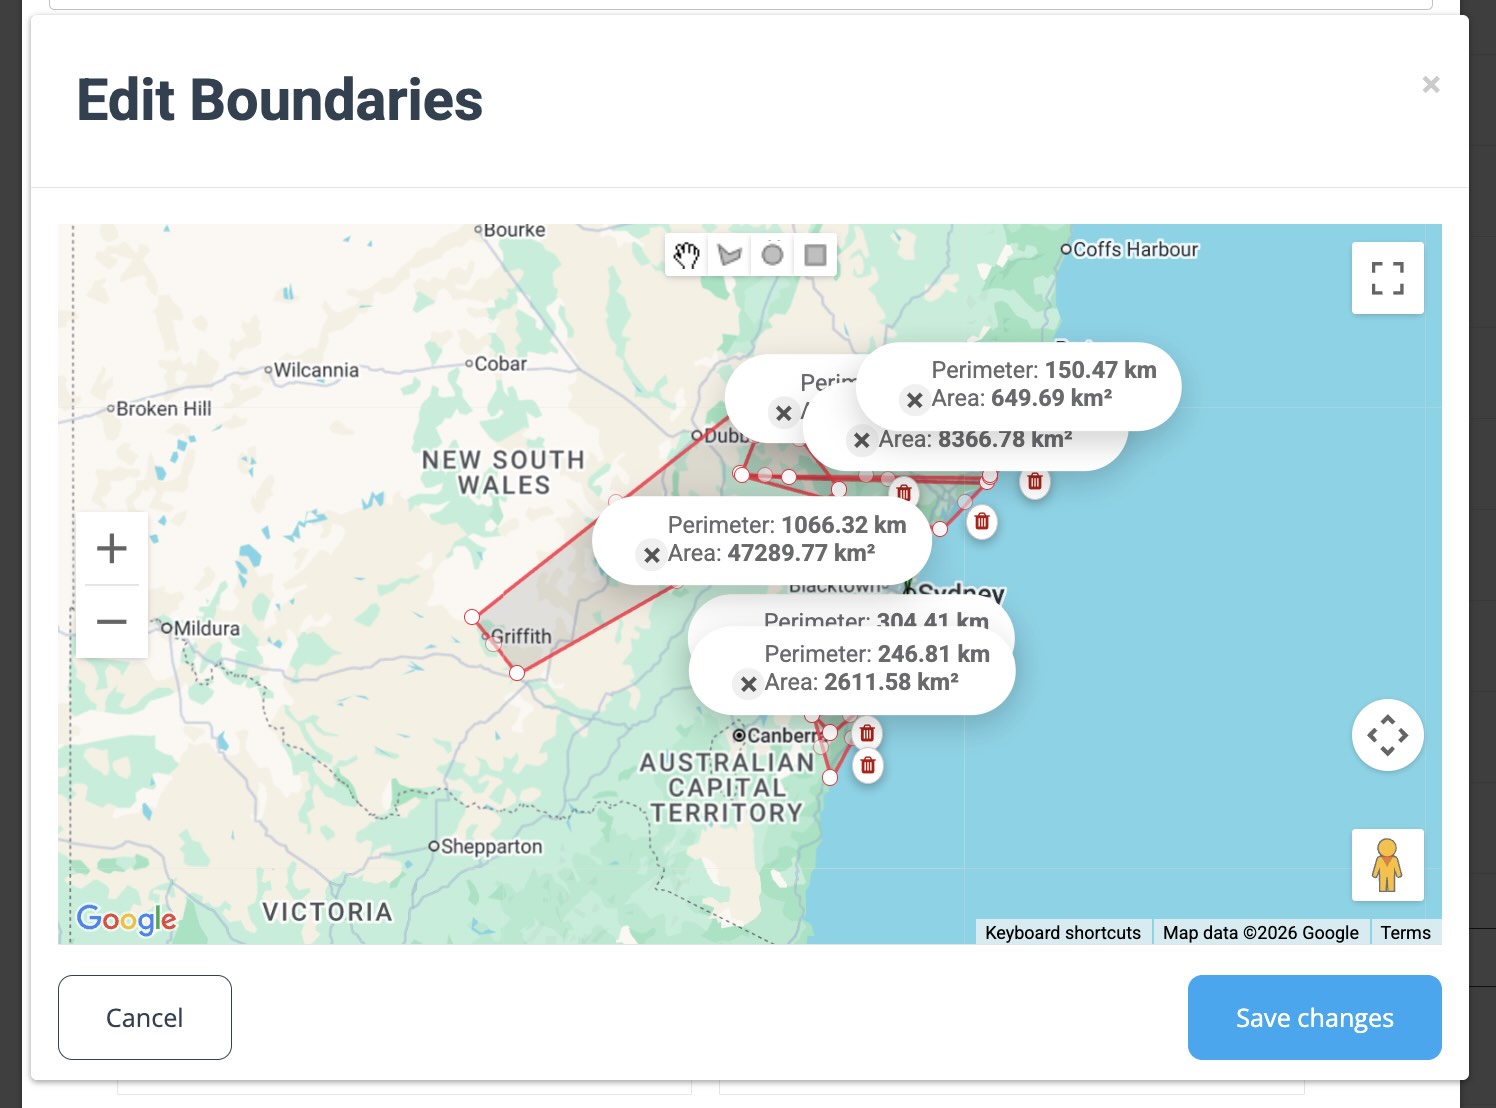
3) Geo Pricing Zones (option-level location pricing)
Apply different rates for a custom field option based on the customer’s location/service zone. You can set a Zone Rate for each zone and draw zone boundaries on the map, so pricing automatically matches the service area.
- Use cases: remote area surcharges, regional labour pricing differences, large service territories with multiple rate bands.
- Setup tip: keep zone names aligned with your service areas to avoid confusion when reviewing bookings.
4) Quantity Discount Tiers (at option level)
Offer tiered discounts for quantity-based options (e.g., per m²). Define quantity ranges and apply a discount per range so larger jobs automatically receive better pricing, without manual quoting.
- Use cases: “50–200 m²: -$2/m²”, “200–500 m²: -$3/m²”.
- Customer impact: customers get transparent, fair pricing at higher quantities while you protect margins at smaller jobs.
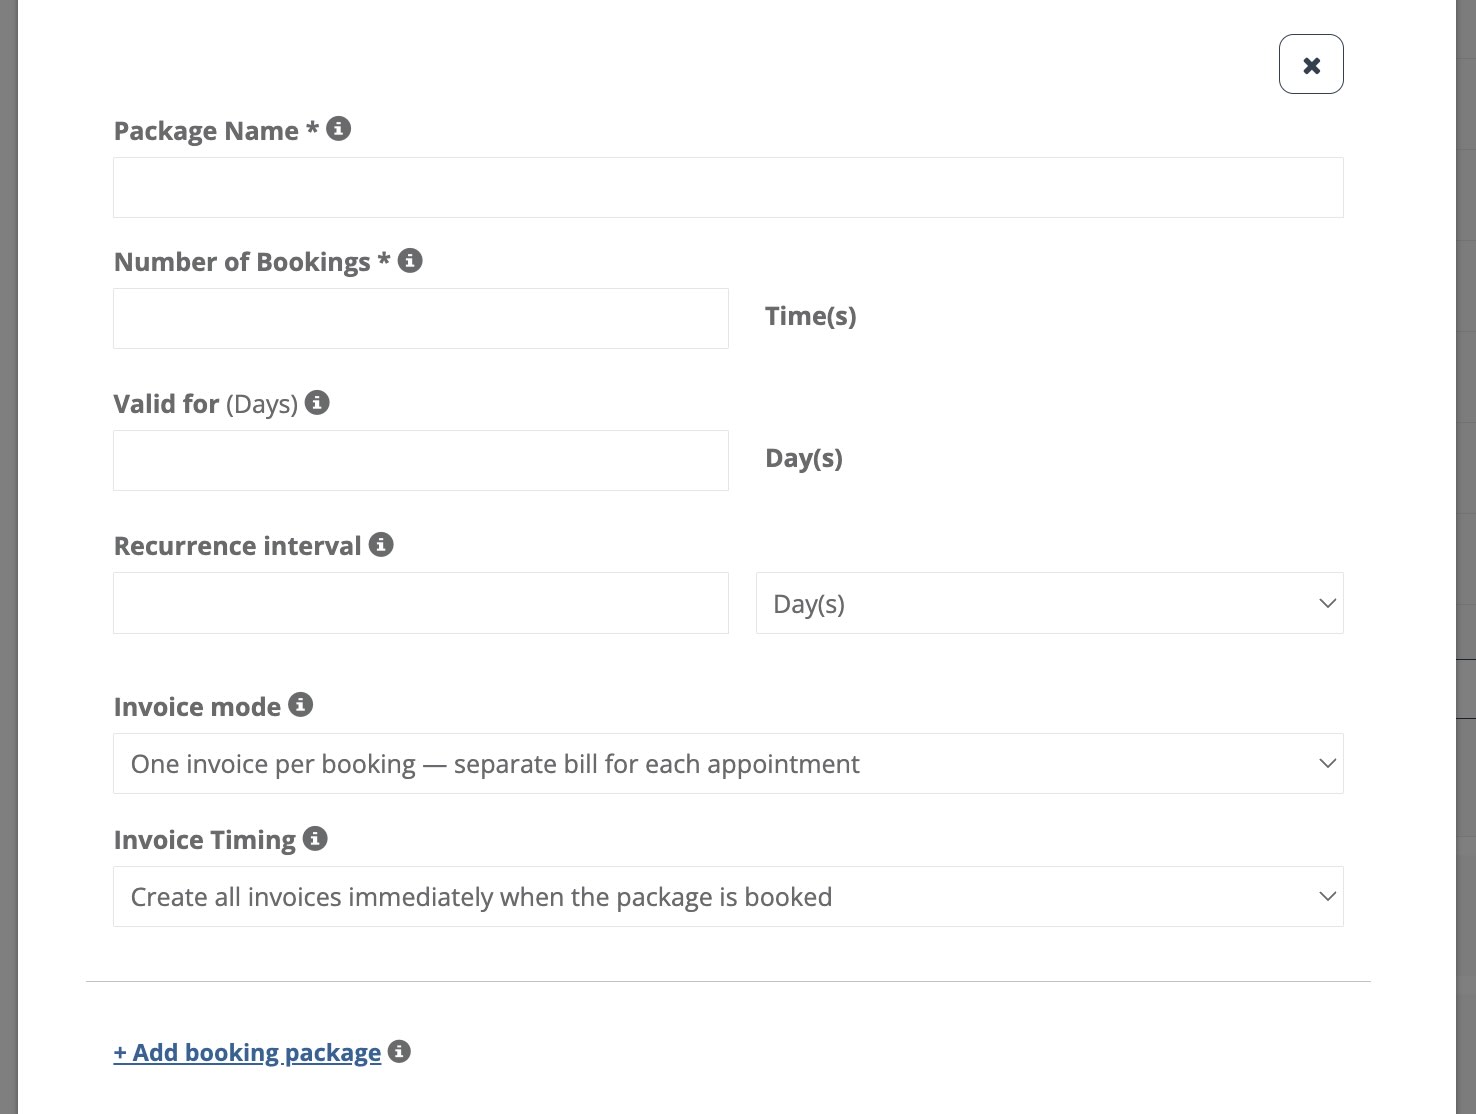
5) Booking Packages (at option level)
Turn an option into a package that represents multiple bookings/visits. Configure the number of bookings, validity period, recurrence interval, and invoice timing—ideal for prepaid bundles or multi-visit programs.
- Use cases: “4-visit maintenance package”, “quarterly service bundle”, “prepaid multi-session program”.
- Billing control: define how invoices are created (e.g., per booking or based on your package rules) and when invoices should be generated.
Customer Portal pricing & duration transparency (recommended)
These Customer Portal settings help you be transparent about how totals and duration are calculated—especially when your final price depends on custom field selections (add-ons, quantities, extras) or when pricing varies by job.
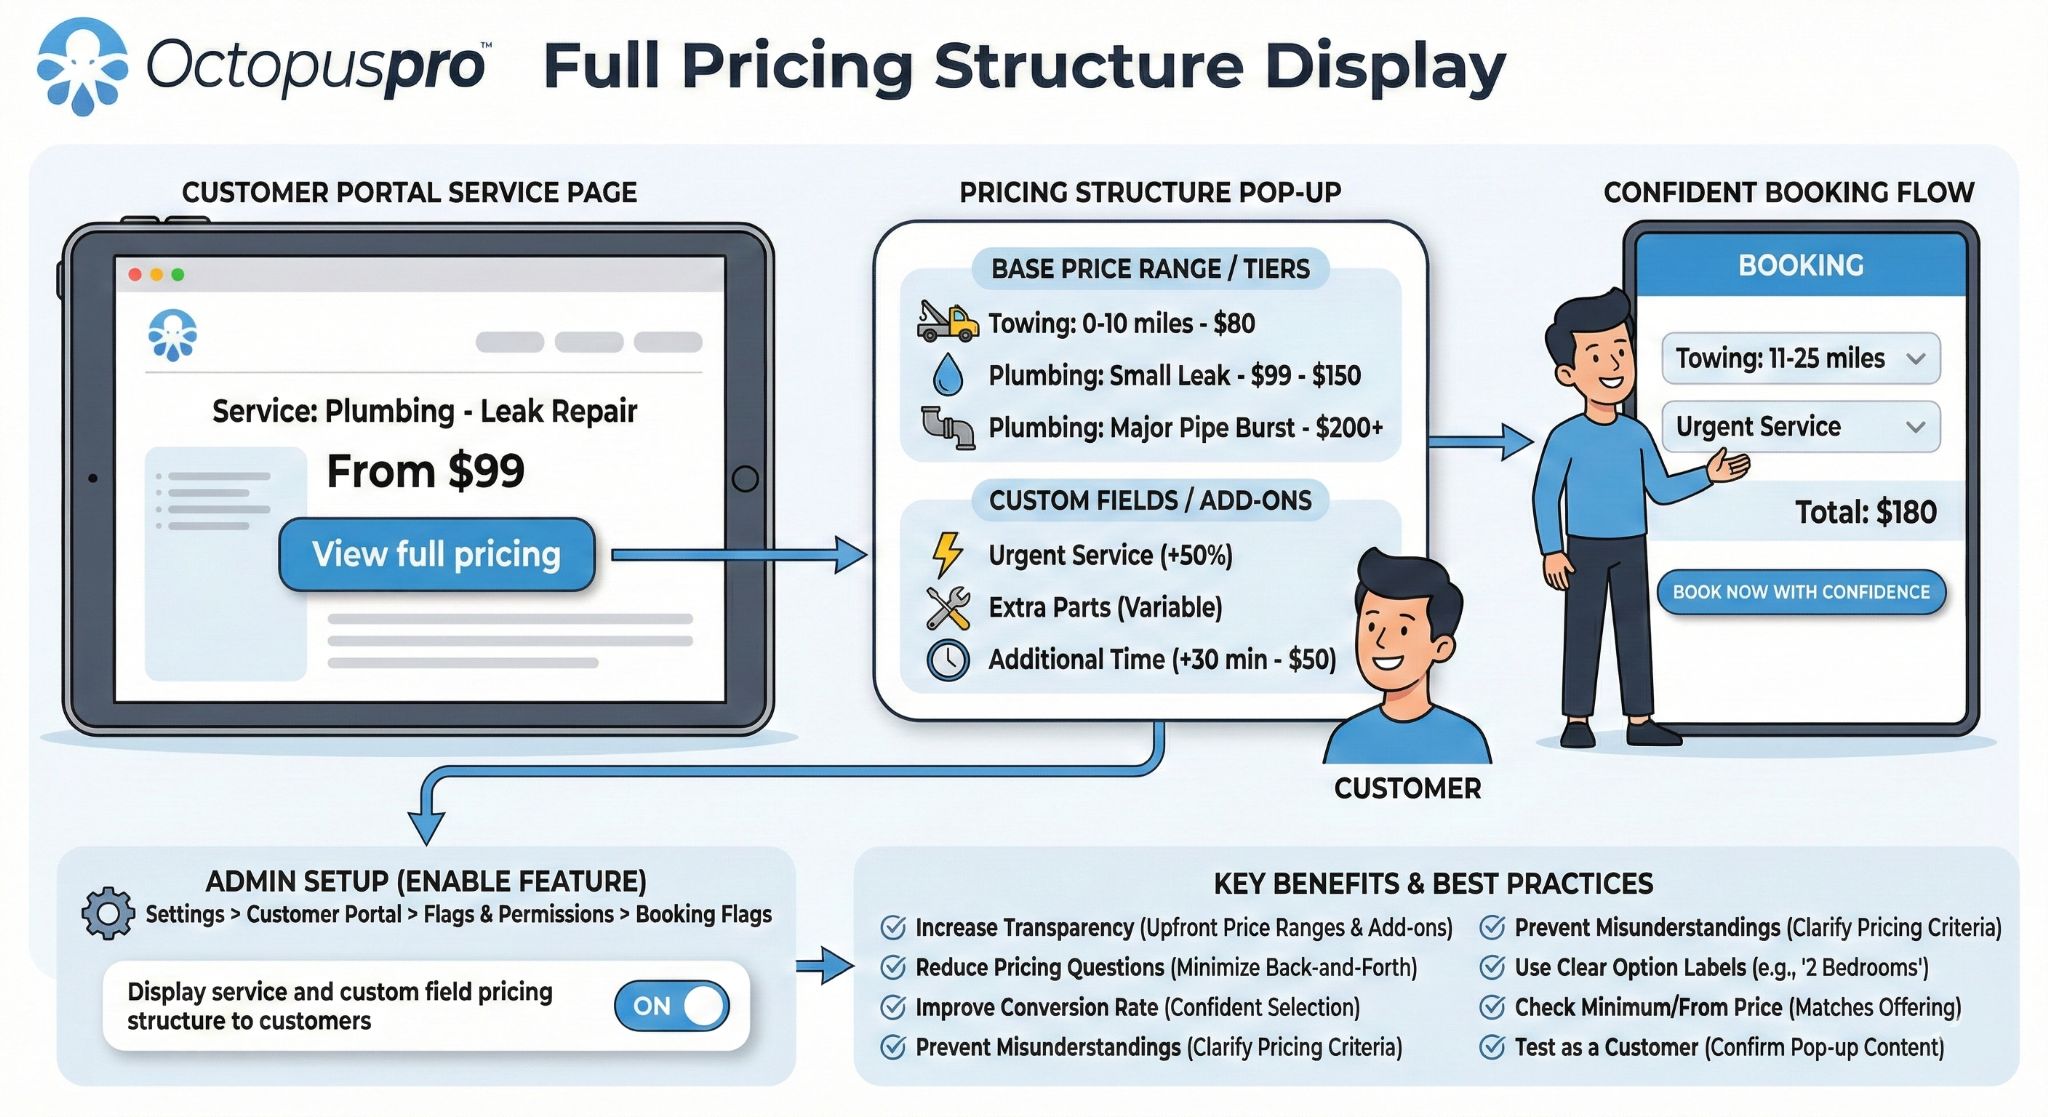
Display service and custom field pricing structure to customers
Show customers how the total is calculated—for example: Base service price + custom field add-ons (where applicable). This improves trust and reduces “why is it this price?” questions before checkout.
Learn more: Display Service & Custom Field Pricing Structure to Customers
Update service pricing on the go (real-time totals during checkout)
Enable real-time pricing updates so totals change instantly as customers add services and select custom field options. This reduces surprises at checkout and makes it clear how each selection affects the total.
Learn more: Update Service Pricing on the Go
Display service minimum price (e.g., “From $99”)
Show a minimum starting price for services where the final price may vary (size, quantity, add-ons, job conditions, or zones). This helps customers understand the baseline cost while still allowing custom fields to determine the final total.
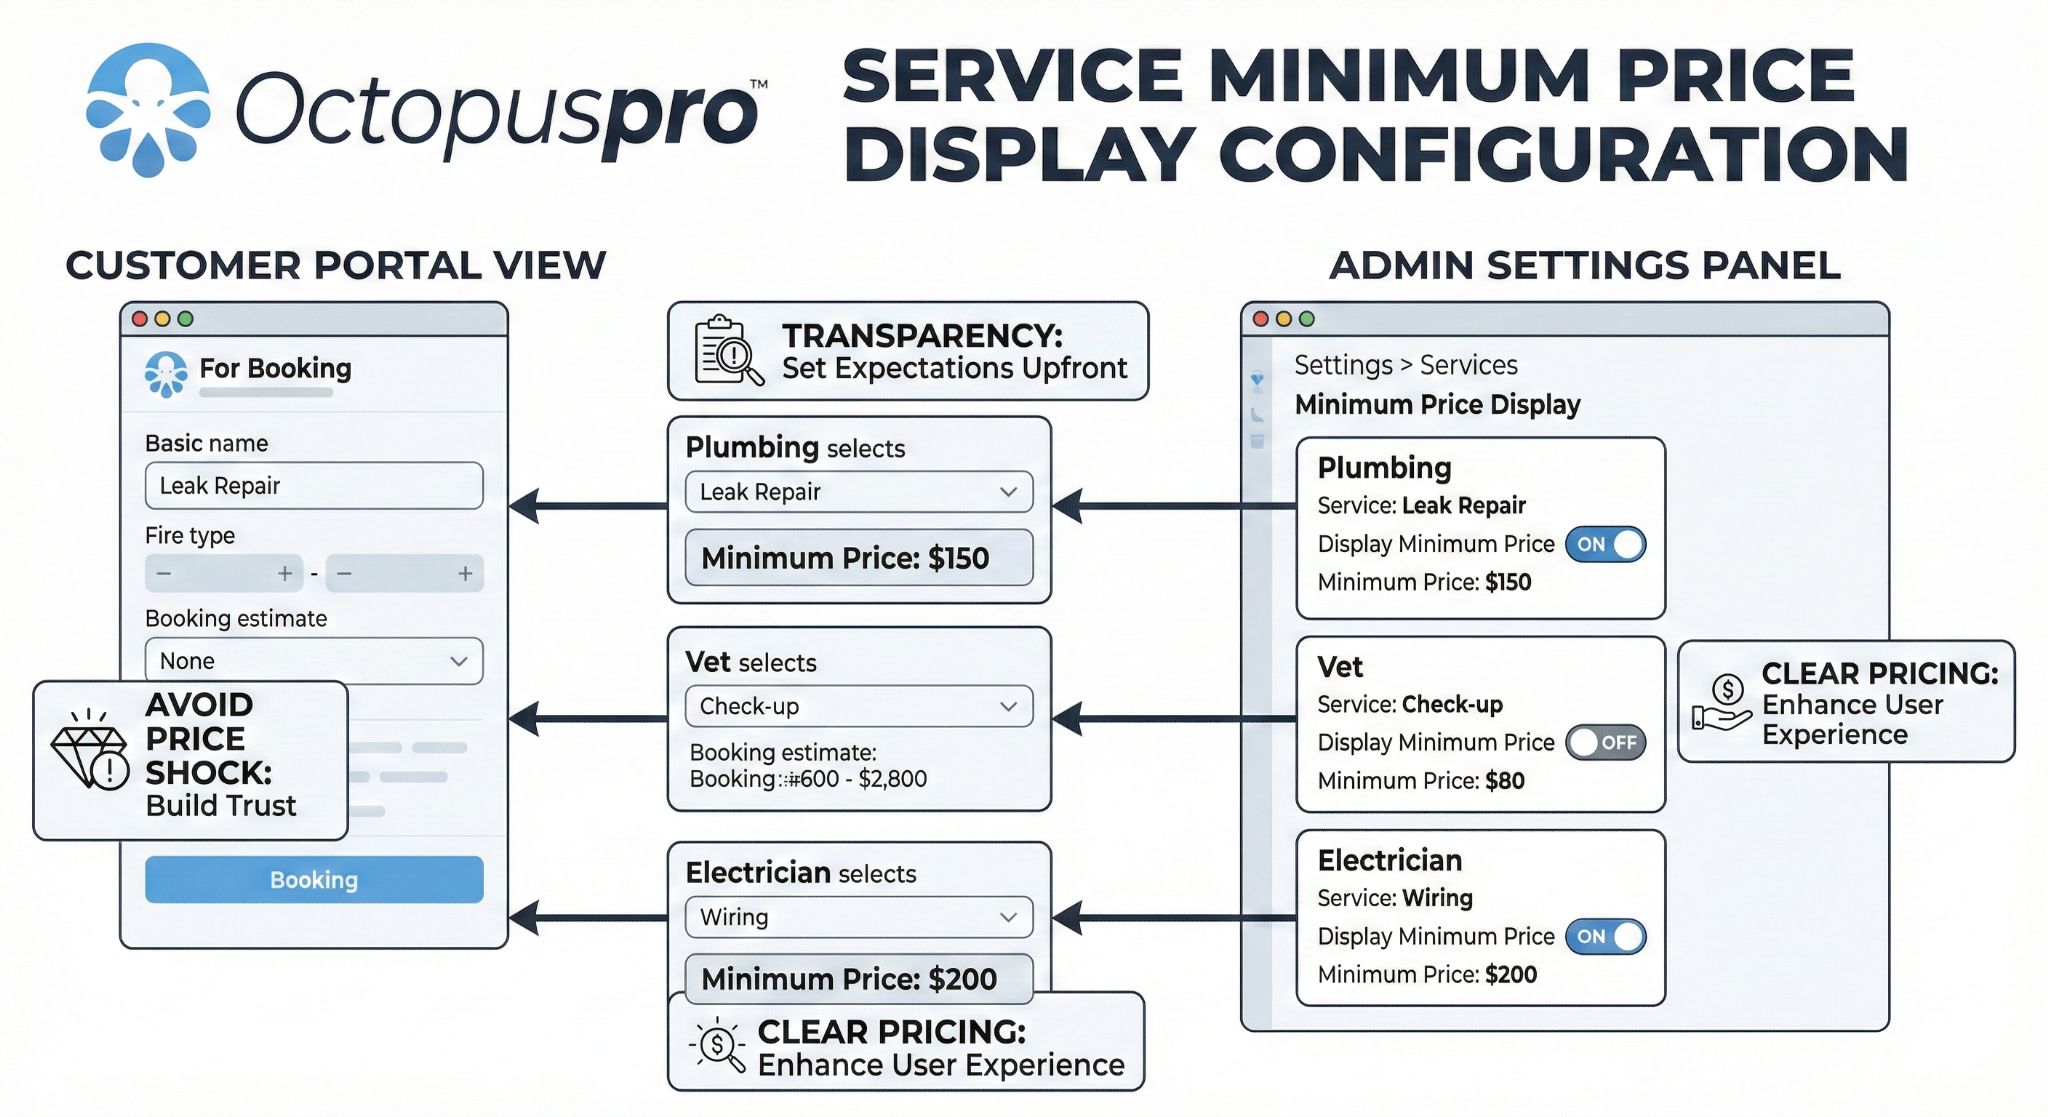
Learn more: Display Service Minimum Price in the Customer Portal
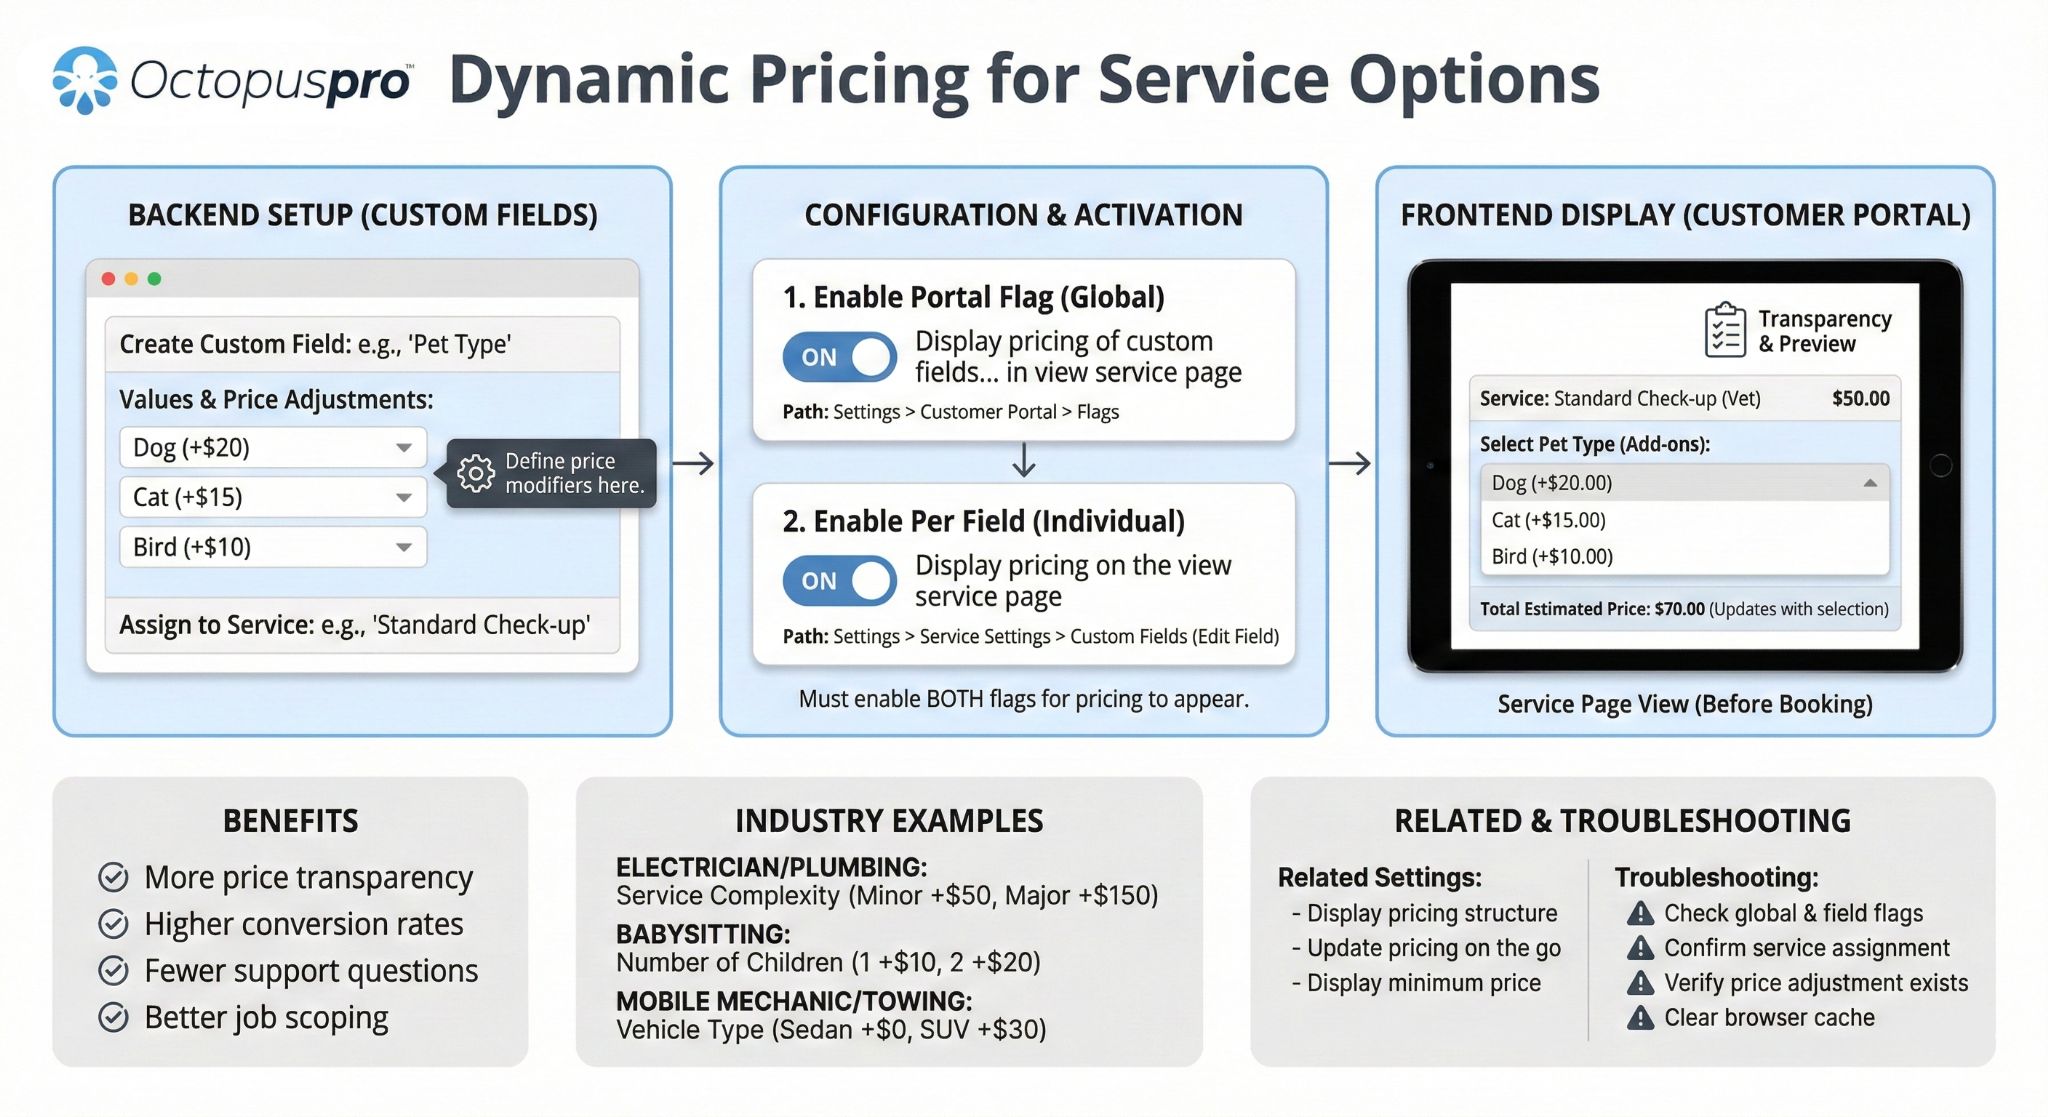
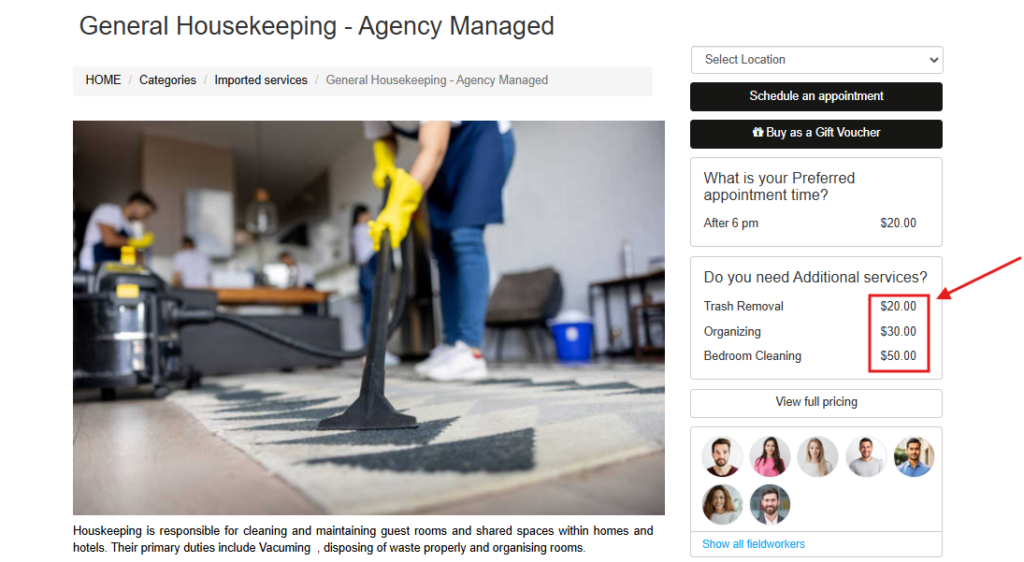
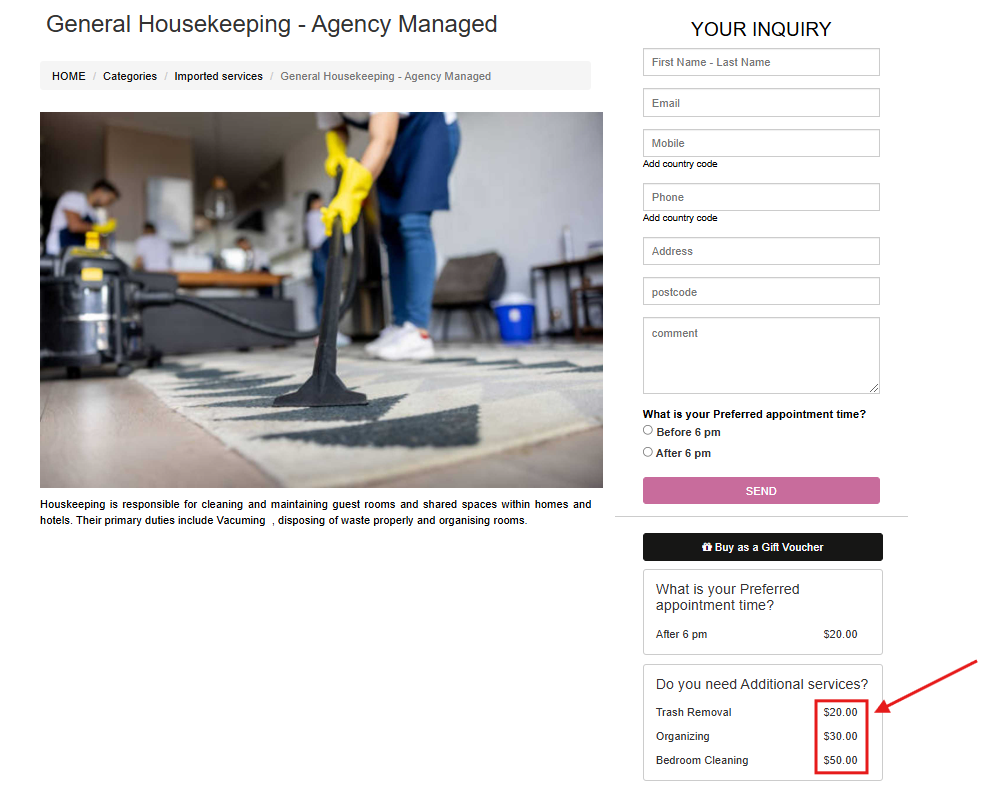
Display pricing of custom fields on the service page
Display the prices of custom options (custom fields) directly on the service view page—before customers reach checkout. This improves transparency, reduces price-related questions, and helps customers choose the right options with confidence.

Tip: This works especially well for add-ons (e.g., “After-hours +$20”, “Extra room +$15”), packages, and upsells.
Learn more: Display Custom Field Pricing on the Service View Page (Customer Portal)
Display booking duration / estimated time to customers
Show customers the estimated duration of the service/booking in the Customer Portal (for example, “This service usually takes ~2 hours”). This helps set expectations, reduces scheduling confusion, and improves customer satisfaction—especially for longer or multi-step services.
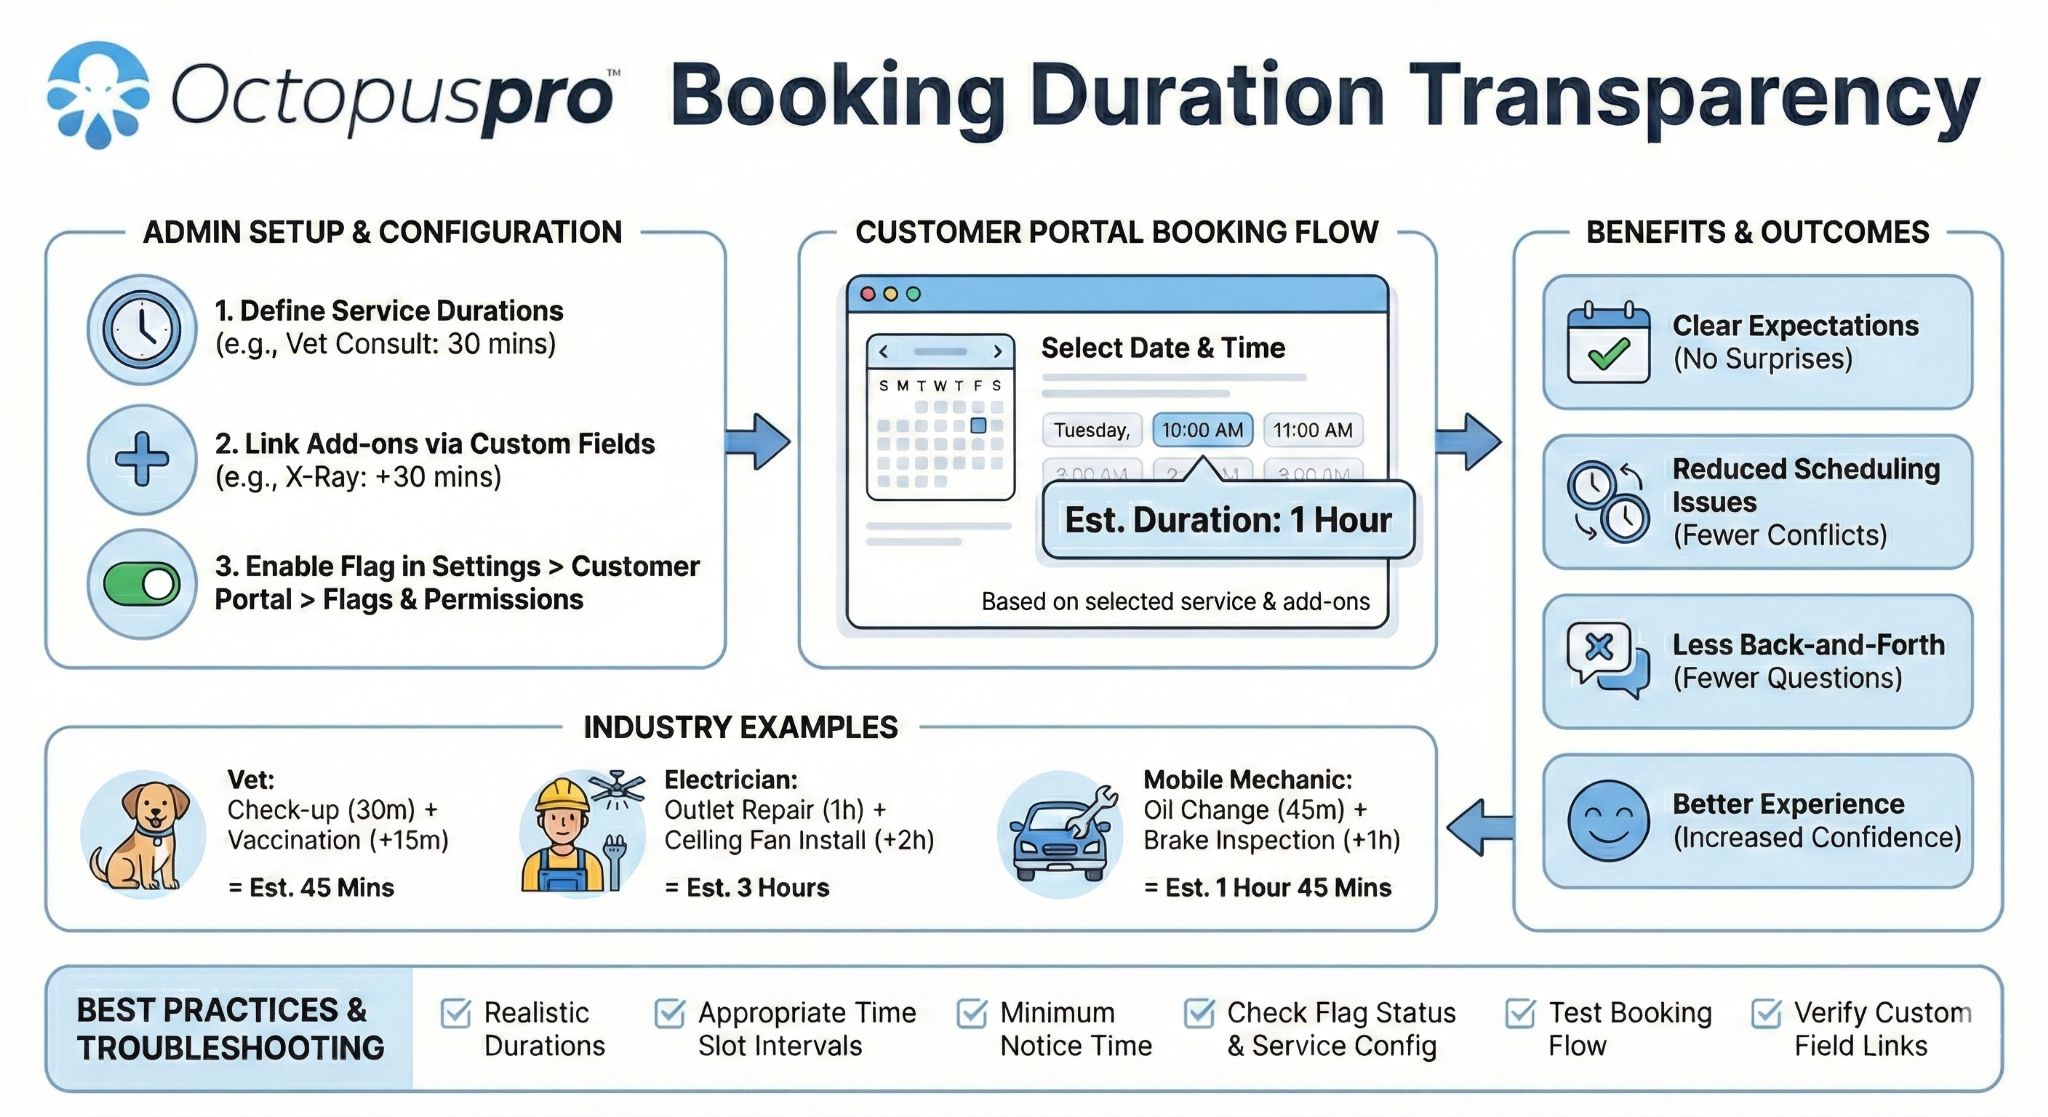
Learn more: Display Booking Duration / Estimated Time
Create a new Custom Field
- Go to Settings → Service Settings → Custom Fields.
- Click Create new.
- Enter the field details (label, type, visibility), then click Save.
Tip: Use customer-friendly questions as labels, and prefer option-based field types (dropdown/radio/buttons) whenever possible for cleaner reporting.
How field labels appear (Admin, App, Portal)
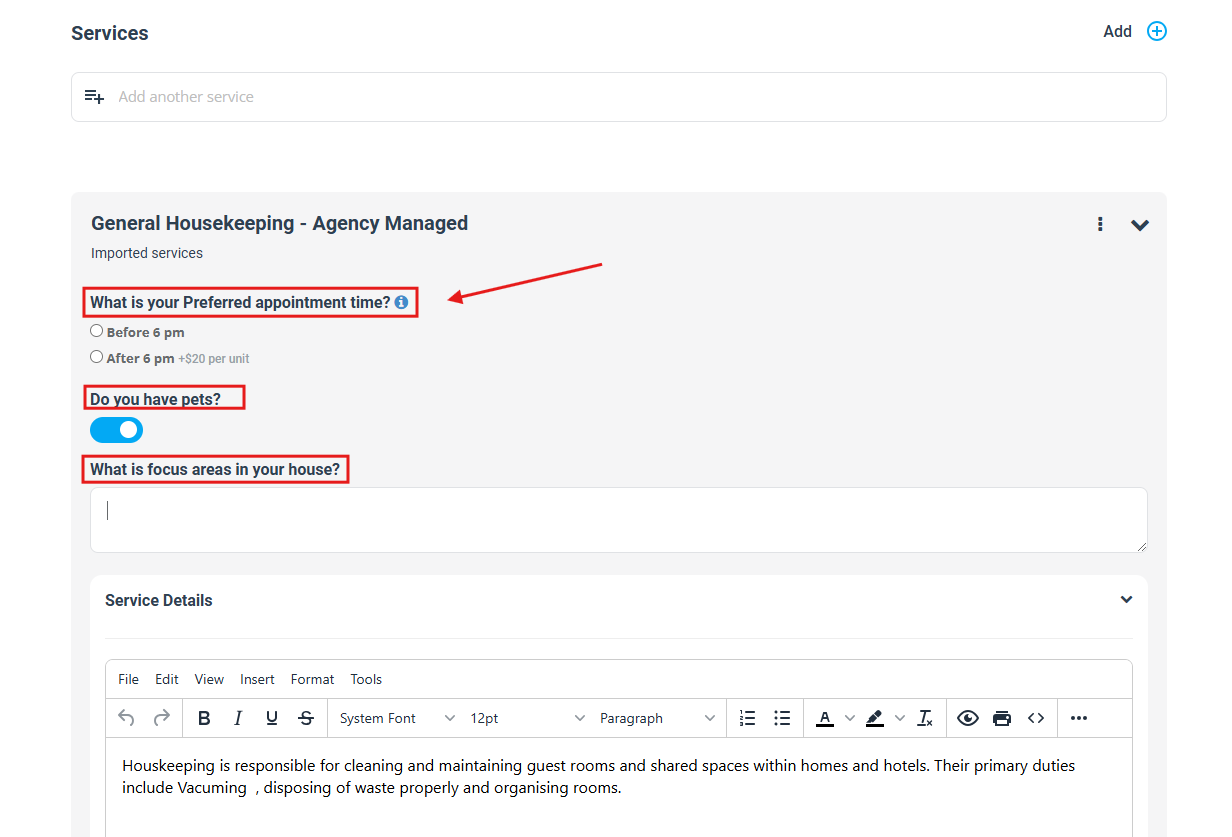
Admin (creating/editing booking/quote):
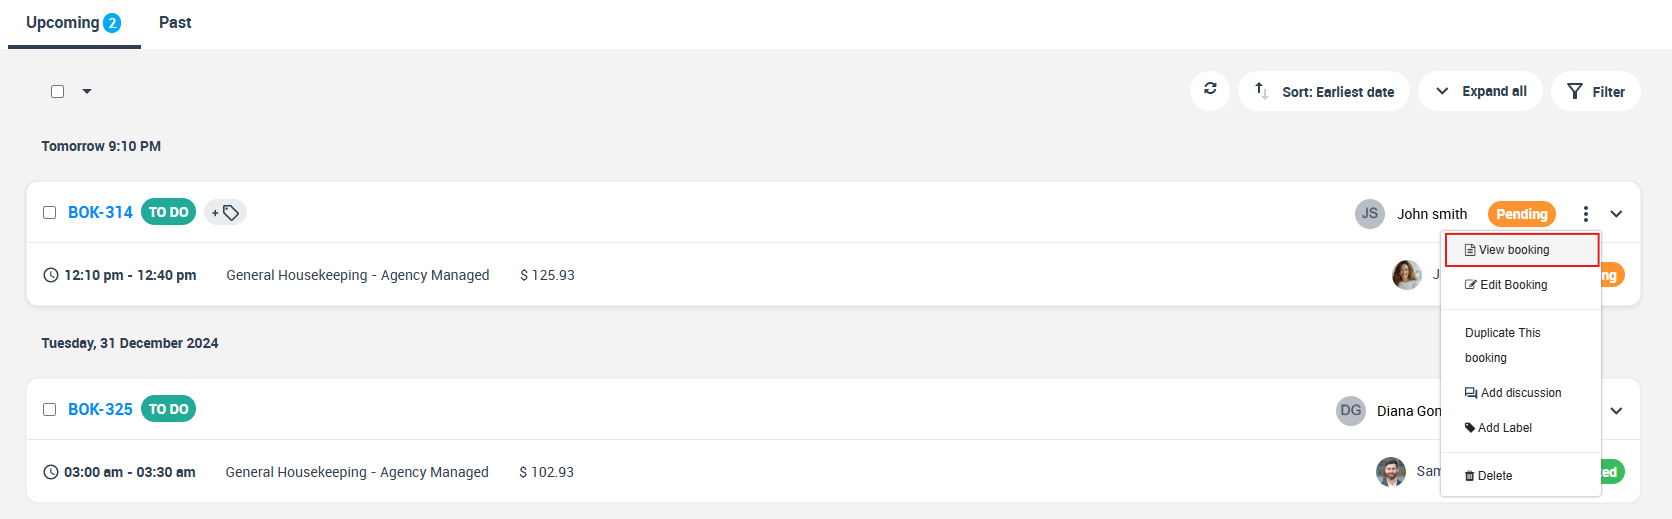
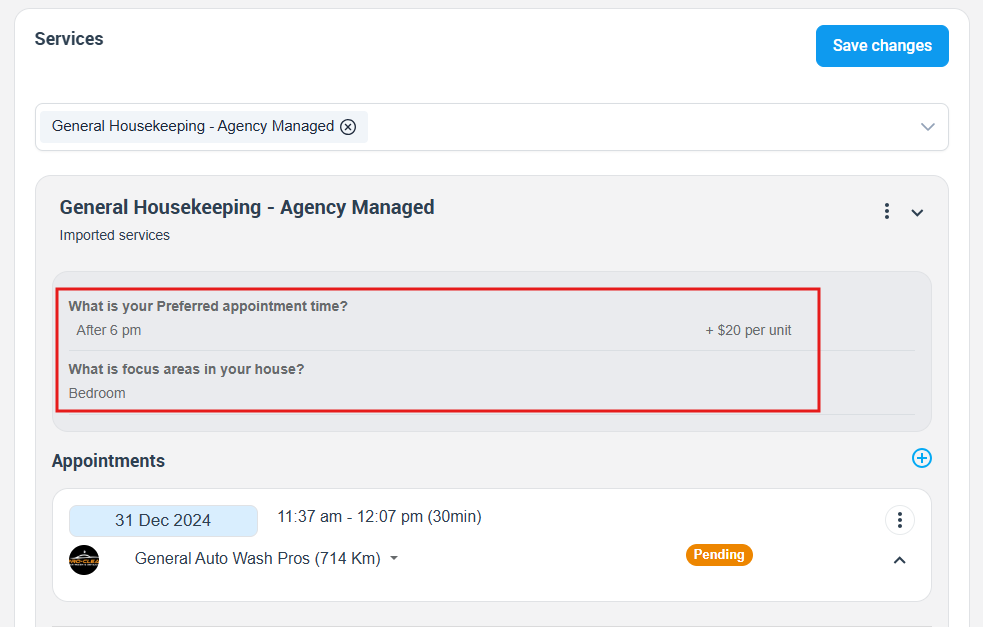
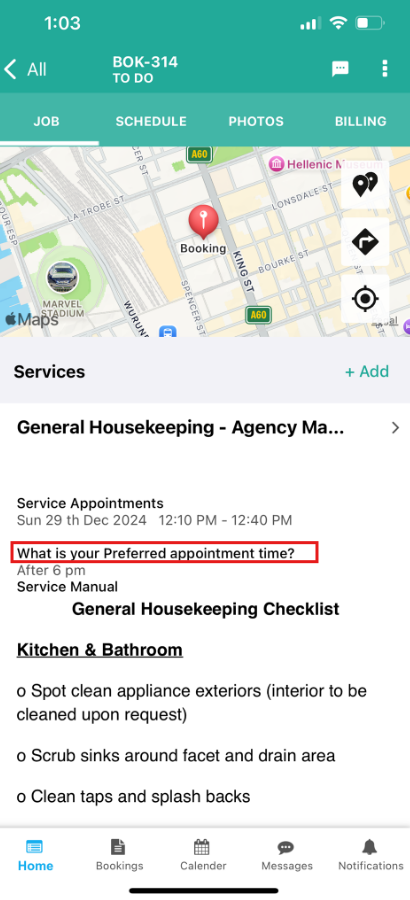
Admin (reviewing booking/quote details):
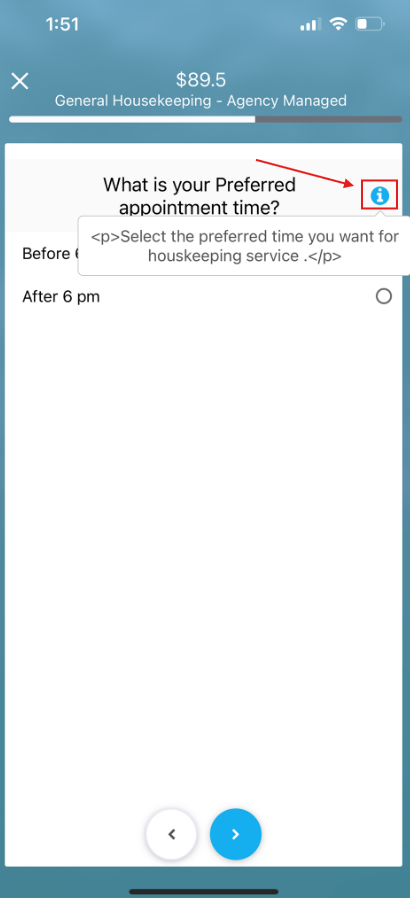
Fieldworker app (350px wide):
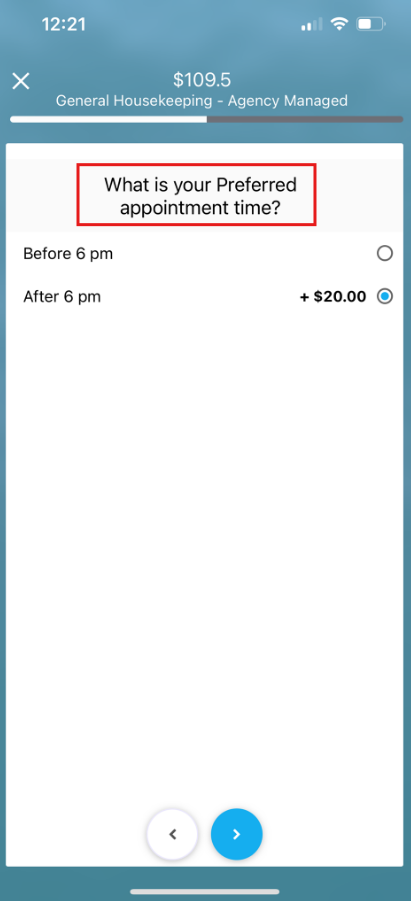
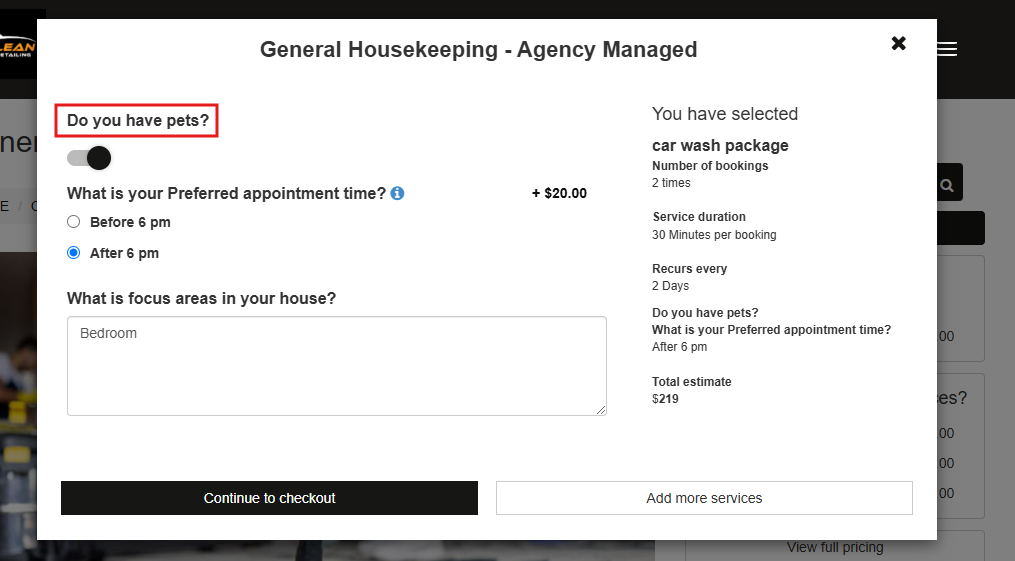
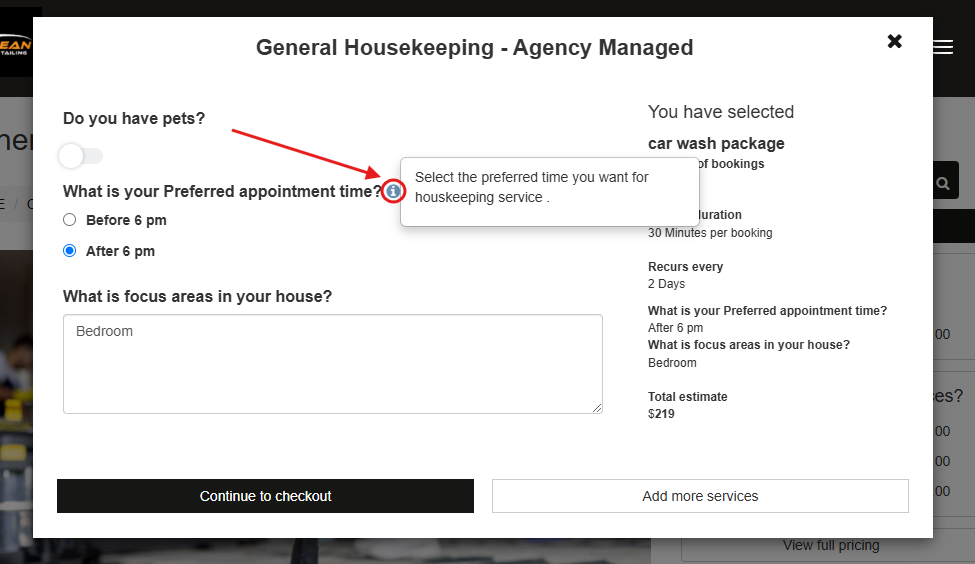
Customer Portal (online booking):
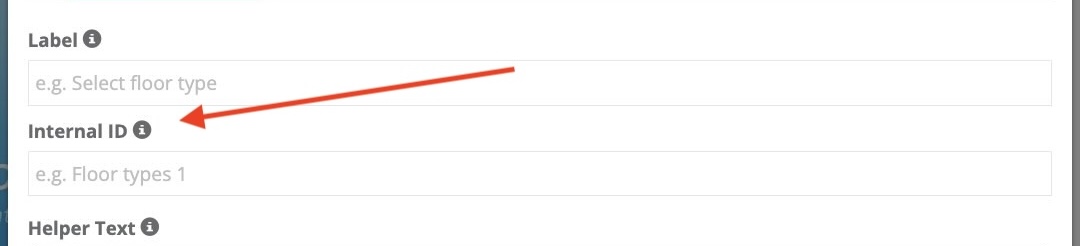
Internal ID (Field ID)
In the Custom Field editor, this may appear as Internal ID. It’s your internal unique identifier (not shown to customers). It’s useful when you have multiple fields with similar labels. Use a consistent naming convention (e.g., vehicle_type, preferred_time, gate_code).
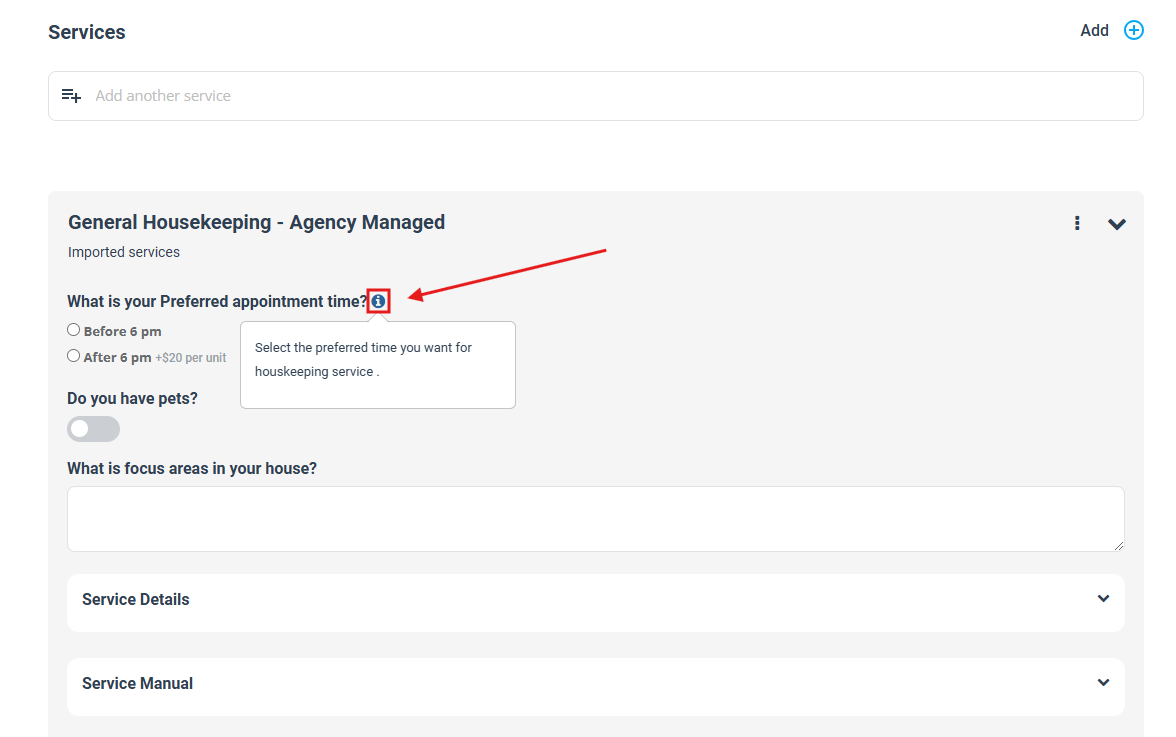
Helper Text (tooltips)
Helper Text provides extra guidance and appears as a tooltip (info icon). Use it to reduce confusion and improve form completion. In many accounts, Helper Text is a rich-text editor—so you can format text, add lists, and insert helpful notes.
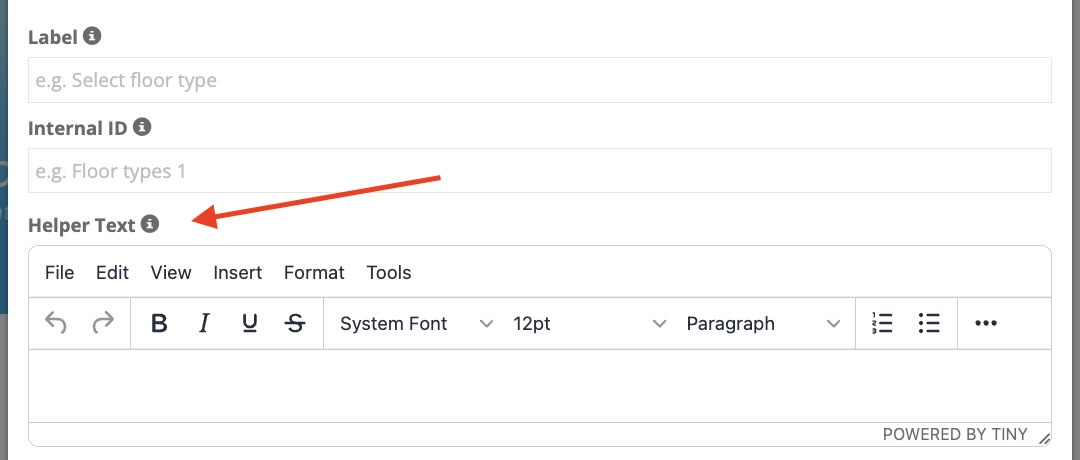
How Helper Text appears:
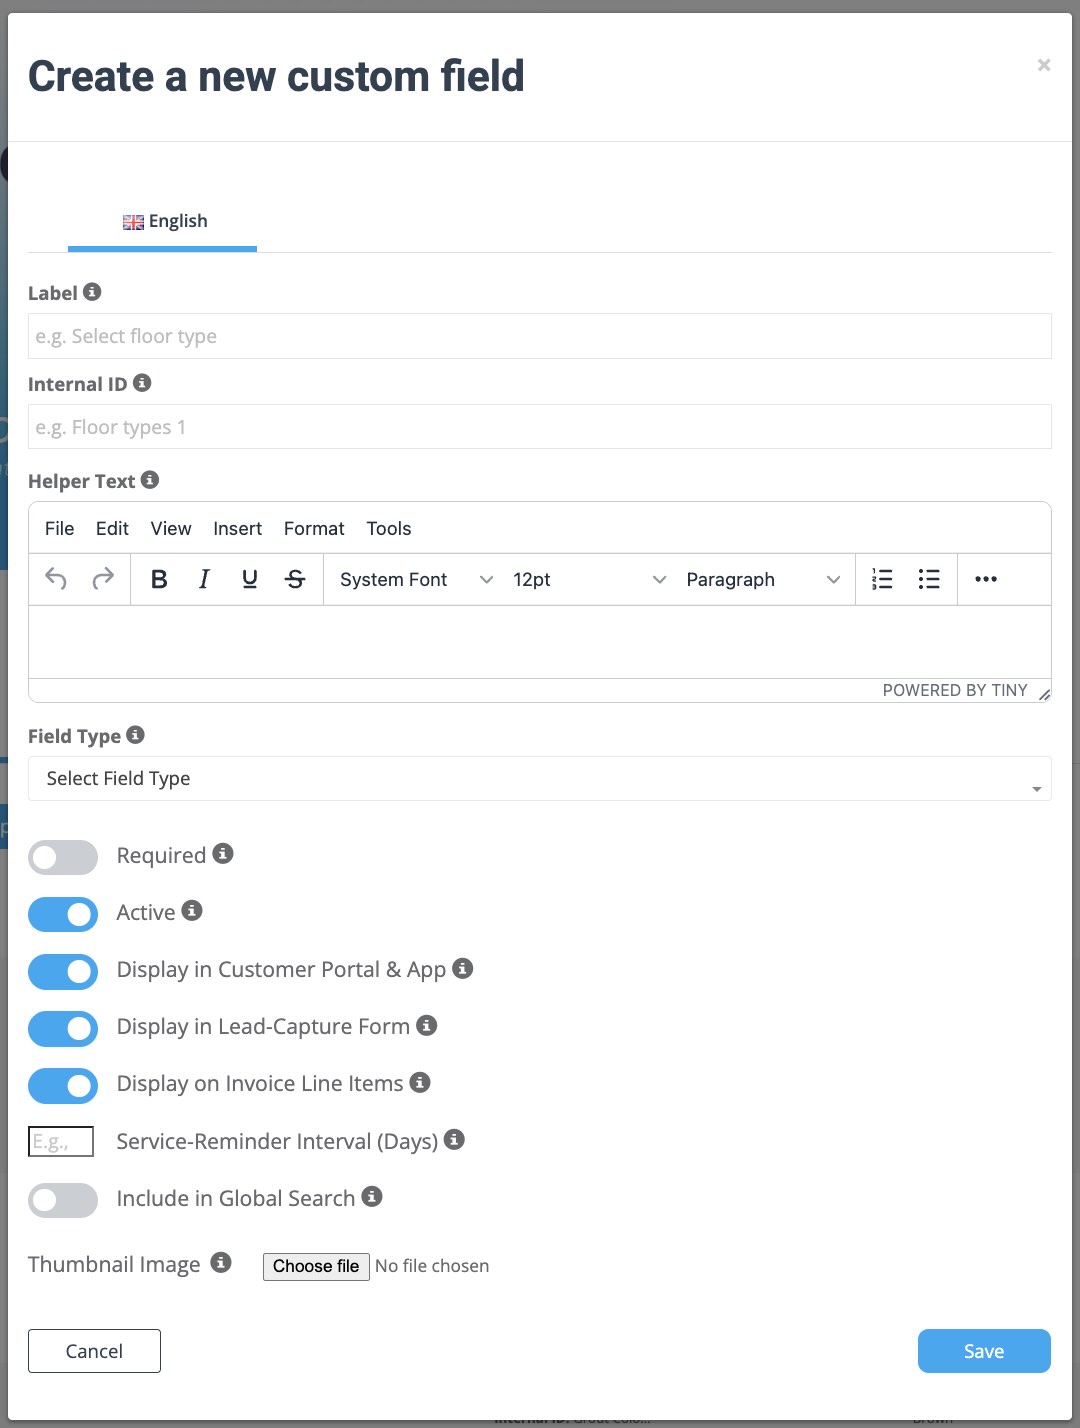
Visibility & behaviour settings
The Custom Field settings popup includes several toggles and fields that control where the field appears and how it behaves. Note: the UI now uses “Display…” and “Include…” style labels. In general, ON = enabled/shown and OFF = disabled/hidden.
- Required: When enabled, users must answer this field before they can continue (during booking/checkout, and on Lead Capture if the field is displayed there).
- Active: When enabled, the field is available for use in your booking flows. If disabled, the field won’t appear for new bookings/quotes/portal checkouts (existing records keep historical answers).
- Display in Customer Portal & App: When enabled, customers can see and complete the field in the Customer Portal (and customer app, if used). Turn this off for internal-only fields.
- Display in Lead-Capture Form: When enabled, the field appears on your Lead Capture (Inquiry) form so you can qualify leads and collect requirements earlier.
- Display as Dropdown in Lead-Capture Form: When enabled, the field displays in a more compact dropdown style on the inquiry form (useful for long forms and mobile). This is typically most useful for single-choice option fields (e.g., radio/button group). You’ll usually enable Display in Lead-Capture Form first.
- Display on Invoice Line Items: When enabled, the selected answer/option can be displayed on invoice line items (helpful when the customer’s selection affects deliverables or materials). Turn this off if you prefer cleaner invoices.
- Service-Reminder Interval (Days): Optional. Enter the number of days to help standardise service reminders (e.g., 180 for a 6-month follow-up). Use 0 to leave it unset.

Learn more: Automate Recurring Service Reminders for Customers - Include in Global Search: When enabled, the field value can be used in global search (helpful for key identifiers like “Registration number”, “Serial number”, “Site code”). Use sparingly to keep search results clean.
- Thumbnail Image: Optional. Upload a small image to visually represent the field where supported (useful for option-style fields and more visual booking flows).
Display pricing on the view service page:
Using Custom Fields in Lead Capture (Inquiry widget)
If you use the Lead Capture form (website inquiry widget), you can show relevant Custom Fields on the inquiry form to qualify leads and collect job requirements early. This is especially useful when customers are submitting an inquiry first (instead of booking immediately).
- To display a Custom Field on the inquiry form, enable Display in Lead-Capture Form in the field settings.
- To keep the inquiry form compact, enable Display as Dropdown in Lead-Capture Form (where supported) for long option lists.
- After a customer submits the inquiry, the Custom Field answers are stored inside the inquiry record for your team to review.
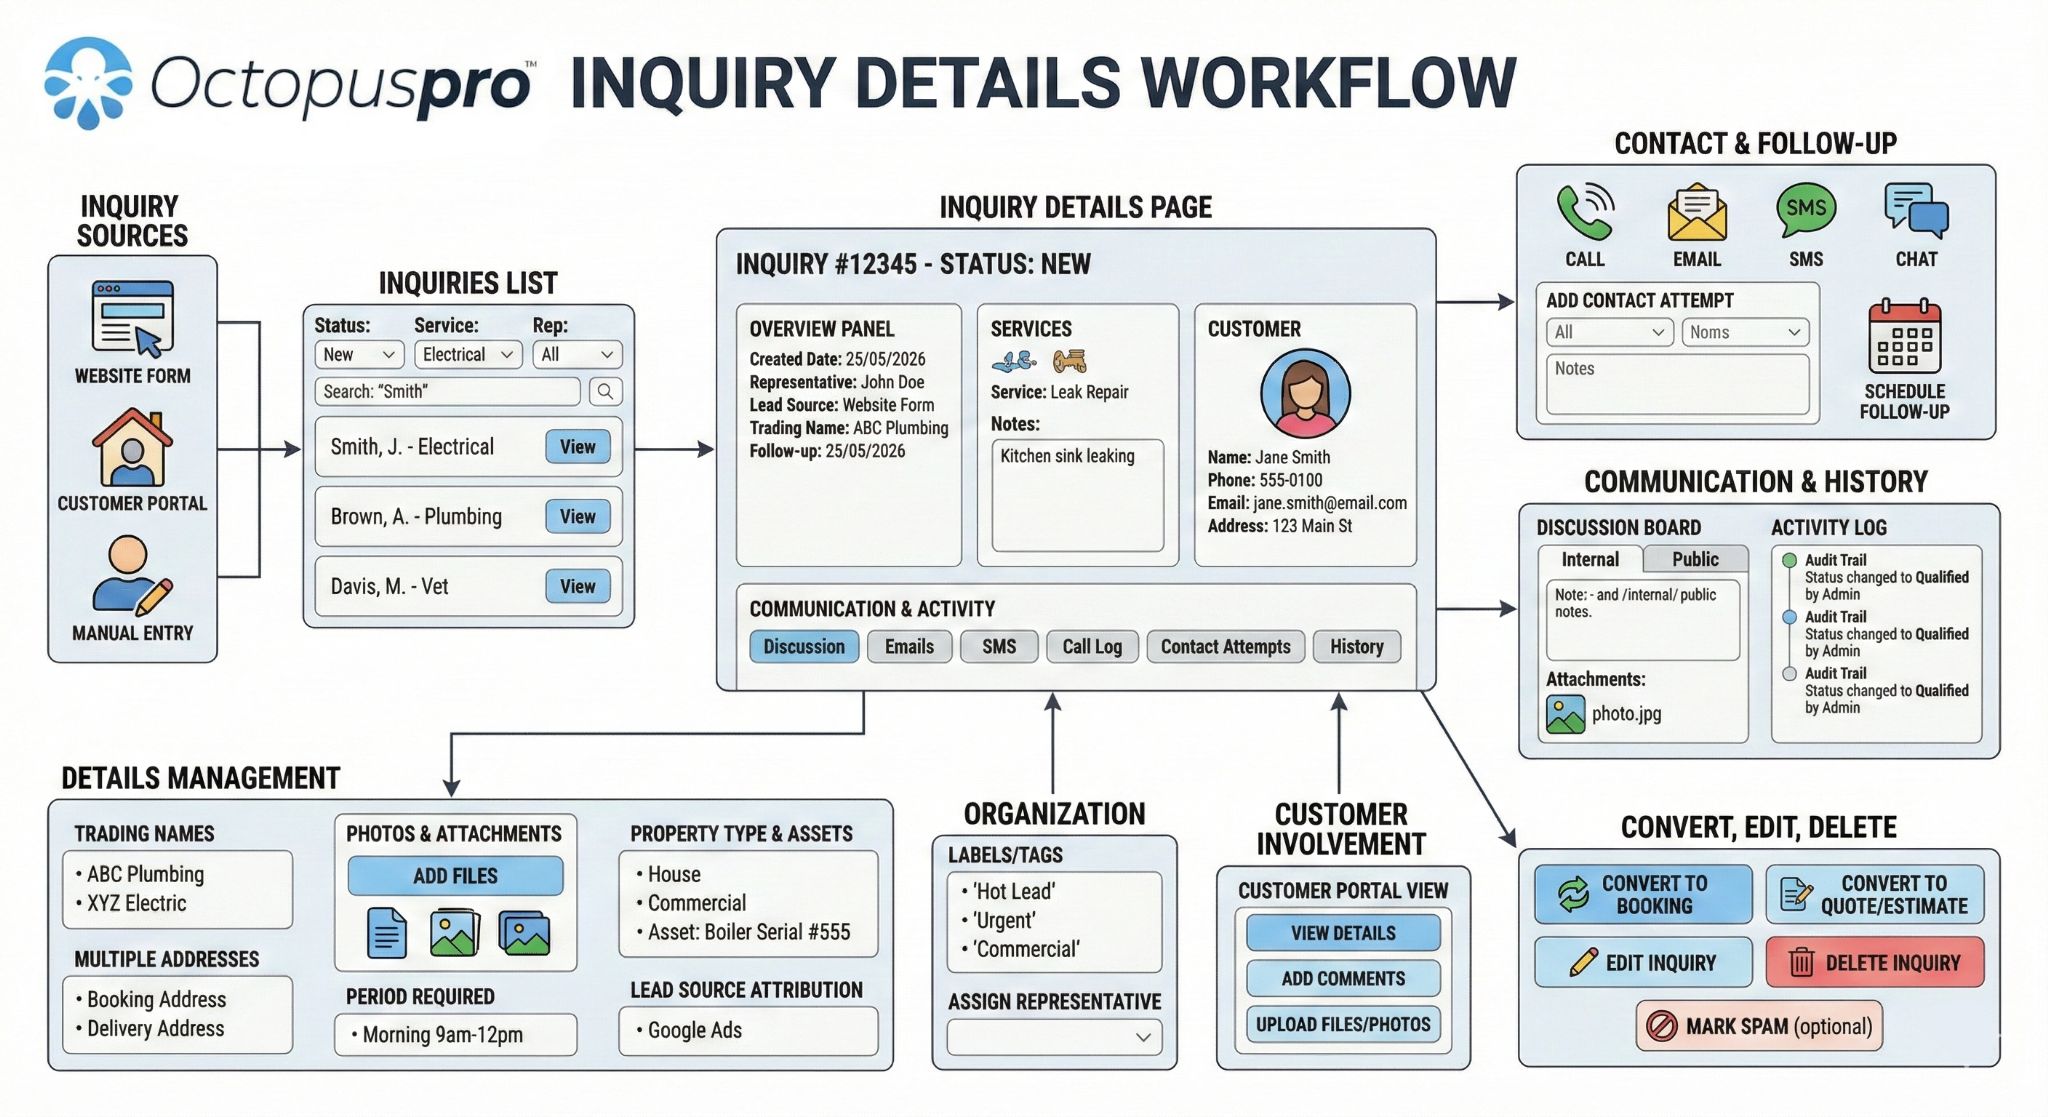
Learn more: View Inquiry Details | Inquiries & Lead Management (Overview)
Custom Field types
Choose a field type that matches the input you need. For predefined choices, use dropdown/radio/button groups to reduce typos and improve reporting.
| Field type | Best used for | Learn more |
|---|---|---|
| Date Picker | Preferred date, access date, delivery date. | View guide |
| Time Picker | Preferred time, access window. | View guide |
| Single-Line Text | Gate code, reference number, short answers. | View guide |
| Paragraph / Long Text | Access notes, instructions, longer descriptions. | View guide |
| Number Stepper (±) | Quantities (rooms/items/units), per-unit pricing. | View guide |
| Toggle Switch (Yes/No) | Binary choices (pets, parking, urgent booking). | View guide |
| Dropdown (single-select) | Choose one option from a list (compact UI). | View guide |
| Radio Button (single-select) | Choose one option with all choices visible. | View guide |
| Button Group (single-select) | Choose one option using big buttons (mobile-friendly). | View guide |
| Multi-Select List | Select multiple add-ons from a list (compact UI). | View guide |
| Checkbox (multi-select) | Multiple selections (extras, inclusions). | View guide |
| Checkbox Button Group | Multi-select shown as buttons (great with thumbnails). | View guide |
| Signature Pad (eSign) | Capture consent/sign-off at booking time. | View guide |
Tip: For long booking forms, group related questions into steps. Custom Field Groups (Multi-Step Booking Forms)

Values/options, pricing & time adjustments
For selection-based fields (dropdown, radio, button group, checkbox types), you will create the selectable values/options. Each option can support things like:
- Default additional cost (e.g., +$20 for after-hours)
- Default additional time (Extra duration) (where enabled in your account)
- Thumbnails/images to make options clearer (great for mobile)
- Dependent field triggers (show follow-up questions only when needed)
- Default selection & option order to influence customer choices
Step 1: Open the Custom Fields list and click “Manage Values”

Step 2: Create a new value/option

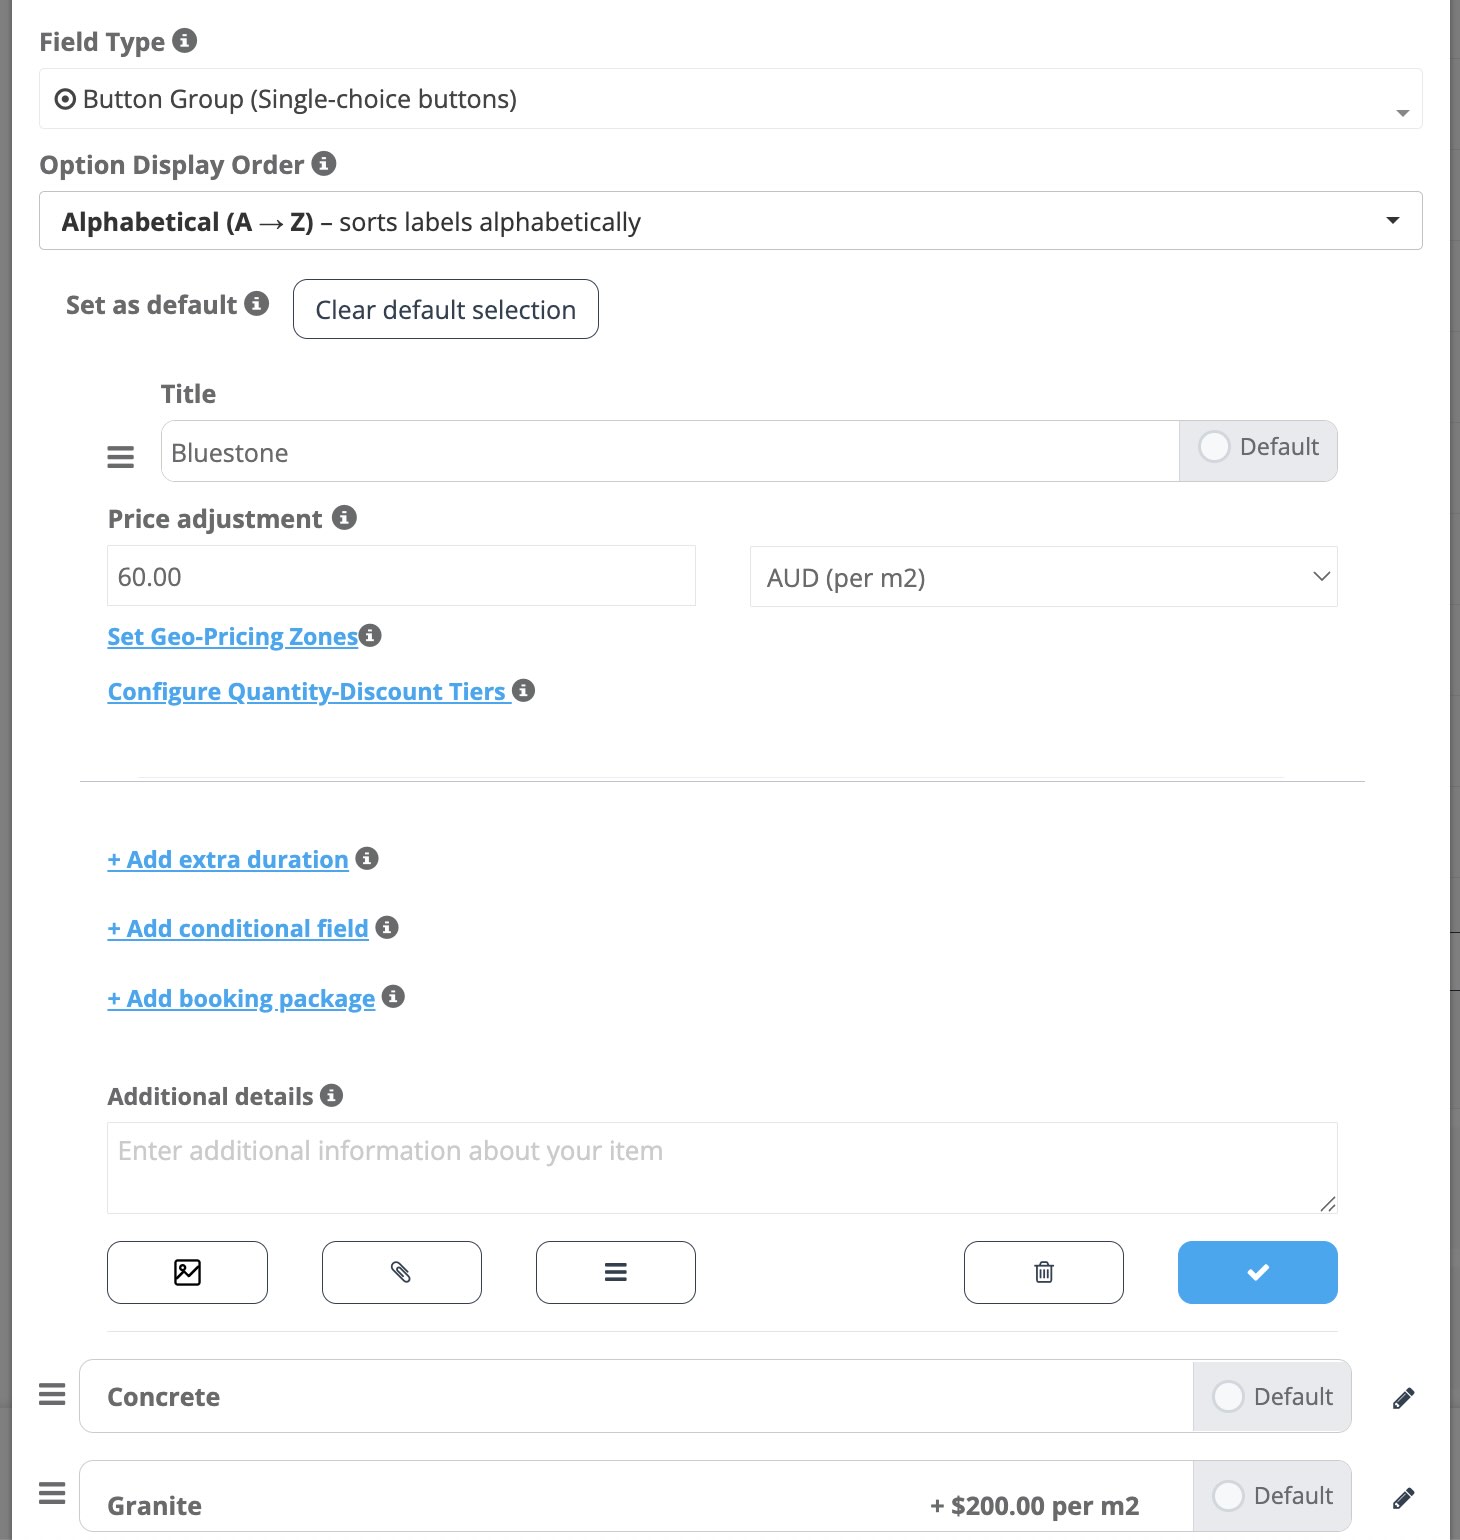
Step 3: Configure pricing, extra duration, defaults and conditional display
- Price adjustment: add a fixed or unit-based adjustment (depending on your configuration).
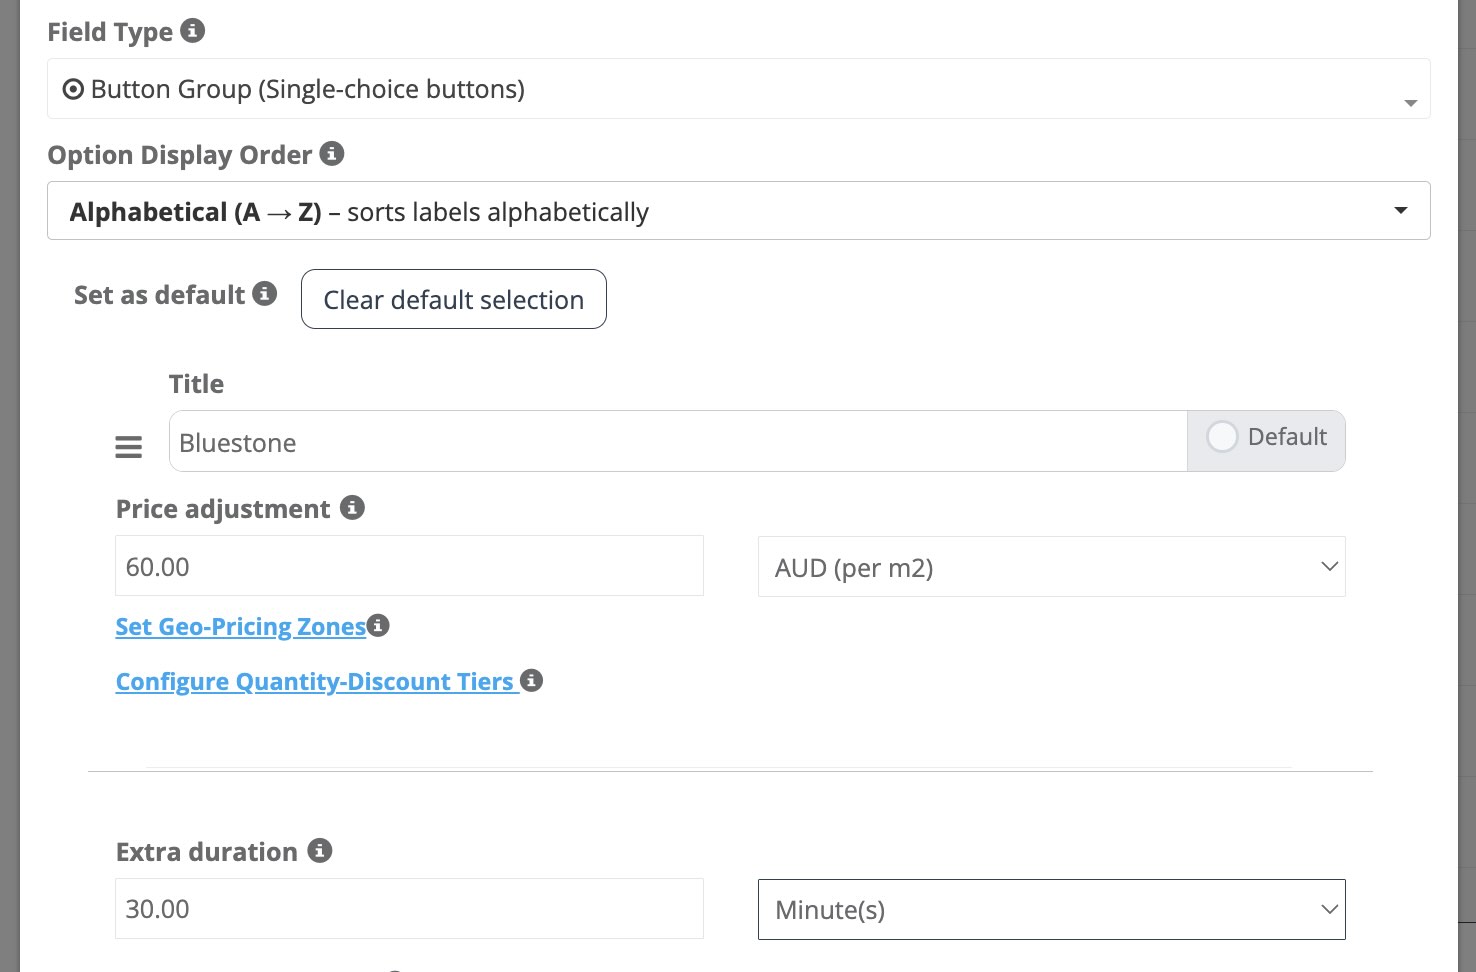
- Extra duration: add extra time for specific options (useful for larger/complex jobs).
- Set Geo-Pricing Zones: apply different pricing per area/zone (where enabled).
- Configure Quantity-Discount Tiers: create tiered pricing/discounts based on quantity ranges (where enabled).
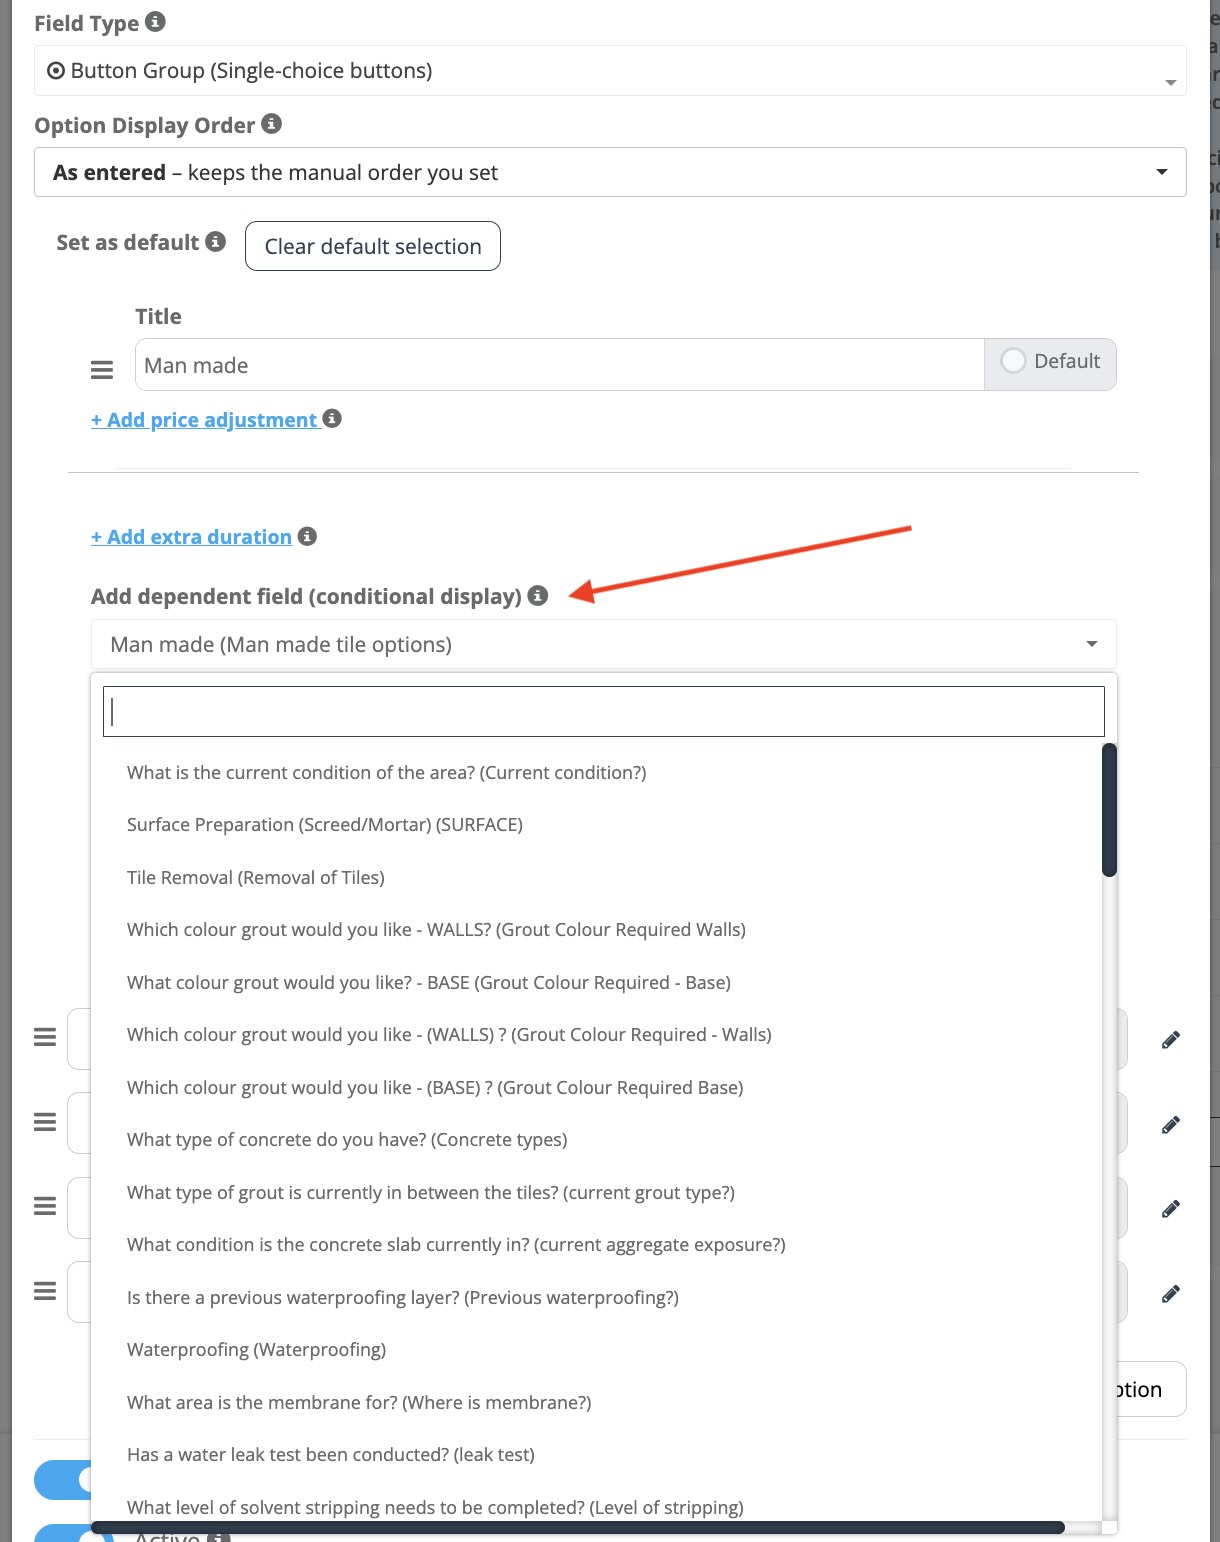
- Add dependent field (conditional display): show a follow-up field when this option is chosen.
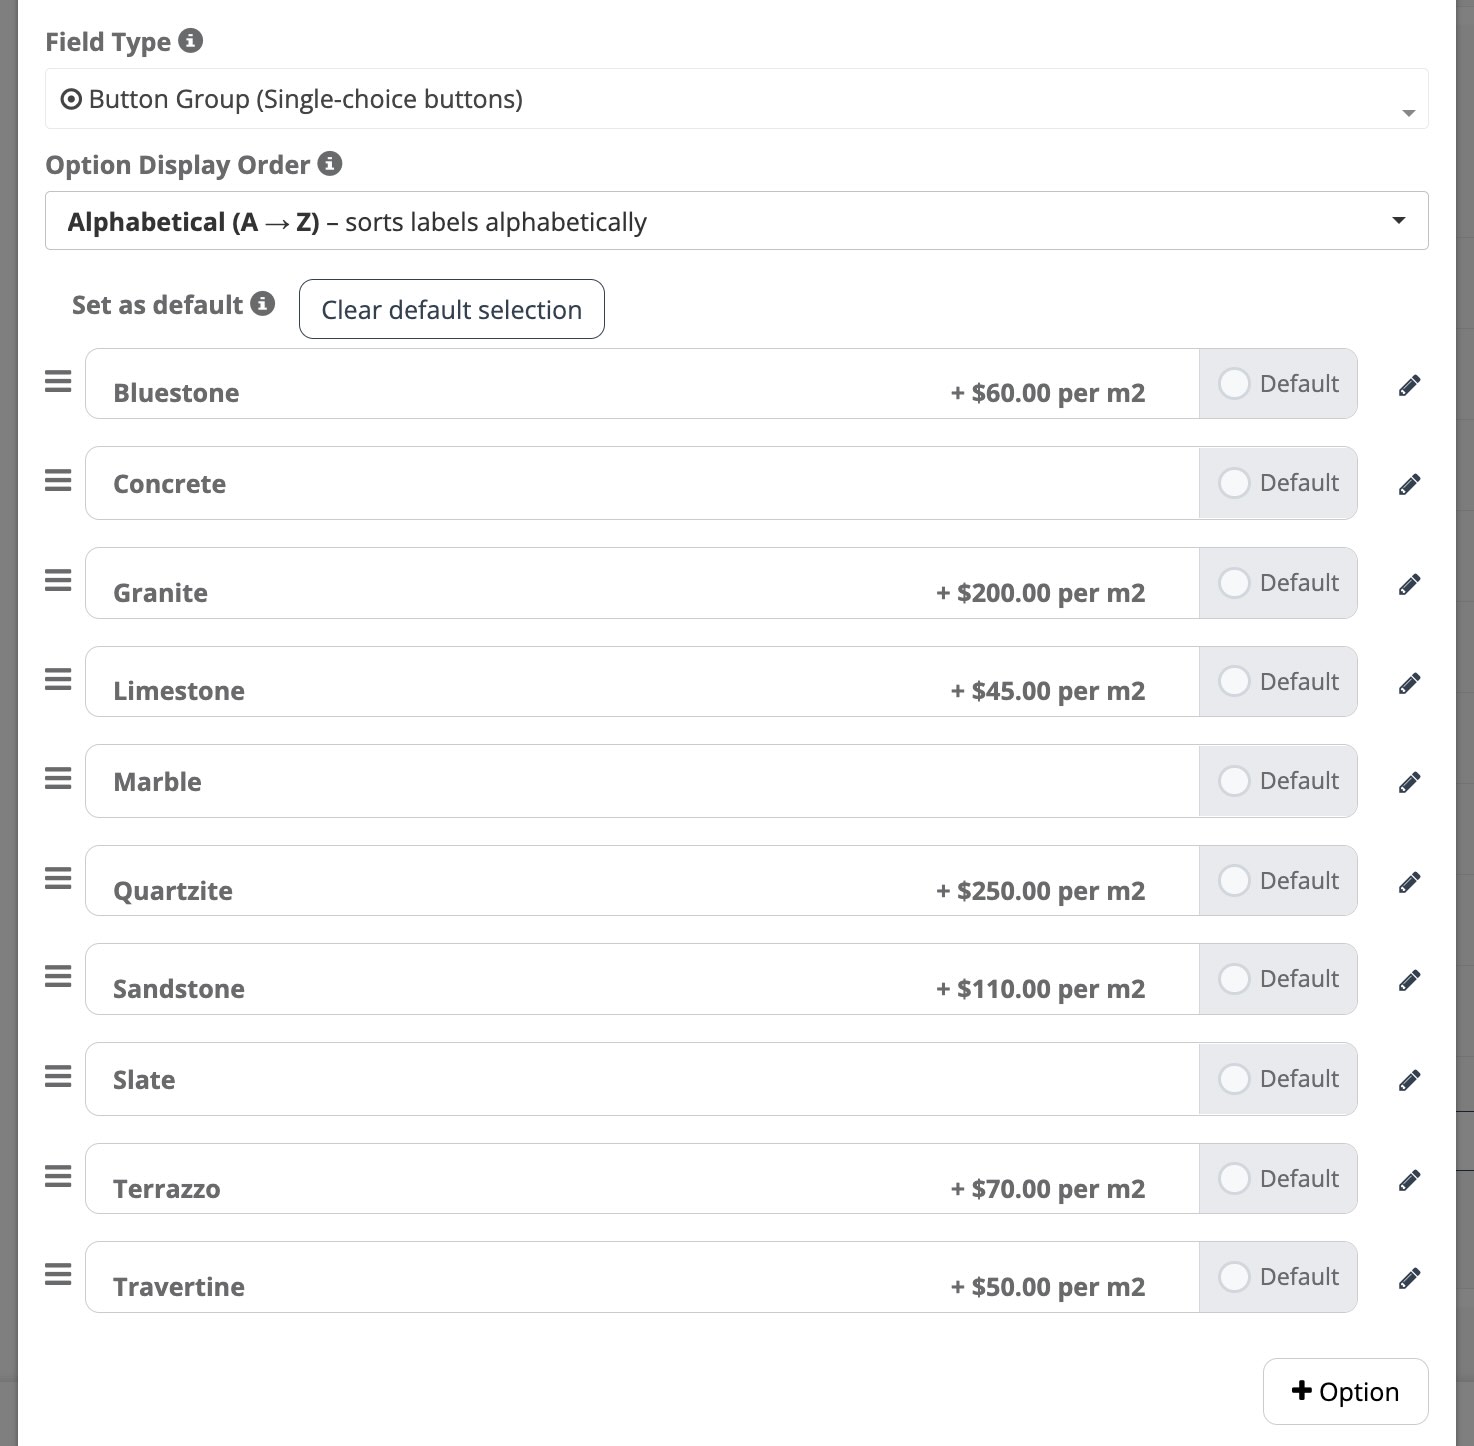
- Option Display Order: control how options are shown to customers (e.g., As entered / Lowest cost first / Highest cost first / Alphabetical).
- Set as default: preselect an option for faster checkout (use carefully; customers can still change it).
Note: If your service has a base price, option pricing is usually added on top of it. Always test the customer flow after pricing changes to confirm totals appear as expected.
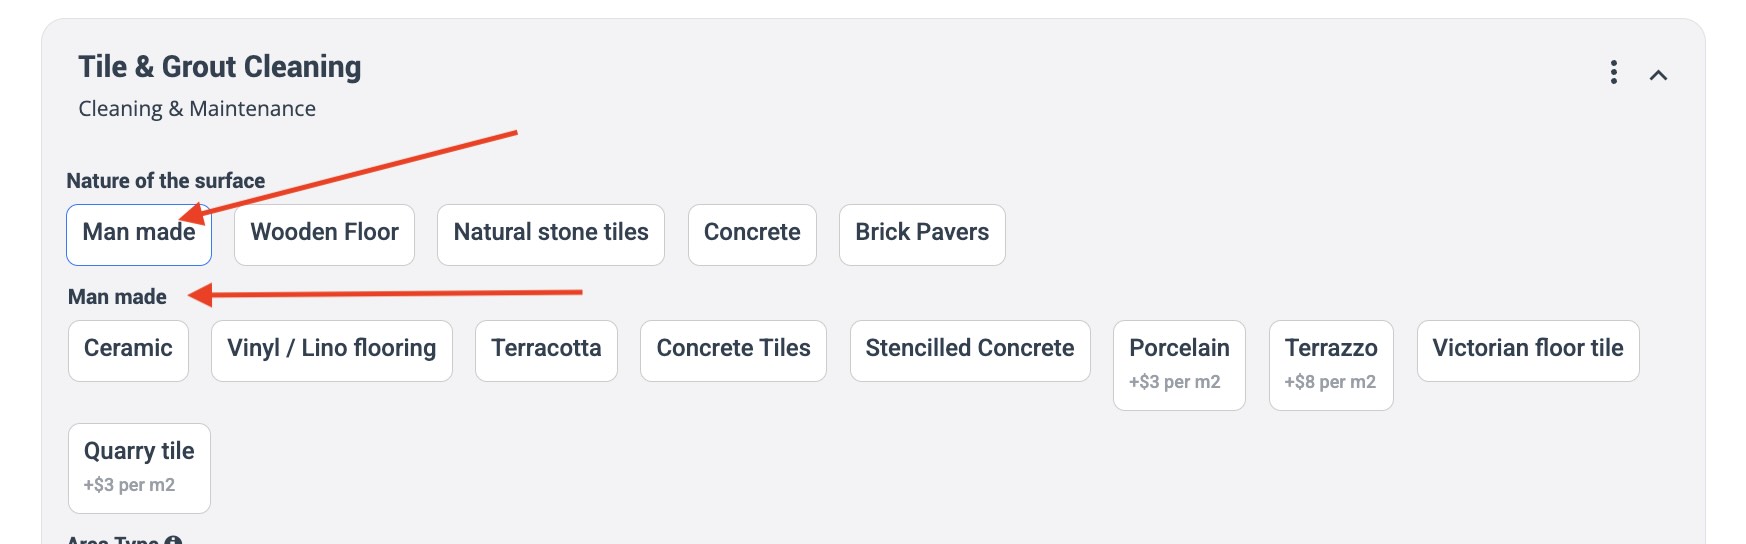
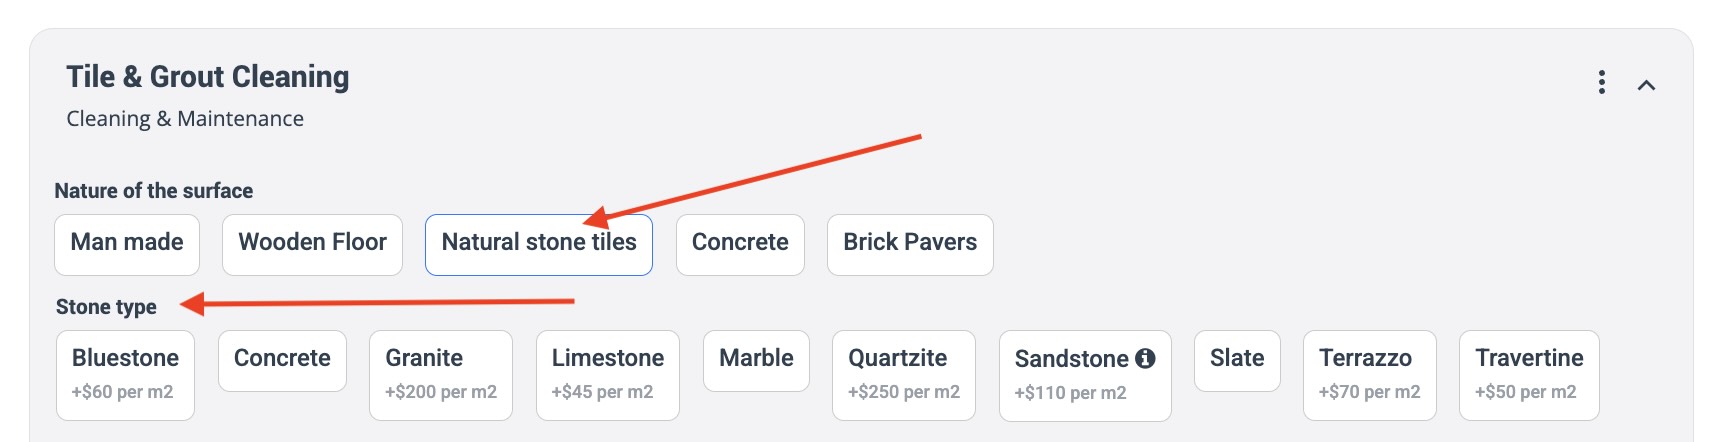
Dependent Custom Fields (Conditional Logic)
Dependent custom fields (conditional logic) let you show follow-up questions only when they’re relevant. This keeps booking forms short, improves completion rates, and helps you collect the right details without overwhelming the customer.

Example: If a customer selects “Yes” to Do you have pets?, you can automatically show a follow-up field such as What type of pet?
How it works
- Create a primary (trigger) custom field with options (e.g., Yes/No, property type, material type).
- Add a dependent custom field and set it to appear only when specific trigger option(s) are selected.
- Optionally, apply pricing and/or extra duration to dependent options—so totals and time estimates remain accurate.
Visual examples
Best practices
- Use conditional logic to hide “edge-case” questions unless needed (pets, stairs, access issues, special materials).
- Keep option labels customer-friendly (they appear in the portal/online booking if enabled).
- Test the flow end-to-end in the booking form and Customer Portal to confirm the right fields appear.
Learn more: Dependent Custom Fields (Conditional Logic) – Full guide
Assign Custom Fields to Services
To show the right questions for the right service, you must link (assign) Custom Fields to services.
- You can link multiple custom fields to one service.
- You can reuse the same custom field across multiple services.
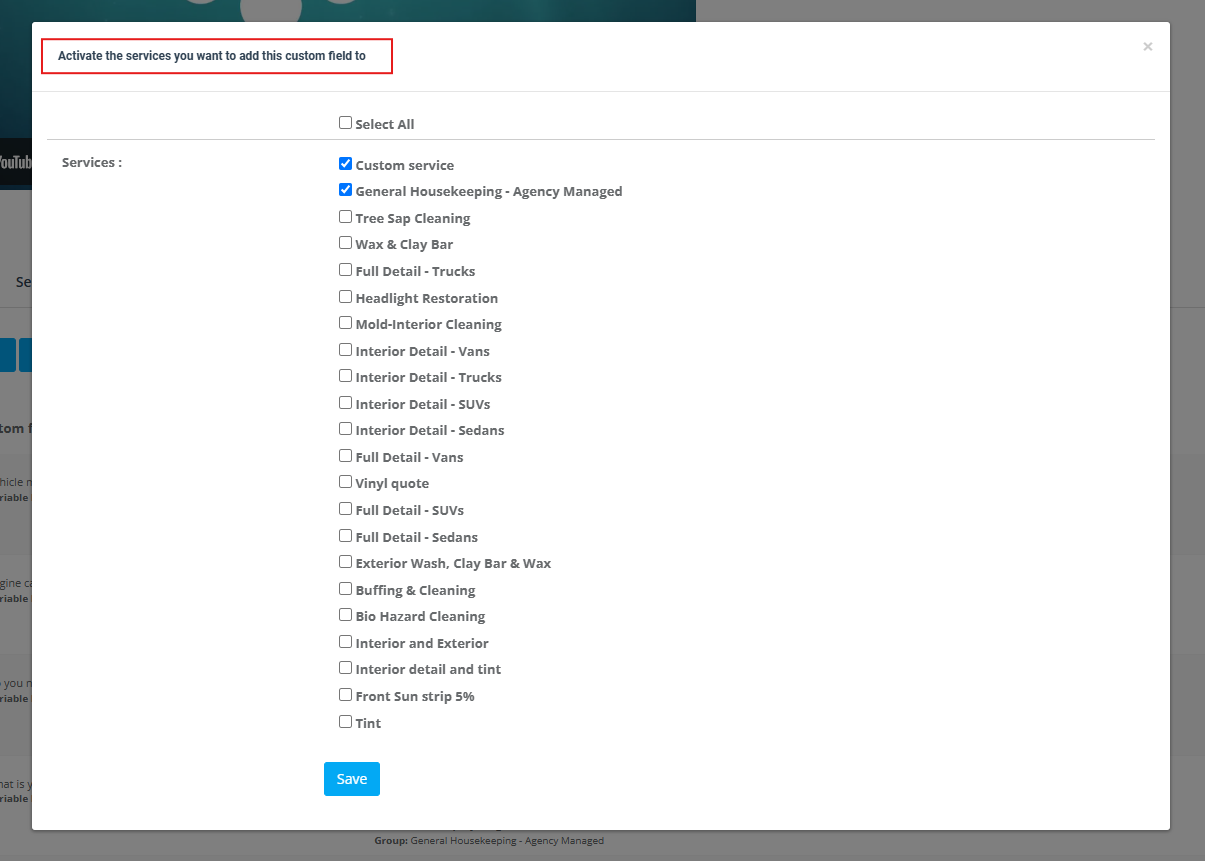
Method A (recommended): Bulk link from the Custom Fields list
- Go to Settings → Service Settings → Custom Fields.
- Select the checkbox next to the custom field(s).
- Click Connect to services.
- Select the relevant services and click Save.

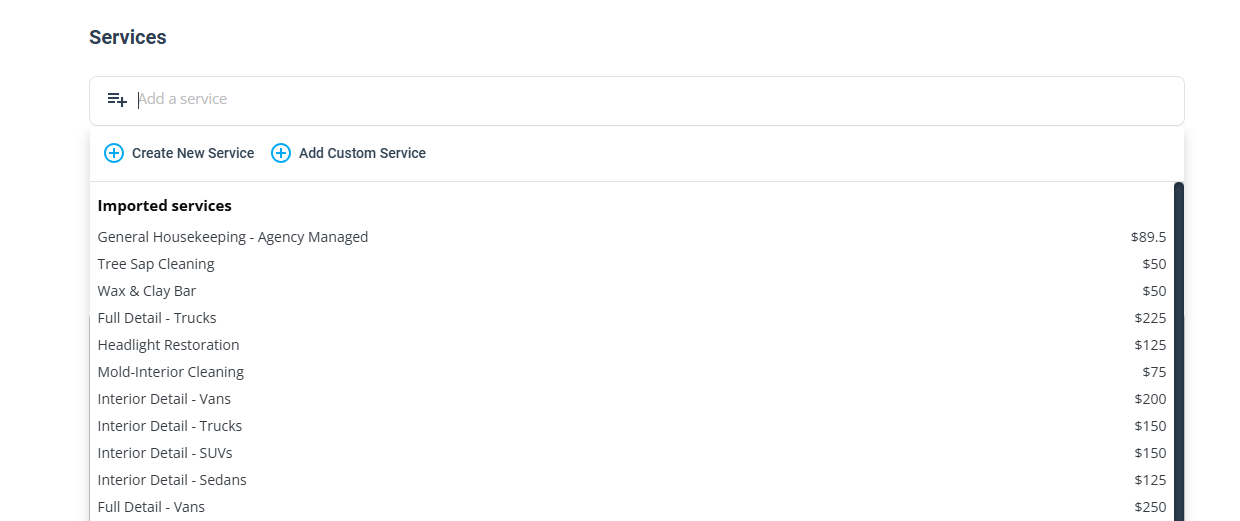
Method B: From the Services list (service-first workflow)
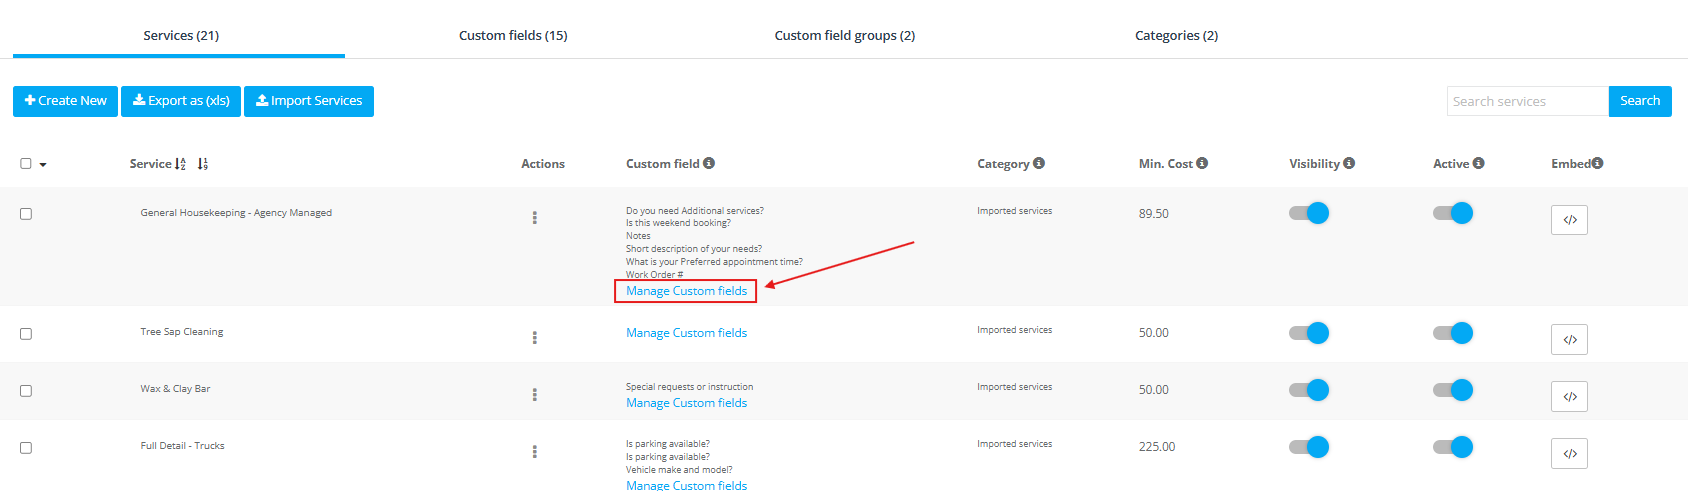
Service setup: You can also add fields while creating/editing a service. Creating a New Service


Learn more: Assign Custom Fields to Services – Full guide
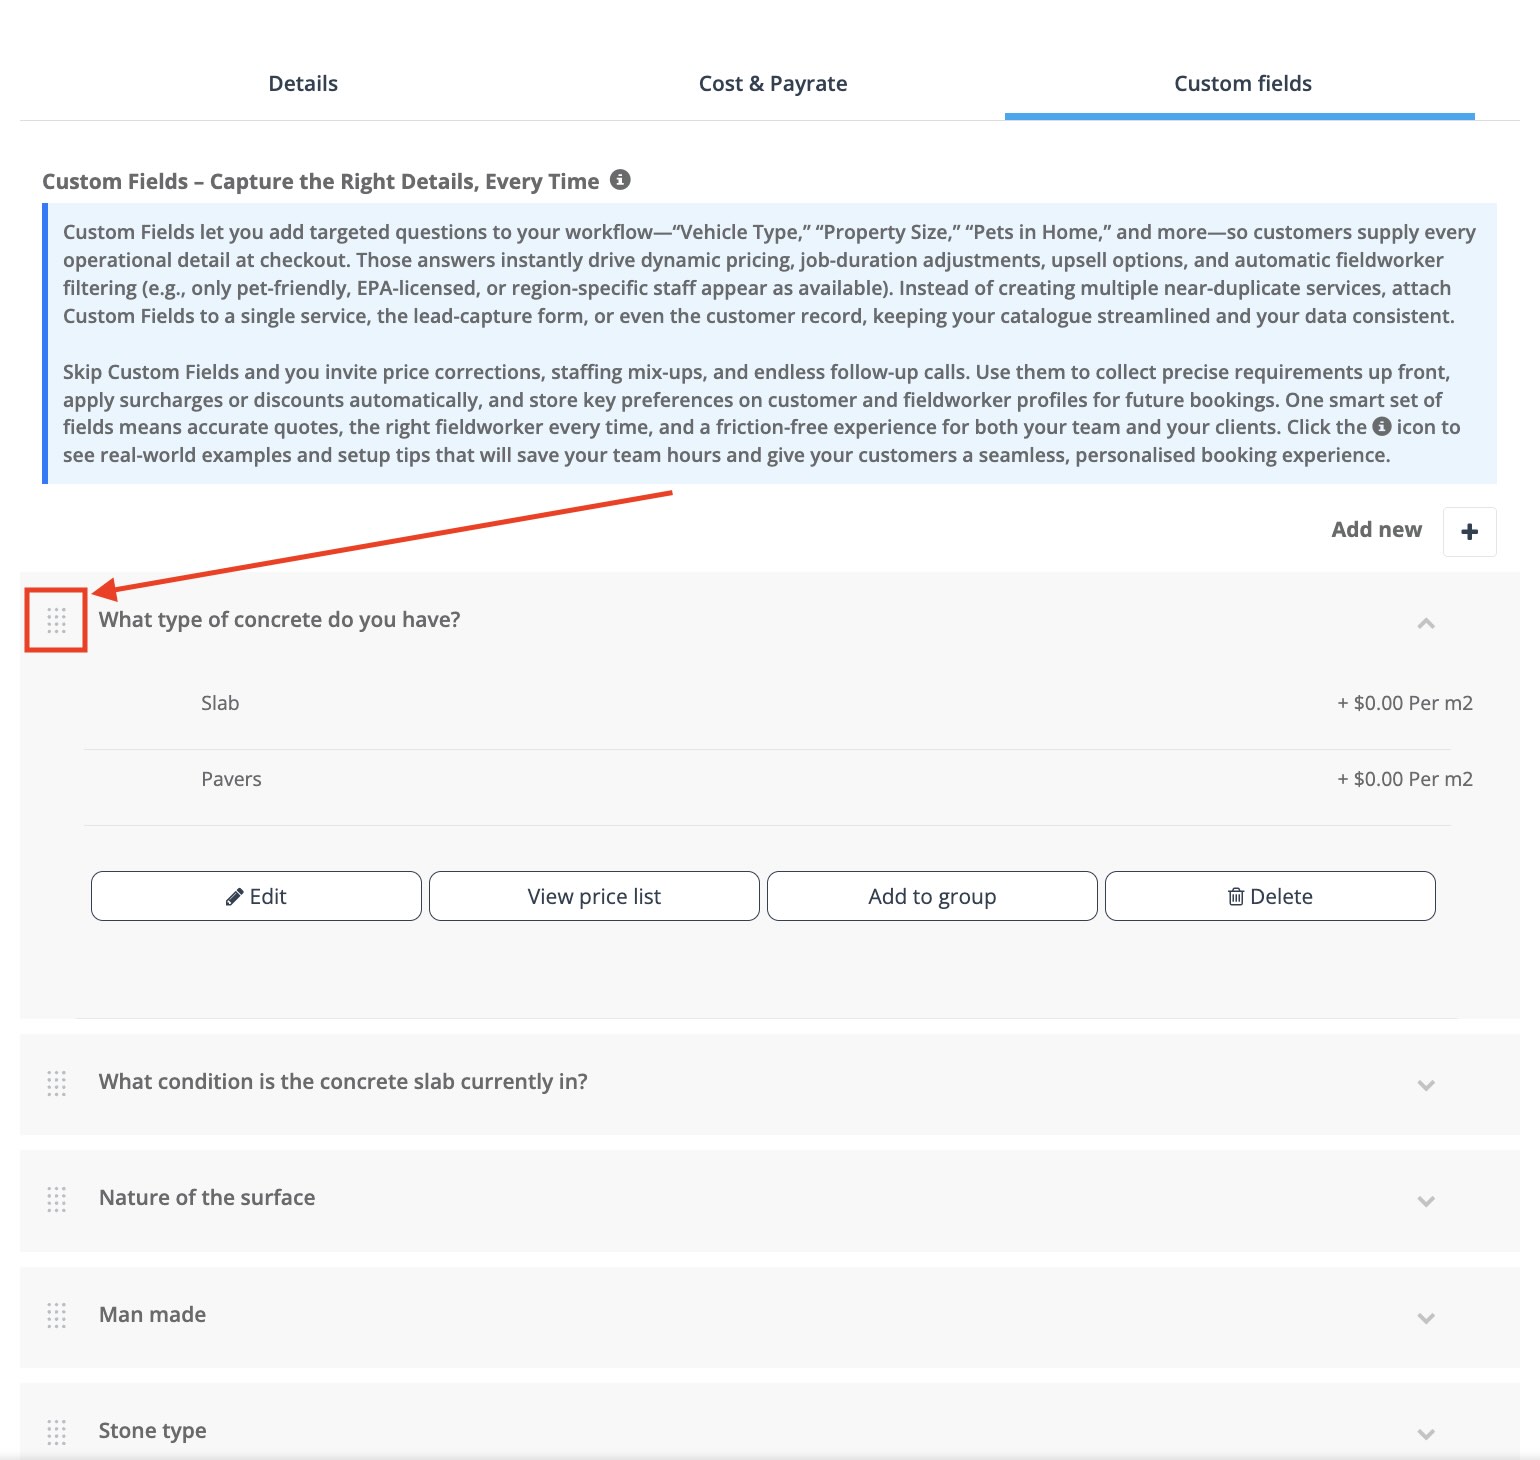
Reorder Custom Fields (drag & drop)
Field order affects conversion and speed. Put essential questions first, optional add-ons later. To reorder fields for a service, open the service’s Custom fields tab and drag-and-drop the fields into your preferred order.
Tip: If you need to control which fields appear based on selections, use dependent fields and groups to keep the booking flow clean.
Bulk tools (Import/Export/Groups)
If you manage lots of fields, OctopusPro provides bulk tools on the Custom Fields screen (availability may vary by account), such as:
- Import custom fields (reuse templates or migrate a setup)
- Export as CSV (audit, review, or back up your configuration)
- Manage groups (organise fields into steps/sections for cleaner checkout)
Recommendation: After importing or changing many fields, test an online booking in the Customer Portal to confirm field order, visibility, and pricing.
Related articles
- Lead Capture Form (Website Inquiry Form)
- Inquiries & Lead Management (Overview)
- View Inquiry Details
- Customer Portal Contact Us Form & Lead Capture
- Accept Online Bookings Through Your Website
- Customer Portal Flags & Permissions
- Custom Field Groups (Multi-Step Booking Forms)
- Dependent Custom Fields (Conditional Logic)
- Assign Custom Fields to Services
- Customer Profile Custom Fields
- Fieldworker Profile Custom Fields
- Forms & Checklists Setup
- Automate Recurring Service Reminders for Customers
- Role-Based Access Control (Permissions)
To stay updated, please subscribe to our YouTube channel.