
Create a New Service (Configure Pricing, Packages, Custom Fields & Customer Booking Options)
A Service is what you sell (e.g., “Gutter Cleaning”, “Emergency Call-Out”, “Online Consultation”). Once a service is created, it becomes selectable across your entire system—including Quotes, Bookings, Invoices, the Customer Portal, the Branded App, and the Fieldworker App.

When you configure a service correctly, OctopusPro can:
- Apply the correct pricing model (time, job/flat fee, or unit-based)
- Enforce payment requirements (deposit, full payment, staged payments)
- Offer packages/bundles for recurring or prepaid work
- Automatically adjust price using tiered/adaptive rates, quantity discounts, and geo-price zones
- Capture job-specific details using Custom Fields (including option-level pricing rules)
- Control which fieldworkers can perform the service and how they get paid
Optional add-ons (account dependent): Some accounts may also show additional service options such as Meter In-Job Mileage (GPS-based mileage billing), Product Share (product revenue split), Stripe Connect payouts, and advanced auto-invoicing logic. If you don’t see a setting mentioned below, it may not be enabled for your plan or configuration.
- Product Share & fieldworker payouts: learn how service share, product share, and payout totals are calculated and displayed in bookings/quotes/invoices: Fieldworker Commission, Pay Rates & Payouts and Fieldworker Payroll Management & Reconciliation.
- Stripe Connect payouts: if you run a marketplace-style model and need automated split payouts: Stripe Integration (Direct Payments & Stripe Connect).
- Auto-invoicing logic: if you want invoices auto-created when customers book online: Auto-Create Invoices on Customer Portal Bookings.
Table of contents
- Ways to create a new service
- Service details (name, category, descriptions)
- Why service detail matters (best practices)
- Customer-facing options (service & booking preferences)
- Display options (what customers/fieldworkers see)
- Multi-language service setup
- Service packages & bundles
- Embed booking & gift voucher buttons on your website
- Assign services to fieldworkers (skills-based scheduling)
- Cost & pay rates (pricing models, deposits, tax, rules)
- Payment requirements for online bookings (service-level overrides)
- Pricing models (time, job, unit) + advanced pricing tools
- Pricing model fields (quick reference tables)
- Cross-model settings (minimum price, tax, zones, discounts)
- Quick pricing examples (real-world)
- Meter In-Job Mileage (GPS odometer billing)
- Tiered / adaptive pricing (rate tiers)
- Minimum booking price
- Tax rate (GST/VAT/sales tax)
- Geo-pricing zones (location-based pricing)
- Quantity-based discounts (bulk/volume pricing)
- Fieldworker pay rates (hourly/commission)
- Custom fields (booking questions, pricing add-ons, eligibility)
- Manage services (view/edit/delete)
- Add services while creating bookings/quotes/inquiries
- How customers view services in the Customer Portal
- Import & export services
- Finishing your service configuration
Ways to create a new service
You can create services in several ways depending on your workflow:
Method A: From Service Settings (recommended)
- Go to Settings
- Select Service Settings
- Click Services
- Click Create New

Method B: While creating a Quote, Booking, or Inquiry
If you’re creating a quote, booking, or inquiry and can’t find the service you need, click Create New Service from the service picker. This helps you build your service catalog without leaving the workflow.
Related guides:
Method C: Import services in bulk (CSV/Excel)
If you’re migrating from another system or creating a large catalog, use Import Services to upload your list in one go. See Import & export services below.
Method D: Sync from accounting software (basic data only)
If you sync from accounting software (e.g., Xero/QuickBooks), you may be able to import basic service items. However, advanced settings (custom fields, packages, tiered pricing, discounts, and zones) typically still need to be configured inside OctopusPro.
Service details (name, category, descriptions)
Use the Details tab to define what the service is, how it should appear to customers, and what your team needs to deliver it consistently.
Service name
Choose a short, outcome-based name customers immediately understand (e.g., “End of Lease Cleaning”, “Emergency Drain Unblock”, “Online Consultation”). This name appears in the customer portal, quotes, bookings, invoices, and reports.
Category
Categories help customers browse your catalog and help staff find services faster. Use clear, non-overlapping categories (e.g., “Cleaning”, “Plumbing”, “Tutoring”).

Learn more: Organize Service Categories
Customer description (what customers see)
Write a clear explanation of what’s included, what’s excluded, and what customers should prepare. If pricing varies, explain what affects cost (size, condition, access, travel, after-hours, add-ons, etc.).
Internal notes / service manual (what staff see)
Add internal steps, safety notes, checklists, and quality standards so fieldworkers and office staff deliver the service consistently—especially if you use subcontractors.
Media (images, gallery, videos, attachments)
- Gallery images: Upload service images to improve conversion and help customers understand the outcome.
- Show Gallery toggle: If enabled, customers can browse the gallery; if disabled, the first/cover image is used as the service image.
- YouTube video link: Add a video to demonstrate the service and set expectations.
- Attachments: You can attach PDFs/images that can be reused in workflows (e.g., auto-attached to quotes/invoices/booking summaries depending on your settings).
- Keep it lean: enable only what customers actually need—too many choices can slow checkout.
- Test both roles: preview as a customer (private/incognito window) and as an admin after changing toggles.
- Combine smartly: customer interaction options work with Packages, Geo-Pricing, Quantity Discounts, and Custom Field add-ons.
Why service detail matters (best practices)
| If you… | The result is… |
|---|---|
| Use a vague name (e.g., “Package 1”) | Lower search visibility; customers skip it. |
| Leave the description blank | More follow-ups; fieldworkers arrive unprepared. |
| Skip internal instructions | Inconsistent quality across jobs and contractors. |
Spending a few minutes on service detail can save hours of support time later and improves consistency across every booking.
Customer-facing options (service & booking preferences)
These settings control how the service appears in your Customer Portal and how customers can interact with it online, including direct booking, lead capture visibility, gift voucher purchase, group/shared bookings, and recurring reminder defaults.
| Setting | What it does | Typical use case |
|---|---|---|
| Display on Customer Portal | Displays the service in your online service catalog. Turn this off to hide the service from customer-facing channels while keeping it available for internal admin use. | Seasonal or invite-only services you don’t want publicly visible all year. |
| Allow Online Bookings | Determines whether customers can self-schedule this service through the Customer Portal. If turned off, the service can still remain visible (if portal display is enabled), but customers may be limited to sending an enquiry or purchasing a gift voucher instead. | Complex services that need staff review before a booking is confirmed. |
| Display in Lead Capture Form | Makes the service selectable in your website enquiry / lead capture form so prospects can request more information without booking instantly. | Quote-first services such as large projects, inspections, or customised work. |
| Allow Multiple Addresses per Booking | Allows customers to add more than one service address within the same booking when your portal configuration supports multiple addresses. | Multi-site cleaning, inspections, deliveries, or property services. |
| Enable Gift Card Purchase | Lets customers purchase this service as a gift voucher / gift card from the portal or via a service-specific gift-voucher button. | Spa treatments, lessons, consultations, babysitting hours, or prepaid service gifts. |
| Allow Group or Shared Bookings | Allows the service to be used for group, shared, or multi-attendee bookings. When enabled, you can define how pricing should be calculated for those bookings. | Classes, workshops, tours, therapy groups, shared appointments, or private sessions with multiple attendees. |
| Default Recurring Service Reminder Interval (Days) | Sets the default number of days used for recurring service reminders for this service. | Annual reminders, routine maintenance, recurring inspections, or repeat seasonal services. |
Payment requirements for customer-portal bookings: If Allow Online Bookings is enabled, you can choose whether this service uses your account-wide payment policy or custom payment terms for this service. These rules apply only to bookings created by customers online. Bookings entered by your office staff or fieldworkers follow your internal payment workflow.
Group booking pricing mode
When Allow Group or Shared Bookings is enabled, you can choose how pricing is calculated for multiple attendees. This is a service-level default used by your staff for pricing logic, and it can be overridden on an individual booking if needed. Customers do not directly configure this setting during online booking.
| Pricing mode | How pricing works | Best for |
|---|---|---|
| Per Session | Charges one flat rate for the whole booking regardless of how many attendees join. | Private group lessons, shared appointments, therapy groups, or bookings where one combined fee covers everyone. |
| Per Person | Charges each attendee individually, so the total price increases with the number of participants. | Classes, workshops, tours, fitness sessions, and public group events where each attendee pays separately. |
Embed options: If enabled in your setup, OctopusPro can generate embed code for Embed a ‘Book Now’ Button for Your Website and, when Enable Gift Card Purchase is enabled, Embed a ‘Buy Gift Voucher’ Button for This Service. This makes it easy to place service-specific booking and gift voucher buttons on your website, landing pages, or promotional pages.
Learn more:
- Accept Online Bookings Through Your Website (Customer Portal)
- Lead Capture Form (Inquiry Widget)
- Customer Portal: Repeat / Recurring Bookings
- Recurring / Repeat Bookings (Admin + Portal)
- Sell Gift Vouchers Online (Gift Cards)
Display options (what customers & fieldworkers actually see)
Use these toggles to control where your service description appears across staff views and customer-facing documents. This helps you keep your portal listing concise while still showing the right amount of detail on operational screens, quotes, booking summaries, and invoices.
| Setting | Where it shows | Why enable it |
|---|---|---|
| Display Service Description to Fieldworkers | Admin booking screens and the Fieldworker App | Helps staff understand service scope, inclusions, exclusions, materials, and delivery notes before attending the job. |
| Include Service Description on Invoices | Invoice PDFs, customer invoices, and invoice emails | Improves billing clarity by reminding customers what the invoiced service covered. |
| Include Service Description on Quotes/Booking Summaries | Quote PDFs, booking summaries, and booking-related documents | Makes approvals easier by clearly stating what is included before the customer accepts the quote or booking. |
Multi-language service setup
If you serve customers in multiple languages, you can translate service content and customer-facing text without duplicating services.
Why it matters
- Expand your market: reach multilingual regions or cross-border customers without running separate websites.
- Boost conversion & retention: customers book more confidently when they can read pricing, scope, and T&Cs in their first language.
- Professional consistency: every customer-facing surface—portal, PDFs, and notifications—stays clear and on-brand.
How it works
- Enable languages: Go to Settings → Customer Portal → General Settings and enable the languages you support.
- Switch language context while editing: Use the language selector on Service Settings pages to enter translated versions.
- Translate key content:
- Service name, short description, full description
- Custom field labels + helper text (including option names and measurement guides)
- Dynamic messages (checkout/confirmation screens, portal buttons, invoice notes, PDF headings)
- Email/SMS templates used for booking confirmations, reminders, and updates
- Save: OctopusPro stores each language variant and displays the correct version based on the customer’s portal language (customers) or your interface language (admins).
Tip: translate incrementally—start with your top-selling services and most-used templates, then expand. Fieldworkers typically see the admin/UI language, while customers see their portal language.
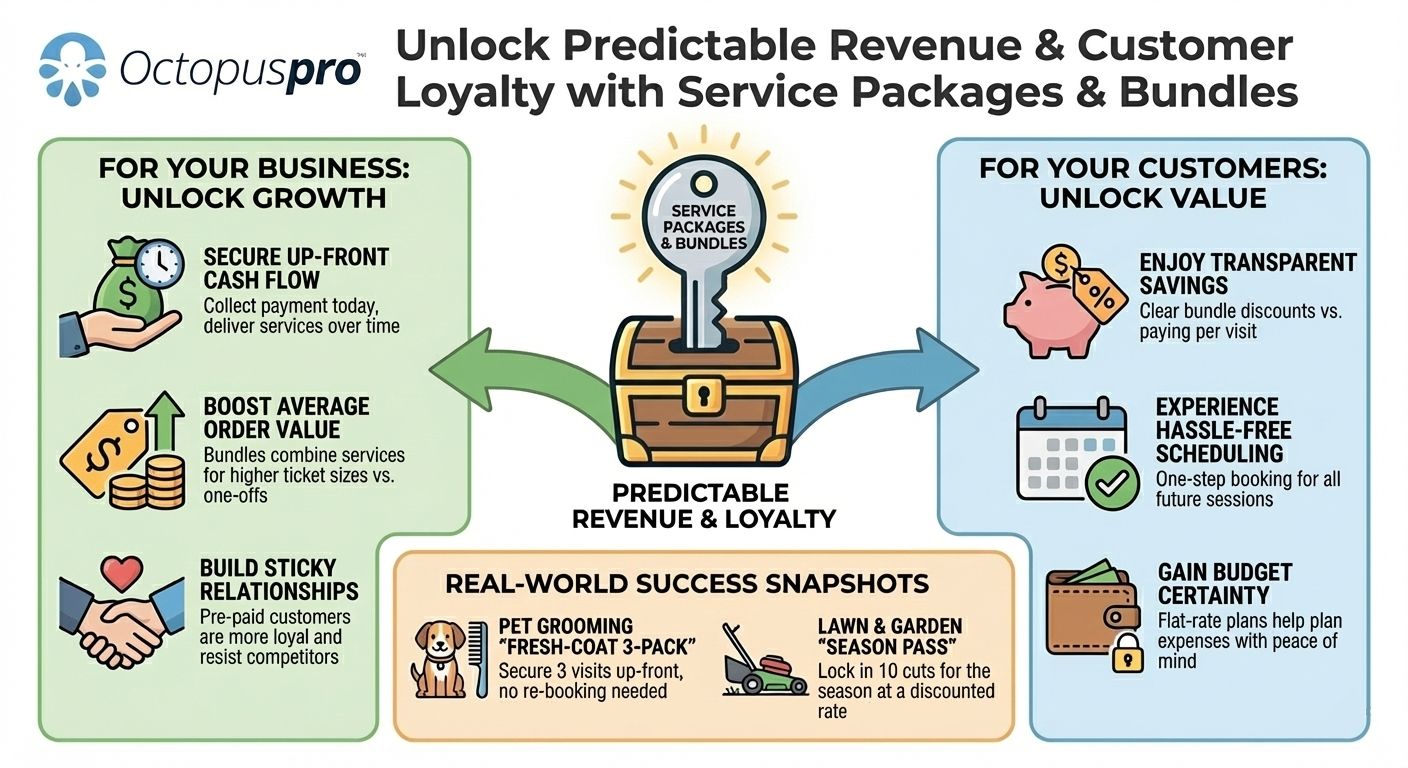
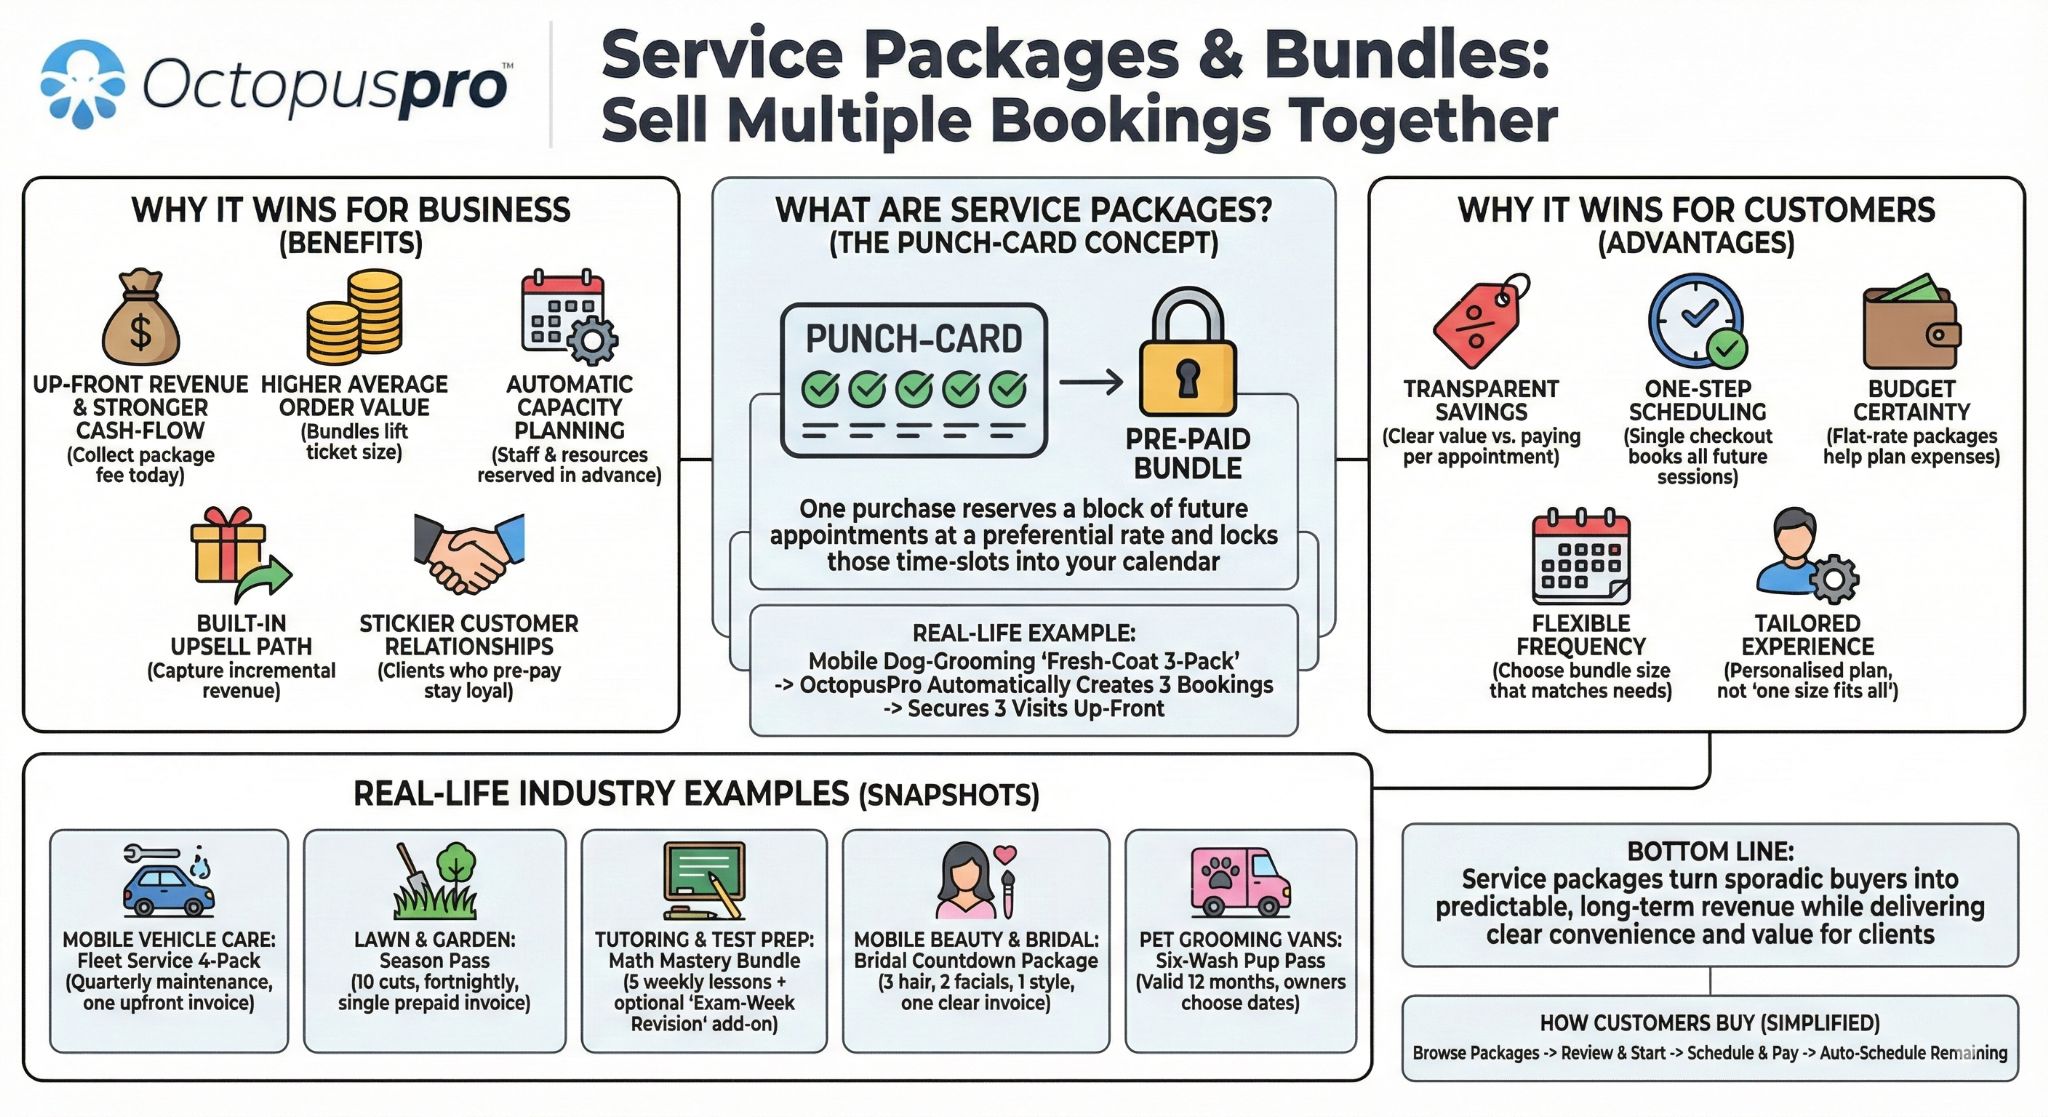
Service packages & bundles
Packages let you sell multi-visit or prepaid bundles (e.g., “10 tutoring sessions”, “Monthly lawn care plan”, “4-service car wash pass”). Packages can increase average order value, improve retention, and reduce admin time by predefining the rules.
Typical package setups
- Maintenance plans: e.g., “Quarterly service plan” (auto-schedule every 3 months).
- Class/session passes: e.g., “10-session tutoring pass” (customer chooses dates, credits tracked).
- Seasonal countdowns: e.g., “Bridal countdown package” (multiple appointments with a planned cadence).
- Multi-visit bundles with expiry: e.g., “10-cut lawn plan (expires in 12 months)”.
Learn more: Build Service Packages & Bundles
Package setup checklist
- Create the package and set the number of included visits/units.
- Choose a pricing model (time, job, unit). Packages often include a built-in discount.
- Select an invoicing rule:
- Individual invoice per booking (pay-per-session)
- All at once (issue every invoice immediately)
- First booking only / release as visits come due (subscription-style)
- Single combined invoice (customer prepays the lump sum)
- No auto-invoice (manual invoicing)
Packages inside a service vs. stand-alone packages
- Stand-alone package: appears as its own purchasable item (e.g., “4-Service Car-Wash Pass”).
- Option within a service: customer chooses “One-off” vs “Annual Plan (12)” during booking.
Custom-field package add-ons
Need a bundle tied to a specific add-on option (e.g., “6 extra filter replacements”)? Create the package under that custom field value so the add-on tracks its own prepaid balance.
Tracking & reporting
- Package Report helps track remaining bookings, usage dates, and package revenue.
- Fieldworkers can see remaining visits (visibility depends on your configuration).
- Customers can see remaining visits in My Packages (portal & app).
Why packages win
| For your business | For your customers |
|---|---|
| Bigger up-front revenue and steadier cash flow | One checkout, many bookings (no repeat forms) |
| Higher lifetime value through built-in commitment | Discounted rate vs. ad-hoc bookings |
| Lower admin load via automation (scheduling/reminders) | Clear schedule + remaining visits visible 24/7 |
| Cross-sell gateway (sell upgrades and add-ons across a longer customer lifecycle) | A “plan” feels simpler than repeated checkouts (higher perceived value) |
| Better calendar clarity (future visits are planned/visible, reducing gaps) | Remaining visits/credits are transparent (less back-and-forth) |
Tip: Mix packages with Geo-Price Zones, Quantity Discounts, and Tiered Rates to create location-aware, volume-aware offers.
Embed booking & gift voucher buttons on your website
You can embed “Book Now” and “Gift Voucher” buttons (or share direct links) so customers can start booking or purchase vouchers from your website, landing pages, emails, or social profiles.
Embed a booking button
- Use your full portal link (“Book Online”) to send customers to your service catalog.
- Or generate service-specific booking buttons/links for a single service.
Embed a gift voucher button
- Enable gift vouchers and add a “Buy Gift Voucher” button to your site.
- You can also create service-specific voucher buttons (where supported) so customers buy vouchers for a particular service.
Learn more:
Assign services to fieldworkers (skills-based scheduling)
To ensure the right people appear as available (and can be assigned automatically), define which fieldworkers can deliver each service. This is essential for:
- Smart scheduling: show only eligible fieldworkers
- Dispatch accuracy: prevent assigning the wrong technician
- Customer confidence: consistent service quality across staff/subcontractors

Learn more: Assign Services to Fieldworkers
Cost & pay rates (pricing models, deposits, tax, rules)
Open the Cost & Pay Rates tab inside your service to configure:
- Pricing model: charge by time, job (flat fee), or unit
- Advanced pricing tools: tiered/adaptive rates, quantity discounts, geo-price zones, minimum booking price
- Tax rate: apply GST/VAT/sales tax rules
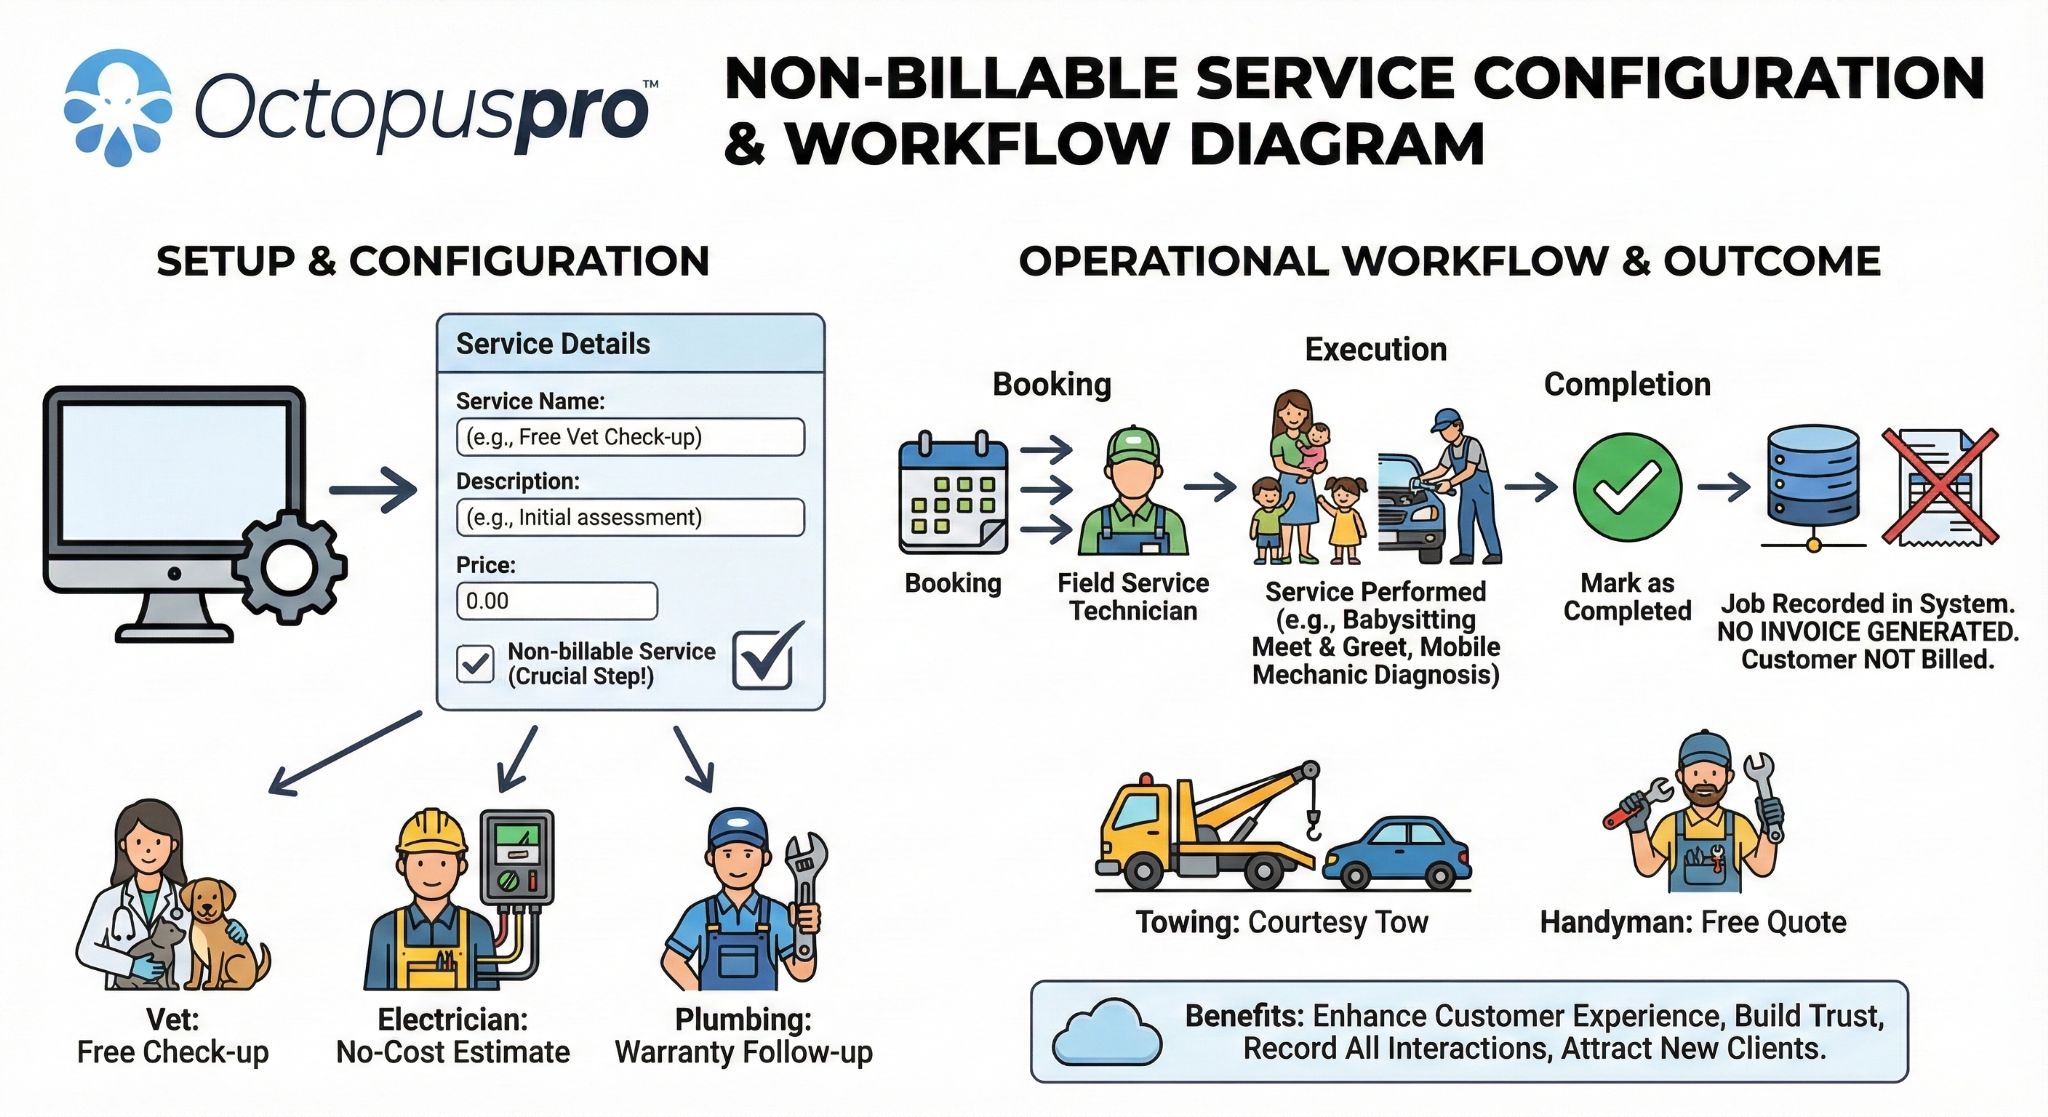
- Type of service: paid vs free (non-billable)
- Fieldworker pay rates: hourly or commission rules (and optional advanced payout features)
If you need a non-billable service (no invoice), follow: Create a Free (Non-Billable) Service
Payment requirements for online bookings (service-level overrides)
You can choose whether a service uses your default payment terms (company-wide) or a service-specific rule (deposit/full payment/instalments). This lets you require strict payment on high-risk services while allowing flexible payment on others.
Company-wide default: your global (default) payment terms are configured under Settings → Financial Settings → Payment Terms. Service-level rules override the company default for customer portal bookings.

Learn more: Service Payment Terms & Deposits (Company Defaults + Service Overrides)
Note: Gift voucher / gift card purchases require full payment at checkout and are not affected by service payment terms.
| Payment rule | When to use it | What the customer sees |
|---|---|---|
| Use account-wide payment policy | Your global rules fit this service. | Checkout uses the default deposit/full-payment rule. |
| Set custom payment terms for this service | This service needs a different deposit, instalment plan, or requires full payment. | Checkout uses the amounts you define for this service. |
How to create a service-specific payment rule
- Go to Settings → Service Settings → Services
- Click Edit next to the service
- Scroll to Payment Requirements for Online Bookings
- Select Set custom payment terms for this service
- Configure:
- Deposit type: percentage or fixed amount
- Due at confirmation: full amount, deposit only, or no payment (invoice later)
- Accepted payment methods: card, bank transfer, wallet credit, cash on arrival (availability depends on setup)
- Instalments/milestones (optional): staged payments based on dates or rules
- Click Save
Best-practice examples
- Emergency call-out: require 100% upfront to reduce no-shows
- Babysitting: 20% deposit at booking, remainder charged 24 hours before
- Virtual service: allow card/wallet only (disable cash)
- Annual package: split into monthly instalments
How it works with other pricing tools
- Packages & bundles: the rule applies to the total package price; instalment dates can align with each appointment.
- Geo-Price Zones: deposit/full payment is calculated after the location-based price is set.
- Quantity discounts & tiered pricing: the payable amount reflects any volume savings before deposit percentages are applied.
Tip: keep global defaults broad (e.g., 30% deposit) and override only the services that need stricter or more flexible terms.
Pricing models (time, job, unit) + advanced pricing tools
OctopusPro supports 3 core pricing models and several optional layers you can combine as needed.
1) Time-based pricing (charge by hour/min/day)
Best for labour-driven services like repairs, babysitting, tutoring, and support work.
- Set the Starting Cost, time unit, and base rate per unit
- Use the Starting Cost as a base charge before time-based pricing is applied
- Optional: add tiered/advanced rates, quantity discounts, packages, and a minimum booking price
2) Job (flat fee) pricing
Best when you charge one fixed price per visit and use add-ons/custom fields to capture variations.
- Set the Starting Cost and optional estimated duration
- Use the Starting Cost as the flat service price before add-ons
- Add custom field options to include surcharges (e.g., “Premium finish +$50”)
- Optional: use geo-price zones for location-based call-out rates
3) Unit-based pricing (price per item/m²/km/unit)
Best for measurable services like tile cleaning per m², deliveries per km, pressure washing per metre, and productized work.
- Define the unit code, unit prompt, Starting Cost, base price per unit, estimated time per unit, and Setup/Prep Time where needed
- Use the Starting Cost as a base charge before quantity-based pricing is applied
- Optional: add tiered/adaptive unit rates, quantity discounts, geo-price zones, and Meter In-Job Mileage (if enabled for transport-type services)
Pricing model fields (quick reference tables)
Below are the most common fields you’ll see in Cost & Pay Rates for each pricing model.
Time-based pricing (fields)
| Field | What it does | Example |
|---|---|---|
| Starting Cost | A base charge applied before time-based pricing is calculated. | $30 call-out + hourly rate |
| Default Duration | Pre-fills the appointment length shown to staff and portal users. | 1 hour |
| Time Unit | Sets your billing unit (minutes, hours, days, weeks). | Hours |
| Base Rate (per unit) | Standard charge for one time unit. | $40 / hour |
Optional enhancements: tiered/advanced rates, bulk/volume discounts, packages, and a minimum booking price.
Job (flat fee) pricing (fields)
| Field | What it does | Example |
|---|---|---|
| Starting Cost | The flat service price before add-ons. | $150 |
| Estimated Duration | Average calendar time (helps prevent schedule clashes). | 2 hours |
Best practice: handle variations via custom field add-ons (surcharges/discounts) and combine with geo-price zones for location-based call-out pricing.
Unit-based pricing (fields)
| Field | What it does | Example |
|---|---|---|
| Starting Cost | A base charge applied before quantity-based pricing is calculated. | $20 base fee + $5 / m² |
| Unit Code (abbreviation) | The short unit shown next to the quantity input and pricing. | m², item, km, mi |
| Unit Prompt | Customer-facing text that explains what quantity should be entered. | “Area size in m²” |
| Reference Image / Diagram (optional) | An optional image or diagram that helps customers understand how to measure or identify the quantity required for the service. | A floor plan, room sketch, fence layout, or measurement example image |
| Default Quantity | The starting quantity shown by default when the service is selected. | 1 |
| Quantity Type | Controls whether the quantity accepts whole numbers only or decimals. | Decimals for area, whole numbers for item count |
| Base Price (per unit) | The amount charged for each unit entered. | $5 / m² |
| Avg Time / Unit | Estimated time needed per unit, used to improve scheduling accuracy. | 6 minutes per m² |
| Setup/Prep Time | Extra time required on arrival before the actual service begins. This helps keep scheduling accurate by accounting for setup, preparation, unloading, access, or pre-service checks. | 0.25 hours = 15 minutes prep time |
| Measurement Guide Title | A short heading shown above the measurement help content. | “How to measure area in m²” |
| Measurement Guide | Rich-text instructions that help customers calculate the correct quantity before booking. | Step-by-step measuring instructions with examples |
| Meter In-Job Mileage | Tracks actual in-app trip distance and auto-fills the billed quantity for transport-style services. | Airport shuttle, chauffeur, courier, tow-truck |
Optional enhancements: tiered/adaptive unit rates, quantity discounts, geo-price zones, Meter In-Job Mileage, and measurement guides to help customers enter the correct quantity.
Cross-model settings (apply across pricing models)
| Option | Purpose |
|---|---|
| Minimum Booking Price | Protects margins by enforcing a floor charge across calculations. |
| Tax Rate | Adds or includes tax (GST/VAT/sales tax) on invoices and documents. |
| Packages / Bundles | Sell prepaid or multi-booking offers with their own invoicing rules. |
| Custom Fields | Collect job requirements and add-ons that can adjust price/duration and filter staff eligibility (including option-level zones/discounts). |
| Geo-Price Zones | Apply location-based pricing via map zones (service-level and option-level). |
| Bulk / Volume Discounts | Apply a single discount when quantity falls inside a range (time/unit models). |
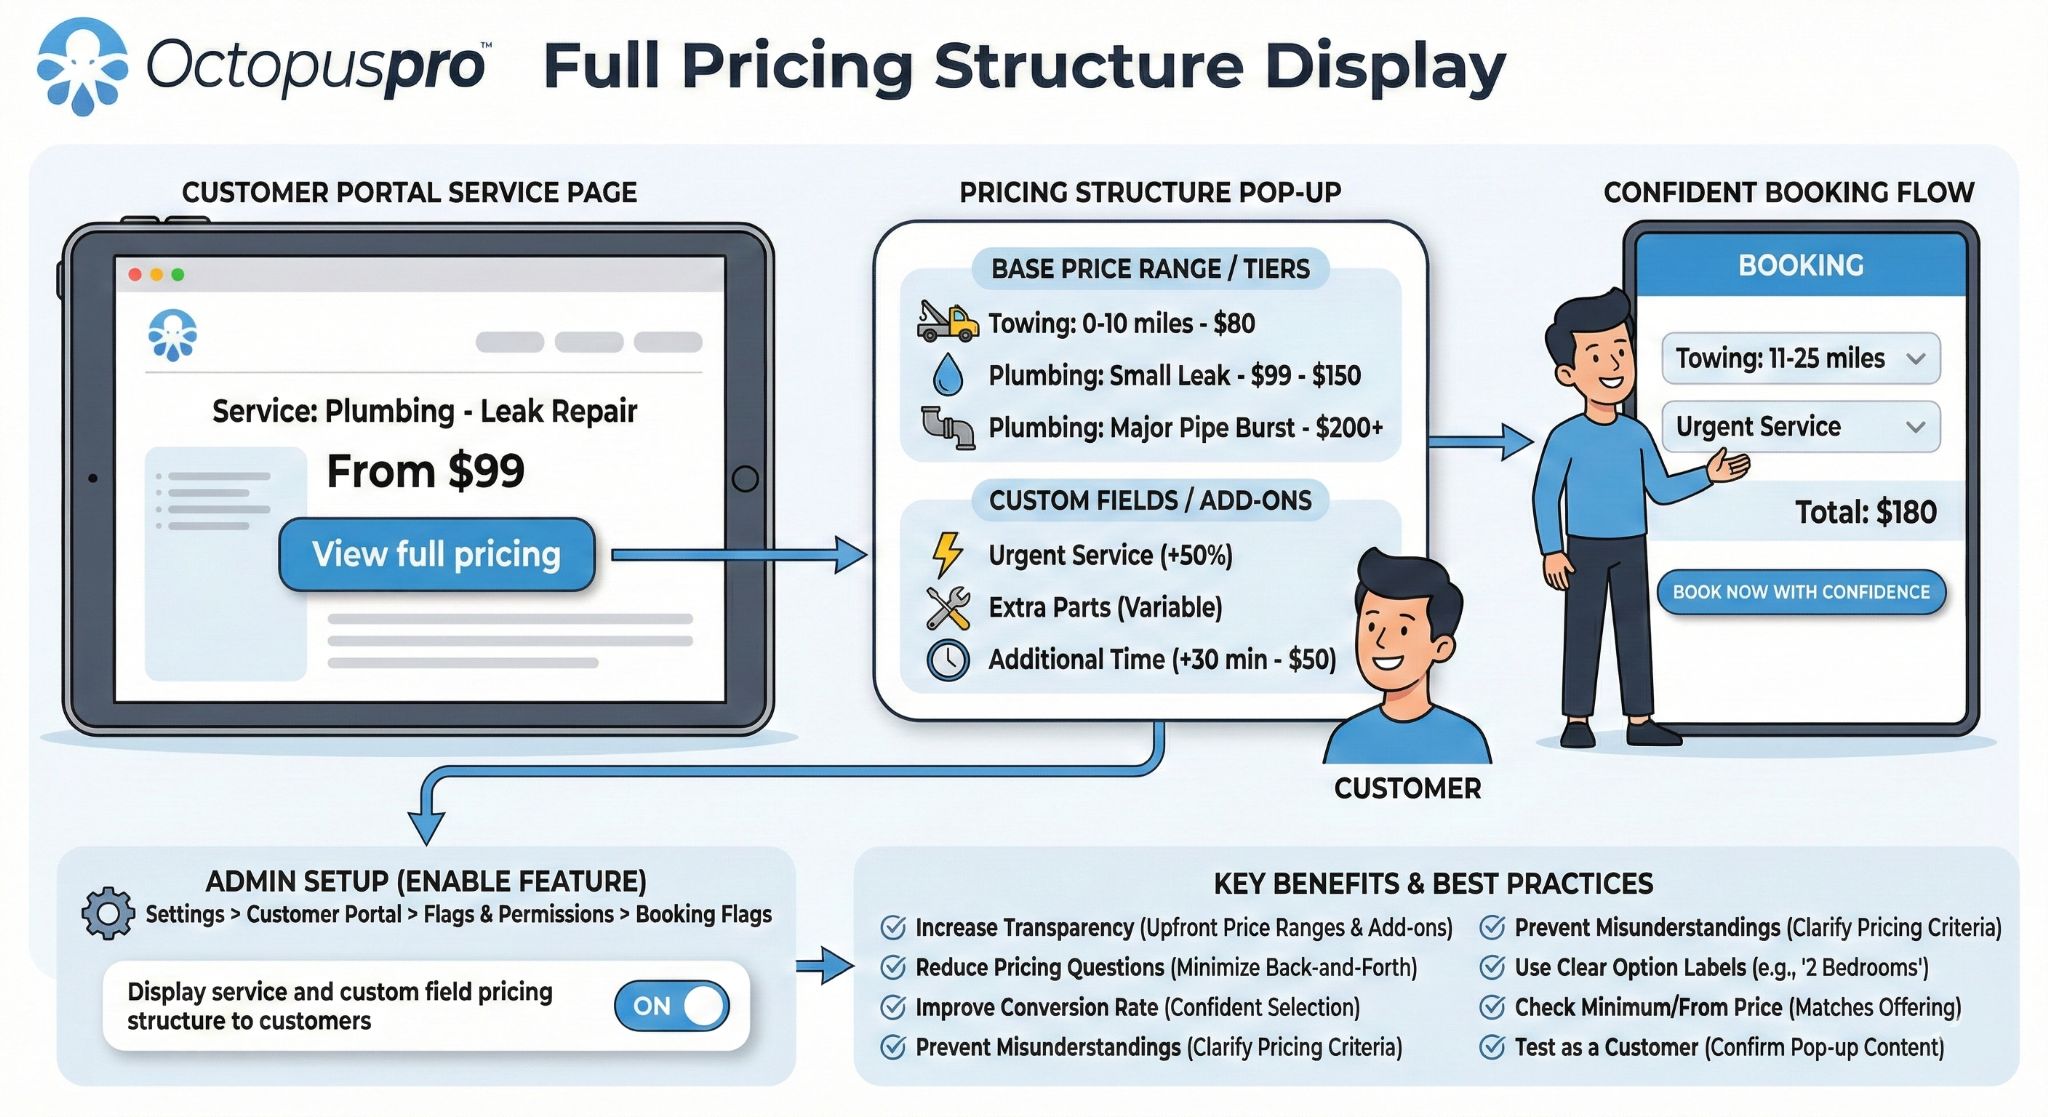

Learn more: Show Full Pricing List in the Customer Portal (Services + Add-Ons) • Display Service Minimum Price (“From $X”) • Display Custom Field Add-On Prices on the Service Page
Quick pricing examples (real-world)
- Mobile Mechanic (Time-Based): Base $120 call-out includes first hour → Tier $90/hr after 1 hour → Geo-zone +$20 in CBD.
- Tile & Grout Cleaning (Unit-Based): Base $5/m² (default qty 10m²) → Tier $4/m² after 100m² → Add-on “Factory Wax Removal +$3/m²” with its own 15% discount for ≥ 200m².
- Babysitting (Job-Based Package): One-off $80 → Package 10 sessions at $70 each prepaid (invoices generated upfront).
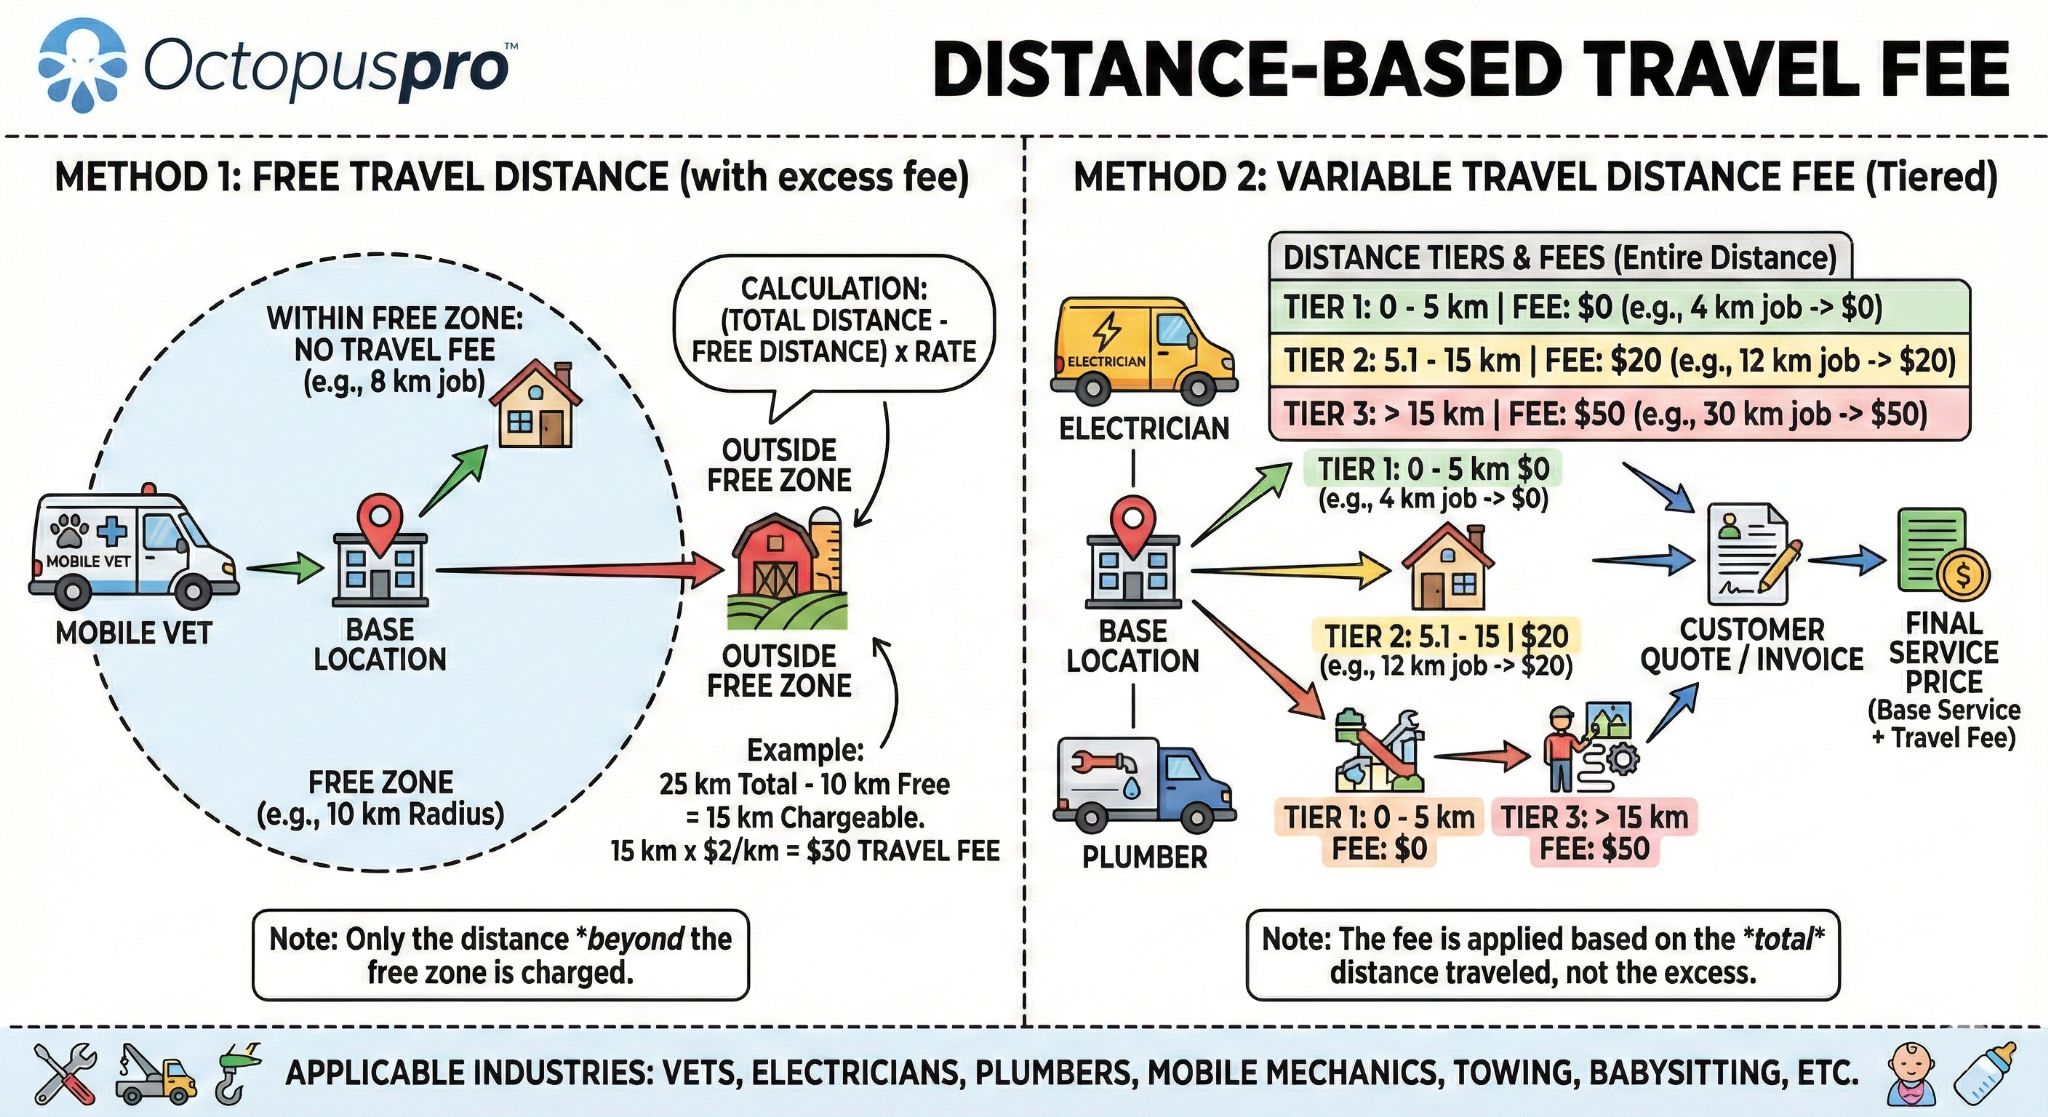
Meter In-Job Mileage (GPS odometer billing)
Meter In-Job Mileage is designed for services where the driving itself is the service—for example airport shuttles, private chauffeurs, ride-hail, medical transport, tow-trucks, and courier runs. Instead of manually entering distance, OctopusPro can capture the trip distance in-app and calculate the final charge automatically.
Where to find it: Settings → Service Settings → Services → Edit Service → Cost & Pay Rates → Charge per Unit → Unit Definition → Meter In-Job Mileage.

How it works
- When the fieldworker taps Start Job (or is auto checked-in by GPS, depending on your setup), OctopusPro starts tracking the trip odometer.
- When the fieldworker taps Finish Job, OctopusPro stops tracking and records the total travelled distance.
- The tracked distance is written into the service Quantity field using your account locale (km or mi).
- OctopusPro then multiplies that quantity by your configured rate per km / mi to calculate the fare.
- Both the distance and the resulting charge remain editable on the booking/invoice in case you need to apply a manual adjustment, discount, or override.
Required fields
- Rate per km / mi: the variable mileage charge.
- Base Fare (optional): a one-off start fee / flag-fall.
- Unit: km or mi (auto-filled but editable).
- Estimated time per unit: helps keep scheduling accurate for quotes and pre-bookings.
Before the trip vs after the trip
- Before the trip (quotes & online bookings): OctopusPro can show an estimated fare using the straight-line distance between the scheduled start and end points.
- After the trip (invoice): the estimate can be replaced by the actual GPS distance captured in-app, so the final invoice reflects the real trip.
- Multi-vehicle / relay jobs: each vehicle or fieldworker can have its own mileage line, which is useful for multi-car wedding transport, relay courier jobs, or split-trip dispatching.
Industry examples
| Service | Typical setup | Example invoice logic |
|---|---|---|
| Airport Shuttle | Base fare + rate per km | Base fare + (actual km × km rate) |
| Executive Chauffeur | Higher base fare + premium km rate | Base fare + city distance charge |
| Tow-Truck | Hook-up fee + per km/mi rate | Hook-up fee + towing distance |
| On-Demand Courier | Low/no base fare + mileage rate | Distance-only or distance + urgency add-ons |
Tips for success
- Check GPS accuracy: poor device signal can affect captured mileage.
- State the mileage rate clearly: include it in the service description so customers understand how pricing works.
- Use a base fare when needed: ideal if you want to recover dispatch/setup costs before mileage begins.
- Keep the unit consistent: if your account uses km, make sure the unit prompt and service wording also use km.
- Use the right feature for the right purpose: if you need to charge for travel to the customer, use your separate Travel / Service-Call Fee setup instead of Meter In-Job Mileage.
Learn more: Automated GPS Odometer-Based Mileage Billing • Distance-Based Travel Fee (Travel to the Customer)
Tiered / adaptive pricing (rate tiers)
Tiered (adaptive) pricing lets you define different rates for different ranges (e.g., first 2 hours at $100/hr, after that $80/hr). This is common when your marginal cost drops (or efficiency increases) as the job gets larger.
Why use it?
- Fair to customers: larger jobs can receive a better marginal rate (economies of scale).
- Protects margins: higher first tier covers call-out/setup; follow-on rate stays profitable.
- Industry-standard: common in cleaning, handyman, tutoring, lawn-care, and logistics.
Key fields you’ll see
| Field | Purpose | Tips / rules |
|---|---|---|
| Default Quantity / Duration | Pre-filled starter value shown to admin & portal users. | Leave blank to force entry, or seed with “1” (e.g., 1 hour, 1 m²). |
| Base Rate | Price for the first block (hour/unit). | Must be set before adding tiers. |
| Add Tier | Adds another price row with min/max thresholds. | Ensure ranges touch but don’t overlap (e.g., 0–2h, 2–8h, 8h+). |
| Estimated Duration / Time per Unit | Keeps schedules accurate as quantities grow. | Provide values; missing duration data can cause scheduling clashes. |
How the maths works
- OctopusPro sorts tiers by the minimum threshold.
- It splits the booking quantity across applicable tiers.
- Each tier slice × its tier price is subtotaled, then totals are combined into the final line price.
Worked example (time-based)
Mobile Mechanic “Diagnostic + Repair”
- Base: $120 for the first hour
- Tier 2: $90/hr for 2–4 hours
- Tier 3: $75/hr for 4+ hours
A 3-hour job bills $300 → ($120 + $90 + $90).
Worked example (unit-based)
Tile & Grout Cleaning (per m²)
- Tier 1: $9/m² for 0–49m²
- Tier 2: $8/m² for 50–99m²
- Tier 3: $7/m² for 100m²+
A 120m² job bills: (49 × $9) + (50 × $8) + (21 × $7).
Time vs unit tiers (at a glance)
| Aspect | Time tiers | Unit tiers |
|---|---|---|
| Customer input | Duration (hours/minutes/days) | Quantity (m²/items/km/etc.) |
| Best for | Labour-first work (consulting, repairs, babysitting) | Measured scope (cleaning area, deliveries, equipment hire) |
| Scheduling accuracy depends on | Default duration + tier definitions | Avg time per unit + tier thresholds |
Field-service snapshots (common uses)
- Mobile mechanics: first hour premium, cheaper follow-on hours.
- Tile & grout: per-m² rate drops as area increases.
- Babysitting: base rate covers setup, then reduced hourly tiers for longer shifts.
- Commercial cleaning: tiered unit rates + optional bulk discount for large sites.
- Transport: tiers by distance/units for predictable pricing brackets.
More info: FAQs (Rate Tiers / Tiered Pricing)
Tips & error-prevention
- No gaps / overlaps: keep tier ranges clean (OctopusPro warns if ranges clash).
- Always supply duration data: calendars rely on it.
- Communicate tier rules: mention tiers in the service description so customers understand pricing.
- Stack strategically: tiered pricing re-prices each block; quantity discounts apply a single subtotal discount—both can be used together for advanced promos.
Quick comparison: Tiered pricing vs quantity discounts
| Feature | Tiered / Adaptive Pricing | Quantity Discount |
|---|---|---|
| Mechanism | Replaces the rate as you cross thresholds | Applies a one-off % or $ discount to the subtotal |
| Billing outcome | Each extra hour/unit may cost less (or more) | All units cost the same, then subtotal drops |
| Best for | Labour where efficiency improves with scale | Promotions (“Book 100m², save 10%”) |
Extra help: if you need “first hour at $X then cheaper after”, rate tiers are the correct tool. See FAQs: Tiered pricing (Rate Tiers).
Minimum booking price
A minimum booking price is a floor charge that ensures every appointment covers fixed costs (travel, setup, admin time).
Examples
- Personal coaching: set a $50 minimum per session so prep/follow-up time is always covered
- Mobile cleaning: enforce a minimum so small add-on jobs don’t fall below your travel + labour cost
How to configure
- Edit the service → open Cost & Pay Rates
- Scroll to Minimum Booking Price
- Enter the minimum amount and Save
If a quoted total falls below your minimum, OctopusPro automatically lifts the price to the minimum and may flag the adjustment on admin/customer screens (depending on your display settings).
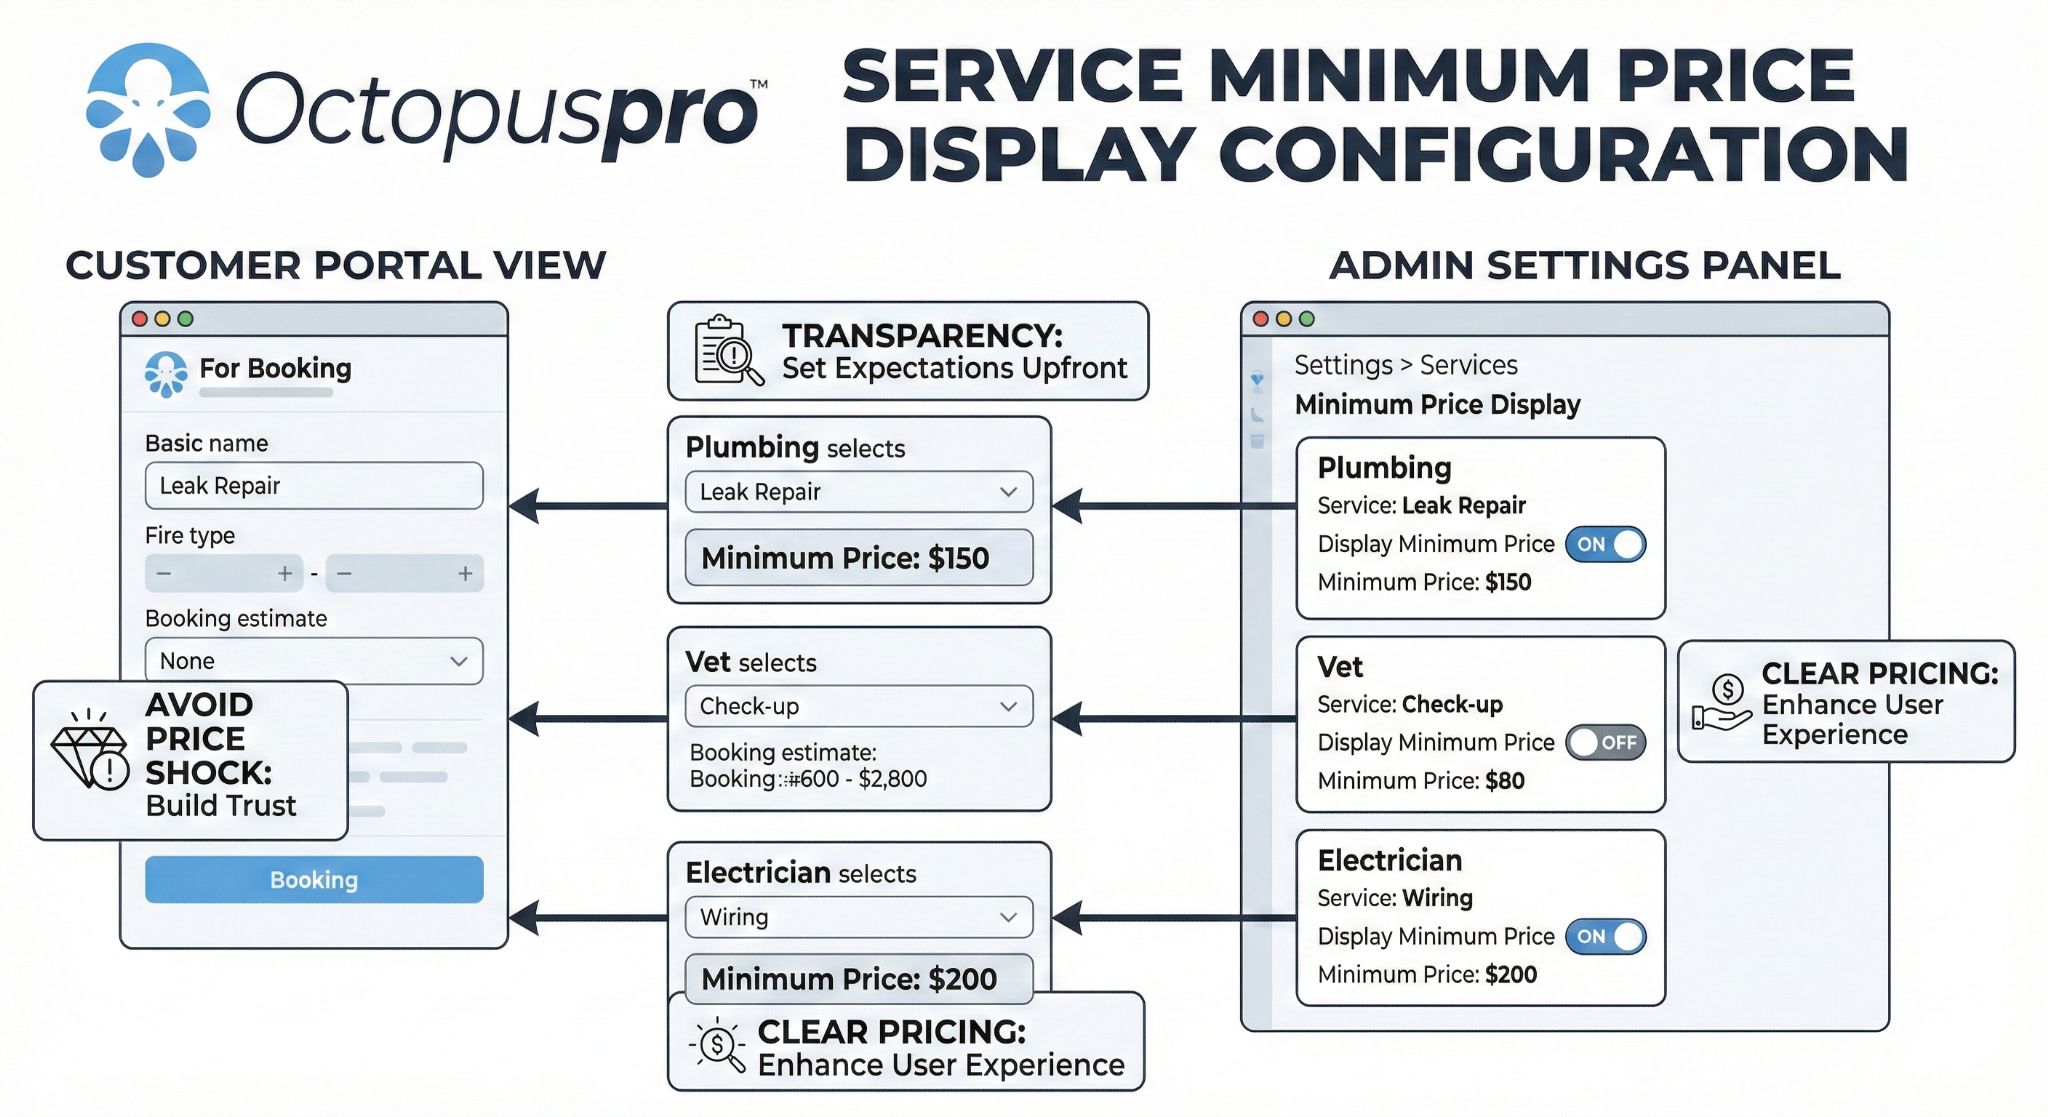
Learn more: Display Service Minimum Price (“From $X”) in the Customer Portal
Tax rate (GST/VAT/sales tax)
Assign a tax rate to each service to keep invoices compliant. You can create new tax codes and choose whether tax is added on (exclusive) or included (inclusive).
Adding a new tax code (from inside a service)
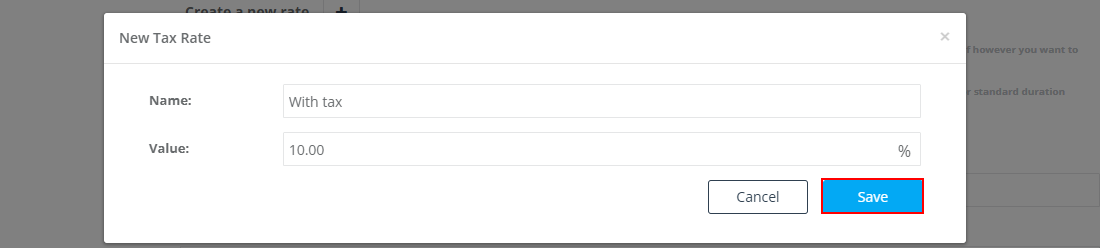
- In the service → Cost & Pay Rates, open Tax Rate (dropdown) → Add new tax rate.
- Enter a Name (e.g., GST 10%) and Value (10).
- Choose whether tax is Added on (exclusive) or Included (inclusive).
- Save. The code becomes selectable for services.
Best-practice pointers
- Naming: match your accounting platform labels (GST 10%, VAT Standard, etc.)
- Inclusive vs exclusive: inclusive is common for B2C pricing; exclusive is common for B2B quotes where tax is shown separately
- Auditing: regularly review tax reporting/exports to ensure the correct rate is applied

Learn more: Manage Tax Rates (GST, VAT & Sales Tax)
Geo-pricing zones (location-based pricing)
Geo-Price Zones let you charge different prices based on location. When an address is selected, OctopusPro automatically applies the zone price—no manual edits.

Why use it?
- Match local costs & demand (CBD premium vs suburb discount)
- Instant quotes (price updates as soon as address is chosen)
- Works with time, unit, and flat-fee services
- Stacks with tiered pricing, quantity discounts, and packages
How to add a price zone (step-by-step)
- Go to Settings → Service Settings → Services.
- Click Edit next to the service (or create a new one).
- In Cost & Pay Rates, open Location-Based Price Zones → click Manage Zones.
- Click New Zone and set:
- Zone name (e.g., Inner-City Premium)
- Draw / select area(s) on the map (one or more polygons)
- Unit price (rate that replaces the base price inside the zone)
- Save. Repeat for as many regions as needed.
Tip: one zone can contain multiple non-contiguous areas—great for pricing several premium postcodes the same way.
Option-level zones (custom field values)
You can also apply zones to specific custom field options (add-ons) so an option costs more/less in certain regions. Option-level zones stack on top of service-level zones and discounts.
- Go to Services → Manage Custom Fields, edit the field, expand the option row, then click Set Geo-Price Zones.
- Follow the same zone steps (draw areas + set price) for that option.
Availability note: the Set Geo-Price Zones link may appear differently depending on the custom field type:
- Text / Number (±) / Toggle fields: you typically need to enable Affects Service Price (or “Price & Duration Adjustments”) before zone pricing becomes available for that field/option.
- Option-based fields (Dropdown, Radio, Button Group, Checkbox/List): zone pricing is generally available at the option level because each option can carry its own pricing rules.
More info: Geo-Pricing Zones (Location-Based Rates)
Examples
| Industry | Service | Zone strategy |
|---|---|---|
| Mobile mechanics | Emergency tyre change | Urban core priced +20% for traffic/parking costs |
| Babysitting / nannies | Evening sitter (per hour) | Upscale suburb zone adds $5/hr; outer-metro zone reduces $2/hr |
| Tile & grout cleaning | Oil-stain removal add-on | Industrial estate zone discounted to win fleet work |
Learn more: Dynamic Geo-Pricing Zones (Location-Based Rates)
Quantity-based discounts (bulk/volume pricing)
Use Quantity-Based Discounts when you want a single price break that triggers once quantity sits inside a range—ideal for “Book 3+ hours, save 10%” or “Order 500m², pay $4.50/m²” promotions.

When it’s available
- Pricing models: time-based or unit-based (not typically used for flat-fee services without quantity input).
- Levels:
- Service-level (discount the whole booking when total quantity hits the range)
- Option-level (discount a specific custom field add-on when its quantity hits the range)
- Discount types: % off subtotal, $ off subtotal, or $ off per unit (depending on your setup).
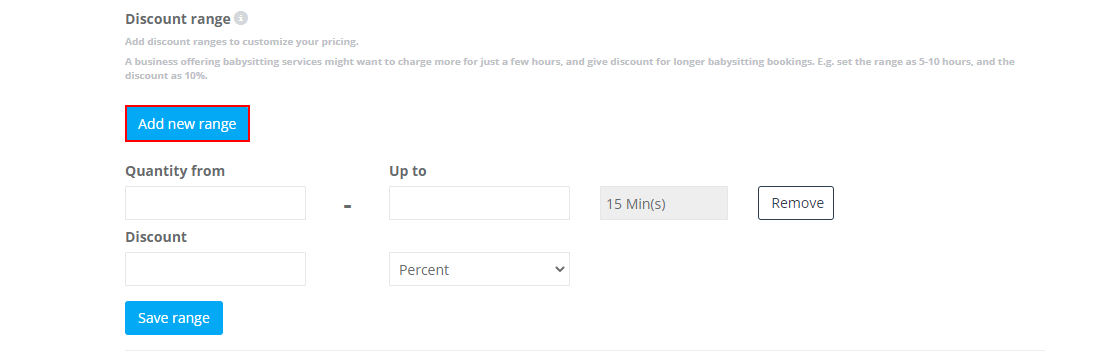
How to add a discount range
- Edit the service (or open the relevant custom field option).
- Click Add Discount Range.
- Enter From / To quantities and the Discount Value.
- Save. OctopusPro validates there are no gaps or overlaps.
How it behaves: customers see only one applicable discount per booking—the system selects the largest range that fits the quantity.
Typical wins (real-world examples)
- Mobile mechanic: “Book 3+ hours and save 10%” (reduces short-job churn and rewards longer bookings).
- Tile & grout: “50–100m² = 5% off, 101m²+ = 10% off” (helps win large-floor jobs).
- Babysitting agency: discount ranges on longer shifts or multi-child add-ons (improves conversion on bigger jobs).
Learn more: Quantity-Based Discounts (Bulk / Volume Pricing)
Admin & fieldworker flexibility
Back-office staff may be able to override suggested discounts on quotes/bookings (depending on permissions). Portal customers cannot edit discounts, helping keep your published pricing consistent online.
Learn more: Quantity-Based Discounts (Bulk / Volume Pricing)
Fieldworker pay rates (hourly/commission)
You can define how fieldworkers are paid for this service. Depending on your configuration, you can set default rates and allow worker-specific overrides.
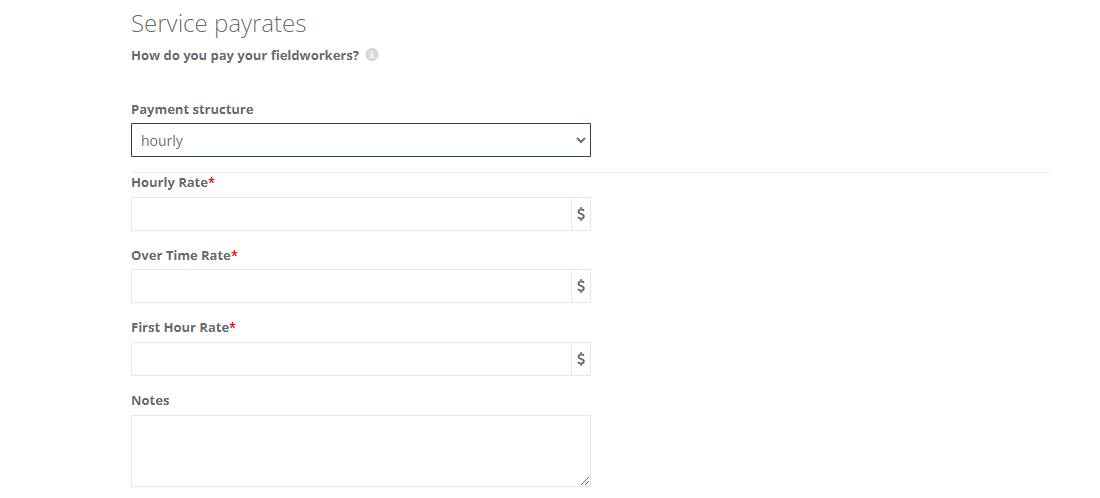
Hourly pay rate
Use hourly pay when you pay fieldworkers based on time worked. You can define hourly rate, overtime rate, and first-hour/call-out premium (if available in your setup).
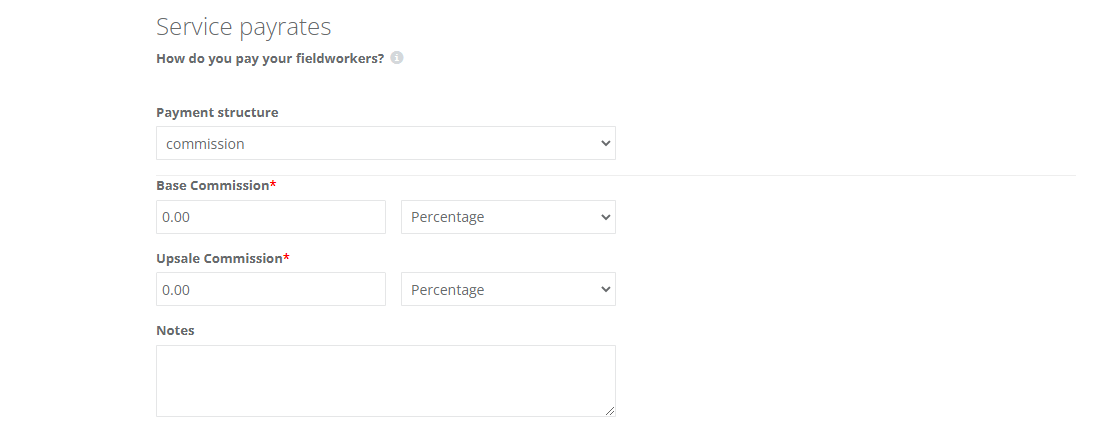
Commission-based pay rate
Use commission pay when fieldworkers earn a percentage or fixed share of the service subtotal. Some configurations support both:
- Base commission: the default share
- Upsale/bonus commission: optional rate to reward add-on or premium sales
Important: only one commission type (base or upsale) may apply for the same fieldworker at the same time (depending on your setup rules).
Optional (account dependent): Some accounts also support product share, automated payouts (e.g., Stripe Connect), and additional payroll tools.

Learn more: Fieldworker Commission & Pay Rates
Also useful: see where service share, product share, and payout totals appear across booking/quote/invoice views: Fieldworker Payroll Management & Reconciliation.
Custom fields (booking questions, pricing add-ons, eligibility)
Custom Fields turn a basic service into a configurable offering. They appear during inquiry/booking/quote creation (and anywhere the service is used), allowing you to collect info, apply pricing rules, and filter fieldworker eligibility.

What custom fields can do
| Capability | How it works | Example |
|---|---|---|
| Collect job-critical info | Show text, dates, toggles, dropdowns, checkboxes, signatures, uploads, and more. | “Access instructions”, “Gate code”, “Preferred day/time” |
| Drive pricing | Enable Affects Service Price and apply surcharges/discounts per option. | “SUV +$15”, “Van +$25” |
| Filter fieldworker availability | Restrict options to eligible workers/skills/certifications. | Only show techs certified for a refrigerant type |
| Trigger quantity discounts or geo pricing | Each option can carry its own quantity discount ranges and geo-price zones. | “Oil-stain removal” add-on discounted for large areas |
| Appear per line-item | If the same service is added twice in one booking, the field set can appear twice. | Multi-room or multi-vehicle jobs, each with its own selections |
Forms & Checklists are typically completed during or after the job (e.g., safety audit) and usually do not affect price or scheduling. Custom Fields are completed before the job and can affect both pricing and scheduling rules.
Why add custom fields?
- Fewer follow-ups: capture the right data up-front
- Accurate pricing: auto-adjust costs based on selections
- Smarter dispatch: prevent wrong worker assignments
- Automation-ready: values can flow into invoices, payroll, and reports
- Rich analytics: spot trends (e.g., “80% of weekend bookings select the pet-friendly cleaner”).

How to set them up
- Edit the service → open Custom Fields tab
- Click + Add Field
- Choose a type, label, helper text, visibility, and whether it affects price
- (Optional) Configure advanced options such as:
- Option-level quantity discount ranges
- Option-level geo-price zones
- Fieldworker eligibility filters
- Save the service
Tip: you can usually drag and drop custom fields to reorder them so the booking flow follows a logical sequence for customers.
How pricing units work (when a field affects price)
When Affects Service Price (or “Price & Duration Adjustments”) is enabled, OctopusPro can apply different pricing units depending on the field type and configuration, such as:
- Flat amount: +$20 once (e.g., “Inside oven +$20”).
- Per-unit amount: +$3 per unit (e.g., “Wax removal +$3 per m²”).
- Percentage: +10% (common for premium upgrades).
- Extra duration: +15 minutes per selection/unit (keeps scheduling accurate).
More info by field type:
- Number Stepper (±) Custom Field (Per-Unit Pricing & Duration)
- Checkbox (Multi-Select) Custom Field (Add-On Pricing)
- Radio Button Custom Field (Single-Select + Pricing)
- Display Custom Field Pricing on the Service Page (Customer Portal)
Real-world templates (examples)
- Mobile babysitting agency: Number of children (stepper), age range, special requirements (long text). Auto-pricing above 3 children; filter carers by newborn skill when under-1 selected.
- On-site mobile mechanic: Vehicle make/model dropdown sets parts cost; “Hybrid/Electric?” toggle filters EV-certified mechanics and adds a flat fee.
- Commercial cleaning: Area size (m²) drives unit pricing; “Factory wax removal” checkbox adds $/m² with an industrial-zone surcharge via geo-price zones.
Types of custom fields (common field types)
- Single-Line Text (Short Text)
- Paragraph / Long Text
- Date Picker
- Time Picker
- Number Stepper (±)
- Toggle Switch (Yes/No)
- Button Group (Single-Select)
- Radio Button (Single-Select)
- Dropdown (Single-Select)
- Checkbox (Multi-Select)
- Checkbox Button Group (Multi-Select)
- List / List Box (Multi-Select)
- Digital Signature (eSign)
Helpful related guides:
- Custom Fields (Full Guide)
- Assign Custom Fields to Services
- Dependent / Conditional Custom Fields
- Custom Field Groups (Multi-Step Booking Forms)
Manage services (view/edit/delete)
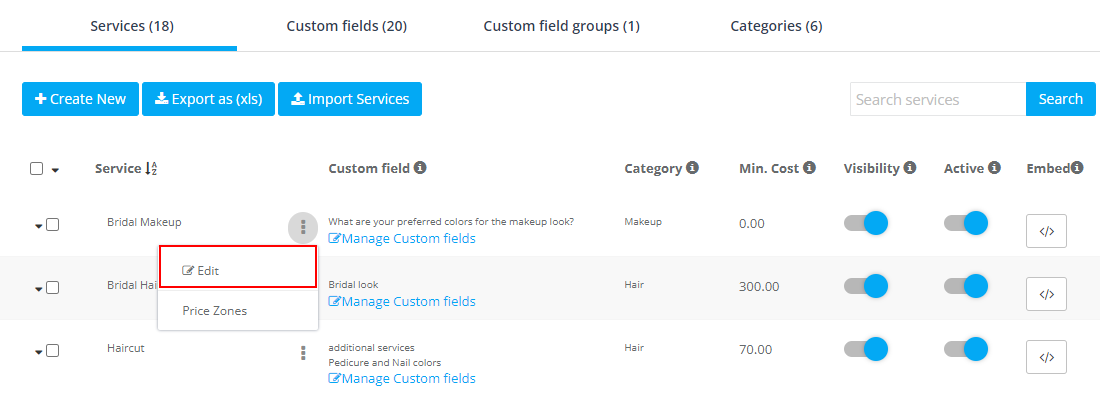
Go to Settings → Service Settings → Services to view, edit, or delete services.
- Edit: Use the action menu next to a service and select Edit
- Delete: Select the checkbox next to a service, then choose Delete from the bulk actions menu (this action is irreversible)
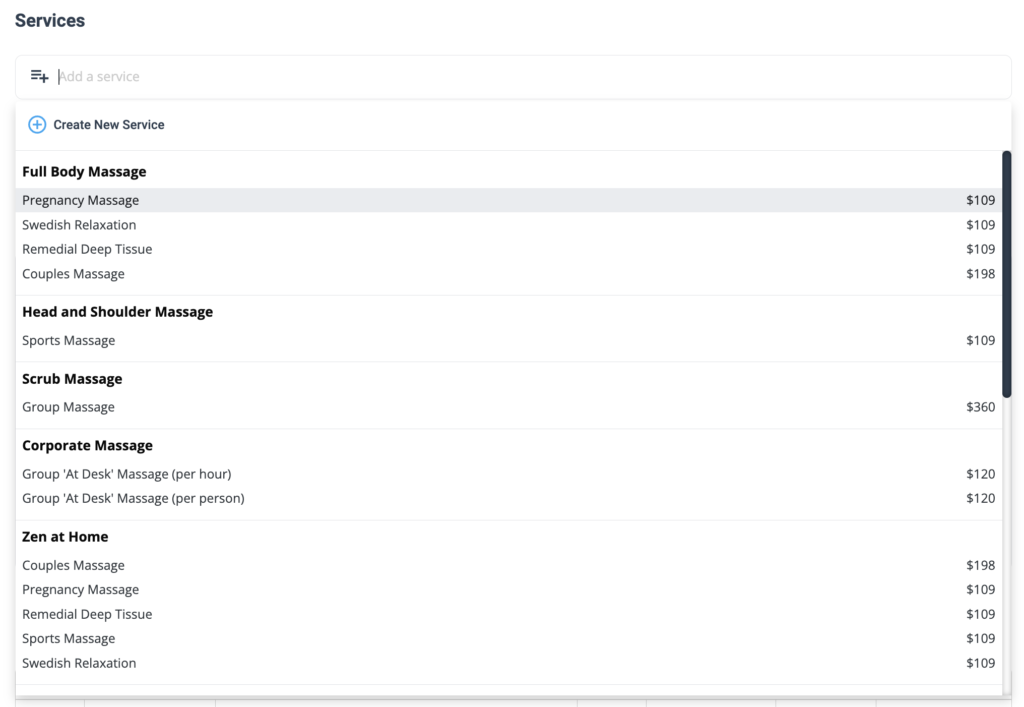
Add services while creating bookings/quotes/inquiries
When creating a booking, quote, or inquiry, you can add services from the service picker. If the service doesn’t exist yet, you can create it on the spot.
Fieldworker-related guides (if enabled in your account):
- Allow Fieldworkers to Create New Bookings
- Allow Fieldworkers to Add Custom Services (Quotes/Bookings/Invoices)

How customers view services in the Customer Portal
Customers browse and book services from your Customer Portal. To find your portal URL:
- Go to Settings
- Select Customer Portal
- Open General Settings to view your portal URL

Inside the portal, customers typically benefit from:
- Category navigation (browse by category)
- Location filters (show services available in their area)
- Search (find services instantly by keywords)

Optional portal transparency features (if enabled):
- Show full pricing list (service price ranges + add-ons)
- Display “From $X” service minimum price
- Display custom field add-on prices on the service page
- Customer Portal Flags & Permissions
Import & export services
To import or export services, go to Settings → Service Settings → Services. You’ll see options such as Export as (xls) and Import Services.

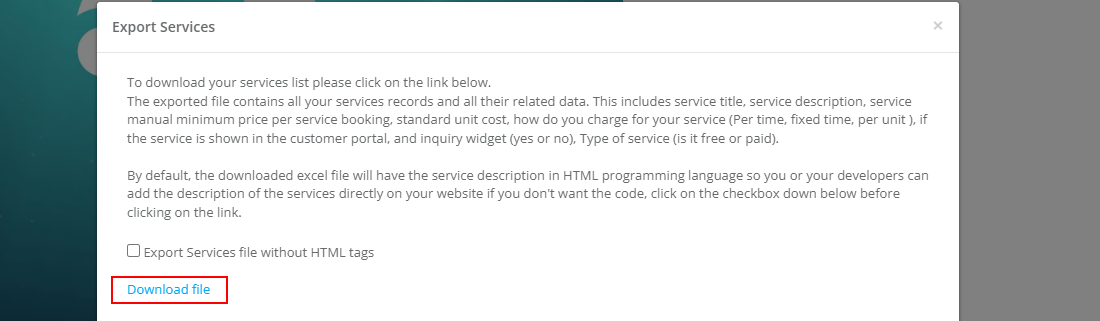
Export services
Exporting produces an Excel file containing your service list and key fields.
Import services (mini walkthrough)
- Go to Settings → Service Settings → Services.
- Click Import Services.
- Upload your Excel/CSV file (use the template if you’re unsure of formatting).
- Click Upload File. Your imported services will appear in the services list.
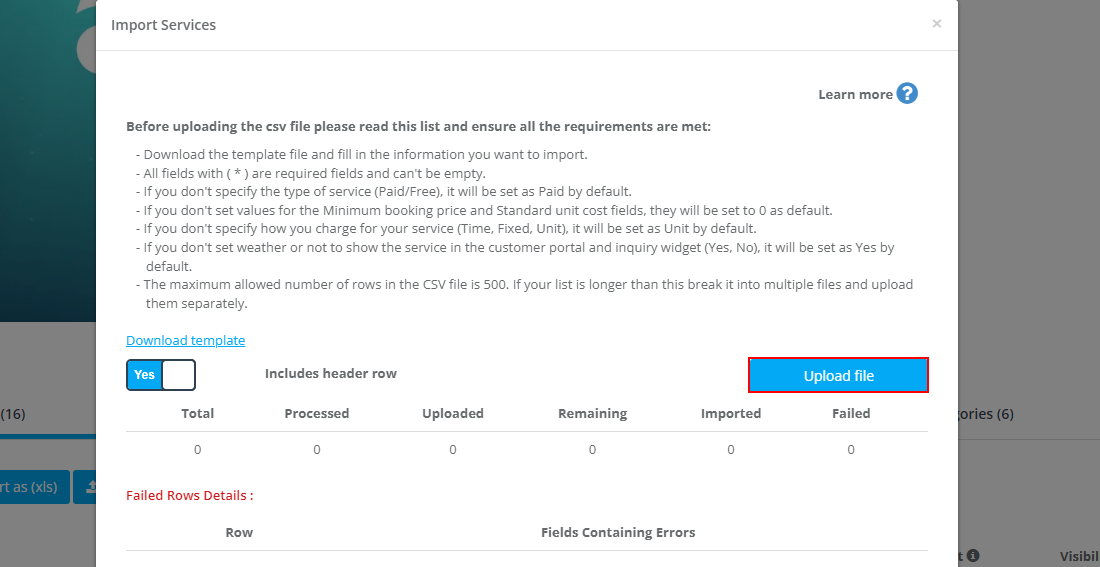
Import notes (from the import screen):
- Use the provided template and ensure required fields (*) are not empty
- If “Type of service” isn’t specified (Paid/Free), it may default to Paid
- If minimum booking price or standard unit cost fields aren’t supplied, they may default to 0
- If the pricing method isn’t specified (time/fixed/unit), it may default to Unit
- Portal/widget visibility may default based on template rules
- Maximum allowed rows per file may be limited. Split larger lists into multiple uploads.
Finishing your service configuration
After configuring details, pricing, fieldworker rules, and custom fields, click Save. You may be prompted to create another service, which is useful when building multiple services back-to-back.


To stay updated, please subscribe to our YouTube channel.