
Forms & Checklists: Use Cases
List of Contents:
Here are some use cases that highlight how to benefit from the Forms & Checklists feature for different industries. These are some of the best suggestions that business owners can get ideas from or even replicate when setting up their own forms & checklists. Below is a step-by-step guide to creating different forms for different industries and scenarios.
Cleaning-Industry-forms-checklists
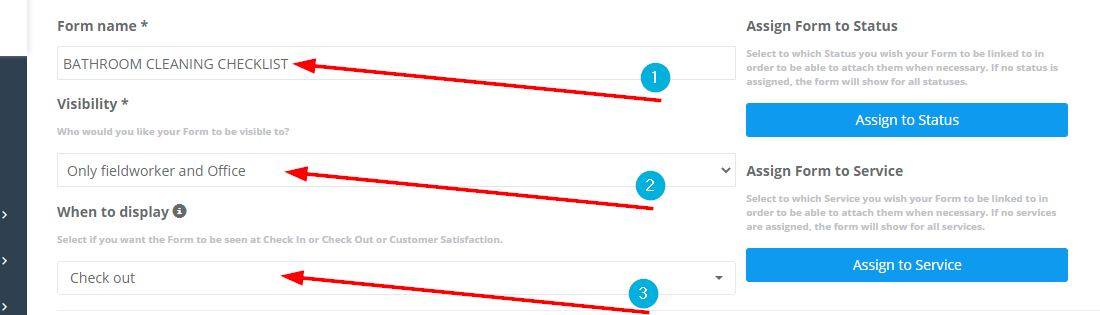
BATHROOM CLEANING CHECKLIST
Housekeepers and cleaners can use this Bathroom Cleaning Checklist is a step-by-step guide for the precise process of cleaning bathroom tiles, mirrors, and drains to ensure providing the best service quality.
For this case, we need to create a checklist directed for the fieldworker asking them to make sure that they performed the right procedures while on the job. The best practice for this form is to make it appear at check-out after the fieldworker finishes their job. You can make it visible for the fieldworker and the office users only. Admins can use this checklist to check if the fieldworker followed all needed instructions and inspection methods to provide the service.
We will create a checklist having the following elements
- Clean the areas in between tiles: Yes/No
- Wipe all surfaces with a dry lobe: Yes/No
- Recheck all tiles to make sure no dirty streaks are left on the tiles: Yes/No
- Use a diluted cleaning solution on the scrubber and scrub tiles to remove dirt, hair, and stains: Yes/No
- Check the mirror from a distance for stains and marks and clean the mirror spotlessly: Yes/No
- Dry and polish the mirror with a dry lobe: Yes/No
- Use the damp sponge with water only to wipe the mirror. (Do not use a glass cleaner as it may give streaks): Yes/No
- Are all glass surfaces clean and polished?: Yes/No
- Look for smudges and re-wipe: Yes/No
- Spray a little bit of cleaning solution on the drain: Yes/No
- Scrub the surface of the drain: Yes/No
- Wash with clean water: Yes/No
- Mop the drain cover and wipe with a dry lobe to remove marks of water from the drain cover: Yes/No
- Drain holes and assure there are no signs of dirt building or moping: Yes/No
- Name and signature of housekeeper/cleaner: Text Input field “So the fieldworker can put his details in case there is multiple cleaners or housekeepers working on the same job”
For setting up this checklist:
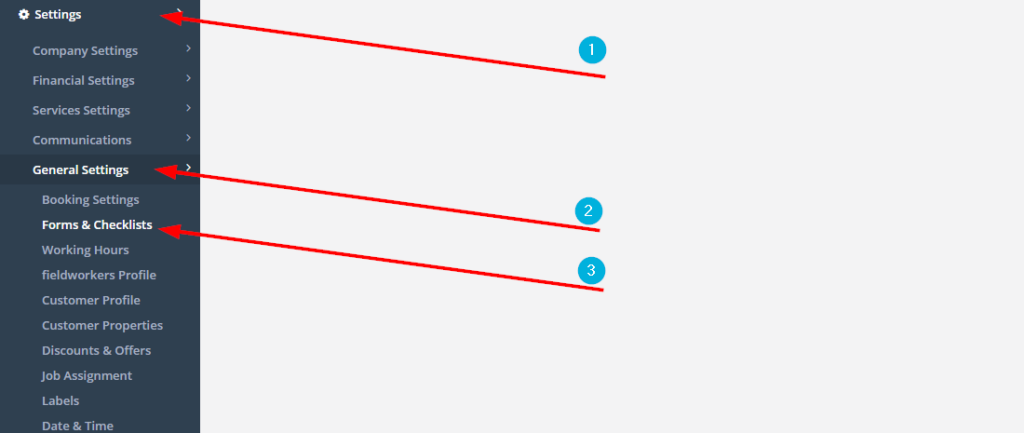
- From the admin web view, go to Settings > General Settings > Forms & Checklists from the side menu on the left
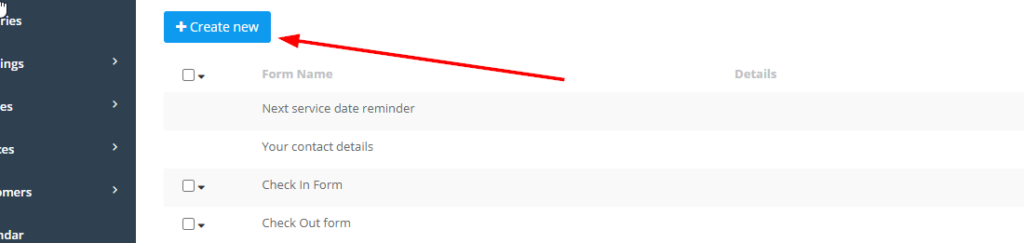
- Click on Create new
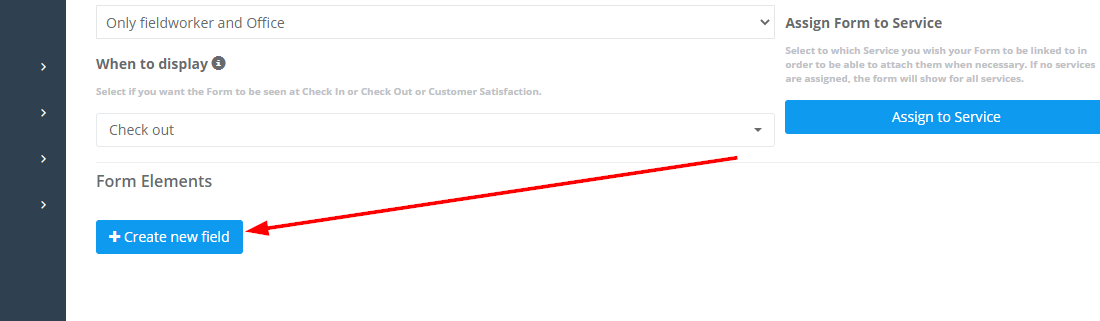
- Set the form name, the visibility option that controls who can view the form, and the display option to determine when it will be displayed. In this case, the visibility option will be set as “Only fieldworker and office” which means that the form will be visible to office users and fieldworkers only. While the display option will be set as “Check-out”, which means that the form will appear once the fieldworker checks out or finishes a job for them to fill out on the branded app.
We can also set this checklist to appear when changing job status to “Completed”. In that case, after the fieldworker finishes the job, the checklist will appear for inspection purposes. To activate this option, click on Assign to Status
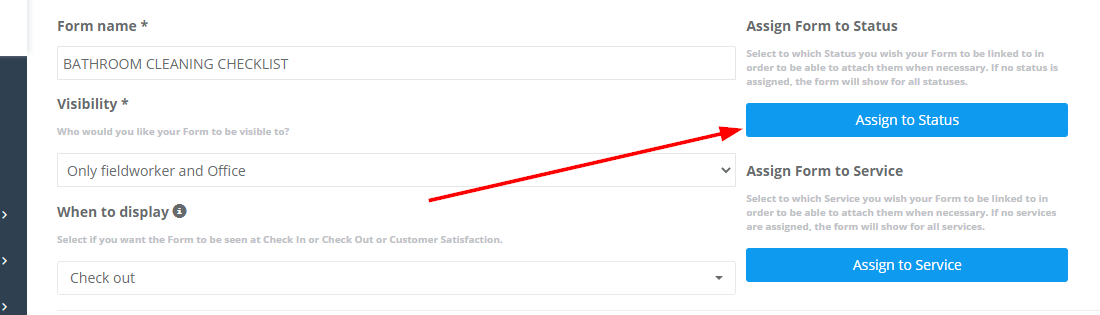
After selecting Assign to Status, click on the checkbox on the left of COMPLETED and press on Save.

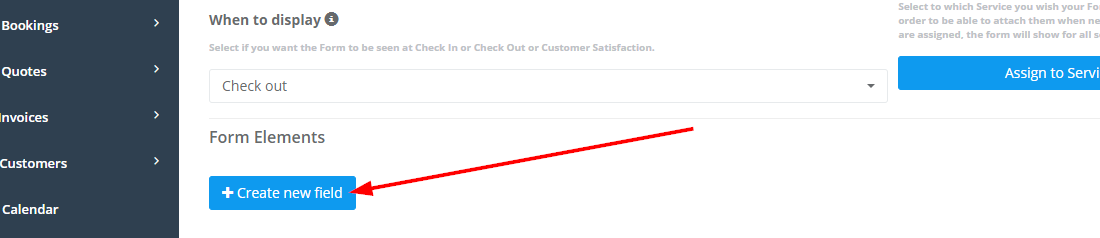
Now we will start adding the Checklist elements, which are the inspection steps and details that the fieldworker needs to perform. To add the checklist elements, click on + Create New Field to add a form element
A popup will appear requiring admin users to provide the following:
- Field name: The field name is the question/information that the admin users need to answer or fill out by fieldworker
2. Field Type: In this case, we need one field type to be added: ‘Radio button’. The ‘Radio button’ is going to be used for questions/form elements with multiple choice. For example, questions that have “Yes/No” choices.
3. Mandatory: We need to set all of the checklist elements as mandatory to ensure that the fieldworker is answering all of the form elements/questions necessary.
4. When selecting the ‘Radio button’ field type you need to manually write the options. This is done by clicking on the ‘Add Option’ button, which appears upon selecting the ‘Radio button’ field type. As an admin user, you can add as many options as you find necessary by clicking on the ‘Add Option’ button each time you would like to add a new option/choice.
5. Admin users can always remove options by clicking on the ‘Remove Option’ button. Clicking on this button will remove the last option that has been added to the options list.
6. Do not forget to click on Save every time you make a change.

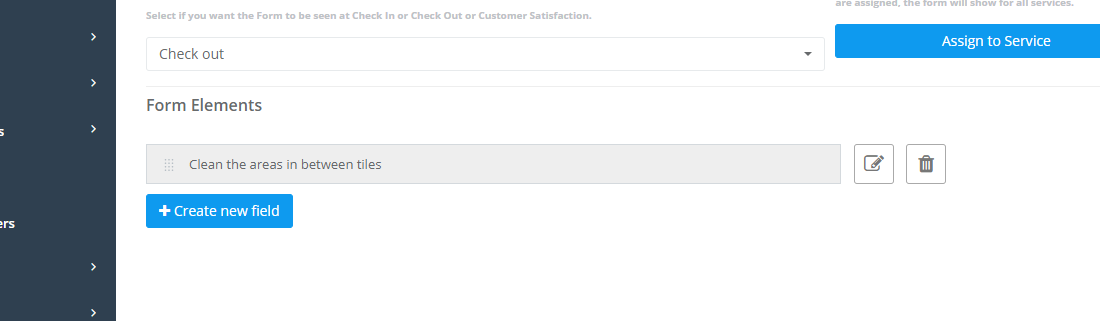
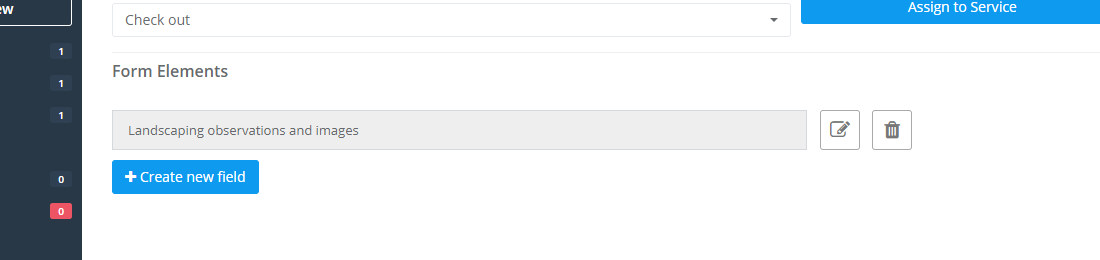
After following the previously mentioned steps, the form elements are going to appear as shown below:
To add more checklist elements, press on + Create new field again and repeat the previously mentioned steps.
For this field example: “Name and signature of housekeeper/cleaner”, we need to add a “Text Field (one line)” in thr field type.

After following through all the mentioned steps, the elements that you’ve created will appear as follows:

You can edit the order of the elements by simply using the drag and drop method

- Don’t forget to click on the Save button located at the bottom right of the page when you finish creating a form, then the created Form will appear in the Forms & Checklists Settings as follows:

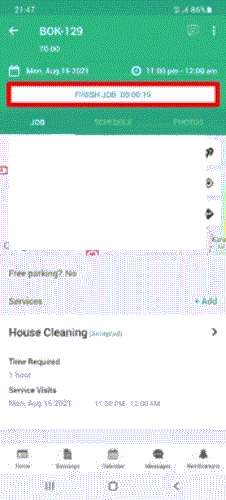
The form will appear to the fieldworker “Check-out” or finishing a job as follows:
Admin users can always check the form at any time from the Forms and Checklists container located at the down right side of the booking view page

Real Estate Industry
PROPERTY CONVEYANCING SERVICES
We define conveyancing as the legal transfer of property from one owner to another. The key stage for this process is the exchange of contracts where it has to match the property details in real life.
For fieldworkers working in this industry, they need to visit the property to make sure the transferred property matches the contract details by making a series of inspections. In order to make sure that the fieldworkers are following the inspection steps correctly and to document each job, you can create a “HOME INSPECTION FORM” containing the following elements:
- Landscaping observations and images
- Driveway and entrance observations and images
- Exterior observations and images
- Comments on the sewage system
- Basement and structure observations and images
- Heating and cooling observations and images
- Water system observations and images
- Electrical system observations images
- Comments on rooms observed and images of the rooms
- Garage observations and garage images
- Overall comments and observations on the property
- Name and Signature of Inspector
For all of the previous elements, we are going to select the field type to be “Text box (multi-line)”. All of the elements are going to be mandatory. However, uploading photos is going to be optional. To set the form up, follow the steps below:
- From the admin web view, go to Settings > General Settings > Forms & Checklists from the side menu on the left

- Click on Create new
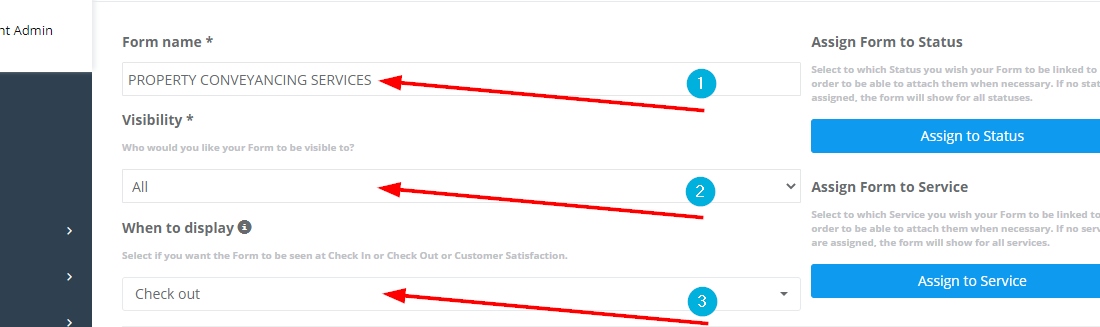
- Set the form name, the visibility option that controls who can view the form and the display option to determine when it will be displayed.
In this case, the visibility option will be set as “All”, which means that the form will be visible to the office users, fieldworkers, and customers.
While the display option will be set as “Check-out”, which means that the form will appear once the fieldworker checks out of or finishes the job.
Now we will start adding the Checklist elements which is the inspection steps and details that the fieldworker need to perform, click on + Create New field to add a form element
A popup will appear requiring admins asking to provide the following:
- Field name: Which the question that you want to ask or the check-up name or description that you want the fieldworker to perform
- Field type: In this use case, we need one type of field to appear to the fieldworker, which is the Text field (multi line) so the fieldworker can type in their observations
- We need to set all of the checklist elements as mandatory to ensure that the fieldworker is answering all of the form elements or questions
4. For the elements requiring uploading a photo we need to set “Show upload photos?” as “Yes”
5. Press Save

The form elements will appear as follows:
To add the other checklist elements, press + Create New field and repeat the previously mentioned steps
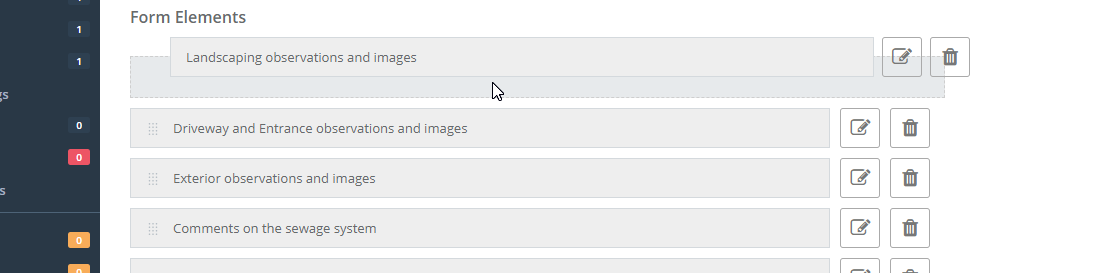
In the end, the elements that you’ve created will look as follows

You can easily edit the order of the elements by drag and drop action to any order that admins find suitable
Don’t forget to click on the Save button located at the bottom right of the page when you finish creating a form
The created Form will appear in the Forms & Checklists Settings as

The form will appear to the fieldworker “After finishing a job” as follows:

Since the Visibility is set to be “All”, that means admin, fieldworkers, and customer users will be able to review the checklist as shown below
Admin users can always check the form at any time from the booking view in the Forms and Checklists container located at the down right side of the page

Fieldworker will be able to view the form from the booking view page in the app as follows:

Customers can view the filled-out form from the customer portal view booking view page under “Forms and Checklists”

Customer Satisfaction
Since OctopusPro’s number one concern is turning the complaints of the customers into smiles. The customer satisfaction form is the form that appears to both customers and office users only after the fieldworker finishes the job and marks it as “Completed”. The customer satisfaction form ensures that the customers receive the best service possible by giving the customers the option to rate the service they received, add comments, compliments, or complaints.
The ideal form/checklist that can be applied in this case is in the transportation industry. In industries similar to private chauffeuring, it is necessary for customers to be able to rate and give reviews on the provided service. This is necessary to ensure that the provided service, which is private chauffeuring, is suitable, safe, and efficient for customers.
Admin users can create a form asking the customer/office users to rate the following details that were provided upon customer’s
- Driving Ability: Satisfactory / Unsatisfactory
- Professional Appearance: Satisfactory / Unsatisfactory
- Punctuality: Satisfactory / Unsatisfactory
- Car Cleanliness: Satisfactory / Unsatisfactory
- Clear Communication: Satisfactory / Unsatisfactory
- How satisfied were you with your overall experience?
The best way to implement this form is making these “Form elements”, that are required to be filled out by the customer or the office users. However, in the case of the “Customer satisfaction” form, the form elements do not need to be mandatory. The customer should have the option of whether they would like to give their feedback regarding the service or not. The “upload photos” is preferable as well, but should not be mandatory.
Following, we will explain how to apply these features, alongside how to create the previously mentioned form:
- From the admin web view, go to Settings > General Settings > Forms & Checklists from the side menu on the left
- Click on “Create New”

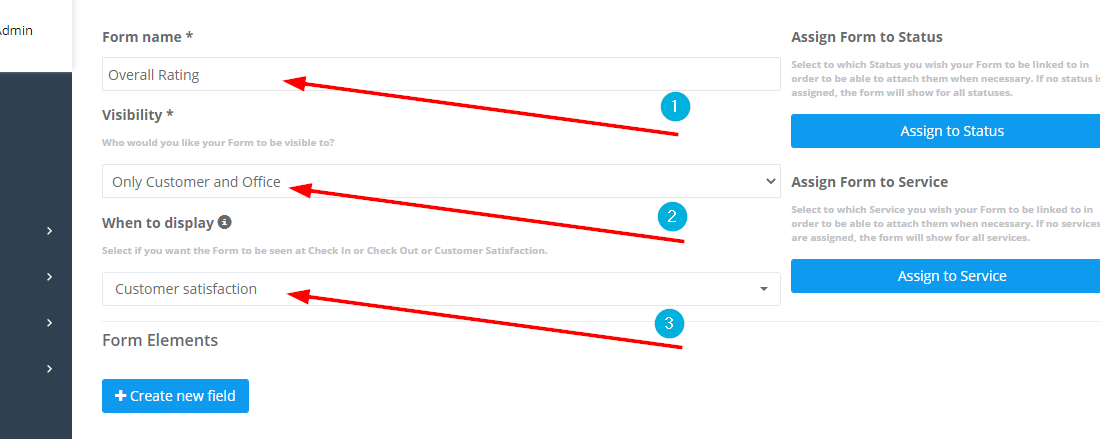
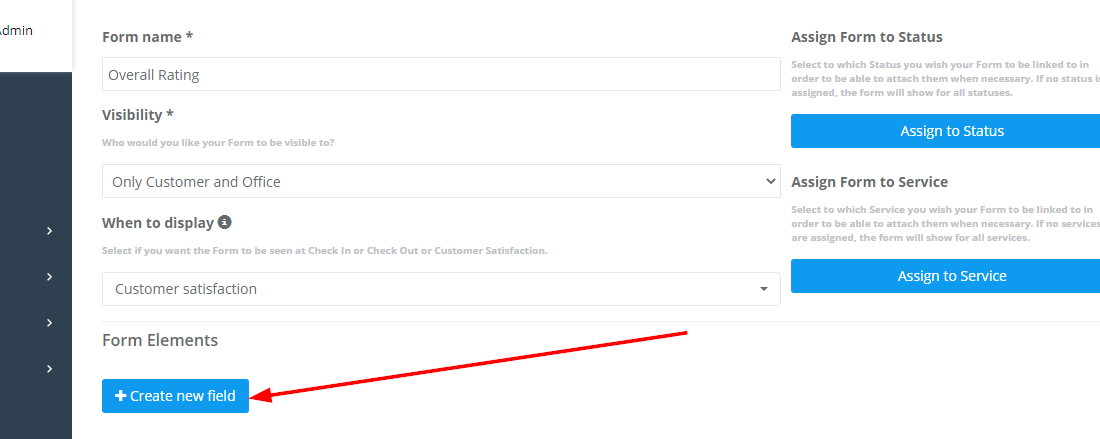
- Set the form name, the visibility option that controls who can view the form and the display option to determine when it will be displayed.
In this case, the visibility option will be set to “Only Customer and Office” which means that the form will be visible to the office users, and customers but not the fieldworker. While the display option will be set as “Customer Satisfaction”, which means that the form will appear after the fieldworker finishes the job and it is paid for
This form will appear to the customer through the customer portal or the branded app, if available, to rate their service experience and give feedback. Also, it will appear to office users, in order for them to be able to receive this feedback and maintain a good service level.
- Next, admin users should start adding the Form elements, which in that case is the pet’s condition after performing the grooming service and details that the fieldworker needs to update for all users to check
In order to do that, click on “+ Create new field”
A popup will appear as shown below:

- Field: In this box, you can insert the field name, which is the question or the title of the form element
- Field type: In this case a multiple choice element, for example, the review related to the “Driving Ability”, the answer for that element will be “Satisfactory” or “Unsatisfactory”
- This form is meant to provide the company with a review about the job, so, the elements can be set to be mandatory, so customers have to give feedback, or, it can be set to be Not mandatory, and in this case the review is optional

- Click on the Add Option button so you can add the answers to the question or the option for the element you are creating; it may be “Yes” or “No” or any text you find suitable. If you need to add more than one option, click on add option again–
- Remove Option is for removing option that you are adding, clicking on it will delete the last option
- At last click on the save button on the downright of the popup to save the element that you’ve created
- The created form elements will appear as follows:

You can easily edit the order of the elements by drag and drop action to any order that admins find suitable

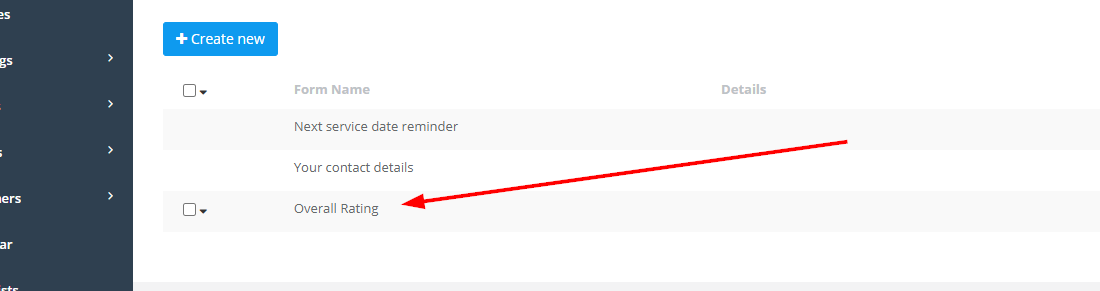
The created Form will appear in the Forms & Checklists Settings as
The form will appear to your customers where they can access it from multiple places including:
- The feedback email, which you can enable from your “automation” section under Settings > Communications > Automations
- The customer portal view page when they go to rate the fieldworker
- The branded app, where your customer can rate the fieldworker after their job is completed and paid
Gift Card
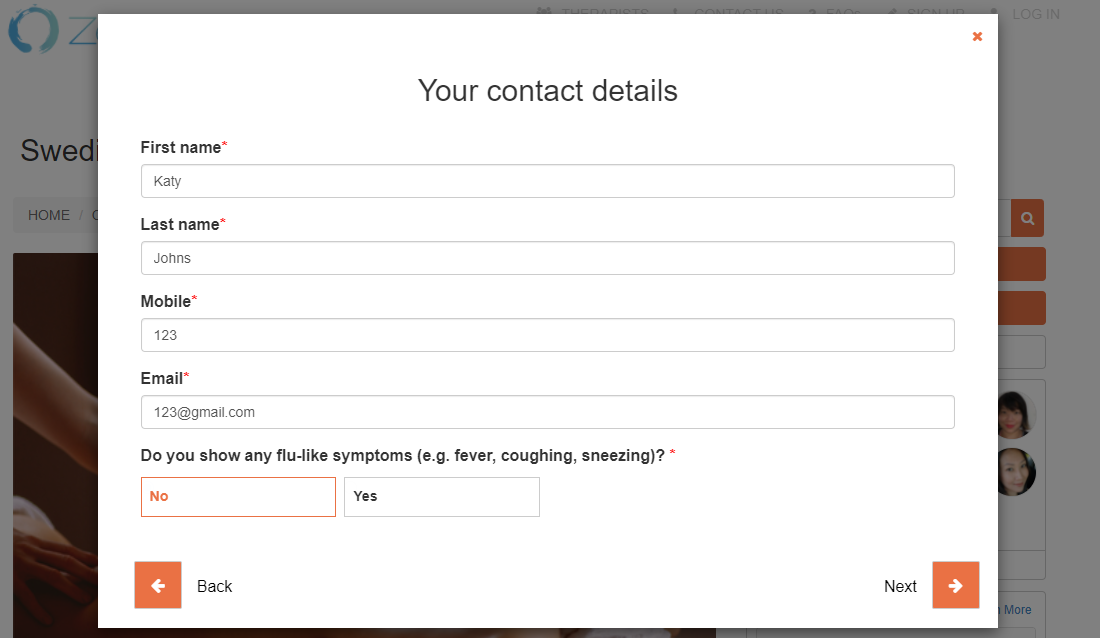
From the admin users’ end, the Gift Card option is a display option that appears when setting up a new form/checklist; however, it can only be selected through the “Your Contact Details” form only.
A gift card is a prepaid debit card that contains an amount of money to be used for future purchases or payments. This gift card can be used for both personal uses or for giving out as a gift to family or friends, which is the most common usage for it. These gift cards can be used to pay online or at physical places providing a service.
In OctopusPro gift cards can be used for any service that has the “send as a gift card” option allowed.
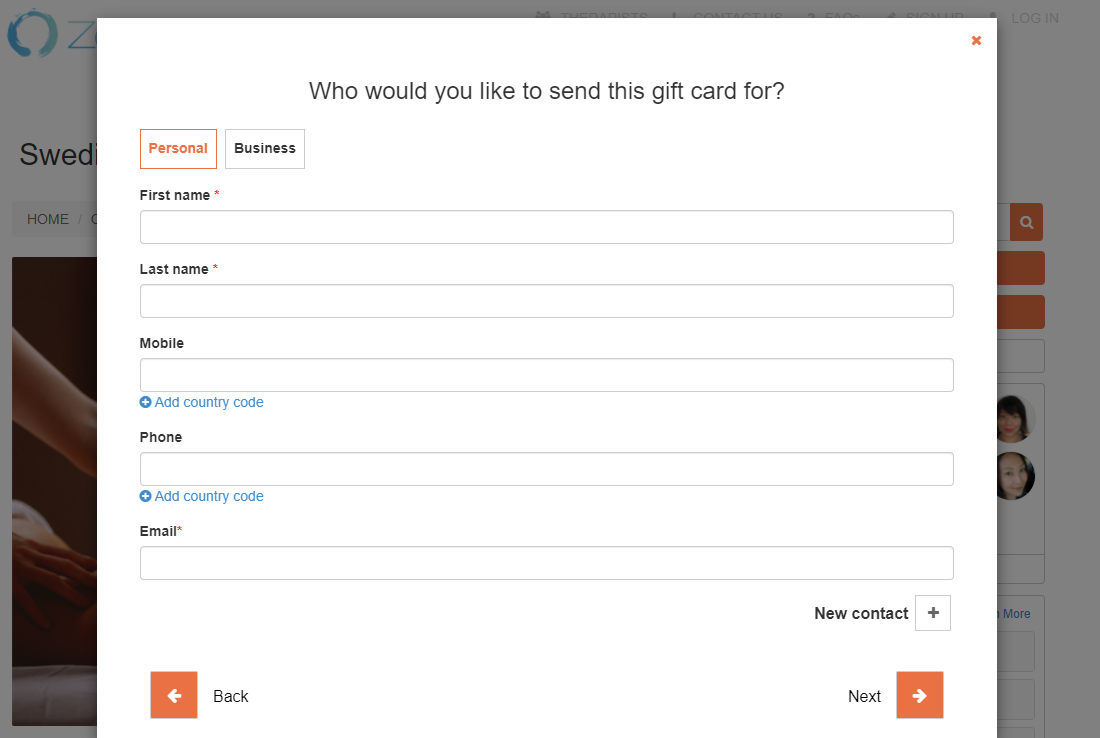
The “gift card” display option requires only two forms to be filled out, both considered to be “contact details” forms that are considered standard forms. These forms mainly require the customer to fill out their personal information and the personal information of the gift card receiver.
In order to fill out these forms, the customer (gift sender) has to go through the booking process after selecting “Buy Gift Card”


- After the customer is done with the booking process, the next pop-up will show the “Your Contact Details” form, where they need to add their personal information in
- After clicking on “Next”, another “Contact Details” form will appear, but this time it will be for adding the gift voucher receiver’s details
- After selecting a payment method and paying for the gift card, both sender and receiver should expect an email sent to the emails that has been provided with the booking details and confirmation
- The email will also have a link for cancelling the booking or rescheduling it if needed.

Admin users can also buy gift cards for their customers and have them sent to the receiver the same way as a regular booking.
- In order for admin users to use the gift card feature, go to ‘+New’ > ‘New Booking’ > Change status to ‘GIFT CARD’

- Next, admin users can fill out the ‘Your contact details’ form for their customer or choose an existing customer. In the case of choosing an existing customer, the customer’s “Contact Details” form should already be filled out and ready to be used

- After either selecting an existent customer or filling out the customer information manually, another pop-up will appear requiring the gift voucher receiver’s contact details to be filled out
- After filling out both forms, proceed with the usual booking process
Multiple Forms & Checklists
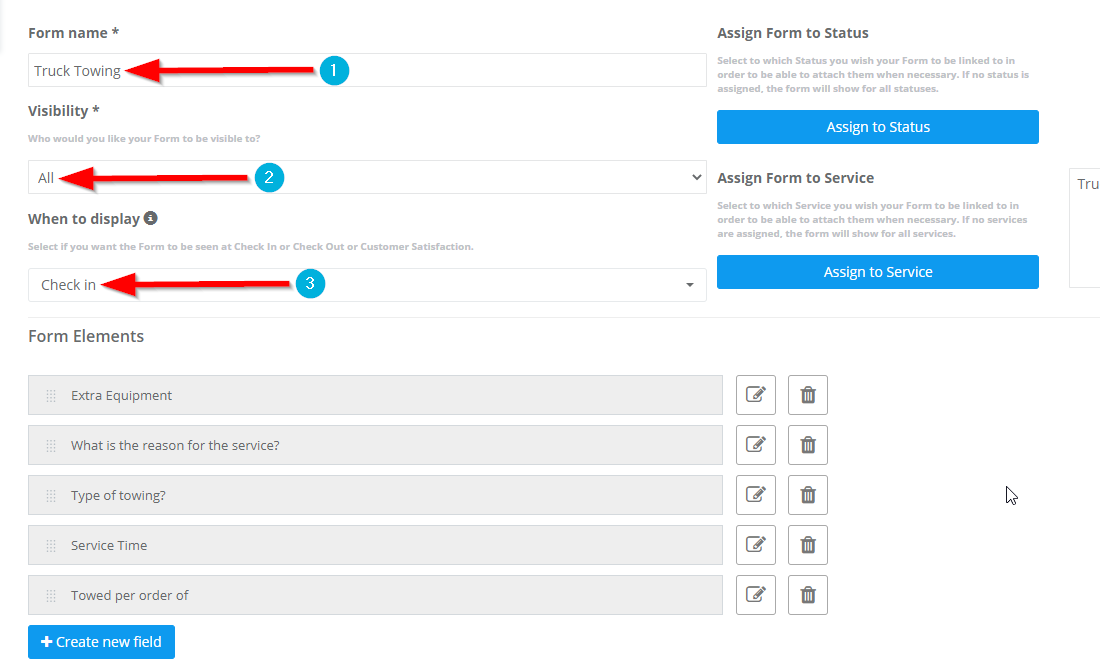
Truck Towing Form
- From the admin web view, go to Settings > General Settings > Forms and Checklists from the side menu on the left.
- Click on Create New

- Set the form name, the visibility that controls to whom the form is visible to, and the display options. In this case, we are going to set it as the visibility as “All”, which means that the form will be visible to the office users, fieldworkers, and customers. We are also going to set the display option as Check-in.
- Now we will start adding the Form Elements, which are the questions the fieldworker should take into consideration to start to perform their task, click on +Create new field

A popup will appear requiring the admins to provide descriptions for the following elements:
Field name: These are the questions that you would like the fieldworker to answer

Field type: As illustrated in this example, we are going to add three types of field types. The first field type is “Radio Button”, which requires the user to select one choice out of the available options.

When you select the field type as radio button, an “Add Option” button will automatically appear. This button will only appear when you are selecting the radio button option.

Admin users can add as many options as they want and that’s by clicking on the add option button again and again

Admin users can always remove options by clicking on the Remove Option button, which will automatically remove the last option added to the list of options

The second field type we are going to use is the Text box (multi-line) field type. This field type is for the details that need to be typed in manually as a text

The third field is the text field (one line), which shows a single line for users to manually type in

For the Three Options for the “Mandatory Options” as in “Show upload photos?” “Are photos mandatory?” In case of choosing truck towing, all of them will be flagged as yes for all of the elements added since all of them are mandatory, the photos indicate how the process of truck towing has been happening from the start till the end as proof of the work done and as the documentation for the company and the customer.

- On each time creating a form element don’t forget to press the Save button

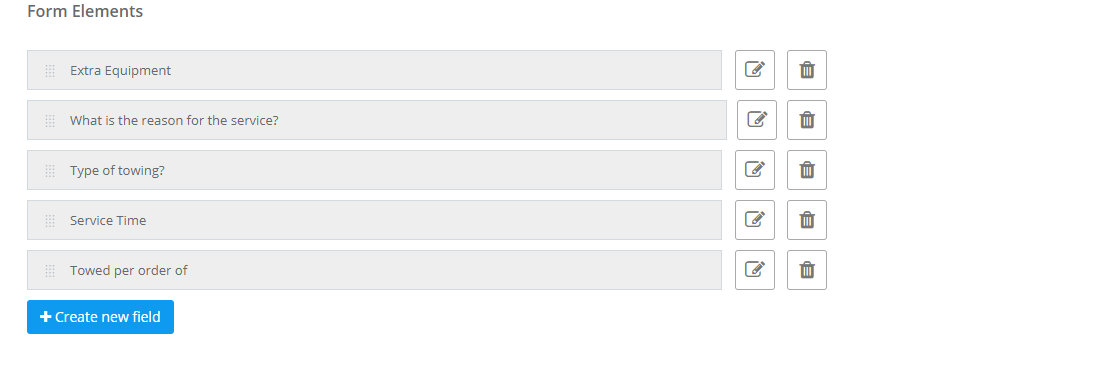
- The created form elements will appear as follows
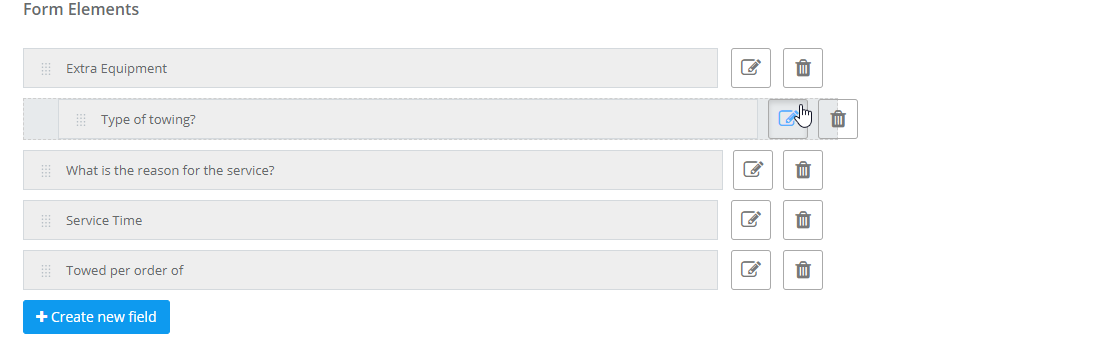
- You can easily edit the order of the elements by dragging and dropping action to any order that admins find suitable
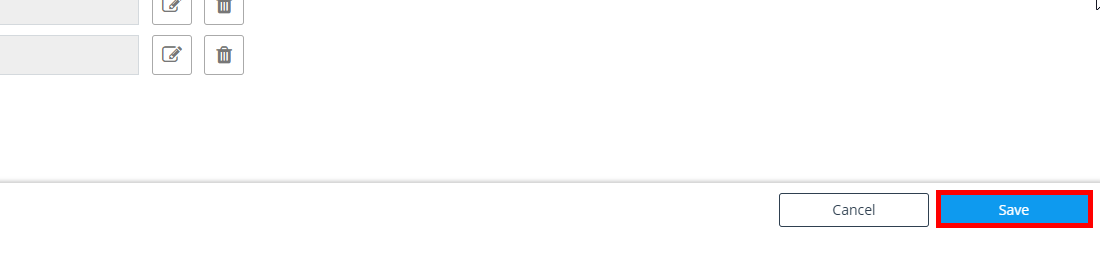
Don’t forget to click on the Save button located at the bottom right of the page when you finish creating a form
The created form will appear in the Forms and Checklists Settings as

The form will appear to the fieldworker “After starting a job” as follows

Since the visibility is selected as Check-In, that means the admins, fieldworkers, and customers will be able to review the checklist as shown below
Admin users can always check the form at any time the form of the booking view in the Forms and Checklists container located at the down right side of the page

Fieldworkers will be able to see the form from the booking view page in the application

And customers can see the filled form from the customer portal view booking view page under “Forms and Checklists”

Full Vehicle Inspection
- From the admin web view, go to Settings > General Settings > Forms and Checklists from the side menu on the left
- Click on Create New

- Set the form name, the visibility controls to whom the form is visible to, we set it as All which means that the form will be visible to the office, customers, and fieldworkers, and the display option as Check-In

- Now we will start adding the Form Elements which are the inspection steps and the details needed for the fieldworker in order for him to start performing the task. Click on + Create New Field.
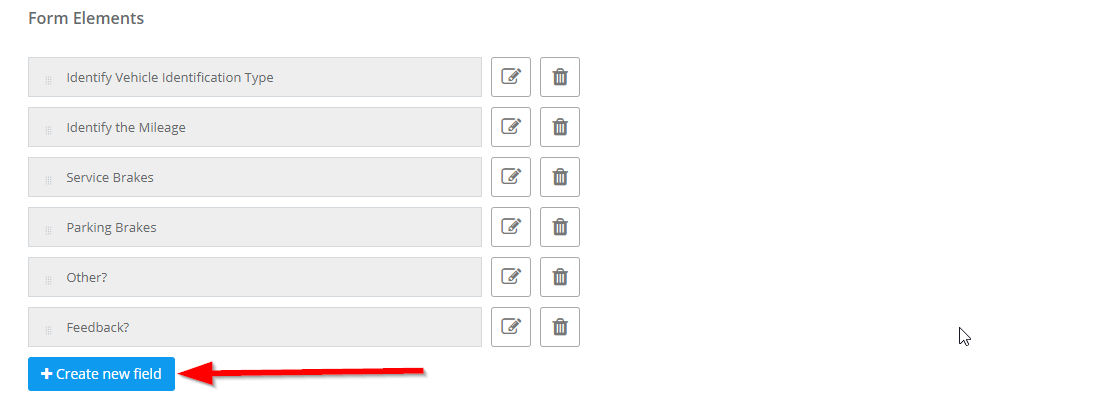
A popup will appear requiring the admins to provide the following:
Field Name: Which are the questions that you want to ask or the description that you want the fieldworker to perform.

Field type: in the following example illustrated, we will select three types of fields that are going to appear to the fieldworker, the first type is the Radio Button (MCQs) which are known as multiple choice questions as in the questions that do have Yes/No.

When you are selecting the field type as the radio button you need to manually type in the options and that is done by clicking on the Add Option Button, as in this button will appear only by selecting the Radio Button.


Admin users can add as many options as they want by clicking on the Add Option Button again and again.

Admin users can always have options by clicking on the Remove Options, this will always remove the last one of the options list.

The second field type is the Text box, which is designed for adding details that need to be typed in manually as text.
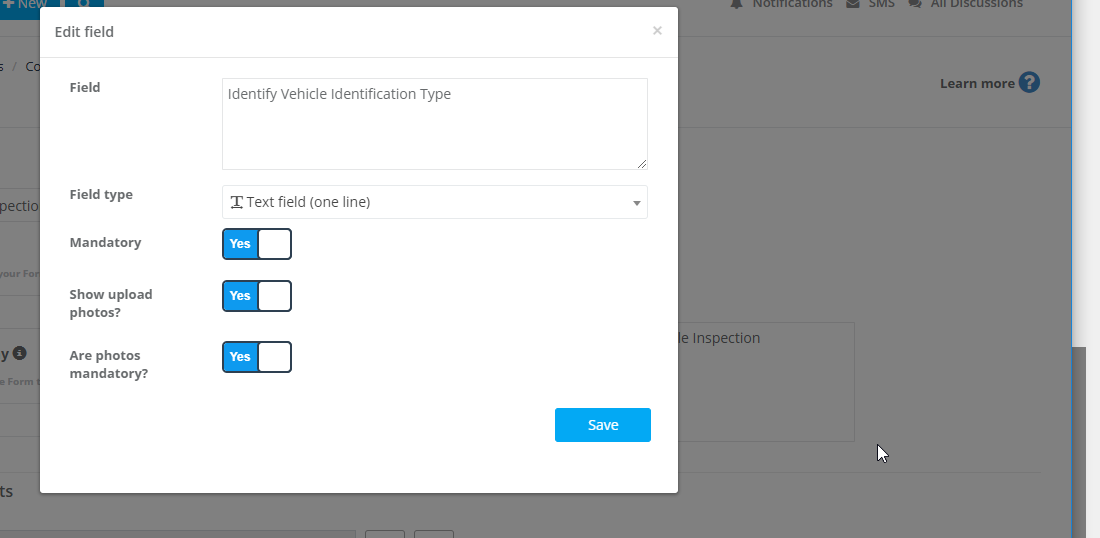
The Third Field is the Text Box One Line and that is suitable for the Full Vehicle Inspection.
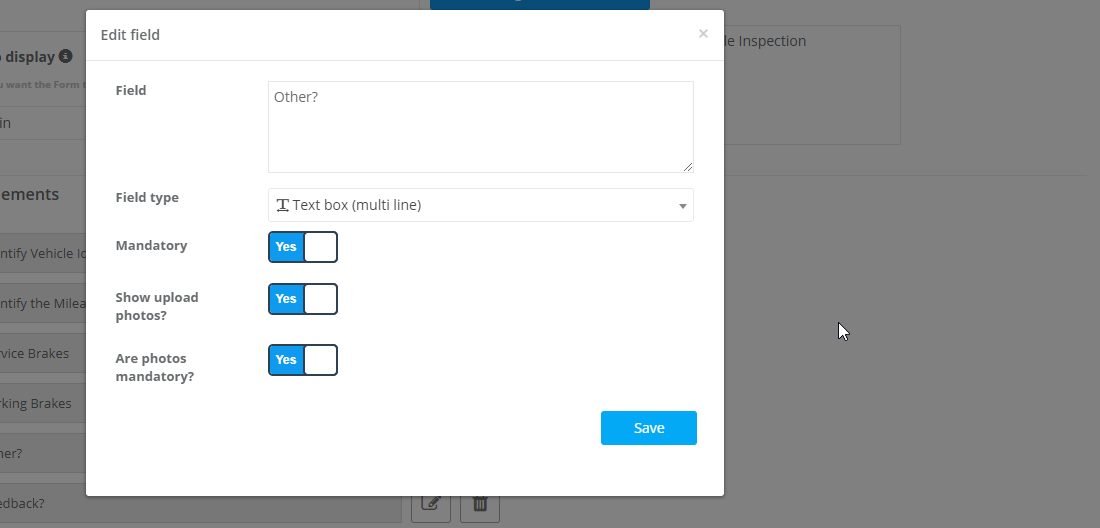
Mandatory options for the photo upload? Are the photos mandatory? In this example illustrated for the full vehicle inspection, all of them will be flagged as yes for all of the elements added since all of them are essential. You need a photo as proof that the inspection is made and that the photos are mandatory as documentation for the company and the customer. The step-by-step photos are essential for the ongoing process of the vehicle inspection, it’s considered to be proof of the submission and ongoing process of the following task.

- On each time creating a form element don’t forget to press the Save Button

- The created form elements will appear as follows
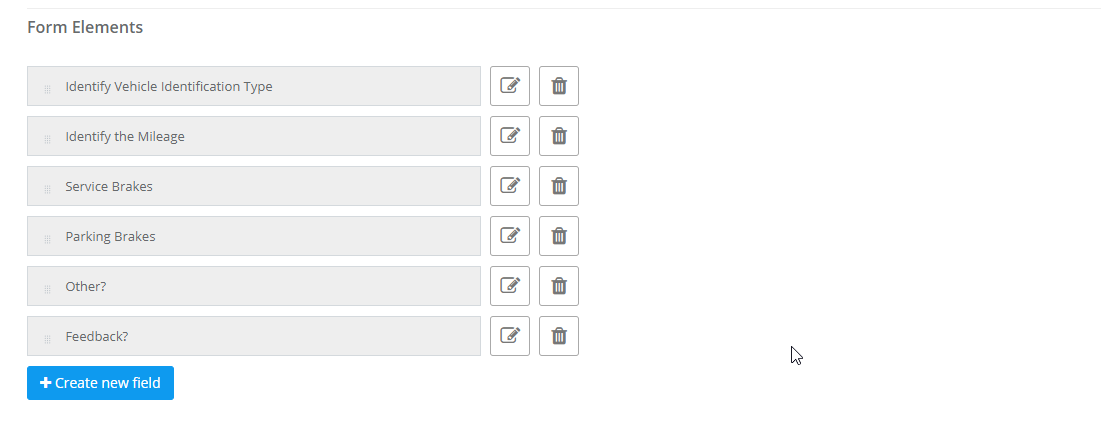
You can easily edit the order of the elements by dragging the dropping the action button to any order that admins find suitable

Don’t forget to click on the Save button located at the bottom right of the page when you finish creating a form
The created form will appear in the Form and Checklists Settings as
The form will appear to the fieldworker “After starting a job” as follows

Since the visibility is selected as Check-In selected means that admins, fieldworkers, and customers will be able to review the checklist as shown above
Admin users can always check the form at any time from the booking view in the Forms and Checklists container located at the down right side of the page

The fieldworker will be able to see the form from the booking view page in the application

And customers can see the filled form from the customer portal view booking view page under “Forms and Checklists”
For more information please visit Octopuspro user guide, and subscribe to our youtube channel.
Also, check out more forms and checklists topics we’ve prepared for you:
If you need to learn about the definition of Forms and Checklists in OctopusPro, click on the link and you will be redirected to a page containing comprehensive information about what forms and checklists are used for, similarities and differences between a checklist and a form, benefits of using the forms & checklists feature, forms & checklists benefits for businesses and difference between service custom fields and forms & checklists.
This page will provide detailed information about how to set up forms and checklists so admin users can create and set up forms in OctopusPro in the most professional way possible. The page will provide information about How to set up forms and checklists in OctopusPro, What are the visibility options and what are they beneficial for?, Display options definition, how to assign a form to a booking status, how to assign a form to a service, Why ‘assign form to a service’ option is available for some services and not others, editing forms and checklists, deleting a form or a checklist, activating and deactivation forms.
Simply, this page will provide the admin user with the proper knowledge to set up and control when forms and checklists appear in OctopusPro. The page also explains the way of setting the visibility option, so forms/checklists appear to the correct users. So, this feature is compatible with forms/checklists directed to the admin users, fieldworkers and customers.
The usage of different forms and checklists in OctopusPro depends on the user dealing with a form. So, after setting up a form, and depending on the form setup, the forms can be directed to admin users, fieldworker and customers. This page explains how to use forms/checklists in different users perspectives, admins from the admin dashboard, customers from the customer portal/ branded apps and fieldworkers from the fieldworker app and customer portal.
This document is covering the following topics: Where can admin users fill forms & checklists from? Where can admin users view the filled out forms & checklists? Forms and checklists from the fieldworker’s perspective, completing Forms and checklists as a fieldworker using the app and completing Forms and checklists as a fieldworker using the browser.
Field Types/Elements in OctopusPro are a set of input fields that the admin can add to the form/checklist so users can fill in the correct data. Admins can create a huge variety of field Types/Elements to a form, from asking a user to provide a date to answering multiple answer questions. So, this page will provide the admin users with details about all of the field types in the system, and how they appear to users.
The page topics are:
- How to create a new field and what are the types of fields that can be used in the system
- Date picker field type
- Time picker field type
- Text box (multi-lines) field type
- Text field (one line) field type
- (+/-) button field type
- Toggle field type
- Dropdown field type
- Radio button field type
- Button group field type
- List field type
- Checkbox field type
- Making a form element/field Mandatory
- Mandatory fields in admin web view
- Mandatory fields in fieldworker App
- Mandatory fields in the customer portal
- Requesting to upload photos for a form/checklist element
- Requesting to upload photos fields in admin web view
- Requesting to upload photos fields in fieldworker App
- Requesting to upload photos fields in the customer portal
- Making Photo Uploads Mandatory for all Users
- Editing and Deleting Form & Checklists Fields/Elements
For more information please visit Octopuspro user guide, and subscribe to our youtube channel.