
Google Reviews Integration & Automated Review Requests
OctopusPro helps you connect Google Reviews to your business so you can display trusted public feedback on your Customer Portal, give customers a direct way to leave a Google review, and, depending on your account setup, automate Google review requests by email and SMS. This helps you build trust with new customers, strengthen your online reputation, and collect reviews more consistently after completed work.

Once connected, you can display your public Google Reviews, including star ratings, reviewer names, and review comments, on your Customer Portal homepage so customers can see trusted third-party feedback while they are deciding whether to contact you or place a booking. You can also configure Trading Name-specific Google review links, support different brands or locations, and use Google Review Invitations and Reminders to send eligible customers Google review invitation emails and follow-up reminder emails after qualifying customer feedback is submitted.
On this page:
What this feature does
Why use Google Reviews in OctopusPro?
Google Reviews vs OctopusPro’s built-in Customer Feedback, Ratings & Reviews
How it works
Examples and use cases
Before you start
Step 1: Create your Google Maps Platform API key
Step 2: Get your Google Place ID
Step 3: Get your Google review link
Step 4: Add Google Reviews credentials in OctopusPro
Step 5: Configure Google Reviews per Trading Name
Step 6: Display Google Reviews on the Customer Portal homepage
Step 7: Set up Google Review Invitations and Reminders
Best practices
Troubleshooting
FAQ
Related articles
What this feature does
This feature connects OctopusPro to your Google Business Profile and Google Maps Platform so you can use your Google review data across multiple parts of your workflow. It is designed for businesses that want to manage Google Reviews more professionally across one or more brands, locations, or Trading Names.
In most cases, businesses use this feature to:
- Display Google Reviews on the Customer Portal homepage
- Add a direct Leave a Review button that sends customers to the correct Google review form
- Use different Google review settings for different Trading Names, brands, branches, or service regions
- Use the Google Review Invitations and Reminders automation to automatically send Google review invitation emails and reminder emails after eligible customer feedback events
- Insert the correct Google review link into templates, canned responses, and customer communication
- Strengthen social proof, improve customer confidence, and support more consistent review collection
If you do not want to display reviews on the Customer Portal, you can still use the integration for direct Google review links, Trading Name-specific review settings, and automated review requests.
Why use Google Reviews in OctopusPro?
Google Reviews are one of the most widely recognised forms of customer social proof. Connecting them to OctopusPro helps you use those reviews more effectively across your booking, communication, and customer-facing workflows.
Key benefits
- Build trust faster: Customers can see real third-party feedback before they contact you or book.
- Increase enquiry and booking confidence: Reviews reduce uncertainty and help customers feel more comfortable choosing your business.
- Strengthen your brand: Consistent positive feedback supports a more professional and credible business image.
- Collect reviews more consistently: Direct review links and automated workflows make it easier to request reviews after completed work.
- Support multi-location and multi-brand businesses: Different Trading Names can use different Google review settings.
- Improve service quality: Reviews can help you identify what customers value most and where operational improvements may be needed.
Tip: Invite customers to leave honest feedback, keep review requests neutral, and focus on making the review process easy rather than selective.
Google Reviews vs OctopusPro’s built-in Customer Feedback, Ratings & Reviews
Although these features are related, they serve different purposes and work best when used together.
Google Reviews Integration is mainly for managing your public reputation. It lets you connect Google Reviews to OctopusPro, display Google Reviews on your Customer Portal, use direct Google review links, configure review settings per Trading Name, and use the Google Review Invitations and Reminders automation to send eligible customers Google review invitation emails and follow-up reminder emails after qualifying customer feedback.
Customer Feedback, Ratings & Reviews is OctopusPro’s built-in internal feedback workflow. It is designed for collecting private customer feedback, managing complaints and service follow-up through Issues, capturing star ratings and written comments tied to bookings, using Rating Tags such as communication or quality of work, and tracking performance trends for reporting and fieldworker management.
The main difference
- Google Reviews Integration: focused on public Google reviews, public social proof, Customer Portal display, and external review requests
- Customer Feedback, Ratings & Reviews: focused on private internal feedback, complaints handling, booking-linked ratings, service recovery, and internal performance improvement
How they work together
- Use Customer Feedback, Ratings & Reviews to collect internal feedback first, monitor service quality, track complaints, and measure booking or fieldworker performance.
- Use Google Reviews Integration to build your public reputation by displaying Google Reviews and sending customers to your Google review page.
- Together, they help you manage both sides of the customer feedback process: private operational feedback inside OctopusPro and public reputation building on Google.
- This also gives you more flexibility, because you can use OctopusPro’s internal rating workflow even if you do not display Google Reviews on the Customer Portal, and you can use Google Reviews without relying only on internal ratings.
Example workflow
A business may first collect an internal customer rating and written feedback through OctopusPro after a booking is completed. That internal feedback can help the business identify complaints, service issues, or training needs. The business can then use its Google Reviews setup to invite customers to leave a public Google review, helping grow its public online reputation while still keeping internal quality control inside OctopusPro.
Learn more about the built-in feedback workflow here: Customer Feedback, Ratings & Reviews.
How it works
OctopusPro connects to Google through the Google Maps Platform and uses your Google Business Profile location details to retrieve your public review information and direct customers to the correct Google review page.
At a minimum, the setup usually includes these 3 values:
- Google Maps Platform API key
- Google Place ID, which uniquely identifies your business location on Google
- Google review link, used for the Leave a Review button and review-request communication
Depending on your account setup, Google review links can be configured at the company level and also per Trading Name. The review link can be resolved in different ways, such as:
- Place ID mode: build the review link using a Google Place ID
- Manual URL mode: paste the review link copied from Google Business Profile
- Short name mode: use an existing Google short name review URL if your business already has one
Once configured, the same Google Reviews integration can support Customer Portal display, Trading Name-specific review links, the Google Review Invitations and Reminders email automation, and optional QR-based review access where supported.
Examples and use cases
Single-brand business: A cleaning company displays Google Reviews on its Customer Portal homepage to reassure new customers before they request a quote or book online.
Multi-location business: A service business with several branches uses different Trading Names so each branch can use its own Google review profile and review link.
Repeat-service business: A home maintenance business uses Google Review Invitations and Reminders to automatically email customers after they submit a qualifying fieldworker rating, helping the business collect more Google reviews without manual follow-up.
Lead-generation use case: A business using the Customer Portal for online enquiries and bookings displays Google Reviews to improve trust and conversion before customers submit a request.
Brand separation use case: A company operating multiple sub-brands under one OctopusPro account configures different review titles, review counts, and review links per Trading Name so each brand keeps its own reputation profile.
Before you start
Before setting up Google Reviews in OctopusPro, make sure you have the following:
- An active Google Business Profile for the business location you want to use
- Access to the Google Cloud Console so you can create and manage an API key
- A Google Cloud project with billing enabled, because Google Maps Platform usage may incur charges depending on your usage and Google configuration
- The required Google APIs enabled in your project, typically Places API and, depending on your setup, Maps JavaScript API
- If you use multiple brands or locations, the correct Google details for each Trading Name you want to configure
Helpful links
- Google Cloud Console
- Google Place ID documentation
- Google Place ID Finder
- Google Business Profile
- Verify your business on Google
Security note: Treat your API key like a password. Restrict it to the APIs you need, apply application restrictions where appropriate, keep it secure, and rotate it if you think it has been exposed. If you over-restrict it, the integration may stop working.
Step 1: Create your Google Maps Platform API key
You need a Google Maps Platform API key so OctopusPro can connect to Google and retrieve your review data.
To create the API key:
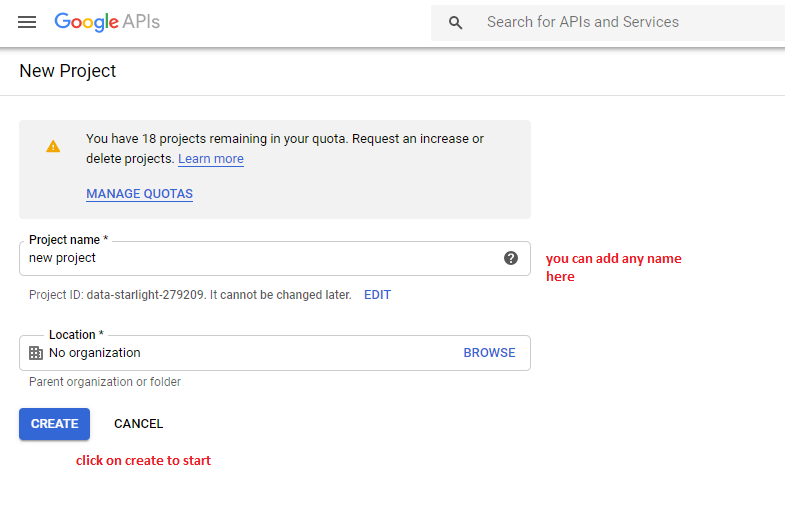
- Sign in to the Google Cloud Console.
- Create a new Google Cloud project or open an existing one.
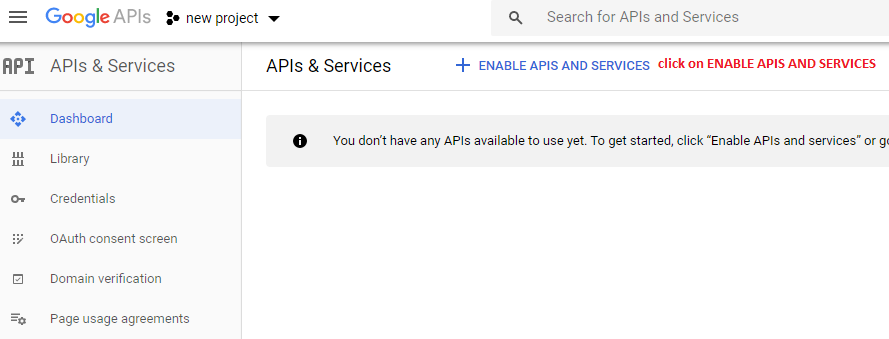
- Enable the required APIs, typically Places API and Maps JavaScript API.
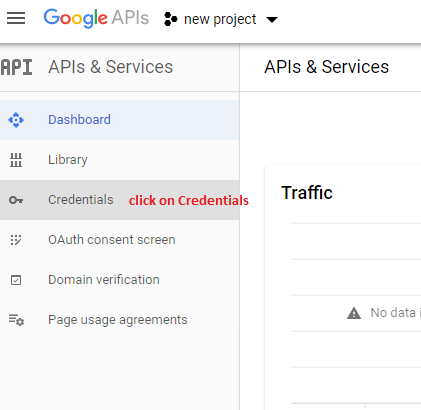
- Open Credentials.
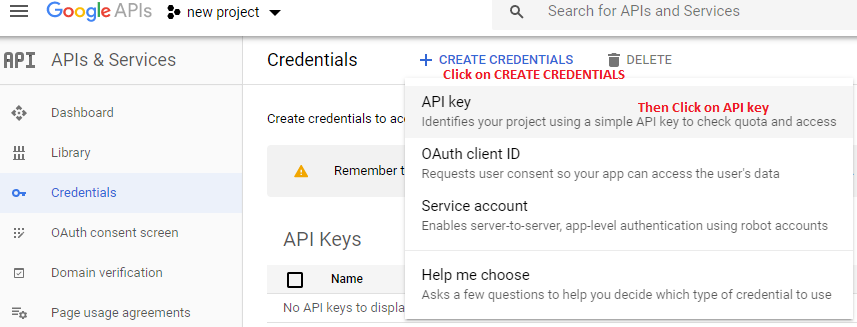
- Create a new API key.
- Copy the key and store it securely.
Create a new project
Enable APIs and Services
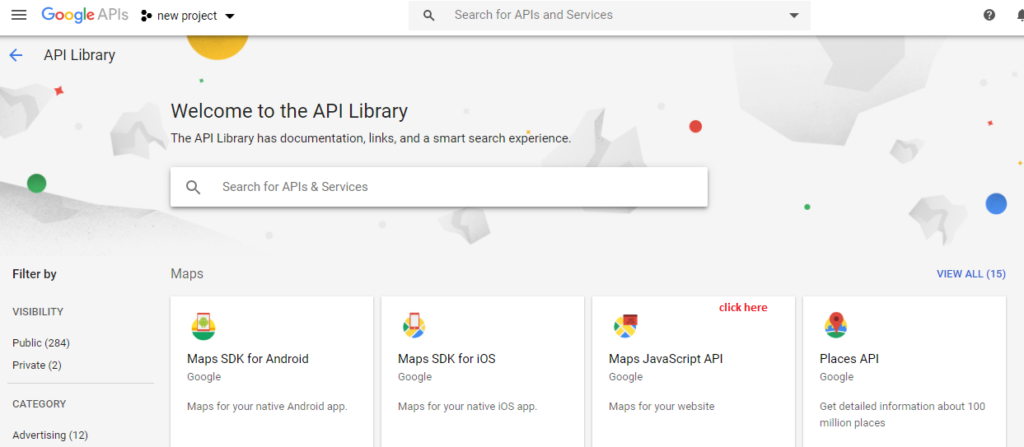
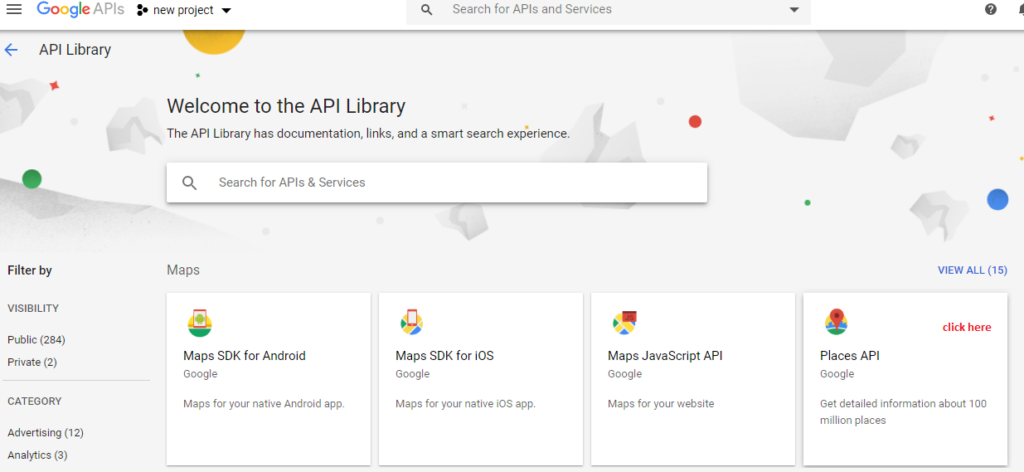
Open the API Library and enable Maps JavaScript API
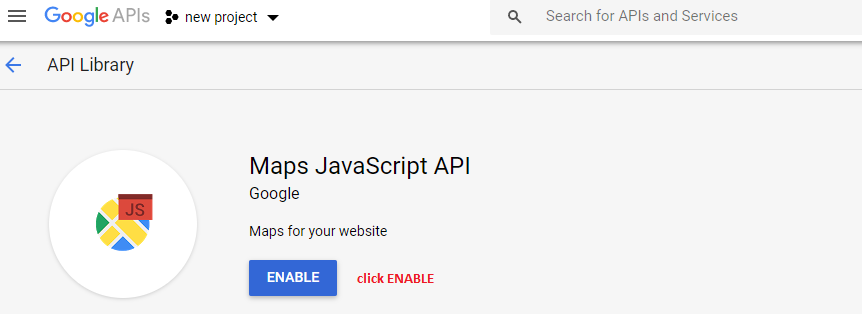
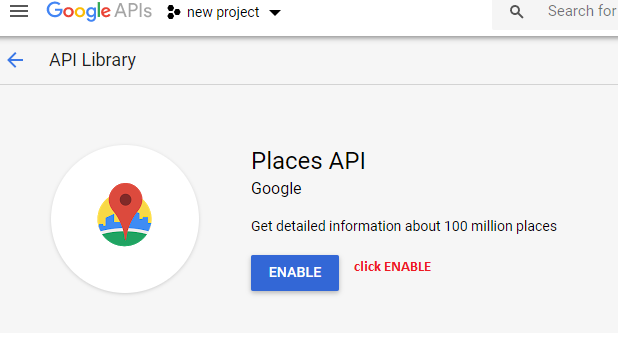
Enable Places API
Create the API key in Credentials
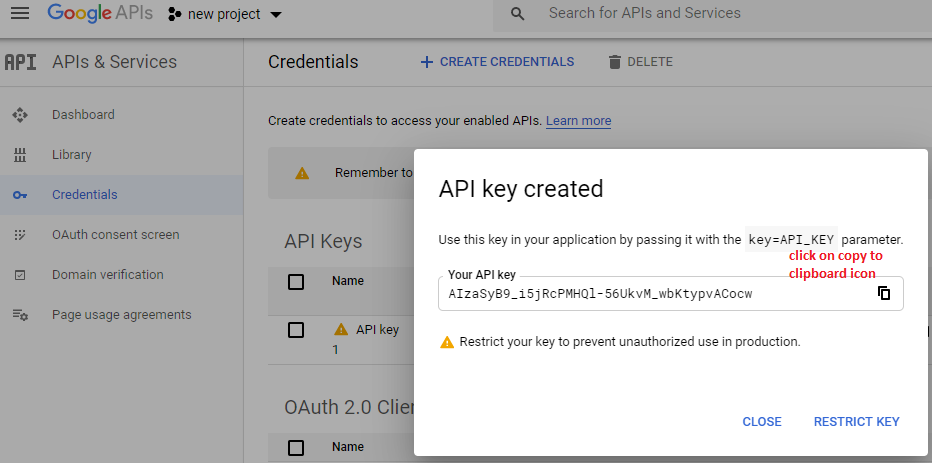
Result: You now have the first required value: your Google Maps Platform API key.
Step 2: Get your Google Place ID
Your Place ID uniquely identifies your business location on Google. OctopusPro uses it to pull the correct Google review data for the business, location, or Trading Name you want to configure.
To get your Place ID:
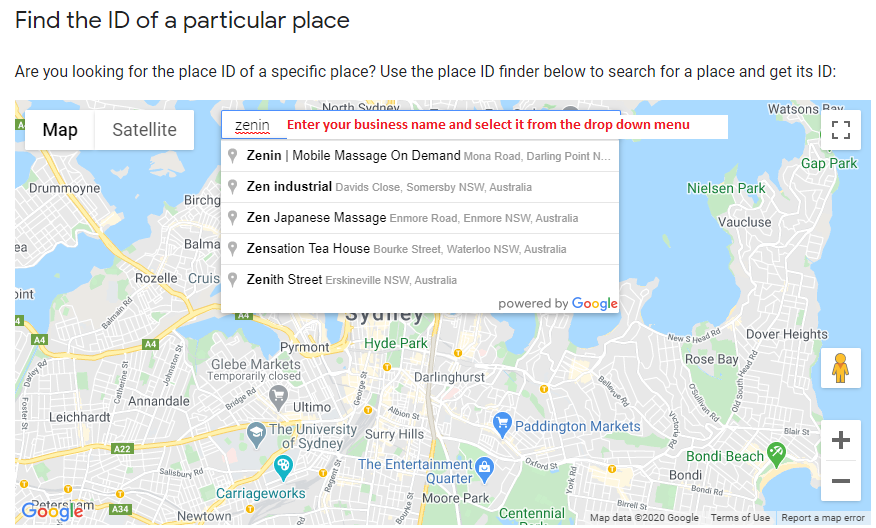
- Open the Google Place ID documentation or the Place ID Finder.
- Search for your business.
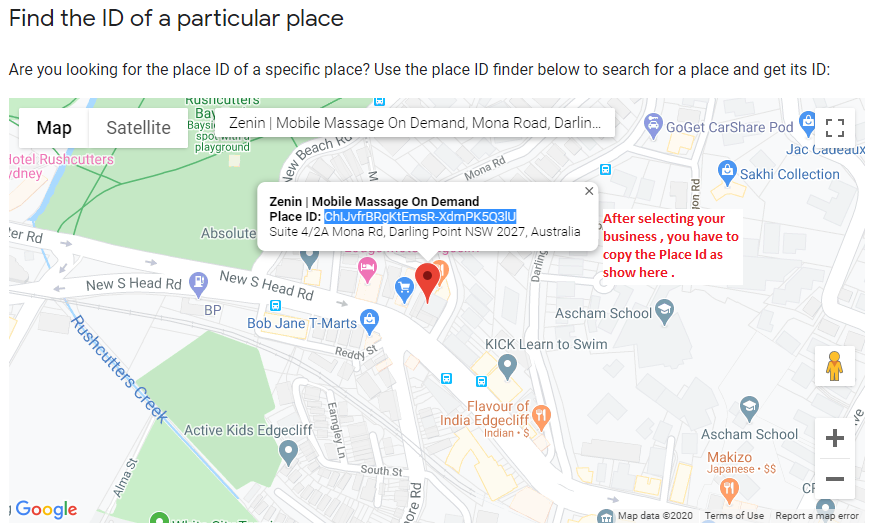
- Select the correct location from the results.
- Copy the Place ID.
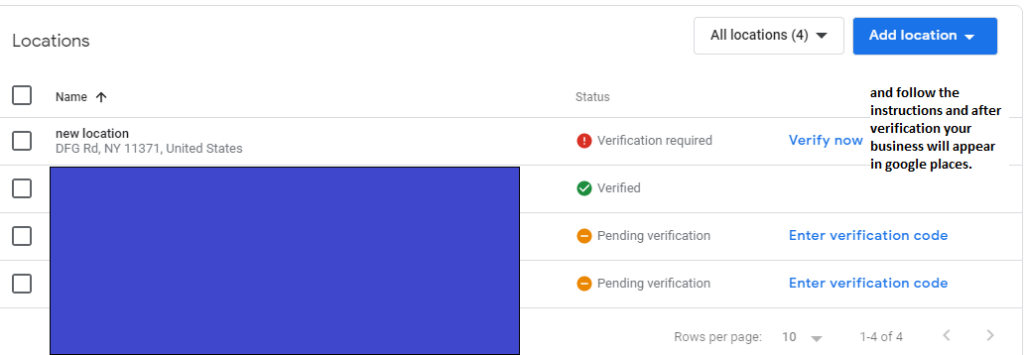
If your business does not appear, make sure the location exists and is verified in your Google Business Profile.
Result: You now have the second required value: your Google Place ID.
Step 3: Get your Google review link
Your Google review link is the direct URL customers use to leave a review. This powers your Leave a Review button and can also be used in email templates, SMS templates, canned responses, and automated review-request workflows.
To get your review link:
- Log in to your Google Business Profile.
- Open the correct business profile or location.
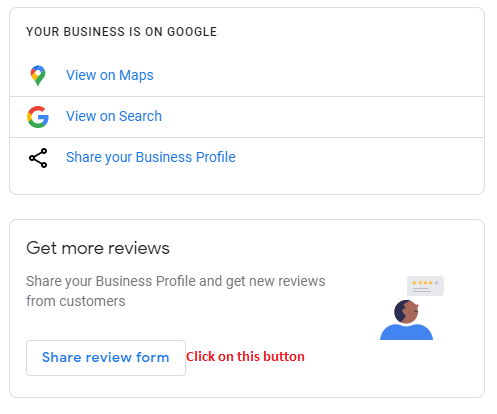
- Find the option to share your review form or request reviews.
- Copy the direct review link.
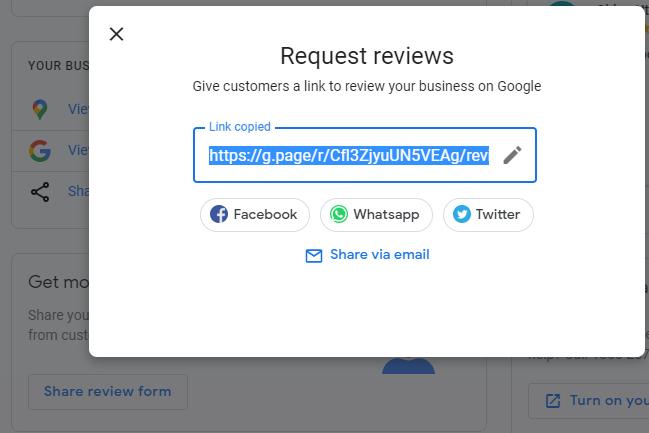
Result: You now have the third required value: your Google review link.
Step 4: Add Google Reviews credentials in OctopusPro
Once you have your API key, Place ID, and review link, add them inside OctopusPro.
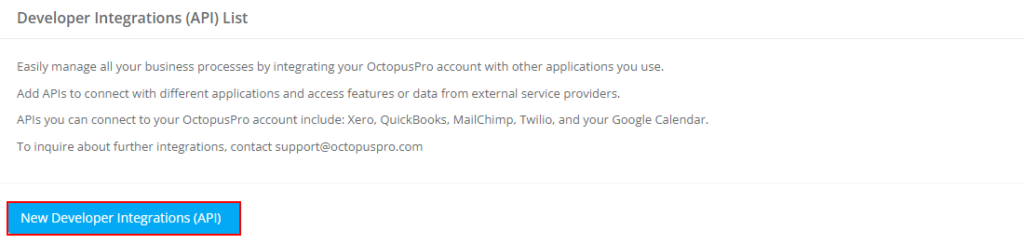
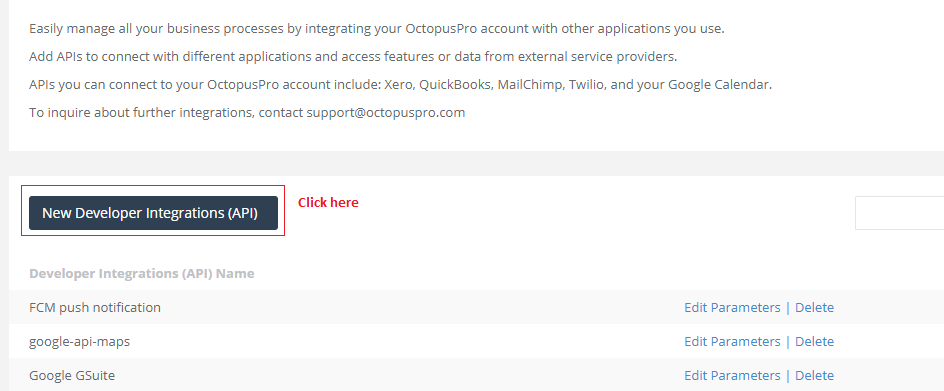
- Go to Settings → Company Settings → Integrations (API).
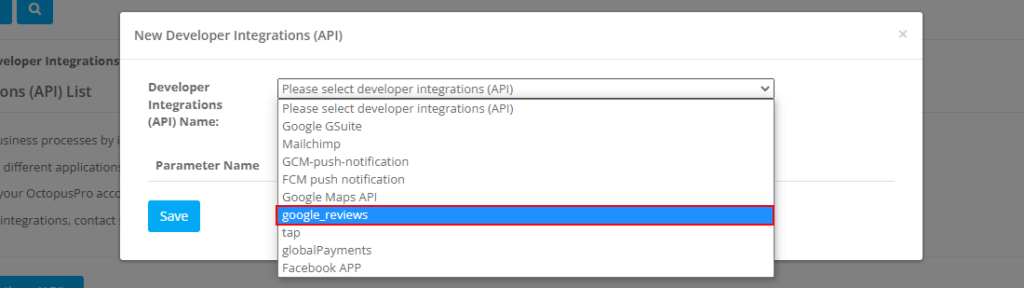
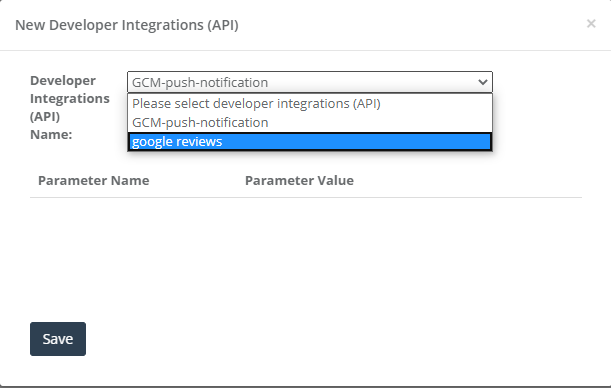
- Click New developer integrations (API).
- Select Google Reviews from the list.
- Enter the following values:
- Google Maps API key
- Place ID
- Google review link
- Click Save.
Current interface examples
Detailed step-by-step examples
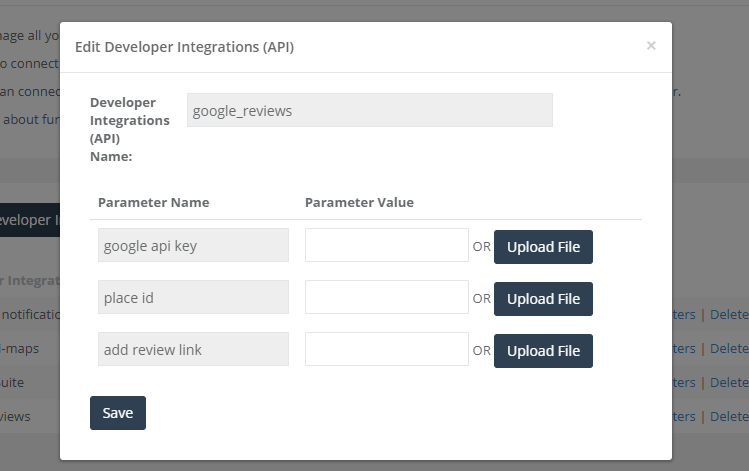
Note: Depending on your account version, the screen layout may look slightly different, but the required values and setup logic are the same. On some older screens, the review URL field may appear as add review link.
Step 5: Configure Google Reviews per Trading Name
If your business uses multiple Trading Names, sub-brands, branches, or service regions, you can configure Google Reviews separately for each Trading Name so each brand or location can use the correct Google review destination and display settings.
This is useful when:
- You operate multiple branches with different Google Business Profile locations
- You run multiple brands under one OctopusPro account
- You want each location or brand to show its own review content rather than sharing one set of reviews across all portals and communications
Typical path: Settings → Company Settings → Trading Names → select a Trading Name
Depending on your account configuration, the Google Reviews section for a Trading Name may include options to:
- Enable or disable Show Google Reviews
- Choose a review link mode, such as:
- Use Place ID to build the review link from a Google Place ID
- Paste a review URL copied from Google Business Profile
- Use short name URL if the business already has an existing Google short name
- Assign a specific Google Place ID
- Store a direct Google review URL
- Store an existing Google short name where supported
- Set a custom section Title, such as Google Reviews or What our customers say
- Choose the number of reviews to display
- Set a minimum rating threshold for displayed reviews
- Adjust colour theme or display styling
- Use Test Review Link to confirm the review button opens the correct Google review form
- Generate or refresh an optional QR code linked to the final Google review URL where supported
If a booking is linked to a Trading Name, OctopusPro can use that Trading Name’s Google Reviews configuration first. If the Trading Name does not have a valid Google Reviews setup, the system can fall back to the company-level Google Reviews configuration where available.
Learn more here: Manage Multiple Trading Names or Sub-Brands through a Single Business Account.
Step 6: Display Google Reviews on the Customer Portal homepage
After saving your Google Reviews integration, enable the Customer Portal flag so the reviews section appears on the portal homepage.
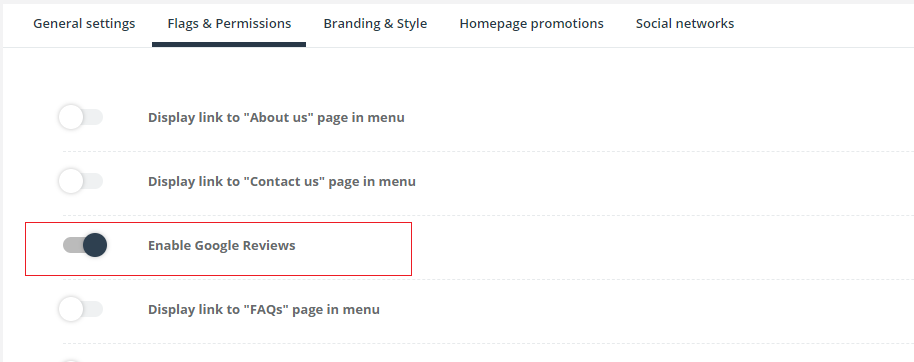
- Go to Settings → Customer Portal → Flags & Permissions.
- On some accounts, this may appear under Settings → Communications → Customer Portal → Flags & Permissions.
- Under Website Flags, enable the Google Reviews option. Depending on your account version, this may appear as:
- Display Google Reviews in customer portal homepage
- Display Google Reviews on customer portal homepage
- Enable Google Reviews
- Click Save.
Current interface example

Alternate interface example
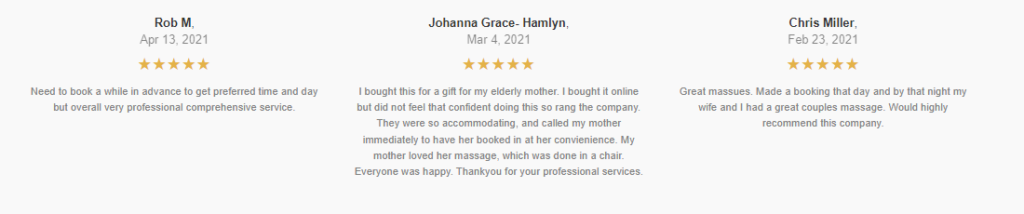
What customers see on the portal
Once enabled, the Google Reviews section appears on the Customer Portal homepage, commonly toward the bottom of the page depending on your portal layout and settings. Customers can read reviews and, where configured, click through to leave a new review.

Learn more about these settings here: Customer Portal Flags & Permissions.
Step 7: Set up Google Review Invitations and Reminders
In addition to displaying Google Reviews on your Customer Portal, OctopusPro can also use Google Review Invitations and Reminders to automatically send Google review invitation emails and follow-up reminder emails after eligible customer feedback is submitted.
This is especially useful for businesses that want to build their Google review profile more consistently without relying on manual follow-up from office staff after every positive customer rating.
Google Review Invitations and Reminders
Google Review Invitations and Reminders is an automation that automatically sends Google review invitation emails and follow-up reminder emails to eligible customers using your configured Google review link.
In this workflow, review invitation emails are sent after a customer submits a 4-star or 5-star fieldworker rating, provided all other automation conditions are met.
The automation will only send the email when:
- the company has this automation enabled
- the company account is in good standing
- the relevant Trading Name has Google Reviews configured
- the customer submitted a qualifying 4-star or 5-star fieldworker rating
- the required delay period has passed since the rating was submitted
- email sending is enabled for that Trading Name
- the customer has not already received the maximum allowed number of reminder emails
- enough time has passed since the last reminder email was sent
The automation uses the Google review settings configured for the relevant Trading Name. If that Trading Name does not have its own Google review link or Place ID configured, the system can fall back to the company-level Google Reviews settings where available.
This helps you request Google reviews more consistently while reducing manual follow-up from office staff.
How the review link is used in automation
- A Google review link can be stored per Trading Name, so each brand, branch, or location can use its own Google review destination.
- The review link can be based on a Google Place ID, a pasted Google review URL, or an existing Google short name URL if one is already in use.
- Once configured, the system can insert that link into email templates, SMS templates, and canned responses using placeholders such as {google_review_url}.
- Some setups may also support a QR code placeholder, such as {google_review_qr_img}, allowing review-request emails or documents to include a scannable code linked to the correct Google review page.
Typical automation flow
- Send the first review invitation email automatically after a customer submits a qualifying 4-star or 5-star fieldworker rating.
- Wait for the configured delay period before sending the first email.
- Only send the email if the company has this automation enabled and the company account is in good standing.
- Use the Google Reviews settings configured for the relevant Trading Name, with fallback to company-level settings where available.
- Only send the email if email sending is enabled for that Trading Name.
- Optionally send follow-up reminder emails until the configured maximum number of reminders has been reached.
- Wait the configured interval between reminder emails.
- Stop further reminders when the maximum reminder count has been reached or when the customer is no longer eligible.
Why this is useful
- Helps you request reviews more consistently
- Reduces manual admin work for office staff
- Supports multi-brand and multi-location businesses using Trading Names
- Makes it easier to include review requests in branded post-service communication
- Lets you reuse the correct Google review link across templates and workflows
Important: Review requests should stay neutral, should not promise incentives, and should follow your local email communication, consent, and compliance rules. This automation is designed for email-based review invitations and reminders, so make sure your email settings, templates, and customer eligibility rules are configured correctly.
Related setup areas may include Manage Multiple Trading Names or Sub-Brands through a Single Business Account, Automated Reminders & Confirmations (Email, SMS & WhatsApp), and Customer Feedback, Ratings & Reviews.
Best practices
- Ask for honest reviews: A natural review profile looks more credible and helps you gather balanced feedback.
- Ask at the right time: Review requests are usually most effective after a completed booking or once the customer confirms they are satisfied.
- Make the review process easy: Add your review link to booking completion messages, invoice emails, payment confirmations, SMS messages, and your Customer Portal.
- Test the review link before using it: Use the available test-link options to confirm the correct Google review page opens for the correct brand or location.
- Respond to reviews professionally: Future customers often read your responses as closely as the reviews themselves.
- Use feedback to improve operations: Repeated comments about timing, communication, quality, or staff behaviour can help you identify patterns and improve service delivery.
- Keep your API key secure: Use API and application restrictions carefully so the integration remains secure without breaking functionality.
- Automate review requests carefully: If you enable review-request automations, keep the wording neutral, avoid incentives, and make sure your email and SMS communication settings follow the correct consent and compliance rules.
Troubleshooting
If Google Reviews are not appearing correctly, or if the review link is not working as expected, check the following:
- The Google Reviews integration is saved correctly
- Your Google Maps API key is valid and does not contain extra spaces or incorrect characters
- Billing is enabled on the Google Cloud project
- The required Google APIs are enabled, especially Places API and any others your setup depends on
- The Place ID is correct and points to the correct business location
- Your Google Business Profile location is live and verified
- The selected review link mode has the required value, such as Place ID, manual URL, or short name
- The Trading Name configuration is complete if you expect a location-specific or brand-specific review link
- The Customer Portal flag is enabled and saved if you want reviews to appear on the portal homepage
- API key restrictions are not blocking requests
If you restricted the API key and reviews are still not showing, try loosening the restrictions temporarily to confirm the connection works, then re-apply the correct restrictions once the setup is confirmed.
If Google Review Invitations and Reminders is not sending, check that the automation is enabled, the company account is in good standing, the relevant Trading Name has Google Reviews configured and resolves the correct Google review link, the customer submitted a qualifying fieldworker rating, the required delay period has passed, email sending is enabled for that Trading Name, the maximum reminder count has not been reached, and enough time has passed since the last reminder email.
For broader Google API setup guidance, see Google Maps API Integration.
FAQ
Can I edit or delete Google Reviews from OctopusPro?
No. Google Reviews are managed through Google, not OctopusPro. You can respond to reviews and manage your listing from your Google Business Profile.
How often do reviews refresh?
Reviews are pulled from Google through the API. Refresh timing can vary depending on Google, caching, and your configuration, so new reviews may take some time to appear.
Can I use this for a mobile or service-area business?
Yes. As long as your business has a valid Google Business Profile and the correct Place ID, you can use Google Reviews in OctopusPro whether you operate mobile, on-site, workshop-based, in-store, or across multiple service areas.
Can I display Google Reviews without using automated review requests?
Yes. Displaying Google Reviews on the Customer Portal and automating review requests are related but separate capabilities. You can use one without the other, depending on your account setup.
Can I automate review requests without displaying Google Reviews on the Customer Portal?
Yes. If your account supports Google Review Invitations and Reminders, you can still use Trading Name-specific Google review links and automated review invitation emails and reminder emails after qualifying customer feedback, even if you do not display Google Reviews on the Customer Portal.
Can I show different reviews for different brands or locations?
Yes. This is one of the main reasons to configure Google Reviews per Trading Name. Each Trading Name can use its own Place ID, review URL, or supported short name configuration.
Do I need both the API key and the review link?
Yes, in most setups you need the API key and Place ID to retrieve and display reviews, and the review link to power the Leave a Review button and review-request communication.
Can I limit the number of reviews shown or set a minimum star rating?
On accounts that support Google Reviews configuration per Trading Name, you may be able to control how many reviews appear and apply a minimum rating threshold for displayed reviews.
Can I automate Google review requests?
Yes. If your account supports Google Review Invitations and Reminders, OctopusPro can use Trading Name-specific Google review links to send automated Google review invitation emails and reminder emails after a customer submits a qualifying fieldworker rating, based on your configured delay, reminder limit, reminder interval, and Trading Name Google Reviews settings.
What is Google Review Invitations and Reminders?
Google Review Invitations and Reminders is an automation that sends Google review invitation emails and follow-up reminder emails to eligible customers using your configured Google review link.
When does Google Review Invitations and Reminders send emails?
In this workflow, emails are sent after a customer submits a qualifying 4-star or 5-star fieldworker rating, based on your configured delay, reminder limit, reminder interval, Trading Name Google Reviews settings, and email communication rules.
Can each Trading Name use a different Google review link?
Yes. This is useful for multi-location and multi-brand businesses, because each Trading Name can use its own Place ID, pasted review URL, or existing short name URL where supported.
Can I include a QR code for Google review requests?
Some setups may support storing a QR code asset linked to the final Google review URL, which can then be used in templates or customer-facing documents.
How is this different from OctopusPro’s built-in Customer Feedback, Ratings & Reviews?
Google Reviews Integration is mainly for public Google reviews, Customer Portal display, and Google review requests. OctopusPro’s built-in Customer Feedback, Ratings & Reviews feature is mainly for private internal feedback, complaints handling, booking-linked ratings, Rating Tags, and performance tracking. Many businesses use both together so they can improve service internally while also building their public reputation on Google.
Related articles
- Customer Feedback, Ratings & Reviews
- Manage Multiple Trading Names or Sub-Brands through a Single Business Account
- Automated Reminders & Confirmations (Email, SMS & WhatsApp)
- Customer Portal Flags & Permissions
- Customer Portal Settings Guide
- Customer Portal SEO Meta Tags: Optimize Meta Titles & Descriptions
- Google Maps API Integration
To stay updated, please subscribe to our YouTube channel.