
Using Forms & Checklists
This page list of content:
- Where can admin users fill forms & checklists from?
- Where can admin users view the filled out forms & checklists?
- Forms and checklists from fieldworker perspective
- Completing Forms and checklists as a fieldworker using the app
- Completing Forms and checklists as a fieldworker using the browser
- In case of having Multiple Forms Checklists for a single job
Where Can Admin Users Fill Forms & Checklists From?
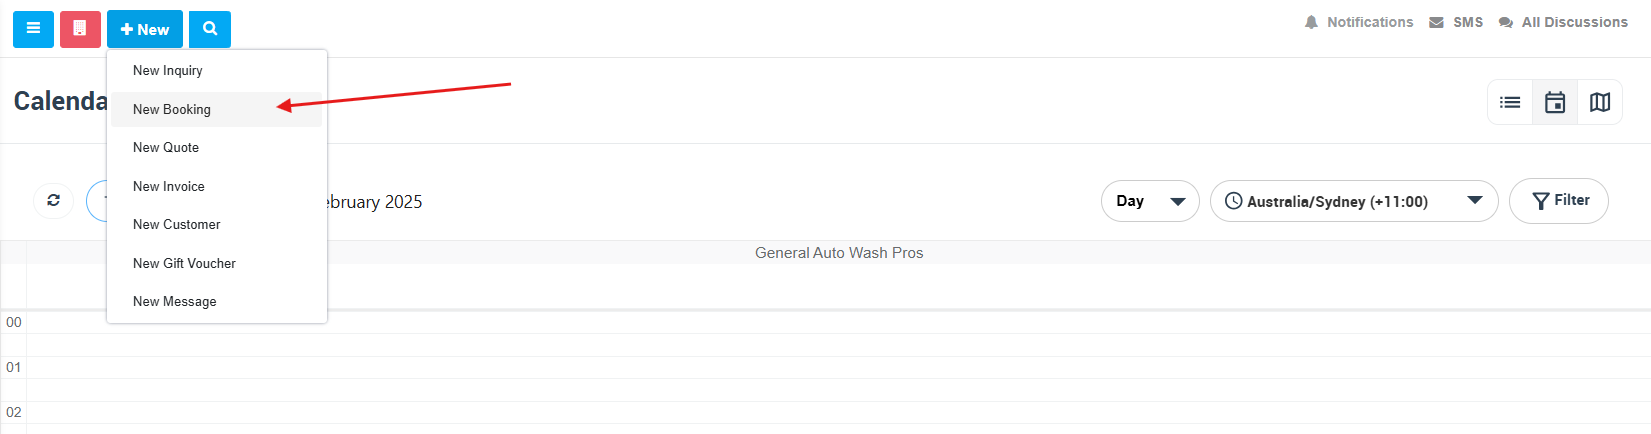
After setting up the forms & checklists and determining who they are visible for, admin users can access these forms & checklists and fill them out upon requesting a new booking.
- This can be done through signing into your admin user, clicking on +New, or clicking on Bookings > New Booking from the side menu on the left

- Then select ‘New Booking’.
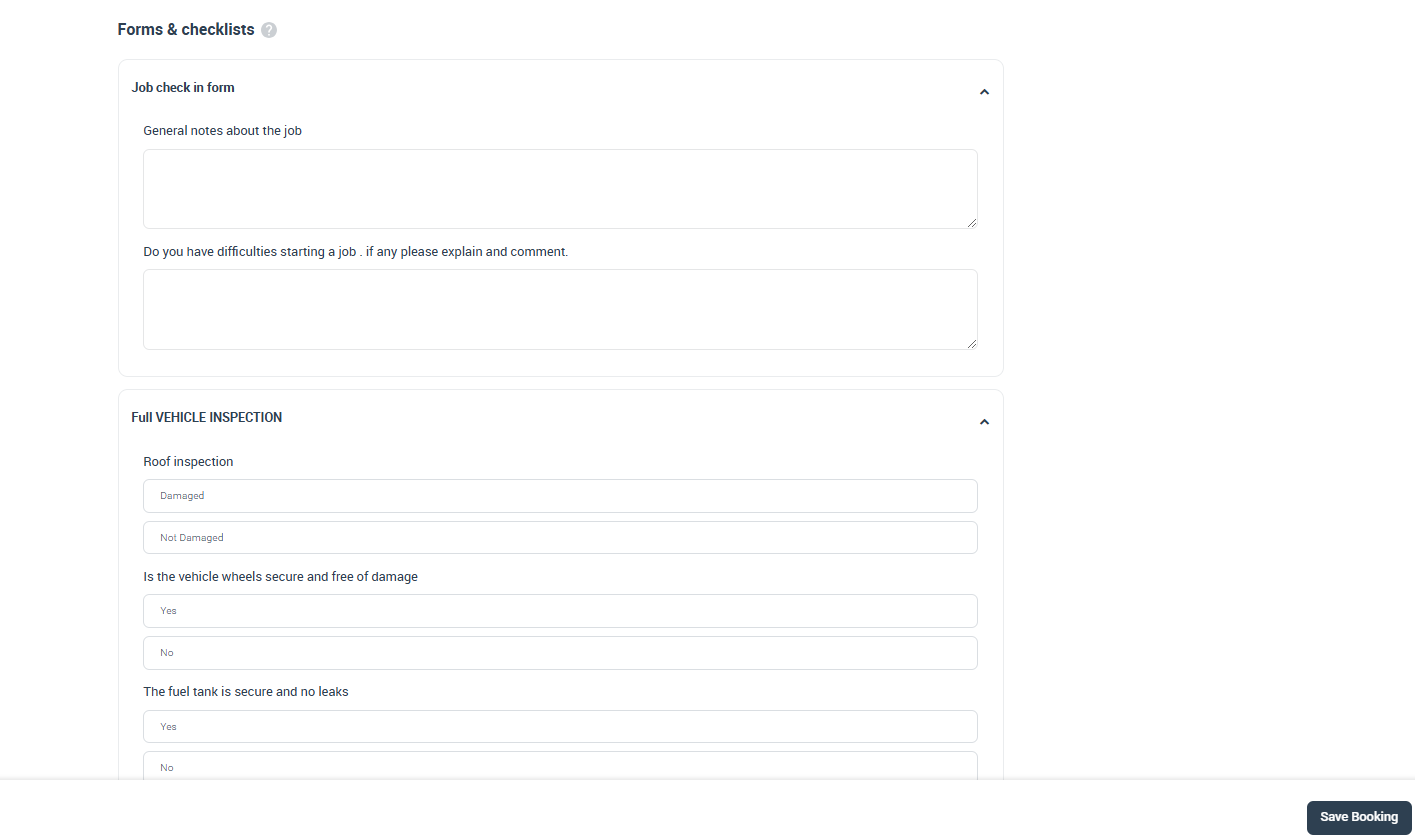
- After following the booking process and filling out the needed forms, you will be able to view the forms/checklists. The form/checklist will appear under the name you added in the “Form Name” field while setting it up.
Where Can Admin Users Find Filled-Out Forms & Checklists?
After the form is filled and a new booking is made, the admin can view the filled out form from their admin account through:
Bookings > Upcoming or past bookings ……….Select any booking
- The admin user can view all past, pending, future, or canceled bookings through their account; therefore, depending on the booking’s status, the admin can access the form from any of the departments under the Bookings list.
- Then, there is the “All Bookings” department, which shows all the bookings that have ever been made in the past, future bookings to be attended, pending bookings that still need confirmation… etc.
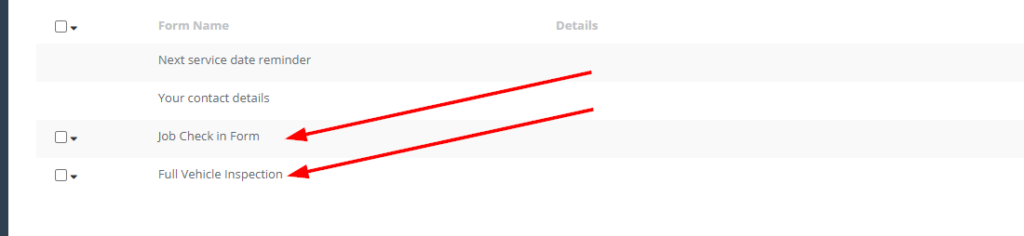
- After selecting any department under the “bookings” list and clicking on a specific booking, the admin will be able to view the booking information, including the form/checklist that has been filled by them, the fieldworker, or the customer
Forms and Checklists From Fieldworker Perspective
- Collecting data and processing it for every job can be quite time-consuming, especially if your business has fieldworkers located all across the country. In that case, creating forms for fieldworkers will make for a better field service report, and you will be able to avoid miscommunication between admin users and fieldworkers. This feature will make the business run smoothly without disconnect and delays between field service reports.
- All industries have their own regulations that are placed to ensure higher quality and efficiency when providing services. “Checklists” help your business systematically ensure that jobs and services procedures are effective, clear, and created in a way that is easy for your employees to access and complete.
Completing Forms and Checklists As A Fieldworker Using The App
- OctopusPro gives your team access to their job forms and checklists no matter where they are. Whether they are on their desktop or mobile device, fieldworkers can check tasks as they go, store completed forms, and send forms to clients all with a click of a button.
- Fieldworkers can quickly and easily record important details of their jobs from any mobile device. This includes job safety inspections, assessments, documentation, site facilities, accident reports, audit reports, chemical tracking, accessibility, equipment, and more. All forms and checklists are completely customizable, so you can create specific instructions for specific services, or create default checklists applicable to all services.
Completing Forms and Checklists As A Fieldworker Using The Browser
The process of completing forms and checklists as a fieldworker using the browser is a very essential matter in OctopusPro. Explained below is the process of completing forms & checklists from the fieldworker web page:
By logging in to the Admin account, go to Settings > General Settings > Forms and Checklists
Create a new form by applying the visibility to be “All” and “Always Displayed”, then just add one question, assign a service to it and save it.
When you log out from the Admin account and log in as a fieldworker, by creating a new booking, to check the edited form, just go to viewing the form as in the Actions > Edit > View, the form will be visible.
- From the admin web view, go to Settings > General Settings > Forms & Checklists from the side menu on the left
- Click on +Create new
- The Create a new form page will appear requiring you to select/add the following:
- Form name: Counseling
- Visibility: as All
- When to display: Always Displayed
- Create a new field
- After filling the details in the Edit field, press on ‘Save’, then close the window and ‘Save’ the whole Form.
- On the fieldworker Login> ‘Create a new booking’.
- A new page will appear
- When the fieldworker logs in from the web browser, navigating to Bookings > All bookings from the side menu opens the booking list.
- Then the following shown page will appear just as the attached screenshot below, from the Actions > Edit and the form will be visible.
After that, the editing option will be visible to edit, you can see the red arrow has focused on “Counseling” meaning that the service is shown.
In Case Of Having Multiple Forms Checklists For A Single Job
- Creating multiple forms and checklists for your company may result in having 2 or 3 forms for a single service, so what happens if we assign two forms to a single job?
- If the forms “When to display?” options are different, for both check-in & check-out, for instance, the form will appear to the fieldworker as mentioned at both check-in and check-out statuses.
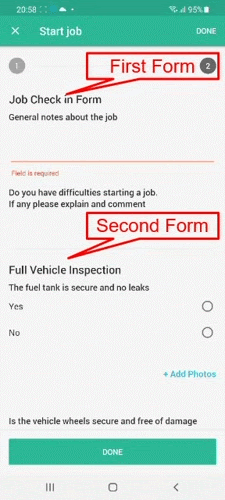
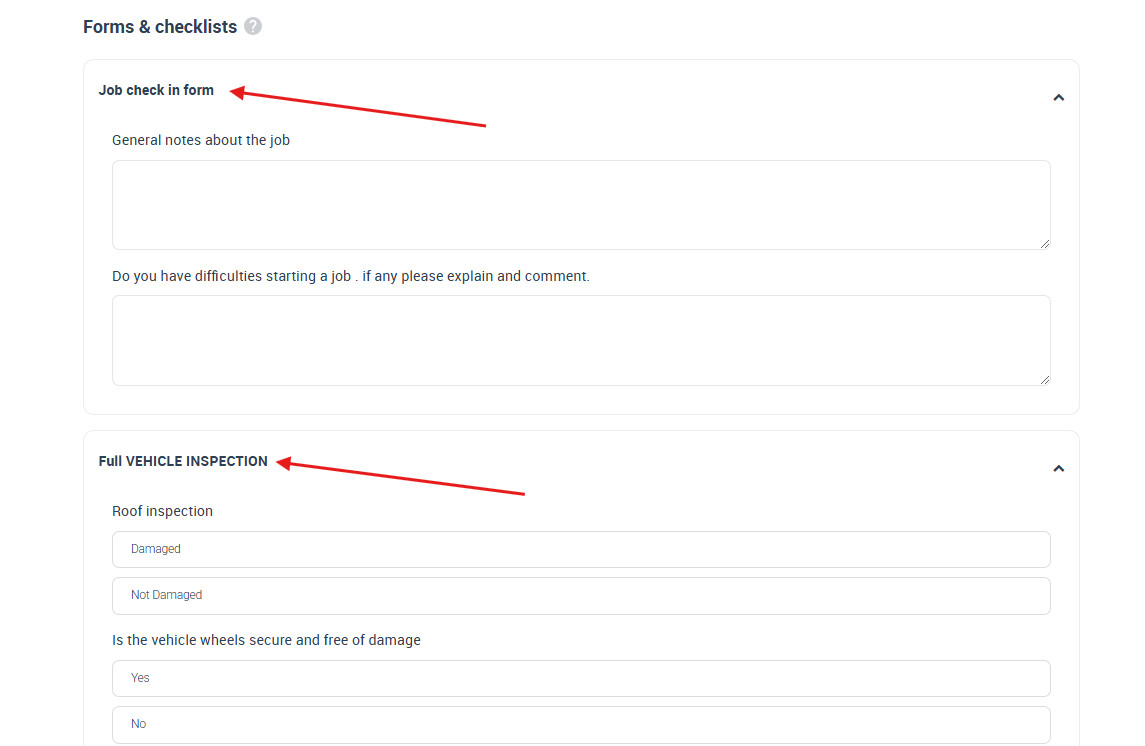
- But, what if we have two forms that have the same display option? This is an example of two forms having the display option selected as Check-in using the truck towing business. The first form is going to ask the fieldworkers to provide information regarding the job itself; while the second form is going to ask the fieldworker to perform detailed inspection procedures before starting the job.
The fieldworker will be able to view both forms separately upon checking in from the fieldworker app as follows:
- Note: Each form is going to have its own separated title to distinguish forms from each other
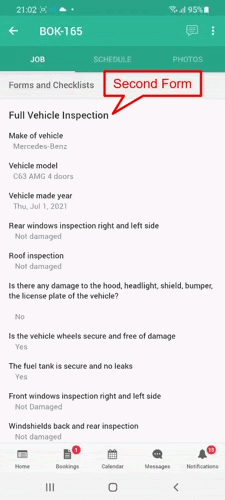
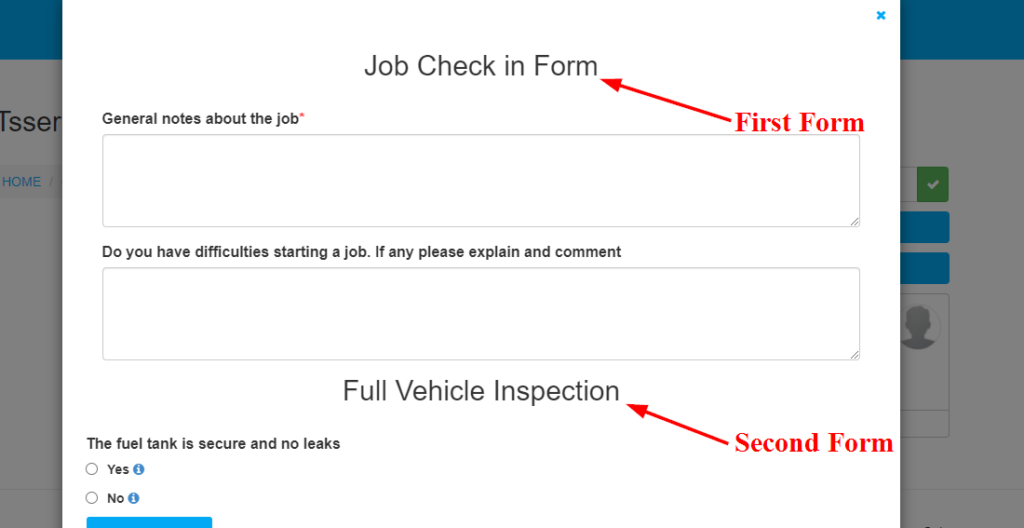
Admin users will be able to view the multiple forms and checklists from the web through the booking view page as follows:
- Note: Each form is going to have its own separated title to distinguish forms from each other.
Customer users will be able to preview multiple forms and checklists from the customer portal on the booking view page as follows:
- Note: Each form is going to have its own separated title to distinguish forms from each other.
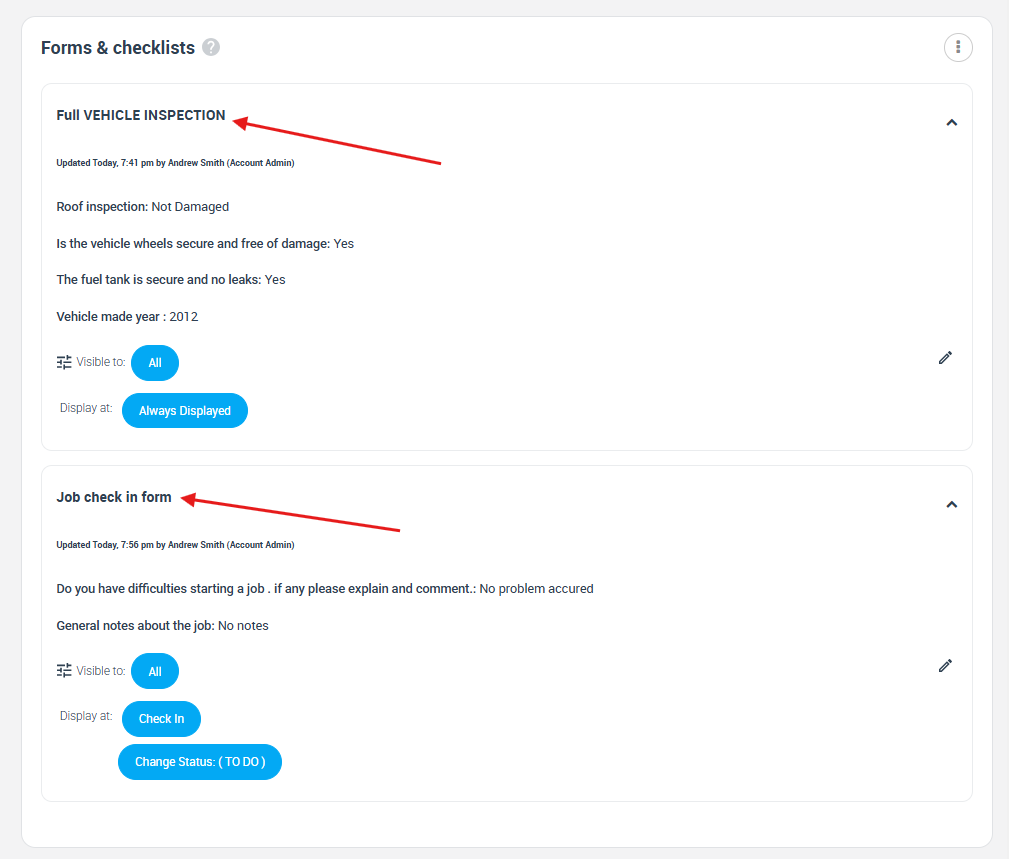
In Case Of Having Multiple Forms Checklists For A Single Job For Admins
- Forms and checklists appear to the admin users to fill out when creating a booking that happens when the form is set to have the display option as “All”, Therefore, in that case of having Multiple forms and checklists for a single job, the admin users will be able to view two forms separately upon checking-in from the web view. Each form is going to have its own title separated by the form name.
- Upon creating a booking, the admin will view the two forms as follows:
Admin users will be able to view the multiple forms and checklists from the web on the booking view page as follows:
- Note: Each form is going to have its own separated title to distinguish forms from each other
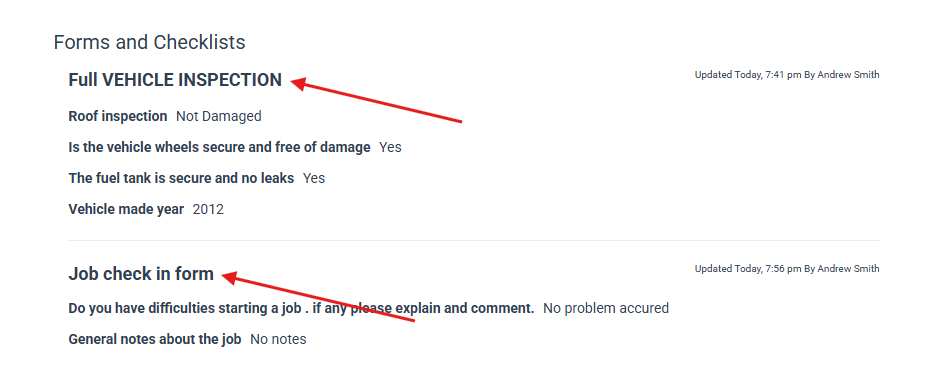
In Case Of Having Multiple Forms Checklists For A Single Job For Customers
- Forms and checklists will appear to the customer users to fill out when creating a booking. These forms and checklists appear when the form is set to have the display option as ‘All’. Therefore, in the case of having multiple forms and checklists for a single booking, the customer will be able to view the two forms separately upon checking in from the customer portal. Each form is going to have its own title separated by the form name.
Customers will be able to view the multiple forms and checklists from the customer portal on the booking view page as follows:
- Note: Each form is going to have its own separated title to distinguish forms from each other
Also, check out more forms and checklists topics we’ve prepared for you:
If you need to learn about the definition of Forms and Checklists in OctopusPro, click on the link and you will be redirected to a page containing comprehensive information about what forms and checklists are used for, similarities and differences between a checklist and a form, benefits of using the forms & checklists feature, forms & checklists benefits for businesses and difference between service custom fields and forms & checklists.
This page will provide detailed information about how to set up forms and checklists so admin users can create and set up forms in OctopusPro in the most professional way possible. The page will provide information about How to set up forms and checklists in OctopusPro, What are the visibility options and what are they beneficial for?, Display options definition, how to assign a form to a booking status, how to assign a form to a service, Why ‘assign form to a service’ option is available for some services and not others, editing forms and checklists, deleting a form or a checklist, activating and deactivation forms.
Simply, this page will provide the admin user with the proper knowledge to set up and control when forms and checklists appear in OctopusPro. The page also explains the way of setting the visibility option, so forms/checklists appear to the correct users. So, this feature is compatible with forms/checklists directed to the admin users, fieldworkers and customers.
Field Types/Elements in OctopusPro are a set of input fields that the admin can add to the form/checklist so users can fill in the correct data. Admins can create a huge variety of field Types/Elements to a form, from asking a user to provide a date to answering multiple answer questions. So, this page will provide the admin users with details about all of the field types in the system, and how they appear to users.
The page topics are:
-
- How to create a new field and what are the types of fields that can be used in the system
- Date picker field type
- Time picker field type
- Text box (multi-lines) field type
- Text field (one line) field type
- (+/-) button field type
- Toggle field type
- Dropdown field type
- Radio button field type
- Button group field type
- List field type
- Checkbox field type
- Making a form element/field Mandatory
- Mandatory fields in admin web view
- Mandatory fields in fieldworker App
- Mandatory fields in the customer portal
- Requesting to upload photos for a form/checklist element
- Requesting to upload photos fields in admin web view
- Requesting to upload photos fields in fieldworker App
- Requesting to upload photos fields in the customer portal
- Making Photo Uploads Mandatory for all Users
- Editing and Deleting Form & Checklists Fields/Elements
This page provides real-time examples of forms and checklists for different industries. So, admin users can preview the use cases and create forms/checklists that are compatible with their business. Industries like real estate, cleaning and automotive are considered and explained in this document.
For more information please visit Octopuspro user guide, and subscribe to our youtube channel.