
OctopusPro’s Calendar Day View
The Calendar Day View is a powerful tool that allows users to manage bookings on a day-to-day basis. This includes functionalities such as changing the assigned fieldworker, rescheduling bookings, creating new bookings, creating unavailable events, editing the time of the booking, and viewing fieldworker labels. This guide will walk you through these features, enabling you to effectively manage your bookings using OctopusPro’s Calendar Day View.
Table of Contents:
- Accessing Calendar Day View
- Changing Assigned Fieldworker Using Drag and Drop
- Rescheduling Bookings in Calendar Day View
- Creating a New Booking from Calendar Day View
- Creating an Unavailable Event from Calendar Day View
- Editing Booking Time Directly from Calendar
- Viewing Fieldworker Label on Calendar Day View
- Adding a New Label to Fieldworker Profile
Accessing Calendar Day View
To access the Day View:
- Navigate to your “Calendar”.
- On the right side of the page, select “Day” to show bookings for the current day.

The day view will display all the bookings scheduled on the current day in blocks. You can also navigate to a specific day using the arrows on the left side of the page or by clicking on the calendar icon and selecting a specific day.

Changing Assigned Fieldworker Using Drag and Drop
OctopusPro’s Calendar Day View simplifies team management by enabling seamless reassignment of bookings to different fieldworkers directly from the calendar. This feature is incredibly beneficial for dynamic scheduling needs, especially when fieldworkers’ availability changes or new bookings are created.
Steps to Change Assigned Fieldworker Using Drag and Drop
- Access Calendar Day View: Navigate to your Calendar from the OctopusPro dashboard. Choose the ‘Day’ view to display all the bookings scheduled for the selected day.
- Identify Booking: On the Calendar Day View, you will see all bookings scheduled for the day. Each booking is represented as a block in the column of the assigned fieldworker.
- Reassign Booking: To change the assigned fieldworker for a booking, click on the booking block, drag it, and drop it into the column of the new fieldworker.
- Booking Update: Once you’ve dropped the booking block in the new fieldworker’s column, the reassignment is completed instantly. The booking details on the calendar update automatically to reflect this change.
Note: This action will only be successful if the new fieldworker is available during the selected booking hours and is capable of providing the required service.

Using the drag and drop feature to reassign bookings on OctopusPro’s Calendar Day View comes with multiple benefits:
- Efficiency: This feature eliminates the need to go through multiple screens or fill out forms to reassign bookings. It simplifies the process, making it quick and efficient.
- Flexibility: The drag and drop functionality allows for easy adjustments to account for unexpected changes in fieldworkers’ schedules or availability.
- Visibility: The Calendar Day View gives a clear picture of all fieldworkers’ schedules for the day. This visibility aids in making informed decisions when reassigning bookings.
- Real-Time Updates: Changes made using the drag and drop feature are applied and displayed instantly on the calendar, ensuring everyone has access to up-to-date information.
Remember, successful reassignment requires that the chosen fieldworker is available during the booking’s scheduled hours and can provide the required service. Using this drag and drop feature effectively can help streamline your operations and increase your business’s responsiveness to changing situations.
Rescheduling Bookings in Calendar Day View
Rescheduling bookings in the Calendar Day View of OctopusPro is a breeze. Whether it’s a customer request, an unexpected fieldworker absence, or any unforeseen changes, you can swiftly adjust bookings to suit the new circumstances. Let’s delve into how you can leverage this feature for smooth and effective booking management.
Steps to Reschedule Bookings
- Access Calendar Day View: Navigate to the Calendar in your OctopusPro dashboard. On the right side of the page, select ‘Day’ to display bookings for the current day.
- Select a Booking: Find the booking you wish to reschedule. All bookings scheduled for the day are displayed in distinct blocks, offering a clear picture of your day’s layout.
- Drag and Drop: To reschedule a booking, click on the booking appointment. Drag and drop the booking to the desired new time slot. As you drag, the software will highlight the slot where the booking will be placed, helping you make precise adjustments.
Notifications and Confirmations
Once you drop the booking into the new time slot, the system automatically updates the booking details. A key advantage of OctopusPro is that it automatically sends a notification to both the customer and the assigned fieldworker. This ensures all parties are kept in the loop about the changes, reducing confusion and miscommunication.
Things to Consider
- When rescheduling bookings, ensure the selected new time slot is available and that it doesn’t conflict with other bookings. Also, ensure the rescheduled time is within the working hours of the assigned fieldworker.
- In the Day View, you can also reschedule a booking to a different day. Use the arrows at the left of the page to navigate to the desired day and then follow the drag-and-drop procedure.
Advantages of Rescheduling in Day View
- The process of rescheduling bookings in the Day View is designed to be quick and easy, reducing the administrative load and leaving more time for you to focus on your business’s growth. This also provides a high degree of flexibility, allowing for dynamic scheduling and accommodating last-minute changes seamlessly.
- Moreover, it eliminates the need for a separate communication to notify changes. Automatic notifications ensure customers and fieldworkers are immediately informed of any scheduling adjustments, leading to better customer service and fieldworker coordination.
- By implementing the Calendar Day View’s rescheduling feature, you are not only improving your operational efficiency but also enhancing your responsiveness and adaptability to changing scenarios.
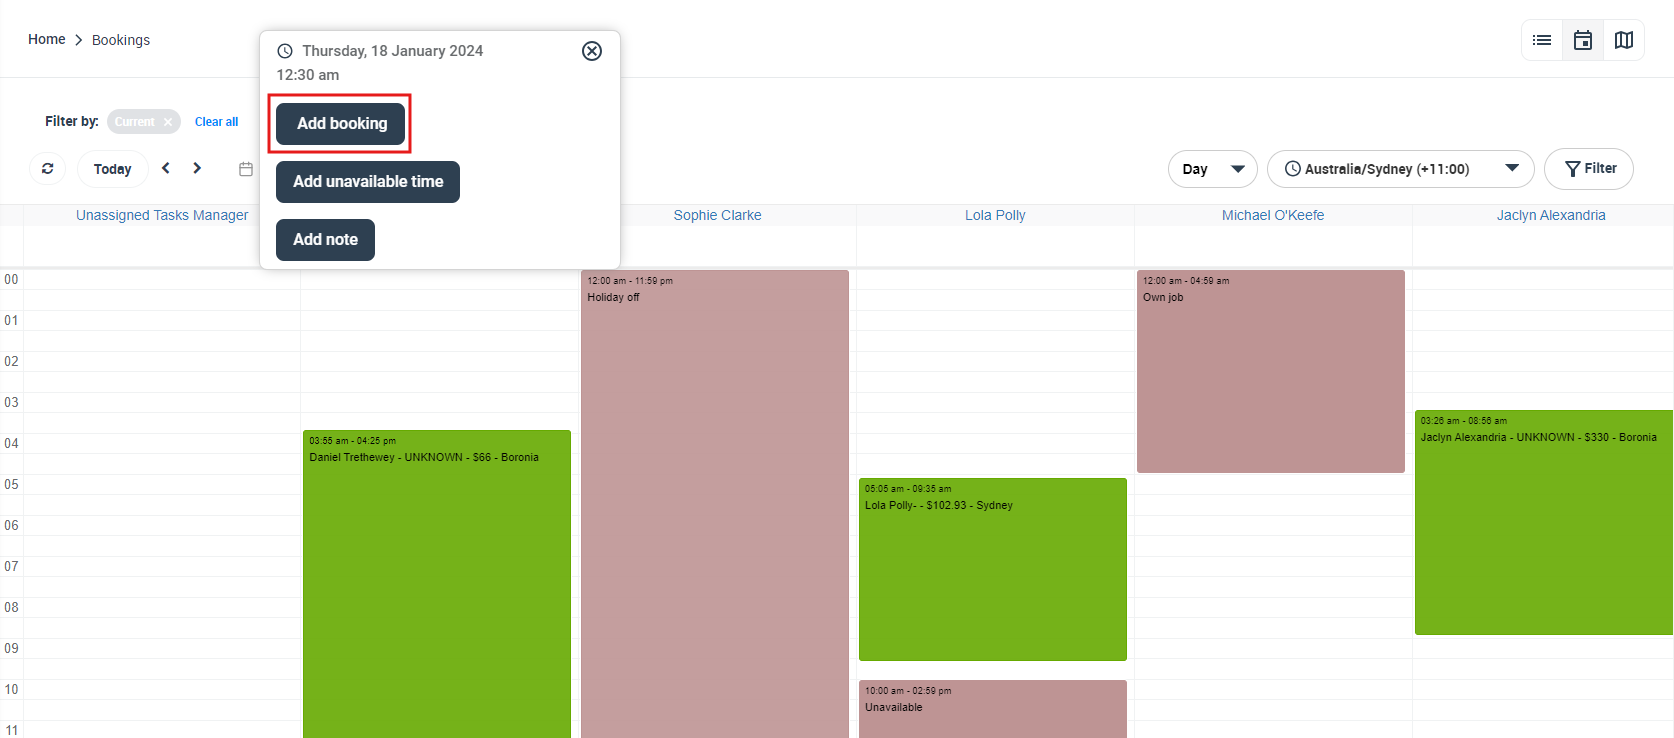
Creating a New Booking from Calendar Day View
- Click on the calendar time slot where you want to schedule a booking.
- A pop-up window will appear, click on “Add Booking”.
- You will be redirected to the “Create a new booking” page. Enter all your booking details and save.
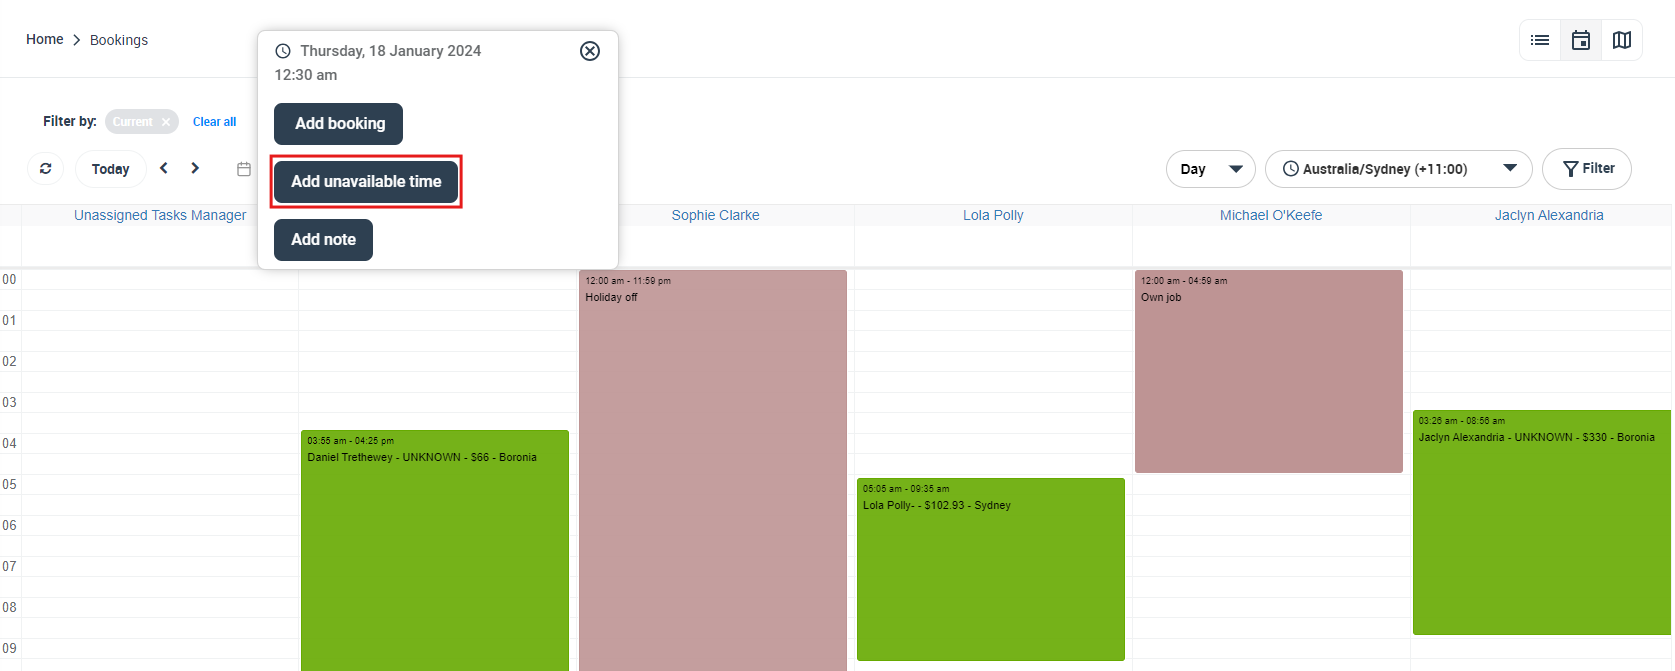
Creating an Unavailable Event from Calendar Day View
- Click on the calendar time slot that you want to mark as unavailable.
- A pop-up window will appear, click on “Add unavailable time”.
3. To mark an entire day or specific time as unavailable, select your general fieldworker (which acts as the default calendar for your business) from the dropdown list and enable the toggle button ‘All day’.
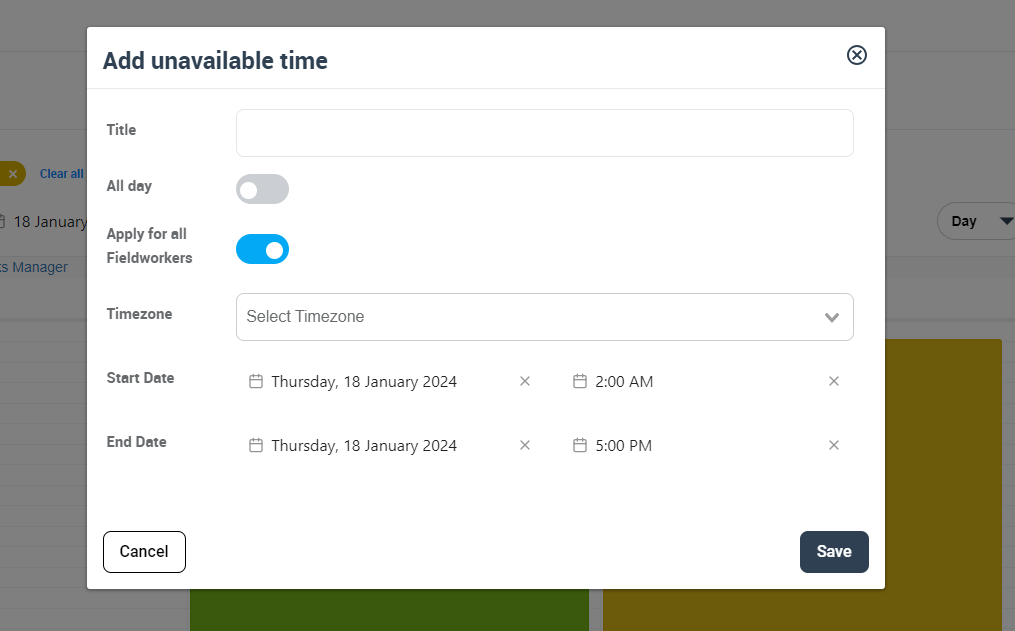
4. To set an unavailable event at a specific time of the day, select the day from the date picker, and pick the time, then click “Save”.


Editing Booking Time Directly from Calendar
Modifying the duration of a booking in OctopusPro is a straightforward process, thanks to the intuitive design of the Calendar Day View. Whether you need to accommodate a customer’s request for more service hours or shorten the scheduled duration, you can do it directly from your calendar, making it an efficient and versatile solution for managing your bookings.
Steps to Edit Booking Time:
- Access Calendar Day View: Begin by going to your OctopusPro dashboard and navigating to the Calendar. Choose ‘Day’ from the options on the right to show all bookings for the current day.
- Choose the Booking: Look for the booking whose time you wish to edit. The bookings are displayed in distinguishable blocks, making it easy for you to identify the right one.
- Adjust the Duration: Hover over the bottom edge of the booking block until your cursor changes into a resize icon. Click and drag the edge to adjust the booking duration. Dragging downwards will extend the booking time while dragging upwards will reduce it. Release the mouse button once you have set the desired duration.
Notifications and Confirmations
After adjusting the booking time, the system will instantly update the booking details. Notably, OctopusPro takes care of notifying the customer and the assigned fieldworker about the changes, and sending an email informing them about the updated booking duration. This automatic notification process ensures everyone is on the same page, leading to improved customer satisfaction and efficient fieldworker management.
Things to Consider
When editing the booking time, ensure the modified duration doesn’t overlap with other bookings and that it’s within the working hours of the assigned fieldworker. Keep in mind that extending a booking might require the fieldworker’s confirmation depending on your company policy.
Benefits of Editing Booking Time in Day View
Editing the booking time directly in the Calendar Day View provides you with a real-time, visual tool to manage your service durations, which brings several benefits:
- Increased Efficiency: Time adjustments can be made directly, eliminating the need for additional steps. This saves time and makes your operations more efficient.
- Better Communication: Automatic notifications keep all parties informed about changes, minimizing misunderstandings and ensuring transparency.
- Greater Flexibility: The feature allows you to be agile and responsive to changes, whether they’re requested by the customer or necessitated by internal changes.
- Improved Customer Satisfaction: Quick and smooth adjustments to booking time can enhance the customer’s experience and increase their satisfaction with your service.
By using this feature, you not only optimize your operations but also create a more streamlined and effective booking process.
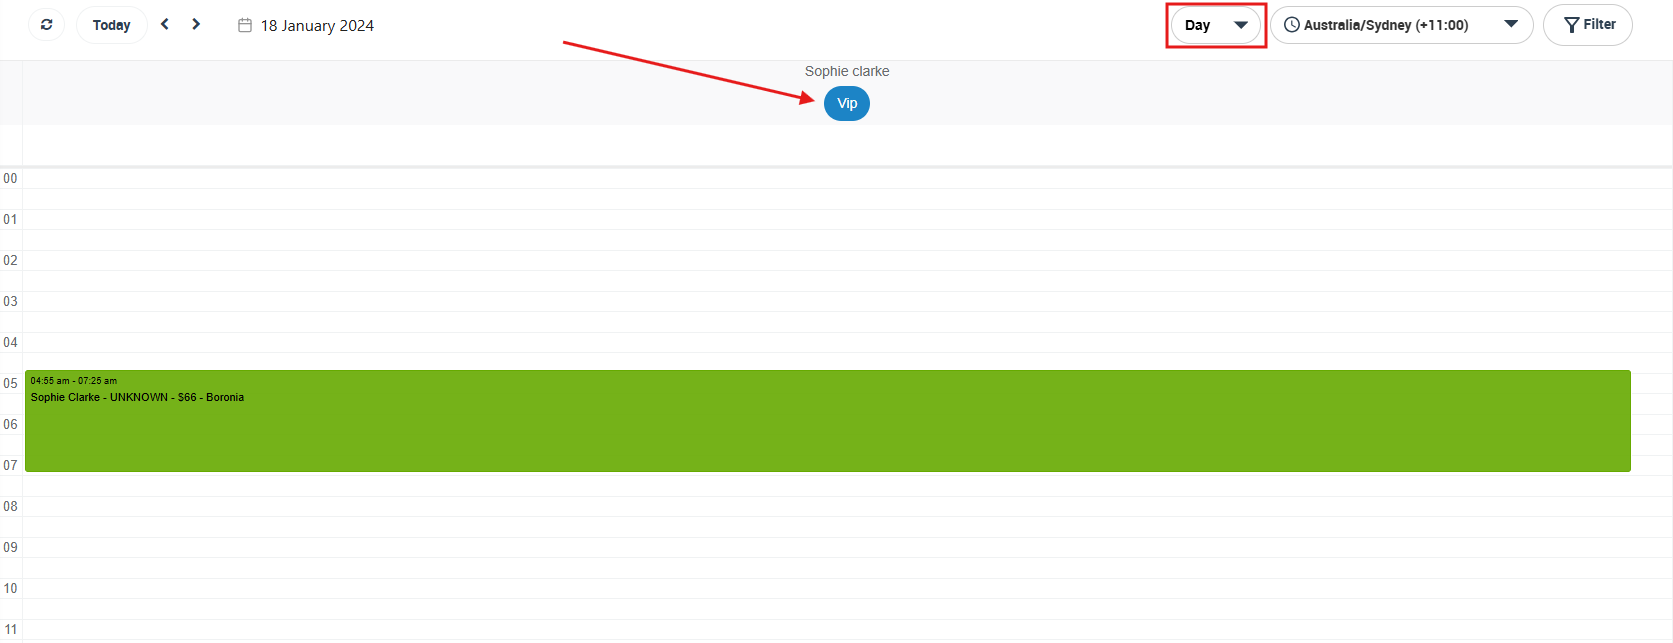
Viewing Fieldworker Label on Calendar Day View
In a dynamic, customer-centric business, having a clear overview of your team’s activities and attributes is crucial. OctopusPro’s Calendar Day View offers an effective way to visually manage your team’s schedules and categorize your fieldworkers using labels. This feature allows you to view the assigned labels of your fieldworkers directly on the calendar, enhancing your operational efficiency and decision-making process.
Steps to View Fieldworker Label on Calendar Day View
- Access Calendar Day View: Start by navigating to your OctopusPro dashboard and going to the Calendar. Choose ‘Day’ from the options on the right to display all bookings for the current day.
- Identify Fieldworker: In the day view, you will find columns for each fieldworker with bookings on that day. The column header displays the fieldworker’s name.
- View Labels: Under the fieldworker’s name in the column header, you will see their assigned label(s). These labels are defined based on their skills, availability, region, or any other characteristic relevant to your business.
Benefits of Viewing Fieldworker Labels in Calendar Day View
The ability to view fieldworker labels on the Calendar Day View offers multiple advantages for your business:
- Better Resource Allocation: Labels can help you understand a fieldworker’s skill set, experience, or specialization at a glance. This visibility aids in allocating the right fieldworker to each booking, enhancing service quality.
- Improved Scheduling Efficiency: Labels can provide insights about a fieldworker’s availability or geographical region, helping you schedule appointments more efficiently and minimize travel time.
- Enhanced Decision-Making: The visual representation of labels on the calendar aids in making quick and informed decisions, especially when adjusting schedules or reassigning bookings.
- Customized Overview: The labeling feature is customizable, allowing you to define the criteria for the labels as per your business needs. This makes the labels a versatile tool for managing your workforce.
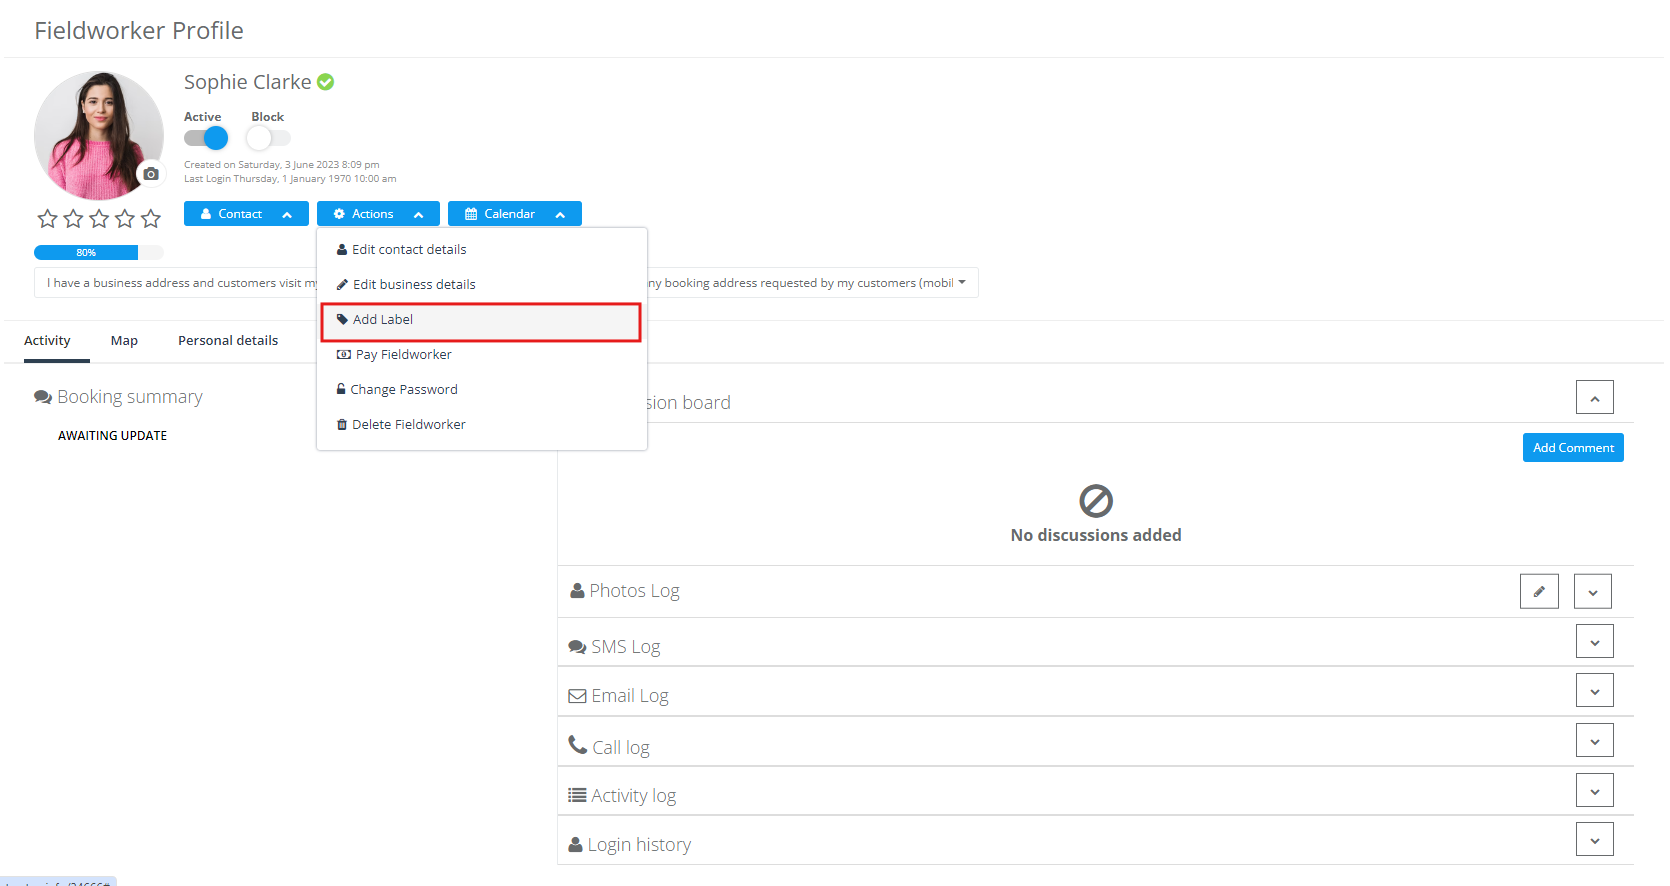
Adding a New Label to Fieldworker Profile
If you wish to add a new label to a fieldworker’s profile, you can do so from the Actions button:
- Select the Fieldworker: Click on the ‘Actions’ button corresponding to the fieldworker’s name in your dashboard.
- Add Label: From the drop-down menu, select ‘Add label’, You can choose from existing labels or create a new one.
Remember, using fieldworker labels effectively can help streamline your operations and contribute to better customer satisfaction by ensuring the right person is assigned to the right job. The ability to view these labels directly on the Calendar Day View makes this even more convenient and efficient.

This comprehensive guide aims to enable you to maximize the benefits of the Calendar Day View feature, making your daily booking management more efficient and effective.
Related Articles
To make the most out of our calendar management tools, we recommend exploring the following resources. These articles provide further insights on how to use each feature effectively:
- Understand how to organize your schedule with Scheduling and Dispatching
- Learn about viewing your schedule from different perspectives:
- Discover how to expand your scheduling capabilities with:
- Customize your view by applying filters:
We’ve designed these guides to help you take full advantage of our tools and streamline your operations. Happy scheduling!
To stay updated, please subscribe to our YouTube channel.