
Add a new fieldworker
With OctopusPro, you can take full control of all your user accounts. When creating a new user, you have to decide on the user role. Creating user accounts for your office and fieldworkers gives them live access to inquiries, bookings, invoices, and complaints and allows them to communicate instantly with other employees and customers from anywhere.
By default, you will have account admin, fieldworker, and customer user roles. If needed, you can create more roles, such as ‘Account Assistant’ for example. You can add all your users, including fieldworkers, from Settings > Company Settings > Users > Add User. However, to complete a fieldworker profile, you will have to go to the Fieldworkers page from the main menu on the left side, where you can also add new fieldworkers from that page.
Table of contents
- Add a new fieldworker user from the all users list page
- Add a new fieldworker from the fieldworker list page
- What kind of information does the fieldworker need to provide the admin in order to register on their behalf in OctopusPro?
- How can fieldworkers register an account for your company?
- What is the difference between adding new fieldworkers and inviting fieldworkers in OctopusPro?
- How to invite my fieldworkers to create an account?
- Importing fieldworkers using an xls file
Add a new fieldworker user from the all users list page
To add a new fieldworker from the all users list page, from your sidebar menu, go to Settings > Company Settings > Users
On the all users page, click on Add user
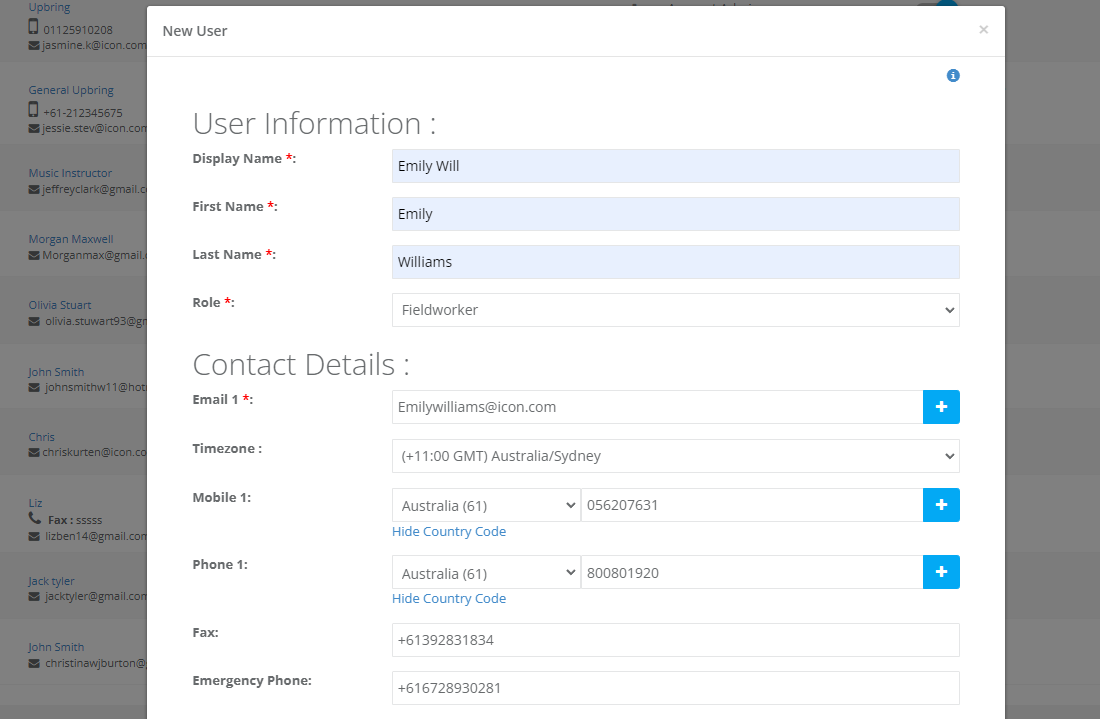
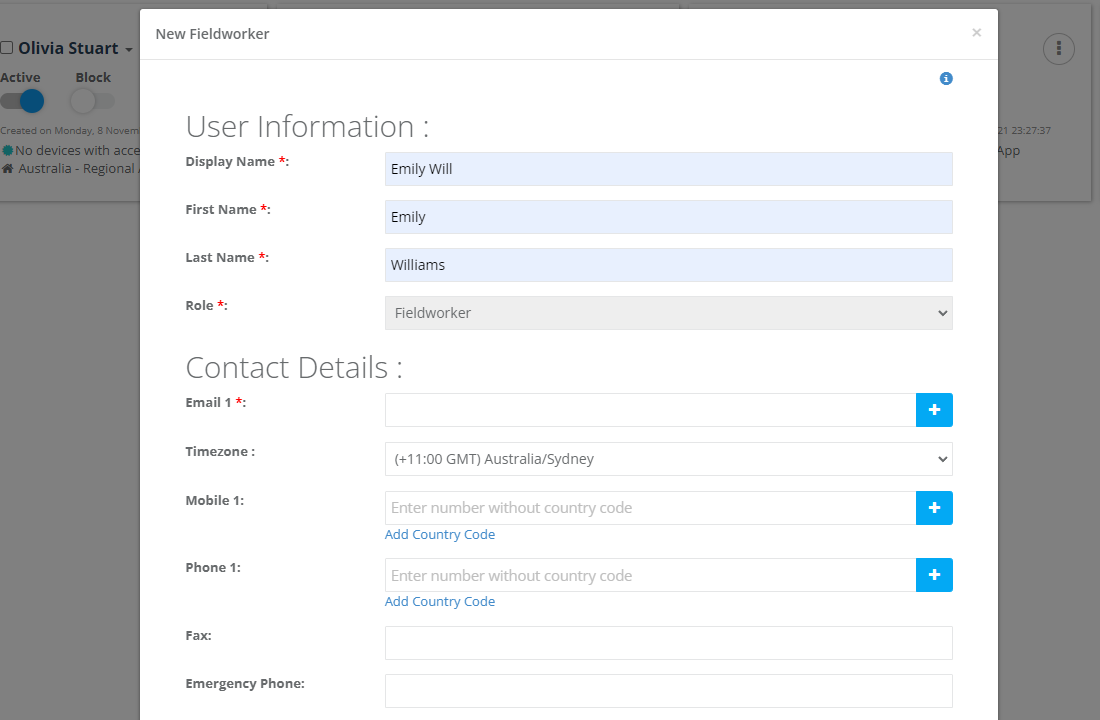
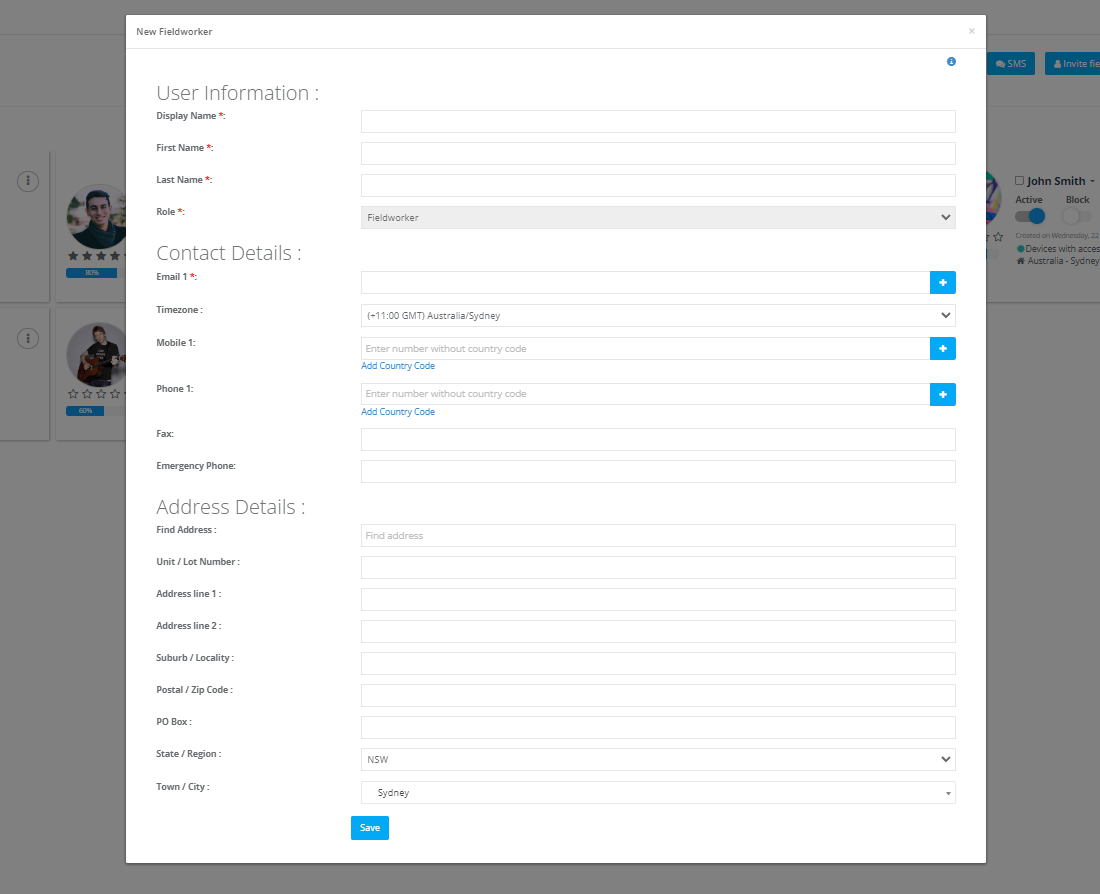
A popup window will appear to add your new user information, you will be required to add their personal information, their contact details, and you can add their address details too.
First, add in your new fieldworker’s display name, their first and last name, then select their role, in this case, select fieldworker. (These fields are all mandatory)
Now, you can add in your new fieldworker’s contact details, you will be required to add their email address, to send them emails and to be able to activate their account through, so this field is mandatory.
You can add in their timezone, mobile, phone, fax, and emergency phone. These fields are all optional when creating a new user account as an admin user, so you can leave them empty for now and have your fieldworker fill them in later, or you can do so yourself.
Then, you can add in your fieldworker’s address details here, you can click on find address to connect to google maps and locate your fieldworker’s address on the map, and then the information will be filled in the rest of the fields automatically.
You will be required to enter your fieldworker’s State/Region and Town/City where they are located, the fields will automatically be filled in with the state and town of your company.
Finally, click on Save to add your new fieldworker account.

After clicking on save, another popup window will appear, if you wish to assign all your active services on your account to this fieldworker profile, click on Yes, assign all services, you can do so in the case that your fieldworker provides all the active services on your account. But, if you wish to assign the required services to the new fieldworker account yourself, then click on No, I will assign the required services myself.
To learn more about how you can assign specific services to your fieldworker click here.

After creating a fieldworker account, click on the name of the fieldworker from the fieldworker list to view the fieldworker profile and add more information.
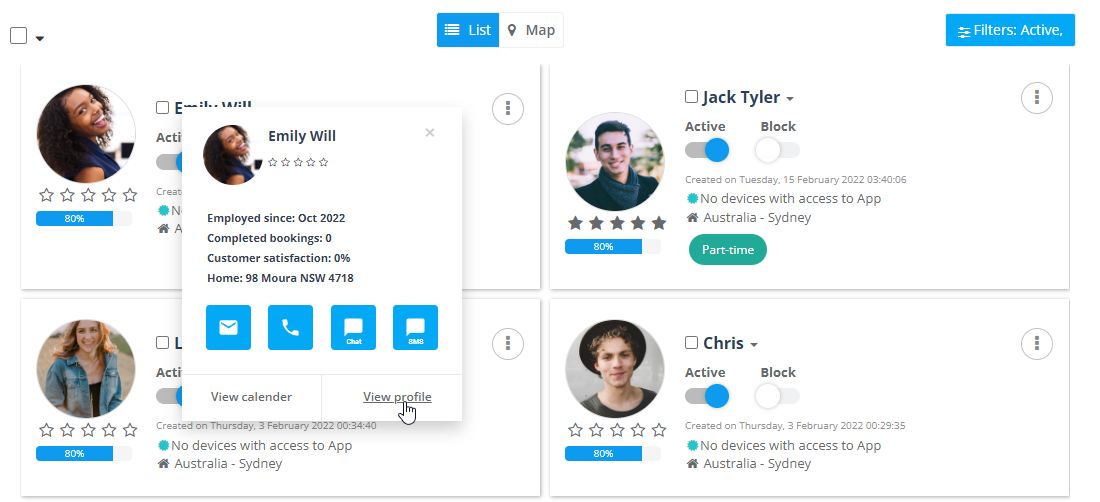
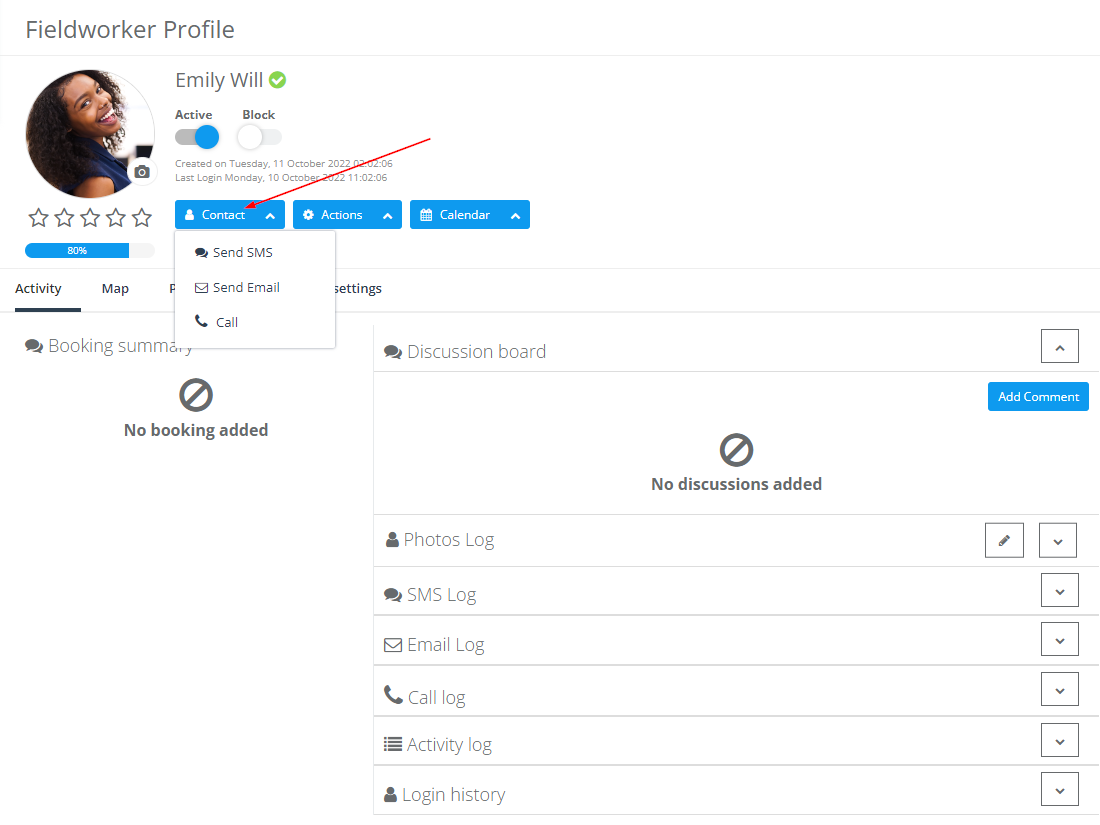
From the fieldworker profile, you can add a profile picture for the fieldworker, decide the active status, or block the fieldworker.
From the Contact box, you can contact the fieldworker via SMS or Email or even directly call them.
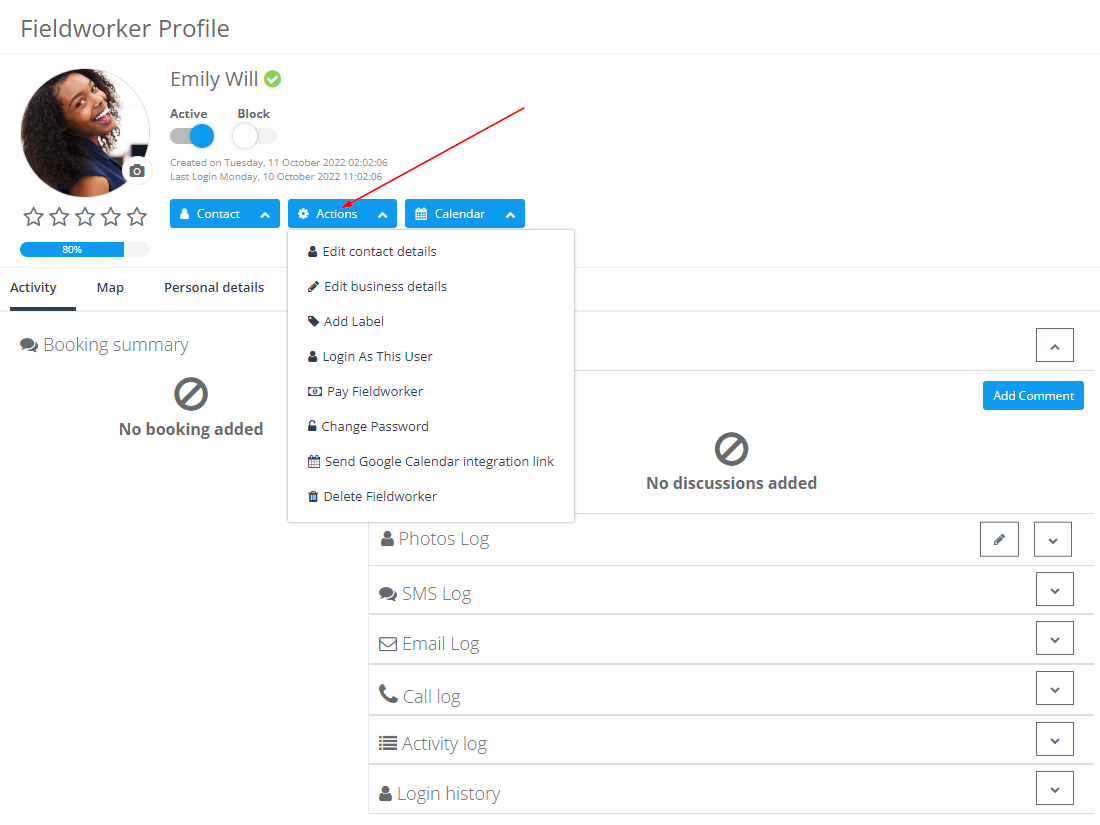
From the Actions box, you can edit the fieldworker information, add a label to their account, log in as this user, pay fieldworker, change password, send them a Google Calendar Integration link to connect their google calendar to their OctopusPro calendar, or you can choose to delete the fieldworker.
From the Calendar box, you can view the local calendar, which shows their availability and assigned bookings. You can view any fieldworker’s calendar easily from the ‘Fieldworkers’ page.

You should ask your fieldworkers to add their details by either logging into the OctopusPro app from their mobile, or to their OctopusPro account in a browser. Otherwise, as an admin, you can of course also do this.
The fieldworker profile contains four pages: Activity, Map, Personal details, and Job settings.

In order for the fieldworker to be able to receive new jobs, it is important that the following information is added: Services Provided (The services assigned to the fieldworker), Default available location (The locations that the fieldworker is available at), and Working Hours (The working days and time for the fieldworker). Which can all be added from the Job settings tab.
Add a new fieldworker from the fieldworker list page
You can add a new fieldworker user from your fieldworker’s list page, from your sidebar menu, go to Fieldworkers.
On the fieldworkers list page, click on Add Fieldworker.

A popup window will appear to fill in your new fieldworker’s details, you will be required to add their personal information, their contact details, and you can add their address details too.
First, add in your new fieldworker’s display name, and their first and last name, and the role will automatically be selected as Fieldworker. (These fields are all mandatory)
Now, you can add in your new fieldworker’s contact details, you will be required to add their email address, to send them emails and to be able to activate their account through, so this field is mandatory.
You can add in their timezone, mobile, phone, fax, and emergency phone. These fields are all optional when creating a new user account as an admin user, so you can leave them empty for now and have your fieldworker fill them in later, or you can do so yourself.
Then, you can add in your fieldworker’s address details here, you can click on find address to connect to google maps and locate your fieldworker’s address on the map, and then the information will be filled in the rest of the fields automatically.
You will be required to enter your fieldworker’s State/Region and Town/City where they are located, the fields will automatically be filled in with the state and town of your company.
Finally, click on Save to add your new fieldworker account.

After clicking on save, another popup window will appear, if you wish to assign all your active services on your account to this fieldworker profile, click on Yes, assign all services, you can do so in the case that your fieldworker provides all the active services on your account. But, if you wish to assign the required services to the new fieldworker account yourself, then click on No, I will assign the required services myself.
To learn more about how you can assign specific services to your fieldworker click here.

After creating a fieldworker account, click on the name of the fieldworker from the fieldworker list to see the fieldworker profile and add more information.
From the fieldworker profile, you can add a profile picture for the fieldworker, decide the active status, or block the fieldworker.
From the Contact box, you can contact the fieldworker via SMS or Email or even directly call them.
From the Actions box, you can edit the fieldworker information, add a label to their account, log in as this user, pay fieldworker, change password, send them a Google Calendar Integration link to connect their google calendar to their OctopusPro calendar, or you can choose to delete the fieldworker.
From the Calendar box, you can view local calendar, which shows their availability and assigned bookings. You can view any fieldworker’s calendar easily from the ‘Fieldworkers’ page.
You should ask your fieldworkers to add their details by either logging into the OctopusPro app from their mobile, or to their OctopusPro account in a browser. Otherwise, as an admin, you can of course also do this.
The fieldworker profile contains four pages: Activity, Map, Personal details, and Job settings.
In order for the fieldworker to be able to receive new jobs, it is important that the following information is added: Services Provided (The services assigned to the fieldworker), Default available location (The locations that the fieldworker is available at), and Working Hours (The working days and time for the fieldworker). Which can all be added from the Job settings tab.
What kind of information does the fieldworker need to provide the admin in order to register on their behalf in OctopusPro?
As an admin user, when creating a new fieldworker profile, you will need to have certain information to be able to create the account as some details are mandatory to fill in order to register.
Some of this information includes basic details, like the fieldworker’s first and last name.
You will also need to have the fieldworker’s email, this is necessary as you will need to send the fieldworker a confirmation link through email to activate their account and create a password for themselves to be able to later login to their OctopusPro account either through the Fieldworker app or in a browser.
You will also need to have your fieldworker’s timezone, State/Region, and Town/City where they are located. Automatically, these fields will be filled in with your main company’s Timezone and State/Region, you can change them if you wish.
How can fieldworkers register an account for your company?
Your fieldworkers can register an account for your company in many different ways.
You can either send your fieldworker’s an invitation through email to join your team, add a promo signup form on your customer portal, or you can embed a signup form on your personal website with a button to link your fieldworkers to your registration page to sign up for an account for your company.
Your fieldworkers can also sign up directly from your customer portal homepage.
Inviting fieldworkers to join
You can save time adding your team by inviting your users to join and register an account. Go to Fieldworkers from your sidebar menu, on your fieldworker’s list page, click on Invite Fieldworkers, to send an email to your fieldworkers to join your team.
Your fieldworkers can click on the signup button in the email to link them to the registration page, to signup for an account for your company.

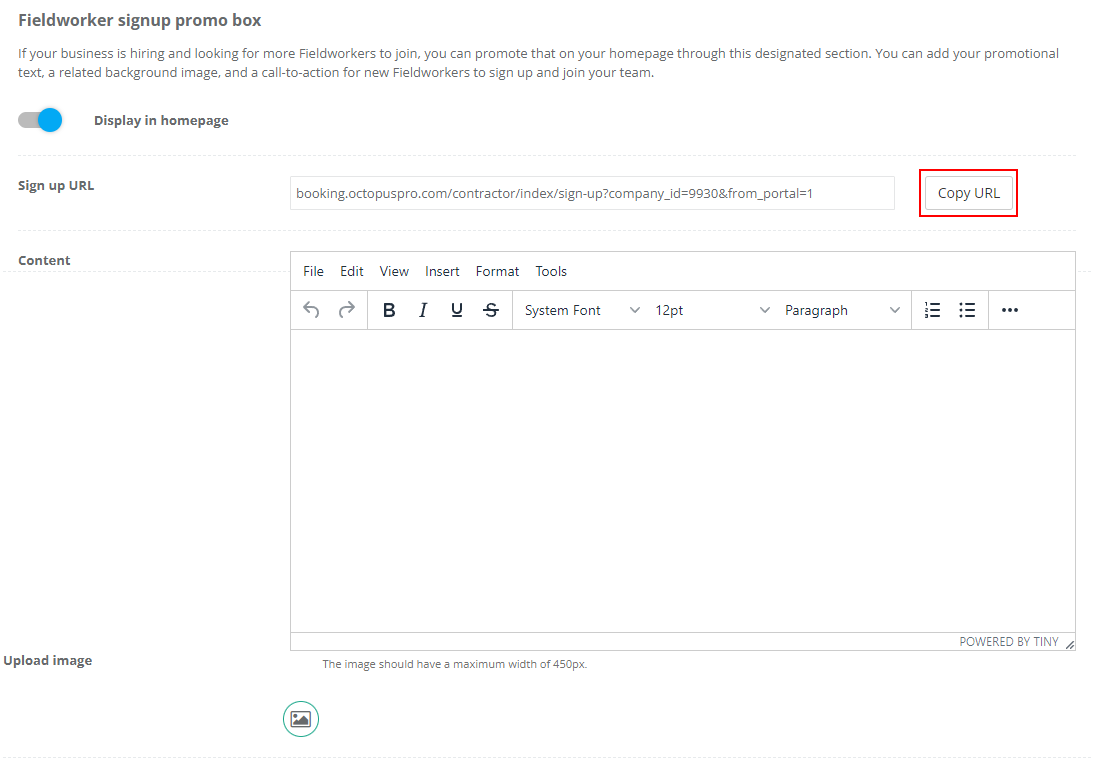
Add a fieldworker signup promotion box on your customer portal
If you want your fieldworkers to be able to see that you’re hiring and want them to sign up for your company, you can add a fieldworker signup promo box on your customer portal.
To do that, go to Settings > Customer Portal > Homepage promotions.
Under Fieldworker signup promo box, You can add your promotional text, a related background image, and a call-to-action for new Fieldworkers to sign up and join your team. To learn more visit Fieldworker sign-up promotion

Once displayed on your customer portal, your fieldworkers can click on the signup button to link them to the registration page to sign up for an account for your company.


Embed a signup button on your personal website
You can embed a signup button on your personal website to have fieldworkers register an account for your company through. All you have to do is copy the sign up URL from your homepage promotions page, and edit the HTML code to add it into your website.
Upon clicking on that button, your fieldworkers will be redirected to your registration page to sign up for an account for your company.
What is the difference between adding new fieldworkers and inviting fieldworkers in OctopusPro?
As an admin user, you can take full control of all your user accounts, and either manually add new fieldworkers yourself, by adding a new fieldworker user for your company and manually adding their details or you can save time and invite your fieldworkers to join, where they can create an account themselves, you can invite multiple fieldworkers at the same time.
How to invite my fieldworkers to create an account?
You can save time adding your team by inviting your users to join and register an account. Go to Fieldworkers from your sidebar menu, on your fieldworker’s list page, click on Invite Fieldworkers, to send an email to your fieldworkers to join your team.
Your fieldworkers can click on the signuo button in the email to link them to the registration page, to signup for an account for your company.
You will be redirected to the invite users page, enter the email of the fieldworker you wish to send an invitation to, select fieldworker, then click on Invite.
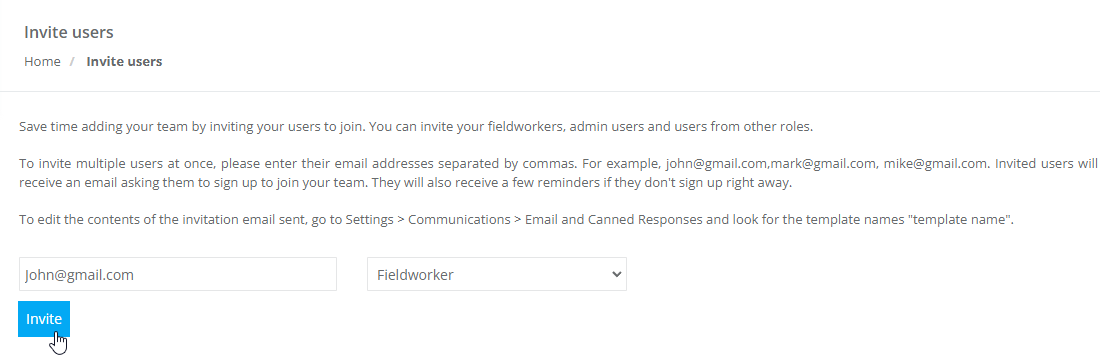
To invite multiple users at once, enter their email addresses separated by commas. For example, john@gmail.com,mark@gmail.com, mike@gmail.com. After entering your fieldworker’s emails, select fieldworker from the dropdown, then click on Invite. Invited users will receive an email asking them to sign up to join your team. They will also receive a few reminders if they don’t sign up right away.

Importing fieldworkers using an xls file
OctopusPro allows you to easily import your existing fieldworkers onto the system, using one file with a few simple steps by downloading a template that is easily customized from the settings.
From your sidebar menu, go to Fieldworkers
On your fieldworkers list page, click on Import Fieldworkers
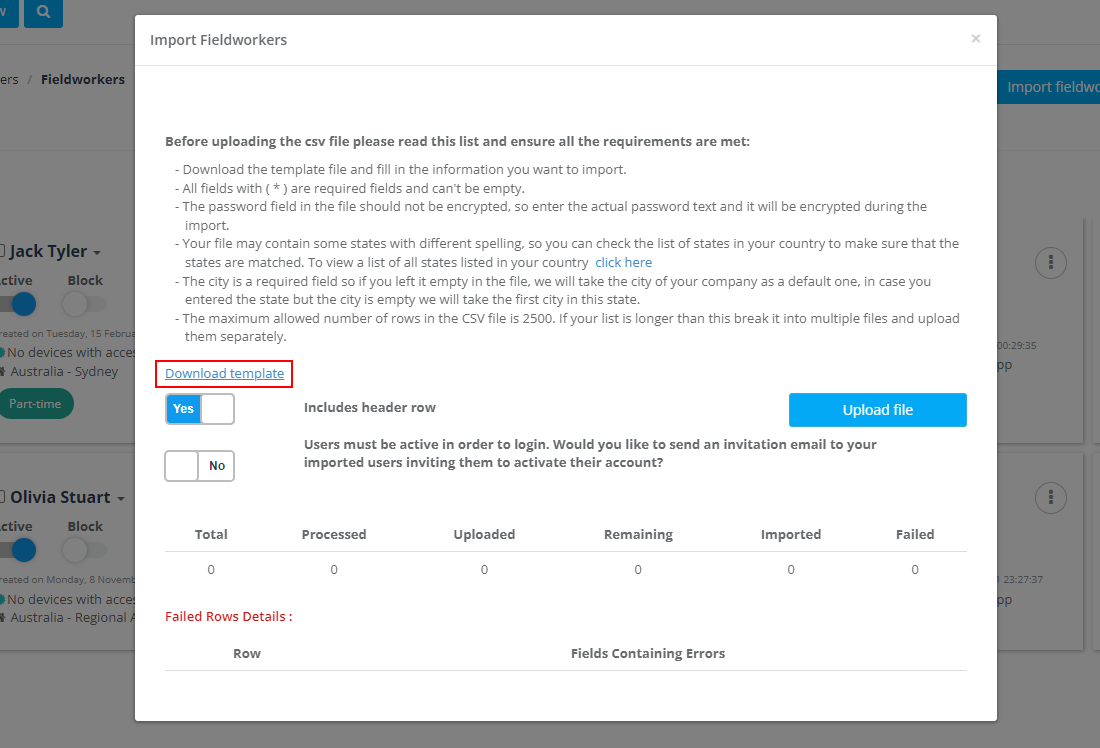
A pop-up window will appear, follow the instructions for importing your fieldworker file.

Before uploading the CSV file please read this list and ensure all the requirements are met:
- Download the template file and fill in the information you want to import.
- All fields with ( * ) are required fields and can’t be empty.
- The password field in the file should not be encrypted, so enter the actual password text and it will be encrypted during the import.
- Your file may contain some states with different spelling, so you can check the list of states in your country to make sure that the states are matched. To view a list of all states listed in your country click here
- The city is a required field so if you left it empty in the file, we will take the city of your company as a default one, in case you entered the state but the city is empty we will take the first city in this state.
- The maximum allowed number of rows in the CSV file is 2500. If your list is longer than this break it into multiple files and upload them separately.
After downloading the template, log into your Google Drive account and upload the file. You can then edit the template by adding the required fieldworker information in the cells.
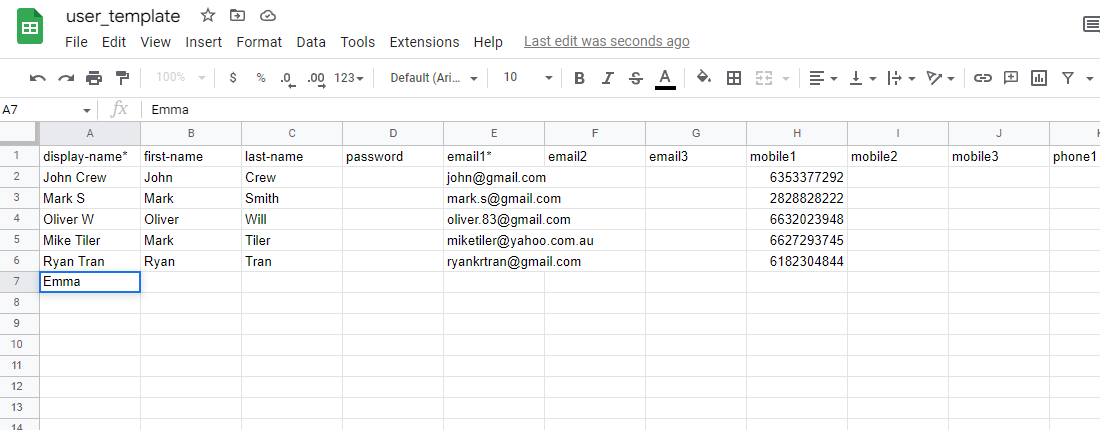
After filling in the template, click on Upload file to upload your fieldworkers onto the system. Make sure the file is saved as CSV to upload it successfully.
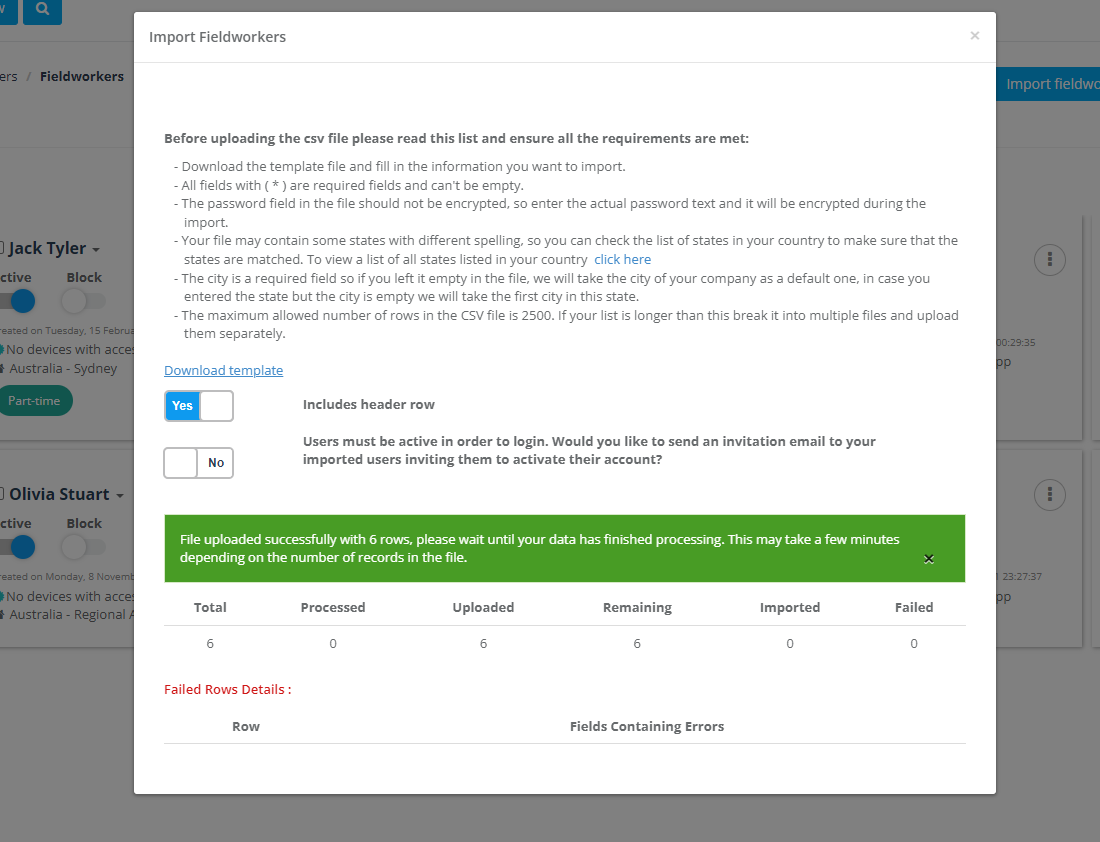
After importing the file, a message will appear confirming that the file has been imported successfully and you will be able to see how many rows have been imported. If there are any fields that failed to be imported, they will be shown in the section Failed Rows Details, so you can edit them and re-upload the file.
For more information please visit OctopusPro user guide, and subscribe to our youtube channel.