
Lead Capture Form (Website Inquiry Widget) – Embed an Inquiry Form on Your Website

OctopusPro’s Lead Capture Form (also known as the Inquiry Form or Website Inquiry Widget) lets you embed a branded enquiry form on any website page. When a visitor submits the form, OctopusPro automatically creates an Inquiry in your account—so your team can qualify the lead, follow up quickly, and convert it into a Quote/Estimate or a Booking without re-entering details.
Schedule a call (Lead Capture Form Implementation Service): get help configuring your Lead Capture Form, automations, and conversion workflow.
On this page
- Examples (desktop & mobile)
- Why you need it
- Why it matters (conversion, speed-to-lead, spam control)
- Core features
- Use cases & examples
- Multi-brand / trading names (white-label lead capture)
- Instant Response System (autoresponder + inquiry reference)
- Customize your confirmation email
- Customize your Lead Capture Form (settings)
- 1) Quick-style controls (Widget Styling)
- 2) Field labels, order, visibility & required fields
- 3) Address & multi-address fields
- 4) Service display logic (services, categories, multi-service)
- 5) Advanced features (uploads, redirect, mailing list, spam)
- 6) Period Required (preferred timeframe)
- 7) Service-specific custom fields
- Master toggle: show custom fields when a service is selected
- 8) Global (form-wide) custom fields
- Key differences: service-specific vs global fields
- Workflow in three steps
- Benefits at a glance + examples
- Test & embed your Lead Capture Form
- Lead Capture Form vs Customer Portal (when to use each)
- Facilitating online bookings through your website (recommended funnel)
- Related guides
- Troubleshooting
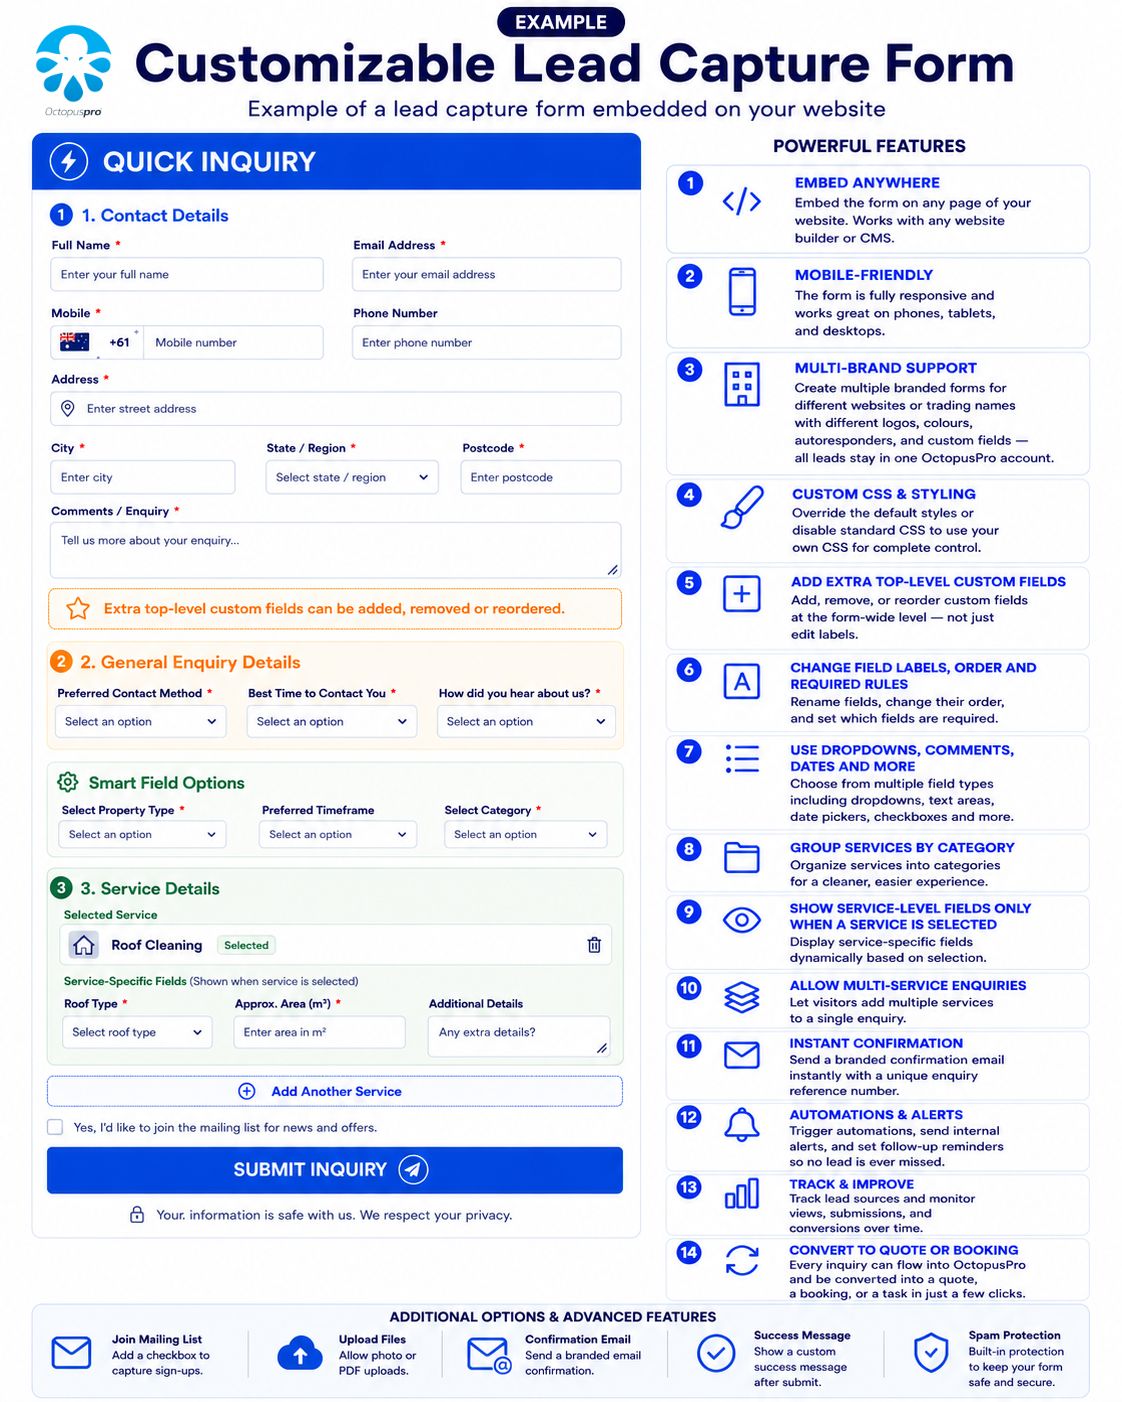
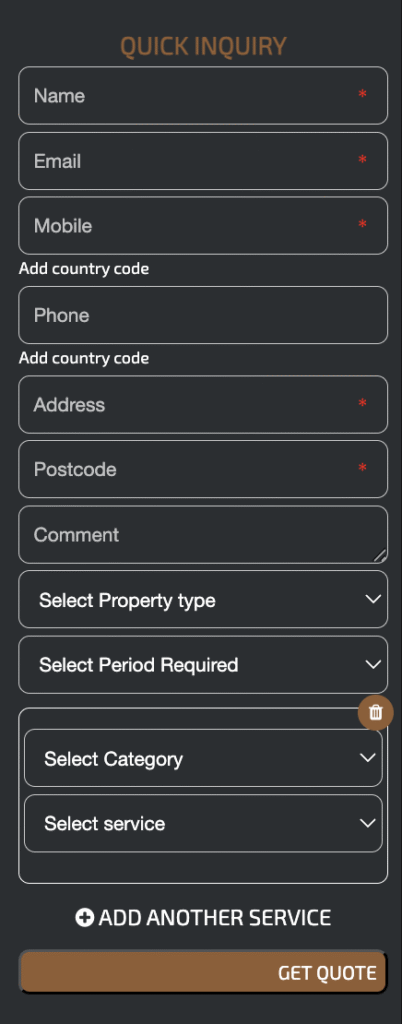
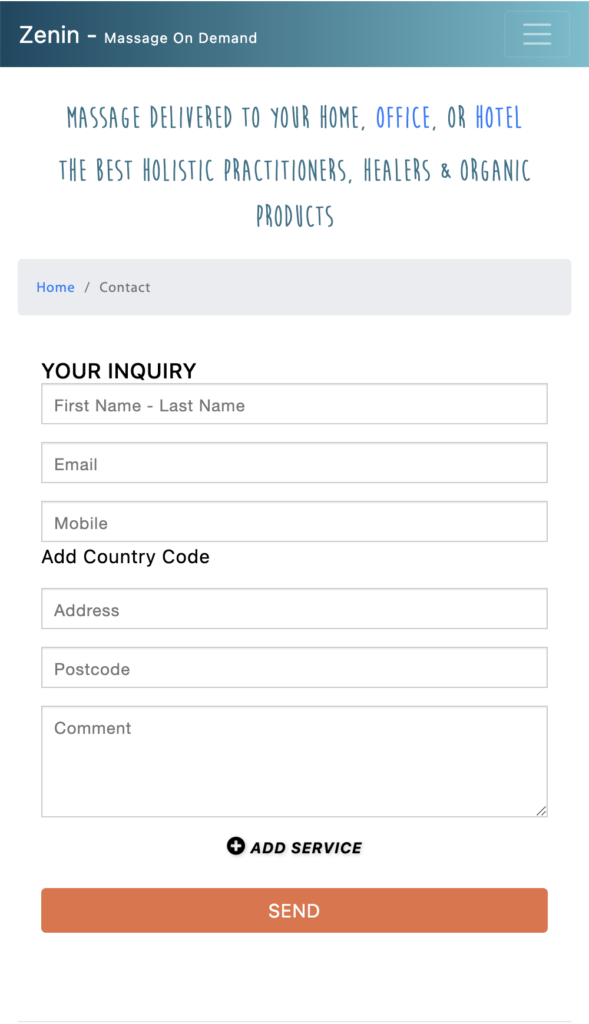
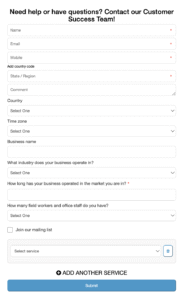
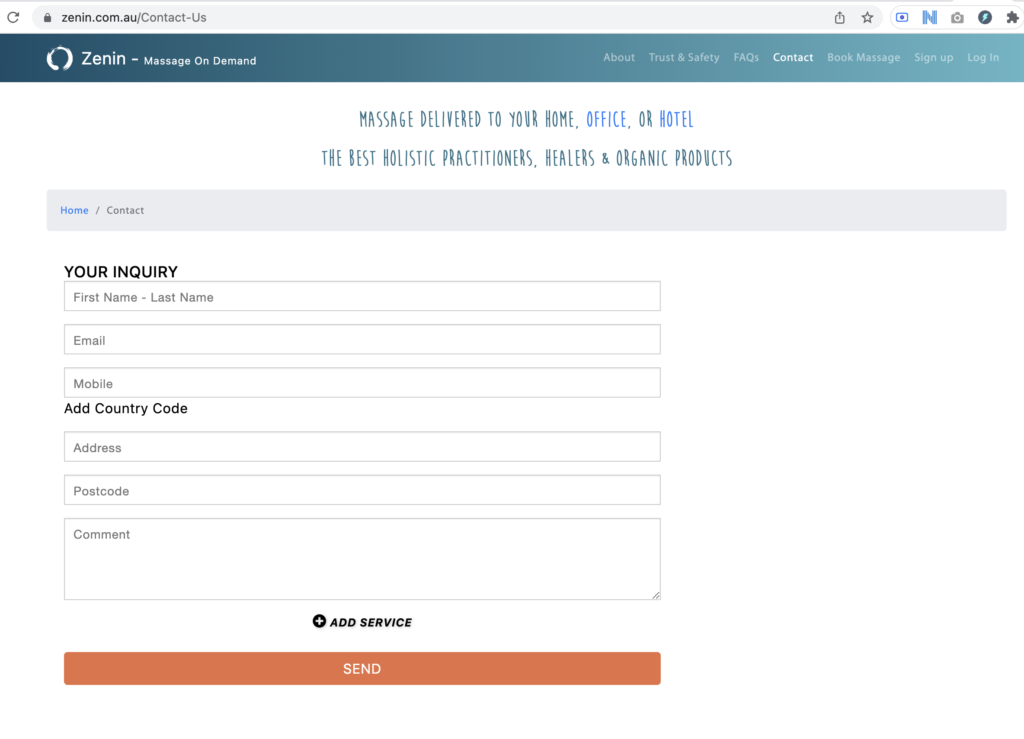
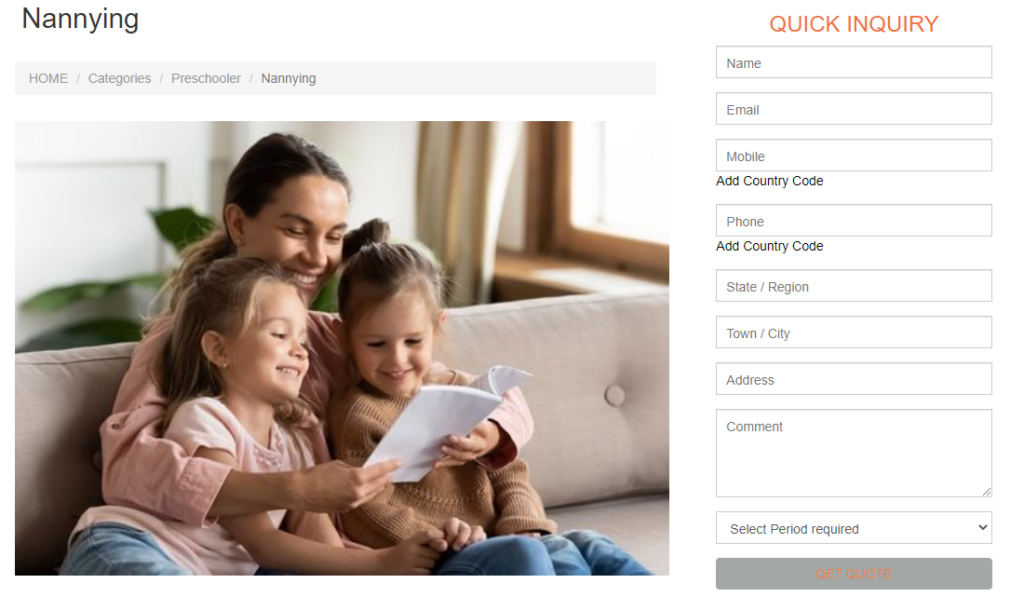
Examples (desktop & mobile)
Below are examples of the Lead Capture Form embedded on different websites and devices:
![]()
Why you need it
- Always open: Visitors can reach you even when the office is closed.
- Instant replies (optional): An auto-email confirms you received the enquiry and tells them what happens next.
- No lost leads: Inquiries land in OctopusPro under Inquiries → New, ready for quoting or booking.
- Less admin: No copying and pasting—details flow straight into your workflow automatically.
Why it matters (conversion, speed-to-lead, spam control)
Revenue & conversion
- Fewer fields = more submissions: Keep the first screen lean, then show only relevant follow-up questions.
- Conditional questions improve quality: Service-based questions capture accurate details without overwhelming visitors.
- Speed-to-lead wins: Fast acknowledgement + quick human follow-up can materially improve close rates.
24/7 availability & spam control
- Protect your inbox: A web form reduces email scraping and bot spam compared to publishing an email address.
- Spam controls (where enabled): Use features such as CAPTCHA, honeypot protection, and IP blocking to keep junk submissions out.
Brand consistency & multi-site support
- White-label styling: Match your website branding (fonts, colours, buttons) for a consistent experience.
- Multi-brand friendly: Support multiple trading names/websites while managing leads from one OctopusPro account.
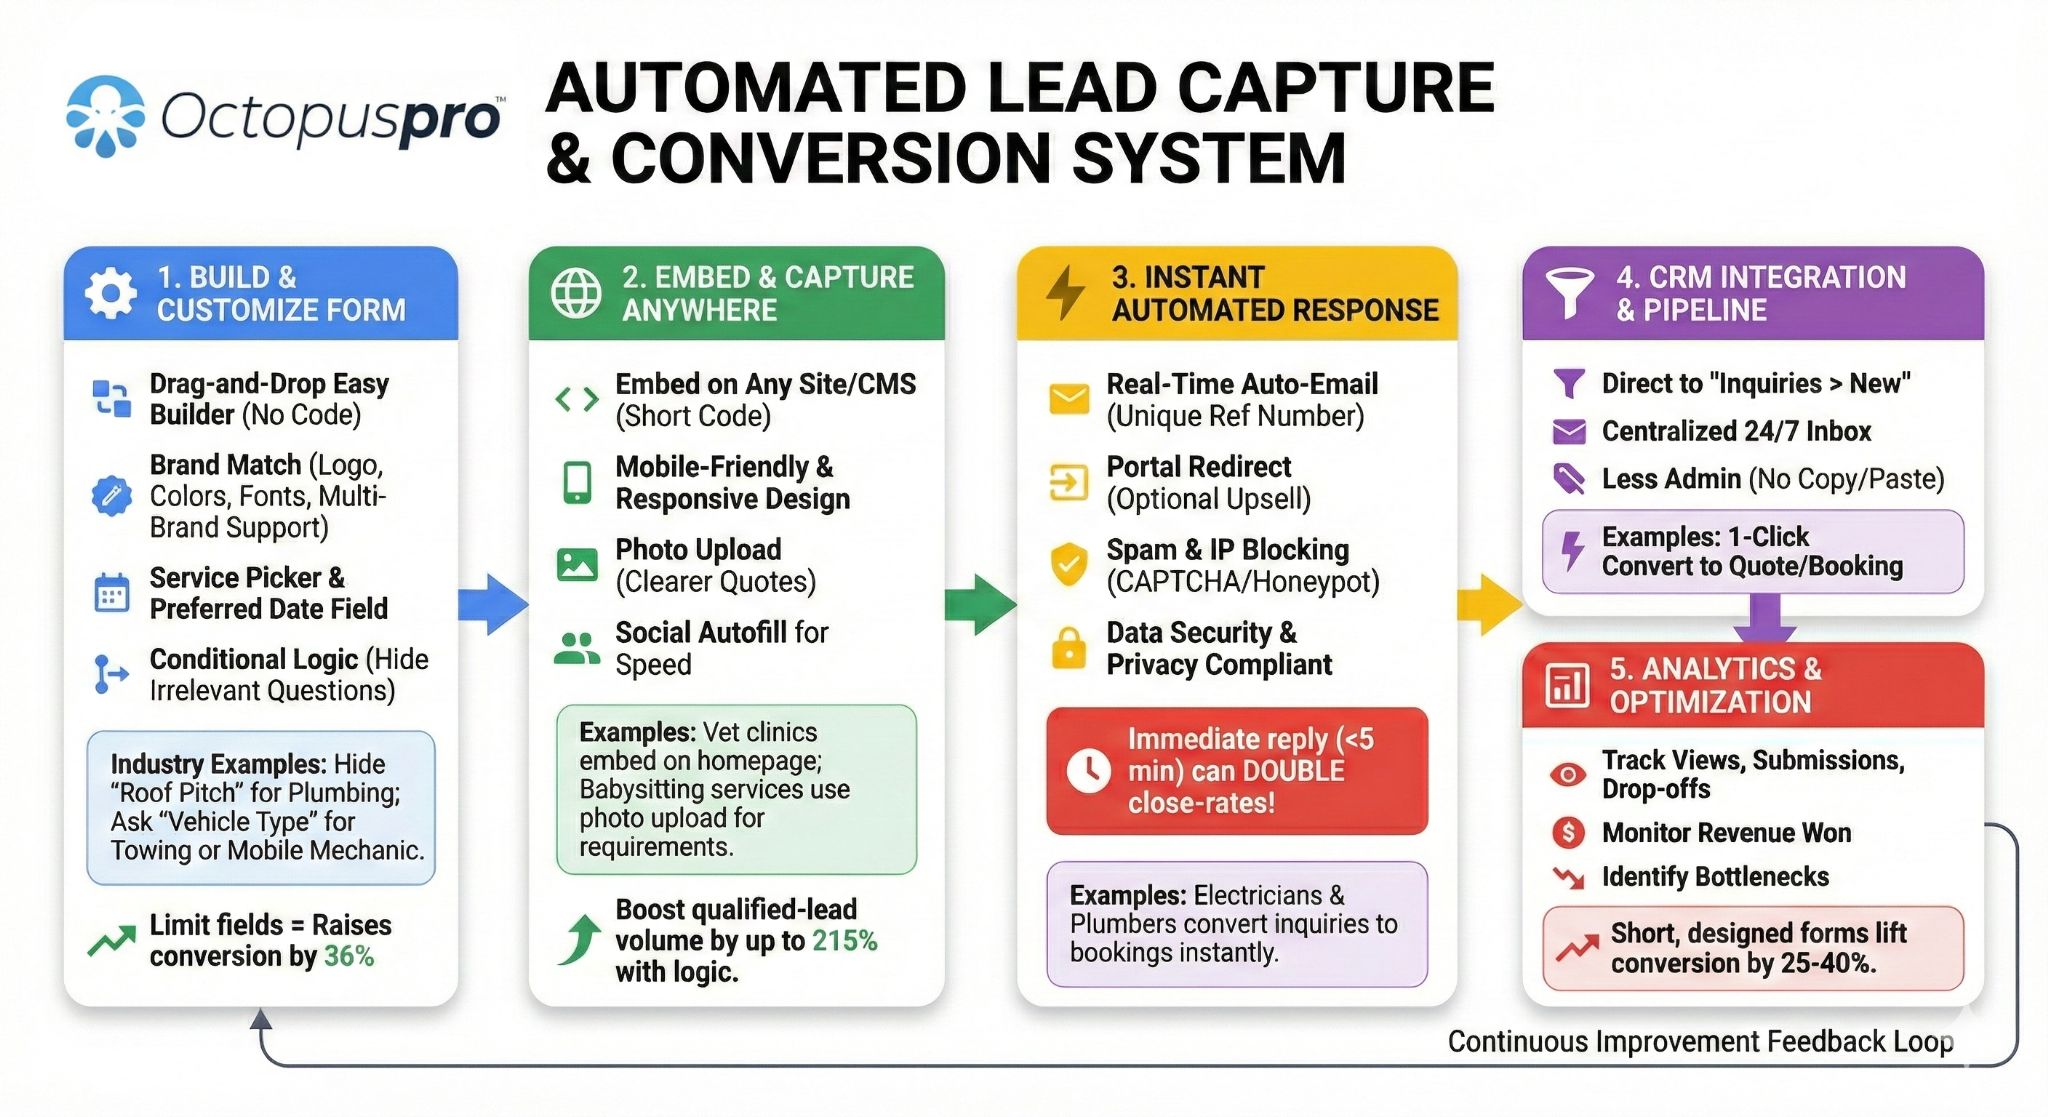
Core features
| Feature | What it does | Why it helps |
|---|---|---|
| Easy builder | Rename fields, reorder them, and show/hide fields based on your workflow. | Create a clean, high-converting form without custom development. |
| Brand match | Customize title, button text, colours, and CSS behaviour. | Creates a consistent, white-label experience on your website. |
| Embed anywhere | Copy one embed snippet into any website/CMS page. | Go live fast on landing pages, Contact pages, service pages, sidebars, and blog sections. |
| Mobile-friendly | Responsive layout works on phones, tablets, and desktops. | Captures leads on any device—critical for mobile traffic. |
| Photo/PDF prompts | Prompt customers to upload photos or documents after submitting. | Better details up front = faster quoting and fewer follow-up questions. |
| Service picker + categories | Let customers select a service, optionally grouped by category. | Reduces misrouted enquiries and speeds up qualification. |
| Service-specific custom fields | Show job-specific questions only after a service is selected. | Keeps the form short while capturing accurate specs when needed. |
| Global (form-wide) fields | Add universal questions that appear on every enquiry. | Standardizes lead data for operations and reporting. |
| Conditional logic | Show extra questions only when a previous answer requires them. | Improves completion rates while still capturing the right details. |
| Spam handling | Mark spam inquiries and block IP addresses (where enabled). | Keeps your pipeline clean so staff focus on real leads. |
Embedding a Lead Capture Form makes your business reachable 24/7, gathers complete inquiry details, and routes them straight into OctopusPro—turning casual visitors into qualified leads and confirmed bookings.
Use cases & examples
- Home services: capture quote requests and job details without phone calls.
- Consulting & coaching: collect discovery call requests and qualification info.
- Event management: capture event date, venue details, guest counts, equipment needs, and special requests.
- Property maintenance: let tenants submit maintenance requests anytime.
- Multi-brand operations: run multiple branded forms across different websites while managing leads in one system.
Multi-brand / trading names (white-label lead capture)
OctopusPro’s white-label Lead Capture Form lets a single account run multiple trading names while preserving a unique look, voice, and workflow for each brand. One code snippet can sit on multiple websites, yet each instance can show its own logo, palette, autoresponder copy, and custom fields—so prospects always feel they’re talking to the right company.
Multi-brand operators gain 24/7 lead intake, instant confirmations, and end-to-end CRM tracking without juggling separate tools.

How multi-brand lead capture works
- Form cloning & branding: Duplicate a master form, apply each trading name’s logo, colours, and CSS, then embed it on the matching website.
- White-label communication: Confirmation emails, autoresponders, and follow-ups reflect the same brand the visitor just interacted with.
- Unified reporting: All enquiries remain centralized so you can compare lead volume, conversions, and performance across brands.
Business gains
| Benefit | Why it matters |
|---|---|
| Consistent identity | 71% of consumers prefer brands that keep look and tone consistent across channels. |
| Faster conversions | Instant autoresponders set expectations and can outperform delayed replies—especially for time-sensitive services. |
| Spam control | Forms hide email addresses from bots, reducing junk mail and giving staff more time for real leads. |
| Information accuracy | Custom fields help capture service type, site photos, and preferred timing up front—reducing back-and-forth. |
Typical multi-brand use cases
- Franchise groups: one account, multiple local brands/websites, unified reporting.
- Agencies: run separate lead capture forms for different client brands while processing leads in one system.
- Multi-vertical companies: separate brands for cleaning, plumbing, electrical, or landscaping—each with its own look and service questions.
- Regional brands: the same parent company can operate different trading names by location while keeping enquiries centralized.
Quick implementation steps
- Create a master form with the core fields and service logic, then apply brand styling per trading name.
- Tailor confirmation emails per brand so customers always feel they contacted the right company.
- Use automations for acknowledgements, internal alerts, and follow-up reminders. See Workflow Automations.
- Track lead sources per site/brand and compare performance. See Track Lead Sources.
Learn more: Manage Multiple Trading Names / Sub-Brands
Instant Response System (autoresponder + inquiry reference)
The Instant Response System can send a branded confirmation email the moment an inquiry arrives, include a unique inquiry reference for tracking, and place the record into your pipeline for quoting or scheduling.
How it works
- Real-time trigger: once a Lead Capture Form or portal inquiry is submitted, OctopusPro can send a customizable acknowledgement email.
- Reference included: the email can include a unique inquiry reference so customers and staff can quote it in follow-ups.
- CRM hand-off: the inquiry is created in your pipeline so staff can convert it to a quote or booking.
Key benefits
| Benefit | Why it matters |
|---|---|
| Speed-to-lead advantage | Fast replies improve conversion chances and reduce drop-off to competitors. |
| Customer assurance | A clear, friendly confirmation email reduces anxiety about “Did my request go through?” |
| Expectation setting | Autoresponders that outline next steps help reduce repeat inquiries and improve customer confidence. |
| Brand reinforcement | Every automated touchpoint repeats your logo, colours, and tone. |
| Workflow clarity | Reference IDs help staff locate and manage inquiries quickly. |
| Scalable nurture | Autoresponders keep leads warm until a human follow-up happens. |
Typical use cases
- Emergency home repair: the auto-confirmation can promise a fast callback and calm stressed customers.
- Event-hire quotes: the email can include an inquiry ID and a prompt/link for venue photos or documents.
- Consulting discovery calls: the autoresponder can include a scheduler link to reduce back-and-forth emails.
Customize your confirmation email
Locate & edit the template
- Go to Settings → Communications → Templates & Canned Responses.
- Open “Inquiry autoresponder email”.
- Insert tags like {add_photo_url} if you want to request customers send you photos related to their inquiry.
Tip: A concise, plain-language email that thanks the sender, restates their request, and outlines next steps tends to perform best for engagement.
Helpful resources:
Disabling the autoresponder (optional)
If you prefer manual follow-ups, switch off Send confirmation email to customer after inquiry is submitted in your related communications/customer portal settings. You can re-enable it anytime.
Optional: If you want inquiry numbers to start from a specific value (useful when migrating systems), see Set Starting Numbers for Inquiries, Bookings, Quotes & Invoices.
Best practices for lightning-fast lead response
- Enable alerts: use mobile or desktop notifications so the first human reply happens quickly.
- Use clear subject lines: something like “Thanks for using {trading_name} @ – We’ve received your inquiry.” is usually clearer than a generic subject.
- Add helpful resources: link to FAQs, preparation tips, or next-step instructions.
- Review templates regularly: refresh wording and brand assets so emails stay current and conversion-focused.
Customize your Lead Capture Form (settings)
Go to:
Settings → Communications → Lead Capture Form
From here you can configure styling, fields, service logic, custom fields, and after-submission behaviour. Once saved, you can generate the embed snippet and publish it on your website.
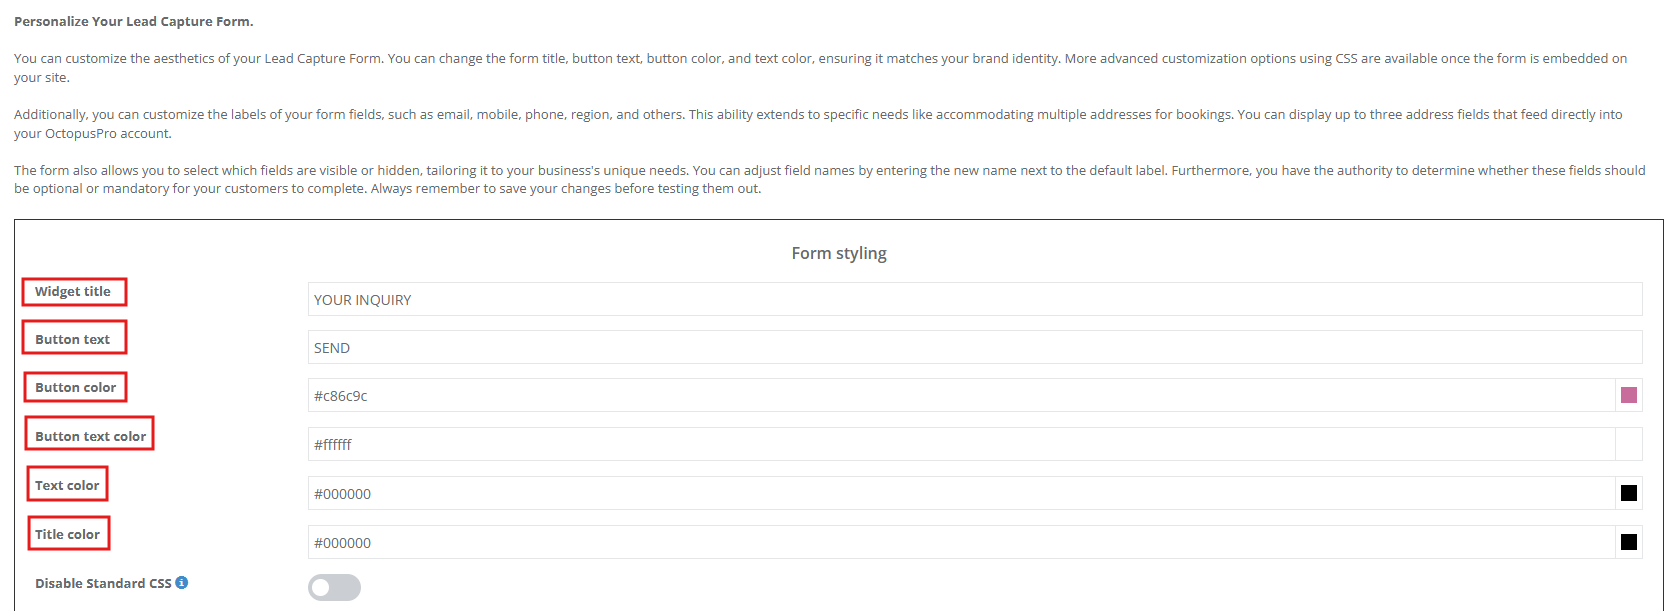
1) Quick-style controls (Widget Styling)
Widget Styling controls how the form looks on your website.
| Setting | What it changes | Typical benefit |
|---|---|---|
| Widget title | Headline at the top of the form | Sets expectations and reinforces brand tone. |
| Button text & button colour | CTA wording and background colour | Clear CTAs can improve submission rates. |
| Button text colour | CTA font colour | Keeps copy readable with your palette. |
| Text colour & title colour | Form body and heading colours | Matches your website styling. |
| CSS overrides | Fine-grain control over spacing, fonts, or animation | Helps achieve a closer visual match with custom site themes. |
| Disable Standard CSS (optional) | Turns off default widget styling | Lets your website/theme CSS fully control appearance. |
2) Field labels, order, visibility & required fields
Rename default labels
Rename labels to match your business terminology (for example, “Name” → “First Name – Last Name”).
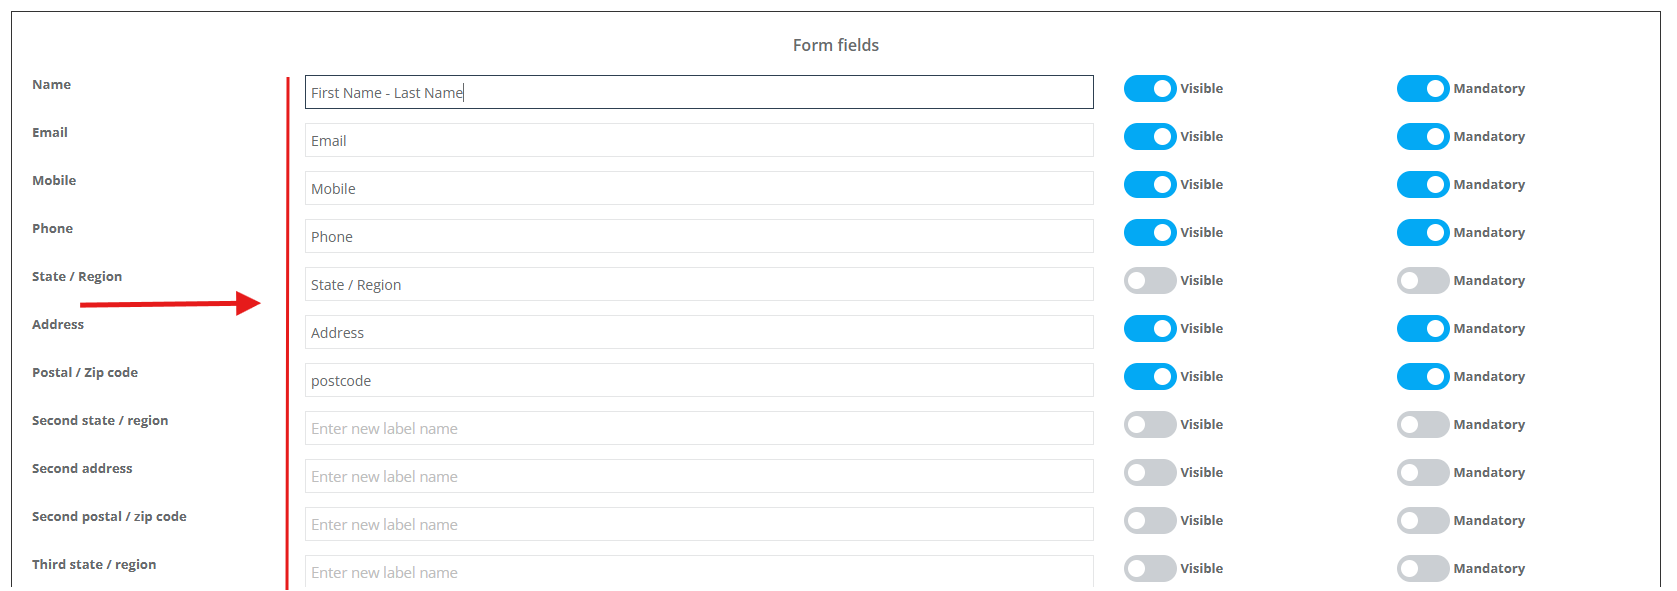

Reorder fields
Drag and drop field rows to create a more logical flow that matches how customers naturally think through the inquiry.
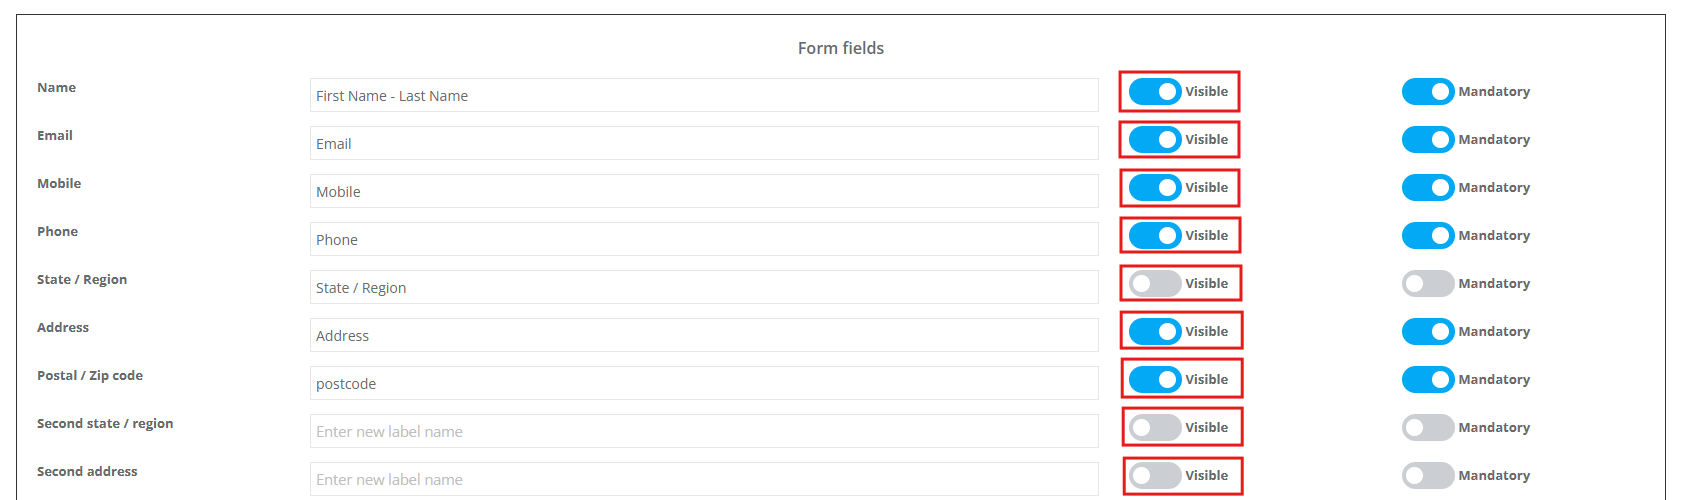
Show/hide fields
Toggle fields Visible on or off to keep the form short and reduce drop-offs.
Optional vs mandatory
Mark essential fields as Mandatory so you always capture enough information to respond (commonly: name, email/phone, address, and message/comments).

3) Address & multi-address fields
If your workflow requires multiple locations (for example pickup + drop-off, multi-site work, removals, or event hire), you can enable up to three address fields and control visibility and required rules. These addresses can also flow into the matching booking addresses when you convert the inquiry into a booking.
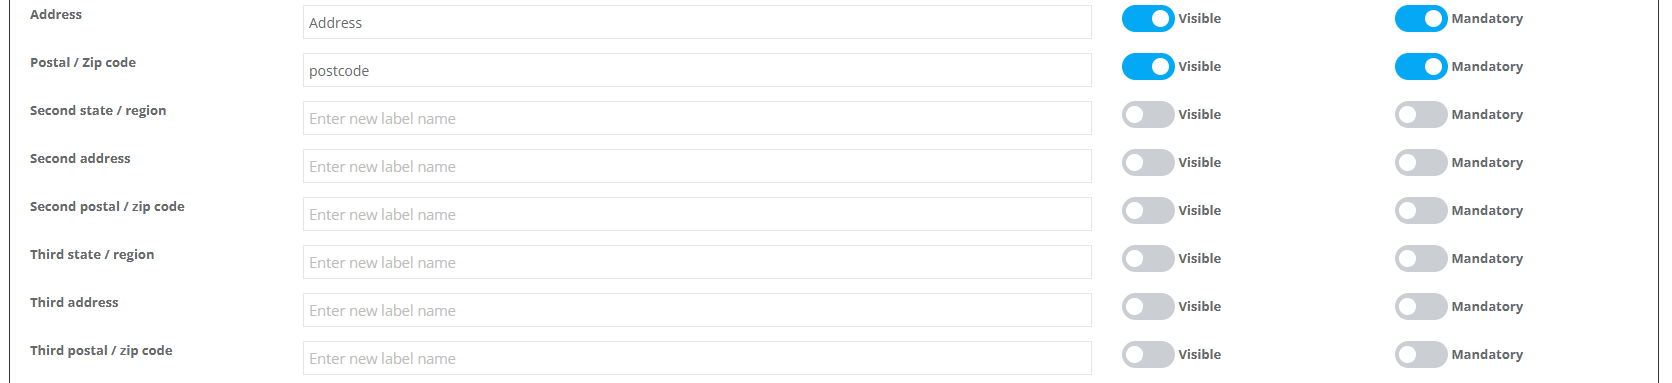
Use-case: A marine transport company captures Marina A → Marina B → Final Berth addresses in one step, eliminating later back-and-forth.
4) Service display logic (services, categories, multi-service)
| Scenario | What to adjust | Customer experience |
|---|---|---|
| Show service list + categories | Enable service display and Show categories | Customers can quickly find the right service from a grouped list, which is especially useful for businesses with many service types. |
 |
||
| Hide all services (general inquiry) | Disable service display in the Lead Capture Form for each service | The form behaves like a simple contact widget, letting your team qualify the lead manually later. |
 |
||
| Enable multi-service selection | Enable Multiple Service Selection | Customers can request multiple services in one enquiry, which is ideal for combo jobs or bundled service requests. |
5) Advanced features (uploads, redirect, mailing list, spam)
The Lead Capture Form supports additional options that improve qualification and reduce back-and-forth:
- Photo upload prompt (after submission)
- PDF upload prompt (after submission)
- Redirect to Customer Portal after submitting an inquiry (optional)
- Custom success message shown after submission
- Send confirmation email after inquiry is submitted (optional)
- Show “Join mailing list” checkbox (optional)
- Spam handling & IP blocking (where enabled)
- Show service custom fields when a service is selected (master toggle)
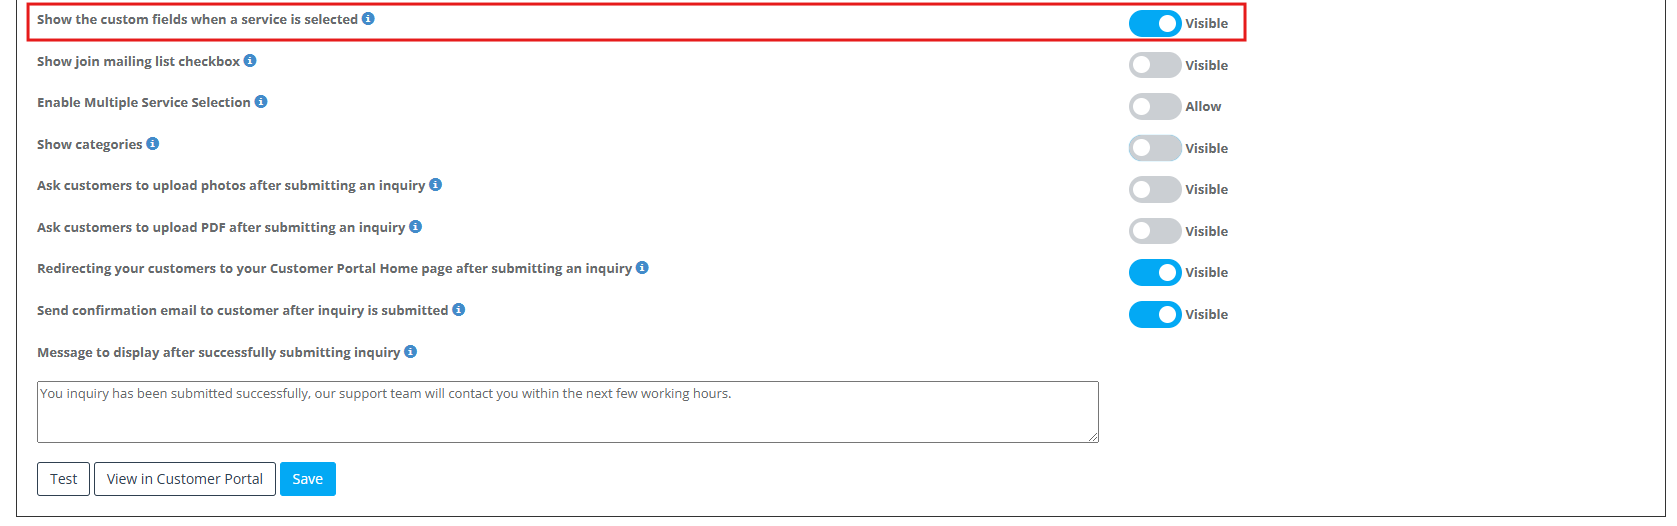
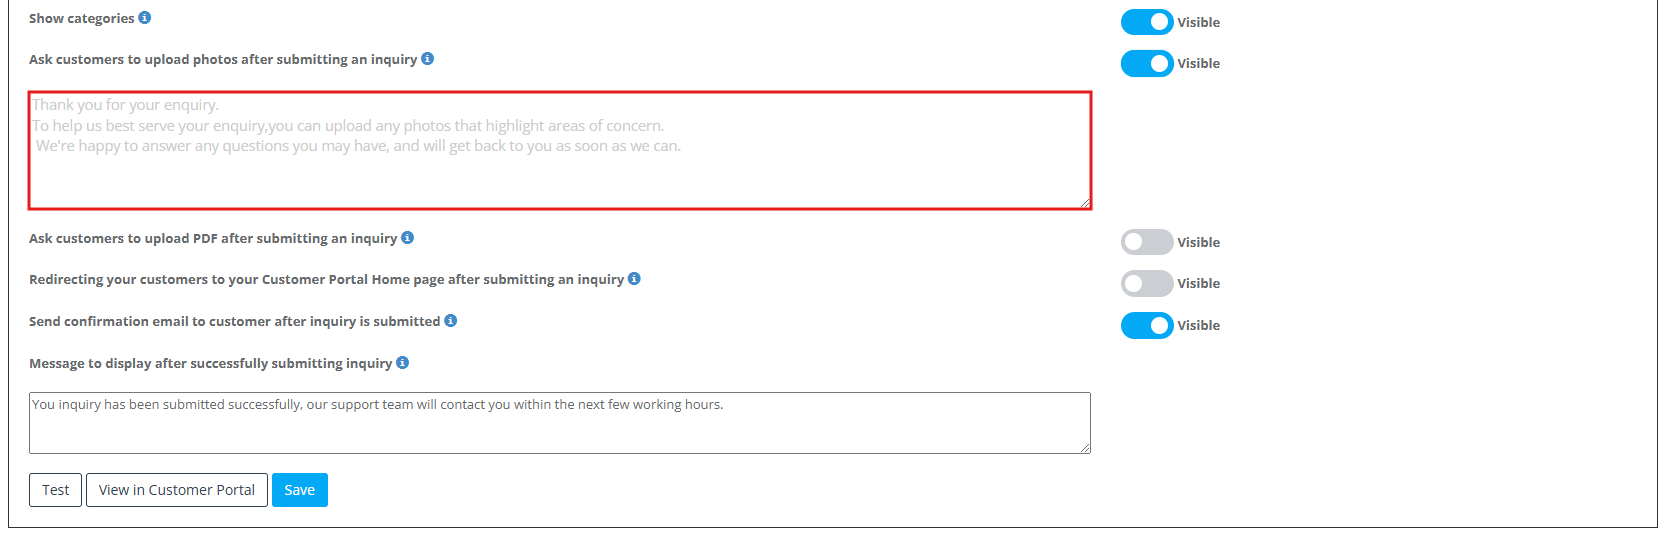
Photo upload prompt (after submission)
If enabled, customers see a tailored popup prompting them to attach relevant images before they navigate away. You can customize the prompt text (for example: “Please upload clear photos of any damage or dimensions needed”). These files are saved to the inquiry record for faster, more accurate quoting.
Mailing list opt-in (optional)
If you use OctopusPro mailing lists, you can show a permission-based Join mailing list checkbox on the form.
Mailing Lists & Marketing Campaigns
Spam handling & IP blocking
If you receive unwanted submissions, use OctopusPro’s spam tools (and IP blocking where available) to keep your pipeline clean.

Manage Spam Inquiries & Block IP Addresses
6) Period Required (preferred timeframe)
The Period Required field captures urgency or timeframe (for example ASAP, next week, next month), helping you triage faster and set expectations earlier.

Add a “Period Required” (Preferred Timeframe) Field
7) Service-specific custom fields
OctopusPro lets you capture only the information you truly need by combining service-specific custom fields with global form-wide fields and a master toggle that controls whether service-specific questions appear at all. This two-layer system produces shorter, clearer forms while still giving your team the granular details needed for accurate quotes and better first-time resolution.

| What it is | How to show / hide | Key benefits |
|---|---|---|
| Extra questions tied to one service (for example roof pitch for Roof Repair). | In Services Settings → Custom Fields, set each field to Visible or Hidden. Use hidden-from-lead-capture options when a field is for back-office use only. | Context-driven data keeps the form short, improves relevance, and gives staff more precise specs before quoting or attending a job. |
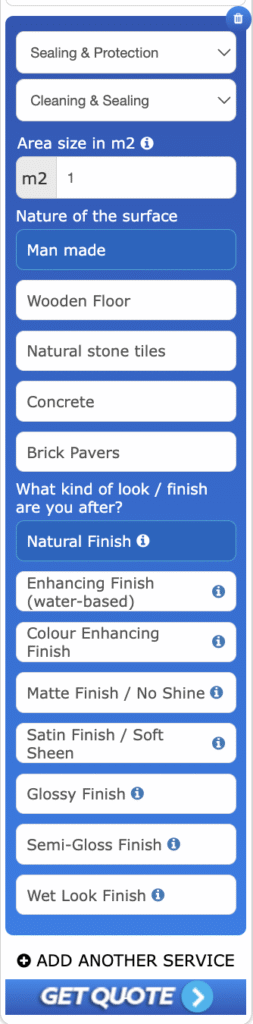
Use-case: A roofing inquiry reveals Roof pitch and Storey height only when Roof Repair is chosen, letting estimators price jobs accurately from photos alone.

Learn more:
Master toggle: show custom fields when a service is selected
This setting in Settings → Communications → Lead Capture Form acts as a global on/off switch for whether service custom fields can appear on the website form.
| Position | Result | Relationship to field flags |
|---|---|---|
| ON | Selecting a service can reveal its fields. | Per-field Visible / Hidden flags still decide what actually shows. |
| OFF | No service fields display even if a field is set to visible. | Useful for ultra-lean external forms where minimal friction matters most. |
Practical flow: Leave the toggle ON for portal users or detailed quote workflows where exact specs matter. Switch it OFF on lean marketing pages where a shorter form may convert better.
8) Global (form-wide) custom fields
Global custom fields appear on every inquiry regardless of service (for example preferred contact method, best callback time, or access notes). This standardizes lead data and improves internal handover.
Use-case: Every inquiry—cleaning, plumbing, or electrical—asks for Preferred contact method so your team knows whether to email, text, or call.
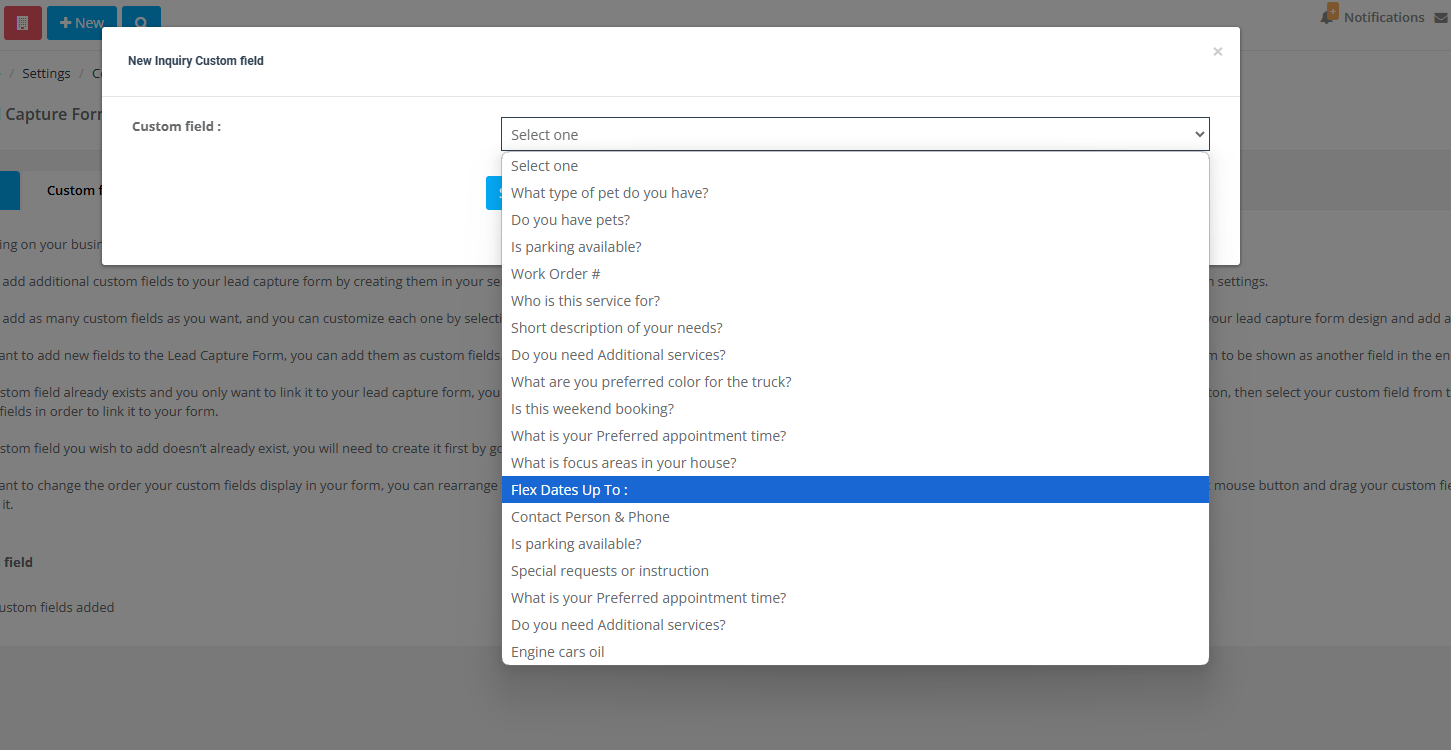
Add global custom fields to the inquiry form
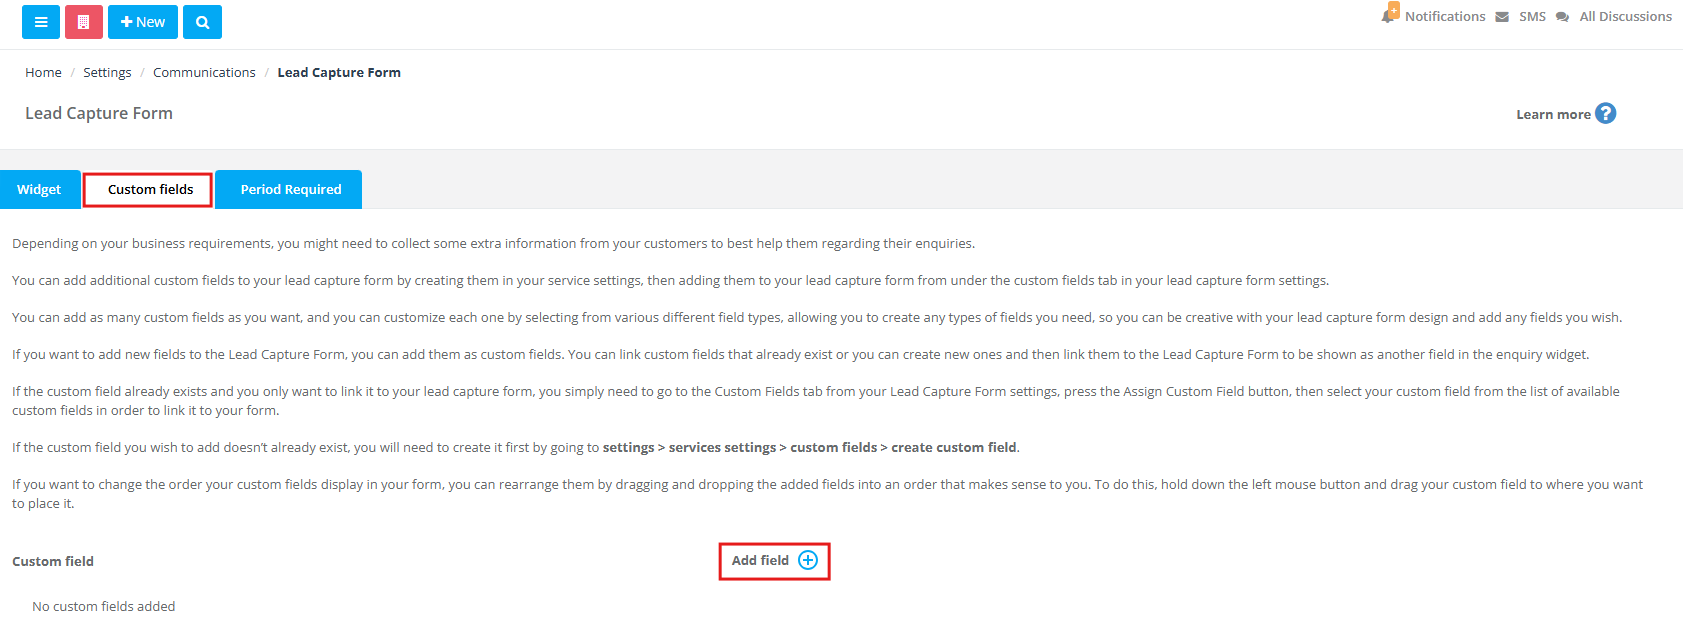
Select a custom field
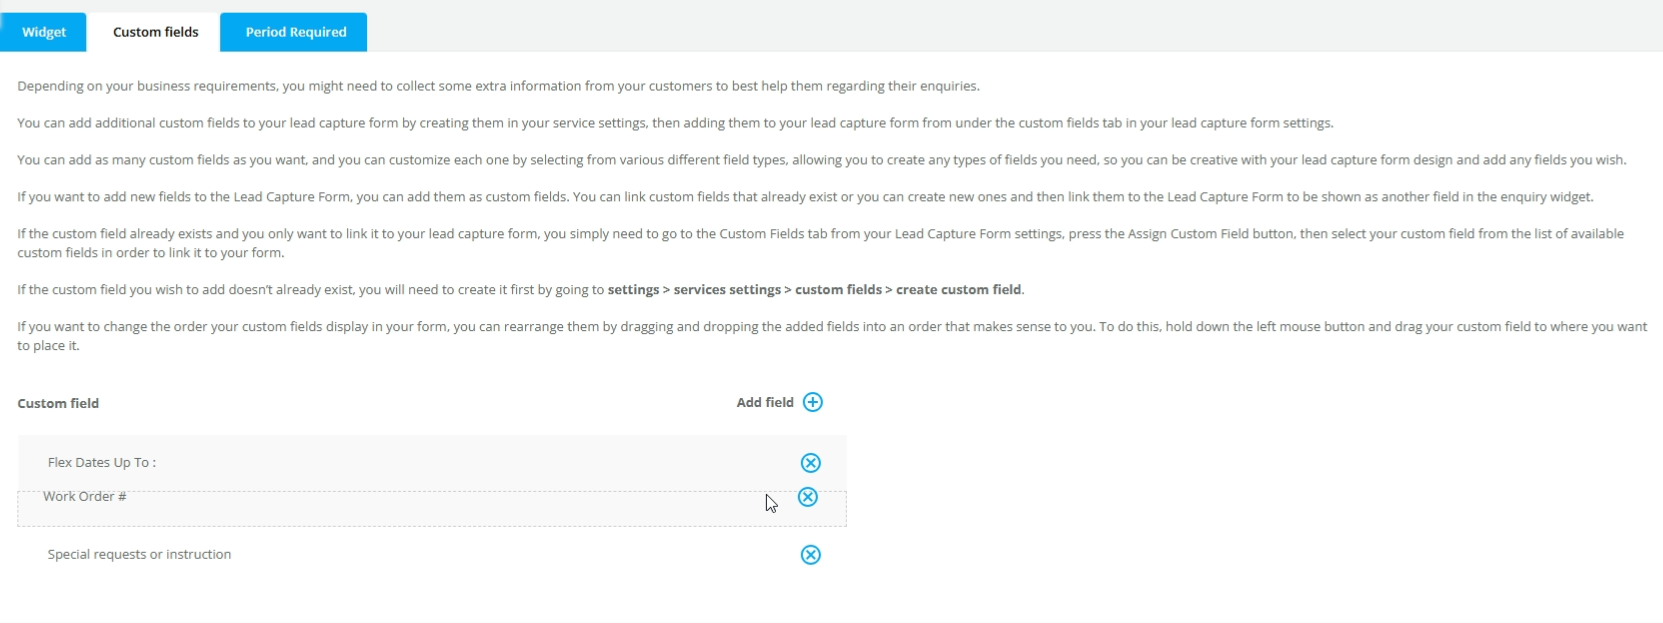
Reorder fields (drag and drop)
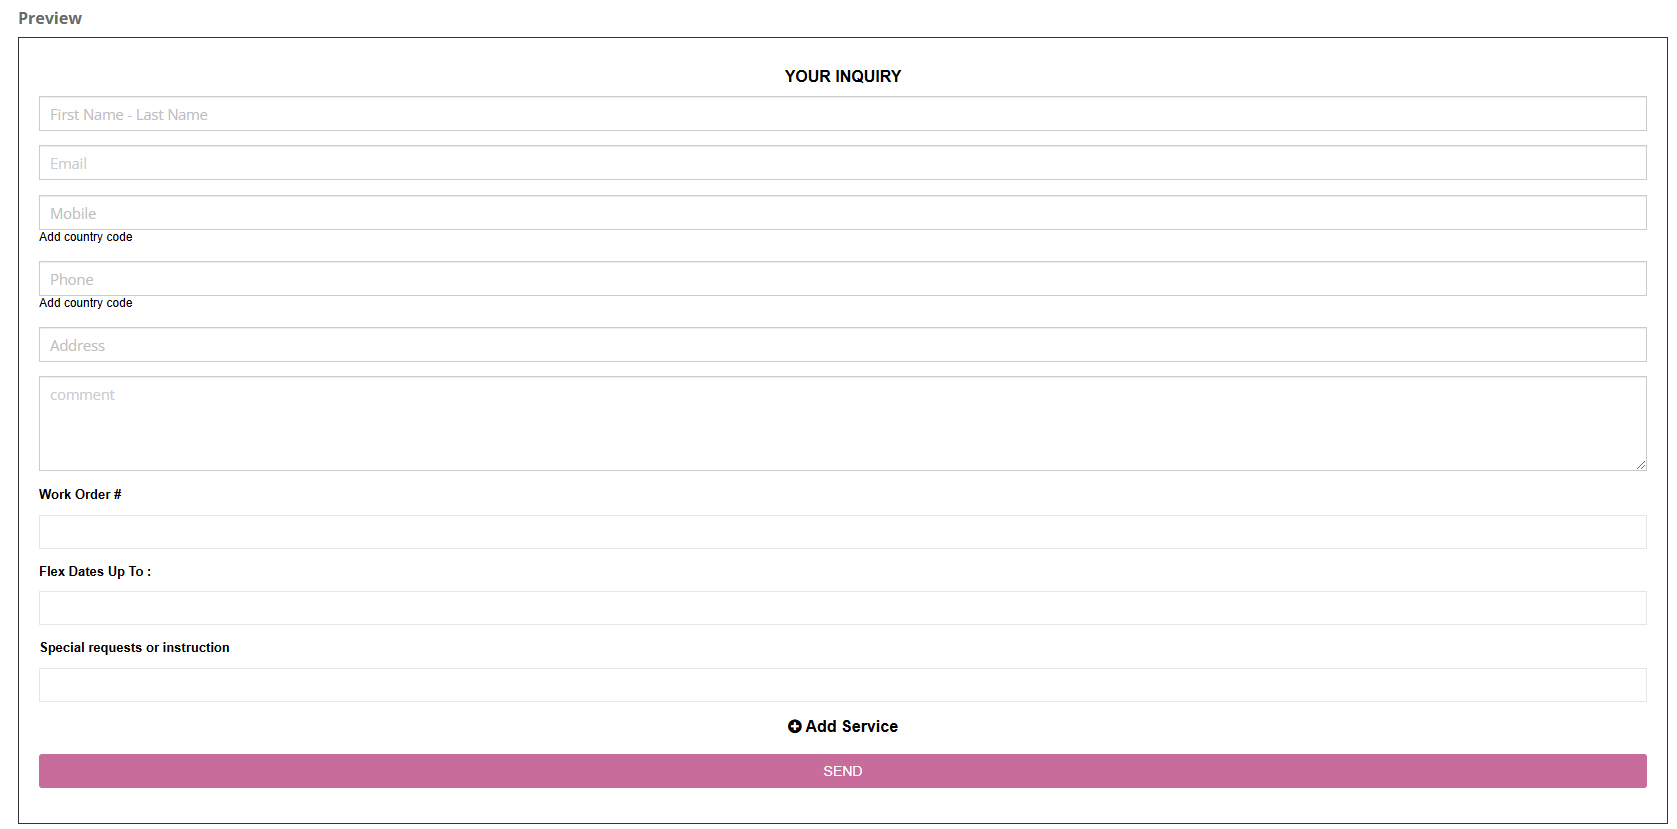
Preview the added fields

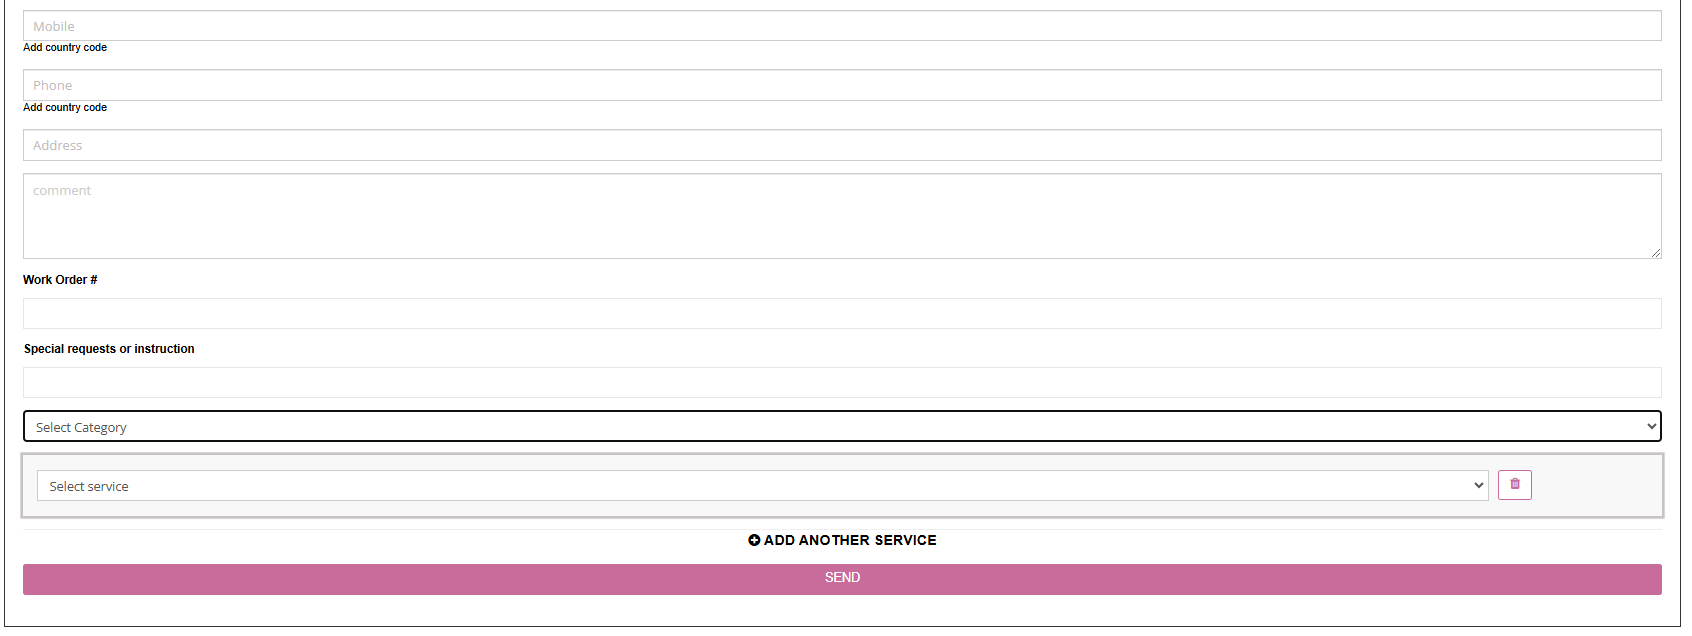
Example of a full form
Key differences: service-specific vs global fields
| Aspect | Service-specific fields | Global form fields |
|---|---|---|
| Visibility trigger | Appears only when that service is chosen | Always visible |
| Typical data | Job-specific specs, dimensions, options | Contact details, timing, and general notes/uploads |
| Configuration path | Create in Services Settings → Custom Fields; control via show/hide flags | Add in Lead Capture Form → Custom Fields tab |
| Impact on form length | Keeps the form short and relevant | Adds a consistent baseline of questions |
Workflow in three steps
- Create or edit fields: build service-specific fields in Services Settings → Custom Fields, and global questions in the form’s Custom Fields tab.
- Assign & order: click Assign Custom Field, drag fields into the right position, and set visibility + required rules.
- Save & test: preview the form, select each service, and confirm only relevant fields appear.
Benefits at a glance + examples
| Conversion | Data quality | Ops efficiency |
|---|---|---|
| Short, dynamic forms improve completion by hiding irrelevant questions. | Service-linked questions support more accurate quotes and fewer change orders. | Less back-and-forth and faster first-time fixes save labour hours. |
Using both field types together—global for essentials and service-specific for details—creates a concise yet complete Lead Capture Form that delights customers, accelerates quoting, and supports stronger booking outcomes.
Examples & use-cases
- HVAC company: “Unit brand” and “Filter size” fields appear only when Air-conditioning Service is selected.
- Event-hire firm: selecting Marquee Rental reveals “Guest count” and “Surface type”, while Lighting Package reveals wattage and rigging questions.
- Mobile vet clinic: choosing Dog Vaccination surfaces weight and breed questions, while Cat Check-up stays simpler.
Collecting precise, service-specific details at the inquiry stage means fewer follow-up emails, faster quoting, and better first-visit readiness.
Test & embed your Lead Capture Form
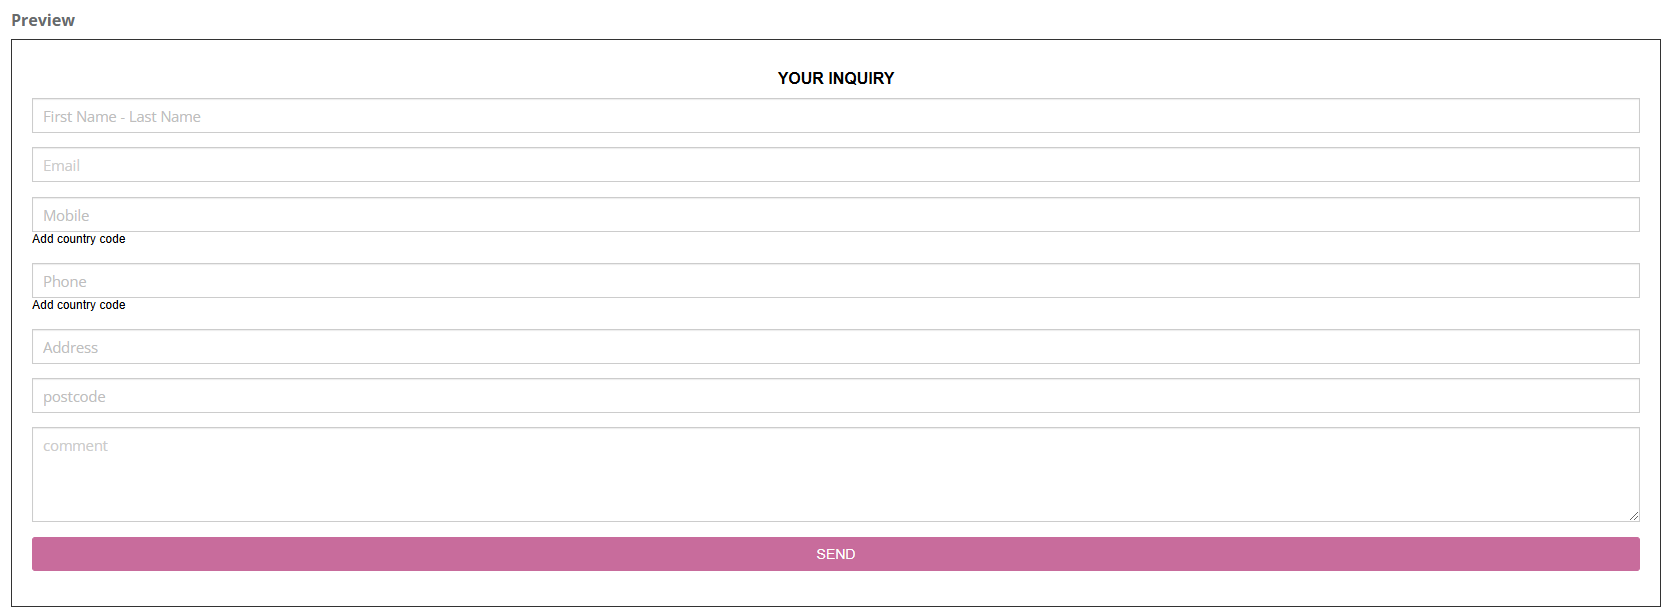
1) Preview before you publish
- Go to Settings → Communications → Lead Capture Form.
- Adjust colours, fields, wording, or logic as needed, then click Save.
- Use the built-in preview and test each service selection to confirm only relevant fields appear.
2) Copy the embed code
- Click Generate Embed Code (shown above the preview).
- Copy the JavaScript snippet.
3) Paste it on your website
- Open an HTML/Code block in your website/CMS.
- Paste the snippet, publish the page, and submit a test inquiry.
- Confirm the inquiry appears in Inquiries → New in OctopusPro.
WordPress tip: Use a Custom HTML block (Gutenberg) or an HTML module/widget (Elementor or other builders). Avoid visual editors that strip scripts.
That’s it—test, copy, paste. Your website now captures leads automatically, and you can fine-tune the form anytime from the same settings screen.
Lead Capture Form vs Customer Portal (when to use each)
Website visitors typically fall into two groups:
- “I want more information” → Use the Lead Capture Form to collect details and follow up.
- “I’m ready to book now” → Use the Customer Portal / Booking Widget to let customers schedule and pay online.

Portal resources:
- Accept Online Bookings Through Your Website (Customer Portal)
- Add a Book Online Button to Your Website
- Customer Portal Contact Us Form & Lead Capture
Facilitating online bookings through your website (recommended funnel)
Prospective customers typically arrive with two mindsets: “Tell me more” and “I’m ready to book now.” OctopusPro supports both with the Lead Capture Form and the Customer Portal.
1) Lead Capture Form – best for “Tell me more”
| Purpose | How it works | Real-life use case | Key benefits |
|---|---|---|---|
| Collect early-stage questions or quote requests. | Embed a short form on any page and ask only the essentials, plus optional global fields such as preferred contact method or file upload. | Bathroom-remodelling blog article: readers submit a rough room size and photos, then sales replies with ball-park pricing. | • Generates qualified leads without overwhelming visitors • Lower drop-off when context-relevant fields are used • Leads funnel straight into your CRM workflow for follow-up |
Best practice
- Keep service-specific fields hidden until a customer picks a service.
- Use the optional photo-upload popup so staff can quote from images and reduce unnecessary site visits.
2) Customer Portal – best for “Book and pay now”
| Purpose | How it works | Real-life use case | Key benefits |
|---|---|---|---|
| Let customers self-schedule, choose extras, and pay online 24/7. | Add an OctopusPro booking widget or a full portal link to your site. Customers can see live availability, service prices, and checkout options. | Window-cleaning franchise: the homeowner picks “Exterior + Screens”, sees open slots, pays a deposit, and receives automated reminders. | • 24/7 booking without staff intervention • Real-time availability helps prevent double-booking • Transparent pricing improves trust and reduces quote requests • Customers can manage future jobs, invoices, and reviews in one place |
3) Which tool where?
| Scenario | Recommended tool | Why |
|---|---|---|
| Blog, partner, or ad landing page where visitors are researching. | Lead Capture Form with global fields only. | Keeps the page lightweight and captures essentials for nurture campaigns and follow-up. |
| Service page for ready-to-buy visitors (for example “Book a Carpet Clean”). | Customer Portal / Booking Widget. | Converts intent immediately and can take payment upfront. |
| Social media promo offering limited-time discount slots. | Portal widget with discount code pre-applied. | Mobile-friendly checkout converts impulsive buyers quickly. |
| Complex B2B project needing specs before price. | Lead Capture + service-specific custom fields visible. | Collects drawings, site plans, and preferred timelines in one step. |
4) Combined workflow (roof-repair example)
- Ad click → landing page with Lead Capture Form.
- Homeowner uploads roof photos and selects Roof Repair; hidden fields for roof pitch and storey height appear and are completed.
- Sales team sends an accurate quote quickly.
- Quote email links to Customer Portal; homeowner picks a date, pays a deposit, and tracks job status online.
Outcome: No phone tag, no second site visit, faster cashflow, and a smoother customer experience.
5) Implementation checklist
- Configure global fields (for example preferred contact method or file upload) in Lead Capture Form → Custom Fields.
- Create service-specific fields in Services Settings → Custom Fields.
- Toggle Show the Custom Fields when a Service is Selected ON for detailed workflows and OFF for lean marketing pages.
- Embed the Lead Capture snippet on content pages, and add the Customer Portal link/widget on booking-ready pages.
- Monitor views, submissions, and conversions over time so you can refine field counts and CTAs.
Bottom line
Use the Lead Capture Form to turn casual browsers into qualified leads with minimal friction, and use the Customer Portal to let ready buyers schedule, pay, and manage jobs on their own. Together they create a conversion funnel that starts with curiosity and ends with a confirmed, paid booking.
For more information, visit our guide on accepting bookings online through the OctopusPro Customer Portal and booking widget.
Related guides
- Inquiries & Lead Management (overview)
- Adding Customer Inquiries
- View Inquiry Details
- Edit Inquiry Details
- Deleting Inquiries
- Inquiry Contact Management
- Inquiry Discussion Management
- Adding Attachments to Inquiries
- Adding Labels to Inquiries
- Convert Inquiry to Booking
- Convert Inquiry to Quote / Estimate
- Managing Follow-Up Reminders
- Mark an Inquiry as Spam
- Inquiries Statistics
- Track Lead Sources
- Label Management (Tags)
Troubleshooting
The form isn’t displaying on my website
- Paste the snippet into an HTML/Code block, not a visual editor.
- Clear caching (site cache/CDN) and hard refresh the page.
- If your site has script-blocking or security rules, allow the widget script and domain.
Service custom fields aren’t showing
- Enable Show the custom fields when a service is selected (master toggle).
- Confirm the custom fields are assigned to the service and set to show in Lead Capture where applicable.
I’m receiving spam enquiries
- Use spam tools and IP blocking (where available) to keep your pipeline clean.
- Manage Spam Inquiries & Block IP Addresses
Schedule a call (Lead Capture Form Implementation Service): get help configuring your Lead Capture Form, automations, and conversion workflow.
To stay updated, please subscribe to our YouTube channel.