
Issue & Complaint Handling for Quotes, Bookings and Invoices
Unified Issue & Complaint Management — turn quotes, bookings & invoices into friction-free resolutions
OctopusPro runs every issue or complaint through an ISO 10002-aligned, closed-loop workflow: Admins or customers can lodge a complaint in seconds and collaborate with fieldworkers in a role-aware discussion board; fieldworkers see push alerts in the app, upload photos from site and (with permission) schedule a follow-up visit, then analyse root-causes via live dashboards. Payments are automatically withheld until an admin approves the fix, protecting quality without messy spreadsheets. Everything is time-stamped, tagged and searchable, giving you an ISO-ready audit trail and happier customers.
Where issues live and who can see them
| Record type | Participants | Life-cycle notes |
|---|---|---|
| Quote / Estimate | Office ↔ Customer (+ Fieldworker if visibility = All) | Follows automatically when quote becomes booking. |
| Booking | Office ↔ Fieldworker ↔ Customer | Photo evidence, follow-up scheduling, payment withheld until closed. |
| Invoice | Office ↔ Customer (+ Fieldworker) | Billing disputes; “Overdue” tag triggers extra alerts. |
Adding an Issue or Complaint
| Entry point | Who uses it | Typical scenario | Steps |
|---|---|---|---|
| Admin on Web | Office staff | Phone-in complaint or quality check | 1. Open the Quote, Booking, or Invoice record. 2. Issues › + Report Issue. 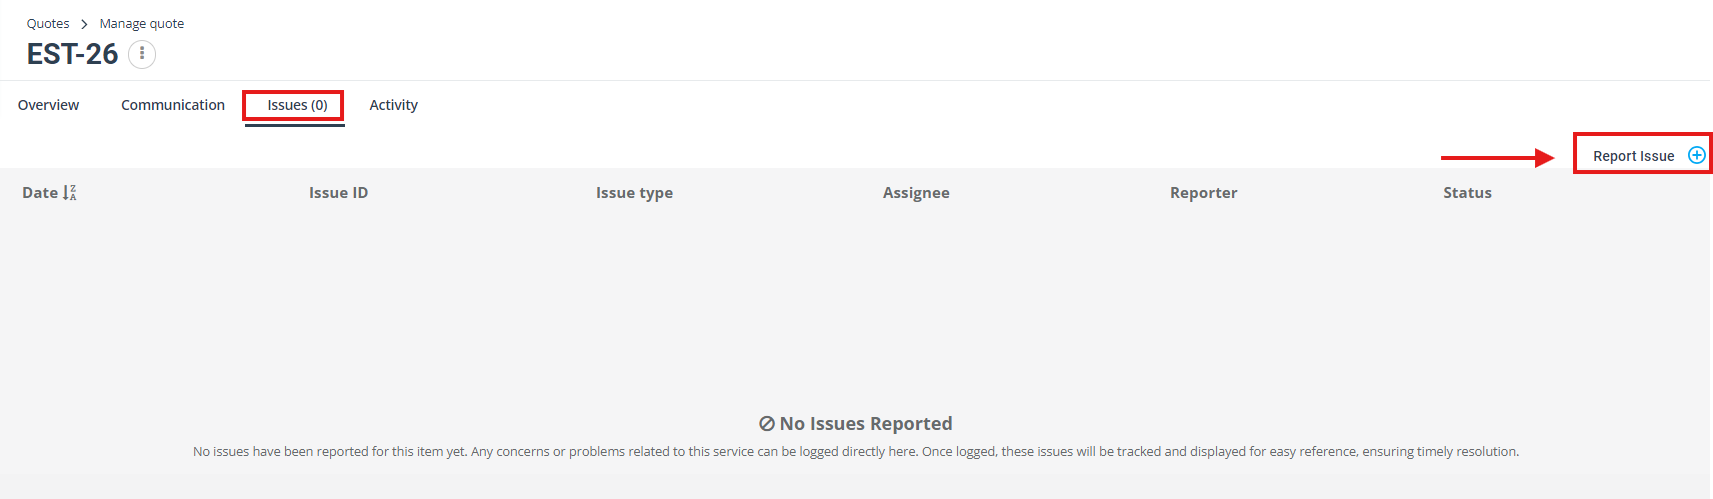 3. Pick an Issue Type, add photos/notes, set an optional Follow-up Date for deferred fixes.  4. Click Save → an acknowledgement-email preview appears; hit Send to reassure the customer instantly. 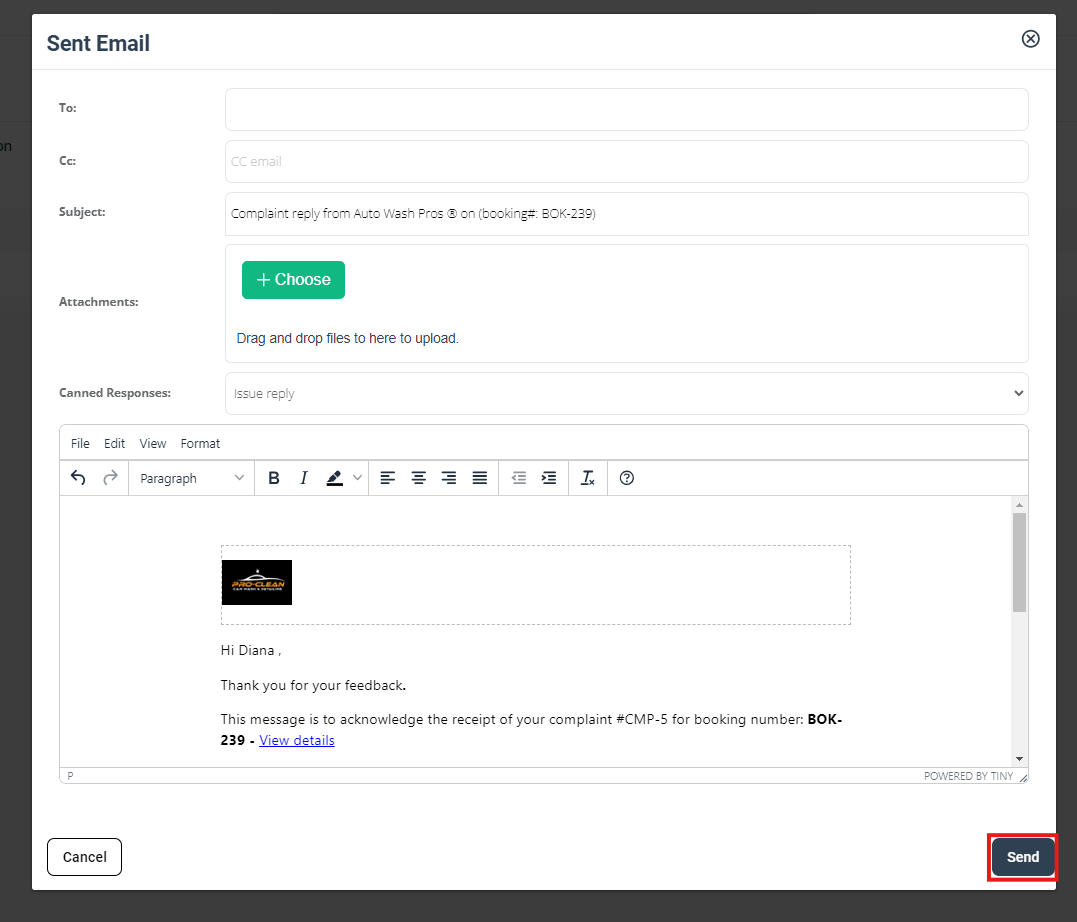 |
Customer Portal |
Customer | Self-service complaint after service or quote review | 1. Client opens their booking/quote/invoice online. 2. Click Report Problem. 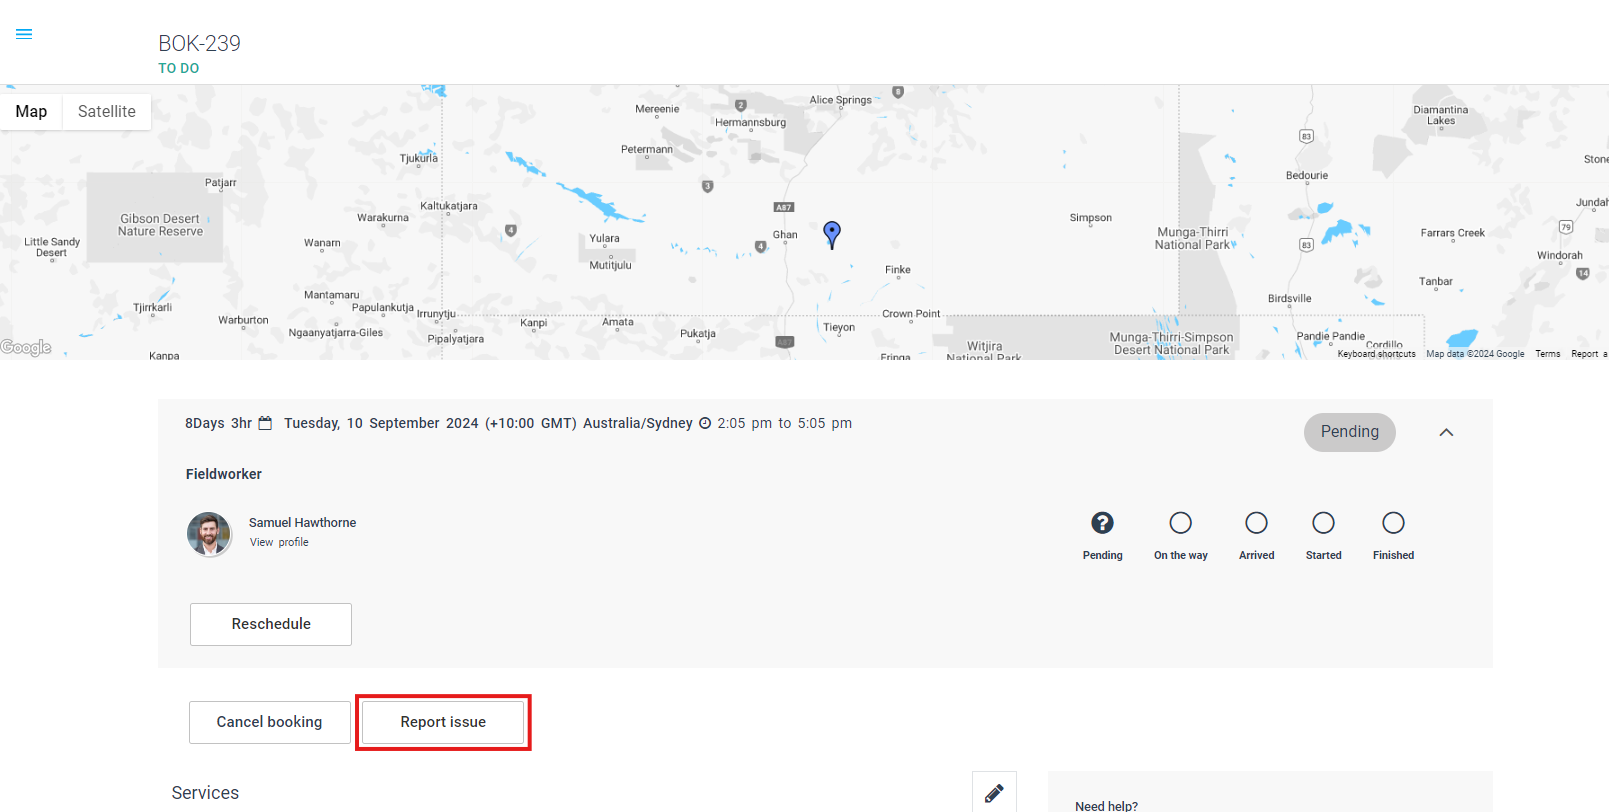 3. Complete the same form and click Submit. 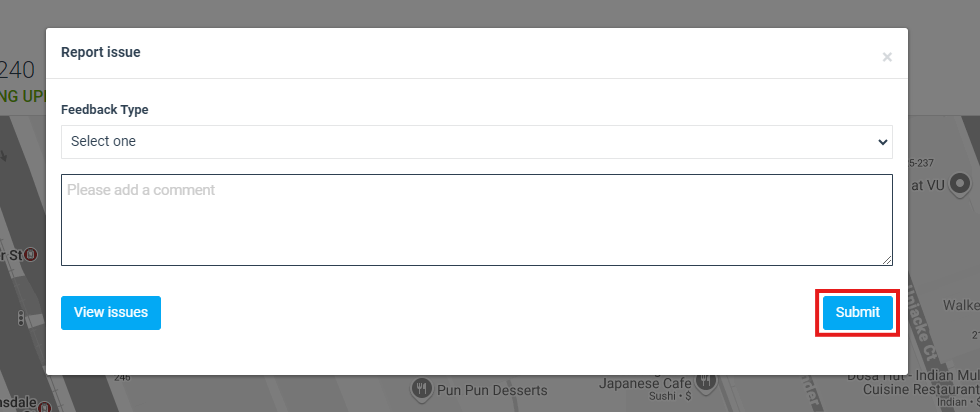 4. Admins and (if visibility allows) assigned fieldworkers receive push/SMS/email alerts. |
| Calendar Shortcut | Admin | Call-in issue while viewing the scheduler | 1. Click the job on the calendar. 2. Actions › Report Issue. 3. Fill the form and Submit—ideal for real-time call-centre workflows. |
Fieldworker Notification: Once the complaint has been saved, it will automatically notify the relevant admin and fieldworker. This feeds into the same issue management process as above.

Tip: Issue Type, photos, and “To Follow” dates give fieldworkers context and trigger automated reminders, keeping resolutions on track and customers informed.
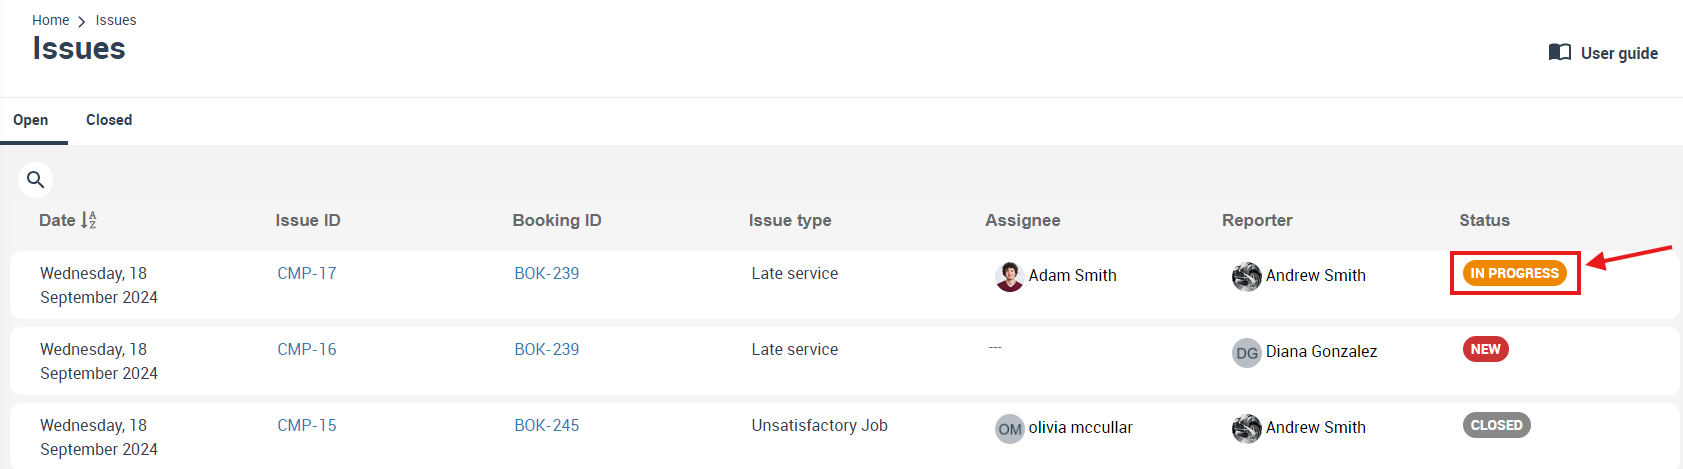
View, Contact, Discuss
Quickly locate any issue/complaint—no matter whether it’s on a quote, booking or invoice—and contact the right people without leaving OctopusPro.
- Locate an Issue
- By ID: Paste the CMP-##### code into the global search bar.
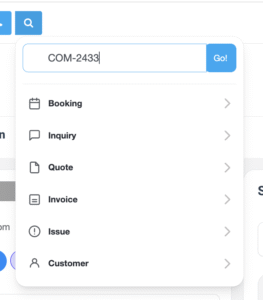
- By list: Navigate to Issues & Complaints > All Issues, or filter by Quotes/Bookings/Invoices.
- By ID: Paste the CMP-##### code into the global search bar.
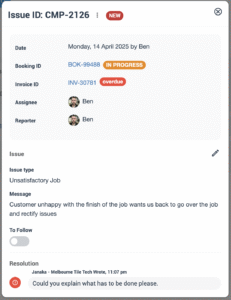
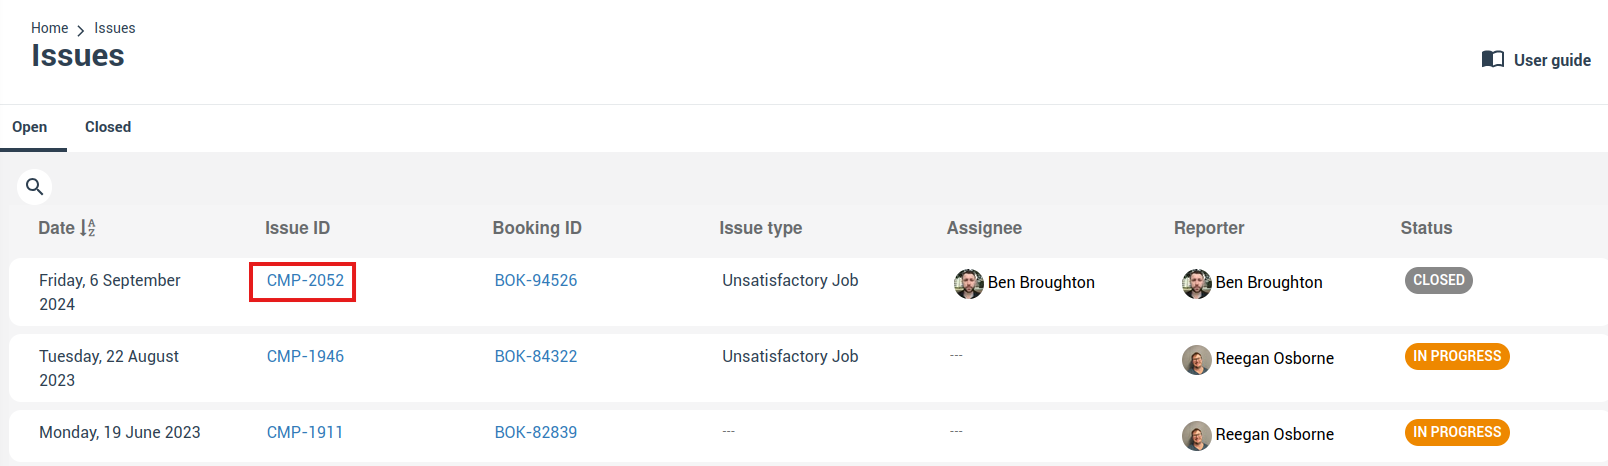
- Open the Details
- Click the CMP code in the results list to view full details.
- Contact the Assignee
- In the list or in the issue detail view, click the Email or SMS icon under Assignee.
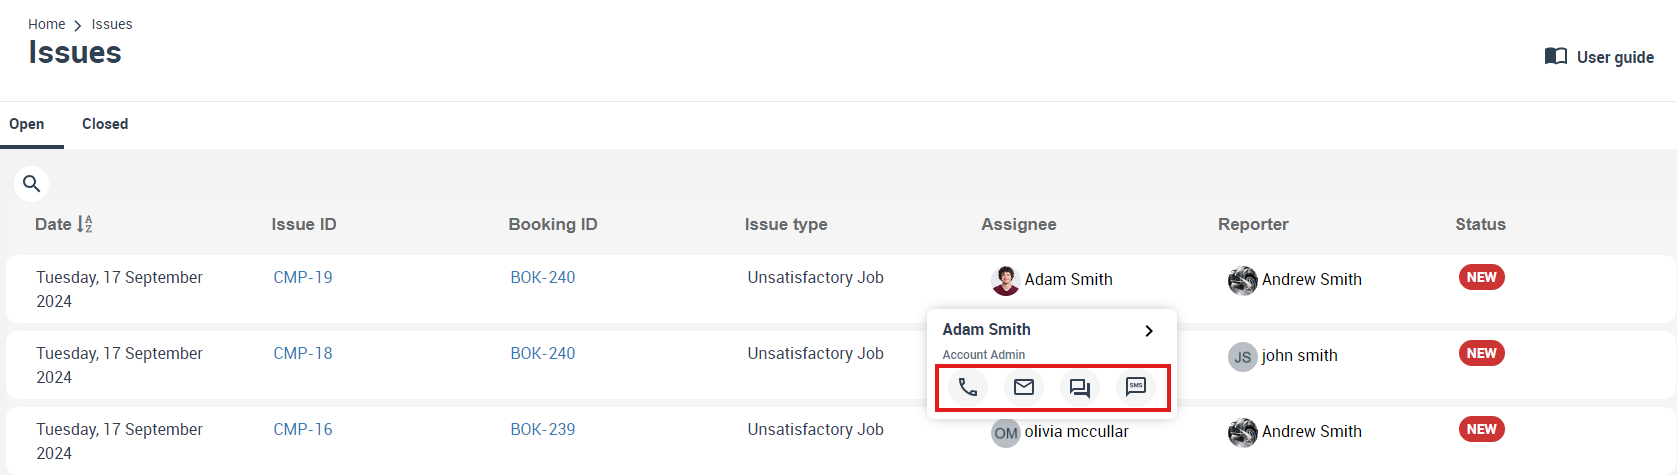
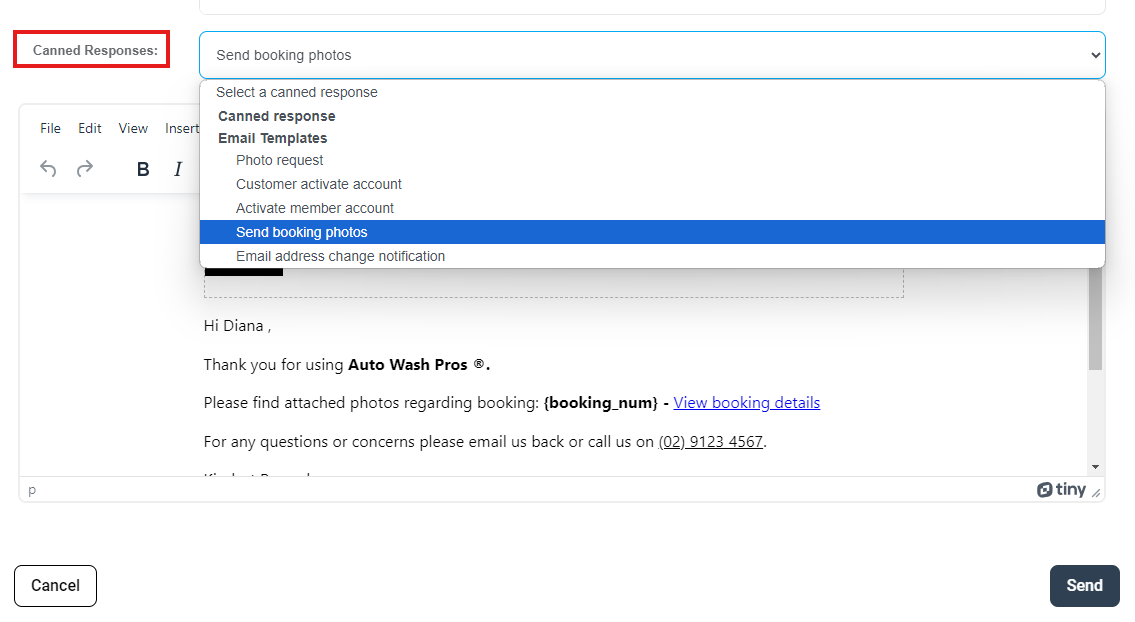
- Pick a canned response or type your own message.
- Click Send.
- In the list or in the issue detail view, click the Email or SMS icon under Assignee.
- Contact the Customer
- Open the booking: click the booking number to load the Manage Booking page.
- Select contact method: hover over the customer’s name, then click the 📧 Email or 💬 SMS icon.
- Compose your message: pick a canned template or type a custom note, then click Send.
- Click Send.
Tip: Every change—status updates, comments, attachments—is logged in the issue timeline so your team always sees the latest. This ensures any adjustment on an issue instantly syncs back to the related quote, booking or invoice.
Discussion Board & Comments
Every issue opens its own Discussion panel, inheriting all job comments and visibility rules.
Keep every conversation about an issue in one place—visible to exactly the right people:
- Add a comment
- Open the issue (Issues › All Issues › click CMP-#####).
- Click Actions › Add Discussion (speech-bubble icon).
- Select visibility:
- Internal (office + fieldworkers only)
- Public (includes customer)
- Type your note, attach images/files, then Post.
- View the full thread
- In the issue detail, click View Discussion to see every message and attachment in chronological order.
- Use @mentions to ping teammates and trigger instant alerts.
- On mobile & customer portal
- Fieldworkers: open the job in the mobile app, tap the Issues tab, then Discussion—all updates sync in real time.
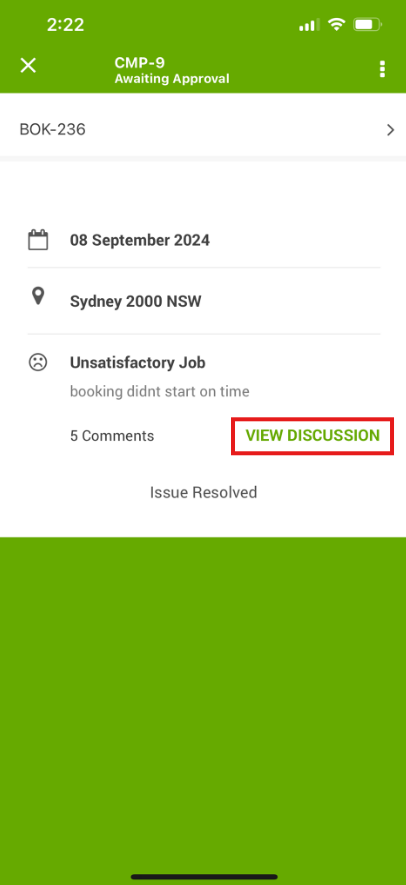

- Customers: if enabled, they’ll see public comments on their booking/quote/invoice page, and can reply right there.
- Fieldworkers: open the job in the mobile app, tap the Issues tab, then Discussion—all updates sync in real time.
- Notifications & control
- Alerts fire via in-app push, SMS or email based on each user’s notification settings.
- Visibility flags ensure sensitive notes stay internal while public updates keep customers informed.
- Users tailor notifications & alerts in top bar Discussions › Settings (All / Mine / Replies, Push / SMS / Email).
Why it matters
- Centralised communication: eliminates scattered emails or calls.
- Full audit trail: every note and attachment is time-stamped for compliance and training.
- Faster resolution: rapid, targeted alerts mean nothing slips through the cracks.
- Transparent updates: customers see progress without opening support tickets.
Managing Customer Issues & Complaints
OctopusPro manages every complaint through a closed-loop workflow: as soon as an issue is logged it’s automatically acknowledged, then tracked in a role-aware discussion board with configurable visibility. Booking and issue statuses switch to In Progress so you can schedule follow-up visits directly from the job, and the system withholds the relevant fieldworker’s payout until an admin verifies the resolution and manually releases payment—each step is time-stamped for full auditability.
1 | Open dialogue in the Issue Discussion board
When you click Issues › + Report Issue (admin) or Report Problem (customer portal) a dedicated thread is created on the Issue Details page.
- Use Add Discussion to swap updates, photos or PDFs.
- @Mention teammates to trigger instant push/email notifications.
Typical win
A customer posts a scratched-glass photo: the office replies internally to order a replacement while the client sees only the public apology and ETA.
2 | Schedule follow-up appointments & switch issue status to In Progress
When an issue requires one or more additional appointments, keep your booking and issue workflows accurate by:
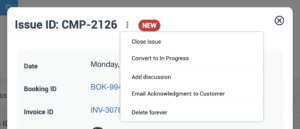
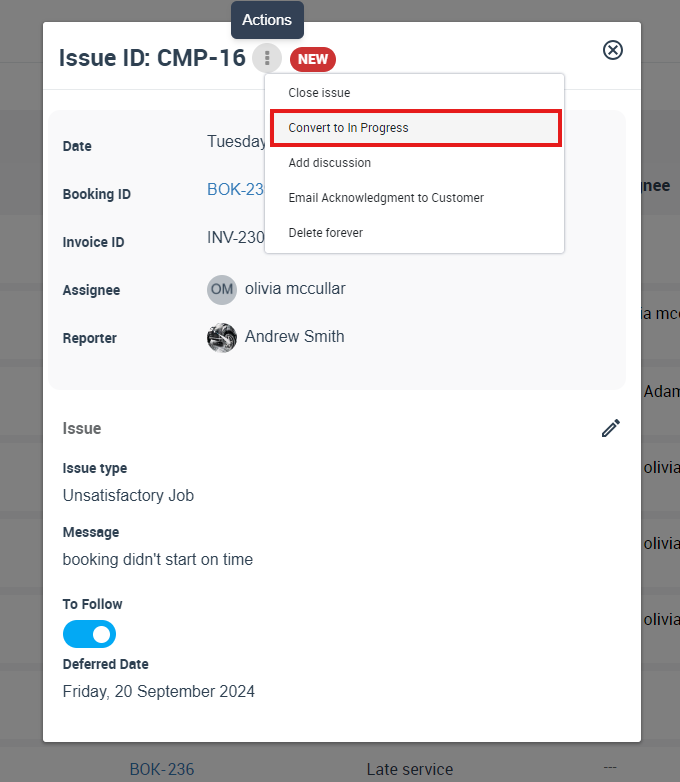
- Convert to In Progress
- Issue status: On the Issue Details page, click Actions → Convert to In Progress.
- Booking status: Open the booking and change its status to In Progress.
Converting both statuses ensures your operations and reporting reflect that remediation work has started.
- Issue status: On the Issue Details page, click Actions → Convert to In Progress.
- Add the Follow-Up Appointment
- Within the now In Progress booking, click + Appointment.
- Select the date, time and fieldworker (same or different fieldworker).
- Click Save—OctopusPro writes the new slot into your crew calendars automatically.
- Notify & Track
- Assigned fieldworkers receive instant notifications and see the new appointment in their mobile app.
- Office staff view real-time capacity changes in the dashboard.
- Customers (if enabled) get public updates via the portal.
Once saved, the new status will appear in the issues list page. This streamlined process ensures transparent status tracking, rapid response scheduling and up-to-date notifications—driving faster resolutions and complete auditability.
3 | Synchronise booking & issue statuses
Keep the Issue Status in lock-step with booking progression:
| Status | What it means |
| New | Logged, awaiting triage. |
| In Progress | Fix scheduled or underway; booking may be auto-switched to this for scheduling. |
| Reopened | Customer unhappy after closure; restarts loop. |
| Awaiting Approval | Fieldworker says resolved; admin must check evidence. |
| Closed | Admin approves fix; payment may be released. |
When an issue is created, OctopusPro flags the job Payment Withheld so fieldworker payments pause until closure—mirroring best-practice retention clauses in trade contracts.
4 | Fieldworker Access to Issues/Complaints (app)
OctopusPro’s mobile app puts issue resolution in your fieldworkers’ hands—literally. Fieldworkers get instant alerts, see every comment and attachment, and update statuses on the go, all while maintaining a full audit trail and real-time sync with the office. This streamlined workflow boosts first-time fix rates, cuts response times and elevates customer satisfaction.
Fieldworker Access to Issues
- Open the app and tap Feedback in the sidebar to view all issues tied to your assigned bookings.
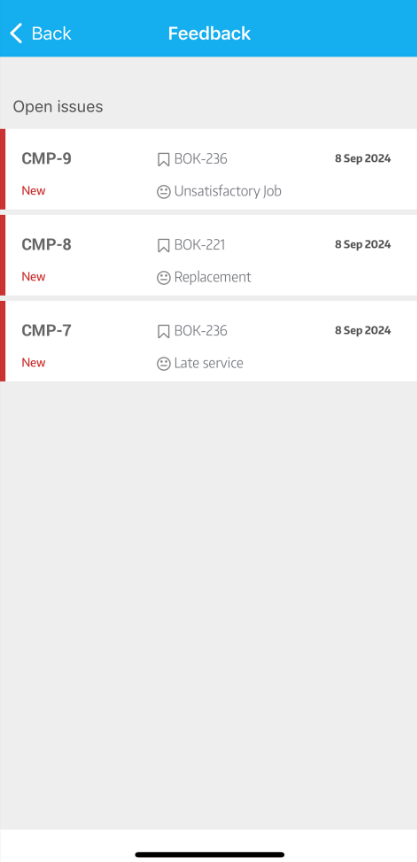
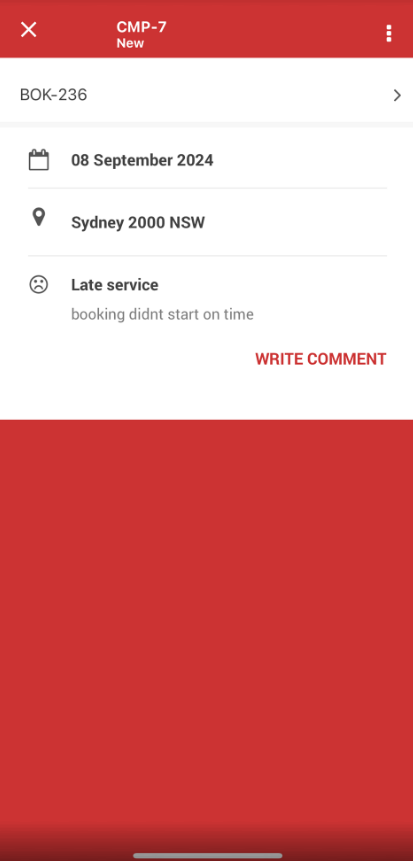
- Tap any issue to see details—including description, photos, discussion thread and current status.
Fieldworker Issue Workflow
- Receive alert: Push notification appears as soon as a new issue lands on your booking.
- Review details: Open the Feedback tab in the app to see description, photos, discussion thread and current status.
- Add comments: Post internal or public notes via Actions › Add Discussion—comments sync instantly with office staff and (if public) the customer.
- Upload resolution evidence: Attach photos or notes documenting your work.
- Attend scheduled appointment
- If the office added a follow-up appointment, tap into your Schedule view and attend at the proposed time.
- If no slot exists and you have permission, contact the customer (via Email/SMS icon) to arrange a convenient time, then confirm in the app.
- Mark as Resolved: Tap Resolve when the work is done. Status flips to Awaiting Approval, handing off to the office for final verification.
- Handoff for approval: The office reviews your evidence; they’ll Approve & Close to complete the ticket (and release payment) or Reopen if further work is needed.

Scheduling Follow-Up Appointments
- If more work is needed, tap + Appointment, propose dates, and submit. The office can then confirm or adjust the slot.
- Once you schedule a follow-up, the status flips to In Progress, keeping everyone aligned on the timeline.
Post-Resolution & Admin Handoff
- Awaiting Approval shows the job is done but pending office verification.
- The office reviews your evidence and either Approves (closing the issue) or Reopens it if more work is needed—automatically reapplying the In Progress status and any payment‐withhold flags.
5 | Payment-withhold safeguards
When a complaint is logged, OctopusPro automatically withholds the affected fieldworker’s payout—flagging their line items on the Booking, its Invoice and the Fieldworker Booking Summary. An administrator then reviews the Issue Discussion thread and clicks Release Payment once the fix is approved; each hold and release is time-stamped for a complete audit trail. Multi-fieldworker jobs get individual holds so you only pause payment for the fieldworker responsible.
Managing holds:
- Booking page: Actions › Withhold/Release Payment
- Invoice page: Same controls for billing disputes
- Fieldworker Booking Summary: Toggle flags per fieldworker
Key benefits:
- Dispute protection: Stops payouts on unresolved work
- Faster resolution: Fieldworkers know payment depends on prompt resolution
- Streamlined reconciliation: Finance views all holds/releases in one report, reducing errors
- Fair compensation: Each fieldworker paid only for work meeting your quality standards
- Customer confidence: Shows issues are fully resolved before payment completion
6 | Real-time notifications to Customer & Fieldworkers
- Fieldworkers get push alerts in the OctopusPro mobile app (and SMS/email if enabled) when assigned issues hit their jobs.

- In cases where the complaint is added by a customer through the customer portal, office admin users and assigned fieldworkers will be notified, subject to their permission and notification settings.
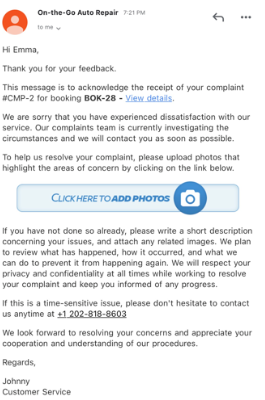
- Customers automatically receive a branded acknowledgement email—immediately after the complaint is saved.
- Keeping the customer informed about the progress of their issue resolution is critical. Regular updates about the actions being taken, estimated resolution time, and any other relevant details should be communicated to the customer.
7 | Deferred issues & “To Follow” tracker
For items that need future action:
- Click on the “Edit” icon, then tick To Follow, and set a date.
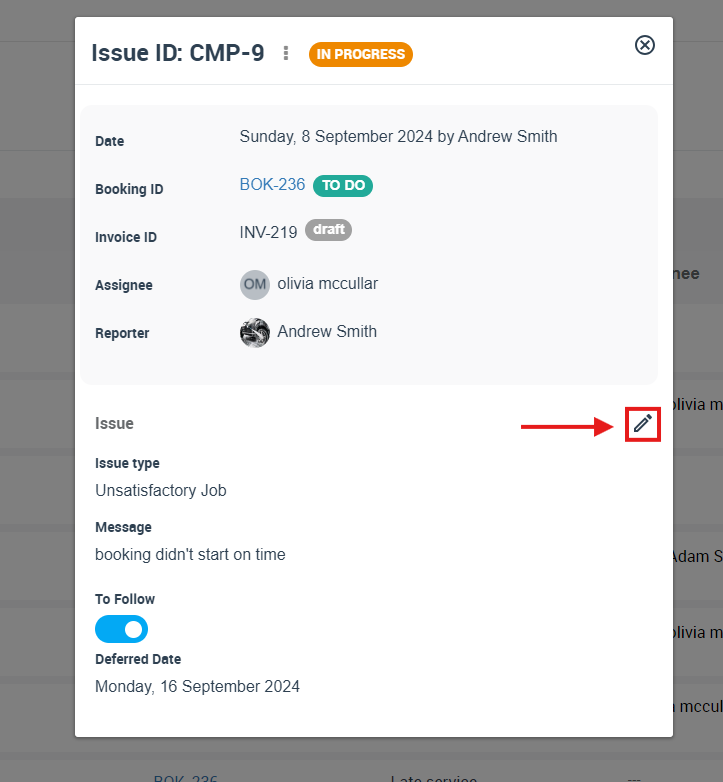
- OctopusPro increments the counter in Feedback › To Follow and queues an auto-reminder for the owner.
- Tag, label or colour-code for easy triage; admins can assign owners to ensure accountability.
8 | Final Step: From “In Progress” to “Closed”
- Resolve the Issue
– Fieldworkers carry out repairs or replacements.
– Fieldworkers upload resolution photos and notes in the Discussion thread. - Keep Everyone Informed
– Office staff post progress updates (“Parts ordered, ETA 2 days”).
– Admin users and fieldworkers and prompted to email updates to customers after every comment or update. - Advance the Status
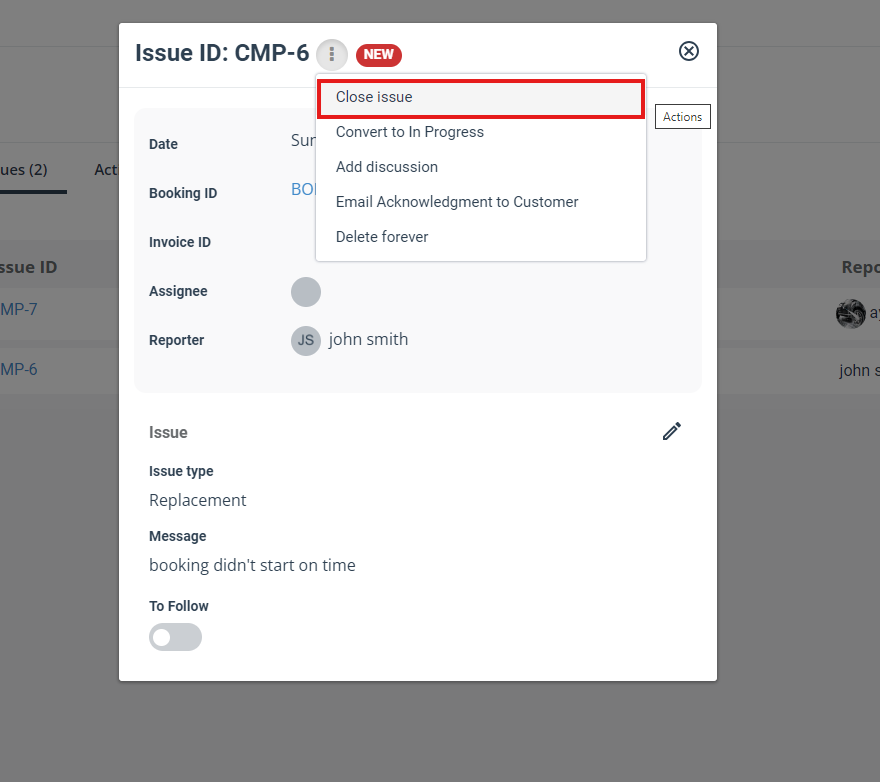
– Once the fix is complete, change the issue to Awaiting Approval (for managerial sign-off) or Closed if no further review is needed. From the issue details page click on the “Actions” button, then select “Close issue”.
- Follow Up & Gather Feedback
– Send a brief satisfaction survey or call the customer to confirm resolution.
– Log feedback in the issue record for future quality improvements.
– Use “To Follow” dates to revisit deferred repairs and prevent repeat complaints.
Edit · Reopen · Delete
Keeping complaint data accurate—while preserving a full audit trail—underpins every recognised service-management and quality standard, from ISO 10002 to ITIL and GDPR. OctopusPro therefore gives admins three tightly-controlled actions: Edit, Reopen and Delete. The matrix below shows how they work:
| Action | Quick Path | Effect | Typical Use Case |
|---|---|---|---|
| Edit | Issues › search / list › open CMP-ID › 🖉 Edit | Updates Type, Description, Follow-Up flag or Deferred Date; change is time-stamped and notified to watchers | Clarify customer notes, attach new photos, reschedule follow-up |
| Reopen | Issues › Closed › open ID › Actions › Reopen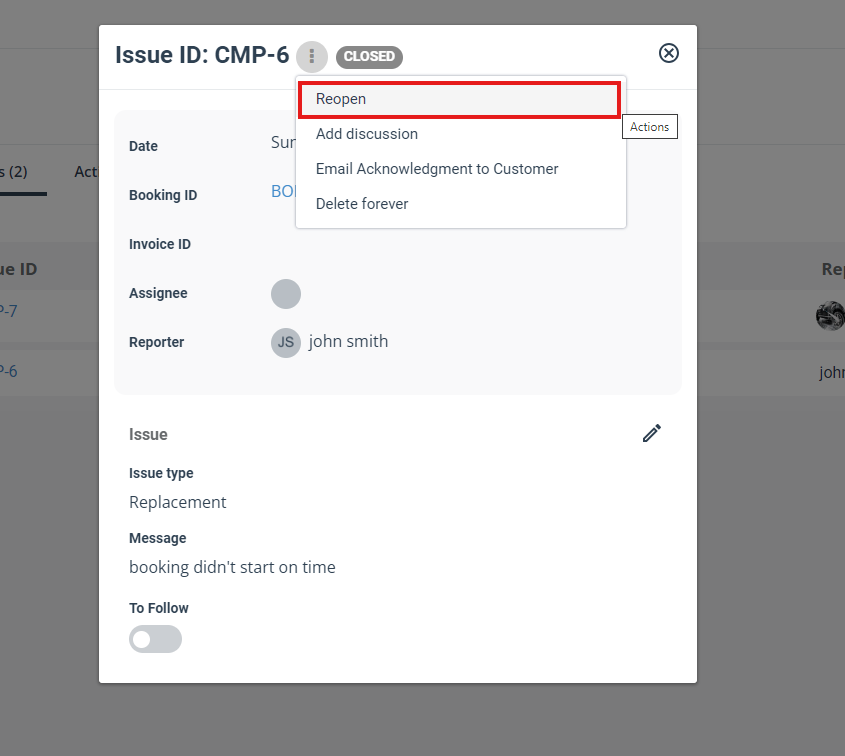 |
Status ↩︎ In Progress; “Payment Withheld” resets until issue is closed again | Customer reports fix failed or admin finds evidence incomplete |
| Delete (Admin only) | Issues › open ID › Actions › Delete Forever | Irreversible erasure of record + attachments; notifies assigned users | Duplicate/test ticket, GDPR “right to erasure”, confidential data entered in error |
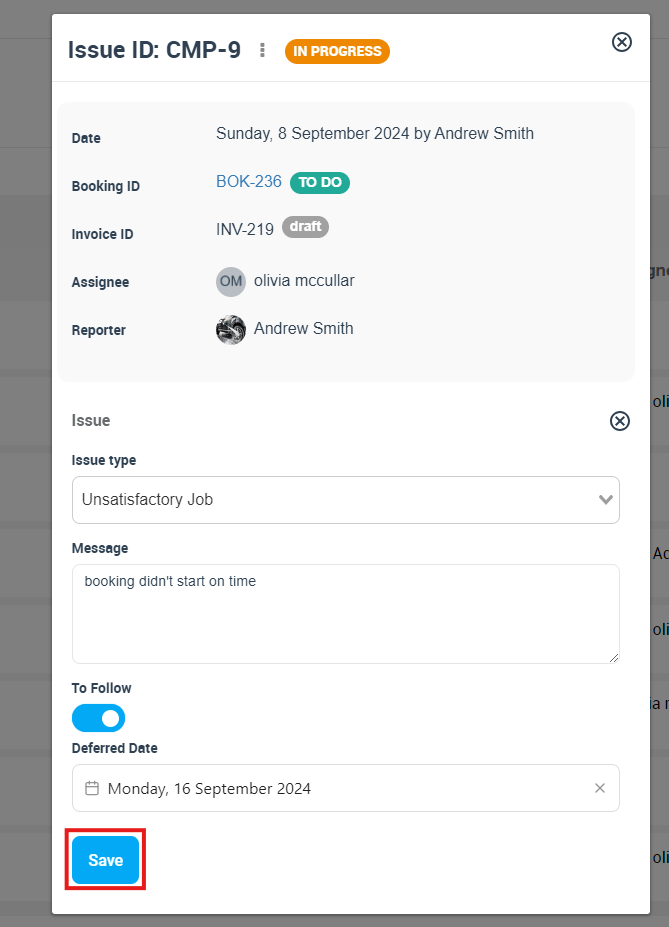
How to edit an issue
- Locate the ticket: Issues > All Issues or paste the CMP-ID in the search bar.
- Open the record and click the Edit (pencil) icon.
- Adjust any of the following fields:
- Issue Type – choose another category (customised in Settings > Issue Types).
- Description – refine wording or add extra detail.
- Follow-Up Required – toggle to flag or clear future attention.
- Deferred Date – pick a new review date.
- Save. OctopusPro logs the change, updates the timeline and pushes notifications via email, SMS or in-app alerts, ensuring transparency and traceability.
Best practice tip: Restrict edit rights to a defined admin role and use audit-log notifications to spot questionable changes early.
Why controlled deletion matters
- Regulatory compliance: GDPR grants customers a lawful “right to be forgotten”; when exercised, data must be purged completely.
- Contract leverage: Retaining only valid, active complaints keeps KPI dashboards and payment-withhold rules accurate.
- Data hygiene: Removing test or duplicate tickets prevents skewed metrics and clutter.
Once deleted, a complaint cannot be recovered—export or capture any required evidence first.
Fast examples
| Use-case | Flow | Outcome |
| HVAC gas leak | Customer reports via portal → Issue auto-emails receipt → Office schedules return visit → Tech uploads fix photos → Admin closes & releases pay. | SLA met, payment protected until proof provided. |
| Cleaning miss-spot | CSR logs from calendar call-in → Payment withheld → Tech back next day → Issue resolved & customer delighted. | Saved customer, avoided refund. |
One-click Acknowledgement Emails – reassure customers the moment an issue lands
In a nutshell: OctopusPro can fire off an automatic acknowledgement email the moment an issue is logged—whether the ticket was created by an admin or by the customer in their portal—so the customer instantly sees that you’ve received their complaint, know who’s handling it, and roughly when to expect an update. Industry research shows that a personalised receipt issued within 24–48 hours measurably boosts trust and lowers the odds of escalation.
Why Acknowledgement Emails Matter
- Defuses anxiety and prevents “ticket chasing.” Customers feel heard the moment they see a receipt, reducing repeat calls, negative reviews or social-media complaints.
- Sets clear expectations. Acknowledge receipt, name the next milestone (e.g., “expect a detailed reply within two business days”) and you comply with complaint-handling standards many regulators now expect.
- Improves satisfaction scores. Personalised sign-offs (“Regards, Sarah – Service Desk Lead”) are shown to lift CSAT versus anonymous notices.
How OctopusPro Sends Acknowledgement Emails
Automatic vs Manual Sending
| Flow | When to use | Steps |
|---|---|---|
| Automatic | Every time an issue is created or imported | 1. Create/receive issue → pop-up shows pre-filled Complaint Acknowledgement template.
2. Click Send; email is queued, logged on the issue timeline and the SLA clock starts. |
| Manual | Resend after edits or send later if auto-send was disabled | 1. Issues › All › open the CMP-ID.2. Actions › Email Acknowledgement to Customer.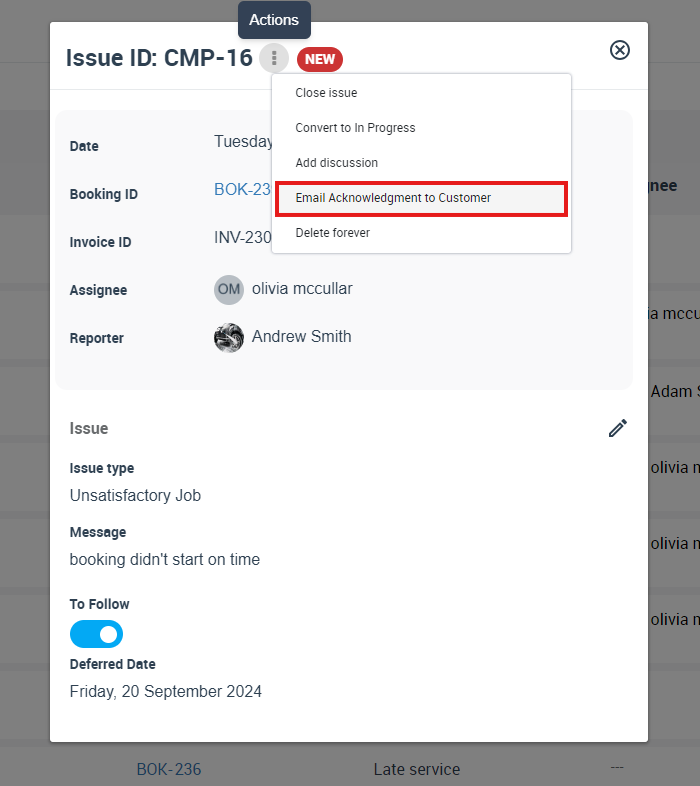
3. Preview (live merge-tags like {customer_first_name}), then Send. Example: A plumbing firm adds leak photos; they manually resend so the customer sees the new reference. |
Automated confirmations within 24–48 h are proven to prevent complaint escalation.
Customising the Acknowledgement Template
- Settings › Communications › Templates & Canned Responses.
- Search Complaint Acknowledgement Email.
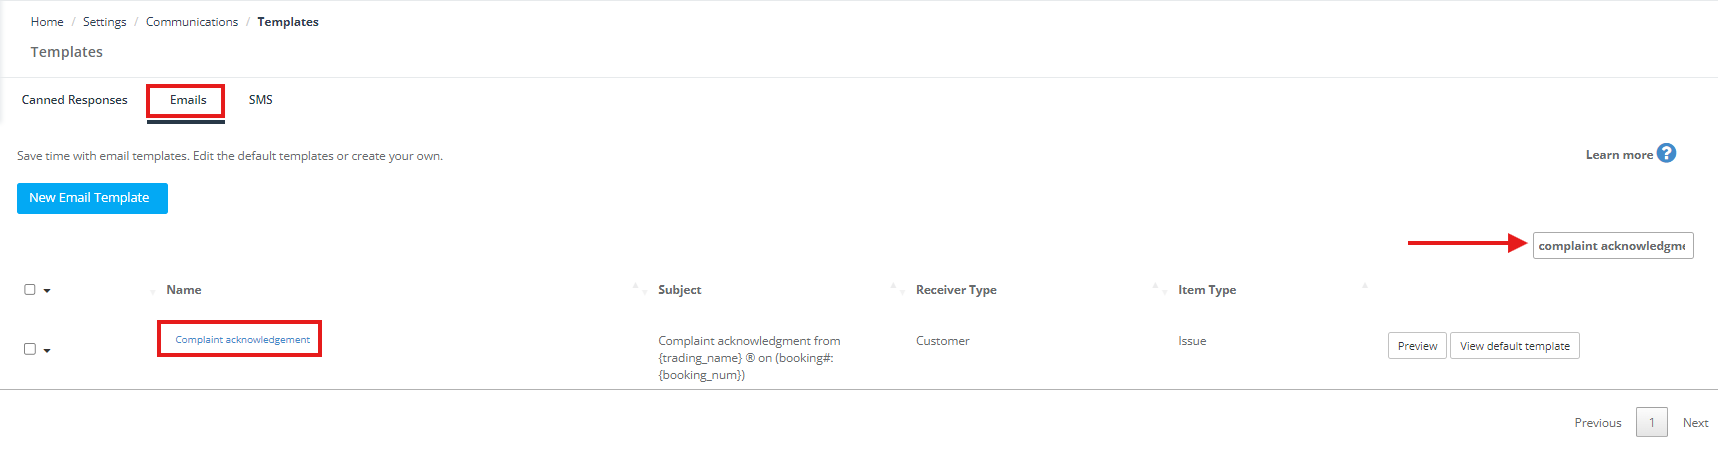
- Edit:
- Text blocks (tone, next-step promise, SLA).
- Branding (logo, colours, social links).
- Attachments (PDF guide, warranty T&Cs).
- Merge-tags for names, ID, agent signature (personalisation lifts open-rates and perceived empathy).
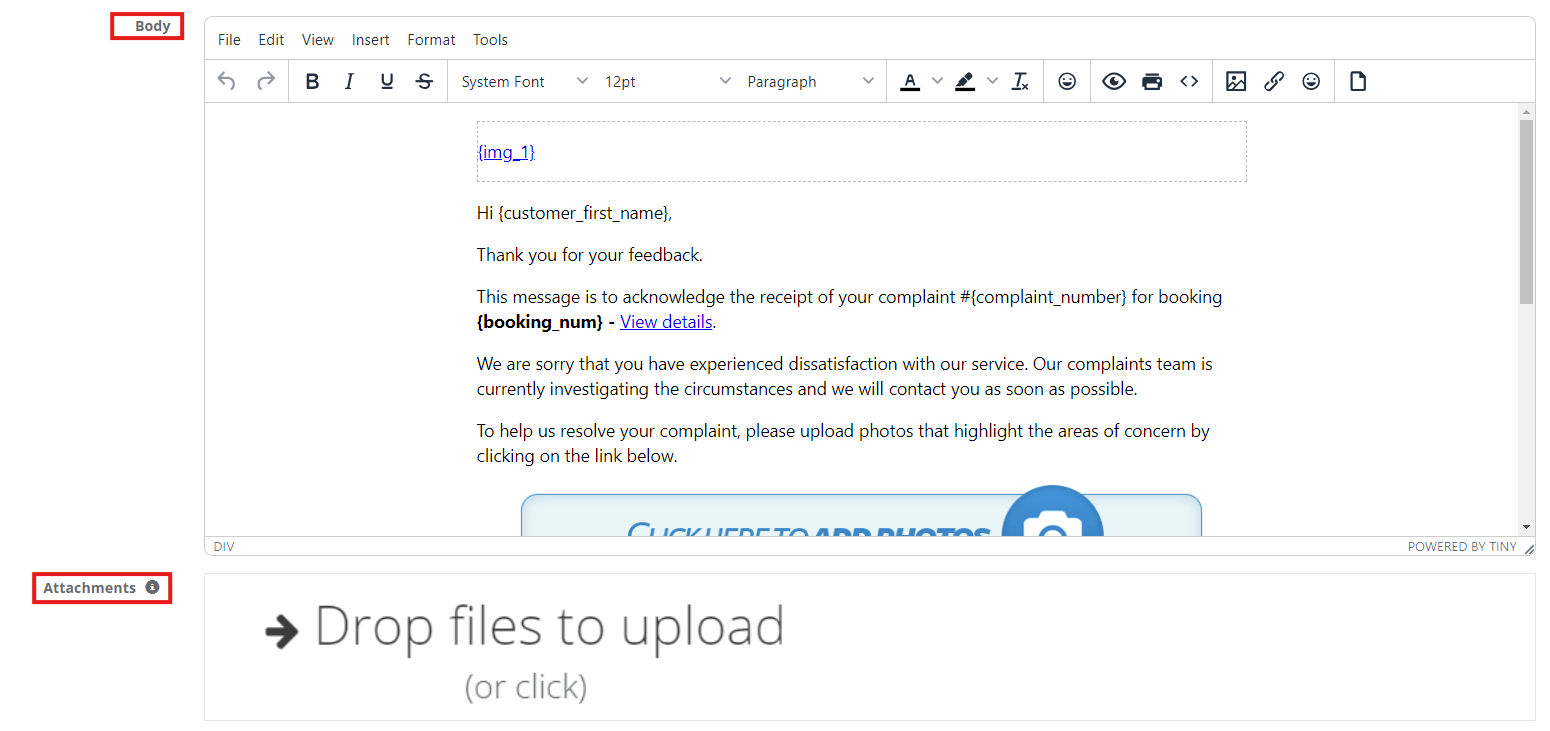
- Save—all future sends use your version.
Tip: Keep the subject line concise—e.g., “We’ve received your complaint #{complaint_number}” — this avoids spam filters and clarifies purpose.
Other Built-In Complaint Emails
| Template | Purpose | Typical tweak |
|---|---|---|
| Complaint Acknowledgement | Confirms receipt, sets expectations. | Adjust greeting, add SLA promise. |
| Send Complaint Details | Restates number, type, comments, discussion link. | Add troubleshooting checklist. |
| Final Complaint Resolution | Confirms issue closed and no further action. | Insert satisfaction-survey link. |
| Open Complaints Reminder | Nudges fieldworker to act on pending issues. | Change urgency language or escalation path. |
All templates use the same editor; edits preserve merge-tags and audit history. Centralising message control ensures consistent, brand-safe communication, a key ISO 10002 recommendation.
Use-Case Highlights
| Sector | Typical Issue | Benefit of Instant Acknowledgement |
|---|---|---|
| Home Cleaning | Missed appointment | Reassures client someone is rescheduling; prevents negative review. |
| HVAC & Trades | Warranty call-back | Shows job ID and ETA so customer doesn’t ring dispatch repeatedly. |
| SaaS / Online Coaching | Billing error | Confirms ticket logged, links to status page; lowers churn risk. |
| Medical Transport | Driver late | Gives hotline number and escalation path, meeting ISO 9001-style service rules. |
By integrating automatic—and fully customisable—acknowledgement emails into your complaint workflow, you signal professionalism, manage expectations, and free support staff from repetitive “just checking you got my email” follow-ups. In short, it’s a low-effort, high-impact win for customer satisfaction and team efficiency.
Real-world wins
| Sector | Pain-point | OctopusPro outcome |
| HVAC | Warranty leak reported post-install | Fieldworker notified, uploads fix photos; admin approves, invoice auto-adjusts. |
| Cleaning | Client finds missed area | Customer portal complaint triggers same-day revisit; payment withheld until closure. |
| Landscaping | Broken sprinkler head | Fieldworker adds replacement cost inside issue; admin invoices variation without data re-entry. |
To stay updated, please subscribe to our YouTube channel.