
[vc_row][vc_column width=”1/4″][vc_widget_sidebar sidebar_id=”sidebar-1″][/vc_column][vc_column width=”3/4″][vc_column_text]
Connect Google Analytics (GA4) to Your OctopusPro Customer Portal
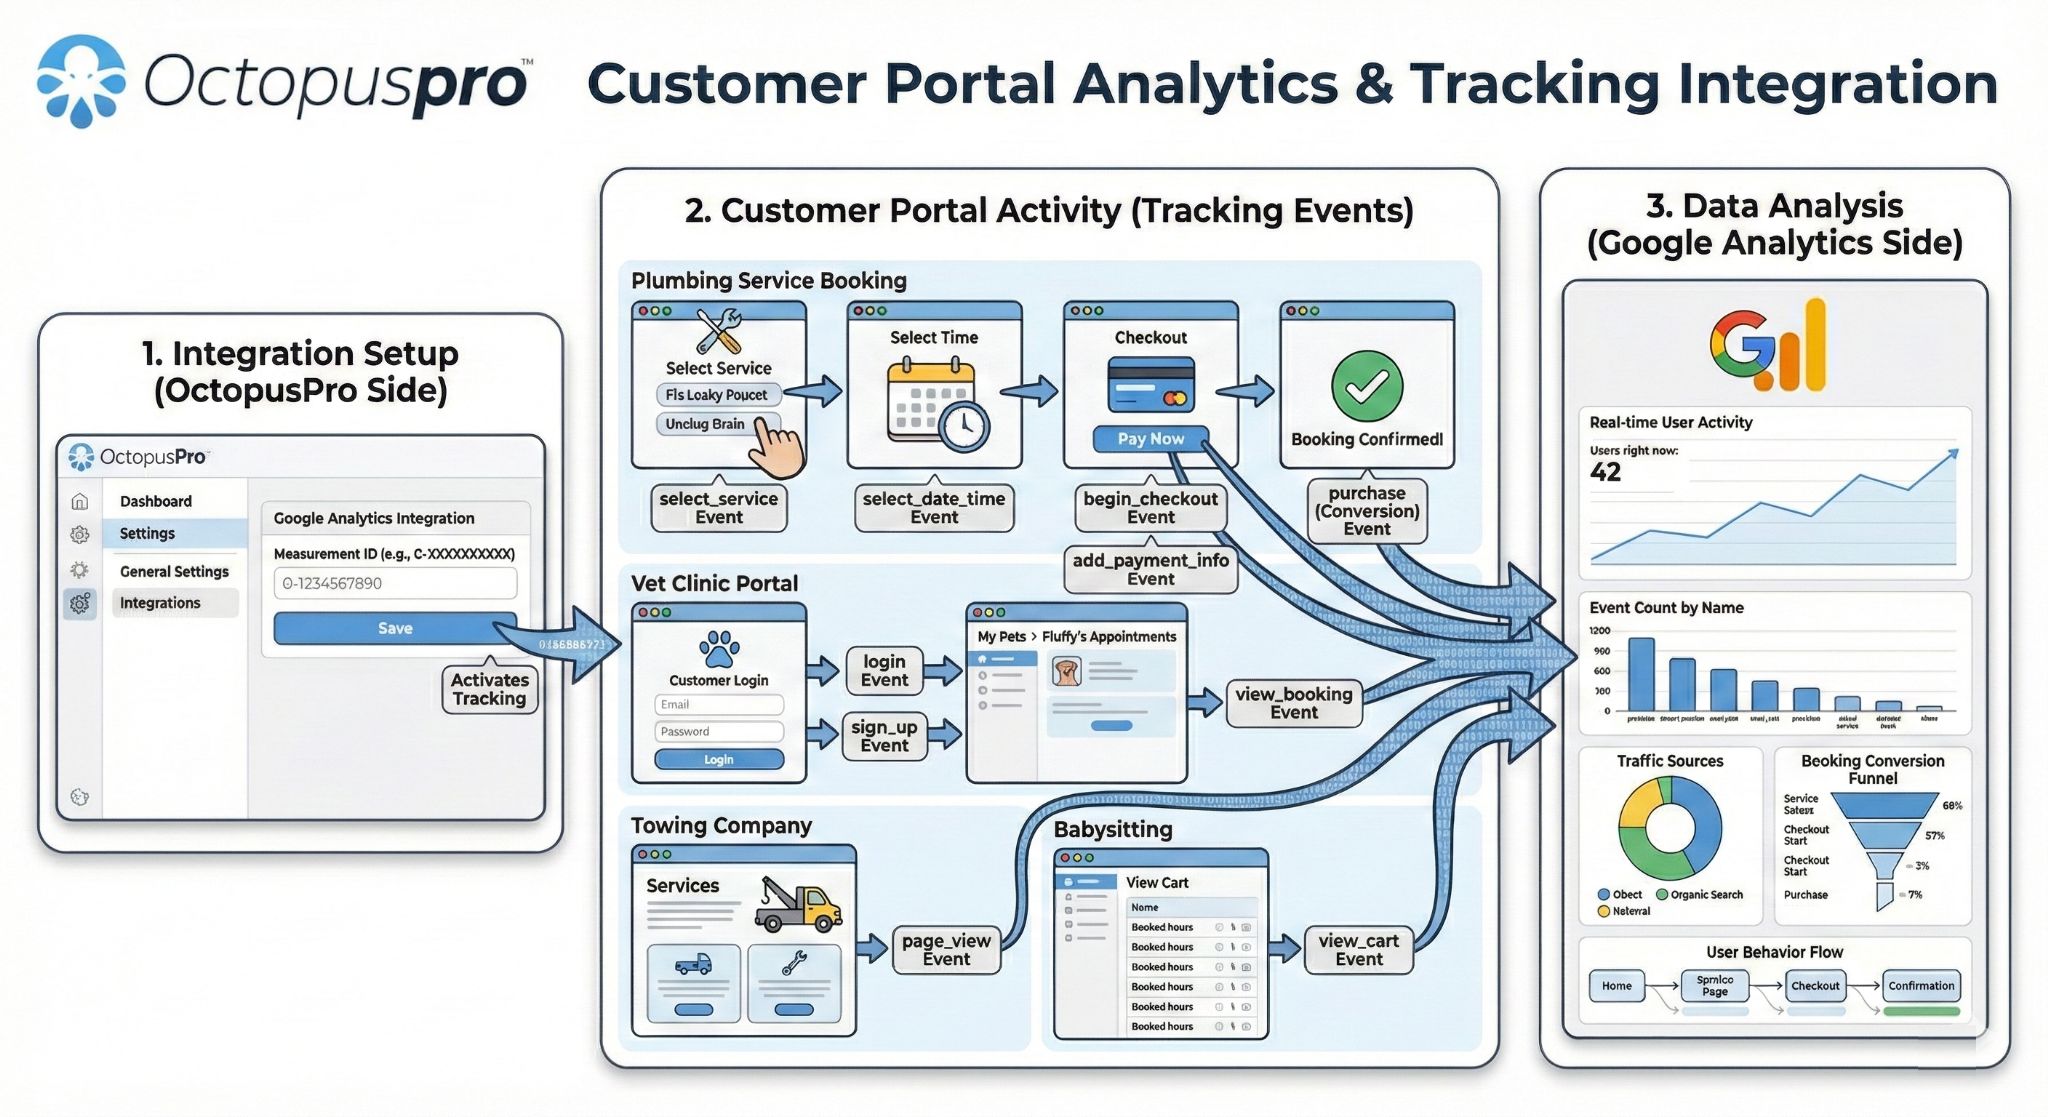
Connect Google Analytics 4 (GA4) to your OctopusPro Customer Portal to track where portal visitors come from, what pages they view, and which journeys lead to outcomes like online bookings, quote requests, and payments. Once enabled, OctopusPro automatically injects your GA4 tracking tag across Customer Portal pages—so you can start collecting analytics data without editing portal code.
On this page
- What this integration does
- Why connect GA4?
- Before you start
- One-time setup (step-by-step)
- Verify data is flowing
- Measuring conversions (bookings, quotes, payments)
- Campaign tracking with UTMs
- Best practices
- Privacy & consent notes
- Troubleshooting
- Related guides
What this integration does
When you paste your GA4 Measurement ID into OctopusPro, your Customer Portal loads GA4 tracking so Google Analytics can record visitor activity such as:
- Traffic sources (Google Ads, organic search, social, referral links, email/SMS campaigns)
- Page views across portal pages (service pages, booking flow pages, customer account areas)
- Engagement metrics (sessions, engaged sessions, time on site)
- User paths (how visitors move through your portal before taking action)
Note: GA4 uses a Measurement ID in this format: G-XXXXXXXXXX. Universal Analytics (UA) tracking IDs are legacy and are not the standard for new tracking setups.
Why connect GA4?
GA4 helps you make data-driven decisions about marketing and your online booking experience. Typical benefits include:
- Measure marketing ROI: see which channels and campaigns drive portal traffic and engagement.
- Improve conversions: identify where users drop off during service browsing, booking steps, or checkout.
- Optimize portal pages: learn which services/pages perform best and where customers spend time.
- Build remarketing audiences: create audiences like “visited but didn’t complete booking” (in GA4/Google Ads).
Before you start
- Google Analytics access: You’ll need access to a GA4 property (Admin access recommended).
- Decide how you want to track:
- Dedicated GA4 property for the Customer Portal (cleanest reporting), or
- Single GA4 property used for both your marketing website and portal (works well if configured carefully).
- Know your portal URL/domain: especially if you use a custom domain or subdomain for the portal.
One-time setup (step-by-step)
Step 1 — Create (or open) your GA4 property
In Google Analytics, create a GA4 property (or use an existing one). If you want separate reporting for the portal, create a dedicated property for the Customer Portal.
Step 2 — Copy your GA4 Measurement ID
In GA4 go to:
Admin → Data Streams → select your Web data stream → copy the Measurement ID (starts with G-).
Step 3 — Paste the Measurement ID into OctopusPro
In OctopusPro go to:
Settings → Customer Portal → General Settings → Analytics & Tracking (Google Analytics section)
Paste your GA4 Measurement ID, then click Save.

Step 4 — Test your portal
Open your Customer Portal in a new browser tab (or an incognito window) and browse a few pages. For a stronger test, complete a short journey such as: browse services → start a booking → proceed through steps (where possible).
Verify data is flowing
- GA4 Realtime: Go to Reports → Realtime and confirm at least one active user after you load your portal.
- Optional (recommended): Use Google’s Tag Assistant (Chrome extension) to confirm GA4 is detected on portal pages.
- Optional (advanced): If you enable debug mode via Tag Assistant, events can be inspected in Admin → DebugView.
Measuring conversions (bookings, quotes, payments)
GA4 is excellent for understanding portal traffic and user journeys. To measure outcomes as “conversions”, use one (or both) of these approaches:
- GA4 Key Events (Conversion Events): Define a key event in GA4 that represents success (for example, reaching a confirmation/thank-you step or a specific portal action), then mark it as a Key event in GA4.
- Use platform-specific conversion tags: If you run paid advertising, use dedicated conversion tracking for best attribution and bidding:
Practical examples:
- Home services: track “booking confirmed” as a key event and compare performance by suburb/service category.
- Clinics/consultations: track “appointment request submitted” and analyze drop-offs by service type.
- Trades with quotes: track “quote request submitted” and measure which campaigns generate the highest-quality leads.
Campaign tracking with UTMs
To accurately attribute portal traffic to marketing campaigns (email, SMS, QR codes, social posts, paid ads), add UTM parameters to links that point to your Customer Portal.
Example:
https://YOURPORTALDOMAIN.com/?utm_source=newsletter&utm_medium=email&utm_campaign=winter_special
- utm_source = where the traffic comes from (e.g., google, facebook, newsletter)
- utm_medium = channel type (e.g., cpc, email, sms, social)
- utm_campaign = campaign name (e.g., spring-clean, EOFY, referral-promo)
Best practices
- Exclude internal/staff traffic: filter office testing so reports reflect real customer behaviour.
- Use a clean test browser: ad blockers/privacy extensions can block tracking (incognito helps).
- Separate website vs portal reporting (optional): if your marketing website and portal are different domains/subdomains, consider using separate GA4 streams (or a dedicated GA4 property) for clearer analysis.
- Combine analytics + ad conversion tracking: GA4 is great for insight; ad conversion tags are best for ad optimization and bidding.
Privacy & consent notes
Google Analytics may use cookies/identifiers and can be subject to privacy rules depending on your region. Consider the following:
- Update your Privacy Policy to disclose analytics usage.
- Use a cookie consent approach where required (for example, GDPR-style consent requirements).
- Avoid sending sensitive personal data to analytics platforms.
Troubleshooting
- No users in GA4 Realtime: confirm the ID starts with G-, remove spaces, click Save again, then refresh the portal.
- Still nothing showing: test in an incognito window, and temporarily disable ad blockers or tracking protection.
- Wrong property/stream: confirm you copied the Measurement ID from the correct GA4 web data stream.
- Seeing staff activity as “customers”: set up internal traffic filters in GA4.
Related guides
- Customer Portal General Settings
- Customer Portal SEO Meta Tags (Meta Title & Meta Description)
- Accept Online Bookings Through Your Website (Customer Portal Setup)
- Google Ads Conversion Tracking (Customer Portal)
- Meta Pixel Integration (Customer Portal)
To stay updated, please subscribe to our YouTube channel.
[/vc_column_text][/vc_column][/vc_row]