
Automate sending reminders and confirmations to your customers and fieldworkers via email, SMS
OctopusPro enables you to automate a wide variety of reminders, notifications, and confirmations for both customers, sub-customers, and fieldworkers via email, SMS, WhatsApp, and in-app push notifications. By automating these workflows, you can drastically reduce manual follow-ups, improve operational efficiency, and ensure everyone gets the right information at the right time.
Table of contents:
- How to send email and SMS reminders to sub-customers added through customer properties?
- How to activate or deactivate automations for customers?
- How to activate or deactivate automations for fieldworkers?
- How to change the frequency, date and time of an automation?
- How to manually run an automation?
- How to view an automation’s description?
- How to view or edit email templates?
- How to view or edit SMS templates?
- How to create new automation and templates that don’t currently exist?
Examples of Automations Available
-
Administrative & Internal Processes
- Twilio Old Call Recording Cleanup
Automatically delete older call recordings to free up storage and manage costs. - Billing Cycle Invoice Locking
Enforce invoice locking once billing cycles end, preventing late edits.
- Twilio Old Call Recording Cleanup
-
Customer-Focused Automations
- Overdue Invoice Reminder
Remind customers of any unpaid invoices to encourage prompt payment. - Inquiry Contact Attempt Notification
Alert customers who haven’t been contacted yet to follow up on their inquiry. - Deposit Payment Reminder for Upcoming Bookings
Prompt customers to pay deposits before their scheduled services. - Abandoned Cart Follow-Up
Re-engage customers who left your booking or checkout process without completing. - Pending Quote Follow-Up
Remind customers who received a quote but haven’t yet confirmed. - Welcome Follow-Up for New Customers
Greet new customers with a welcome message and helpful info. - Discount Voucher Distribution & Follow-Up
Send promotional codes to customers and prompt them to redeem. - Photo Request Reminder for New Inquiries / Upcoming Bookings
Ask customers for photos that help clarify job requirements. - Service Due Reminders for Recurring Appointments
Let customers know when regular or repeat services are approaching. - Upcoming Booking Reminders (e.g., 1 day, 2 days, 3 days, 1 week before)
Ensure customers are ready for upcoming appointments. - On-Hold Booking Follow-Up
Remind customers to confirm or reschedule bookings placed on hold. - Customer Booking Feedback Request
Ask for reviews or ratings after the service is completed. - Daily Customer FAQ Email
Send relevant FAQs to customers who recently inquired or booked. - Promo for Recent Customers
Nurture loyalty by automatically sending special offers to new or recent clients. - Quote Reminder
Nudge customers with pending quotes to take action. - Rate Your Service
Request feedback or ratings post-service to gauge satisfaction.
- Overdue Invoice Reminder
-
Fieldworker-Focused Automations
- Fieldworker Invitation Acceptance Reminder
Prompt newly invited fieldworkers to complete their account setup. - Fieldworker Booking Reminders
Notify fieldworkers about upcoming jobs (1 day, 2 days, 3 days, 1 week, or next-day). - On-Hold Booking Follow-Up
Let fieldworkers know when a job is on hold and needs attention. - Fieldworker Complaint Follow-Up
Remind fieldworkers of unresolved customer complaints requiring action. - Before & After Photo Reminder for Completed Bookings
Make sure fieldworkers capture essential photos for proof of work or quality checks. - Fieldworker Re-Engagement Invitation
Invite inactive fieldworkers back to take on new jobs. - Fieldworker Compliance & Operational Checklist Reminder
Prompt them to follow best practices and protocols to minimize complaints. - Customer Complaint Prevention Checklist
Provide tips or checklists to fieldworkers, reducing the chance of complaints. - Fieldworker Address Completion Request
Remind them to update missing or incomplete profile details. - Fieldworker Working Hours Review Reminder
Ensure their availability remains accurate to avoid scheduling conflicts. - Fieldworker Calendar Unavailability Prompt
Ask fieldworkers to block out times they’re unavailable. - Fieldworker Profile Completion Prompt
Urge them to finish setting up their profile for better job matching. - Fieldworker Insurance Compliance Reminder
Alert them before licenses or insurances expire. - Fieldworker License Expiry Reminder (14 Days Prior)
Provide a two-week notice for license renewal. - Invitation to Join Team Reminder
Nudge prospective or unresponsive fieldworkers to finalize sign-up and start receiving work.
- Fieldworker Invitation Acceptance Reminder
Activating & Customizing Automations
- Enable/Disable: You can turn each automation on or off anytime.
- Frequency & Timing: Adjust how often an automation runs (daily, weekly, monthly, specific days/times).
- Template Editing: Modify email/SMS/WhatsApp templates to align with your branding, tone, and message.
- Integration: Combine with push notifications in your OctopusPro app for a multi-channel approach.
Why Automate?
- Save Time: Eliminate repetitive manual follow-ups.
- Reduce Errors: Automated reminders minimize the risk of forgetting critical tasks or deadlines.
- Improve Engagement: Ensure customers and fieldworkers get timely information and don’t miss opportunities.
- Enhance Professionalism: Consistent, well-timed messages reflect positively on your brand.
For example, you can activate an automated procedure to send out booking reminders on the 15th and 30th day of every month at 11:30 AM to all the customers who have bookings put on hold, you can then rely on OctopusPro to automatically send out the reminders on the scheduled times without the need for manual action.
By leveraging these automations, you can provide a better experience for both customers and fieldworkers, keep your operations running smoothly, and free up your team to focus on more strategic tasks.
Communicating with Sub-Customers and Third-Party Billers
Some businesses involve multiple contacts in a single booking. For example, a primary customer might be an agency, while the actual service recipient is a sub-customer, or an insurance company might pay the bill on behalf of the end client.
How to Enable Communication with Sub-Customers or Third-Party Contacts
-
Activate Sub-Customer Communication
- Navigate to Settings > Communications > Automations and look for the toggle labeled “Communicate with sub-customers added through customer properties.”
- Choose whether to send notifications (emails/SMS/etc.) to both the primary referrer and the sub-customer or only to the sub-customer (or third-party contact).
-
Configure Customer Properties
- Go to Settings > General Settings > Customer Properties to manage sub-customer or third-party billing fields.
- OctopusPro may have some defaults (e.g., Bill Payer, Vehicles, Children, Students) but they’re disabled by default. You can activate these or create new ones to suit your business model (e.g., Insurance Info, Agency Details).
- Ensure the property fields collect key details like email or phone for direct notifications.
-
Apply These Fields to Bookings
- When adding or editing a booking, link the relevant property (such as “Bill Payer” or “End Client”) so OctopusPro knows who should receive each communication.
-
Automations & Notification Settings
- For each relevant automation (e.g., invoice reminders, booking confirmations), confirm that the system includes or excludes the third-party contact per your preference.
Real-World Examples
- Insurance Bookings: Insurance pays the invoice, but the policyholder (sub-customer) also needs job updates.
- Agency/Broker Services: The agency is the primary client, but the actual job site belongs to someone else. You can notify both or just the end recipient.
- Corporate or Government Entities: A company or department handles payments while individual employees or beneficiaries get the booking details.
By activating sub-customer (and third-party) communication, you make sure all necessary parties—be they agencies, insurance providers, or actual service recipients—stay informed in real time.
Please note that:
- To be able to activate automation, you have to be on a paid subscription plan. To check your account subscription, go to Your subscription from the bottom of the side menu on the left, and to know more about how to subscribe click here.
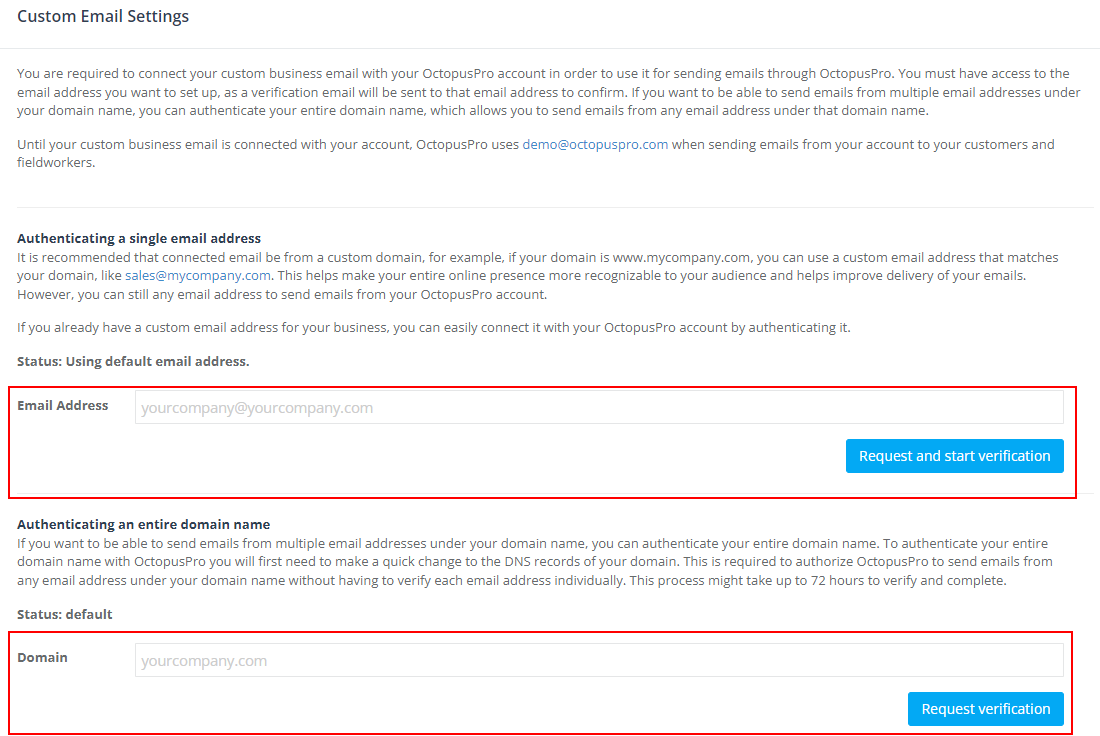
- You must also have a custom email to be able to send automated emails using it.
- To add a new custom email go to Settings > Communication > Custom email settings from the side menu on the left.
- You will be redirected to the custom email settings page where you can add the email you want to be used, or verify your entire domain name to be able to use multiple email addresses.
How to send email and SMS reminders to sub-customers added through customer properties?
From the admin user web view go to Settings > Communications > Automations, you will be redirected to the automations page.
Activate the toggle button if you want to send email and SMS reminders and notifications to the contact details of sub-customers added through customer properties.
- For example, jobs booked through agencies, insurance companies, and other types of businesses where the actual work is booked for their clients which they pass onto you, and where you are required to send reminders and notifications directly to their clients to keep them informed. In these cases, your customer would be the job referrer, like an agency or an insurance company, and the end customer that is receiving the service would be the sub-customer that is added through the customer properties feature.
- If you wish to communicate with the sub-customers added to your client’s bookings, you can create new fields in your customer properties settings to hold their contact details, using the email or phone field types, so it can be used in manual and automated communications between you and your clients.

How to activate or deactivate automations for customers?
- From the admin user web view go to Settings > Communications > Automations, you will be redirected to the automations page.
- In the ‘Recipient’ column you can view ‘customer’ and select email related it .
- Use the toggle button to activate or deactivate the scheduled job you want.
- You can search for added cronjob names using the search bar on the top right.

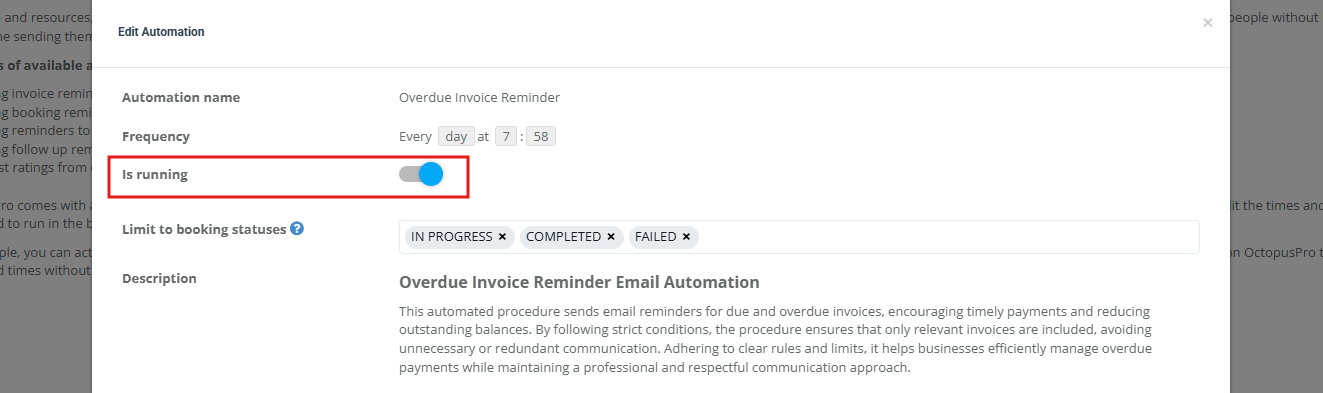
- When you click on the cronjob name, a pop-up window will appear showing the status of the scheduled job if it is running or not, when it will be sent to the customers, and the description of the scheduled job to know how to use it.
How to activate or deactivate automations for Fieldworkers?
- From the admin user web view go to Settings > Communications > Automations, you will be redirected to the automations page.
- Select the email related to the Fieldworker .
- You can search for added cronjob names using the search bar on the top left.
- Use the toggle button to activate or deactivate the scheduled job you want.

- When you click on the cronjob name, a pop-up window will appear showing the status of the scheduled job if it is running or not, when it will be sent to the customers, and the description of the scheduled job to know how to use it.

How to change the frequency, date and time of an automation?
- You can change how many times and when should the scheduled job should be sent to your customers. Go to Settings > Communications > Automations, you will be redirected to the automations page, then click on Edit under the ‘Frequency’ column.

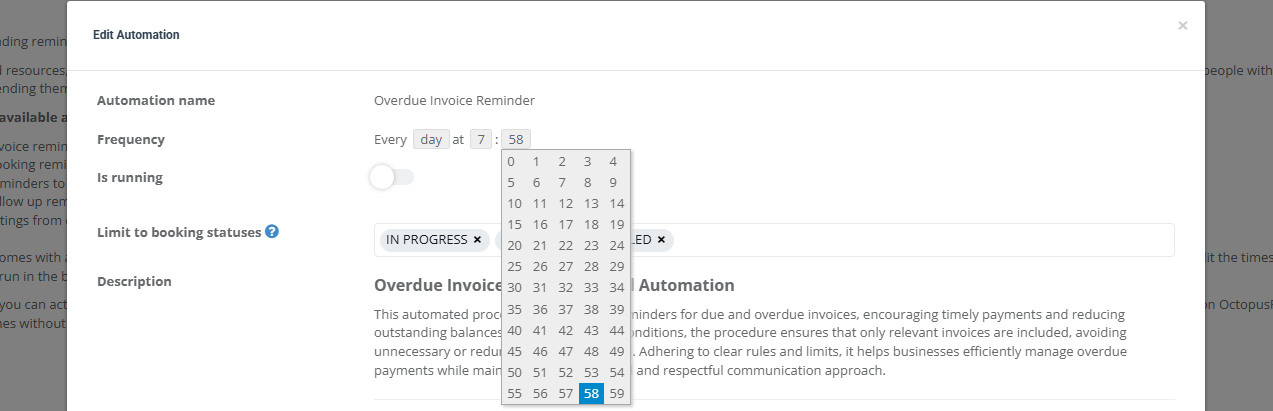
- A pop-up window will appear, you can select the frequency, dates, and time of the scheduled jobs.
-
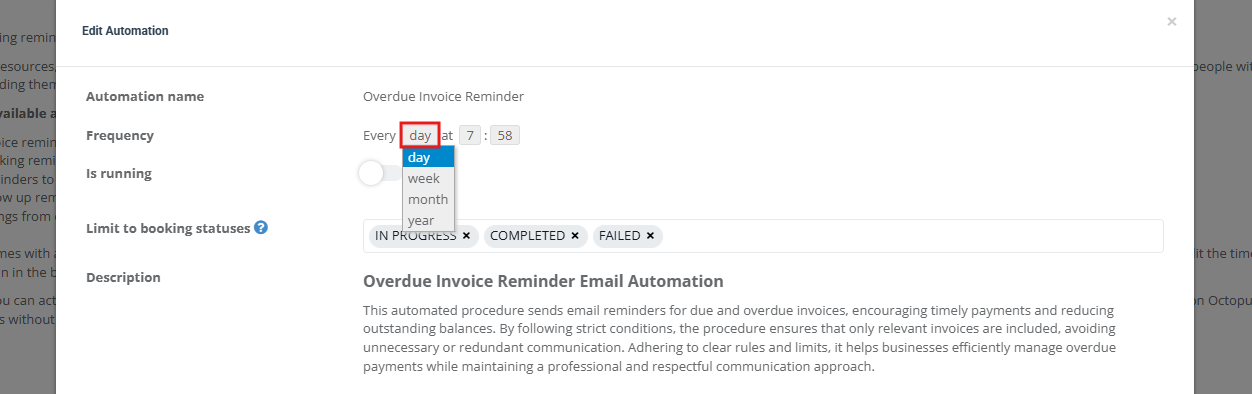
- First, select if you want the task to be automated every day, week, month or year.
-
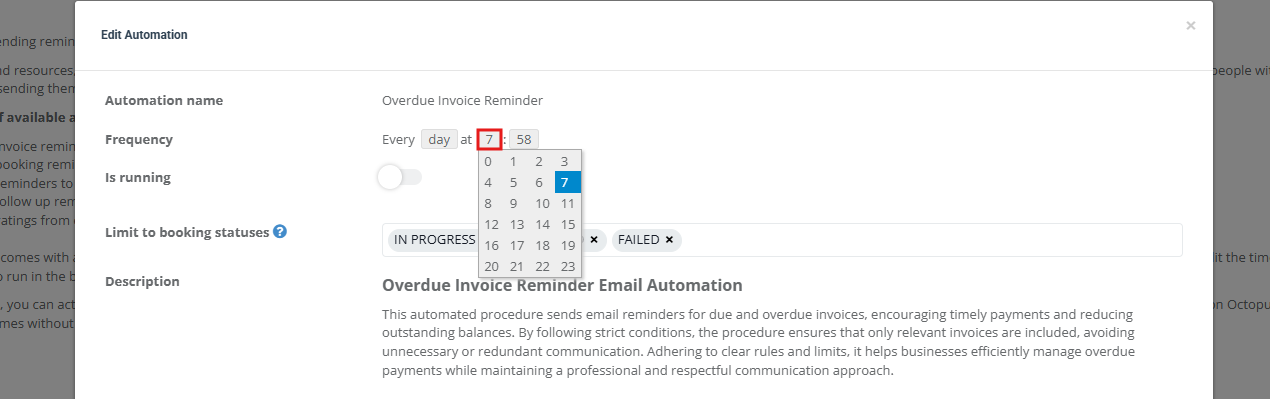
- Then, select an hour or multiple hours. For example: when you select 7 and 8 that means it will run the scheduled job at 7 am and 8 am.
-
- You can then select the minutes according to the hours selected, for example: when you select 58 , that means that the scheduled jobs will run at 7:58 am , so whenever you add hours and minutes it will be added with the same order.
-
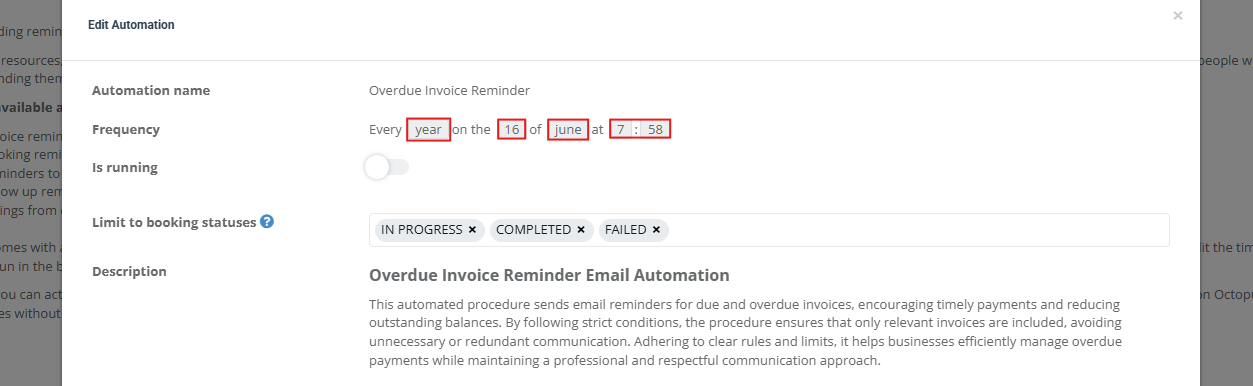
- If you select year then select your preferred day and month or multiple months then select hour/s and minute/s. For example: here the task will be automated every year on the 16th of June at 7:58 ,then click on ‘Save’.
How to manually run an automation?
- You can run an automation manually when you want to send it to a customer, go to Settings > Communications > Automations.
- You will be redirected to the automations page, click on ‘Run now’. The automation will be sent at the same time for only one time.

How to view an automation’s description?
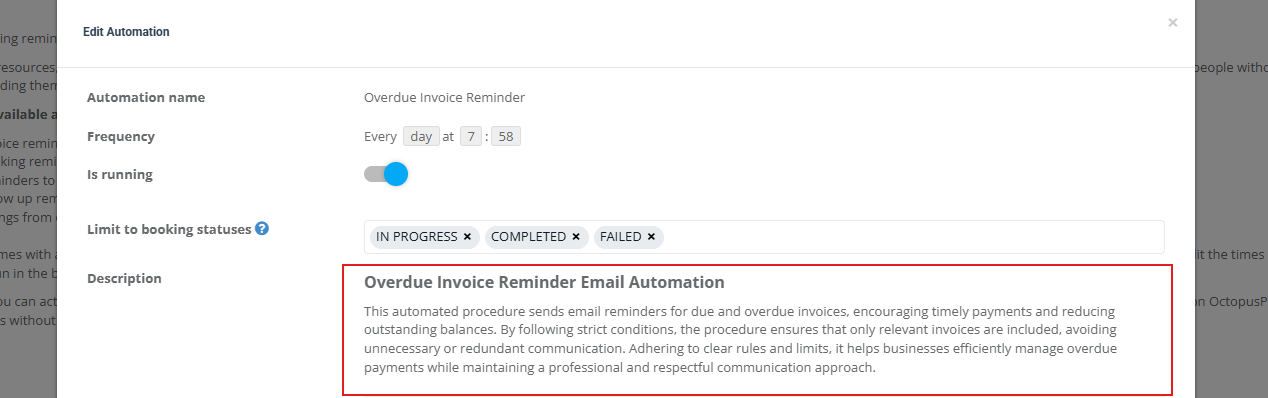
- Go to Settings > Communications > Automations, you will be redirected to the automations page. Click on ‘cronjob Name’ to view the automation’s description.

- A pop-up window will appear describing the selected task and how to use it effectively.
How to view or edit email templates?
- Email template is the email that will be sent to the customer or fieldworker when the scheduled job is activated, you can view and edit it by clicking on the Email template button, you will be redirected to the edit email templates page where you can easily edit the email template.
- To know more about how to edit email templates click here.

How to view or edit SMS templates?
- SMS template is the SMS that will be sent to the customer or fieldworker when the scheduled job is activated, you can view and edit it by clicking on the SMS template button, you will be redirected to the edit SMS templates page where you can easily edit the SMS template.
- To know more about how to edit SMS templates click here.

How to create new automation and templates that don’t currently exist?
You can request new automations or templates by sending an email to our support and write your detailed request and one of the support team will personalize it for you.
To stay updated please subscribe to our youtube channel.