How to Change/Edit Existing Invoice Number
In this guide, we’ll walk you through the process of changing or editing invoice numbers in OctopusPro. Not only will we explore use cases, benefits, and impacts on synced items with accounting platforms like Xero and QuickBooks, but we will also delve into the process of setting a starting number for your bookings, estimates, invoices, and inquiries. This feature, although not frequently needed, can be required for certain business scenarios. Dive in to understand the step-by-step process, when and why you might need it, and how it helps to streamline your operations.
Functionality
Invoice numbers in OctopusPro are typically automatically generated in a sequential manner for easy tracking and organization. This not only minimizes errors but also maintains consistency and uniformity. However, the platform offers flexibility by allowing users to manually change or edit an invoice number.
Use Cases
- Changing Business Operations: If your business operations change and the old invoice numbers don’t align with your new system, you might need to edit the invoice numbers.
- Company Merger: In case of a company merger or acquisition, the need to maintain a new sequence of invoice numbers could arise.
- Implementing New Accounting Practices: If you’re implementing new accounting practices or switching to a new accounting system that requires a different style of invoice numbering, you’ll find this feature useful.
- Correcting Errors: If a mistake was made in the automatic numbering sequence, this feature will allow for the correction of such errors.
Benefits
- Customization: The ability to change invoice numbers means you can customize them as per your specific requirements.
- Consistency: If you’ve recently migrated to OctopusPro from another system and want to maintain the existing invoice numbering sequence, this feature will be extremely useful.
- Error Correction: If an error occurs during invoice generation, editing the invoice number can help rectify it.
Adding a Starting Number for Your Bookings, Estimates, Invoices, and Inquiries
OctopusPro allows you to add a starting number for your bookings, estimates, invoices, and inquiries. This feature is particularly useful if you are a new company and want to give an impression of established business activity to your customers.
For instance, you might not want the first booking in your company to appear to your customers as BOK-1, as it might suggest that you’re just starting out. Therefore, you can add a starting number, so your first booking appears as BOK-400 or any other number that gives the impression of a well-established business.
Here’s how to do it:
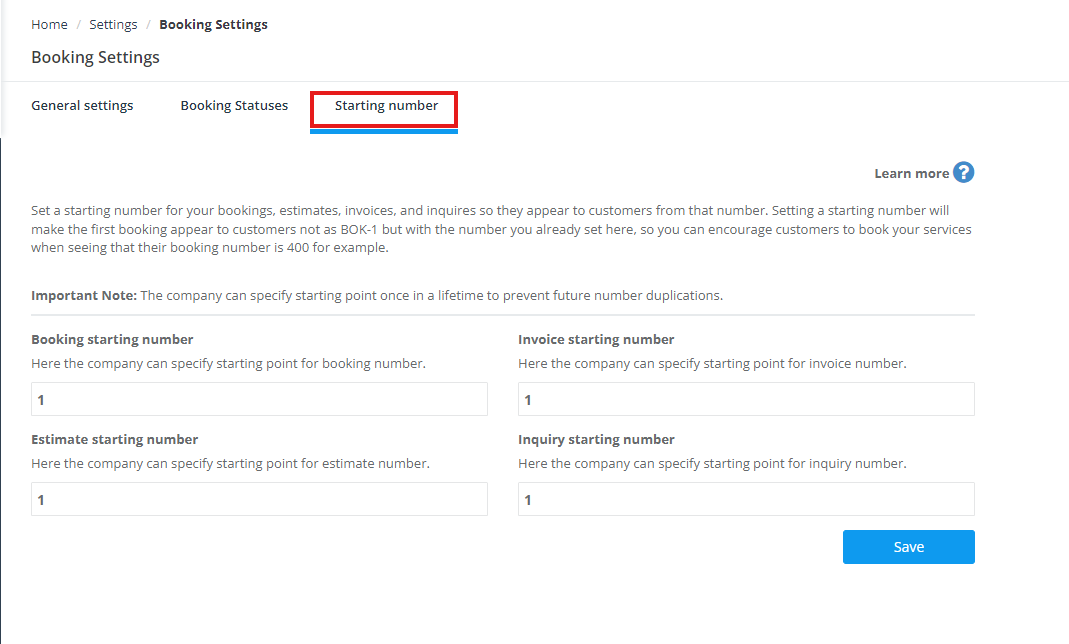
- Navigate to “Settings > General Settings”.
- Choose “Booking Settings” from the list.
- Click on the “Starting number” page.
- In the provided field, enter the number you want your bookings, estimates, invoices, and inquiries to start with.
- Click on the “Save” button to apply changes.
 Now, if you choose 400 as the starting number for your bookings, your first booking will be numbered BOK-400, the second one will be BOK-402, and so forth. This gives the impression of substantial prior activity, which can encourage potential customers to book with you.
If you’ve already had a number of bookings before setting the starting number, OctopusPro will add that to your starting number. For example, if you set your starting booking number to be 400 and you already have 13 bookings, then the next booking will be 400+13, i.e., BOK-413.
Now, let’s move on to how you can change or edit an existing invoice number.
How to Change/Edit an Existing Invoice Number
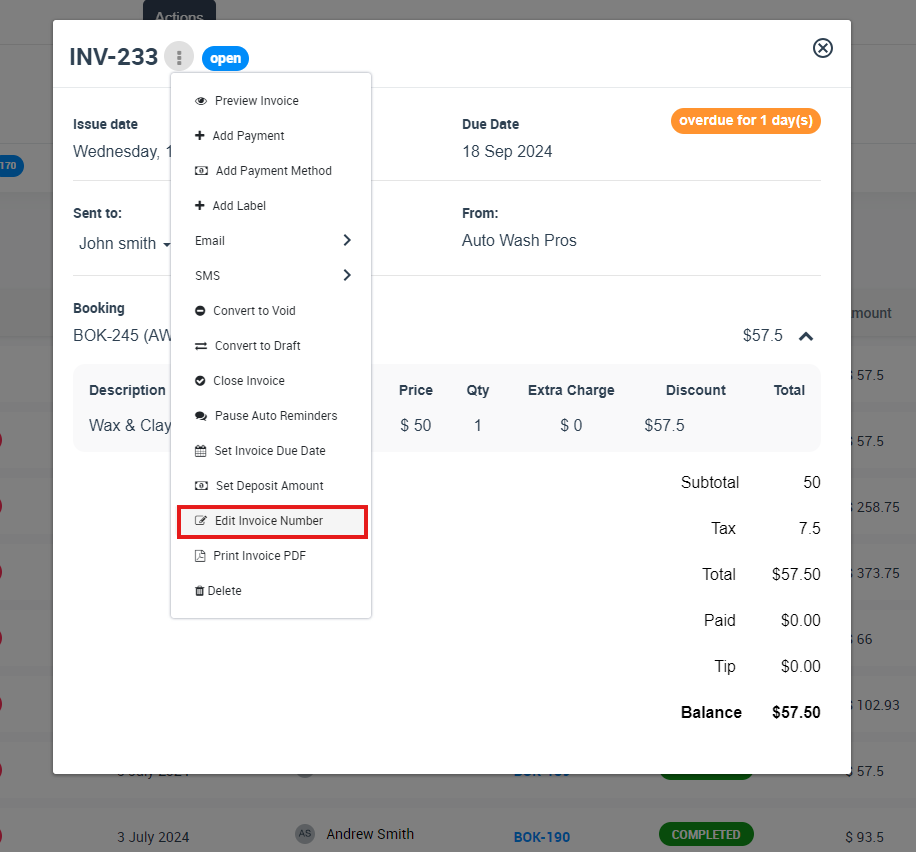
- Navigate to the invoice you want to change. You can do this by going to the “Invoices” tab located in the main navigation menu.
- Click on the specific invoice number that you want to edit.
- Click on the “Actions” button, and A drop-down menu will appear.
- Select “Edit Invoice Number” from the list of options.

5. In the provided text box, enter your desired new invoice number. Please note that the new invoice number should not match any existing invoice number to avoid any confusion.
6. Once done, click on the “Save” button to implement the changes.
Impact on Synced Items with Xero and QuickBooks
When you modify an invoice number in OctopusPro, it does not immediately update in the linked accounting software, be it Xero or QuickBooks. Instead, this change will be visible in your accounting software after the next synchronization process.
This is due to the fact that OctopusPro and your accounting software communicate updates through periodic sync intervals. So, to reflect the new invoice number in Xero or QuickBooks, you’ll need to initiate a sync.
For example, if you have an invoice with the number INV-001 in OctopusPro that is also present in Xero, and you change this number to INV-001A in OctopusPro, the change will only be visible in Xero after the next sync.
Please remember to initiate a sync after making changes to ensure your financial records are accurate and consistent across all platforms.
To stay updated, please subscribe to our YouTube channel.

