
Company Branding and Logo Configuration
This guide explains how to configure your company’s visual identity across OctopusPro. You can upload and manage multiple logo assets—including your default company logo, invoice logo, and signature logo—to ensure consistency across internal dashboards, customer-facing documents, and email communications.
![]()
If you operate multiple sub-brands or divisions, you can also assign distinct logos and images at the trading name level, so each brand’s identity stays consistent while all data remains centralized in one account.
Jump to a section
- 1) Set your default company logos
- 2) Configure trading name logos (sub-brands)
- 3) Assign images to email templates (per trading name)
- 4) Customer portal branding & white-label URL (optional)
- Tips & troubleshooting
1) Set your default company logos
OctopusPro lets you upload three different logos, each used in a specific place. Setting these correctly ensures your branding appears consistently across the platform.
Profile Logo (admin branding)
The Profile Logo is your primary company identifier inside OctopusPro. It appears in your company profile and across the admin interface (for example, in the left-side menu).
![]()
How to upload:
- Go to Settings > Company Settings > Branding.
- Under the Logo section, click Logo Upload.
- Select your logo file (recommended format: JPG), then click Upload.
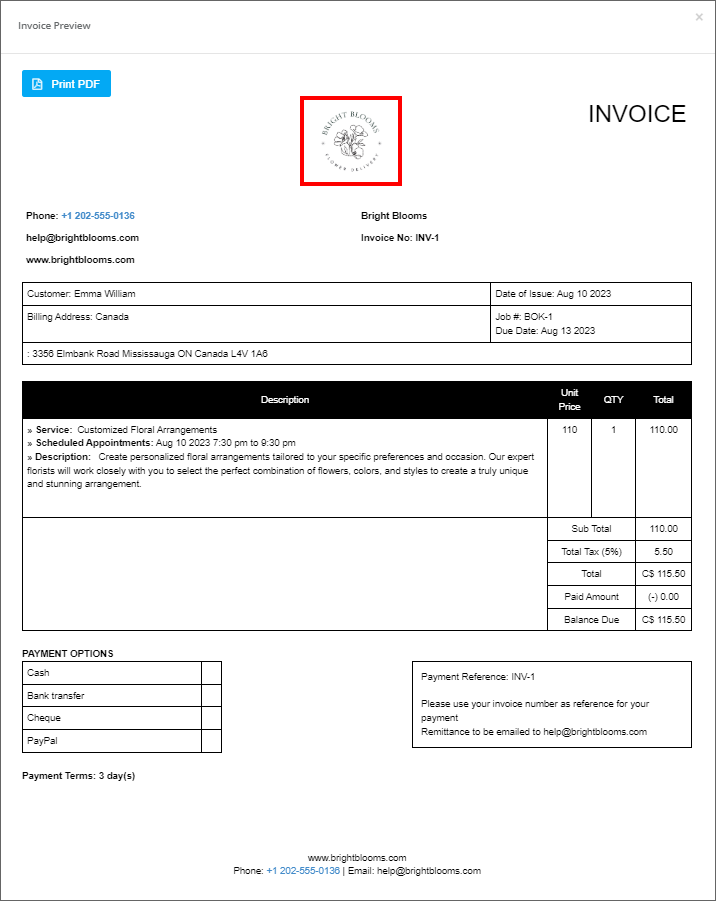
Invoice Logo (PDF documents)
The Invoice Logo is used on customer-facing PDF documents, including invoices, quotes, and booking PDFs. If a booking/invoice is linked to a trading name that has its own logo, that trading name logo will display instead. If not, OctopusPro falls back to your default company invoice logo.
How to upload:
- Go to Settings > Company Settings > Branding.
- Click Invoice Logo Upload.
- Select the file, then click Upload.
Want to change the PDF layout? See Invoice & Quote PDF Template Customization.
Signature Logo (formal communications)
The Signature Logo can be a stylized signature or an additional branding element used in formal communications (for example, signature-style branding in emails or documents where applicable).
How to upload:
- Go to Settings > Company Settings > Branding.
- Click Signature Logo Upload.
- Select the file, then click Upload.
Important considerations
- Use high-resolution images to ensure your logo looks sharp on-screen and when printed.
- Each logo has a different job: Profile Logo (admin UI), Invoice Logo (PDFs), and Signature Logo (formal/signature branding).
- If you operate multiple brands, you can override these defaults by assigning logos per trading name (next section). Only one trading name can be set as the default.
Related: Keep your company address, phone, and business details accurate (these often appear on PDFs and customer communications) via Business Details Settings.
2) Configure trading name logos (sub-brands)
If your business operates multiple brands (for example, different service lines, franchises, or regional divisions), you can upload a unique logo for each Trading Name. This helps you maintain distinct branding across invoices, quotes, booking PDFs, and selected customer communications.
How trading name logos work:
- If an invoice/quote/booking PDF is linked to a specific trading name, that trading name logo will display.
- If the trading name has no logo, OctopusPro falls back to your default company logo.
- You can set one trading name as the default trading name (used when no trading name is explicitly linked).
How to set a trading name logo:
- Go to Settings > Company Settings > Trading Names.
- Click the trading name you want to update.
- Upload the logo for that trading name, then Save.
Need help setting up trading names? See Manage Multiple Trading Names (Sub-Brands).
3) Assign images to email templates (per trading name)
In addition to logos used in PDFs and internal screens, you can assign brand images for email templates (for example, for booking confirmations or invoice emails). This is useful if each trading name needs its own header image, banner, or marketing visual in outgoing emails.
How to assign email template images:
- Go to Settings > Company Settings > Trading Names.
- Find the trading name you want to customize.
- Click Assign Images.
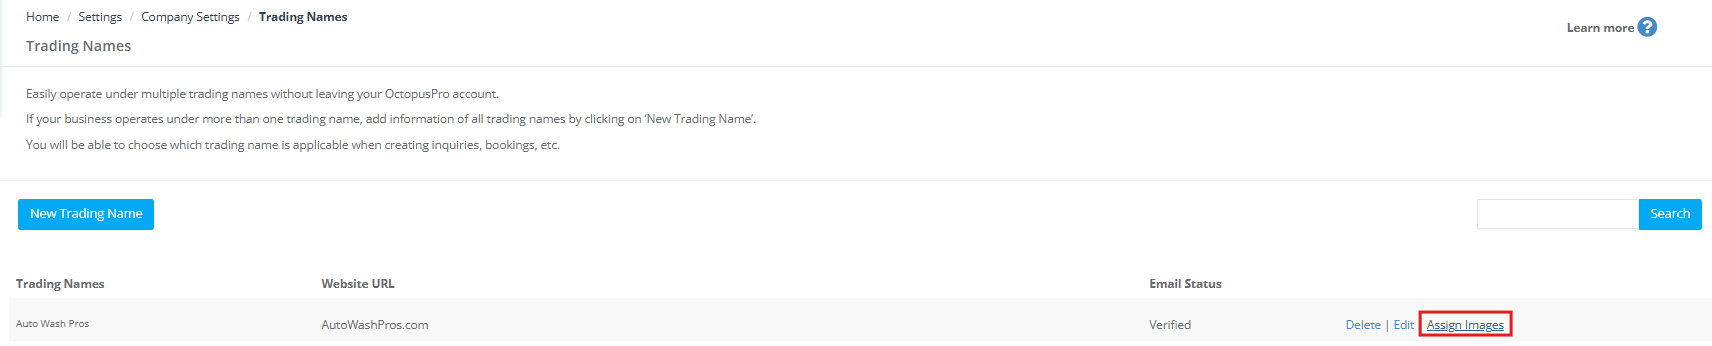
- Select the email template you want to customize (for example: Booking Confirmation, Invoice Email).
- Upload or choose an image for the available image placeholder(s) (for example: {img_1}, {img_2}, {img_3} where available).
- Click Save.
![]()
Important: email images vs invoice PDF logos
- Email template images (assigned via placeholders like {img_1}, {img_2}, etc.) are used only in emails.
- Invoice/Quote/Booking PDFs always use the logo configured in your trading name settings, or your default company invoice logo if none is set.
Manage templates: You can edit your email templates via Email Templates. If you need to insert dynamic logo values and other merge fields, see Template Placeholders (for example, {company_logo_image} shows your company logo in supported templates).
4) Customer portal branding & white-label URL (optional)
If you use OctopusPro’s Customer Portal for online bookings and self-service, portal branding is managed separately from company/trading name logos. You can customize portal design elements (such as the header logo, colors, favicon, and background images) and optionally white-label the portal URL.
- Customer Portal Branding & Style Customization (logo, colors, header styling, favicon, background images)
- Customizing / White-Labelling Your Customer Portal URL (custom domain/subdomain via DNS)
- Customer Portal General Settings (core portal settings, including where to locate your portal URL settings)
Tips & troubleshooting
- Logo looks blurry on PDFs: upload a higher-resolution image and re-check the PDF preview. Avoid tiny source images.
- Wrong logo appears on an invoice PDF: confirm the invoice/booking is linked to the correct trading name, and that the trading name has a logo (otherwise the default company logo will display).
- Email logo differs from PDF logo: this is expected—email template images are configured separately from PDF document logos.
- PDF layout hides or misplaces the logo: review your invoice/quote PDF template settings here: Customize Invoice Template.
To stay updated, please subscribe to our YouTube channel.