Optimising the Customer Profile & Self-Service Portal
A modern field-service operation lives or dies on repeat customers and word-of-mouth reviews. OctopusPro gives you a fully customisable customer portal—think “mini-CRM” meets “self-service app”—that adapts to any industry, from HVAC to mobile dog-grooming.
1 Why Custom Profiles Matter
-
Higher retention: Personal data + booking history = tailored offers that keep clients coming back.
-
Faster checkout: Saved cards and addresses cut average booking time by up to 60 %.
-
Self-service deflection: Customers answer their own questions, reducing inbound calls and emails.
2 Core Building Blocks
| Feature | What It Does | Sample Industries | Resulting Benefit |
|---|---|---|---|
| Custom Fields | Capture any data point—dietary needs, pool volume, vehicle VIN, pet breed. | Catering • Pool-care • Auto detailing • Vet clinics | Bespoke quotes; no back-and-forth calls. |
| Dependents / Assets | Store linked profiles (kids, pets, boats, forklifts). | Childcare • Kennels • Equipment hire | One parent login, multiple service objects; simpler billing. |
| Saved Payment Tokens | PCI-DSS vault; supports cards & wallets. | Any recurring-service model | One-click re-booking; fewer abandoned carts. |
| Frequent Addresses | Home, work, holiday house. | Cleaning • Lawn-care • Mobile physiotherapy | Route batching for lower drive time; quicker checkout for clients. |
| Booking History & Documents | All past quotes, jobs, invoices, photos, PDFs. | Electrical • Landscaping • Beauty salons | Proof of work, warranty tracking, upsell cues. |
| Feedback & Complaints | Structured ticket with status updates. | Facility management • Day spas | Transparent issue resolution; public-review deterrent. |
| Ratings & Notifications | Push/email/SMS alerts; 1–5-star ratings per job. | Tutoring • Photography • Event hire | Real-time NPS; instant remedial action. |
| In-Portal Chat | Role-based messaging with staff or tech on site. | Home renovations • IT support | Clarifies scope; reduces onsite surprises. |
3 Practical Set-Up Guide
-
Design your schema: Settings ▸ Custom Fields ▸ Customer ➜ add dropdowns, dates, numeric ranges.
-
Enable dependents/assets: Settings ▸ Portal ▸ Enable Customer Properties. Rename labels (“Pets”, “Vehicles”).
-
Switch on tokenised payments: Settings ▸ Payment Gateways ➜ toggle Save Card on File.
-
Promote portal sign-up: Add “Manage your bookings online” CTA to invoices and post-job emails.
-
Monitor adoption: Dashboard widget “Portal Log-ins Last 30 Days” tells you if customers are using it.
4 Industry-Specific Examples
-
Fitness Studio: Collect height/weight goals; clients re-book PT sessions, view progress photos, update card on file.
-
HVAC Contractor: Store model/serial numbers per property; homeowner books annual service in two taps; tech sees unit history.
-
Mobile Pet Groomer: Pet profiles with breed & allergies; owner schedules recurring grooms and rates each visit.
-
Corporate Cleaning: Building managers upload floor plans; saved addresses allow multi-site contracts under one login.
5 Key Benefits Recap
| KPI | Without Portal | With OctopusPro Portal |
| First-time booking length | 8–10 min phone call | < 2 min self-service |
| Repeat-booking rate | 40 % | 65 % (average across OctopusPro users) |
| Support tickets per 100 jobs | 12 | 5 (customers track status themselves) |
| Upsell revenue | Ad-hoc | Automated offers based on stored profile data |
6 Next Steps
-
Map the customer journey—identify every data point that speeds quoting or reduces rework.
-
Create matching custom fields—keep names short and clear (“Roof Area m²”, “Allergy Note”).
-
Train staff to encourage portal use at job completion.
-
Review analytics monthly—prune unused fields and add new ones as services evolve.
Pro Tip: The richer the profile, the smarter your automated marketing. Trigger email flows like “Time for your 6-month generator service” based on last-job date and asset type.
Delivering a concierge-level experience no longer requires endless phone calls or spreadsheets. With OctopusPro’s configurable customer profiles and portal, every industry can offer Amazon-style self-service while capturing the granular data that drives repeat business and targeted upsells.
Table of contents
-
Creating and managing customer accounts
-
Managing customers’ profiles
-
Making a new booking
-
Viewing booking history
Creating and Managing Customer Accounts
OctopusPro’s customer portal serves as your independent business site, offering customers a seamless and efficient experience for managing bookings and accessing a range of convenient features. To learn more about the customer portal, click here.
Signing up for a customer account
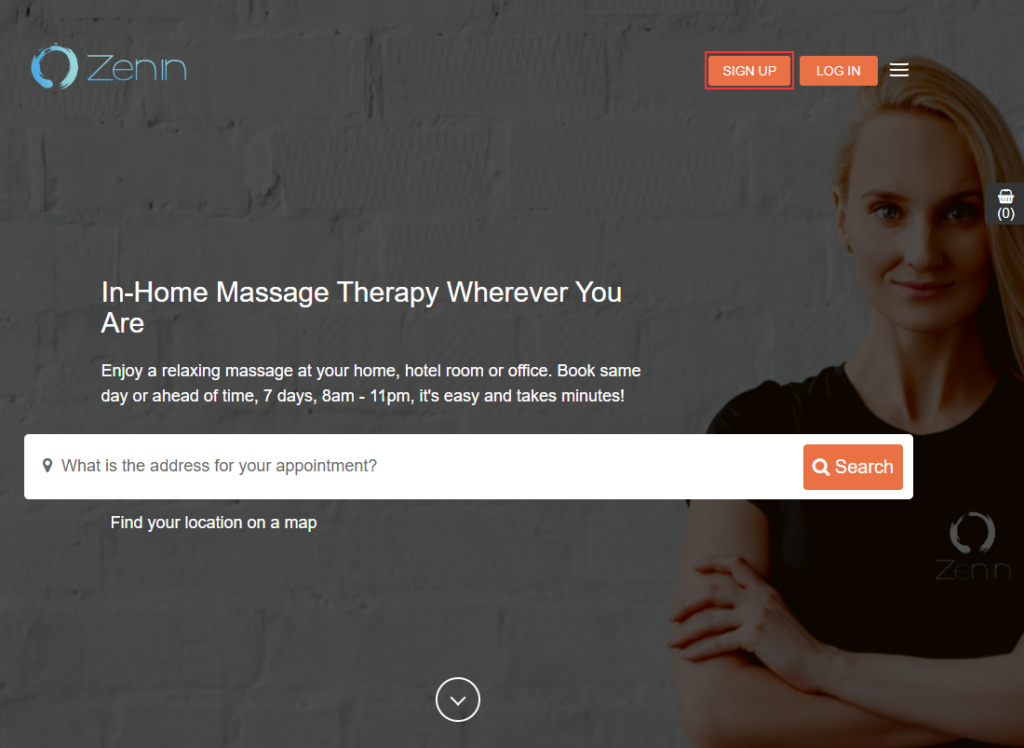
Customers can easily sign up by visiting your customer portal URL and clicking “Sign Up” in the top right corner of the homepage.
A registration form will appear, where customers can enter their personal details to complete the sign-up process. Alternatively, they can also sign up using their Google or Facebook accounts.
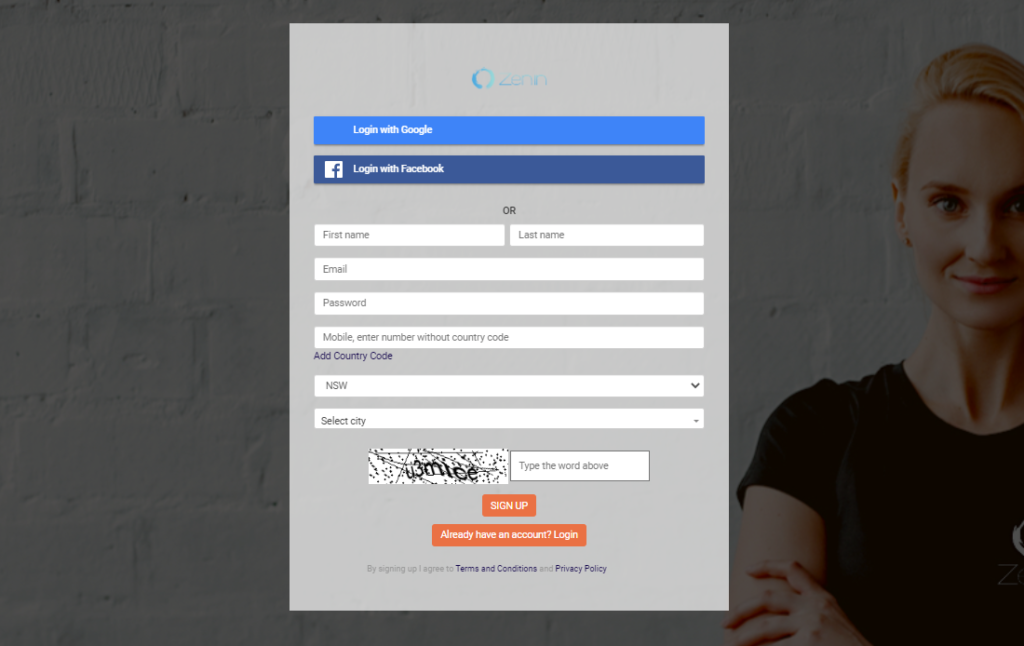
Upon submitting the required information, a verification email will be sent to the provided address, which customers must use to activate their account.
Logging in using email
Once customers have successfully activated their accounts, they can log in to the customer portal by entering their email address and password.
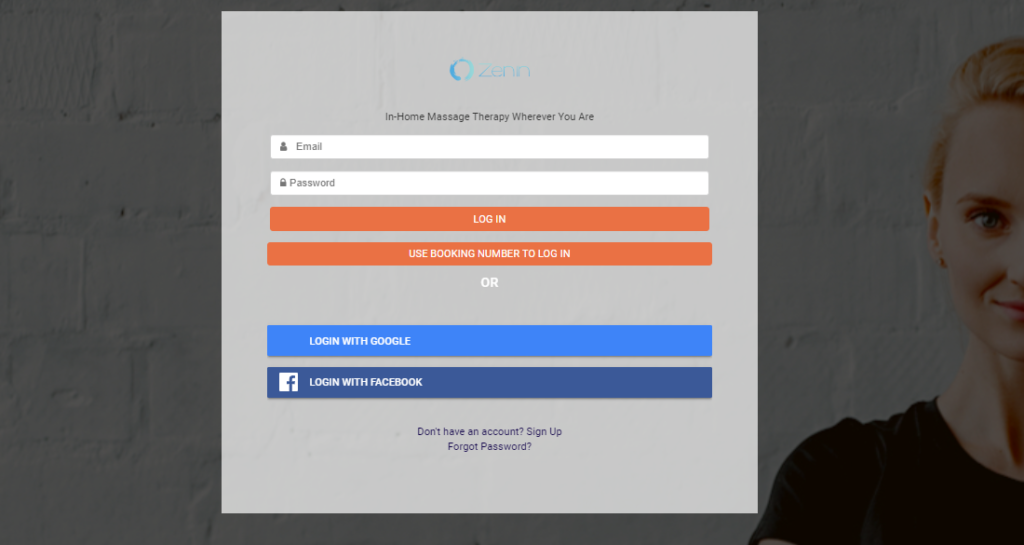
Logging in using Facebook
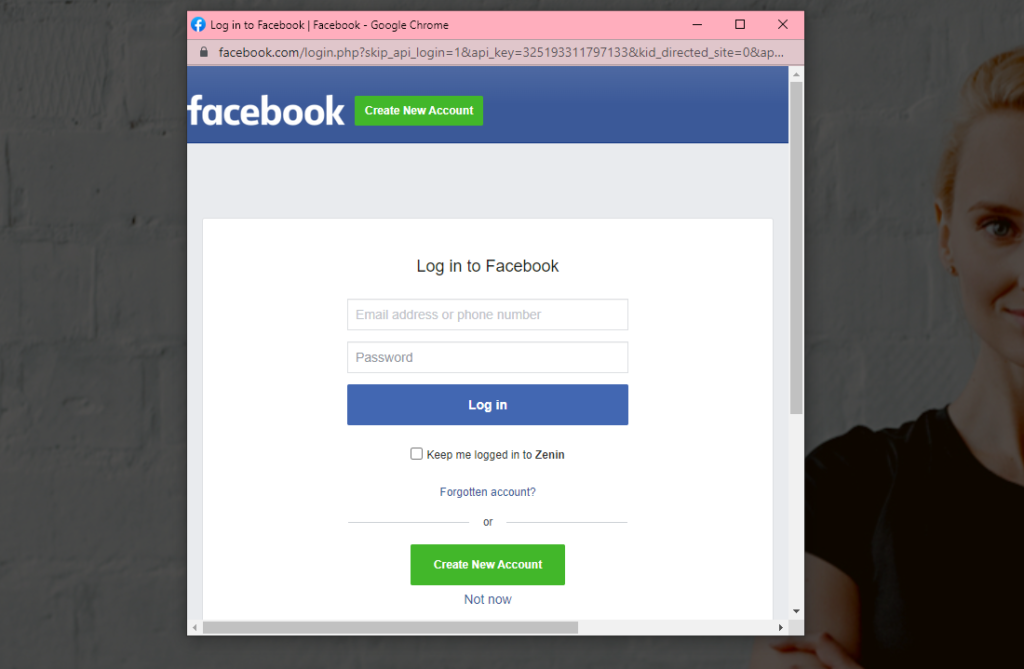
Customers can also use their personal Facebook accounts to log in to your customer portal. To do this, they should click “Log in” at the top right of the homepage and then select “Login With Facebook.”
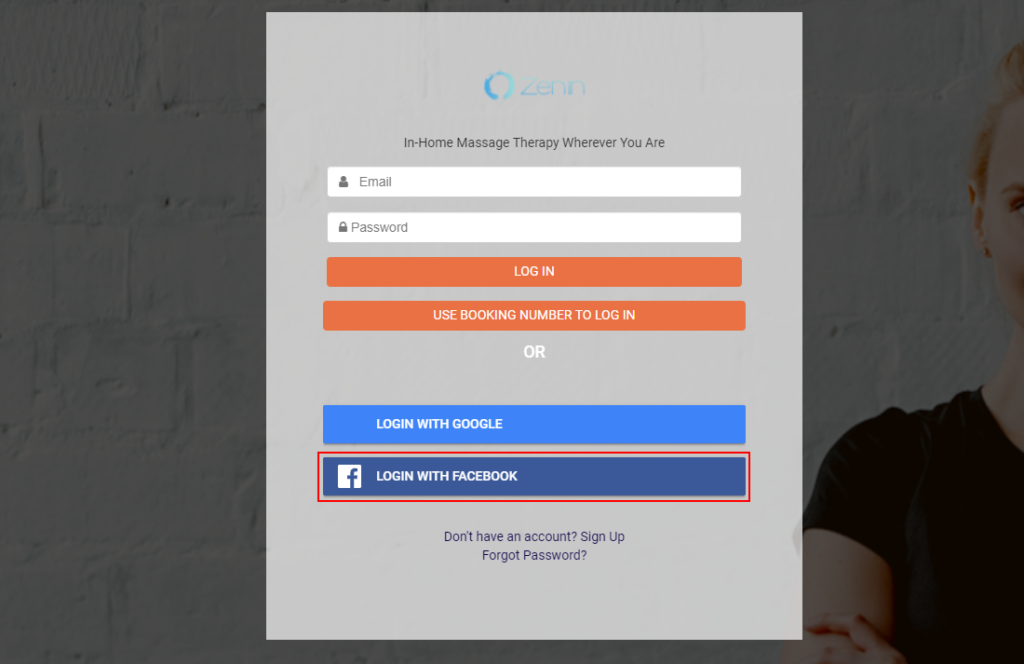
A new window will appear requesting access to their Facebook account. Upon granting access, customers will be logged in to your customer portal using their Facebook account.
Logging in using Google
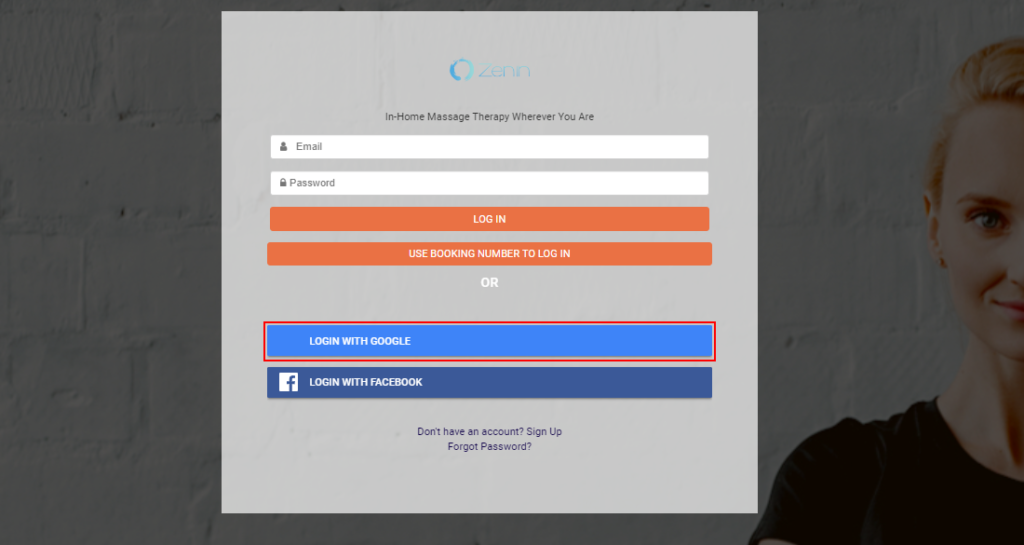
Another option for customers is to log in using their Google accounts. They can click on “Login With Google,” and a new window will appear, allowing them to sign in to their Google account.
Logging in using the booking number
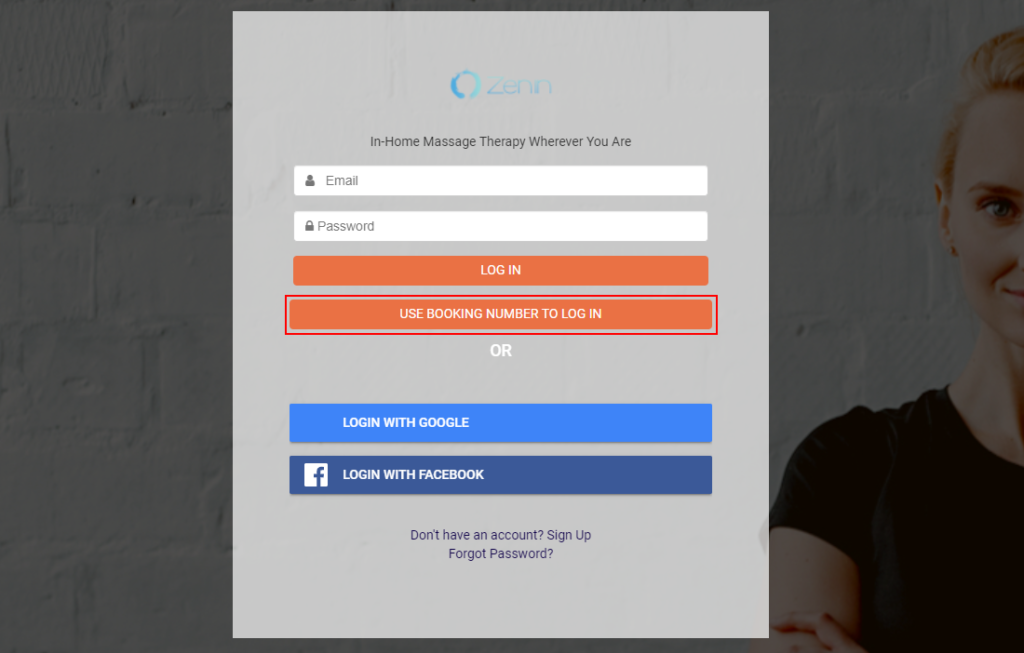
For customers who have scheduled bookings through your customer portal without signing up, they can still access their booking details by logging in using the automatically generated booking number. To log in using the booking number, click “Login” from the customer portal homepage.
Next, click on “Use booking number to log in.”
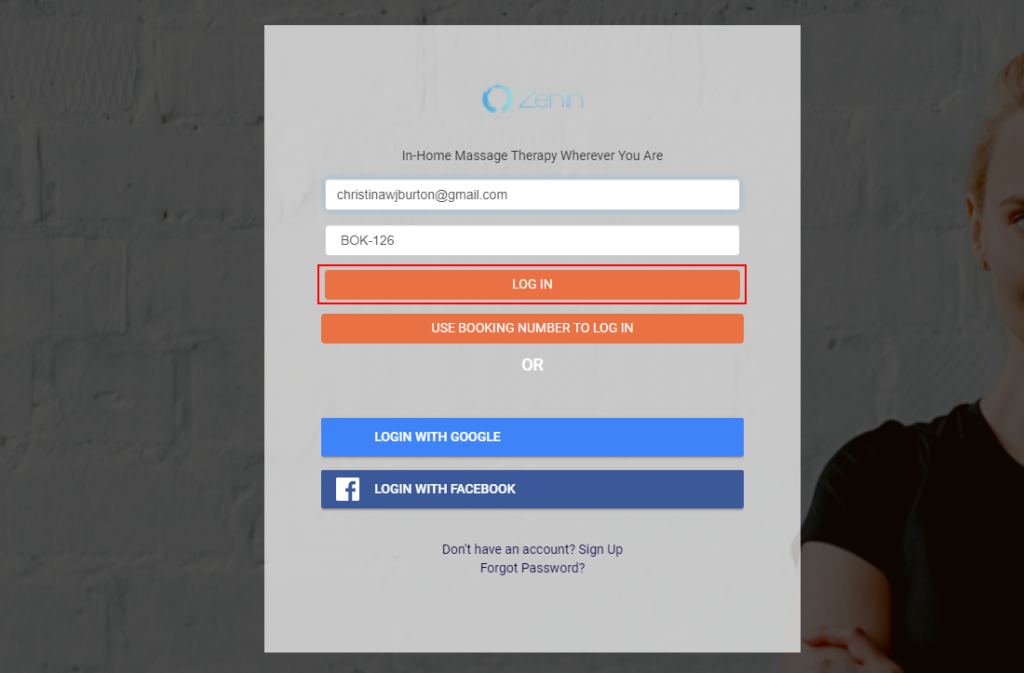
A form will be displayed, prompting customers to enter their email address and booking number. After entering this information, they can click “Log in” to access their booking details.
Managing customers profiles
With OctopusPro, your customers can easily manage their personal information and preferences through their profile. This includes updating profile pictures, resetting passwords, editing personal information, adding contacts, and managing billing addresses.
Adding a profile picture
After logging in to their account, customers can access their profile by clicking on “Profile” from the sidebar menu on the left. This will redirect them to the “My Account” page, where they can manage various aspects of their personal information.
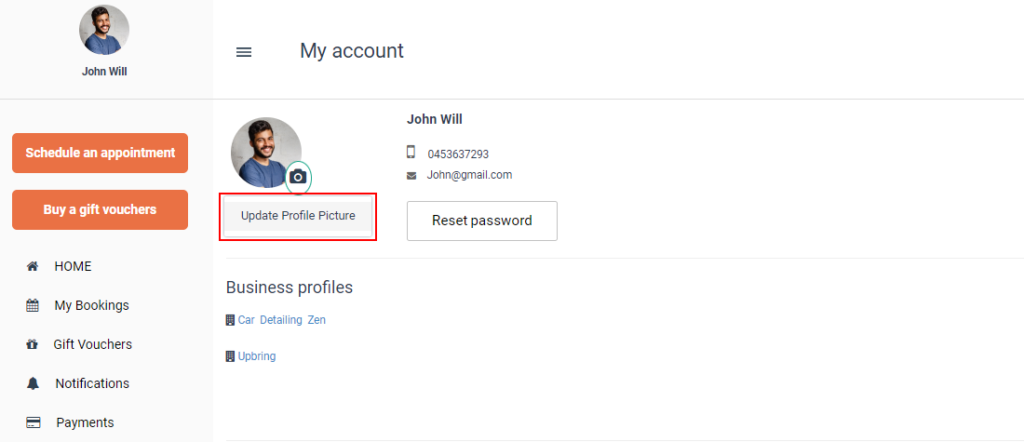
To update their profile picture, customers can click on the camera icon on the current profile picture and then select “Update Profile Picture.”
Updating login password
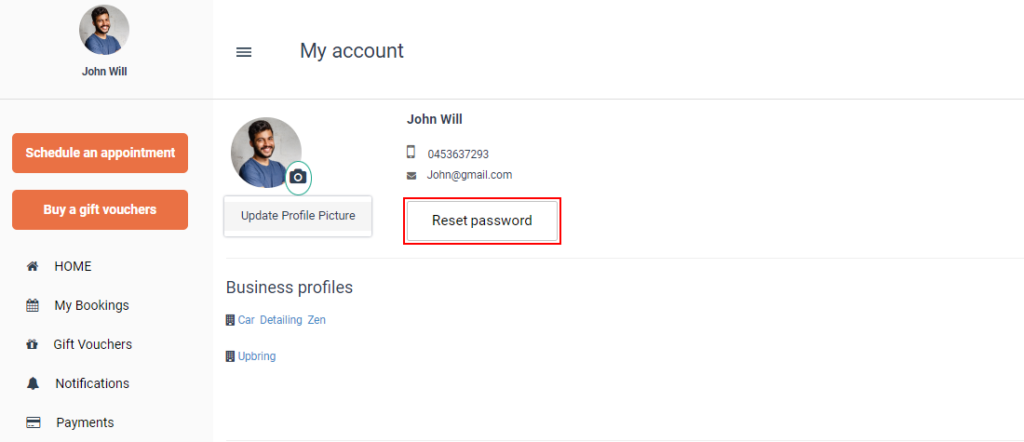
On the “My Account” page, customers can reset their passwords by clicking on “Reset password” under their personal information.
Updating personal profile
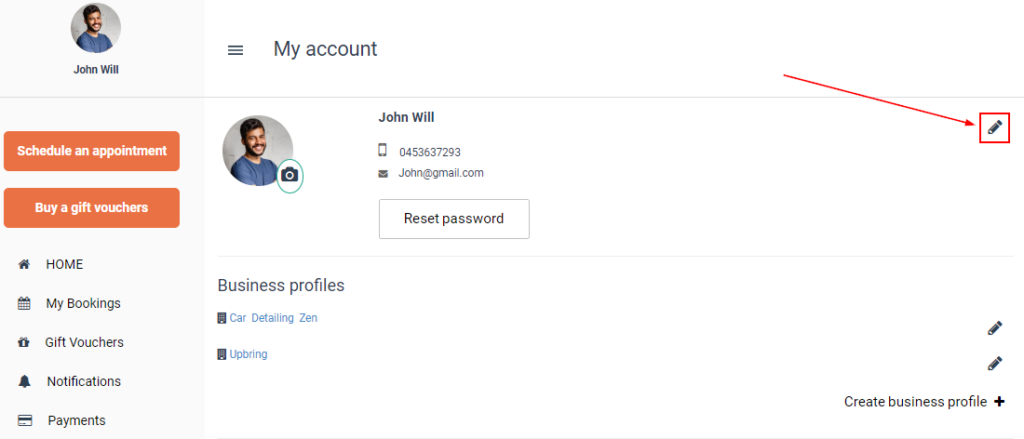
To edit profile information, customers can click on the edit icon next to their details.
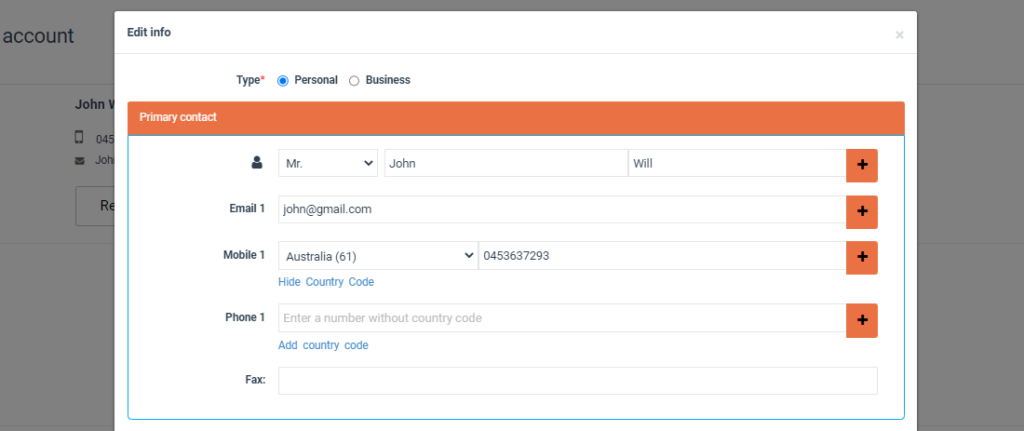
An “Edit Info” form will appear, allowing them to choose between a personal or business profile. They can then enter or edit their first and last name, add multiple names for each contact, and manage their email addresses and phone numbers using the “+” icon next to each field.
Adding additional contacts
Within the “Edit Info” form, customers can add more contacts to their profile by clicking on the “Add another contact” button. A secondary contact field will appear, enabling them to input additional contact details. To add even more contacts, click on “More contacts.”
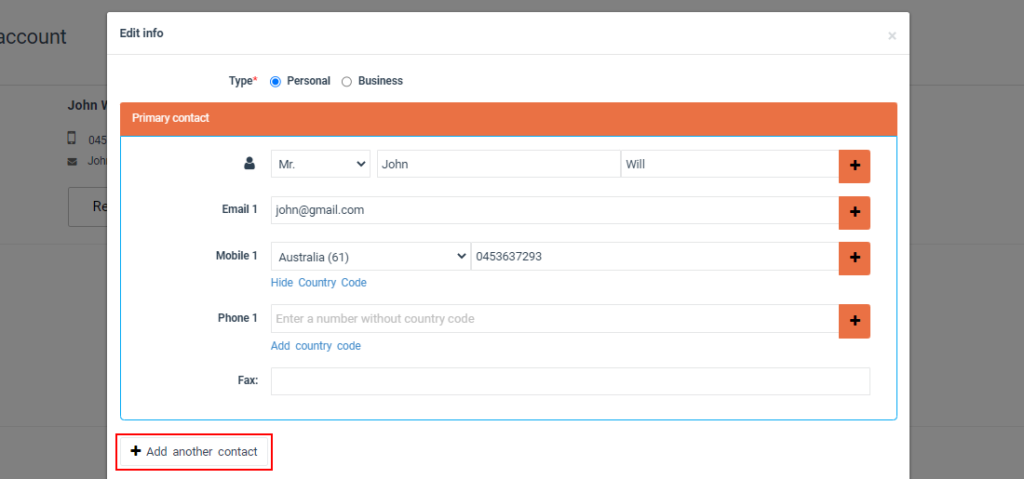
A secondary contact will appear to fill in their contact details. To add more contacts click on More contacts.

Managing billing address to profile
Customers can also update their billing address from the same pop-up window. They can pinpoint their exact location on a map and select their country, state, and town. Additionally, they can choose whether their billing and booking addresses should be the same or different. After entering the required information, they should click on “Save” to finalize changes.
Enhancing Customer Experience with Business Profiles and Saved Locations
OctopusPro offers your customers the ability to create and manage multiple business profiles, saved locations, and payment methods, streamlining their booking process and overall experience.
Adding business profile
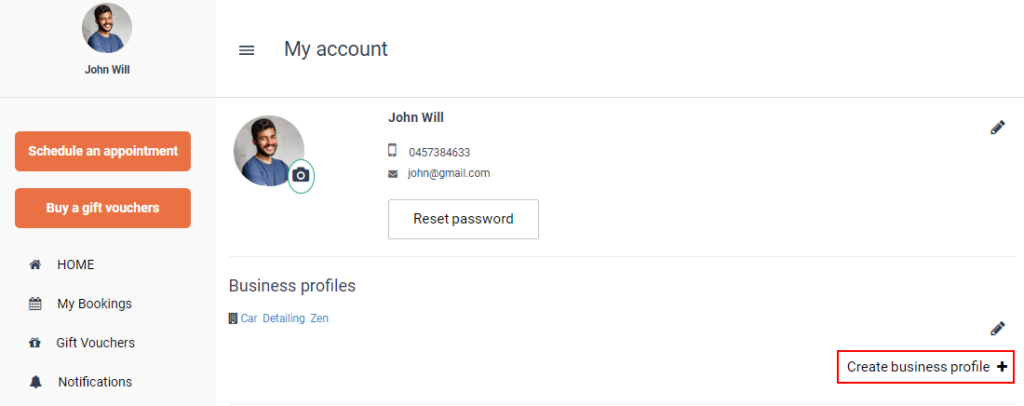
From the “My Account” page, customers can create business profiles by clicking the “Create business profile +” button.
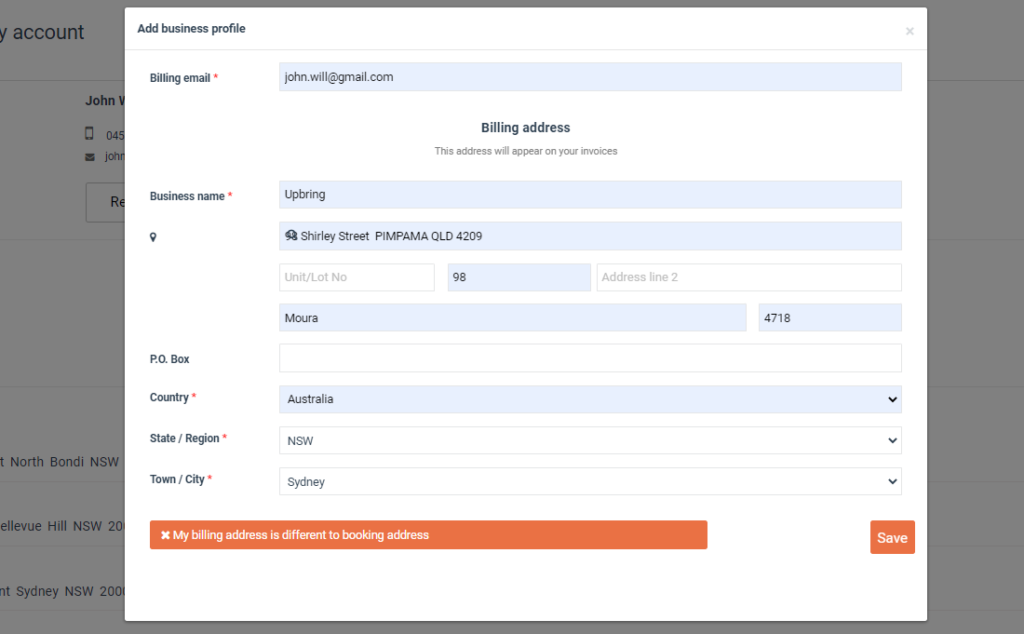
They will need to fill out the “Add business profile” form with billing email, business name, country, state, and town information.
Managing multiple business profiles
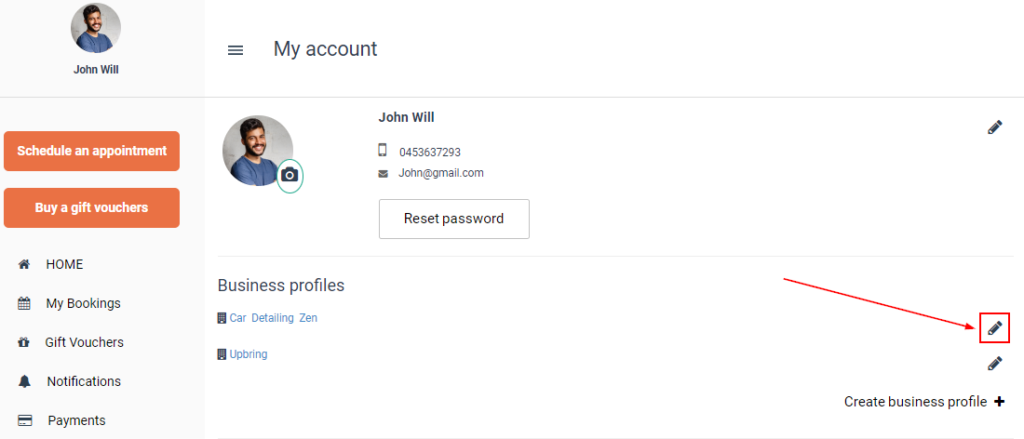
Customers can have multiple business profiles within a single customer account, allowing them to schedule bookings under various company names. To add or edit business profiles, click on “Create business profile” or the edit icon next to an existing profile.
Saved locations
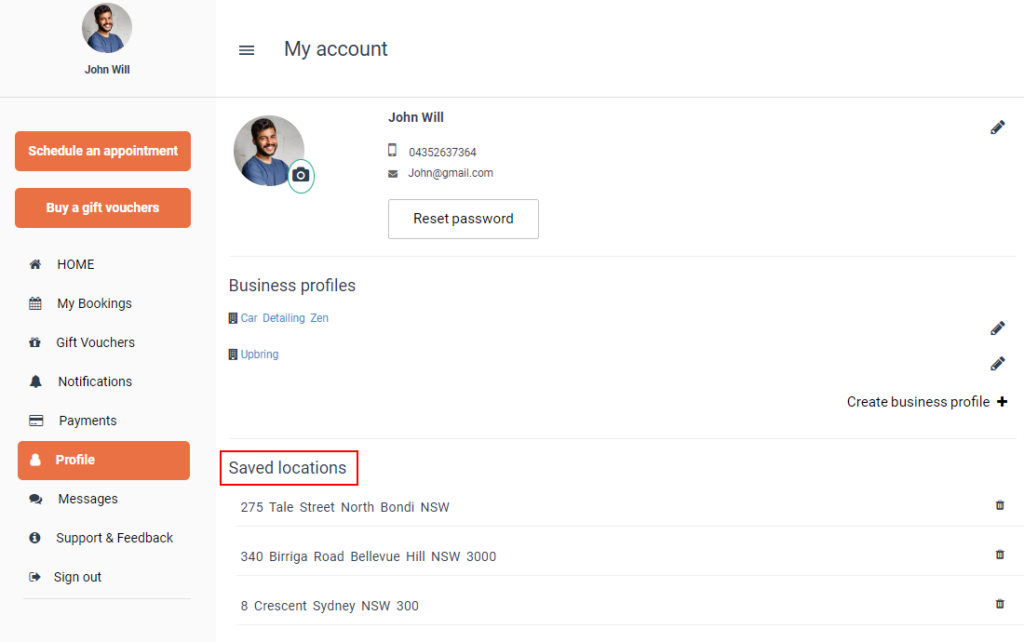
On the “My Account” page, customers can view their saved locations. These are added automatically as customers schedule bookings. To delete a saved location, click on the delete icon next to it.
Selecting a profile when making a booking
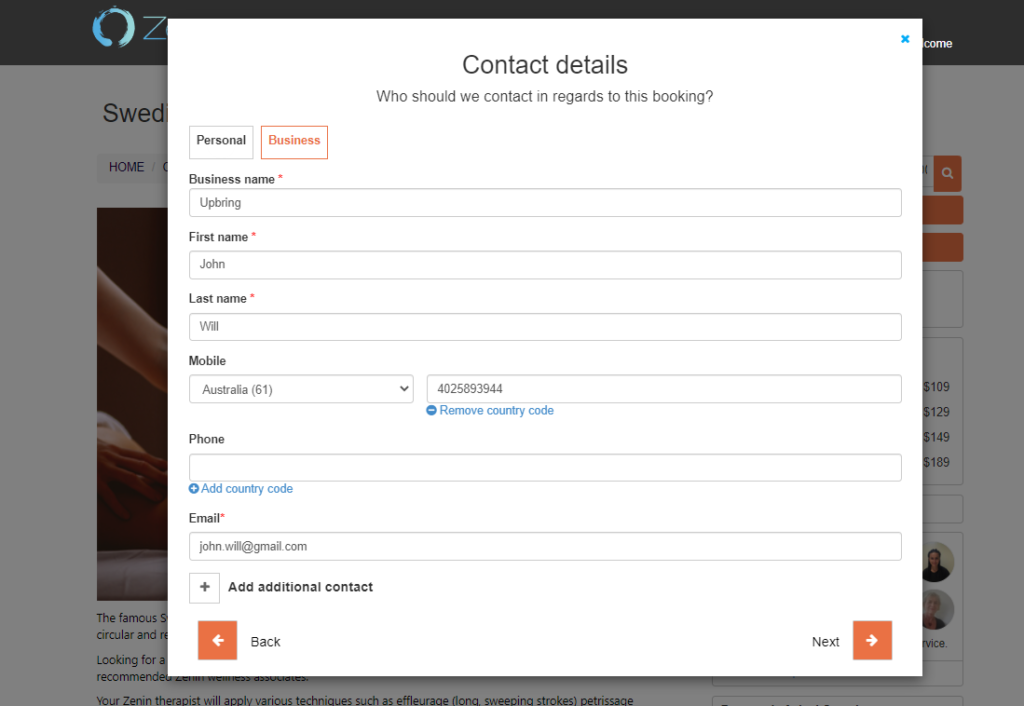
Customers can easily choose their preferred profile when scheduling a booking. If they have multiple business profiles saved, they can switch between them when entering contact details during the booking process on the customer portal.
After selecting a booking time, logged-in customers will see their contact details auto-filled. By default, their personal profile details are selected. To schedule a booking under a business account, they can click on “Business,” and the corresponding profile details will be automatically filled in.
Adding payment methods
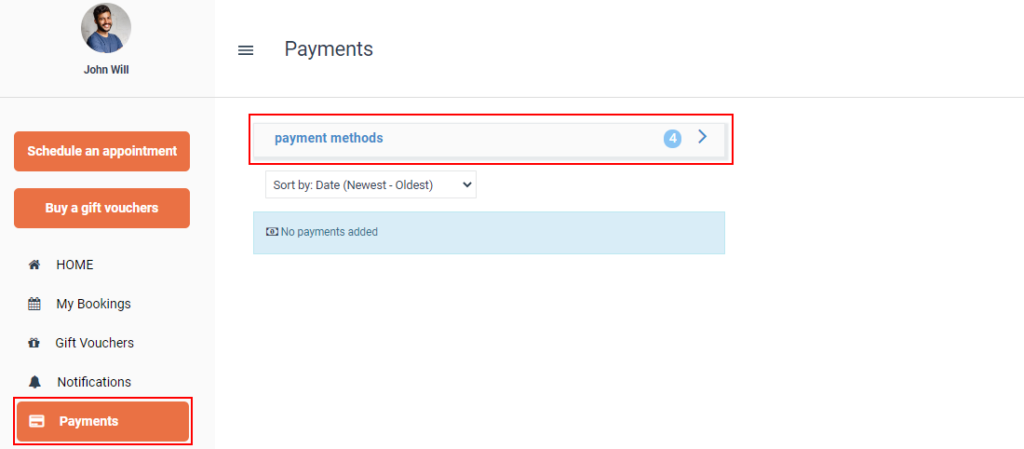
Customers can manage their payment methods by clicking on “Payments” in the sidebar menu on the left. This will redirect them to the payment methods page, where they can view, edit, or add new payment methods.
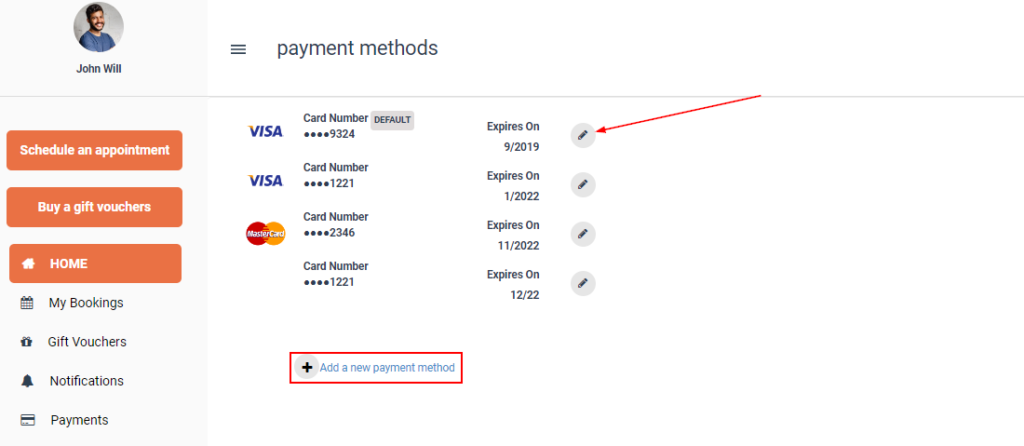
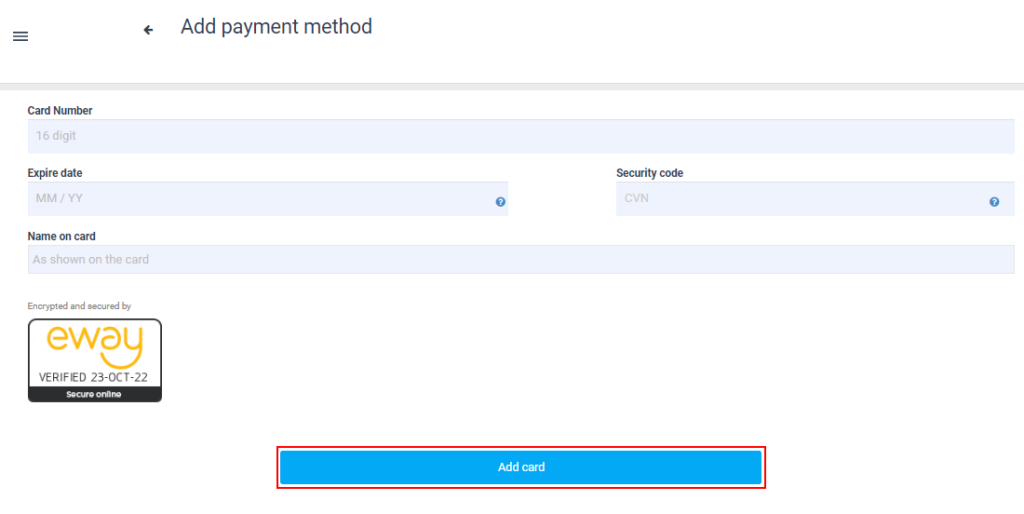
To add a new payment method, click on “Add a new payment method.” Customers can also edit or remove existing payment methods by clicking on the edit icon next to the card information.
Customers can edit or remove payment methods added by clicking on the edit icon next to the card. To add a new payment method click on Add a new payment method.
Adding a New Card
Customers can quickly add a new card by entering their card details and clicking on “Add card.”
Making a new booking
Scheduling an appointment
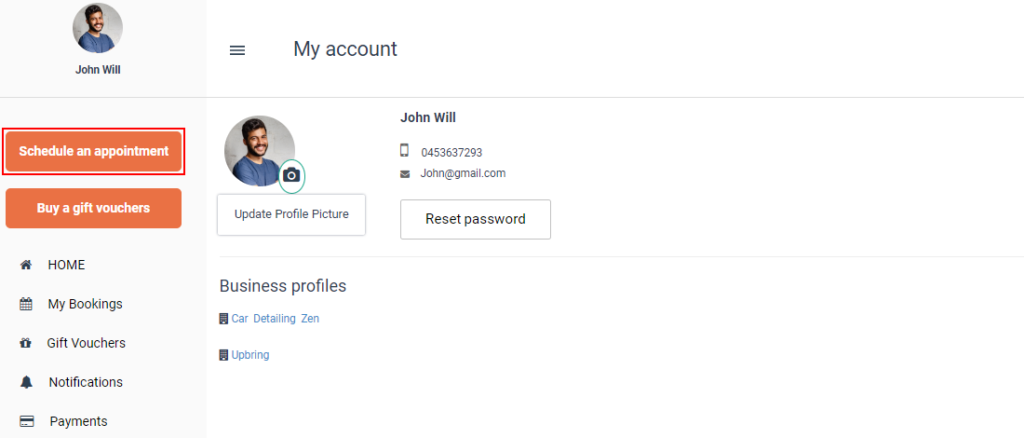
Customers can easily schedule appointments when logged in to their profiles on your customer portal. After logging in, they can click on the “Schedule an appointment” button under their display name in the left-side menu.
Selecting a Service and Viewing Details
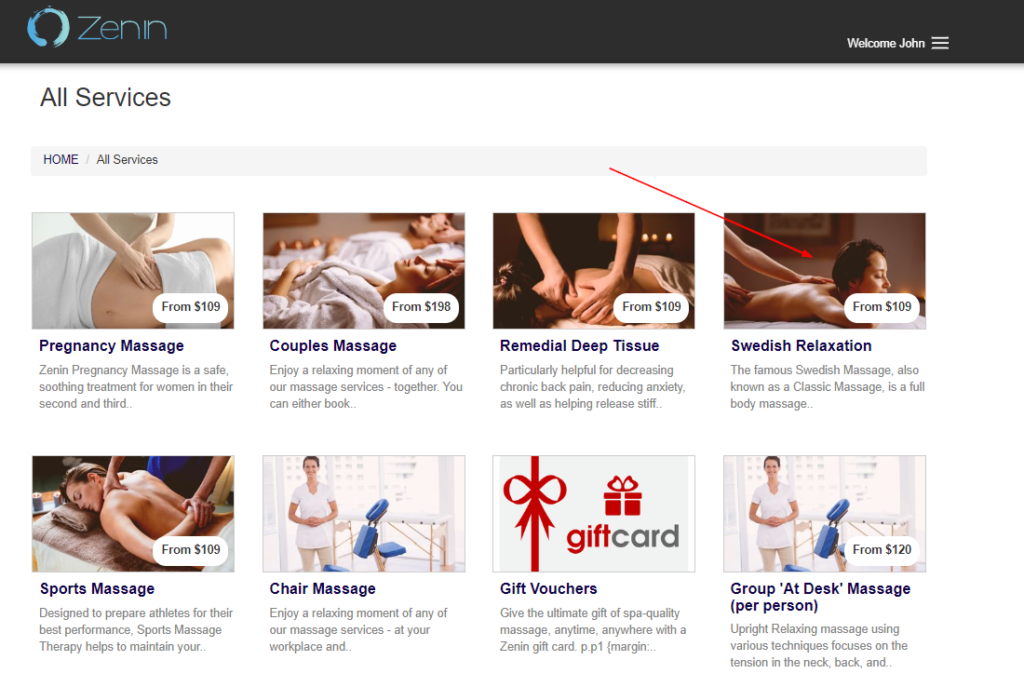
Upon clicking the button, customers will be directed to the “All Services” page, displaying all available services your business offers.
The services will be presented with their starting rates and a brief description.
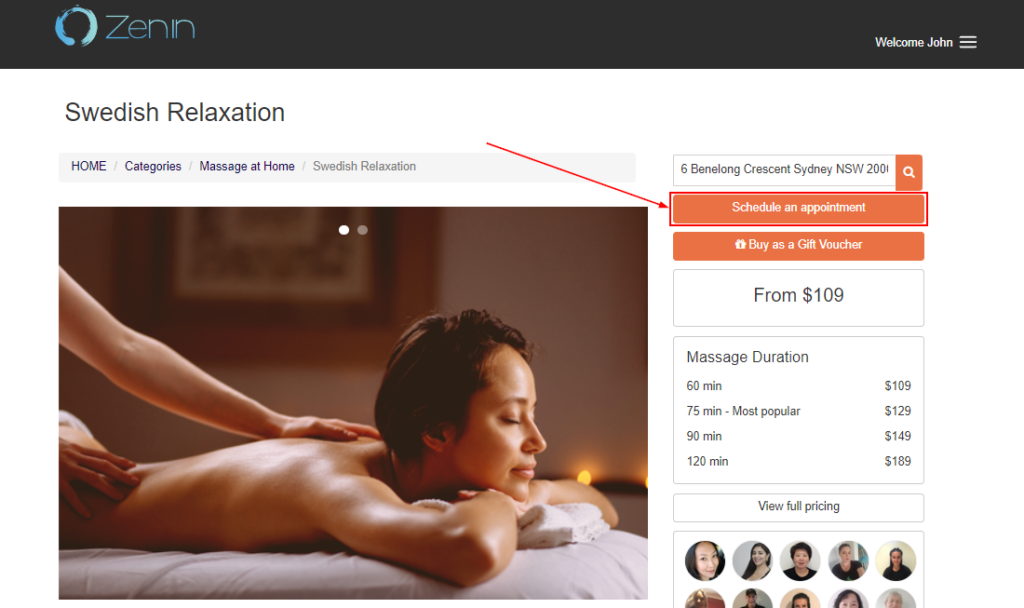
When customers choose a service, they will be redirected to the service view page, where they can see all details for the selected service. They can then schedule the service by clicking on “Schedule an appointment.”
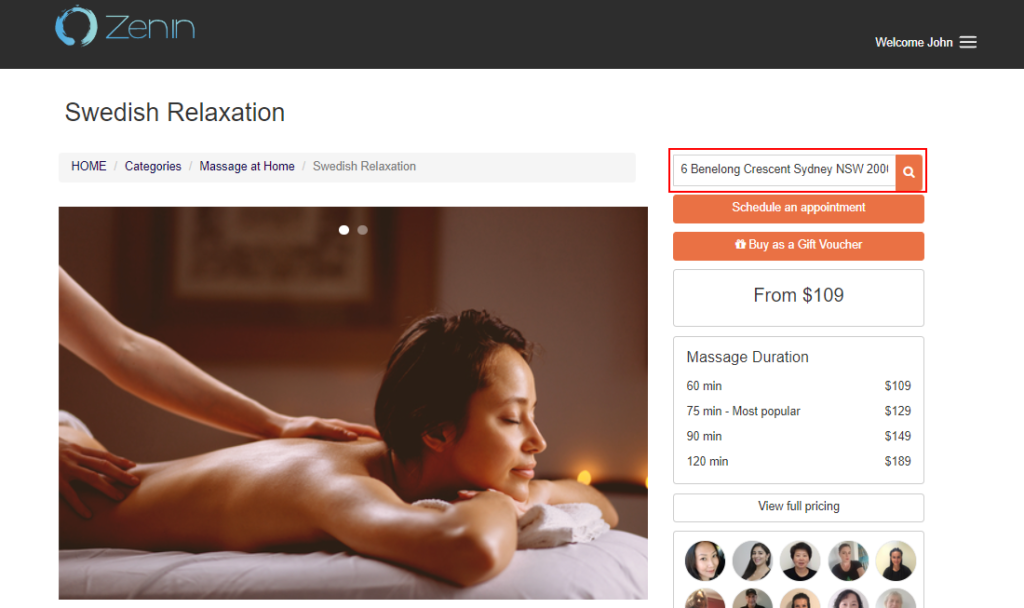
Auto-filling booking addresses from saved locations
If customers have saved locations in their profiles, their addresses will automatically fill when scheduling a new booking. Additionally, customers with saved contact details will have their information auto-filled during the booking process, streamlining the scheduling experience.
Auto-filling customer contact details from profile
If your customers have their contact details saved in their profile, like their first name, last name, email address, phone number, and more saved in their profiles, then they will not need to enter their details again when scheduling a new booking, as it will automatically fill instantly.
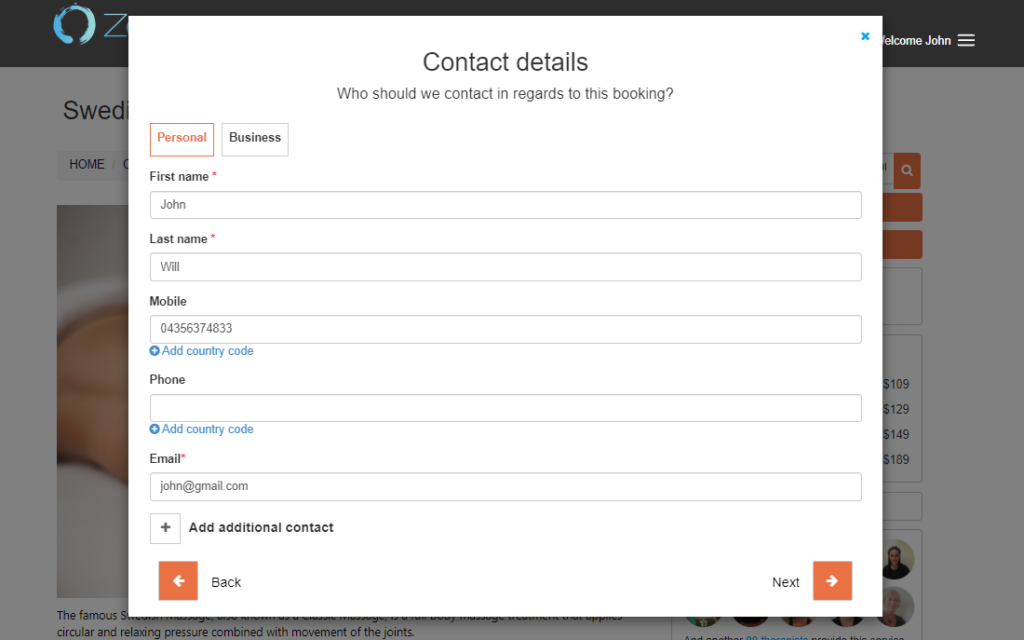
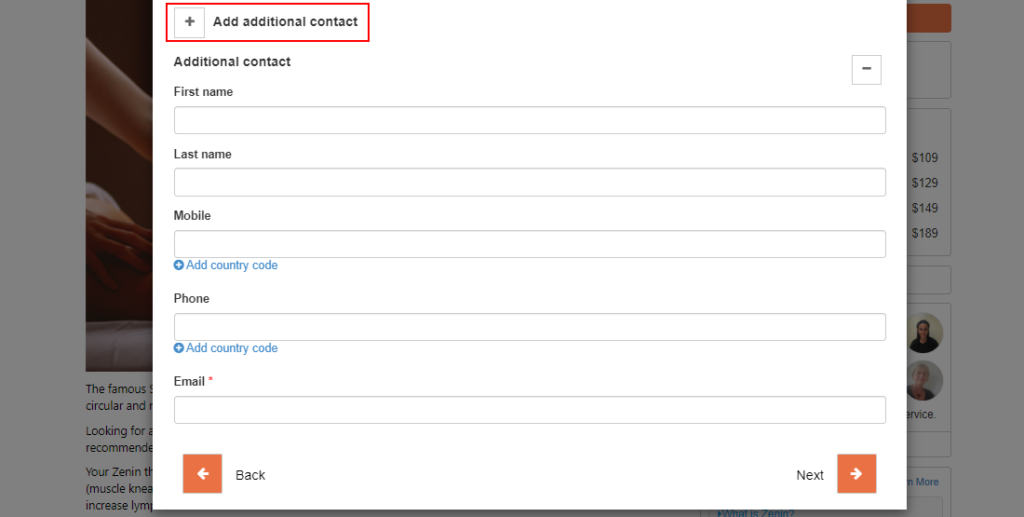
During the booking process when your customers are scheduling a booking through your portal, their contact details information will be automatically filled in from the contact information saved in their profiles, and they will not need to fill it in manually. Your customers will also be able to add/edit or remove any details they wish, they can also add an additional contact, and select them for this booking.
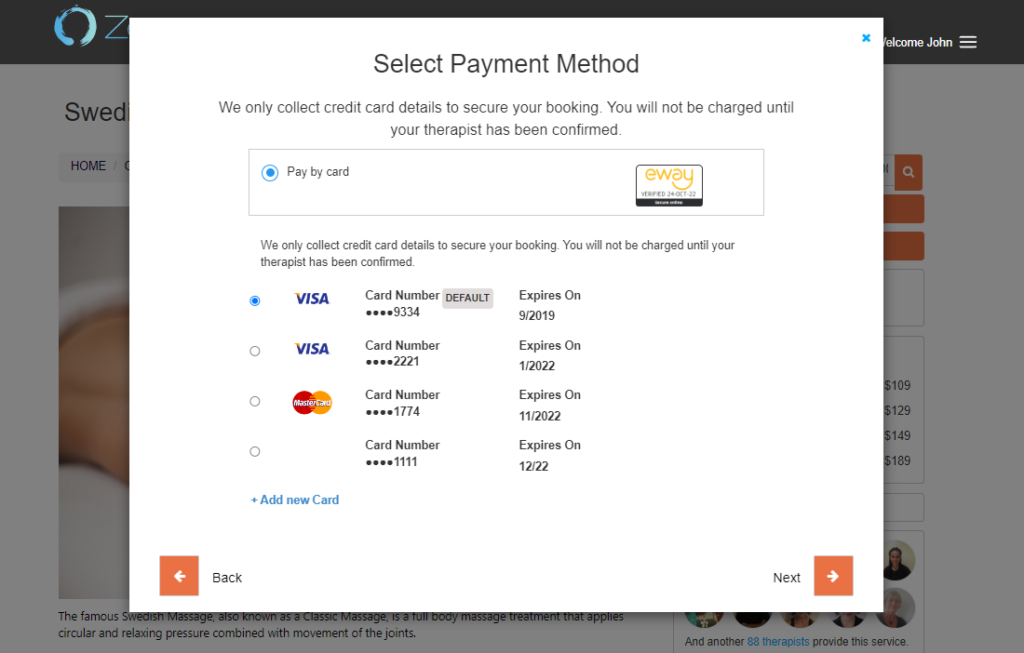
Using saved payment methods when making a booking
Customers with saved credit card information can easily select a stored payment method when checking out, simplifying the booking process.
Purchasing a Gift Voucher
OctopusPro allows customers to purchase gift cards for services, which can be gifted to family and friends. From the customer profile, the “Buy gift vouchers” button is accessible in the left-side menu.
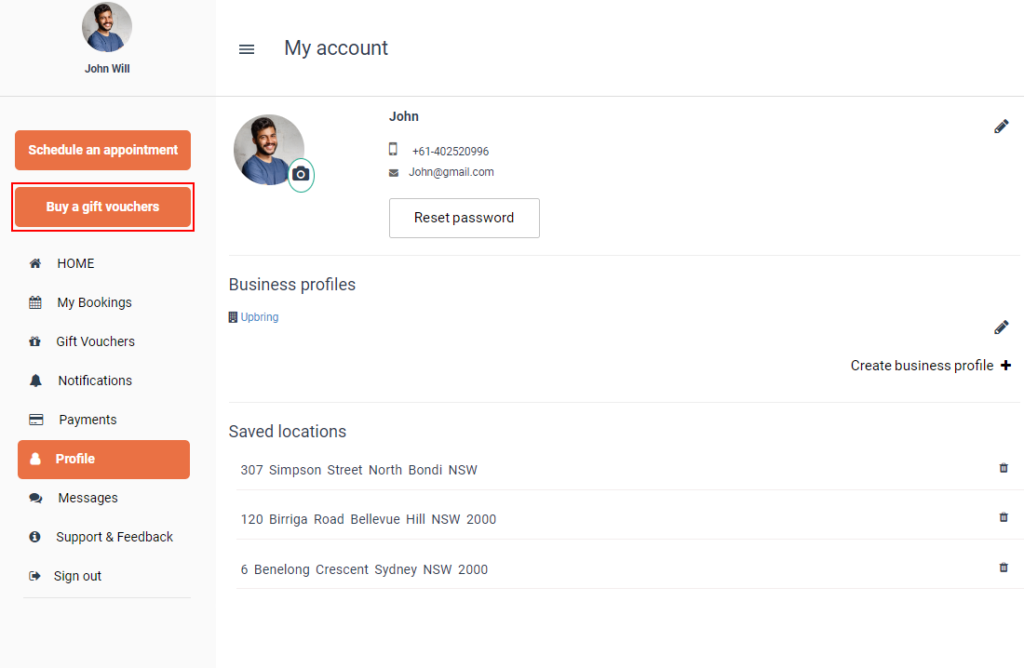
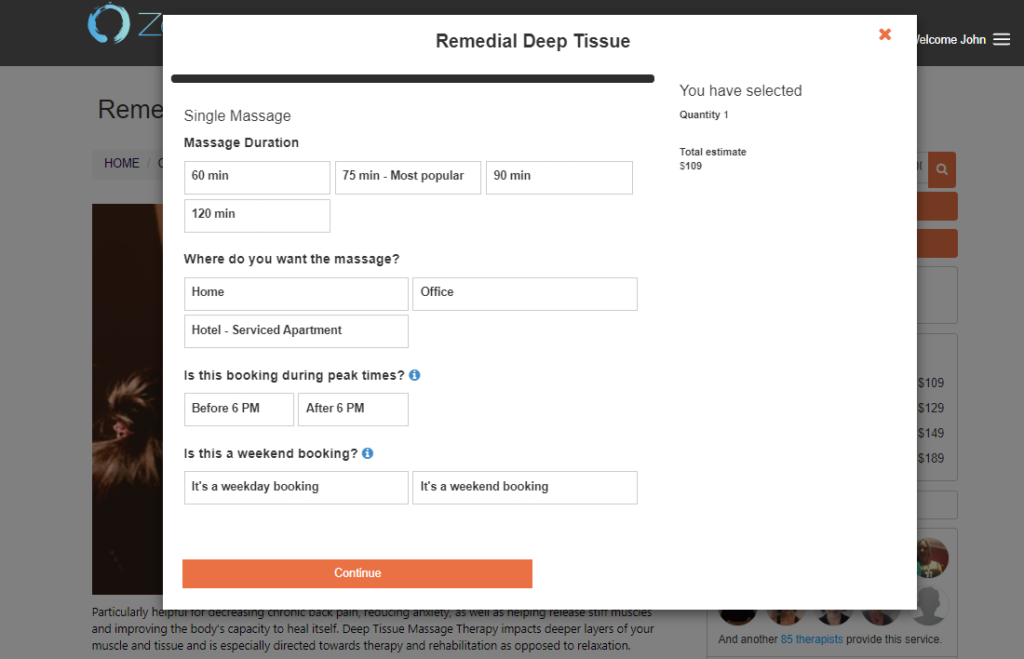
When clicked, customers will be directed to the “All Services” page, displaying services that can be purchased as gift cards, along with the “Gift Vouchers” tab. After selecting a service and clicking “Buy as a gift card,” customers can fill out the required fields and proceed to checkout.
Once clicked, the form of the service displays asking to select the required fields, then if your customers want to add more services to the gift card, they will click on “Add more services” so the services page will appear again to add from, if not, the “Continue to checkout” button will be pressed.
After the required information of the receiver is entered and “Next” is pressed, your customers will get the payment method form to select from the bank card.
At the final stage, when pressing on next, the “Gift Card Overview” form will be displayed containing the recipient information, payment method, and selected service.
To approve buying the gift card, your customers should agree to the terms and conditions, then click on “Confirm booking”.
Viewing booking history
Viewing current / future bookings
Customers can view their current, future, and past bookings by clicking on “My Bookings” from the sidebar menu on the left. They can access booking details, view locations on a map, and sort bookings by date.
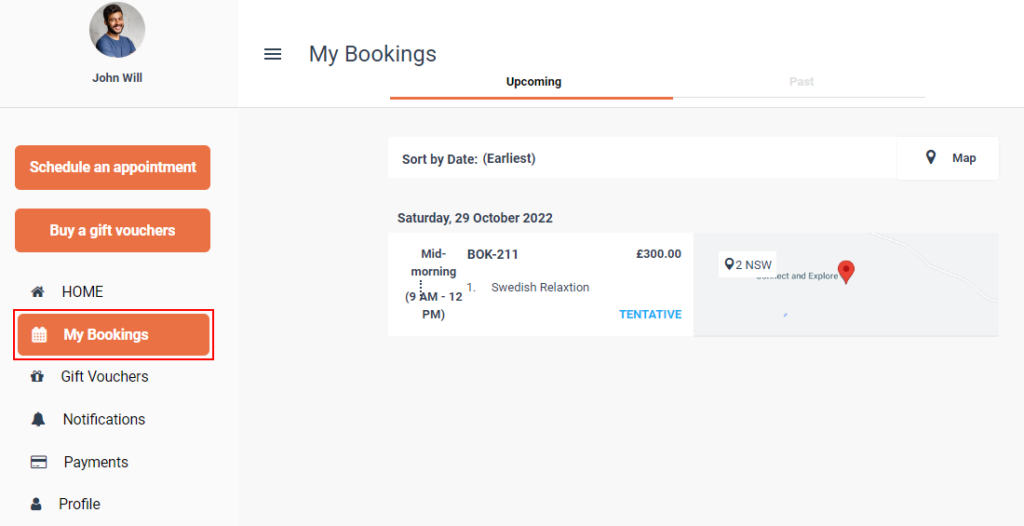
When they click on a booking, they will be redirected to the booking overview where they can:
- View their services.
- View booking location.
- Accept or decline quotes.
- Add instructions.
- Add images.
- Edit contact details.
- Add payment methods.
- Upload attachments.
Viewing past bookings
Your customers can also view their past bookings when logged in on your customer portal, by clicking on My Bookings from the sidebar menu on the left. Then click on Past to view their previous bookings. They can view their booking details, view the booking location on a map, sort their bookings by date, and more.
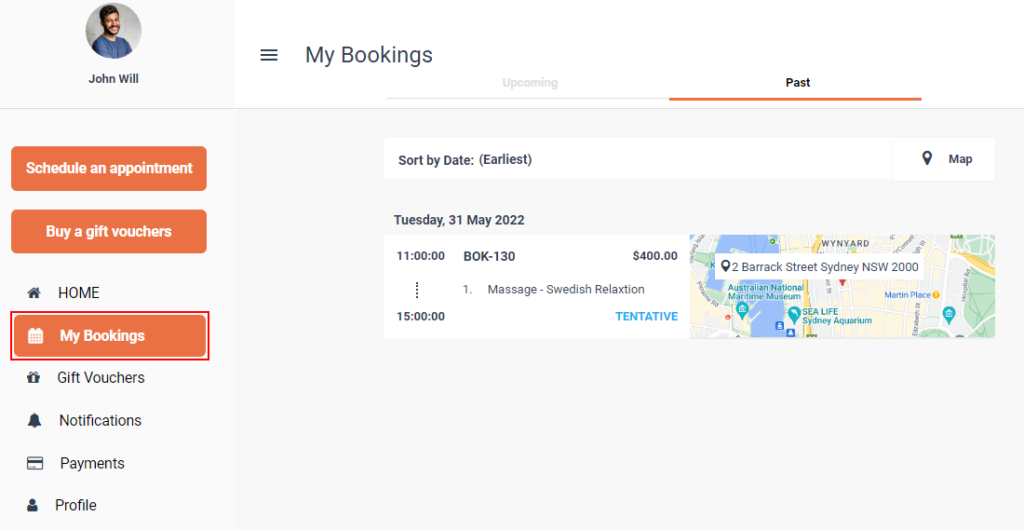
When they click on a booking, they will be redirected to the booking overview where they can:
- Add feedback.
- Rate fieldworker.
- View invoice.
- View their services.
- View booking location.
- Accept or decline quotes.
- Add instructions.
- Add images.
- Edit contact details.
- Add payment methods.
- Upload attachments.
Viewing Gift Cards
Customers can view their purchased gift cards by clicking on “Gift Cards” in the side menu. They can then view upcoming or past gift cards and their details.
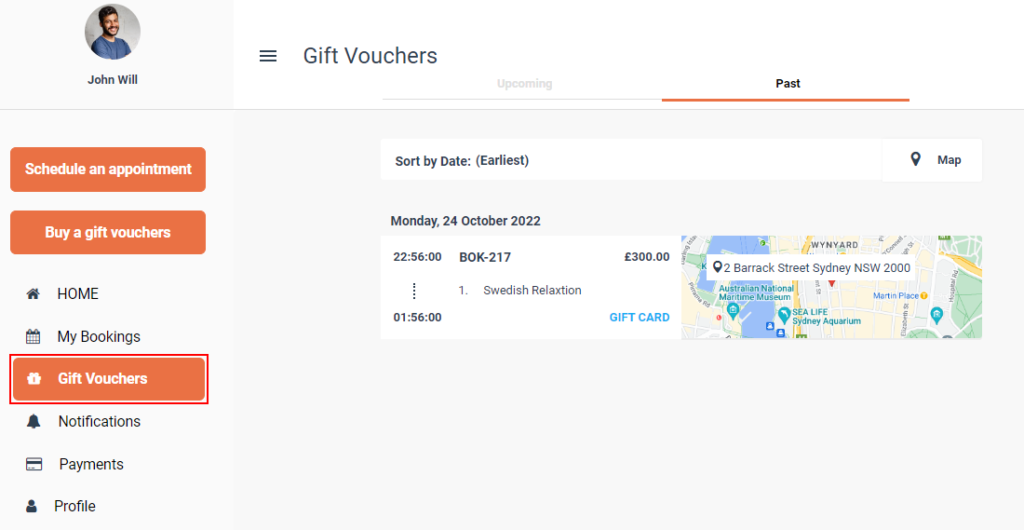
When customers view the gift card, they can:
- Schedule an appointment to use the gift card.
- View the invoice.
- Edit contact details.
- Add instructions.
- Add a payment method.
Viewing and receiving notifications
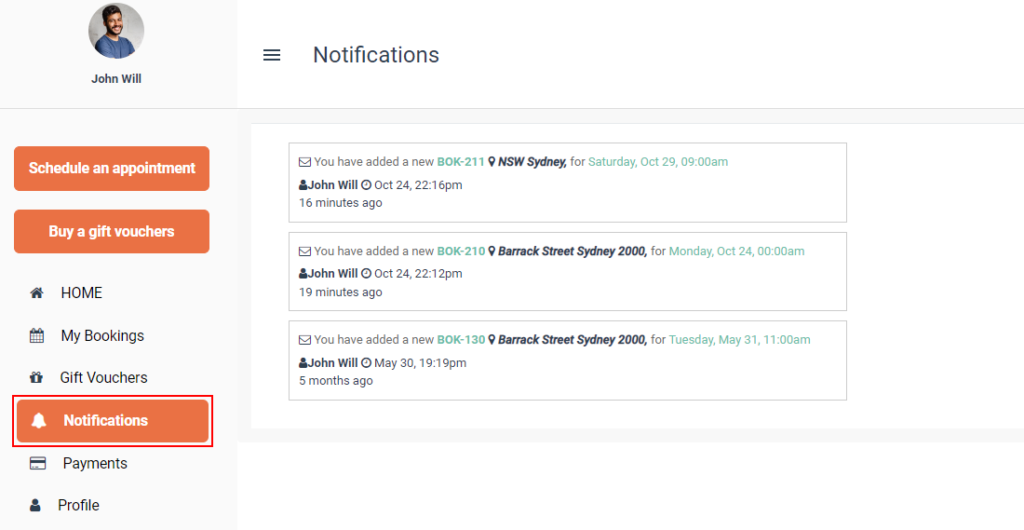
Customers can view notifications related to their bookings by clicking on “Notifications” in the sidebar menu after logging in. They will receive notifications for booking confirmations, modifications, and other updates.
When your customers click on the notification, they will be redirected to the booking overview page to check its full details.
You can decide which notifications your customers receive by changing your settings and granting or denying certain permissions. To learn more about assigning credentials click here.
Chatting with the office
General office chat with the office
To chat with the general office, customers can click on “Messages” under “Support & Feedback” in the side menu. A pop-up window will appear where they can start a conversation, add comments, or upload files.
For discussions regarding specific bookings, quotes, invoices, or complaints, customers can click on “Message us” from the booking overview page. A pop-up menu will appear for them to add comments and upload files.
A pop-up window will appear where they can start a conversation with the general office regarding anything they need, they will simply add a comment or upload a file and click on Post comment.
This conversation will be between you and your customers. You can allow your fieldworkers to get notifications for the conversations sent from your customers, to learn more about how you can let your fieldworkers receive notifications click here.
Comments posted by your customers will be visible in your discussion on the admin portal where you can view the discussions and add comments. To learn more about adding a comment to a discussion, click here.
Chatting with the office regarding a specific booking/quote/ invoice/complaint
Your customers can easily get in touch regarding any booking through the customer portal. Go to My Bookings from the side menu on the left, select a booking, then click on Message us.

A pop-up menu will appear so they add their comments and upload files.
After posting the comment, the conversation will appear on the right of the booking overview. Customers will receive your comments here and can add more comments and upload photos.
Comments posted by your customers will be visible in your discussion on the admin portal where you can view the discussions and add comments. To learn more about adding a comment to a discussion, click here.
Viewing all messages
Customers can view all their messages with the office by clicking on “Messages” in the sidebar menu. They can send messages, upload photos, or delete old comments within each conversation.
For more information please visit Octopuspro user guide, and subscribe to our youtube channel.
