
Deposit & Payment Management for Bookings
A deposit system is a win-win for both business owners and customers. By offering customers the option to make a deposit when booking a service, it demonstrates their commitment, ensuring genuine interest. Not only does this deposit act as a security net for businesses, but it also reduces the chances of cancellations. For instance, in a beauty care business, an admin can require deposits for specific services. Once the service is rendered, the customer pays off the remaining balance.
Deposits serve multiple purposes:
- They vouch for a customer’s intention to avail of a service.
- They lessen the likelihood of last-minute cancellations.
- They allow for the storage of credit card details, ensuring seamless charging of the remaining balance and improved cash flow management.
The terms of the deposit, including its amount, are mutually agreed upon by the admin and the customer. With OctopusPro, businesses can streamline this process. It offers a default deposit feature at the company level, where a standard deposit amount is set for all bookings. Alternatively, the deposit can be auto-calculated as a percentage of the total invoice. This means the deposit would vary based on the total service cost. OctopusPro further lets you set a distinct default deposit for individual services, again calculated as a portion of the invoice. If needed, this automated amount can be manually adjusted per booking or invoice, offering maximum flexibility in ensuring payments for bookings.
Configuring Default Deposit Settings
Default Deposit Configuration via the Admin Portal (Web and App):
-
Navigation: To set the default deposit value, head to Sidebar menu > Settings > Financial Settings > Payment Terms.
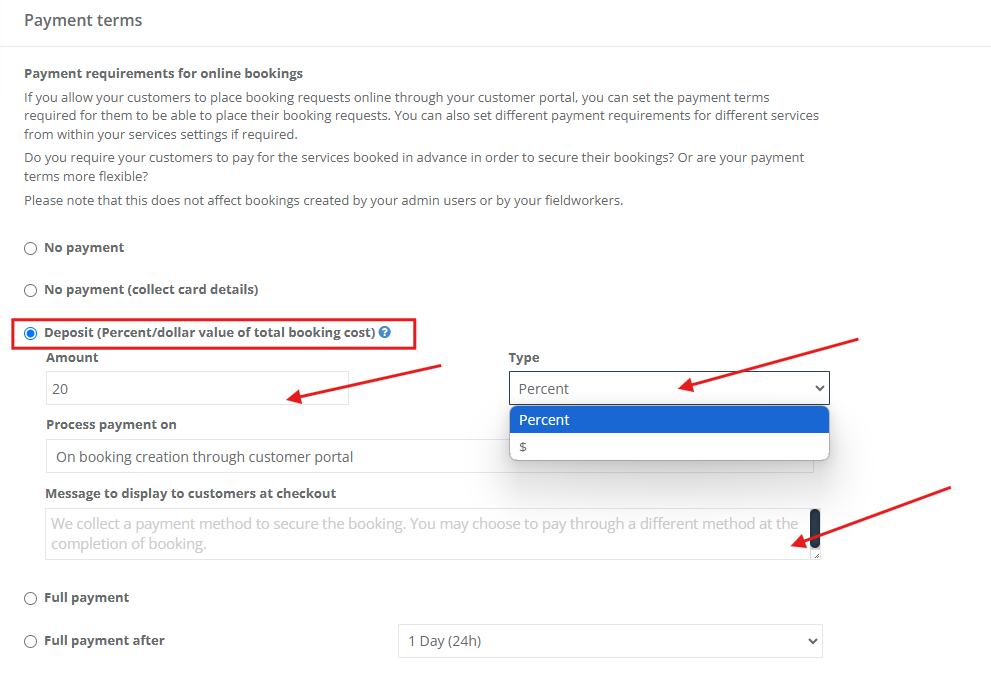
- Deposit Type: Choose your desired format for the deposit: either a Percentage or a Fixed Dollar value. Note that this will act as the standard deposit requirement unless specific values are set for individual services or bookings.
-
Amount Configuration: Determine your preferred default deposit amount, keeping in mind this will be the general standard for most transactions.
-
Source Selection: Decide if the deposit should be a fixed Dollar Amount or derived as a Percentage of the total service cost.
-
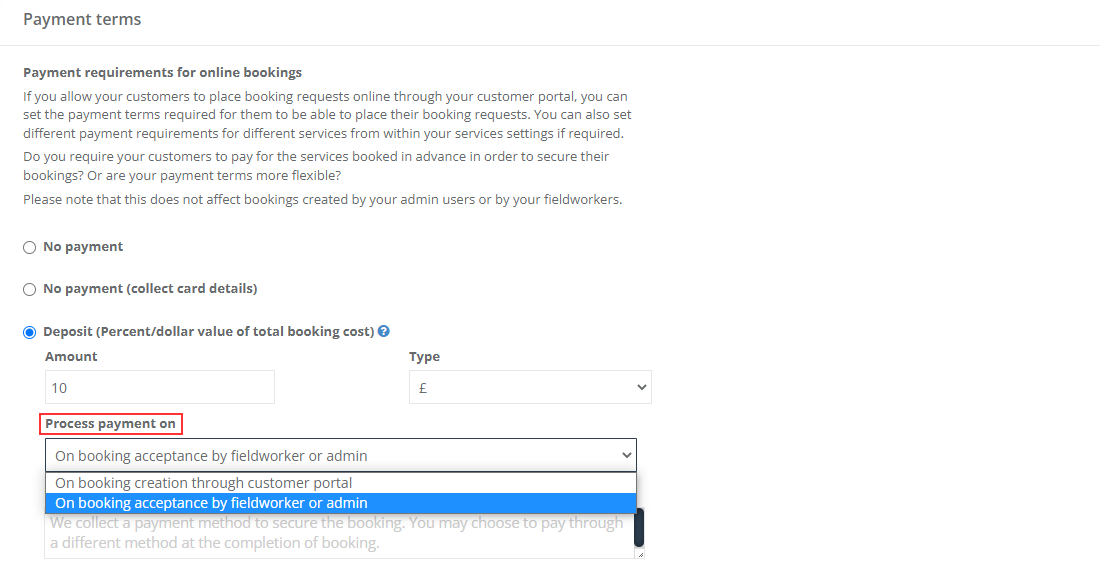
Process Payment Configuration:
- Determine when the deposit should be processed. Choose between:
- On booking creation through the customer portal: This means as soon as the customer finalizes their booking through the portal, the deposit will be deducted.
- On booking acceptance by fieldworker or admin: With this option, the deposit is deducted only after the booking has been approved by either an admin or a fieldworker. This provides an additional layer of validation before any financial transaction.
- Determine when the deposit should be processed. Choose between:
-
Customer Checkout Message: Communication is key. Ensure that your customers fully understand the deposit process. Add any essential details or nuances about the deposit requirements and timing at the checkout phase. This will provide clarity and transparency, enhancing their experience.

Personalizing Deposits for Individual Services
Tailoring deposit amounts for individual services allow businesses to accommodate the unique demands and expectations of each offering. By doing this, companies can better ensure client commitment, optimize revenue, and enhance the booking experience.
Setting Up Deposits for Specific Services:
-
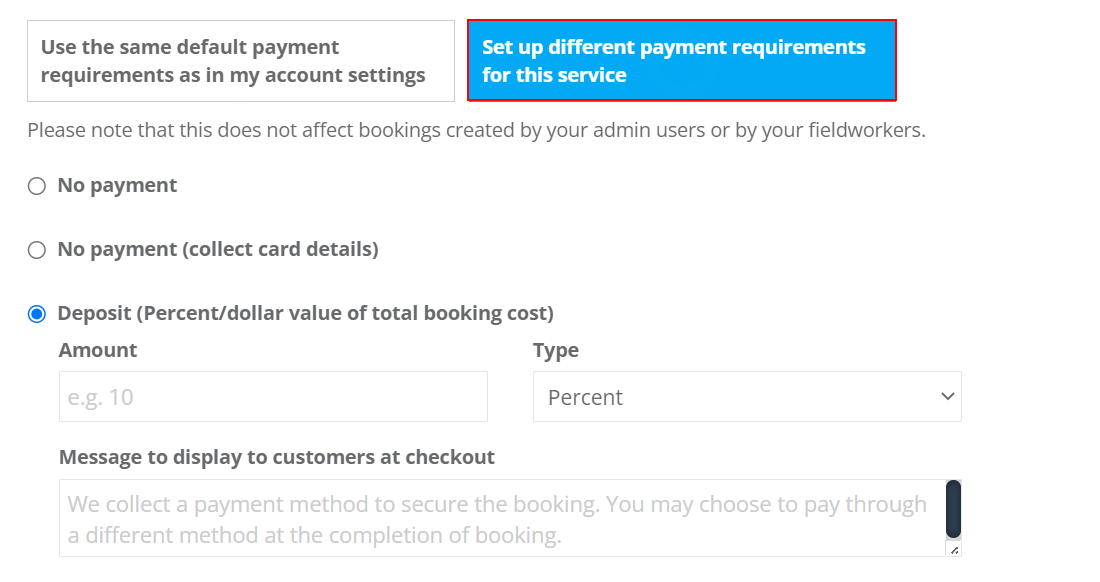
Navigation: Access your service settings by going to Settings > Services Settings > Services.
-
Service Modification: From there, you can either modify an existing service by selecting ‘Edit’ or create a new service.
-
Cost & Payrate Tab: Once you’re in the service details, head over to the ‘Cost & payrate’ tab.
-
Payment Requirements: Click on the option labeled ‘Set up different payment requirements for this service’, then choose ‘Deposit’.
Personalizing the Deposit Amount:
-
Amount or Percentage: You have flexibility in deciding the deposit. You can specify a fixed dollar amount or determine a percentage of the service’s cost.
-
Message at Checkout: To offer clarity to clients and reduce potential confusion, consider adding a brief message that will be displayed during the checkout process. This message can inform customers about why the deposit is necessary or provide details about refund policies.
Service Settings Priority:
It’s crucial to understand the hierarchy of settings:
-
Overwriting Company Settings: Your company might have a global setting, for instance, requiring full payment for services. However, when you specify a deposit for an individual service, this particular setting will take precedence. That means, even if your company defaults to full payments, bookings for this specific service will only require the deposit you’ve set.
-
Consistency in Experience: While flexibility in settings offers businesses a lot of control, it’s also essential to ensure that the booking experience remains consistent and understandable for clients. Regularly review and possibly consolidate settings to avoid potential customer confusion.
By giving individual services their tailored deposit requirements, businesses can cater to the unique nature of each service, ensuring a balanced and fair transaction process for both the provider and the customer.
Deposit Verification: To assure both service providers and customers, a “Deposit Paid” badge or label will confirm successful deposit transactions in booking details.
Adjustments on an Individual Booking Basis
- There may be circumstances where a specific booking requires a different deposit amount than what’s set as the default or even for a specific service. Whether it’s due to a special promotion, a loyal customer, or unique demands for that specific booking, it’s essential to know how to make these adjustments effectively and transparently.
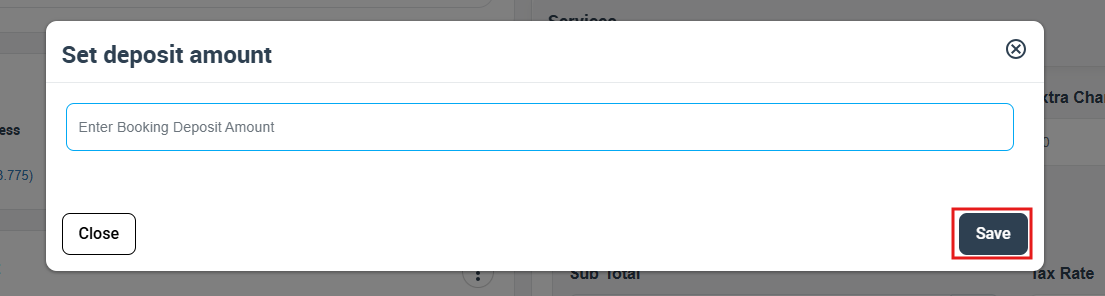
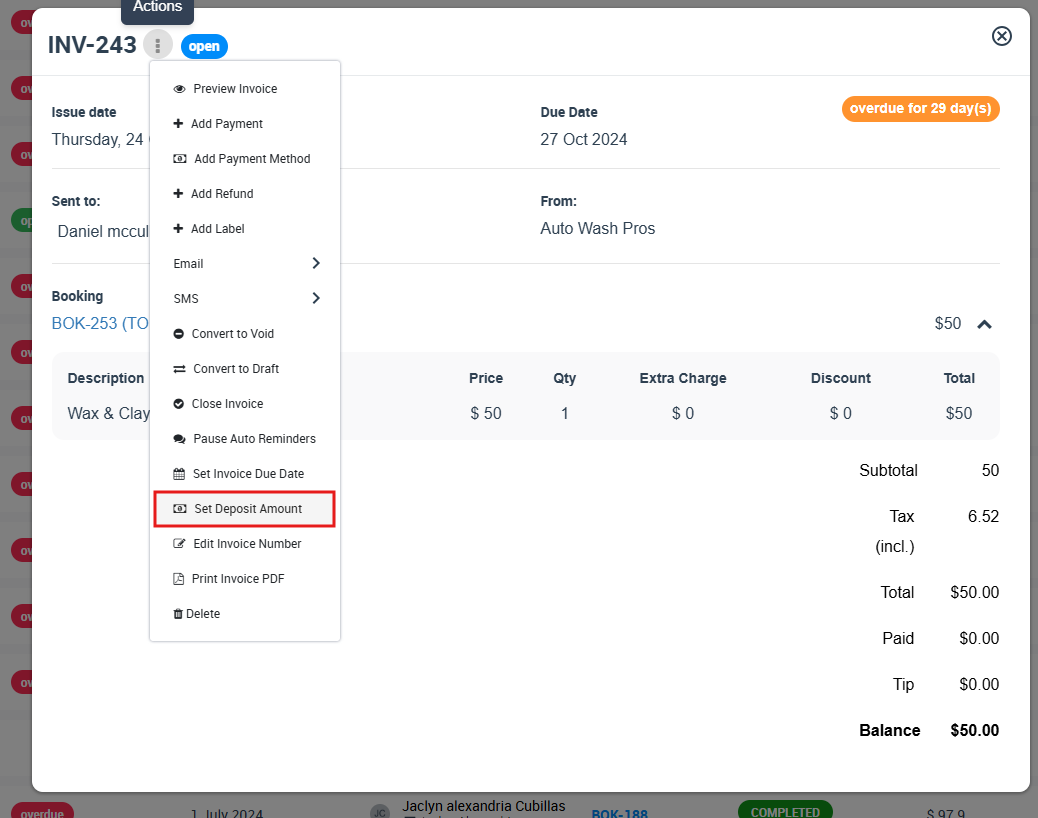
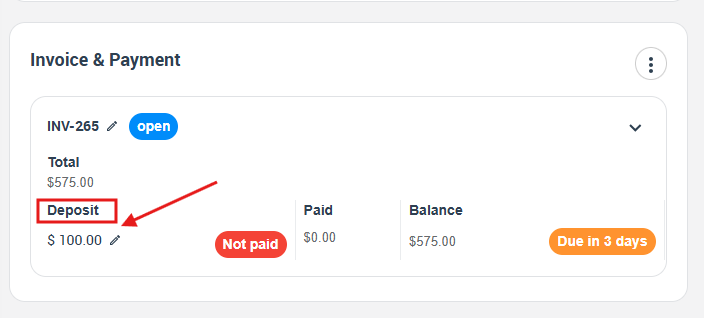
- Booking-Level Adjustments: Find the specific booking you want to adjust. In the Invoice & Payment section, either increase or decrease the deposit value, regardless of default or service-specific presets from clicking on the actions button and selecting ‘Set Deposit Amount’.
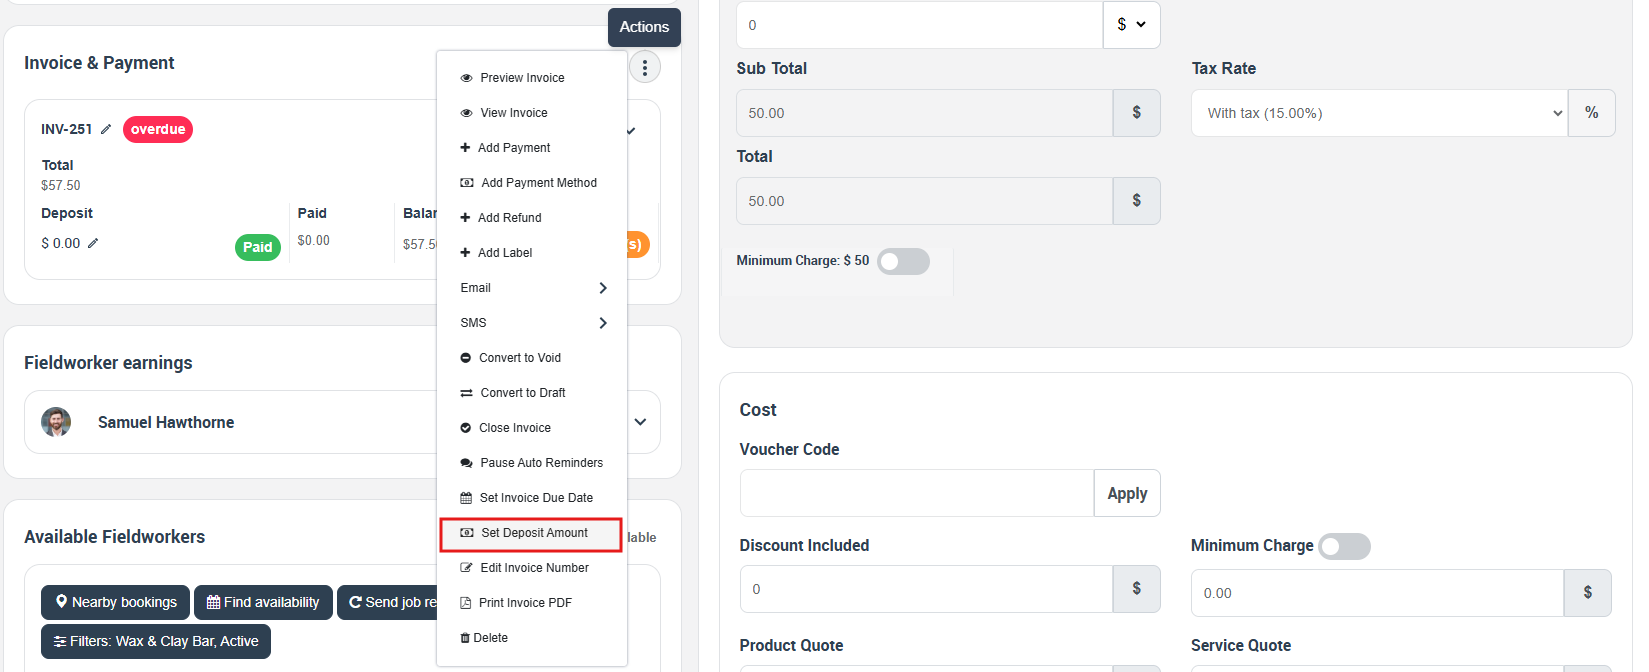
- A popup will appear and you can enter the booking deposit amount.
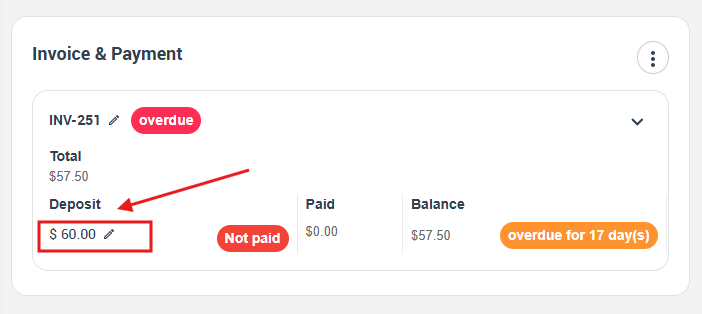
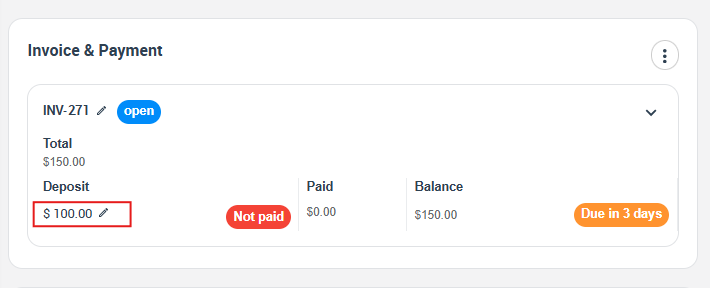
- You can view ‘Deposit’ amount in ‘Invoice& payment’ section.
Deposit Management in Merged and Consolidated Invoices
Merging Invoices – The Basics:
-
Purpose: For those clients who schedule services regularly or book multiple offerings, merging invoices can streamline and simplify the billing procedure.
-
Procedure:
- Navigate to Invoices > All invoices.
- Select the invoices you intend to merge.
- From the dropdown menu, opt for Merge invoices.
-
Important Considerations:
- All merged invoices should pertain to a singular customer.
- Invoices that already have payments recorded against them cannot be merged.
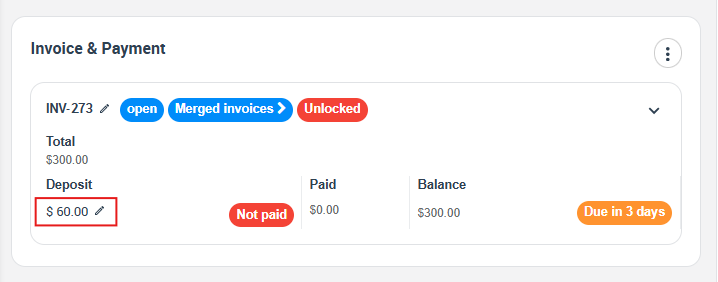
- Post-merging, the total deposit for the consolidated invoice is the sum of individual deposits. For instance, if you consolidate two bookings, each with a deposit of $100, the resultant merged invoice will reflect a deposit of $200.
Adjusting Deposit in Consolidated Invoices:
-
Post-Merging Modifications: Once you’ve merged invoices, you have the flexibility to alter deposit values.
-
Methods:
- Booking Details Page: To modify the deposit for a specific booking:
- Access the booking’s detailed page.
- Go to Invoice& payment section > Set deposit amount.
- Input the new deposit value and confirm your changes.
- Alternatively, you can make direct adjustments from the invoice summary. Simply click on the edit icon adjacent to the deposit value.
- Booking Details Page: To modify the deposit for a specific booking:
-
- Invoice Page: For changes at the invoice level:
- Head to the consolidated invoice page.
- Click on the Actions button, then select ‘Set deposit amount’.
- Input the new deposit value and confirm your changes.
- Invoice Page: For changes at the invoice level:
Remember, always ensure that your clients are informed of any deposit modifications to maintain transparency in your billing process. Visit the merge invoices page to learn more.
Invoicing for Recurring Bookings:
For repeated bookings, control how they’re invoiced:
- Visit the booking details page.
- Choose Actions > Repeat booking
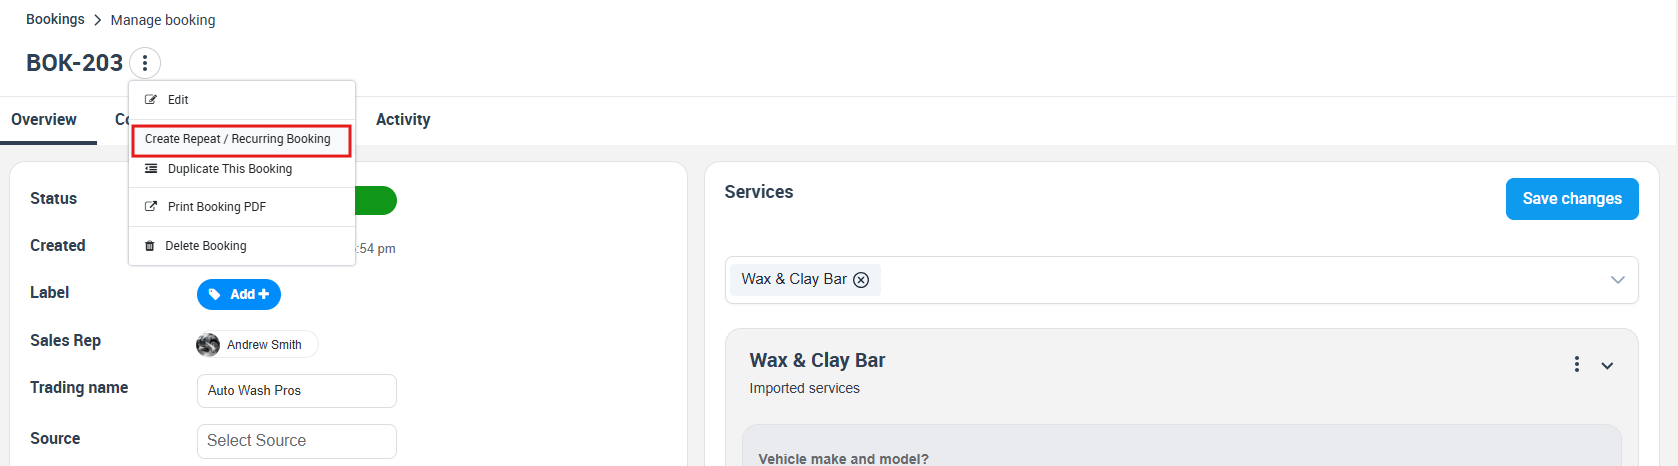
- In the pop-up, specify repetition frequency.
- Opt for Creating a merged invoice for all recurring bookings. This consolidates deposits from all repeated bookings.
Note: Customer-initiated recurring bookings from the portal have individual invoices. However, they can be manually merged later.

Packages & Deposit Consolidation:
Packages are bundled iterations of a single service. For instance, a spa may offer a package of five massages.
- To define a package, head to Settings > Services and modify the desired service, and scroll down to ‘Create new package’.
- opt for Generate one invoice that combines all bookings within the package.
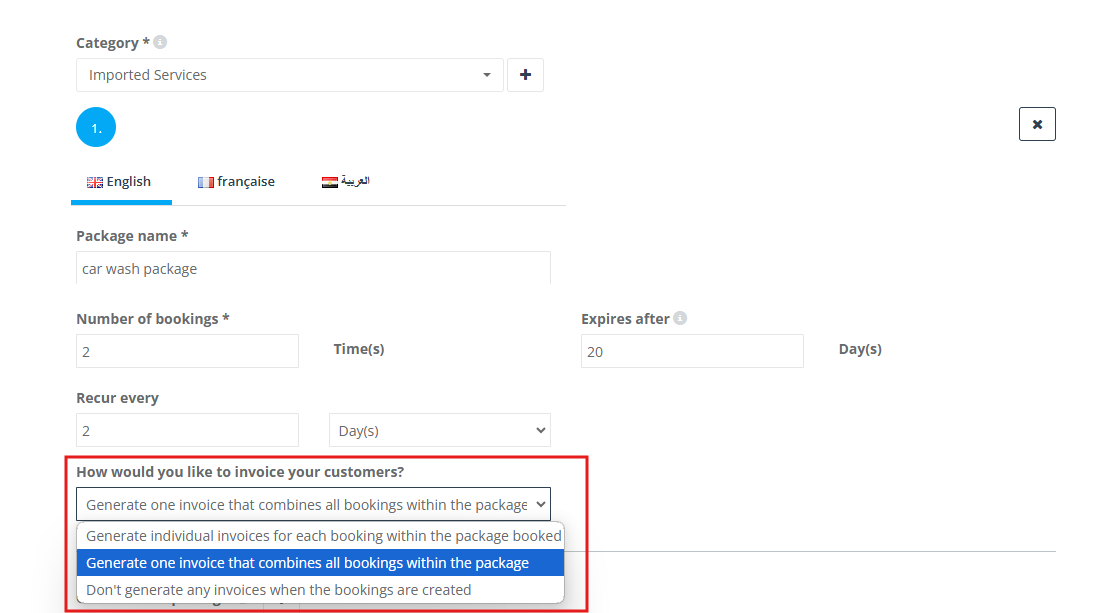
- When a package is reserved, the system merges all invoices automatically. The deposit is an aggregate of all included bookings. E.g., a two-service package, each with a $30 deposit, will display a $60 deposit on the merged invoice.
Reverting Merged Invoices:
There are occasions where a consolidated invoice needs to be separated:
- Navigate to the combined invoice.
- Click Actions > Revert merging invoices.
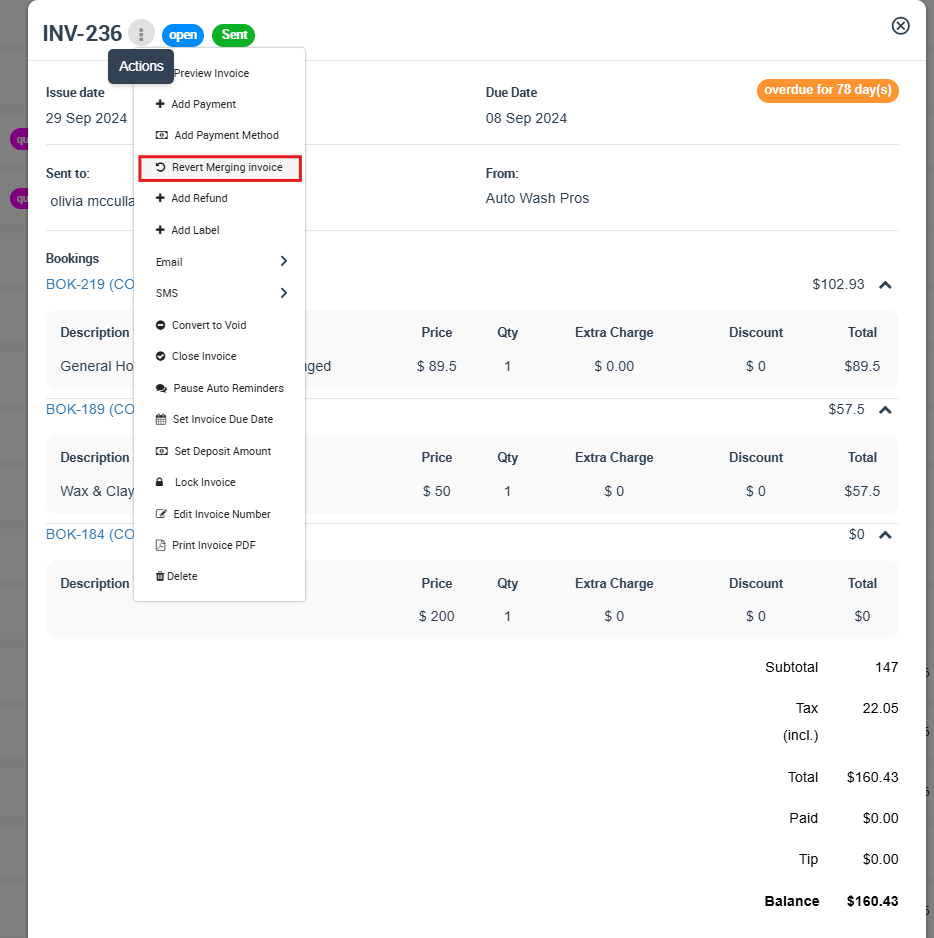
Post-reversion, each invoice reverts to its original deposit value. If you adjusted a deposit in the merged version, you’ll need to reset it individually post-separation.
Requesting Deposit Payments from Customers
Invoice Creation & Viewing:
- Navigate to bookings in the admin portal.
- Choose a booking and generate its invoice.
- Unpaid deposits are highlighted in red.
Methods of Requesting Deposit:
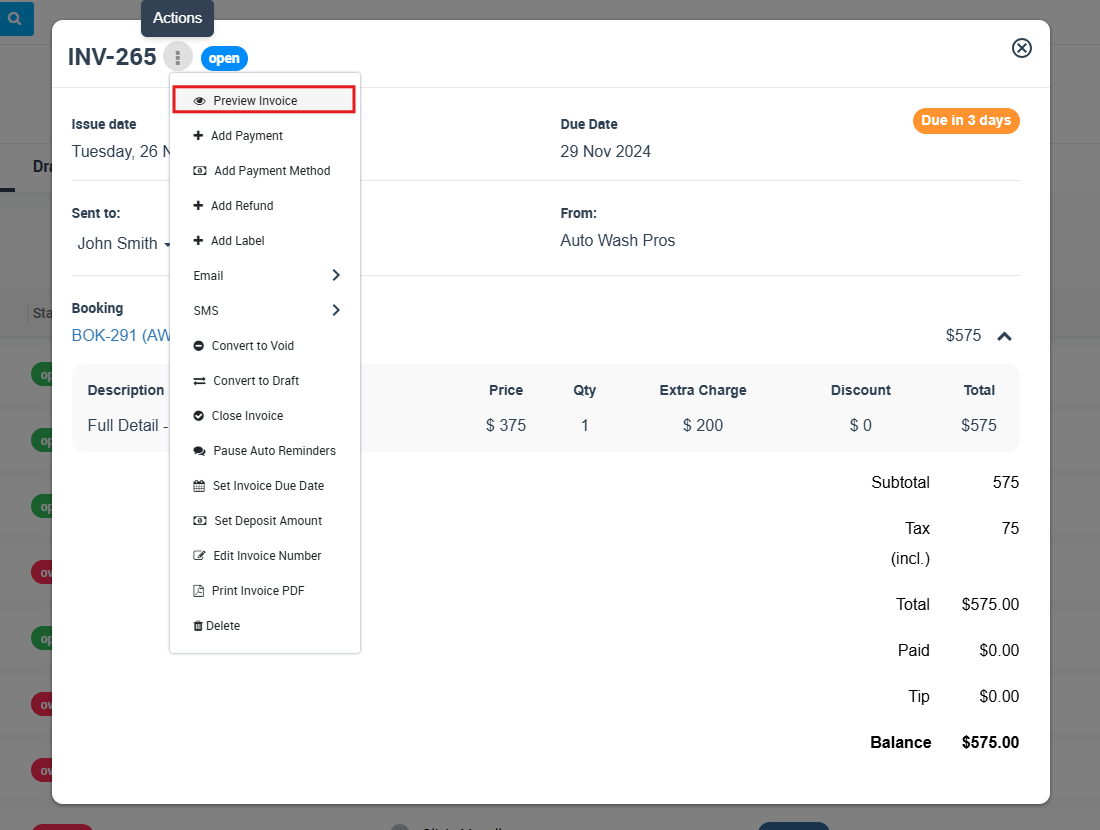
- Via Invoice: After viewing the invoice, click on the actions button then from “Email” button, select “Request Deposit”.
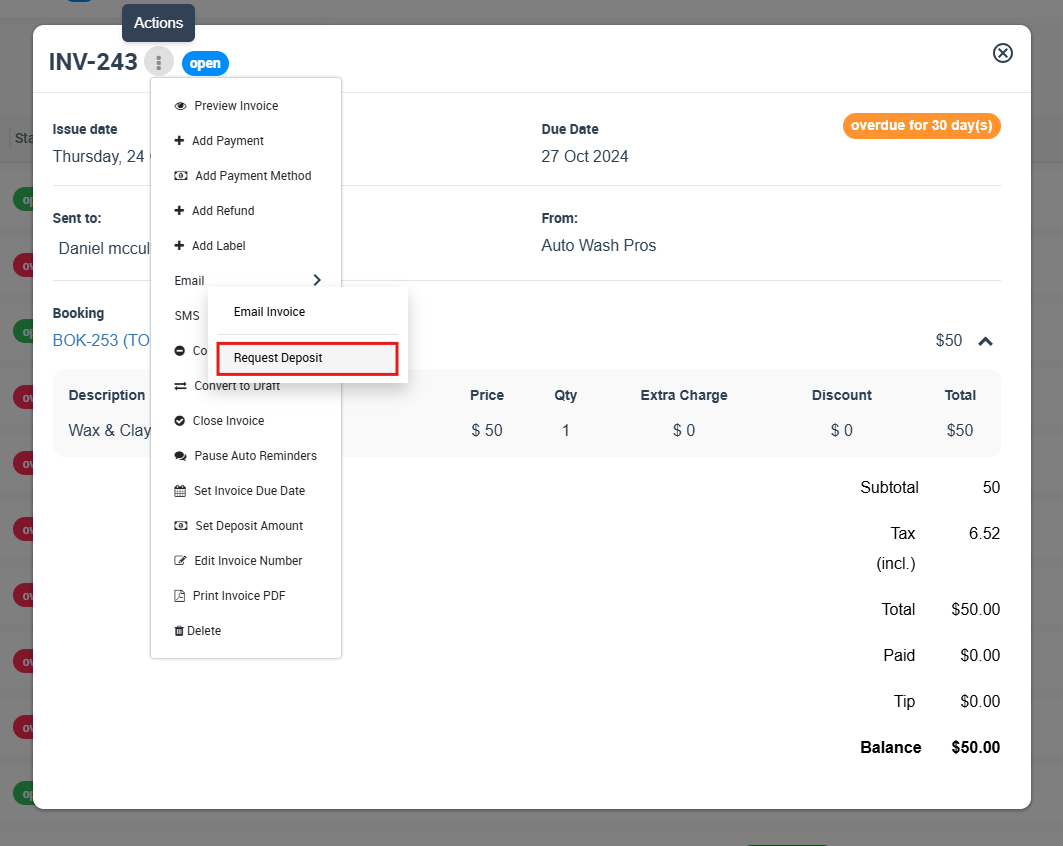
When you click on the email icon, an email form will appear where you can add Cc, subject, and attachments.

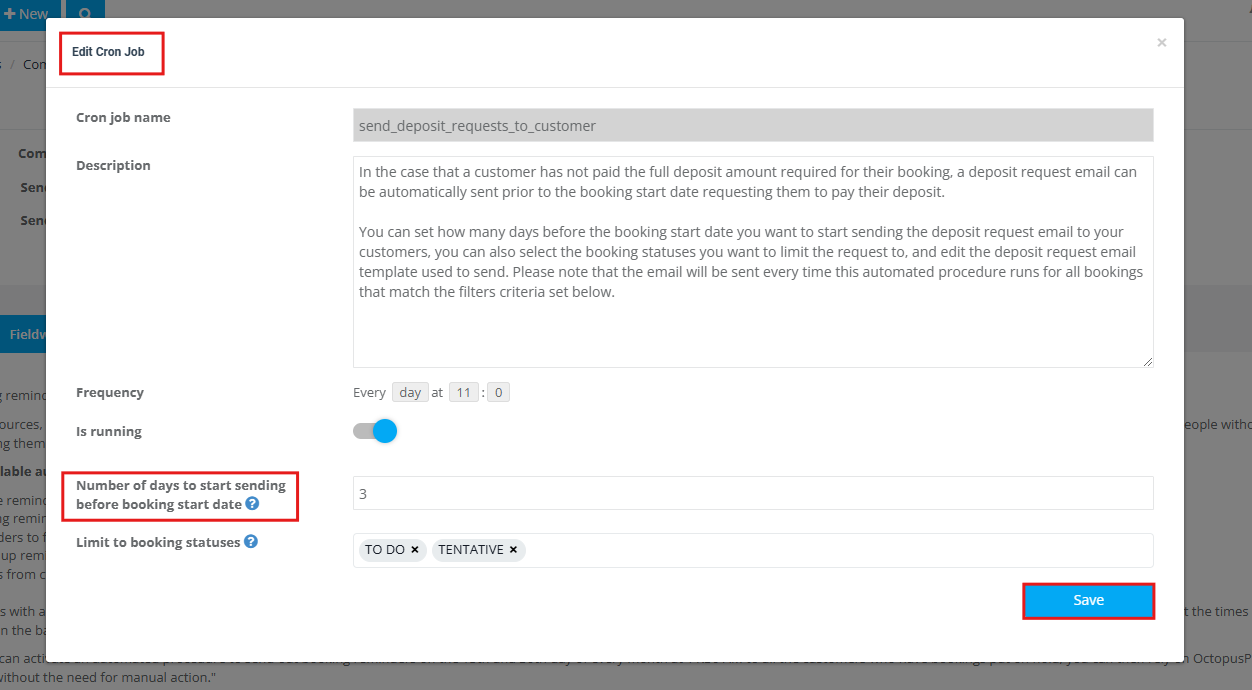
2. Automations: Activate the “Send Deposit Requests To Customer” automated procedure in “Settings > Communications > Automation”. Configure it to send deposit requests if the full amount isn’t paid before the booking start date. Visit the automated procedures page to learn more.
Customizing and Automating Deposit Request Communications:
- Customize message templates in “Settings > Communications > Templates & Canned Responses”. Edit the “Deposit request to confirm booking” templates as needed.
- For automatic reminders, use “Settings > Communications > Automation”. Set parameters like:
- Frequency of reminders.
- Number of days before booking to start sending.
- Specific booking statuses to target.
- The exact email template to use.
- Note: The system will send requests based on the criteria whenever the automation runs.
Customer Payment Process & Booking Status Updates:
- Through Direct Deposit Request: Customers receive a deposit request and are directed to a payment page.
- During Online Booking: When customers attempt to book through the booking widget or customer portal on your website, and if there’s a deposit requirement, they will encounter it during the booking process.
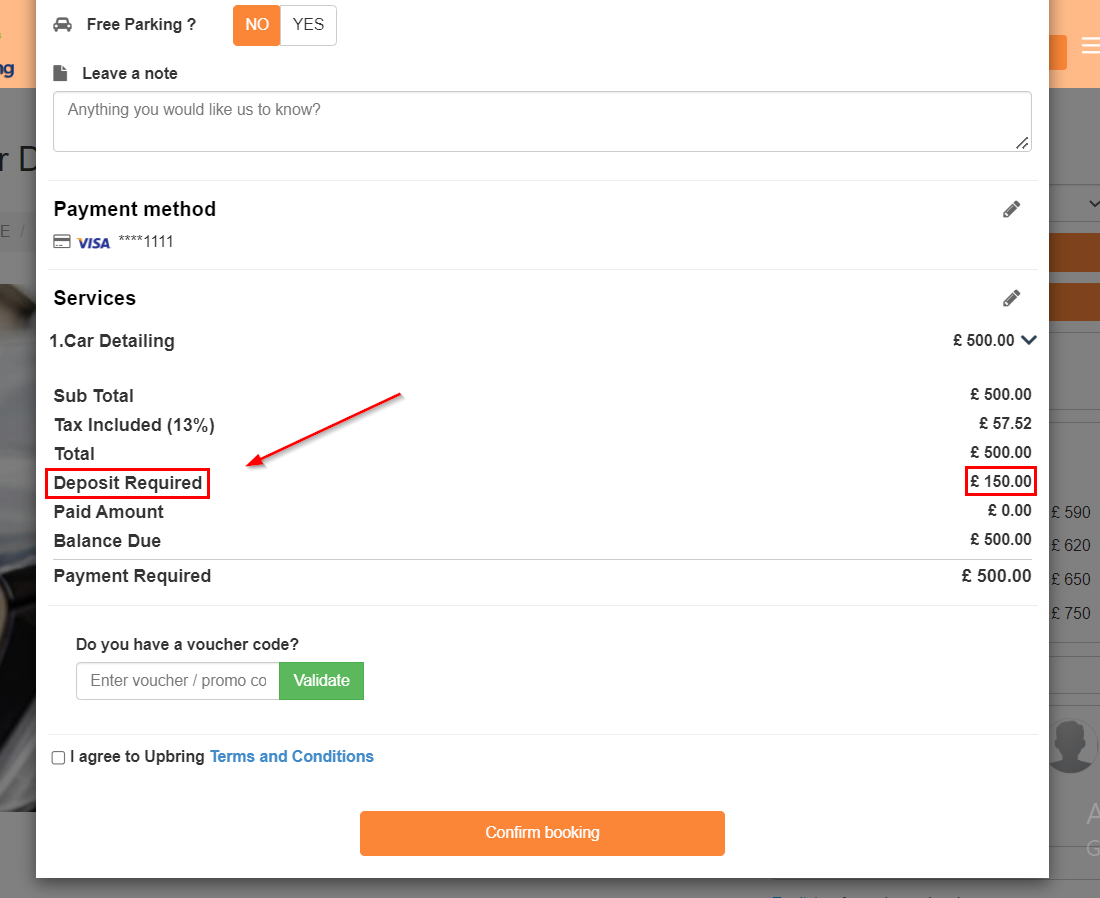
- They see the due amount, choose a payment method, and can securely save payment details.
- After completing the payment, an automatic “Deposit Paid” label is added to both the invoice and the booking

Configuring Deposit Requirements for Online Bookings
For businesses that use the customer portal for online bookings, the ability to require deposits ensures both financial security and a commitment from customers. Here’s how to set up and manage deposit requirements:
Setting Basic Deposit Requirements:
Navigate to Settings > Financial Settings > Payment terms. Within this section, determine whether a deposit is mandatory for bookings. This step ensures that a part payment is collected in advance, cementing the commitment to the booked service.
Note: The deposit settings are exclusive to bookings made via the customer portal. Admin-generated or fieldworker-generated bookings aren’t affected.
Dictating the Timing of Deposit Deductions:
Here you have the flexibility to pinpoint the exact moment the deposit is taken:
-
On booking creation through the customer portal: The deposit is instantaneously processed once a customer finalizes their online booking.
-
On booking acceptance by fieldworker or admin: The deposit is only deducted after the booking receives a green light either by an admin or a fieldworker.
Deposits Upon Booking Acceptance
-
Admin’s Role in Accepting a Booking Request:
-
Booking Review: Once a booking request is received through the customer portal, it initially holds the status of “Tentative.” As an admin, you need to review this tentative booking. This ensures that all the prerequisites, such as availability of resources, meeting customer requirements, and other administrative checks, are considered.
-
-
-
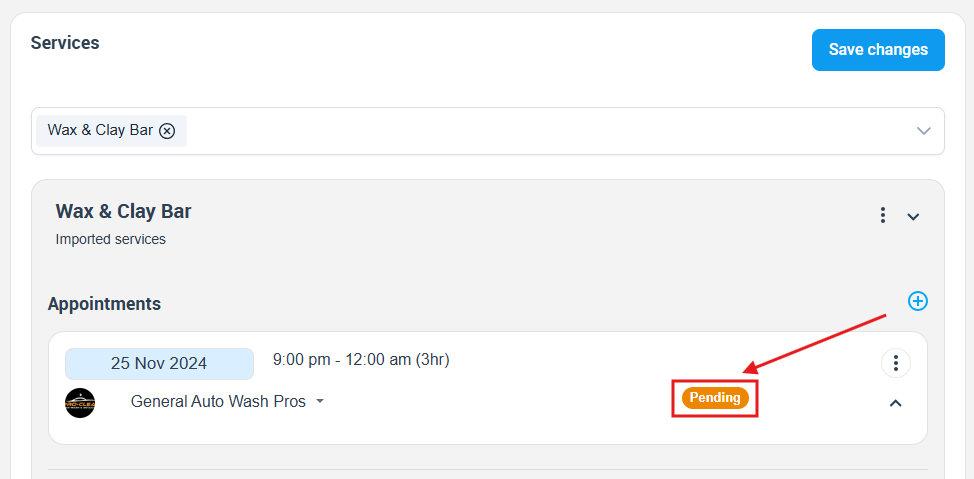
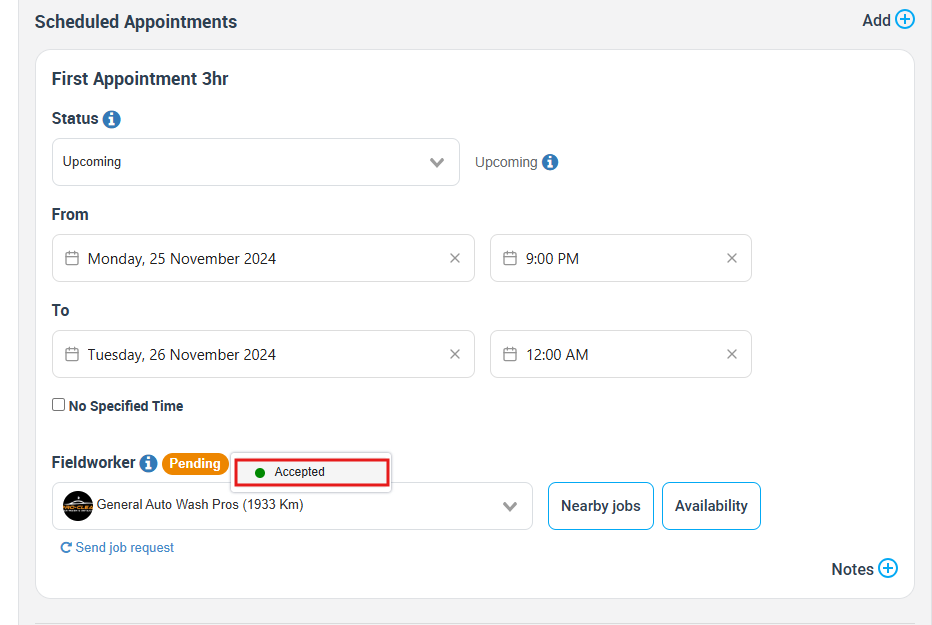
Accepting the Booking: If the booking meets all the necessary criteria, the admin can then approve it. To do this, navigate to the booking details page. go to the service section and look for the ‘pending’ name. Clicking this will give you the option to accept the booking on behalf of the fieldworker or the organization.
-
-
-
Deposit Deduction: Once the booking is accepted by the admin, the system, based on its configuration, triggers the deposit deduction. The stipulated deposit amount is then deducted from the customer’s account, ensuring the service’s commitment from both ends.
-
-
Fieldworker’s Role in Accepting a Booking Request:
-
Receiving Notification: Upon a customer making a booking through the portal, the associated fieldworker is notified. This could be via an app notification, email, or other configured means.
-
Booking Review: The fieldworker checks the booking details, considering factors like location, timing, and any specific requirements set by the customer.
-
Accepting the Booking via Fieldworker Application: If the fieldworker deems the booking feasible, they can accept it directly through their dedicated application. The app typically provides an intuitive interface allowing fieldworkers to quickly approve or decline booking requests.
-
Deposit Deduction: Just like in the admin’s scenario, once a fieldworker approves a booking, the deposit mechanism is activated. The customer’s deposit amount is then automatically processed, confirming the booking and setting the stage for service delivery.
-
Booking Status Transition Involving Deposits:
The status of bookings can shift based on deposit payments:
From “Tentative” to “To-do” Status: Upon receipt, a booking begins in a “Tentative” state. The status shifts to “To-do” once:
-
An admin or fieldworker gives their nod of approval. This can be done on the booking details page—just scroll to the service section and use the ‘pending’ name next to the fieldworker’s name. Fieldworkers can also give their approval via their application.
-
The customer pays the stipulated deposit amount. The method of this deposit collection is contingent on your earlier deposit settings—either immediately upon the act of booking or after the booking is confirmed.
With these configurations, you can effectively manage deposits, ensuring a seamless and structured booking process tailored to your operational needs.
Managing Booking Labels
- Addition: When a deposit payment is processed, the “Deposit Paid” label is auto-added to the invoice and booking.
- Refunds: The “Deposit Paid” label auto-removes when a deposit is refunded.
- Viewing Labels: These labels can be spotted on the listing page, calendar, and booking view/manage page.
Identifying Paid Deposits with Labels
-
Overview: The “Deposit paid” label makes it easier to differentiate between bookings and their deposits paid.
-
How it’s Shown:
- Calendar: Go to Calendar from the left sidebar menu, click on a booking, and if the deposit is paid in full, the “deposit paid” label will appear.
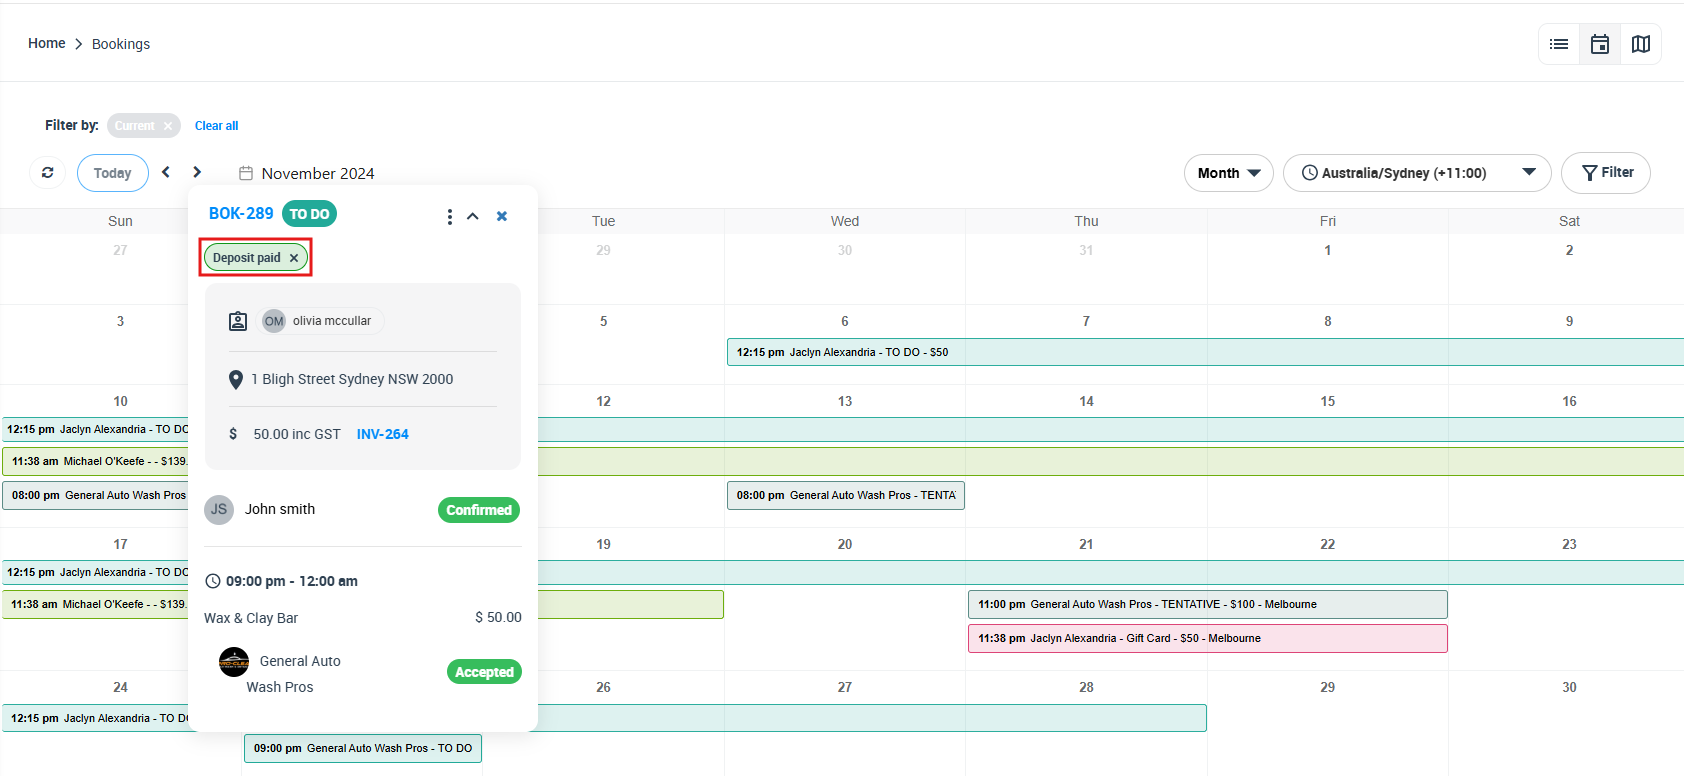
- Booking List Page: Navigate to Bookings > Upcoming or past bookings. Bookings with their deposits paid will be marked with the “deposit paid” label.

- Booking Details Page: Within a specific booking, view the label section on the right to see if the “deposit paid” label is present.

3. Removing the “Deposit paid” Label: This label is removed automatically from the booking when the total amount is paid in full and approved by the admin, ensuring the balance due is zero.
Refunding Deposits
Admin Refund Process:
-
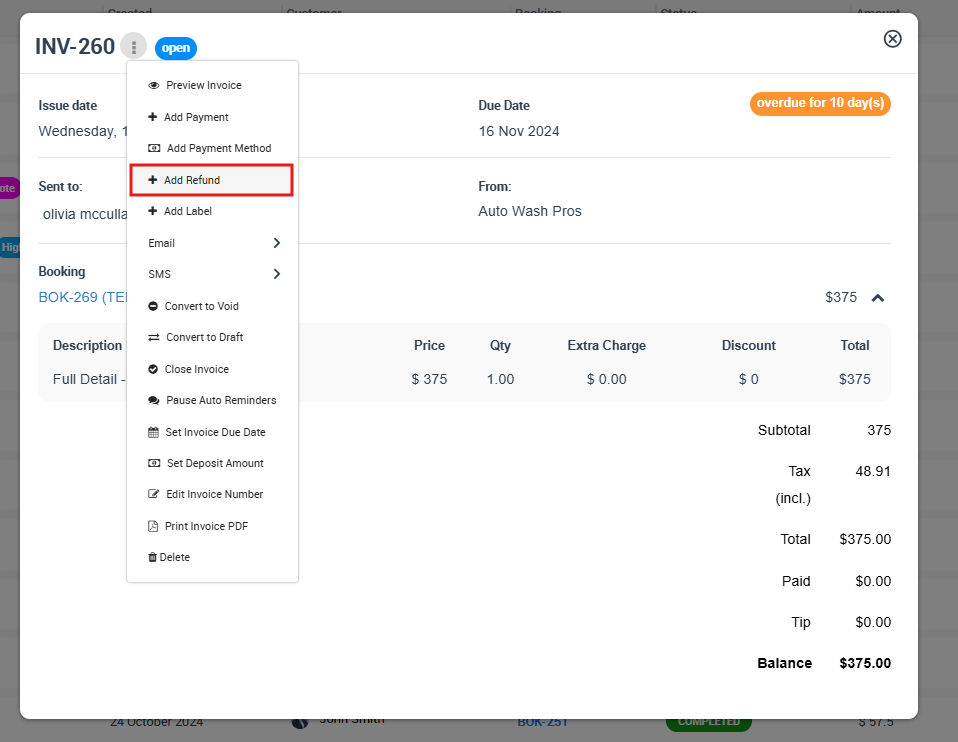
Booking Details Page:
- Access this page.
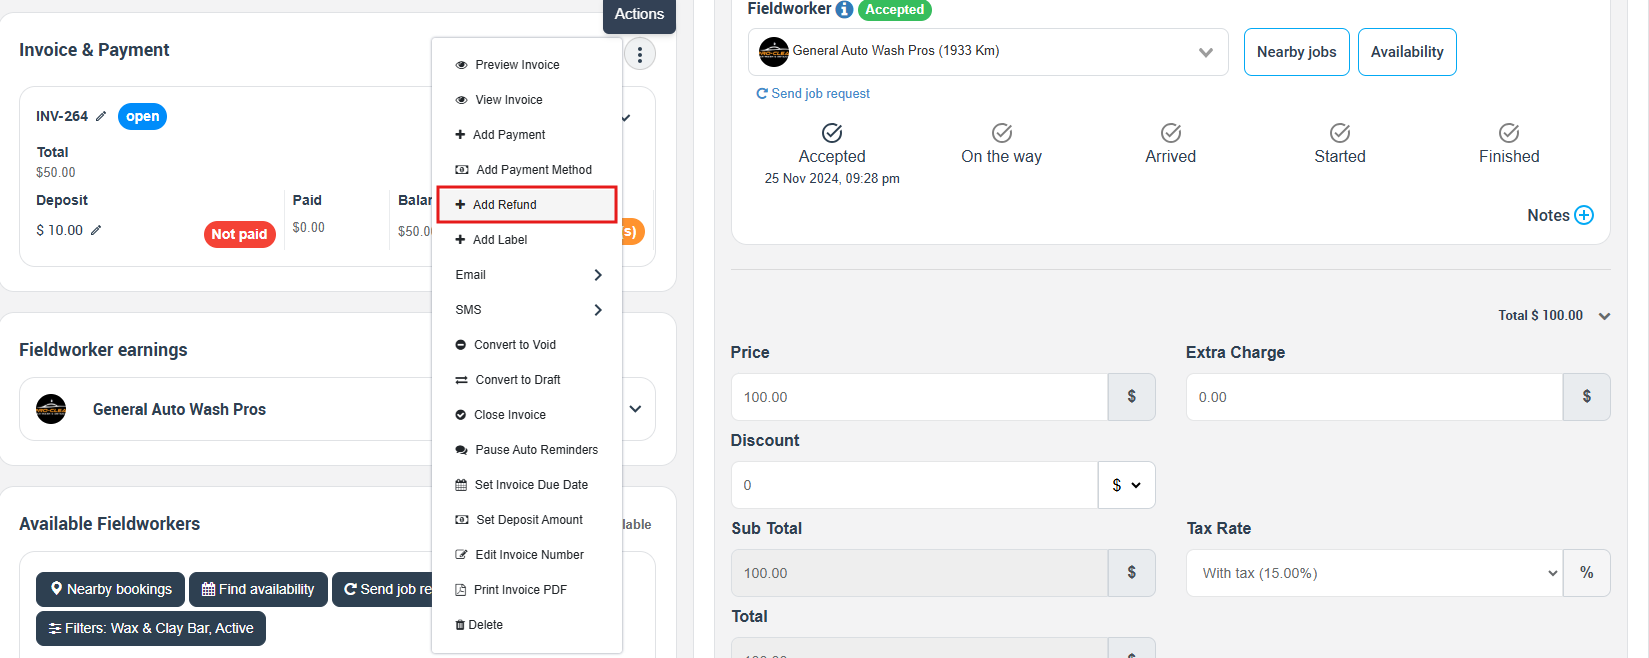
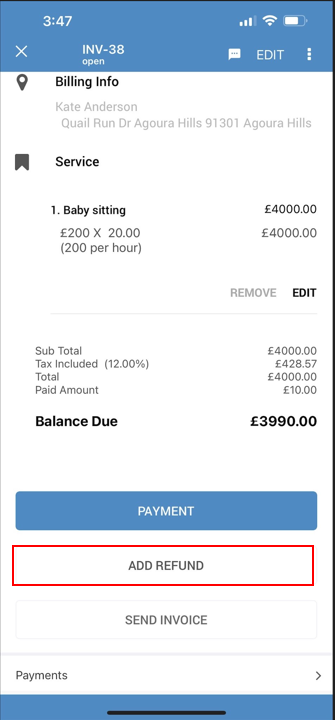
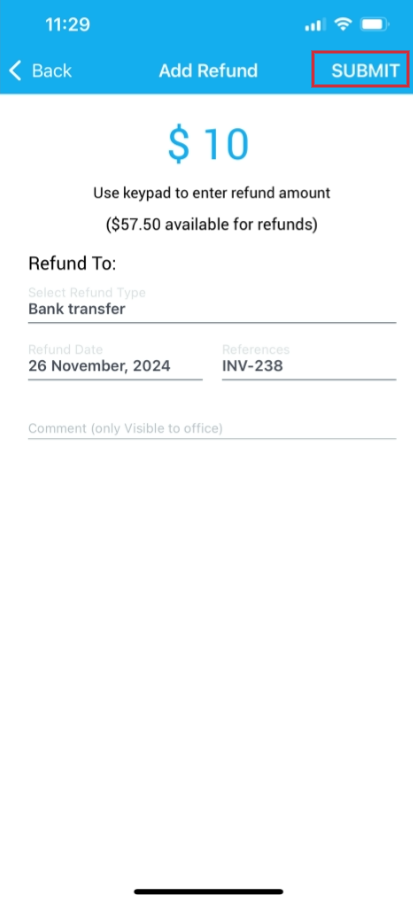
- scroll down to ‘Invoice & payment’ section, Click on the actions button then select ‘Add refund’.
- Specify the amount to be refunded, designate the payment type, and note the reason for the refund.
- Once a refund is initiated, an admin needs to provide final approval.
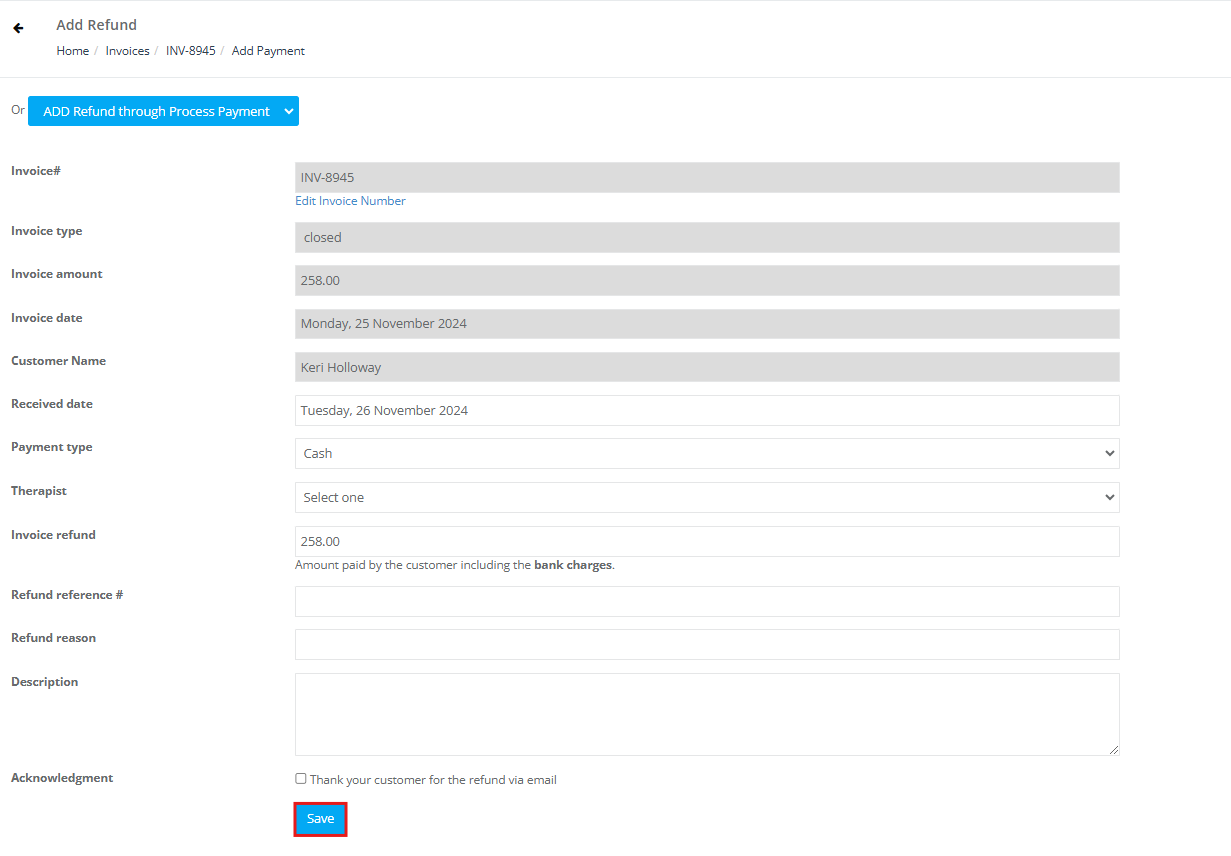
- Invoice Details Page:
- Initiate a refund by clicking on the actions button then select ‘Add refund’.
- For viewing existing refunds, scroll down to the invoice details page and view the refund tab at the bottom.
- It will be redirected to ‘Add refund’ page enter all refund details, then click on ‘Save’.
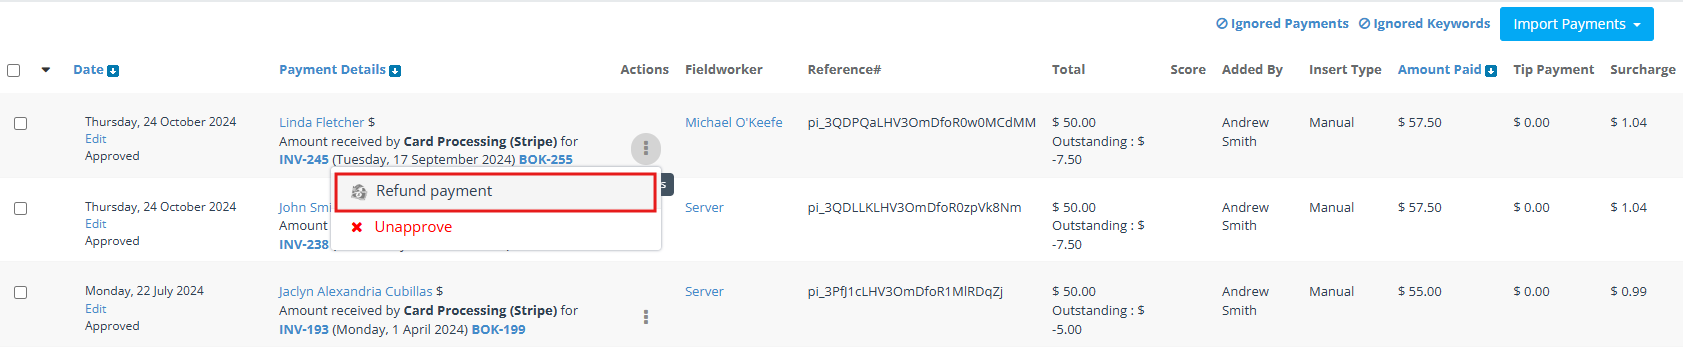
- Payments List Page:
- Head over from the side menu to Invoices >Payments Reconciliation.
- Use filters as needed.
- Choose ‘Refund payment’ for the relevant payment entry.
Fieldworker Refund Process:
Note: This is permissible only if fieldworkers have been endowed with refunding permissions via user roles credentials. Settings for these permissions can be located at Company settings > Users > Roles > Assign credentials.
-
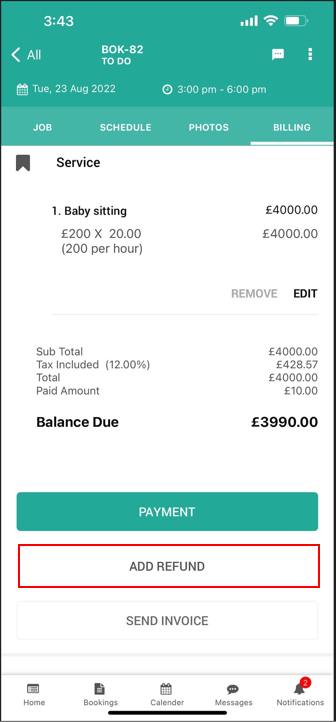
Booking Details Page:
- Using the Fieldworker app, access the intended booking.
- Click on Billing > Add Refund.
- Define the refund amount and choose the refund type.
-
Invoice Details Page:
- On this page, select ‘Add refund’.
- Specify the refund amount and type.

-
Payments List Page:
- Within the fieldworker’s application, navigate to Invoices > All payments.
- Identify and select the payment intended for refund.
- Click ‘Add refund’, determine the amount, choose the type, and finalize the process.

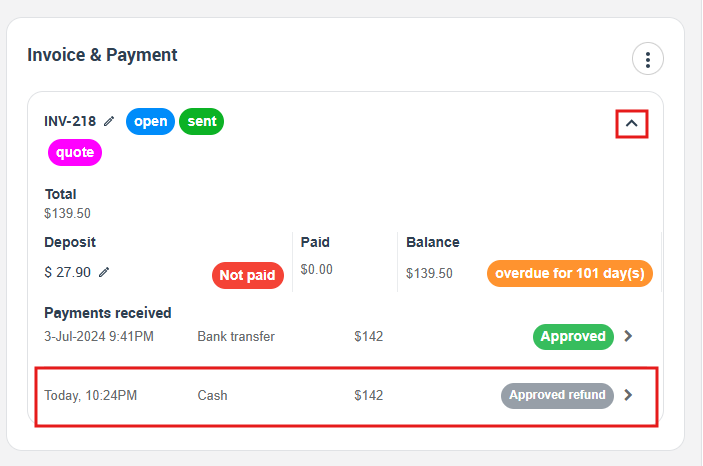
You can go to Invoices > Refund Approval from the sidebar menu, You will be able to view all refunds added, their amounts, and their approval status.

To view added refund go to the booking overview page, Scroll down to the Invoice & Payment section click on the actions button to view the details of refund.
Calculating Deposits
- Default Settings: Deposits are automatically determined based on settings when quoting or creating a booking.
- Example: A 10% deposit setting will calculate the deposit as 10% of the total service price.
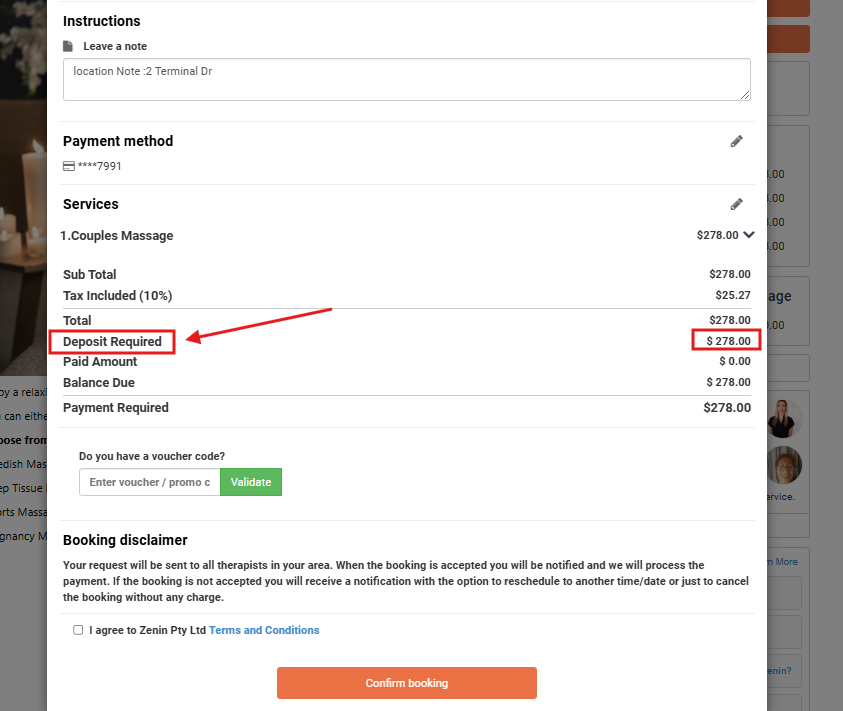
- Visibility: Deposit details appear during booking in the admin portal under the total amount. Customers also see this when they schedule via the customer portal. It displays below the total before they finalize their booking.
Multi-Service Bookings & Deposits
-
Uniform Setting: If you have a company-wide setting, it applies uniformly across all services.
-
Custom Settings Per Service:
- If one service out of multiple has a custom setting, that service uses its deposit rate. The others use the default rate.
- If two services have distinct settings and another doesn’t, each service uses its own rate. The one without a custom setting uses the default rate.
- The total deposit is the sum of the deposit for each service.
Admin’s View of Deposits
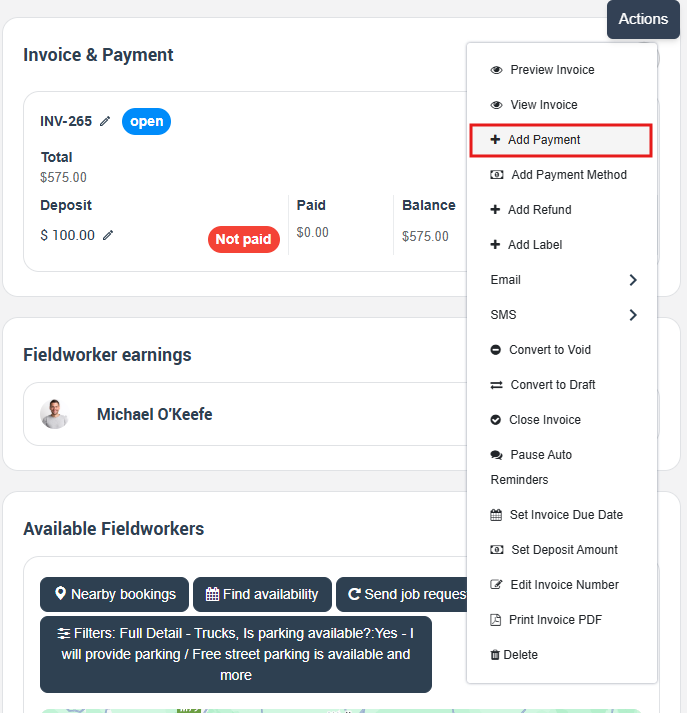
- Booking Details Page:
- Here, you’ll find deposit details, including its payment status.
- Deposits highlighted in red indicate a pending payment, while green signifies a completed payment.
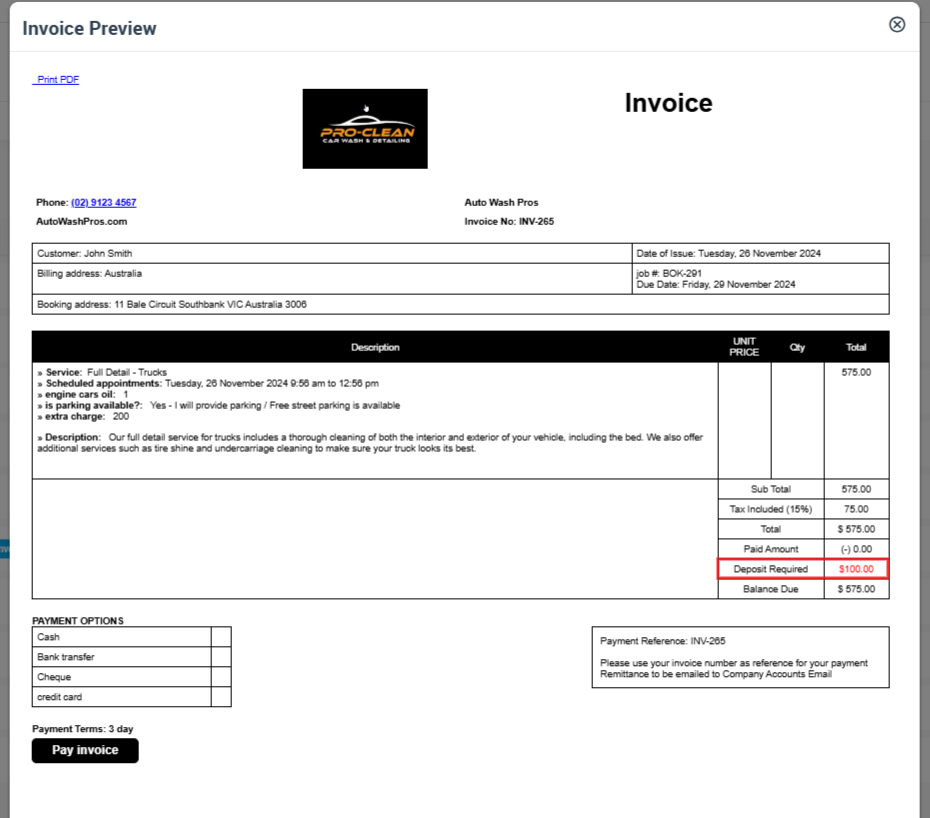
2. Invoice Details Page:
- Accessible from the booking in ‘Invoice & payment’ section or from All Invoices page. This page also displays deposit details in the ‘preview invoice’, using the color-coded system for clarity.
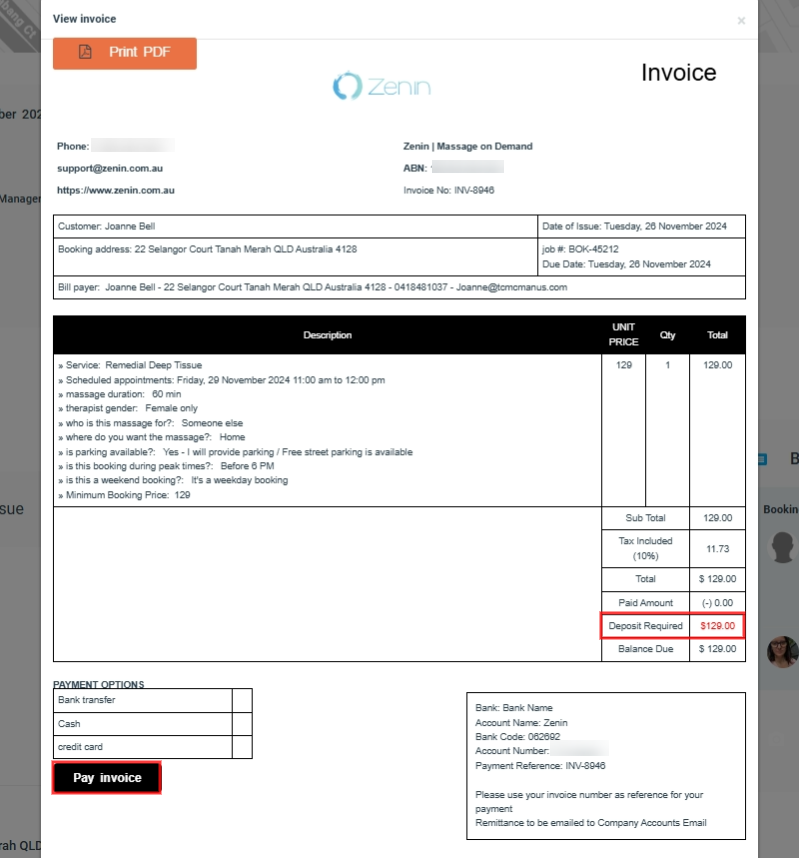
- The invoice PDF will appear and you can see the deposit required amount.
3. Customers’ View of Deposits
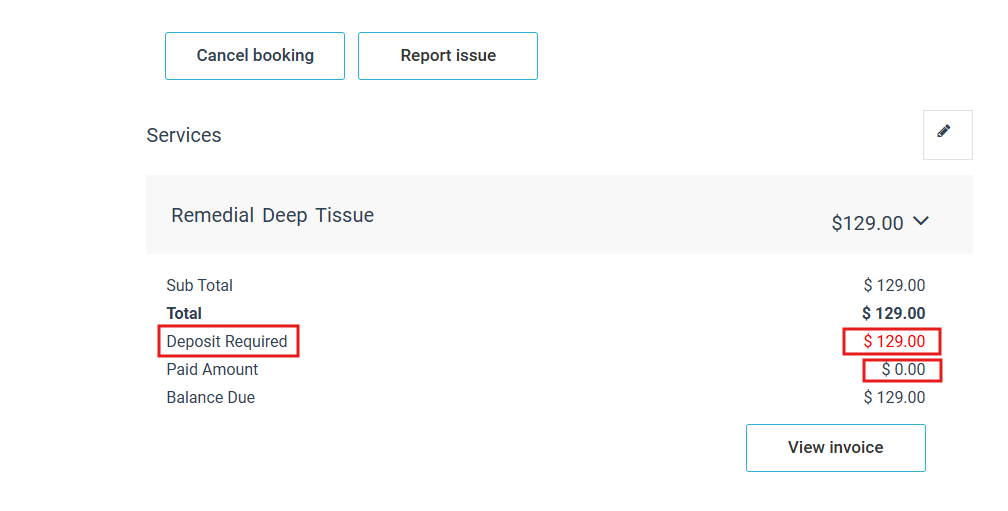
- Booking Overview:
- Customers see their deposit details here
- An unpaid deposit is shown in red with a “Paid Amount” of £0.00.
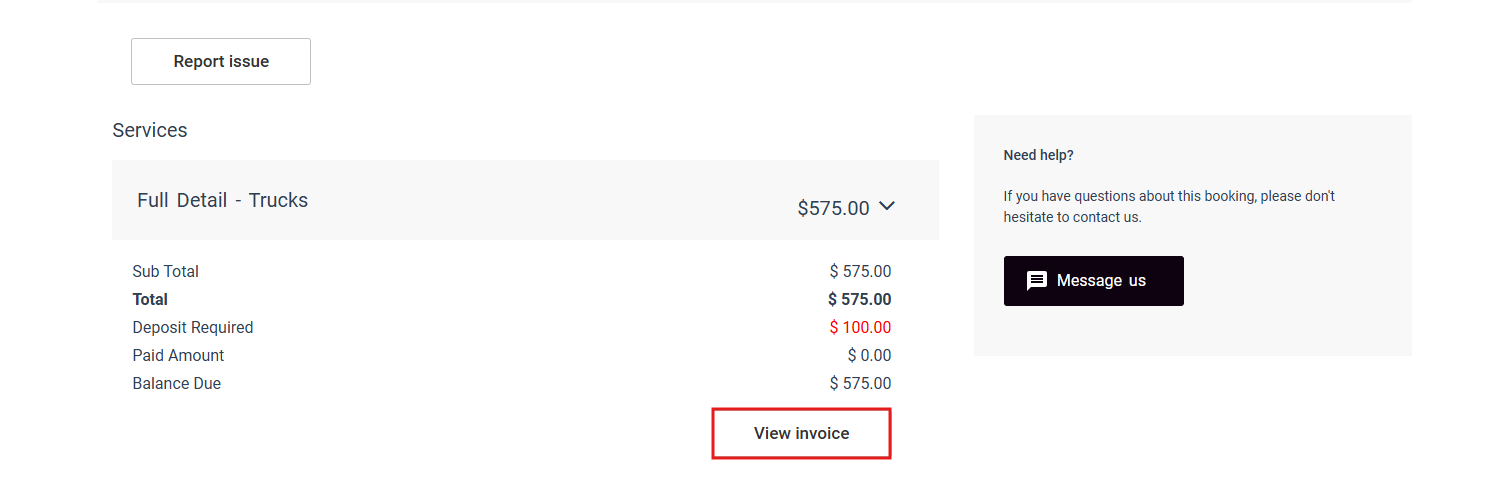
- Invoice Page:
- Accessible via the booking overview.
- Customers can view and pay their deposits from this page
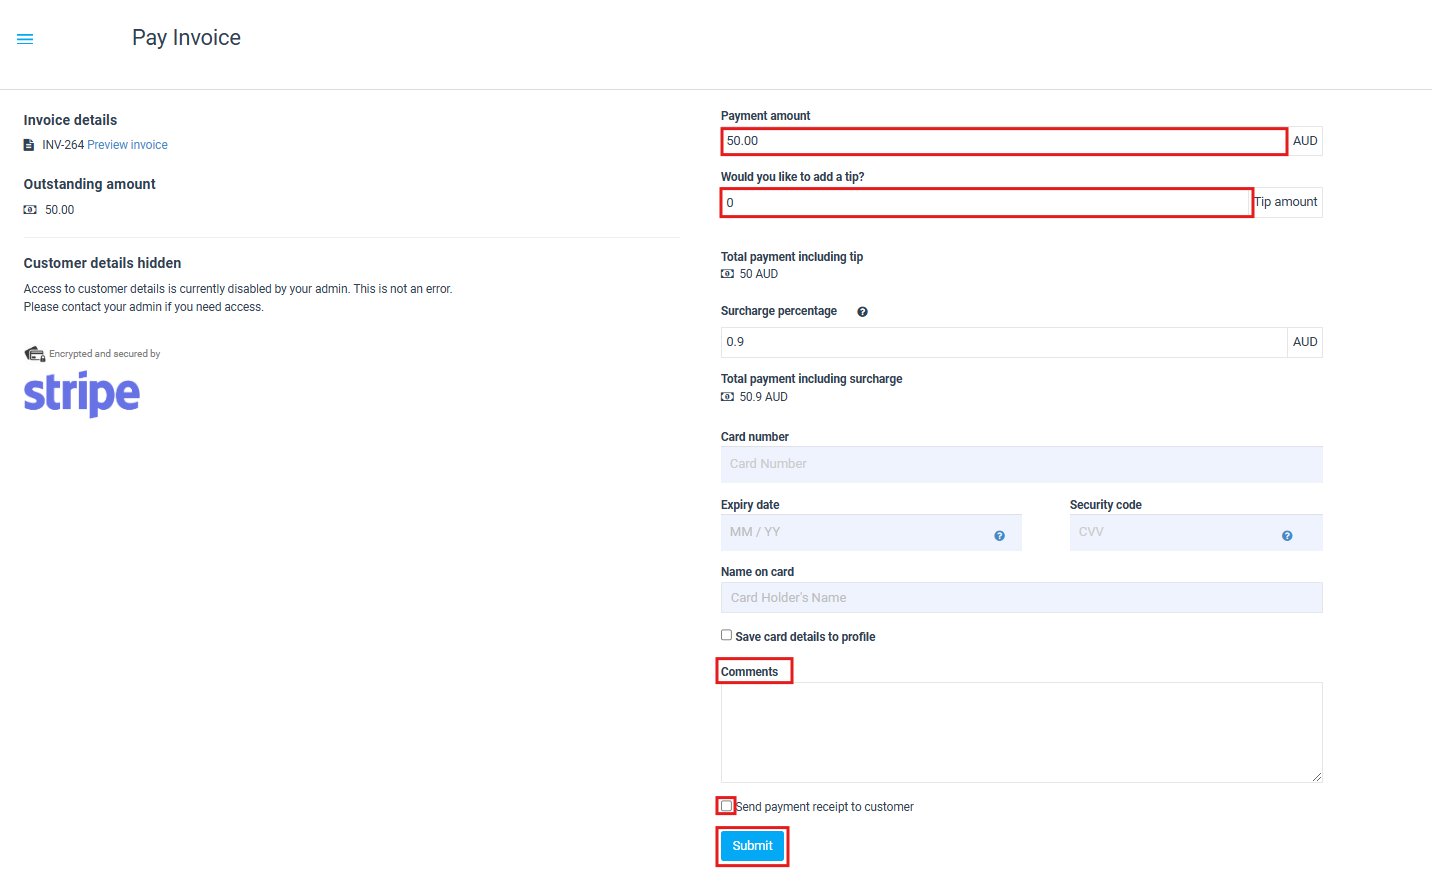
- Click on ‘View Invoice’, the Invoice page will appear to see deposit amount or pay invoice amount.
The invoice PDF will appear and you can see the deposit required amount or Pay invoice.
When we click on ‘pay Invoice’ this popup will appear to enter all details of payment.
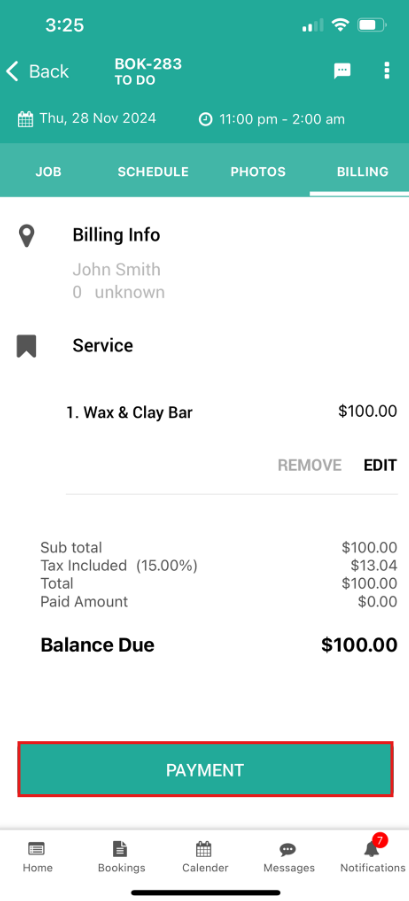
Fieldworker’s App Deposit Views
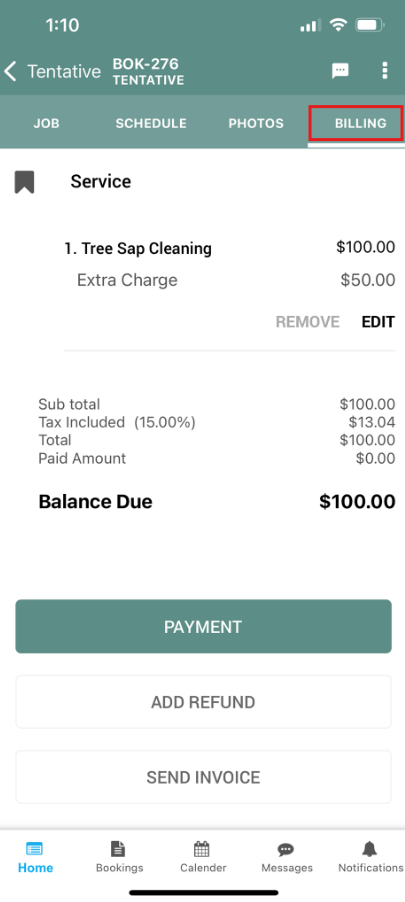
- Navigation: Fieldworkers can access deposit details by navigating to Booking > Billing within their app.
Ways to Pay Deposits
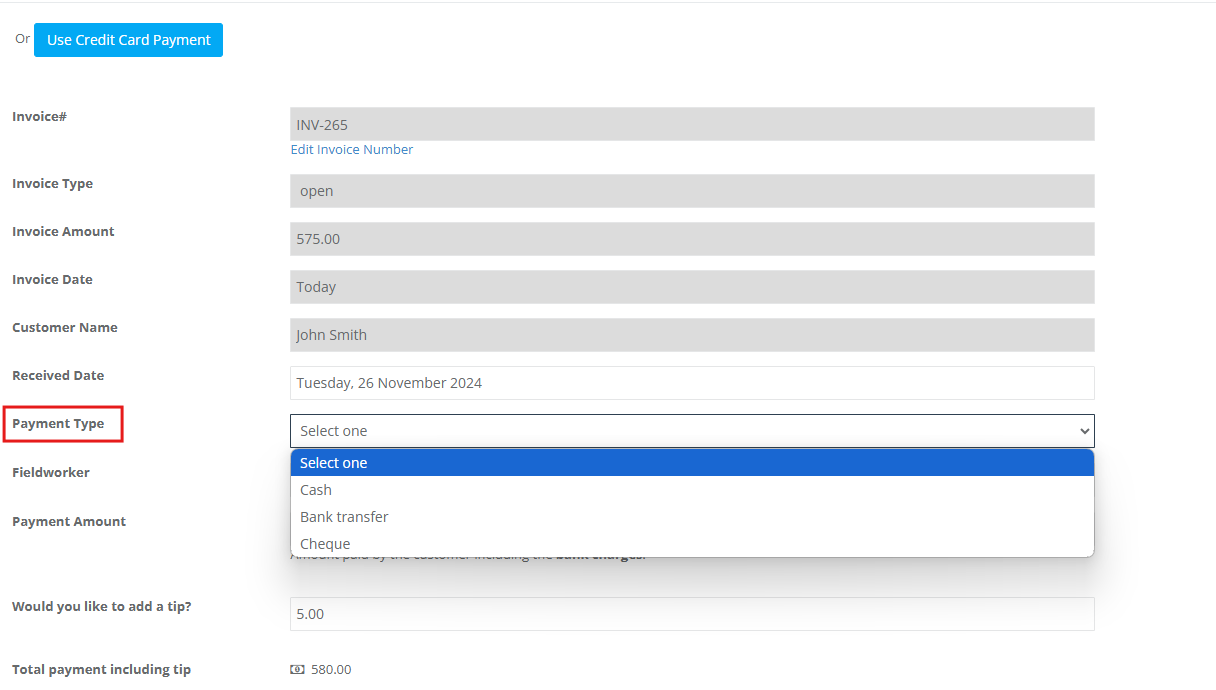
- Admin Payment:
- Admins can manually record a deposit payment through the “Invoice & payment” section found in the “Booking Details” page.
- Options available include credit card payments or other methods you’ve integrated.
2. Booking Invoice Payment:
- Admins can directly add payments to a booking’s invoice from invoice details page.
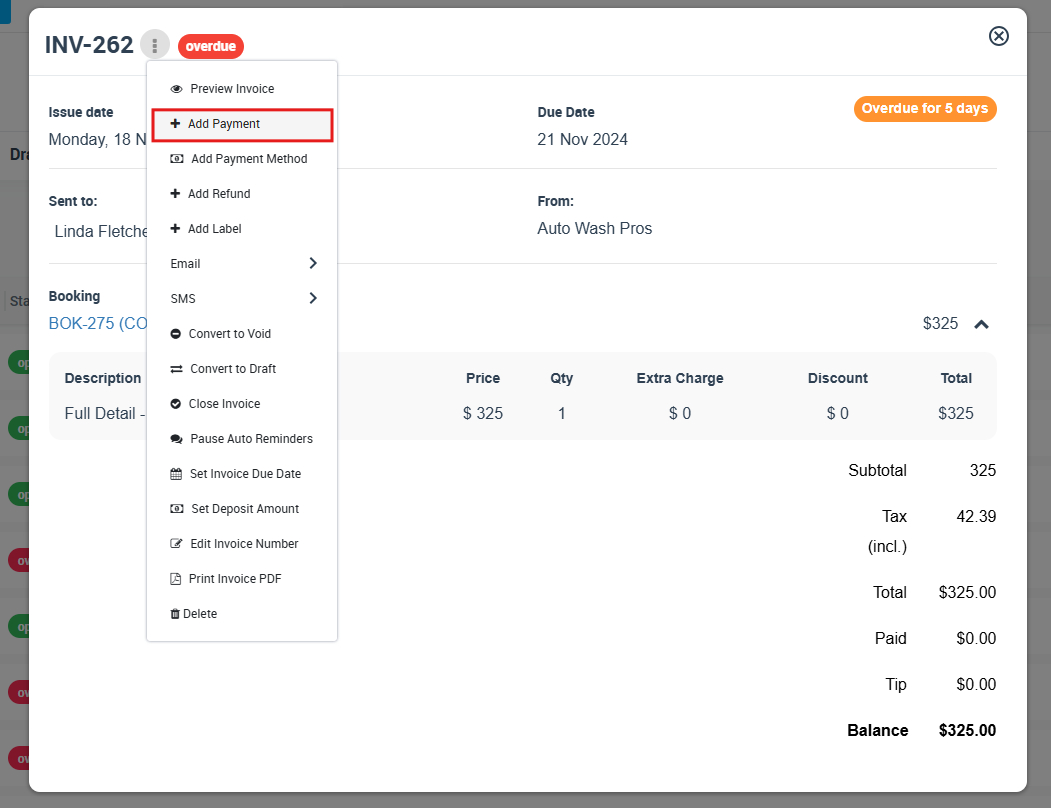
- It will redirect to add payment invoice details page, and enter the payment amount. By default, the total outstanding amount is displayed.
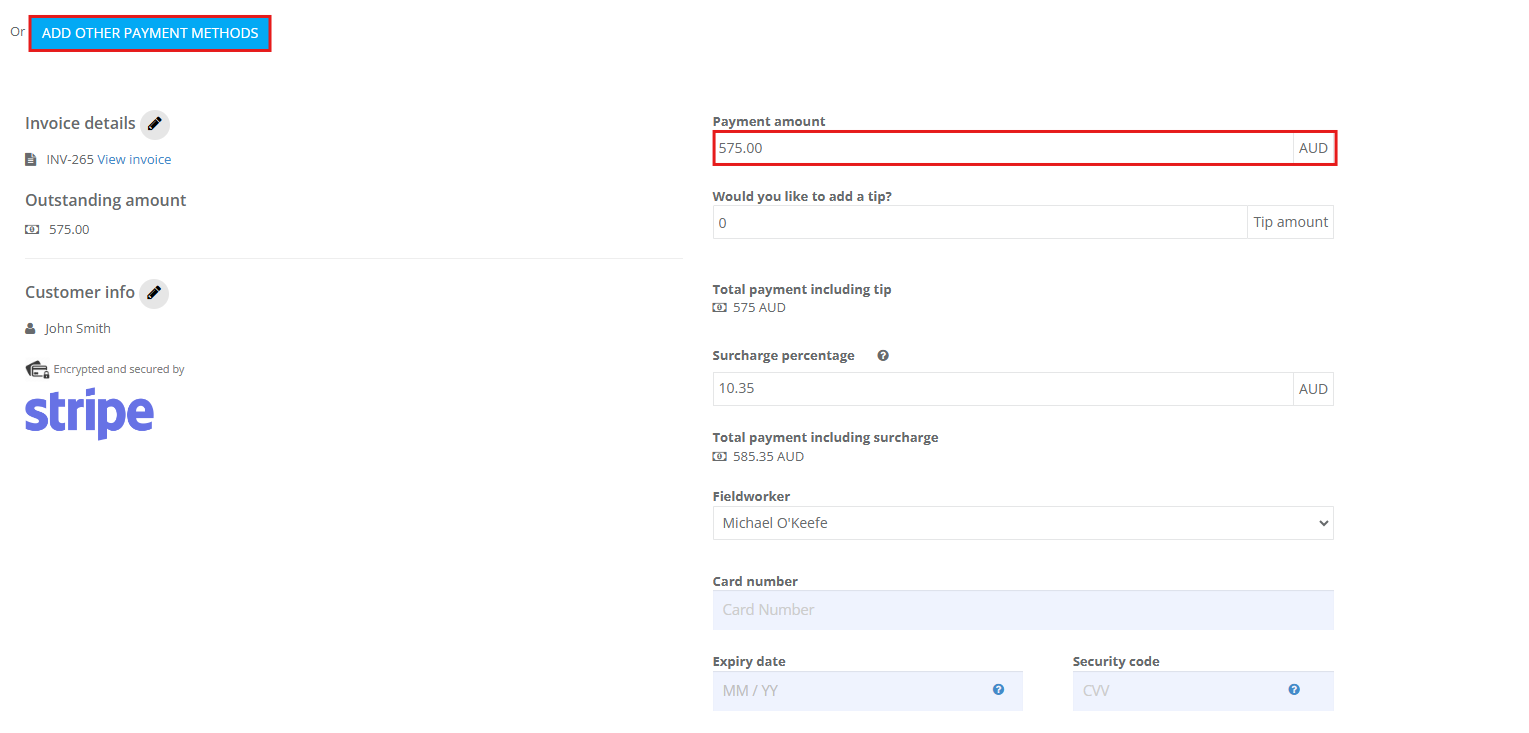
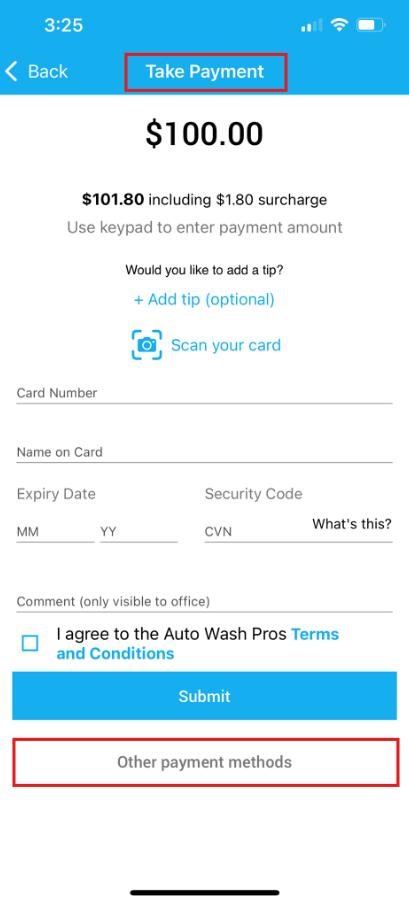
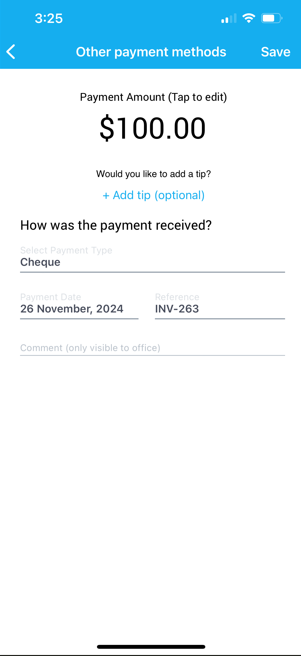
- Or you can choose Other payment method and choose the payment type that want you.
3. Customer Portal Payment:
- When customers book, they have the choice of paying via card or bank transfer
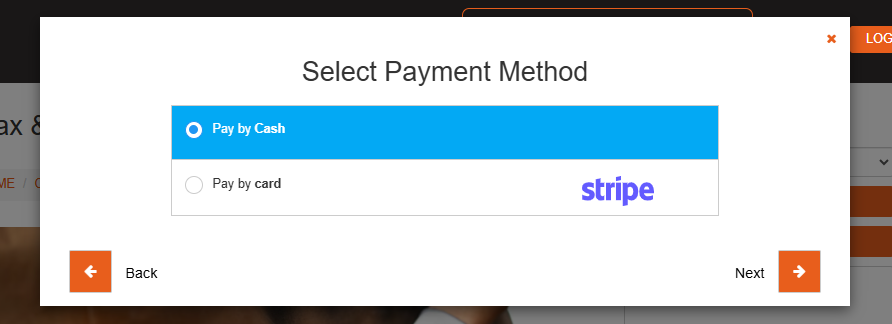
- After selecting the payment method you can view deposit required and confirm booking.
- You can activate additional payment methods for them via Settings > Financial Settings > Payment Integration.

4. Alternative Payment Methods:
- Both admins and customers can use alternative payment methods like cash or check.
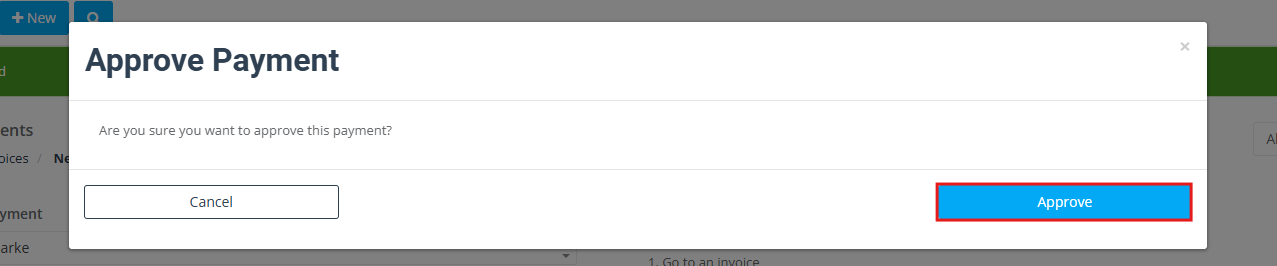
- Cash payments need to be approved by an admin when recorded in the system from Invoices >Payments Reconciliation.
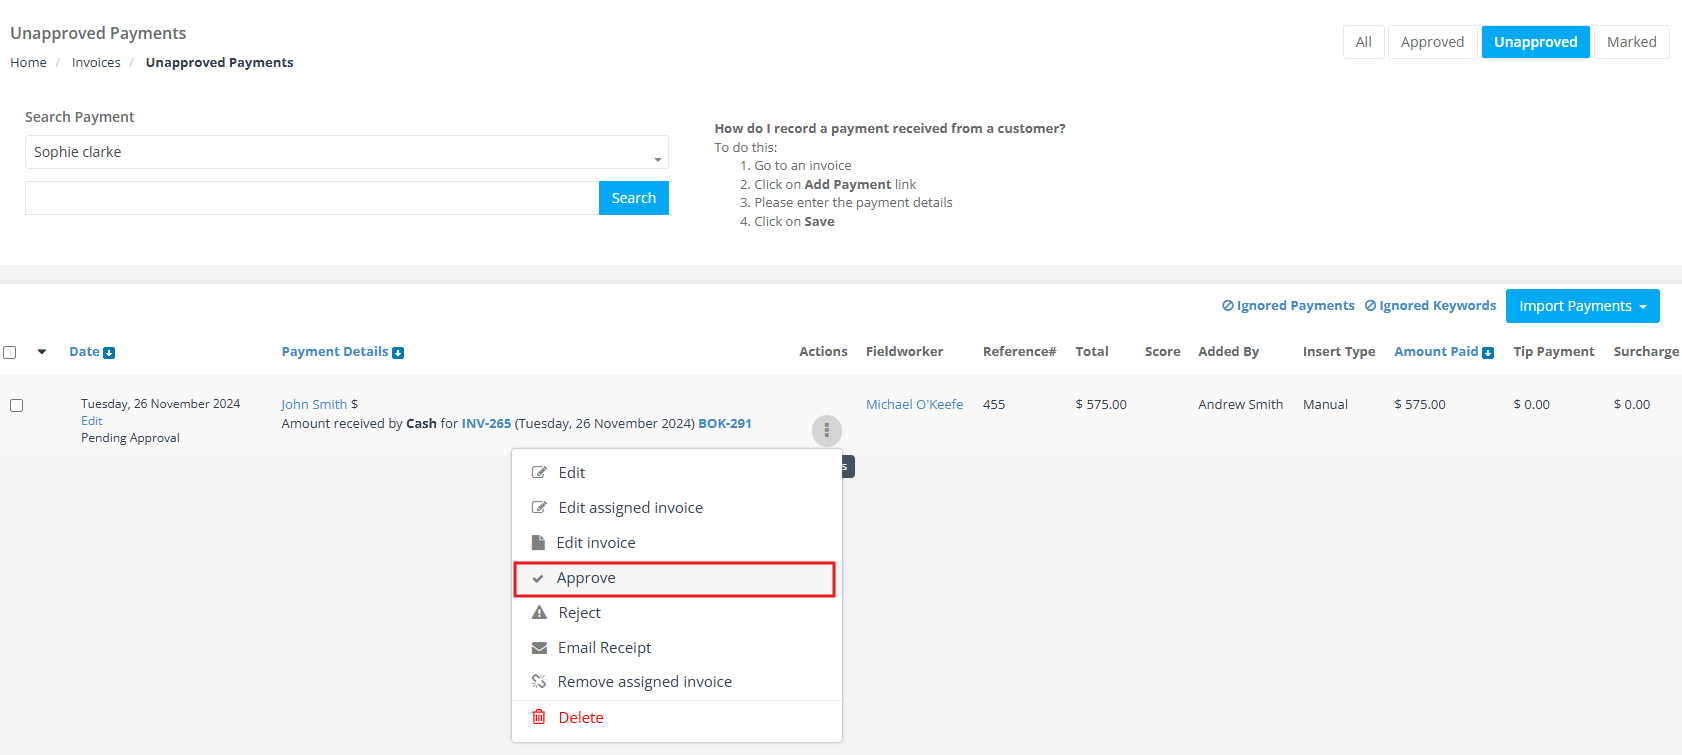
- A pop-up will appear to approve the payment process.
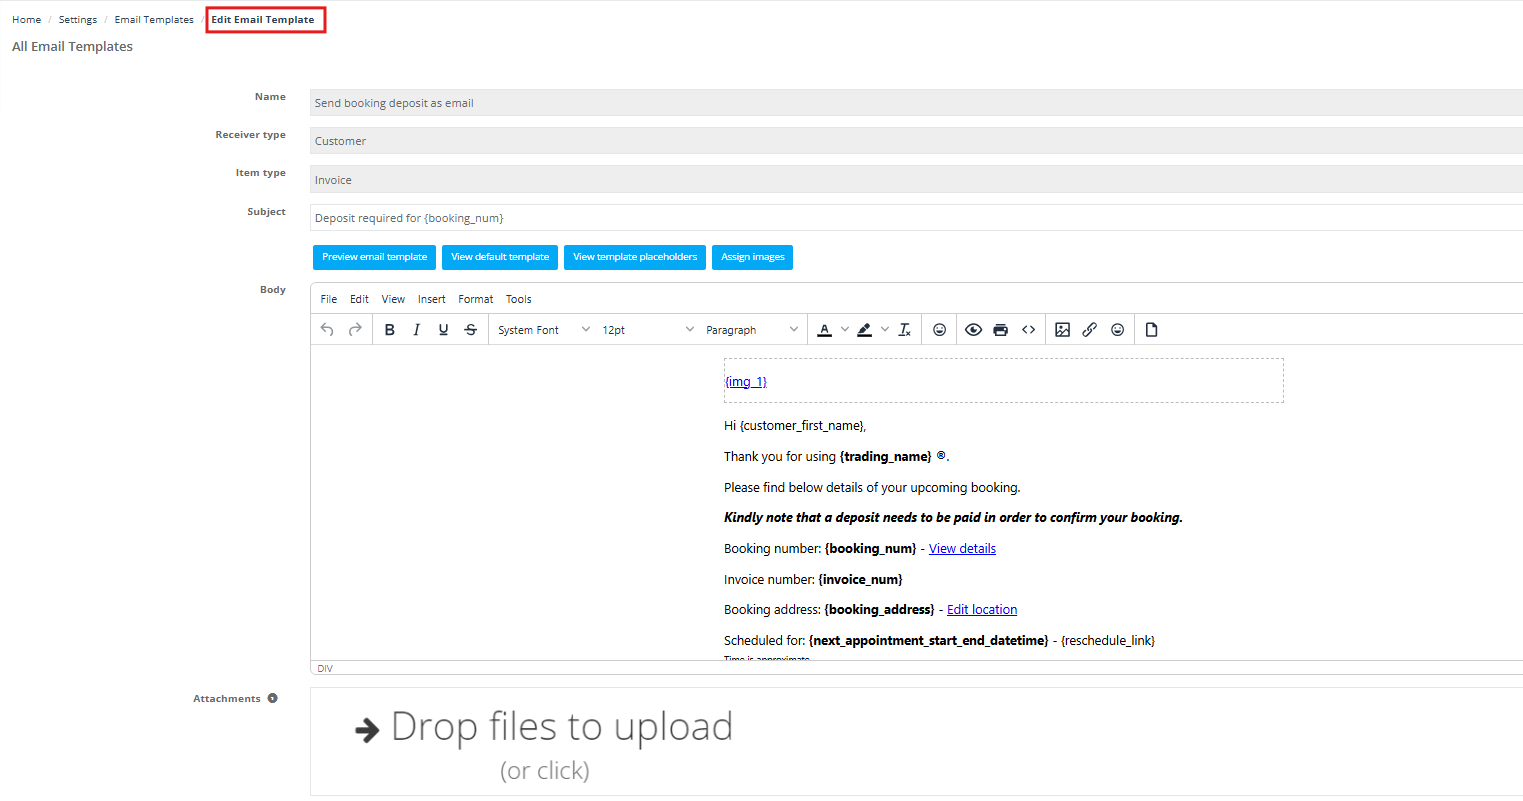
Modifying the Deposit Email Template
-
Navigation: Go to Settings > Communications > Templates & Canned Responses.
-
Editing: Here, select the “Deposit Requests To confirm booking” template from search bar.
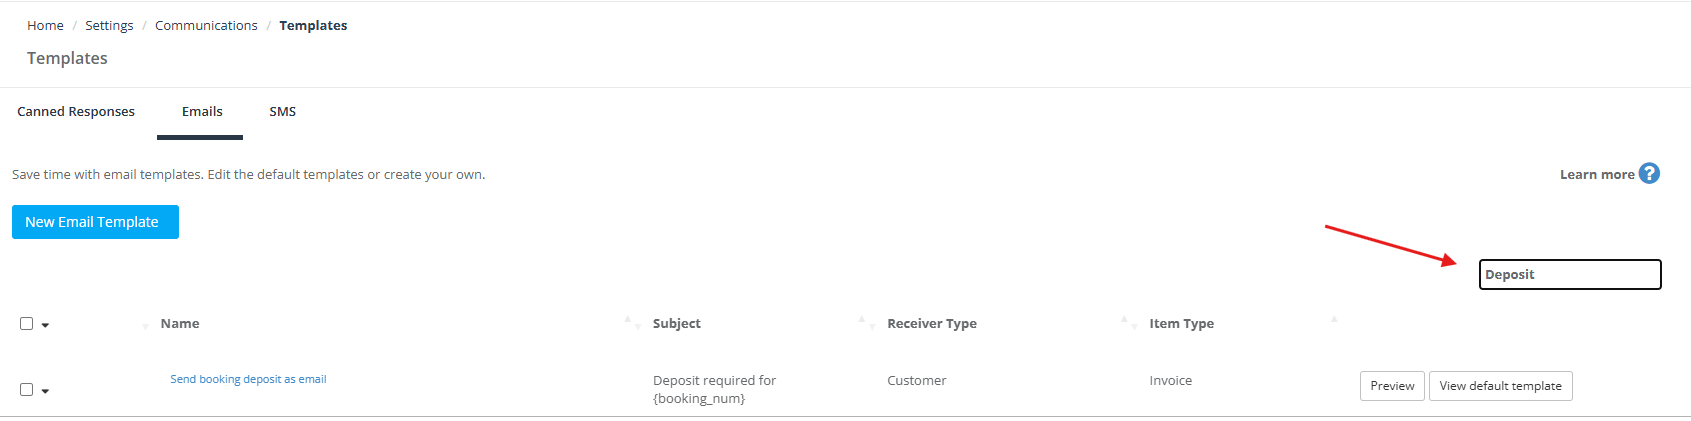
- Edit email template will appear to make changes according to your needs.
Failed Payment Handling
- Notification: If a customer’s deposit payment fails, an automated email is sent to alert them. Admins also get a notification in the booking overview.
On-Site Payments with Fieldworkers
-
Direct Payments: Customers can pay deposits directly to fieldworkers during on-site services.
-
Recording: Fieldworkers should then record these payments in their app, ensuring the admin is updated about the transaction.
To stay updated, please subscribe to our YouTube channel.