Add/Edit Fieldworker Profile
This page list of content:
- Adding/Editing Fieldworkers on OctopusPro
- Why is it important to update the working hours of your fieldworkers in their profile?
- Managing fieldworker’s working hours
- Adding services to the fieldworker’s profile
- Setting up fieldworker’s location
- Editing specific custom field options to fieldworkers
- Assigning PayRate and Commissions to each fieldworker
- Adding Documents to the Fieldworker’s Profile
- Discussion Board
- Travel Radius
- Flags and Permissions for fieldworkers
OctopusPro allows you to create profiles for your fieldworkers on the system. It also enables you to edit the profiles that have been already created. The fieldworker profile can include data related to their working hours, labels, logs, social media, discussion board, etc.
Adding/Editing Fieldworkers on OctopusPro
- To add a new fieldworker profile to the system, from the sidebar select ‘Fieldworkers’. Then, click on ‘Add Fieldworker’.

- Fill in the form to add the user information for a new fieldworker.
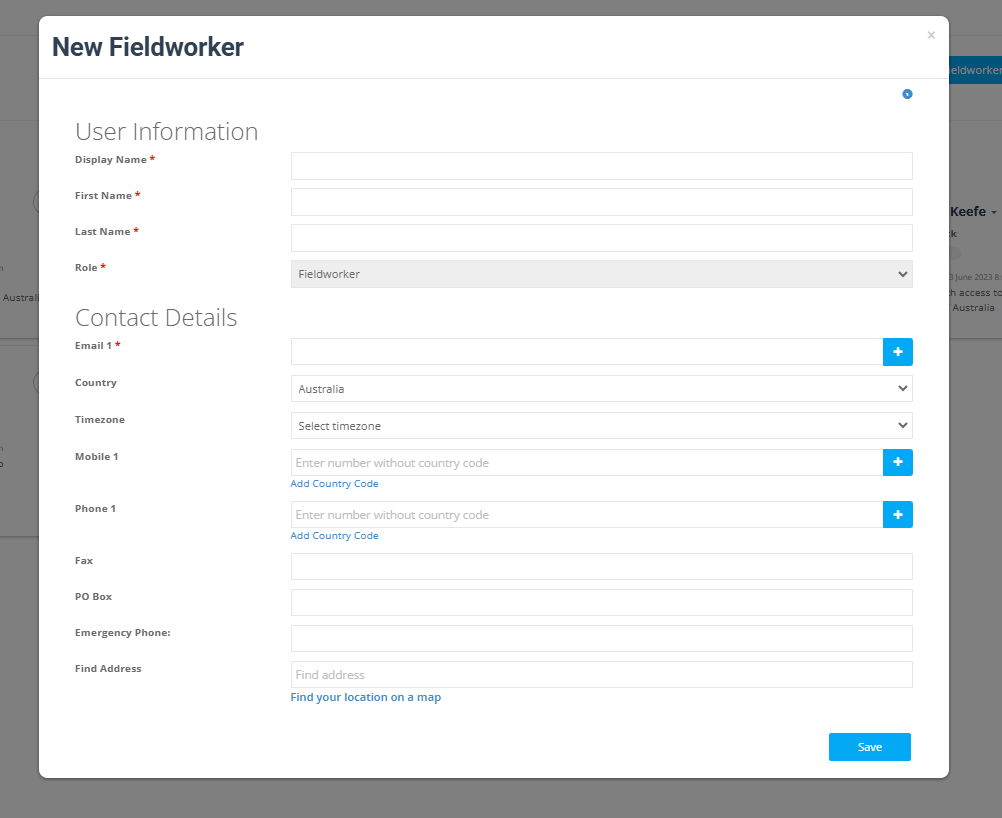
- Fill in the required fields then click on ‘Save’.
- A popup window will appear asking to assign all the services available to the fieldworker. If you select Yes, all the services will be automatically assigned to the fieldworker. On the other hand, if you select No, no services will be assigned to the fieldworker.

- The new fieldworker profile will be added as shown below.
- An email will be sent to the fieldworker to verify their account.
- The fieldworker can create a password for their account
Why is it important to update the working hours of your fieldworkers in their profile?
- It allows admin users to view the real time availability of each fieldworker in order to only schedule bookings for them only during their availability within times they are available.
- It allows your customers to place booking requests using real time availability so they are only able to schedule bookings during times when there is at least one available fieldworker.
- Working hours enables fieldworkers to organize their calendar.
Managing fieldworker’s working hours
- The admin user can manage the fieldworker’s working hours by navigating through Job settings > working hours.
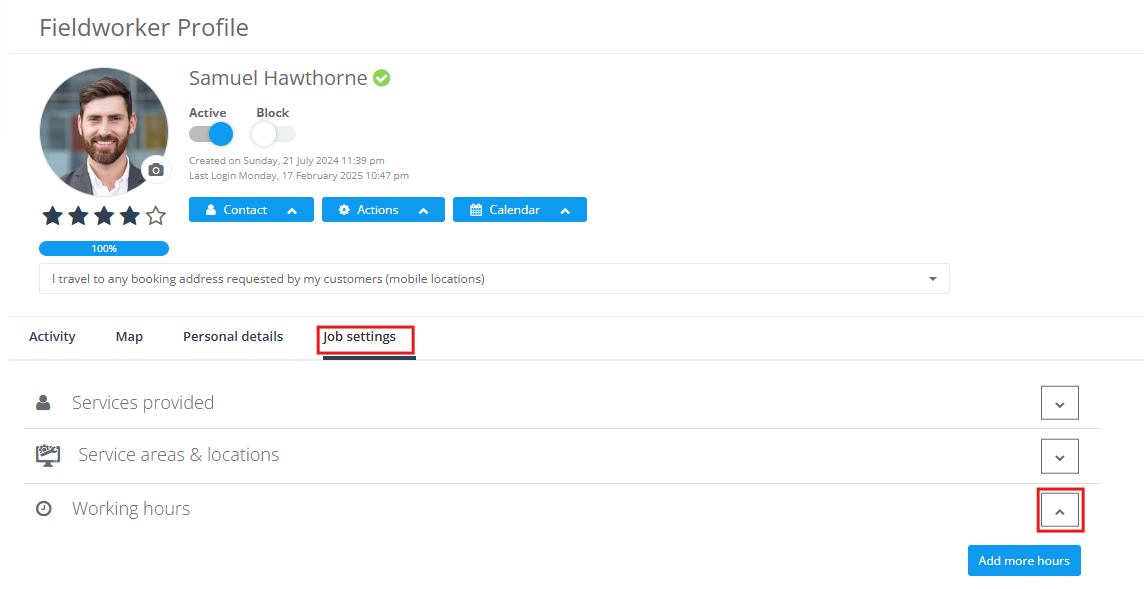
- Select the days and hours at which your fieldworkers are available to work. You can add more than one period of time each day. To add additional periods, click on Add more hours.
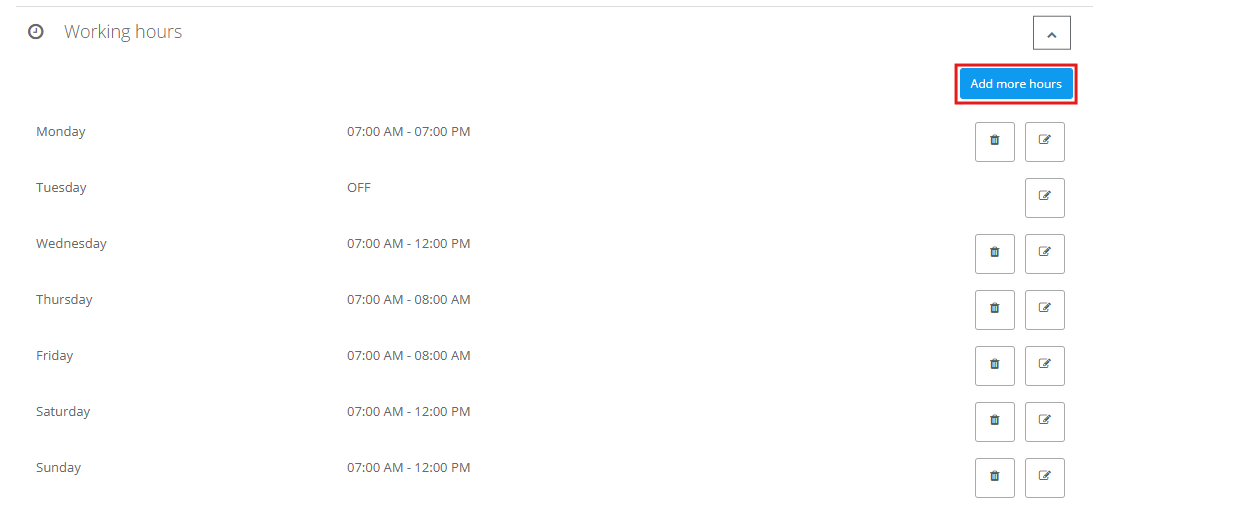
- Note: In case you want to delete the fieldworkers working hours, click on the delete icon next to the set of hours you want to remove. A popup will appear to confirm before deleting the hours.

Adding services to the fieldworker’s profile
In the process of setting up a fieldworker’s profile, you will be able to add services to their profile.
Benefits of adding services to the fieldworker’s profile
- Assigning services enables the fieldworker to allocate services for themselves to choose the service they will be working on.
- Services can be edited and removed from the fieldworkers profile.
How to add services to the fieldworker’s profile
To know how to add services to your fieldworker’s account, check our user guide on how to ‘Add/Remove Services to a Fieldworker’s Profile’
Setting up fieldworker’s location
The locations you add to your fieldworkers’ profiles are essential in making the services they provide available in certain locations. Check our user guide ‘Add available locations for a fieldworker’ to know how you can add certain locations to your fieldworkers’ profiles.
Editing specific custom field options to fieldworkers
Custom fields can be added to your fieldworker profiles to record any information that is not included in the standard fieldworker profile. For example, you can create a custom field to record your fieldworker’s work experience, education, hobbies, interests, date of birth, gender, height, or any other helpful information specific to your industry. You can also set the fields to display pre-entered values to select from. Check out the ‘Fieldworker custom fields’ user guide to know more.
Assigning PayRate and Commissions to each fieldworker
As an admin user, you can set the payrate and commission for each fieldworker your company has.
Check how you can set the fieldworker’s payrate from here: https://help.octopuspro.com/set-fieldworkers-share-per-service
Adding Documents to the Fieldworker’s Profile
OctopusPro allows you to add documents to the fieldworker’s profile.
Adding Insurance for the fieldworker
- To add a document for the insurance to the fieldworker’s profile, from documents in personal details select insurance and click on New insurance as shown below.
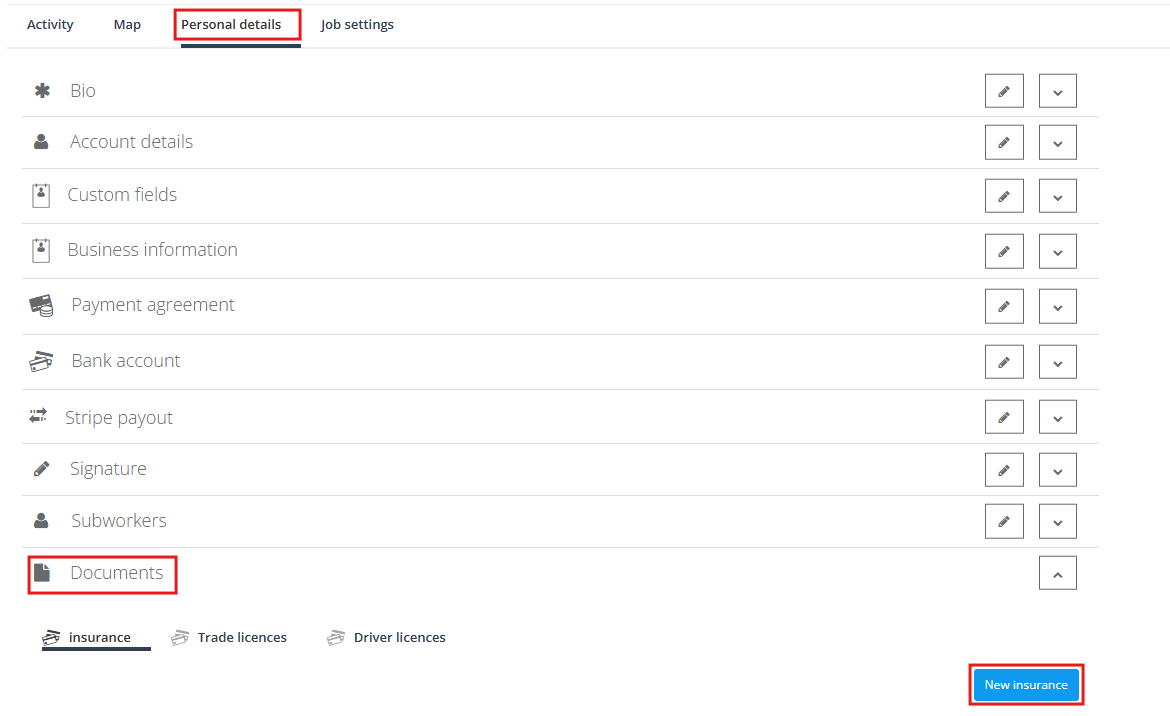
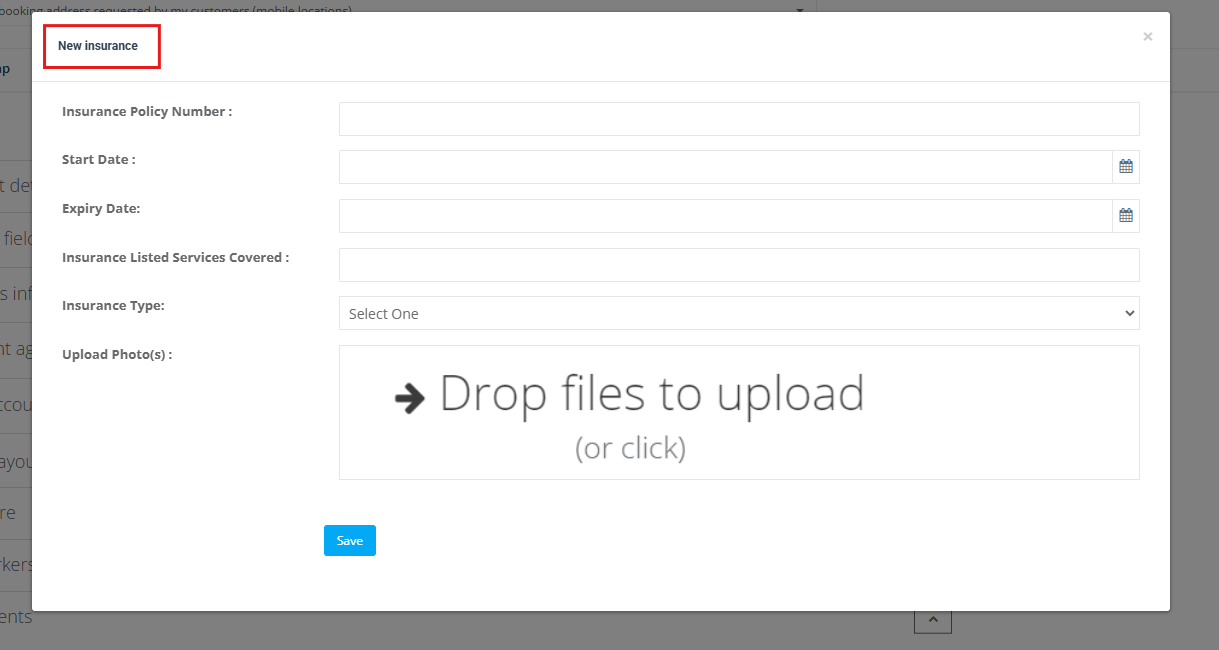
Fill in the required details to create a new insurance:
- The Insurance policy number
- Start date and Expiry date
- The insurance listed services covered
- The Insurance type (workers compensation, public liability, and vehicle insurance)
- Upload photos
- Save the new created insurance
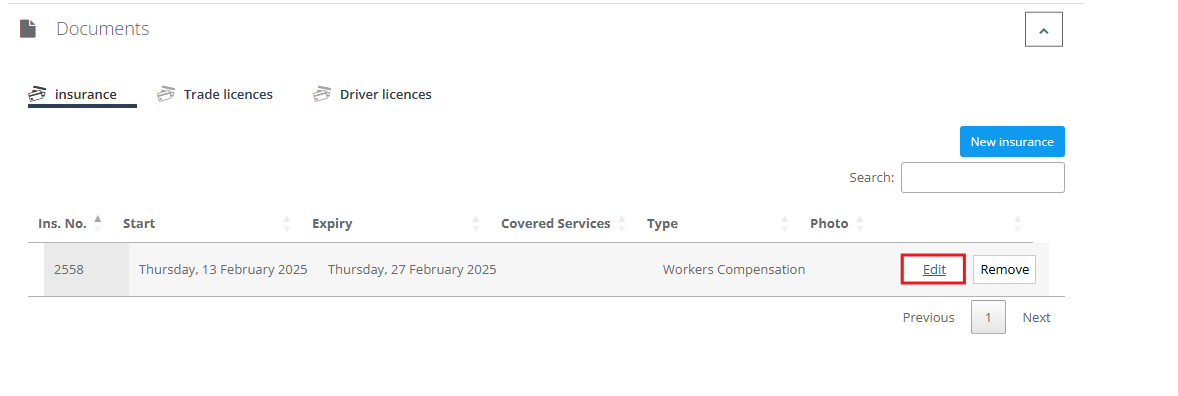
- The new created insurance will be visible.
- After adding the insurance to the fieldworker’s profile, you can edit or remove it:

- To edit insurance details click on the edit button to do the changes you want to apply for the insurance.
- To remove an insurance, click on the remove button, but before proceeding, a popup will appear and a question will be asked “if you are sure you want to delete this fieldworker insurance?” You can either click on OK or Cancel.

Adding Trade Licenses to the fieldworker’s account
- From documents select ‘Trade License’ and then click on ‘New trade license’.

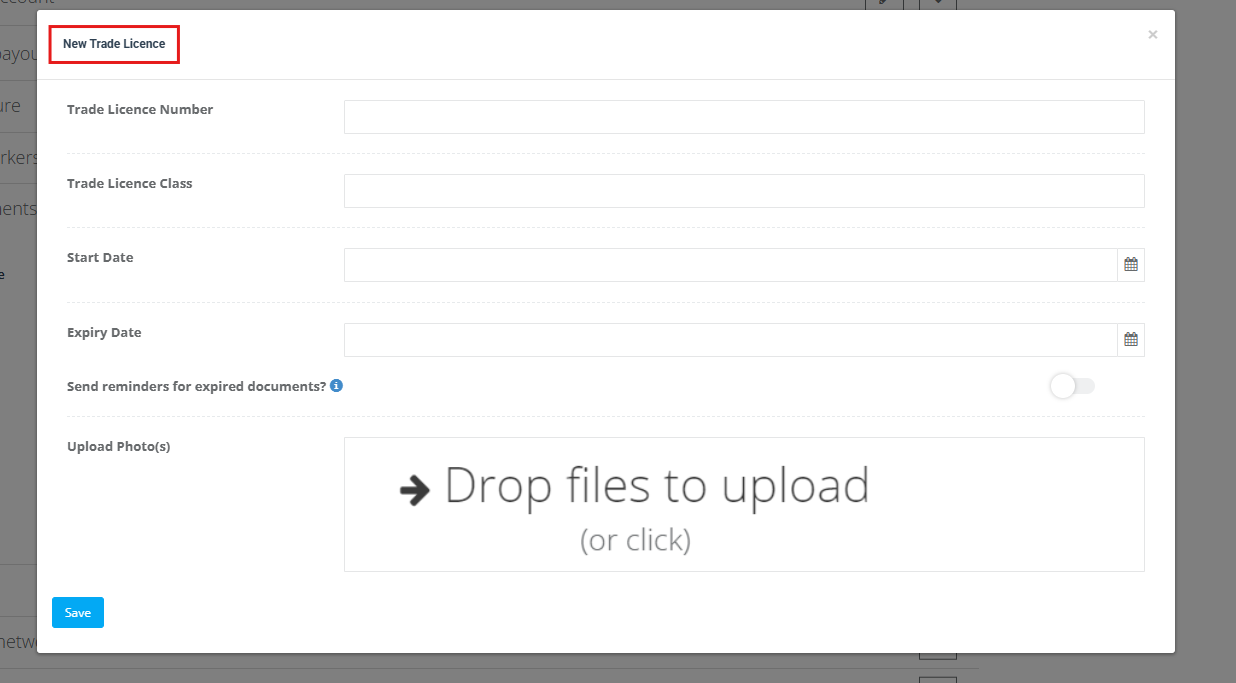
Fill in the required details to create a new insurance:
- Trade license number
- Trade license class
- Start and expiry date
- “Send reminders for expired documents”(move the toggle to either the right or the left side to enable or disable the button)
- Upload photos
- Click on Save
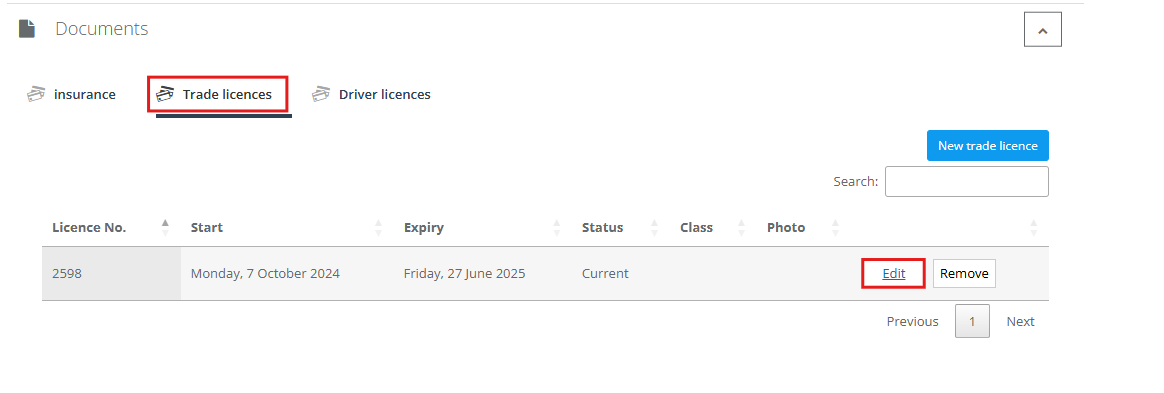
- The new created trade insurance will be visible.
- Note: The trade insurance can be edited, removed, and searched for.

- To edit the trade license details click on the edit button to do the changes you want to apply for the trade license.
- To remove a trade license click on the remove button and a popup will ask you if you are sure you want to delete the fieldworker trade insurance, you can either click on OK or Cancel.

Adding Driver’s Licenses for the fieldworker
- From documents select ‘Driver licenses’ and click on ‘New driver license’.

Fill in the required details to create a drivers license:
- Drivers license number
- Driver license type
- Expiry date
- Send reminder for expired documents (move the toggle to either the right or the left side to enable or disable the button),
- Upload photos
- Click on Save
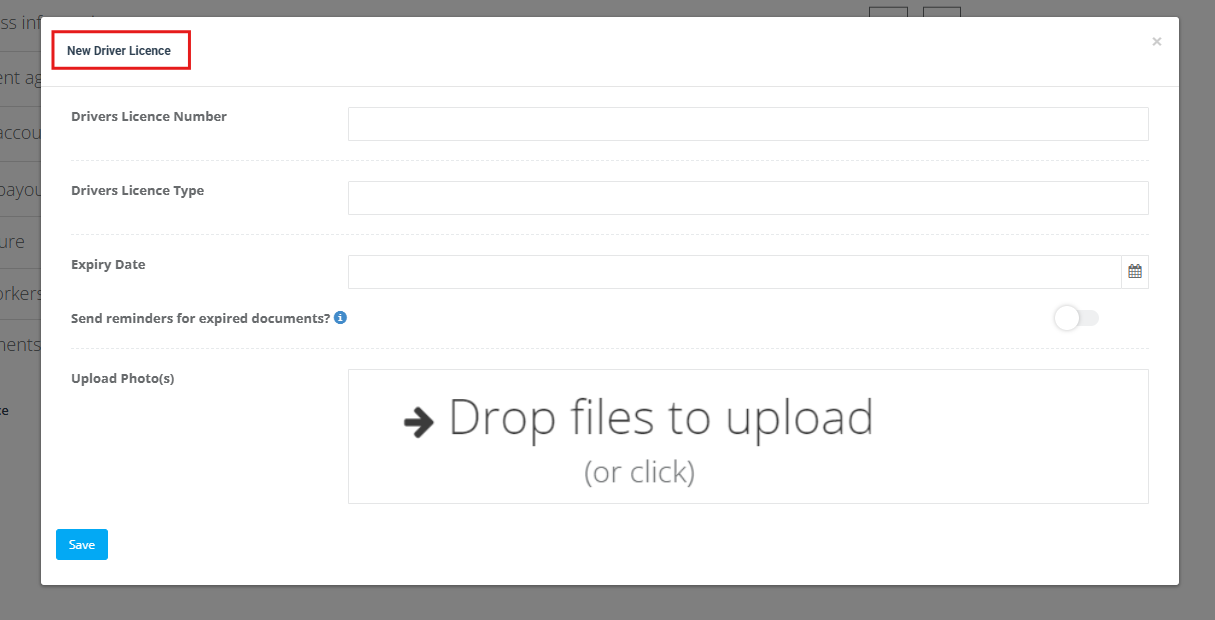
- The newly created driver’s license will be visible.
- Note: The driver’s license can be edited, removed, and searched for.

Discussion Board
The discussion board allows the admins, customers, and fieldworkers to communicate with each other in an easier way. It can be found in the bookings, quotes, invoices, and inquiries so admin users, fieldworkers, and customers can communicate easily.
Difference between that Discussion Board and the Discussion Board on Bookings, Quotes, Inquires, and Invoices
- The difference between the discussion board in the fieldworkers profile and the the rest of the admin web pages such as in bookings, quotes, inquiries and invoices is the visibility option; when it appears to the fieldworker.
- For the rest of the admin webpage as in bookings; the visibility will appear to the office, office and fieldworker, and everyone (customer).
- In the fieldworkers profile it will appear to the office and the office and fieldworker.
Discussion Board for Fieldworkers
- To add the discussion board to the fieldworker profile, follow the upcoming steps:
- Start a conversation
- Change the visibility option to either the office or the office and fieldworker
- Will notify the add/remove comment
- Upload photos
- Post the comment
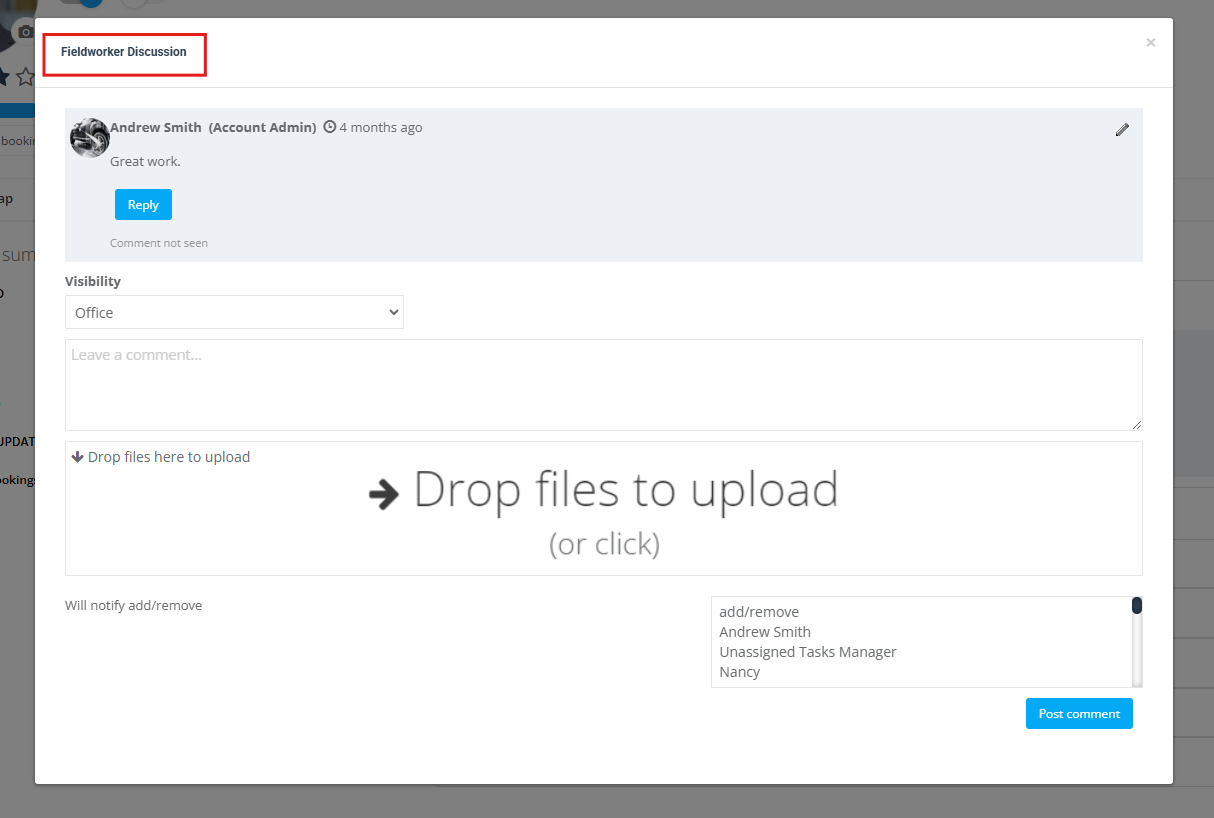
- For example, as shown below add a comment and it will be visible to the office as selected.

Discussion Board in Bookings for fieldworkers
- Go to Bookings > upcoming or past bookings.
- Select one of the bookings and from the Actions > View Booking.

- Click on ‘Communication’ section booking details page and you will find the discussion board for the bookings.

- Add the details as shown below.

Discussion Board in Quotes for fieldworkers
- The discussion board in quotes, go to Quotes > Quotes Tab. Select one of the quotes and from the Actions > View quotes.

- Scroll down in the Quotes Details page and you will find the discussion board for the Quotes.

- Add the details as shown below in steps:
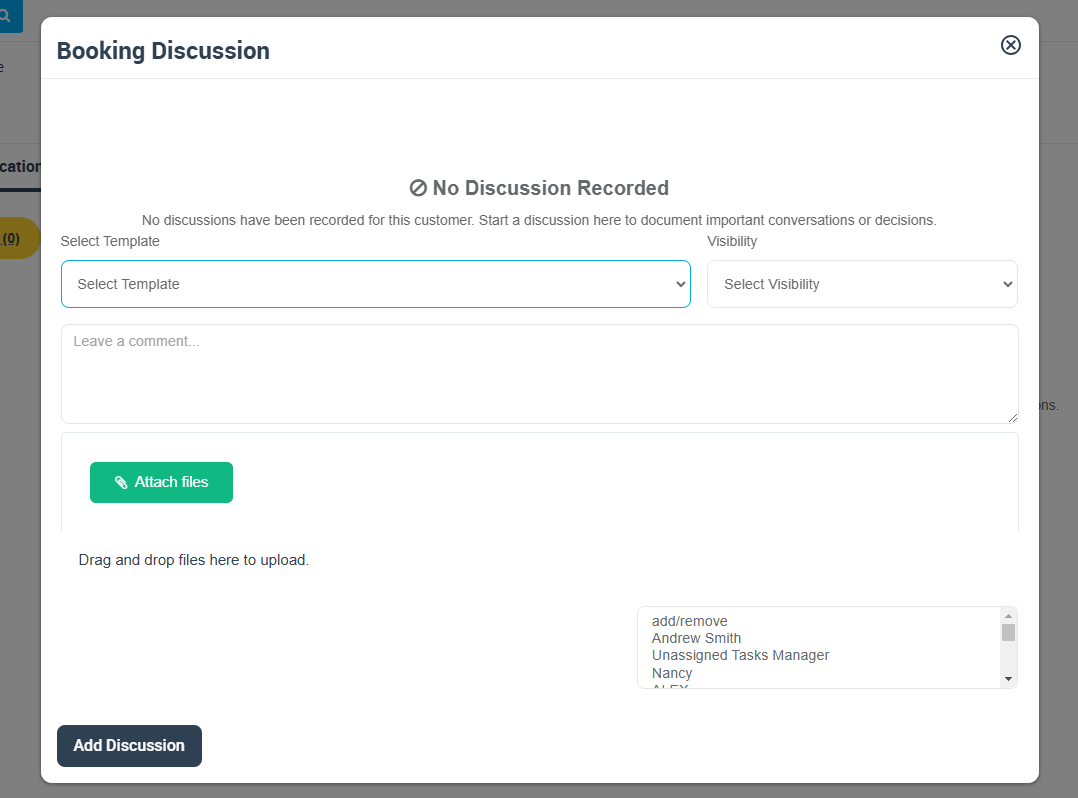
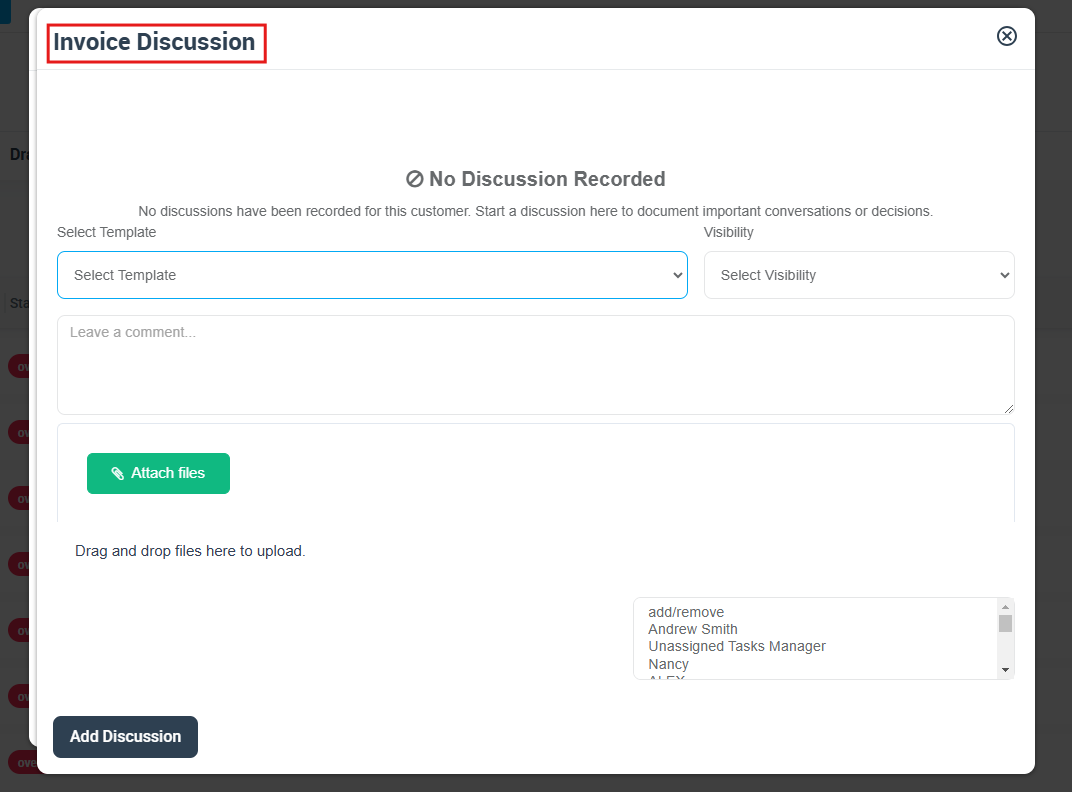
Discussion Board in Invoices for fieldworkers
- The discussion board in the invoices, go to Invoices > Invoices Tab. Select one of the invoices and from the Actions > View invoice.

- Hover over customer name in the Invoices Details page and you will find the discussion board for the Invoices.
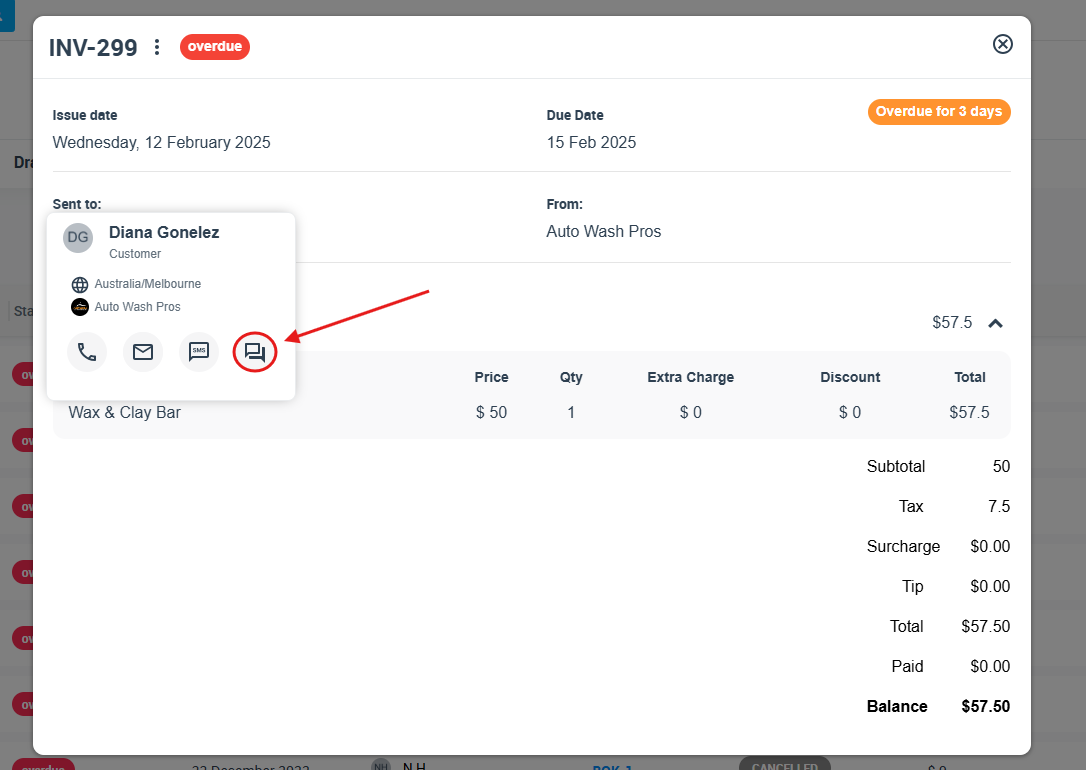
- Add the details as shown below.
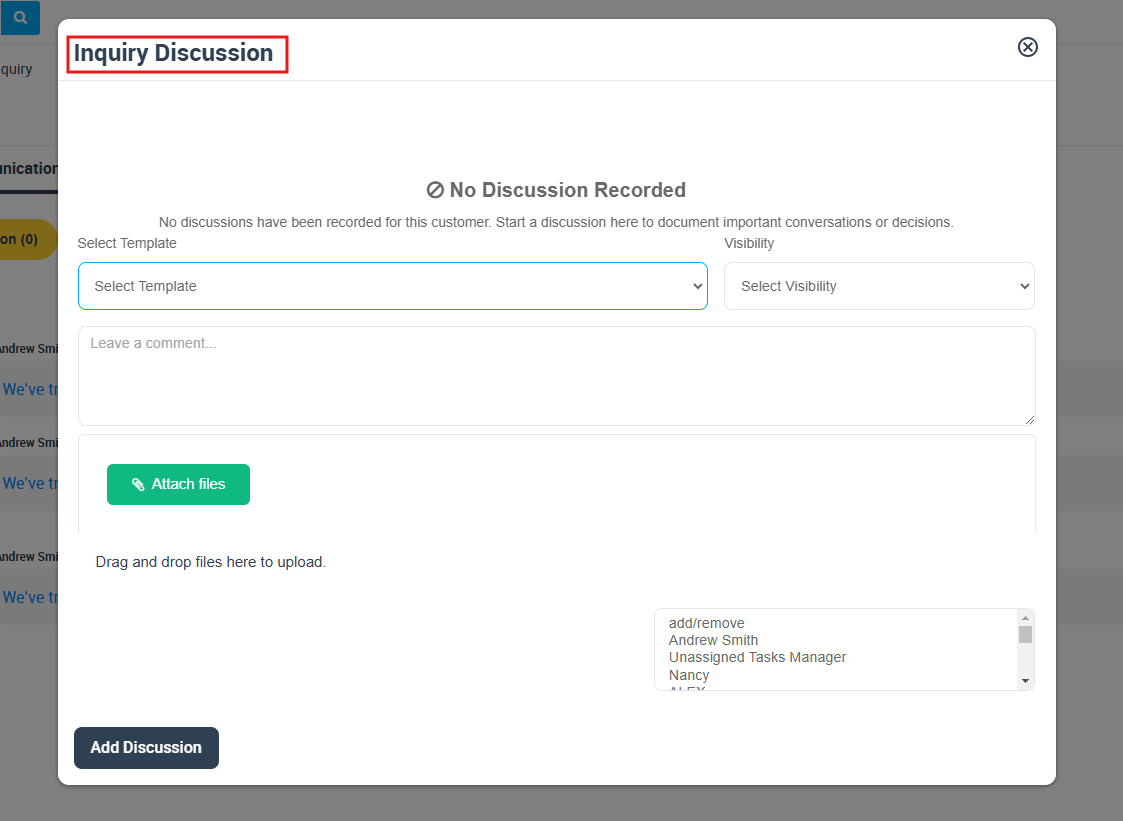
Discussion Board in Inquiries for fieldworkers
- The discussion board in the inquires, go to Inquiries > All Inquiries Tab. Select one of the inquiries and from the Actions > View Inquiry.

- Select ‘Communication’ section in the Booking Details page and you will find the discussion board for the Inquires.

- Add the details as shown below.
Travel Radius
Enabling the Travel Radius feature for fieldworkers allows you to calculate the distance between the fieldworker’s start point to the location of the job as well as the destination between the jobs they have. This allows both fieldworkers and customers to have an estimate arrival time.
Activating/Deactivating the Travel Radius for fieldworkers
- The travel radius appears in the admins webpage and in the OctopusPro application estimating the time when the fieldworker will arrive at the destination.
Flags and Permissions for fieldworkers
OctopusPro has designed fieldworkers’ permissions that allow admin users to control the type of data that can be viewed or viewed and updated by your fieldworkers, also the actions that they can take on the app such as create bookings, create customers, noting that Fieldworkers will still be able to request approval for a certain update in case of lacking the permission to execute the update directly, keeping your data secure and protected.
Check how you can control the fieldworkers’ permissions from here: Fieldworker Permissions
For more information, visit OctopusPro user guide, and subscribe to our YouTube channel.
