Forms & Checklists Setup
This page list of content:
- How to set up forms and checklists in OctopusPro
- What are the visibility options and what are they beneficial for?
- Display options definition
- How to assign a form to a booking status
- How to assign a form to a service
- Why ‘assign form to a service’ option is available for some services and not others
- Next service date reminder form (Default form in the system)
- Your contact details (Default form in the system)
- Editing forms and checklists
- Deleting a form or a checklist
- Activating and deactivation forms
Check out more Forms and Checklists topics we’ve prepared for you:
How to set up Forms and Checklists in OctopusPro
- From the admin web view, go to Settings > General Settings > Forms & Checklists from the side menu on the left
- Click on +Create new

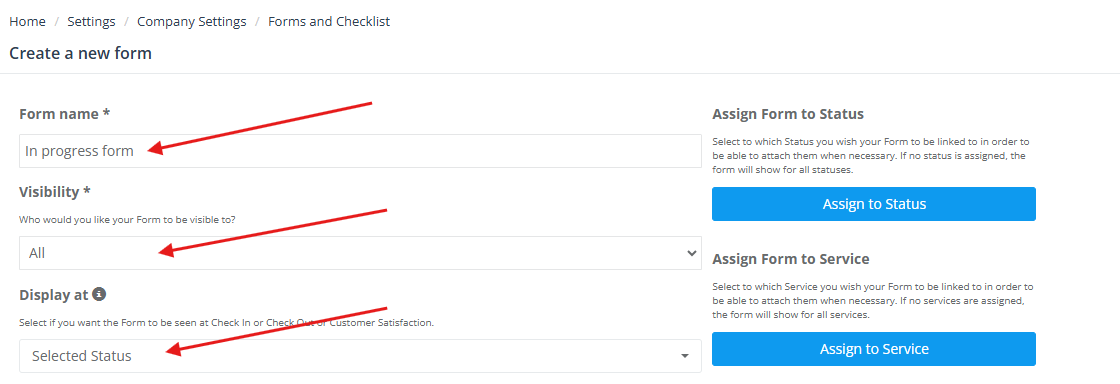
- The Create a new form page will appear requiring you to select/add the following:
- Form name
- Visibility (for detailed information about the visibility options click here)
- Display at (for detailed information about the When to display options click here)
- Assign to Status: This feature gives you the option to have the form appear to users to fill out upon changing the booking status (click here for more details)
- Assign to Service: This feature gives you the option to make the form appear for specified or selected services only (for more details click here)
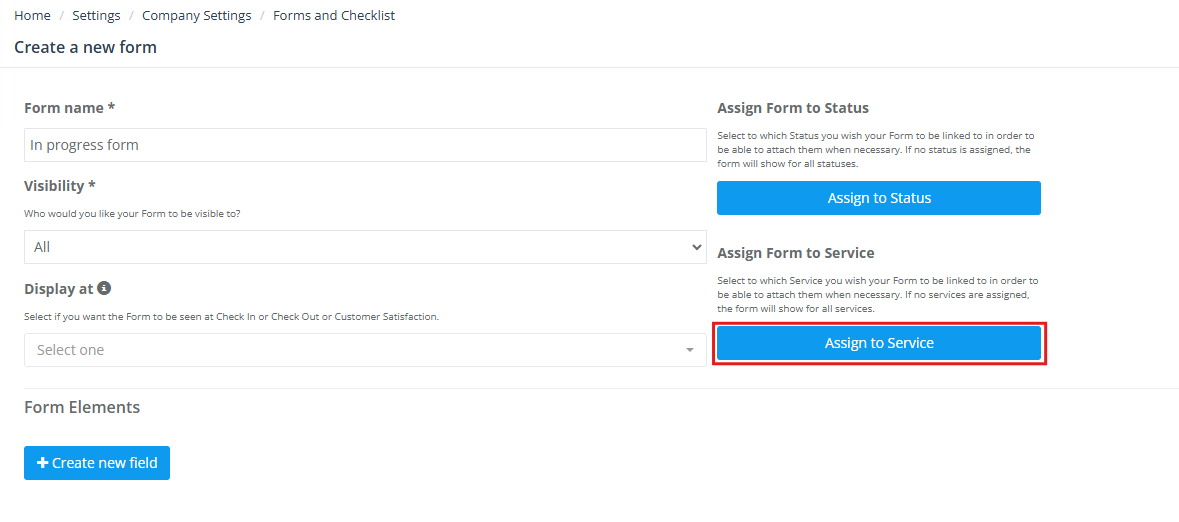
- Now you can start adding the Form elements, which in that case is the inspection steps and details that the fieldworker need to perform by clicking on ‘+ Create new field’

- Field: In this box, you can insert the field name, which can be a question or the title of the form element
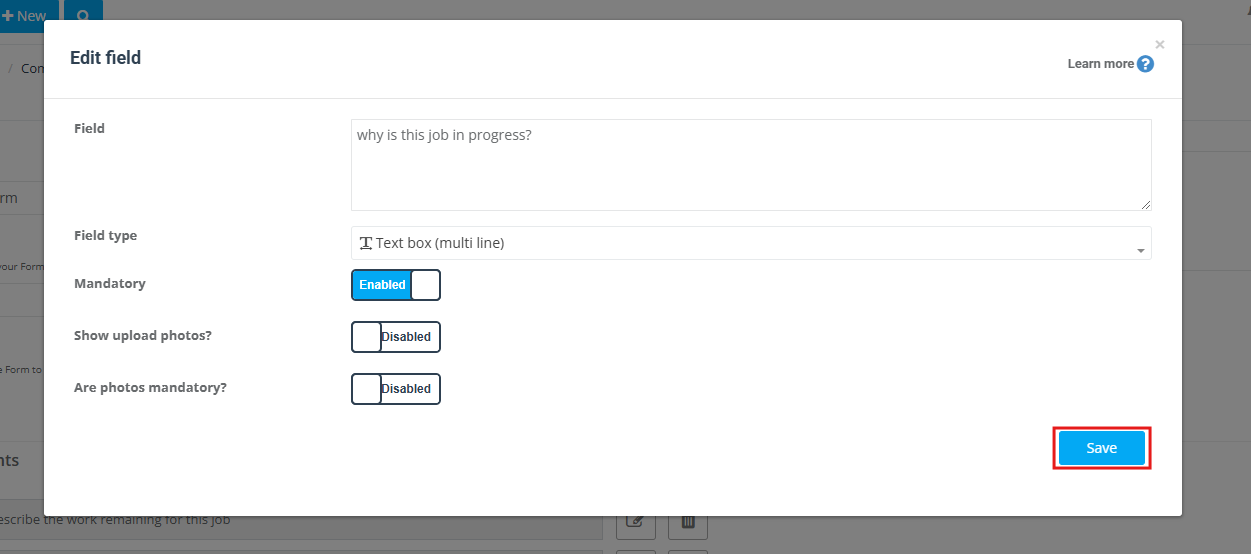
- Field type: There are many field types that a user can choose from when setting up the form/checklist. For a detailed explanation of each field type click here.
For this example, we need the Field type to be a ‘Text box (multiline)’, so fieldworkers can answer questions such as: “Why is this job in progress?”, “Please describe the work that has been completed so far” and “Please describe the work remaining for this job” by typing the details in the text box space.
- It is convenient to make all of the elements Mandatory for this form
- After clicking on Save, the created form elements will appear as follows

- You can easily edit the order of the elements by drag and drop action to any order that admins find suitable

- Do not forget to click on the Save button located at the bottom right of the page when you finish creating a form

- At last, the created Form will appear in the Forms & Checklists Settings as follows

What are the visibility options and what are they beneficial for
In the visibility field, admin users have the option to decide who views each form & checklist. Admin users can select between having the form visible for all users, visible for office users only, visible for customers and office users, or visible for fieldworkers and office users.

The visibility options allow you to limit who the forms & checklists are visible for; for example:
-
- Deciding on whom forms & checklists are visible to helps business owners preserve the organization’s data and privacy by limiting the data acquired and the data displayed to the vieweg
- Adding specific fields for each specific user provides each viewer with only the relevant fields they need to fill out to avoid confusion or gathering unnecessary information
- Controlling visibility options help you save time and improve the user experience
Visibility to All option
That means that the filled Forms and Checklists can be reviewed to all users, admin users, fieldworkers, and customer users.
-
- The admin users will find filled-out Forms and Checklists at the ‘view booking’ page as in the Forms and Checklists container located at the down right side of the page from the Web or the App
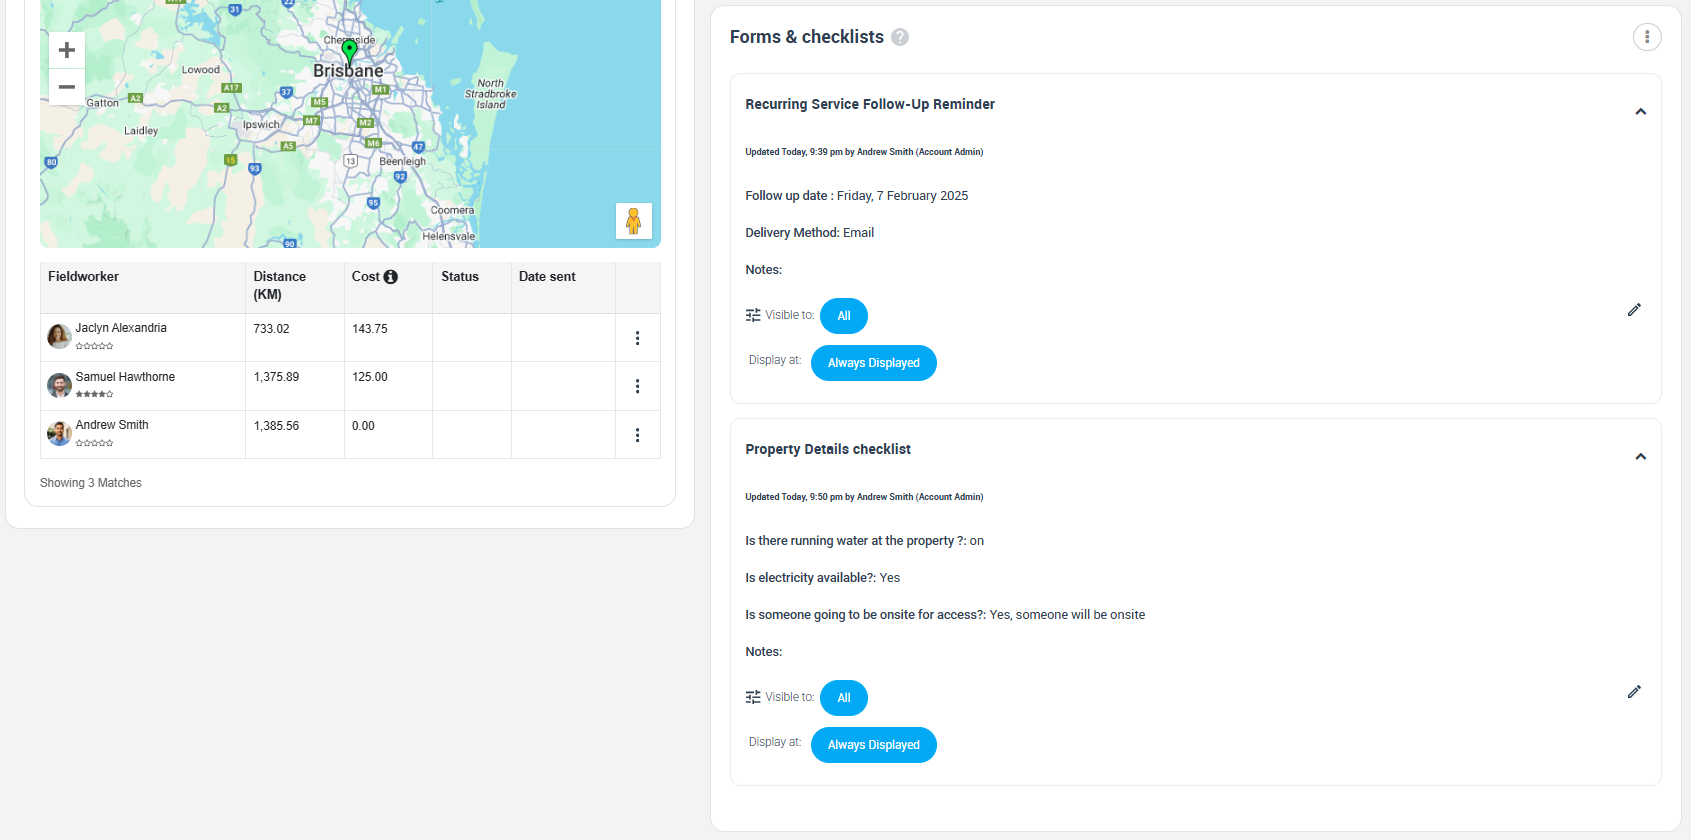
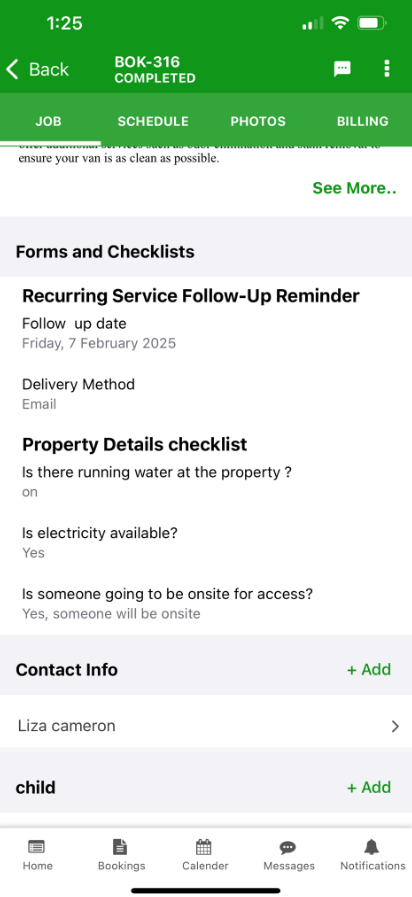
- Fieldworkers can review the filled Forms and Checklists from the ‘view booking’ page from the App as follows:
- And customers can see the filled-out form from the customer portal View Booking page under ‘Forms and Checklists’ section.
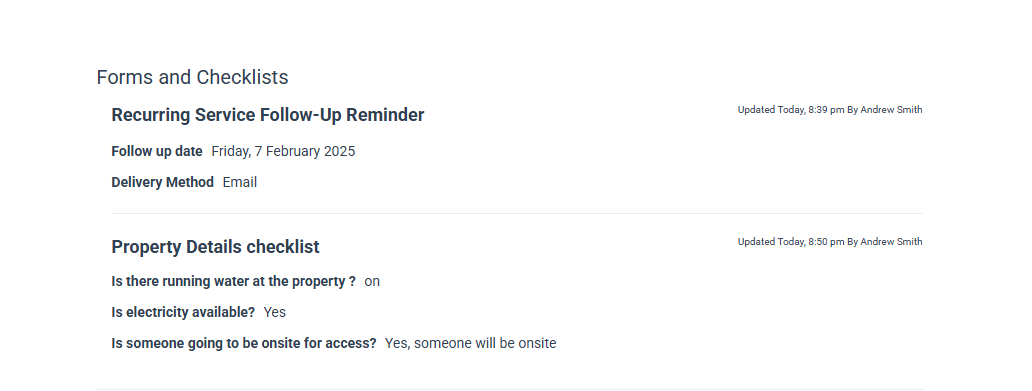
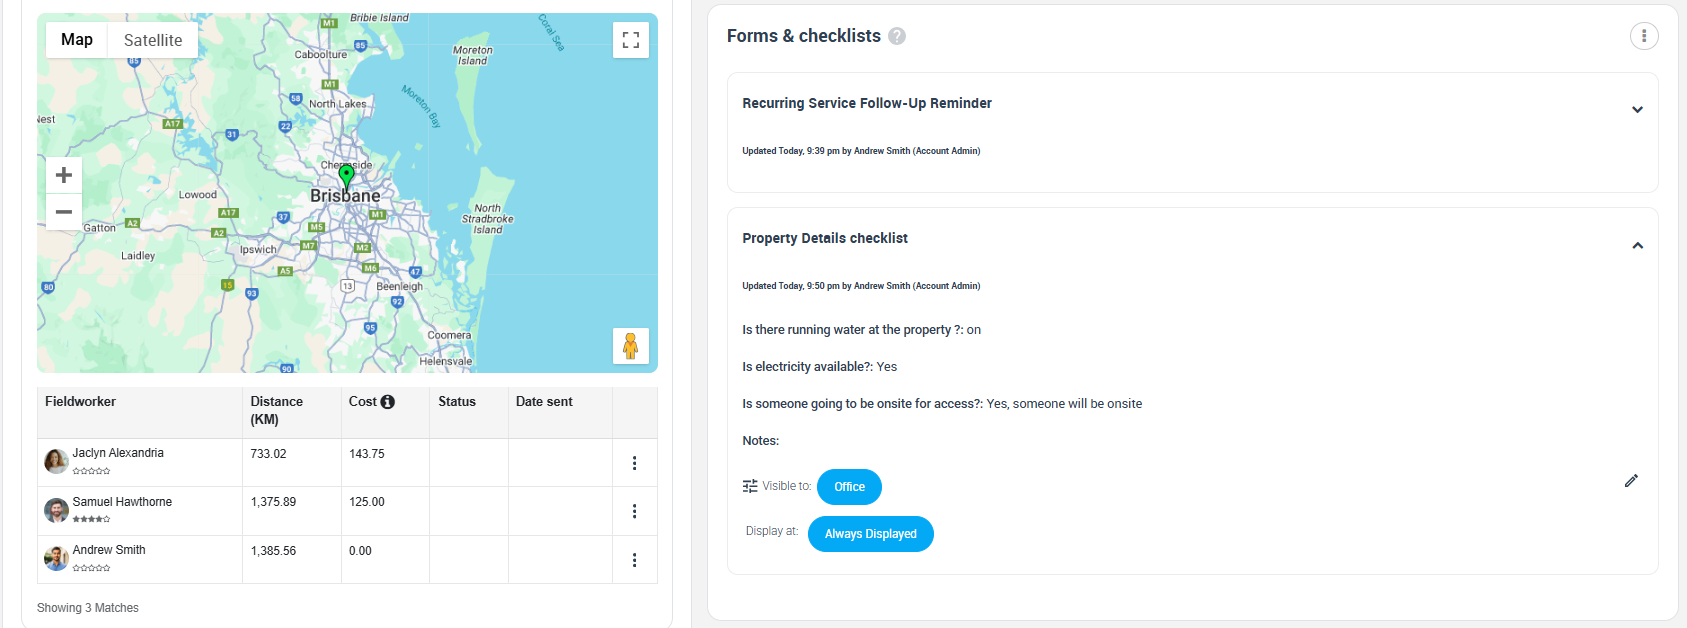
Visibility to Only Office option
- Selecting the “Only Office” visibility option means that only admin users can see and review the filled Forms and Checklists from the Web or the Admin App, Fieldworkers and customers won’t be able to see them.
- The admin users will find filled-out Forms and Checklists at the view booking page as in the Forms and Checklists container located at the down right side of the page:
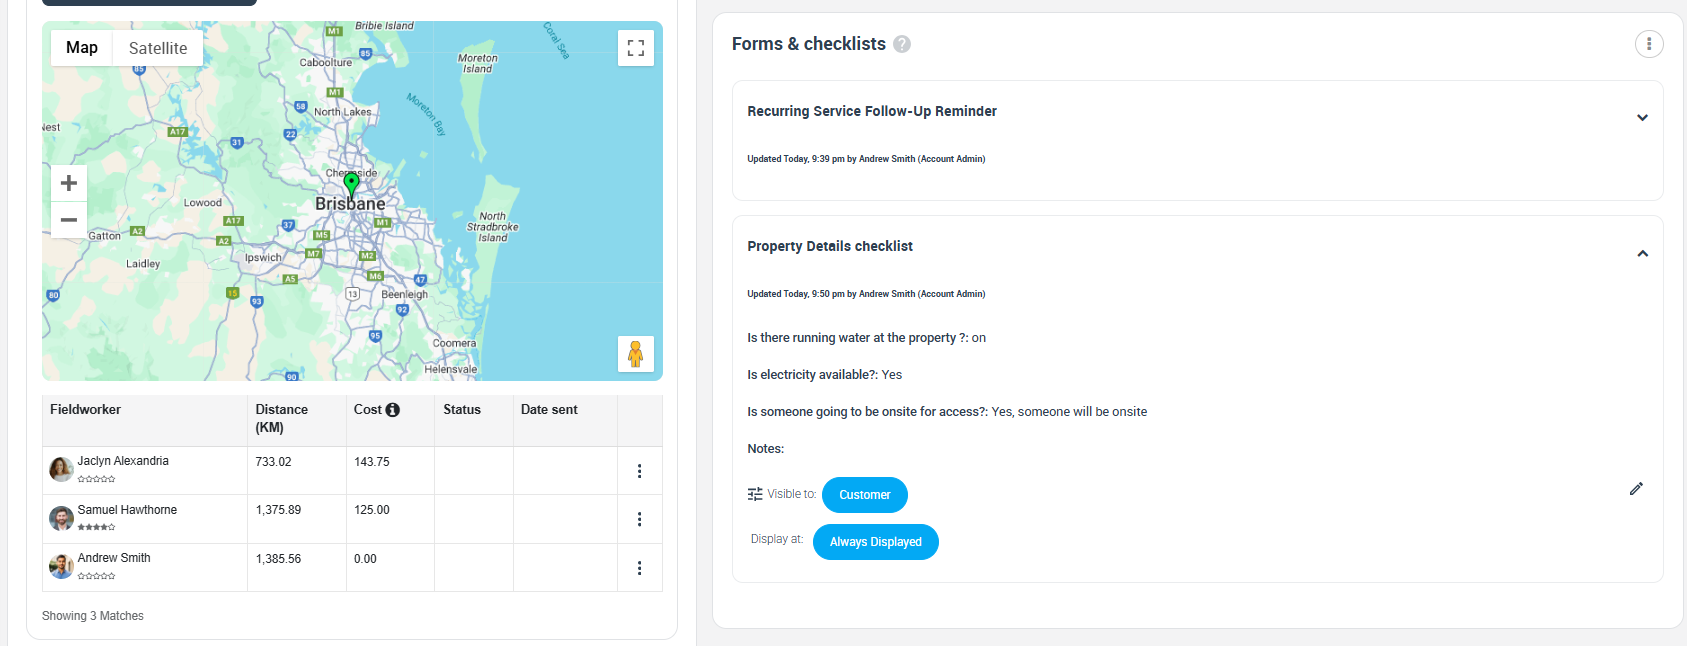
Visibility to Only Customer and Office option
This option will enable the customers and the admin users to see and review the filled-out Forms and Checklists; however, fieldworkers will not be able to see or review the filled-out Checklists and Forms
- Admins users will find filled Forms and Checklists at the view booking page as in Forms and Checklists container located at the down right side of the page:
- And customers can see the filled-out form from the customer portal ‘view booking’ view page under “Forms and Checklists”

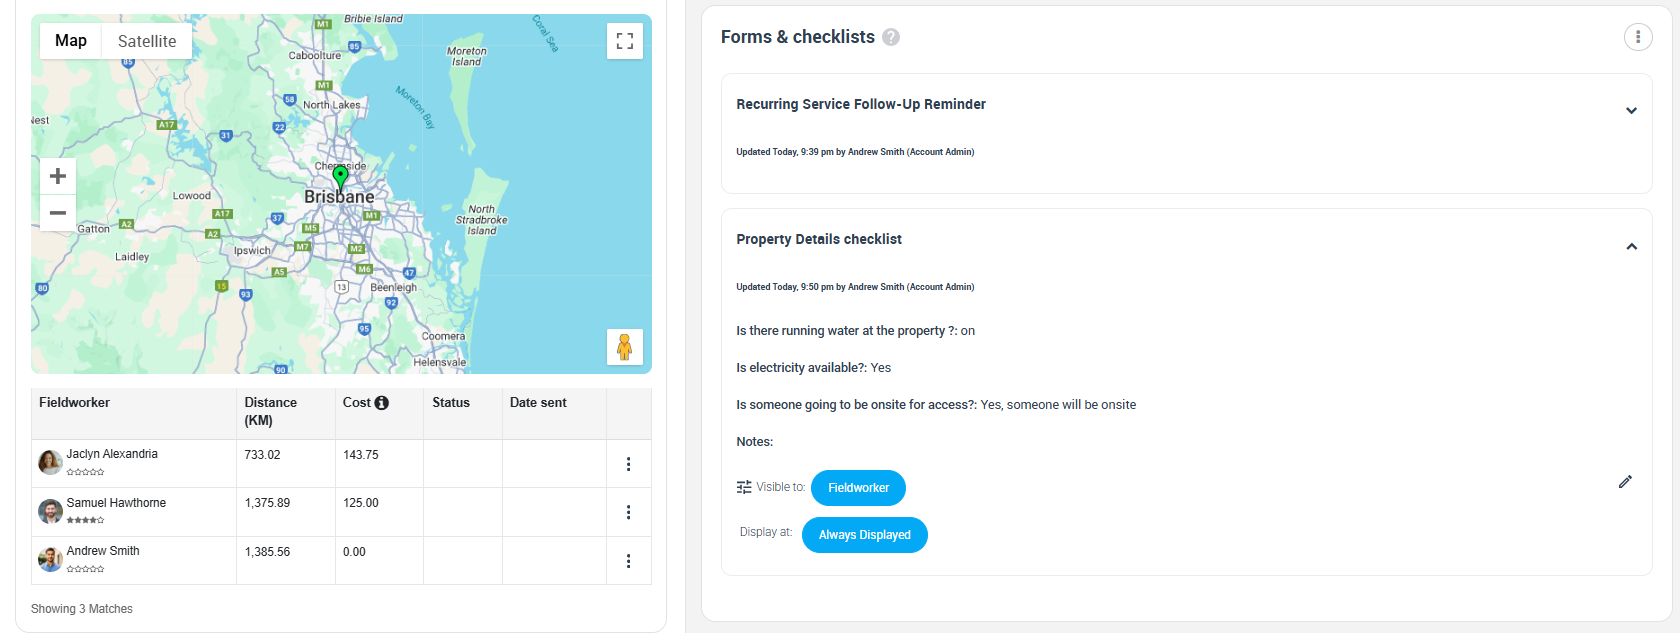
Visibility to Fieldworker and sub-Fieldworker and Office option
In this case, only fieldworker and admin users will be able to review the filled-out Form and Checklist; however, customers will not be able to see or review them.
- Admin users will find filled Forms and Checklists at the ‘view booking’ page as in the Forms and Checklists container located at the down right side of the page:
- Fieldworkers can review the filled-out Forms and Checklists from the ‘view booking’ page from the App as follows:

When to display options
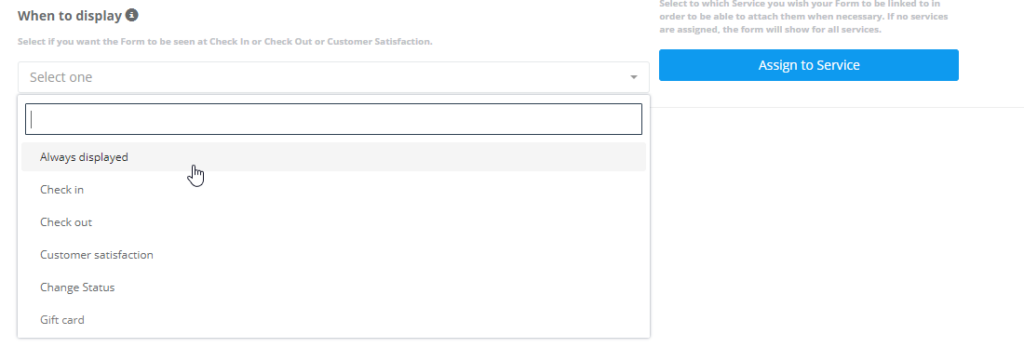
Always displayed
Selecting this display option means that the form will appear in all bookings for customers, fieldworkers, and office users in the process of making a booking. They are general information that can be changed based on each job, also, the form appears for the fieldworkers when changing the status of the job from the fieldworker app.
These forms contain general data collection that could change based on each job. Moreover, the forms with the “Always Displayed” display option appear to fieldworkers when changing the status of the job from the fieldworker app.
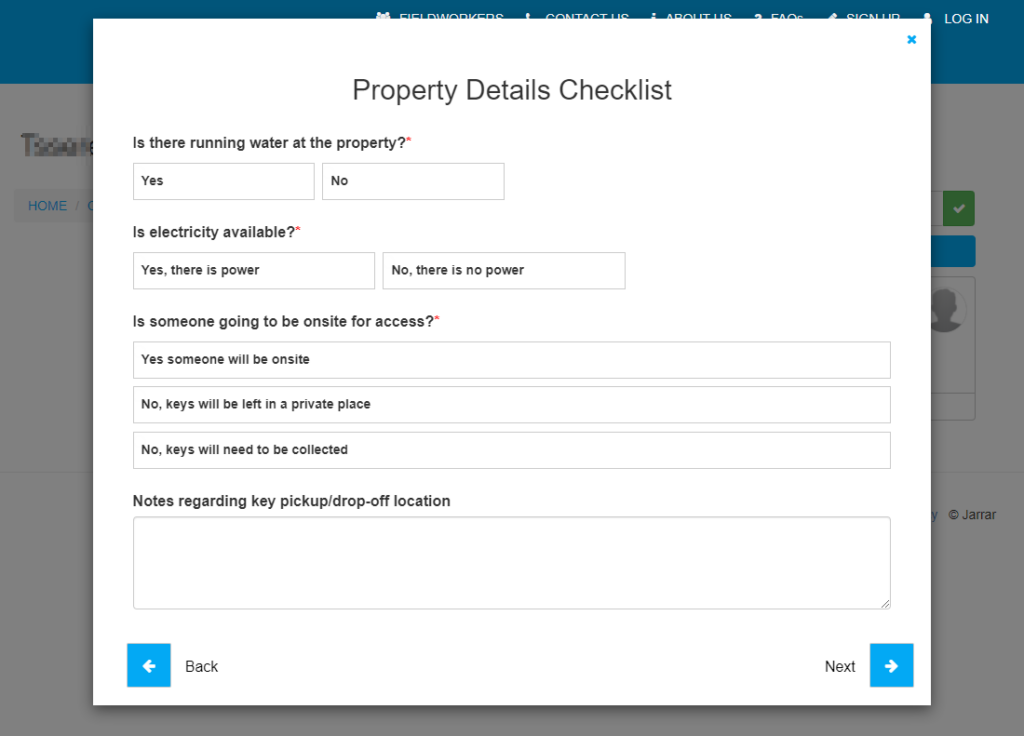
For example, in Cleaning businesses for property cleaning services, users have to provide detailed information about the property. For example, if the property has electricity or if there is running water his information is important for the fieldworker in helping them choose the right equipment and prepare the proper setup for each job.
In this case, admins need to create a form asking details directed to the user while creating a booking having the following form elements
- Is there running water at the property?: Yes/No
- Is electricity available?*: Yes there is Power/No, there is no power
- Is someone going to be onsite for access?: Yes someone will be onsite/No, keys will be left in a private place/No, keys will be left in a private place
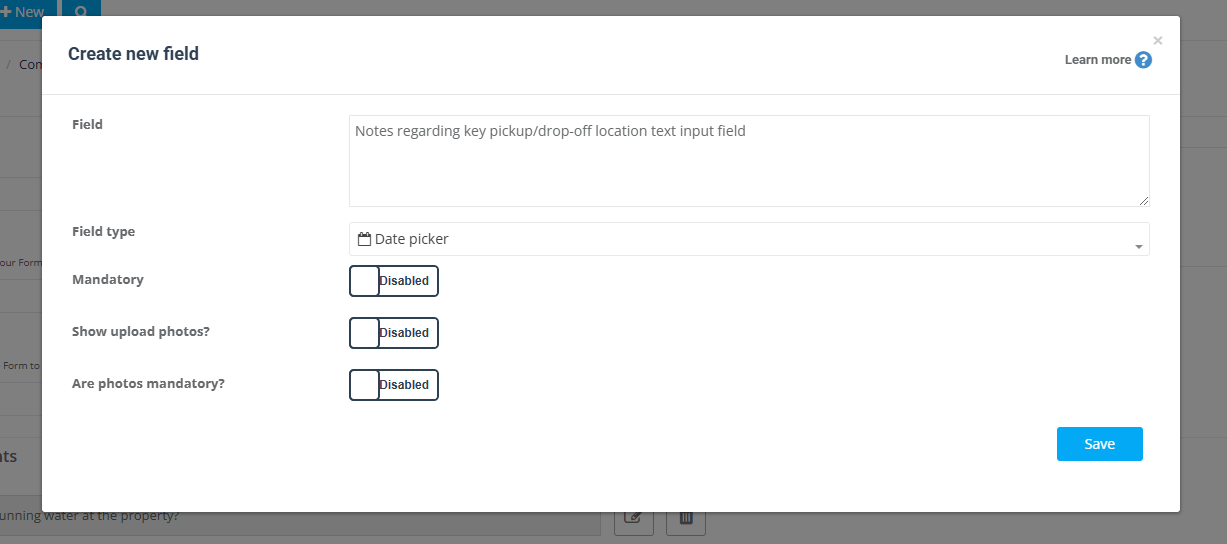
- Notes regarding key pickup/drop-off location text input field
For setting up this checklist:
- From the admin web view, go to Settings > General Settings > Forms & Checklists from the side menu on the left
- Click on ‘Create new’.

- Set the form name, the visibility that controls to whom the form is visible for, we set it as All which means that the form will be visible to the office, fieldworkers, and customers, and the display option as Always Display
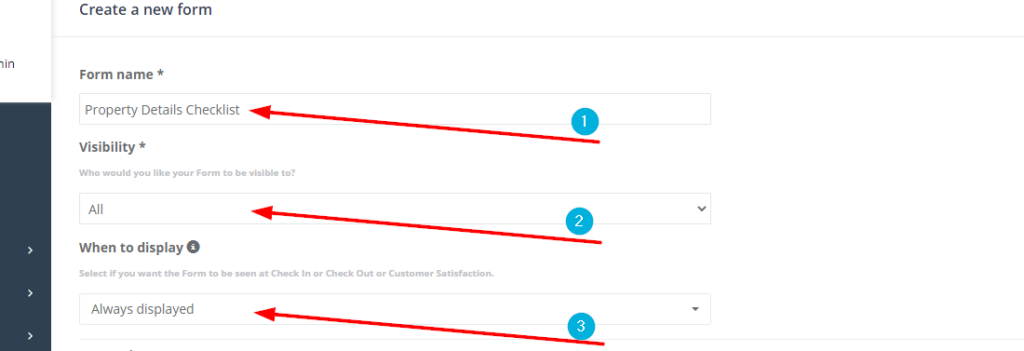
- Now we will start adding the form elements, which is in that case are the inspection steps and details that the fieldworker needs to perform
- Click on +Create new field

- A popup will appear as shown below:
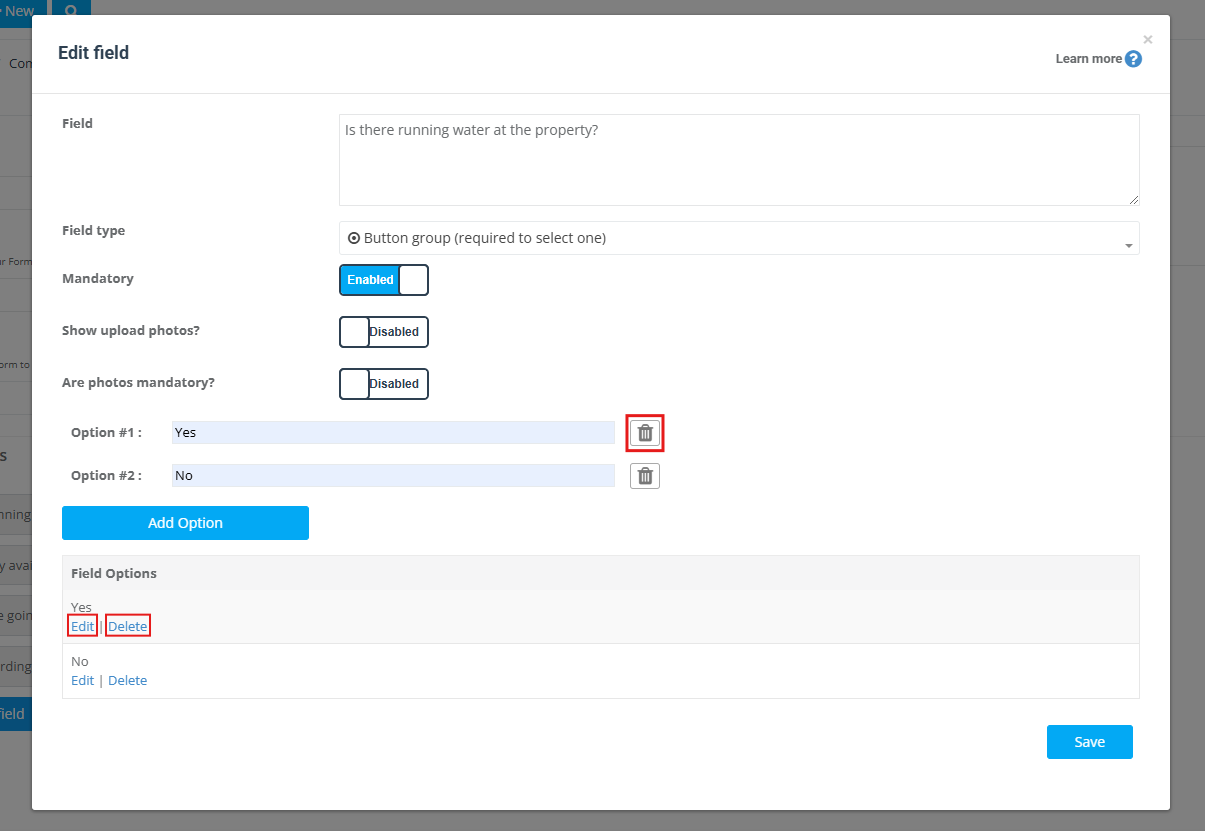
- Field: In this box, you can insert the field name, which is the question or the title of the form element
- Field type: In this case, we have two types of field elements. The first type is a multiple-choice element, similar to the ones that have ‘Yes/No’ for a choice. The best field type to choose for this is the ‘Button Group’
- This form is meant to provide the fieldworker with important details about the job; therefore, we will set all of the multiple-choice elements to be mandatory in order to make sure that the customer is unable to continue the booking process without filling out these fields or answering the field questions.

Note: Users do not need a photo upload for this case, that is why the “upload photos” feature is going to be optional, not mandatory.
- Click on the ‘Add Option’ button so you can add the options or the multiple choices for the element you are creating. It may be “Yes” or “No” or any text you find suitable. If you need to add more than one option, click on the ‘Add option 2’ button again and keep repeating for each option you would like to add.
- ‘Remove Icon’ is used when you need to remove an option that you added as a choice. Clicking on it will delete the last option added
- Edit: This is for editing an already saved option in case of minor changes
- Delete: This is for deleting an already saved option
- At last click on the ‘save’ button on the downright of the popup to save the element that you’ve created
- Adding a text input field for your users to write in is beneficial for questions that require them to provide notes and detailed instructions. This is done by clicking on the ‘+ Create new field’ button, and selecting the field type to be ‘Text box (multi-line)’.
- All of the created elements can be reviewed in the Create/Edit form and checklist page as
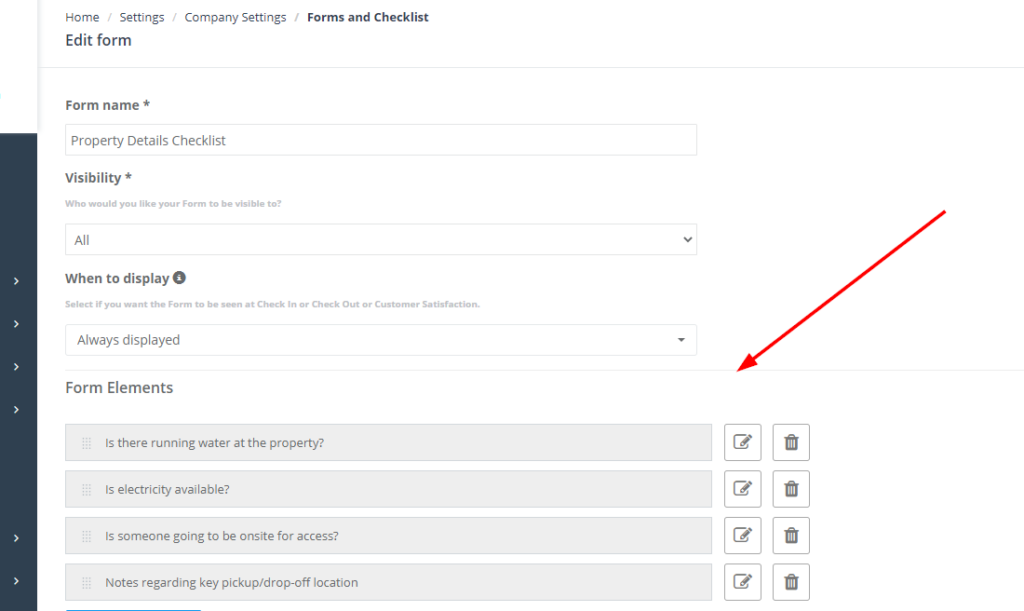
- You can easily edit the order of the elements by using the drag and drop action to any order that admins find suitable

- After you are done with the form, do not forget to click on ‘save’ at the down right of the page

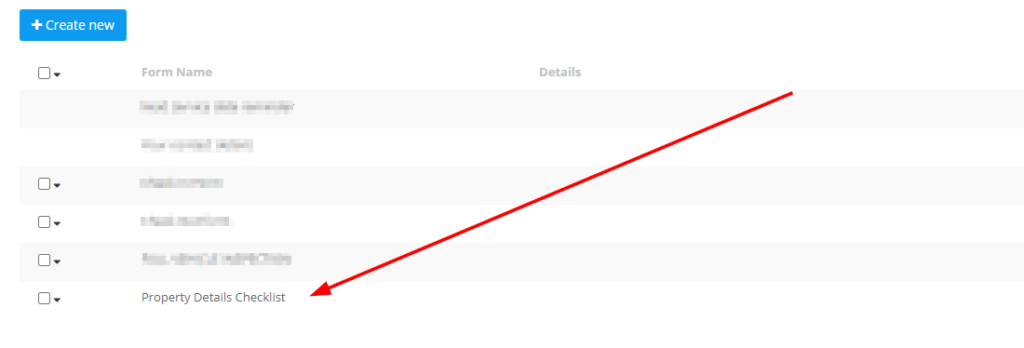
- The created Form will appear in the Forms & Checklists Settings as follows:
- The added form/checklist having the “When to display” option selected as “Always Displayed”, will appear to admins while making a booking, quote, invoice under the title of the “Form Name” that admin users selected as follows:
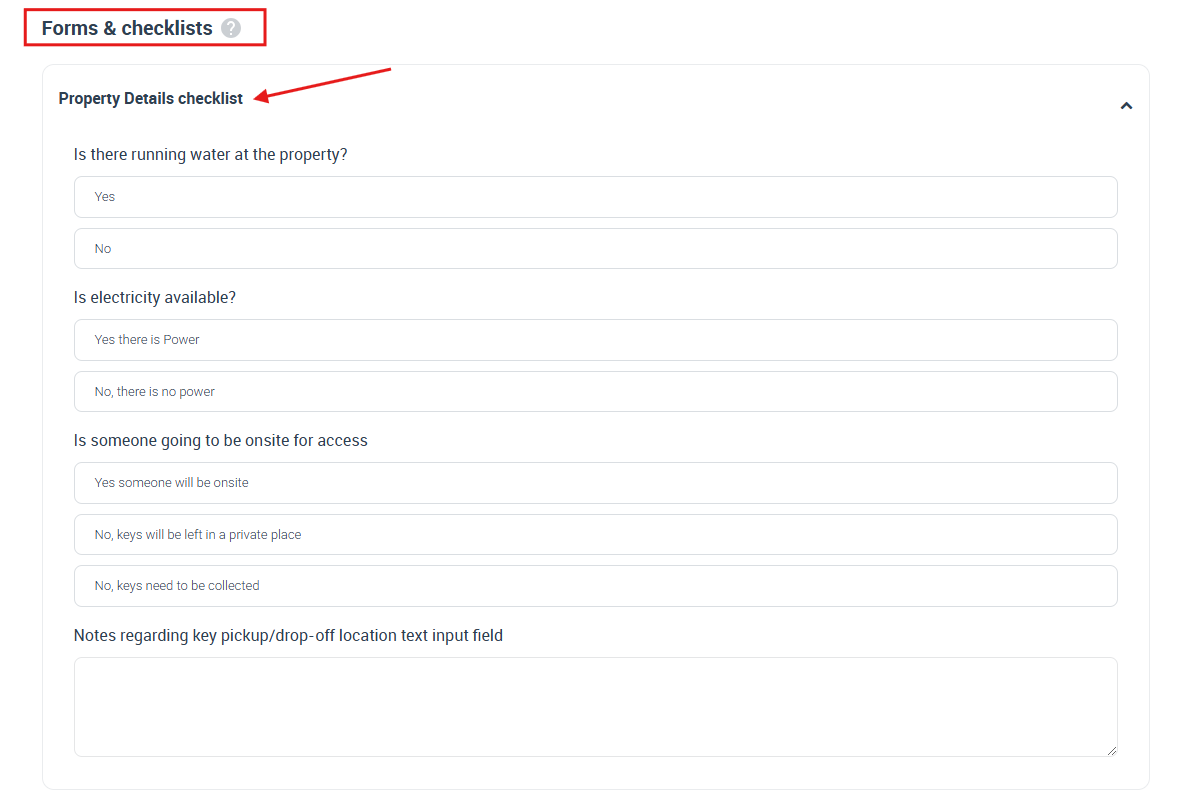
While:
- “1” Form name
- “2” the “Field” name which admin inserted
- “3” is “Option#1” and “Option#2” for “Field” 2
- “4” and “6” are the “Field” names for different elements,
- “5” and “7” are “Options#” for the “Field” name
- “4” and “6” respectively, all of them having “Field Type” as a Button group
- “8” is the Field name for the field “9” having “Text box (multi-line)” type
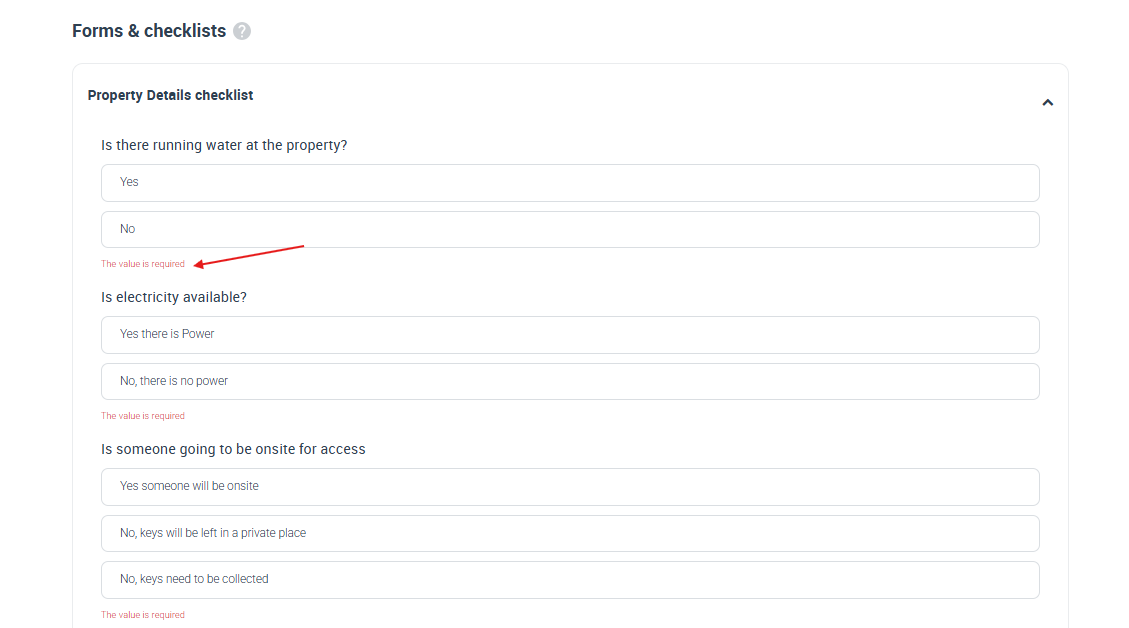
Since we set the form elements as ‘mandatory’ fields, admins can’t finish creating bookings unless they have these fields filled with the required data
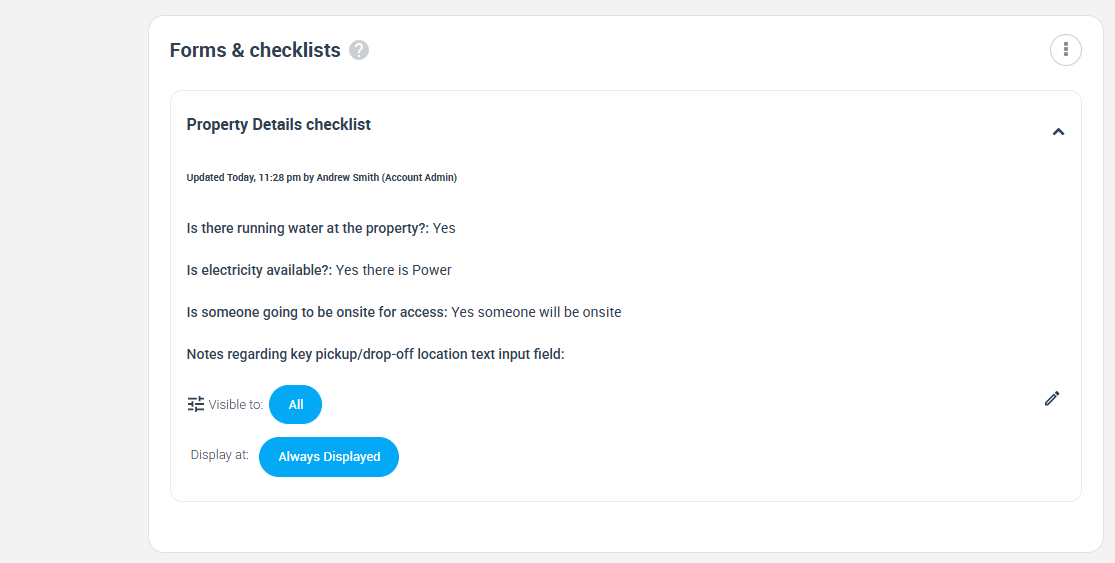
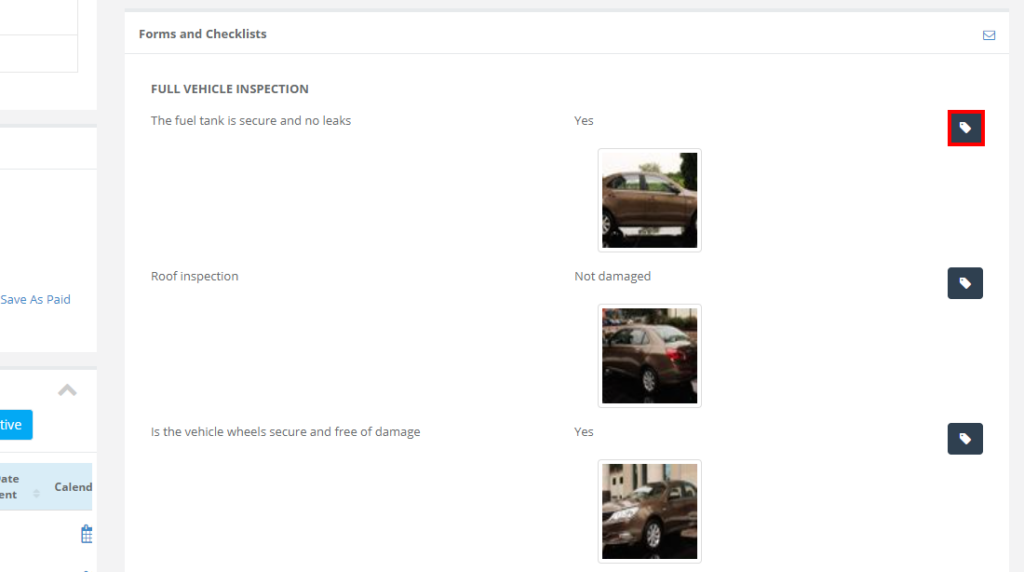
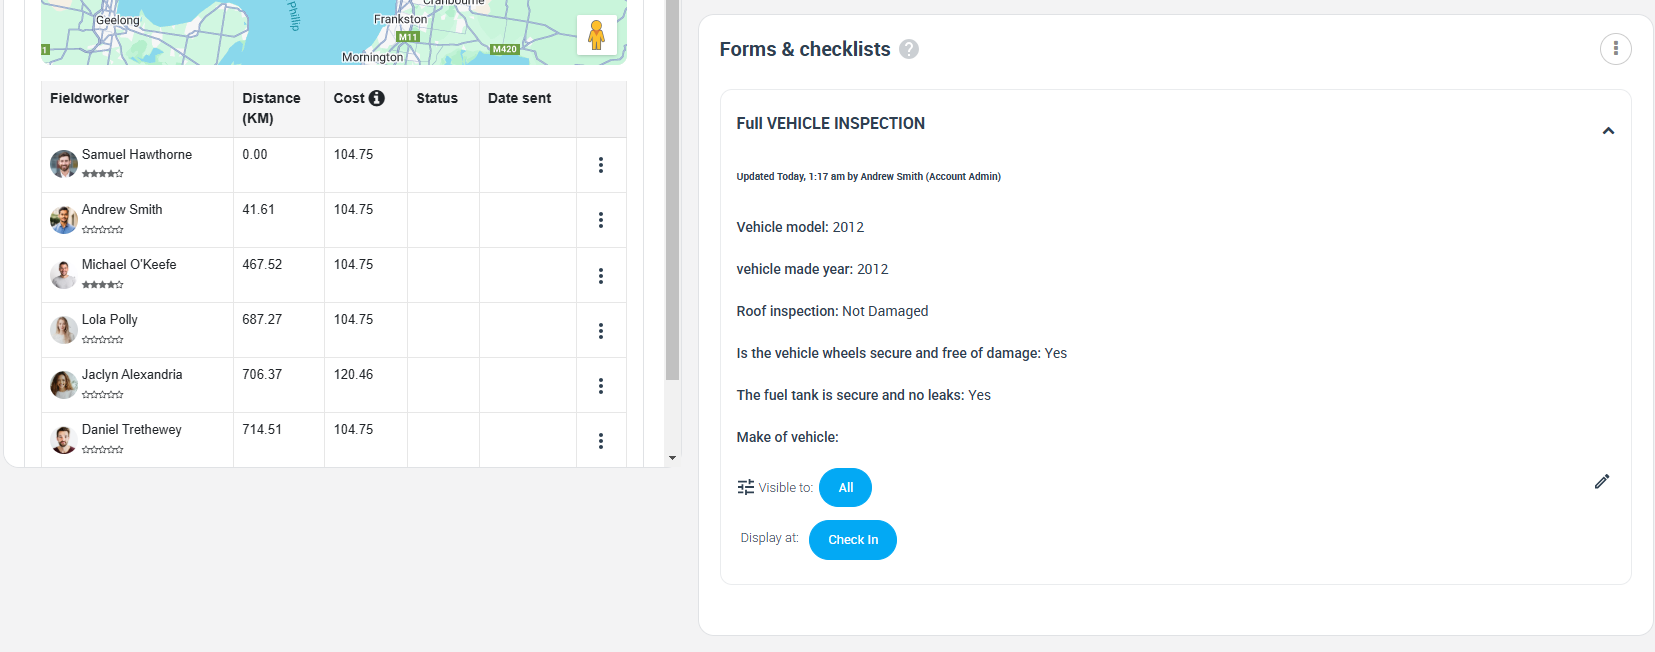
Admin users can always check the form at any time from the Booking View details page in the Forms and Checklists container located at the down right side of the page
Also, admin users can review the added image by clicking on the ‘tag’ button
When fieldworkers create a booking that has a form with the “Always displayed” display option activated, that form will appear on every booking
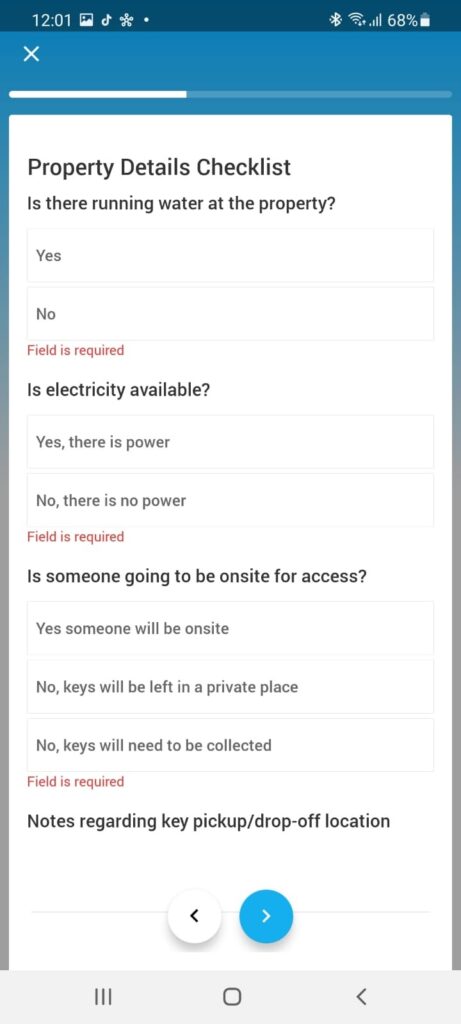
- Also, the form will appear when updating the status of the job in the fieldworker app, this will give the fieldworker to edit the information added to the form in the process of accepting the booking in case some information came out incorrectly.
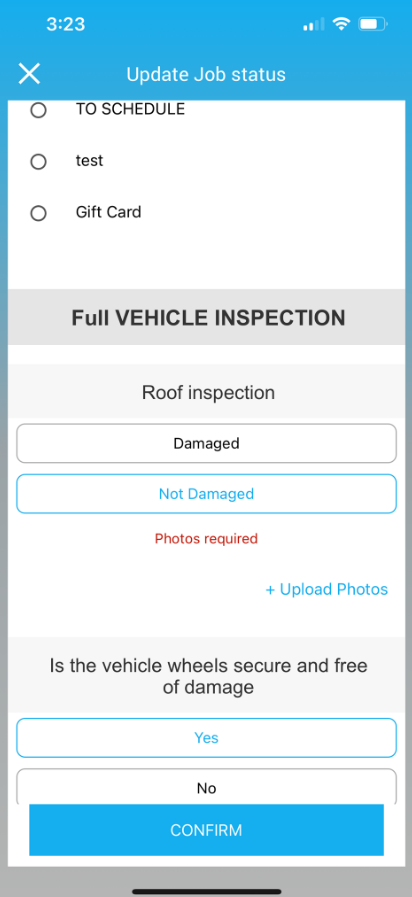
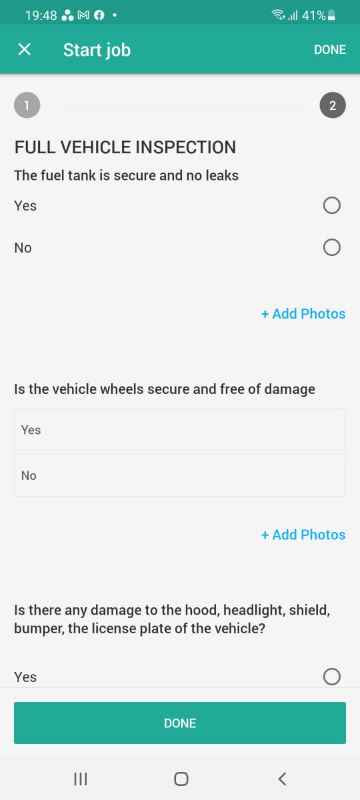
When a fieldworker is ready to start the job and presses on the “Start job” button, the form created will appear to the fieldworker right after they confirm the estimated time required for the job. This will give the fieldworker the access to correct any invalid details entered in that form before starting the job.
For example, if an admin user has created a booking and entered that the property has electricity available and the fieldworker finds out that there is no electricity on-site, the fieldworker can then edit the form and update it with the correct site information.
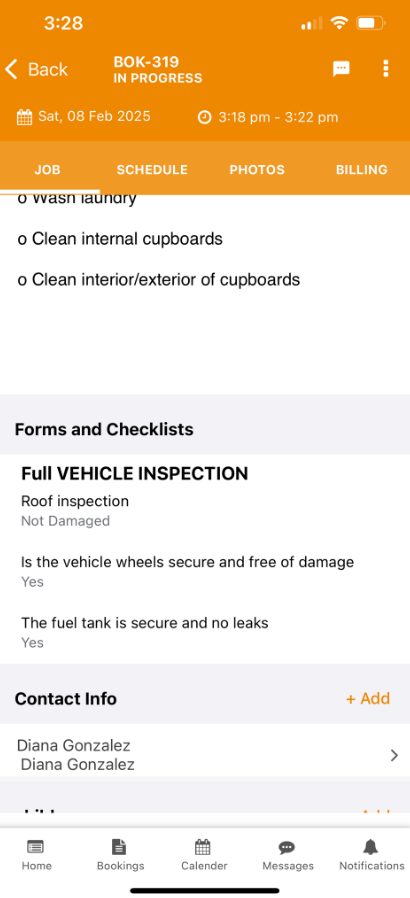
- Fieldworkers will be able to view the form details in the booking view page in the fieldworker app as follows:
- When customers are making a booking from the customer portal, Forms and Checklists that have the “Always Display” display option activated will appear before customers choose the time and date of the booking as follows:
Check-In
The check-in option means that the created form will appear on every booking for the fieldworkers when they start each job. This form will appear right after the fieldworker presses the “Start job” button in the fieldworker app. This button becomes visible after the fieldworker arrives at the job location and presses on the ‘arrived’ button (check booking tracking process<link>)
The ideal form/checklist that we can apply to this feature as an example is in the automotive industry, towing business in particular since the towing truck business mostly deals with moving cars from one destination to another. The fieldworker needs to fill out a vehicle inspection form providing information, photos, and details about the current state of the vehicle. This inspection form is filled out in order to make sure that the towing company doesn’t take responsibility for any damage that the driver is not responsible for during the transportation process.
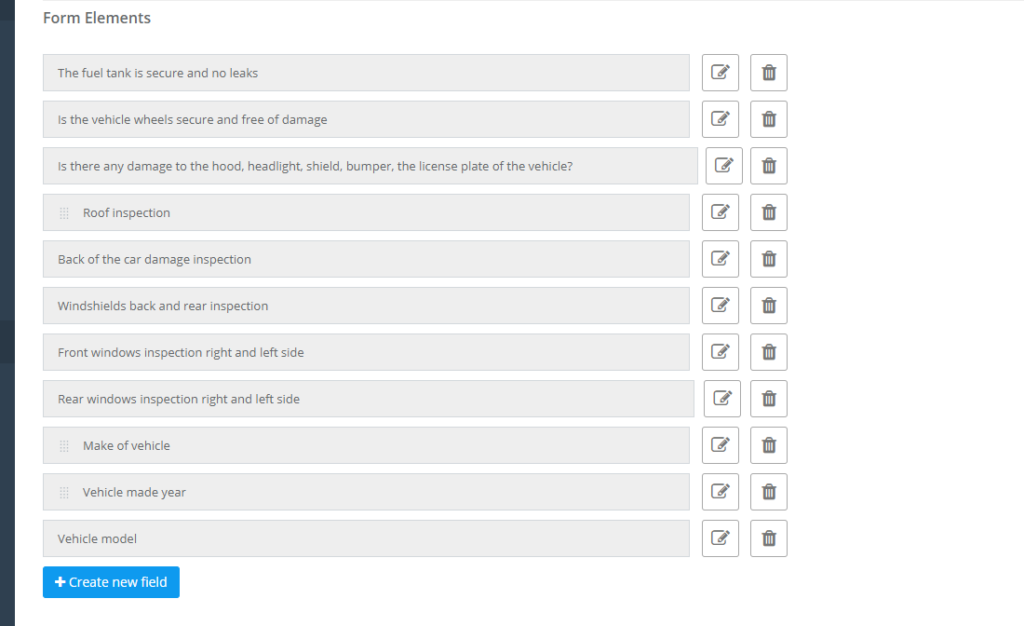
Admins can create a form asking the fieldworker to provide the following details. These questions are called “Form Elements”. Admins can create a form by asking the fieldworker to fill out and answer the following questions:
- The fuel tank is secure and has no leaks: Yes/ No
- Is the vehicle wheels secure and free of damage: Yes/No
- Is there any damage to the hood, headlight, shield, bumper, the license plate of the vehicle? Yes/No
- Vehicle Roof Inspection: Damaged/Not damaged
- Back of the car damage inspection: Damaged/Not damaged
- Windshields back and Rear Inspection: Damaged/Not damaged
- Front windows inspection right and left side: Damaged/Not damaged
- Brand of vehicle: text input field, you can add “for further notice the fieldworker is required to type in the brand of the vehicle manually
- The vehicle manufacture year: Date picker
- Vehicle model: Text input field, fieldworker will type in the vehicle model manually
The best application for this form is making the Form elements and details mandatory. In that case, the fieldworker can’t proceed without providing all inspection details and upload a photo for each inspection step for documentation. Making a form element mandatory is a feature powered by OctopusPro. Following, we will explain how to apply the mandatory option on form elements, alongside how to create the previously mentioned form:
- From the Admin Web View, go to Settings > General Settings > Forms & Checklists from the side menu on the left
- Click on +Create new

Set the form name, the visibility option that controls who can view the form, and the display option to determine when it will be displayed.
- In this case, the visibility option will be set as ‘All’ which means that the form will be visible to the office, fieldworkers, and customers.
- While the display option will be set as ‘Check-in’, which means that the form will appear once the fieldworker checks in or starts a job.

Next, admin users should start adding the Form elements, which in that case is the car’s condition after inspection and before performing the service, as well as any details the fieldworker needs to update for all users to view.
- In order to do that, click on ‘+Create new field’

A popup will appear requiring admin users to provide:
- Field name: The field name is the question/information that the admin users need to answer or fill out by fieldworker

- Field Type: In this example, we need three types of fields to be added: ‘Radio button’, ‘Text box’, and ‘Date picker’
- The first field type is the ‘Radio button’. The ‘Radio button’ is going to be used for questions/form elements with multiple choice. For example, questions that have “Yes/No” choices, similar to the example mentioned in the “Full Vehicle Inspection” form asking about the vehicle condition: Damaged / Not Damaged

Example 1: (Radio button)
- When selecting the ‘Radio button’ field type you need to manually write the options. This is done by clicking on the ‘Add Option’ button, which appears upon selecting the ‘Radio button’ field type.

- As an admin user, you can add as many options as you find necessary by clicking on the ‘Add Option’ button each time you would like to add a new option/choice.

- Admin users can always remove options by clicking on the ‘Remove Option’ button. Clicking on this button will remove the last option that has been added to the options list.

Example 2: (Text box)
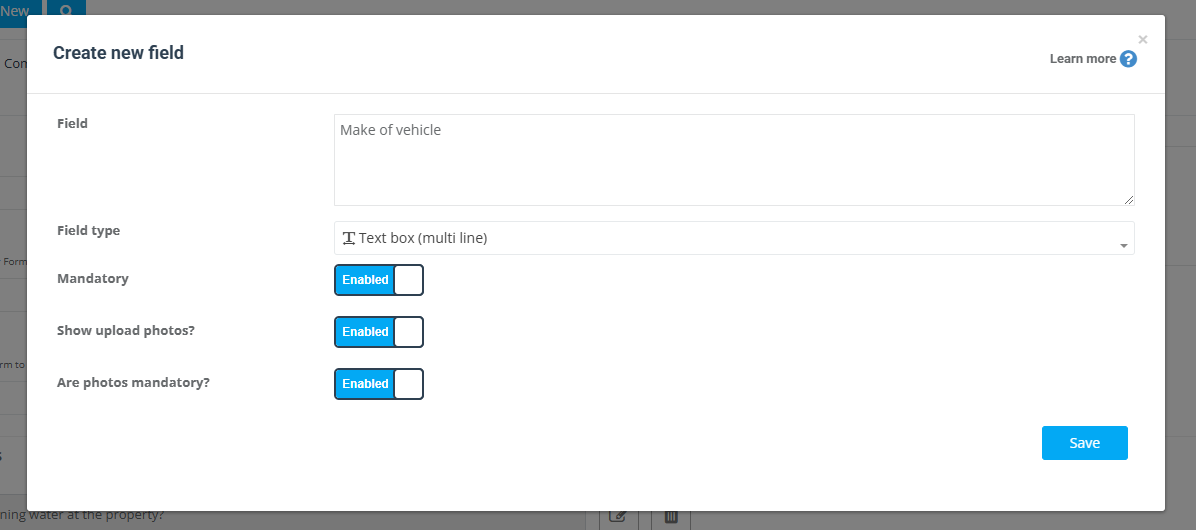
- The second field type is the ‘Text box’. The ‘Text box’ is going to be used for form elements that require description to be provided or written manually.
- This field type is for elements with questions similar to: “What is the make/brand of the vehicle?” as follows:
Example 3: (Date picker)
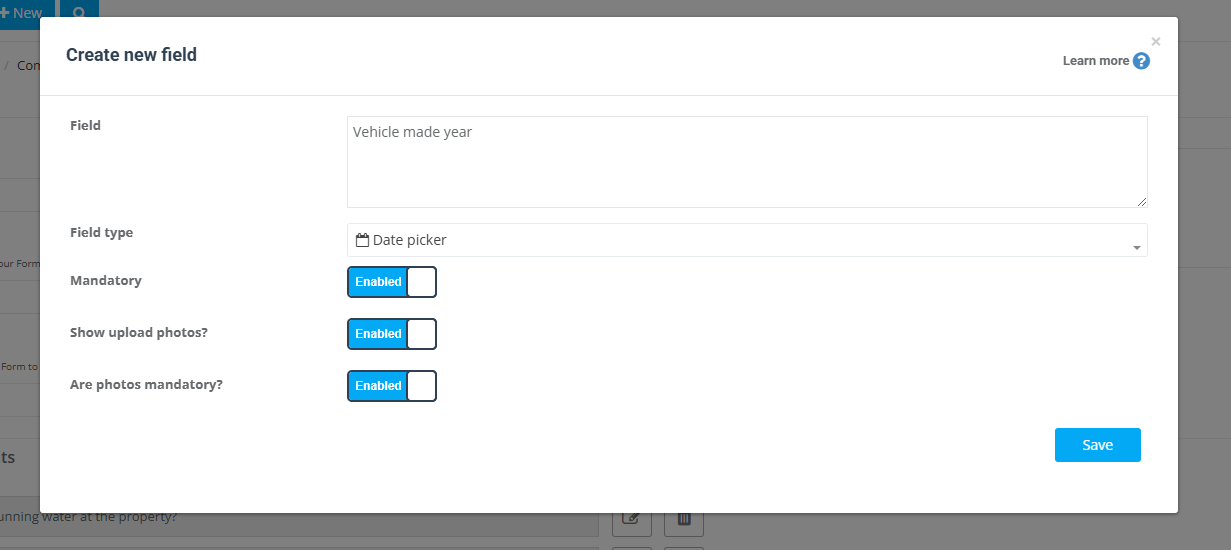
- The third field type is the ‘Date picker’. The ‘Date picker’ is used for elements that need date or year selection to answer the form element/question.
- For example, in this case it can be used to ask about the “Car Made” element which the date that the car was manufactured in as follows:
- Mandatory, Show upload photos? Are photos mandatory?: In this case, all of them will be flagged as yes for all of the elements added since documentation for this provided service is quite important for the company to view as well as the customer.

- After each time you create a new form element, do not forget to press the Save button

- The created form elements will appear as follows
- You can edit the order of the elements by simply using the drag and drop method
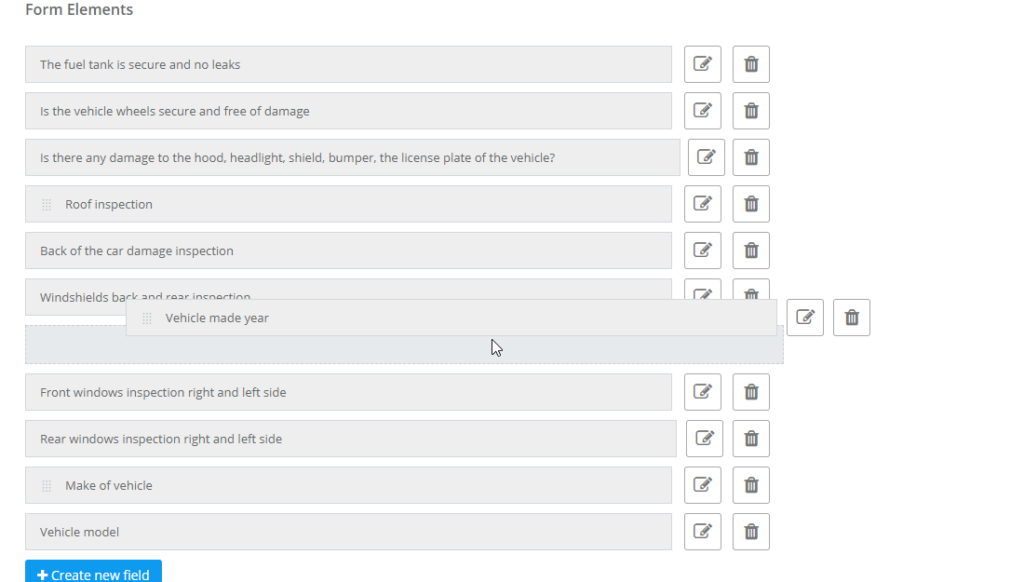
- Don’t forget to click on the Save button located at the bottom right of the page when you finish creating a form

- The created Form will appear in the Forms & Checklists Settings as follows:

- The form will appear to the fieldworker in Fieldworker App after starting a job as follows:
- Admin users can always check the form at any time from the “booking view” page in the Forms and Checklists container located at the down right side of the page as follows:
Check out
The check-out form is the form that appears to fieldworkers after they check out (finish) the job. After the fieldworker finishes the job and selects the “completed” status in the fieldworker app, this option appears once the fieldworker has attended the booking location and/or completed the job.
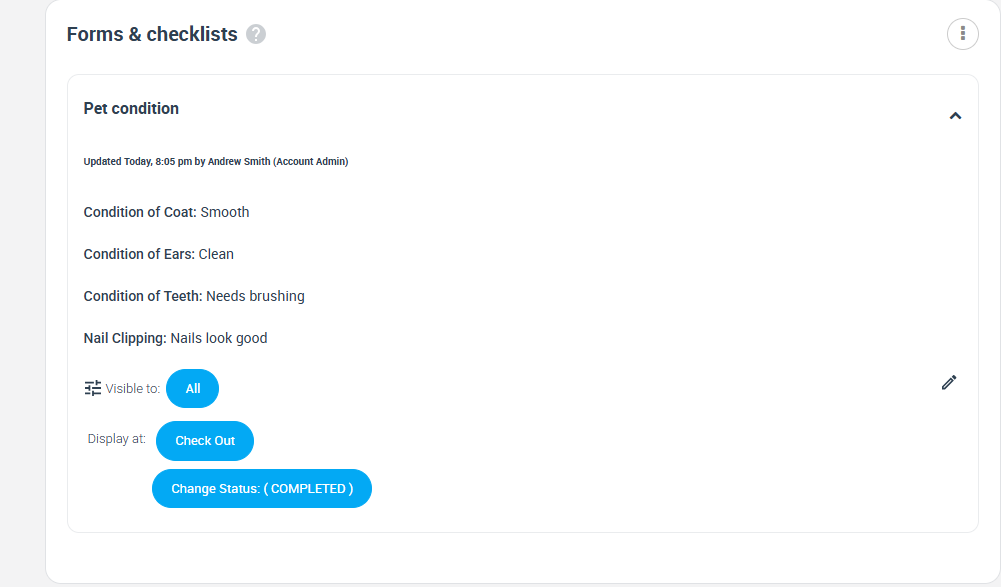
The ideal form/checklist that can be applied to this case is in the pet grooming industry. In the pet grooming industry, the fieldworker needs to fill out information regarding the pet’s overall health or possible diagnosis for example. This form/checklist is also preferred to be visible for all users (especially customers) in order for them to be able to keep track of their pet’s health.
Admin users can create a form asking the fieldworker to provide the following details; these are called “Form Elements” in OctopusPro:
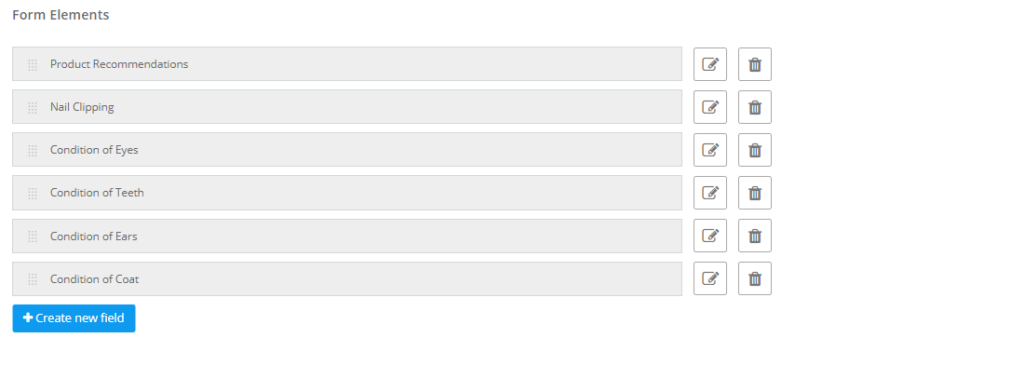
- Condition of Coat: Smooth / Curled / Knotted / Tangled
- Condition of Ears: Clean / Dirty / Needs to seek a vet’s help
- Condition of Teeth: Fresh / Needs brushing / Needs to seek a vet’s help
- Condition of Eyes: Bright / Drippy / Needs to seek a vet’s help
- Nail Clipping: Needs scheduling for clipping / Nails look good / Needs to seek a vet’s help
- Recommended products
The best way to implement this form is making these “Form Elements”, that are required to be filled out by the fieldworker, to be mandatory so the fieldworker can’t proceed without providing a full description of the pet’s condition.
Also, it can be necessary for the fieldworker to upload a photo for each condition, in order to document everything on each booking and for each pet. Making a “Form Element” and the “Upload Photos” feature mandatory can be done through the OctopusPro admin user account.
Following, we will explain how to apply these features, alongside how to create the previously mentioned form:
- From the admin web view, go to Settings > General Settings > Forms & Checklists from the side menu on the left
- Click on +Create new

Set the form name, the visibility option that controls who can view the form and the display option to determine when it will be displayed.
- In this case the visibility option will be set as “All”, which means that the form will be visible to the office users, fieldworkers, and customers.
- While the display option will be set as “Check-out”, which means that the form will appear once the fieldworker checks out of or finishes the job.
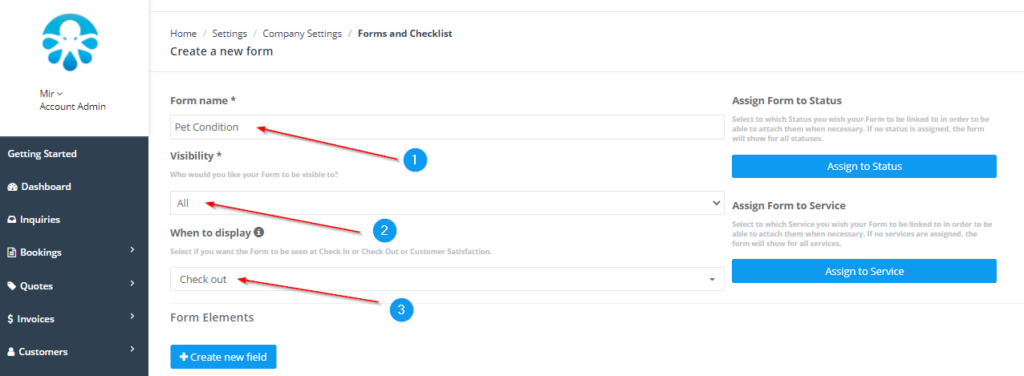
Next, admin users should start adding the Form elements, which in that case is the pet’s condition after performing the grooming service and details that the fieldworker needs to update for all users to view.
- In order to do that, click on +Create new field
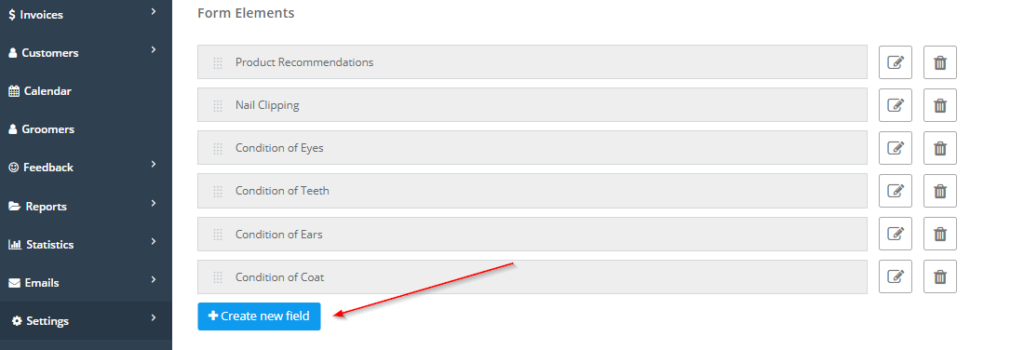
A popup will appear requiring admin users to provide:
- Field name: The field name is the question/information that the admin users need to answer or fill out by fieldworker
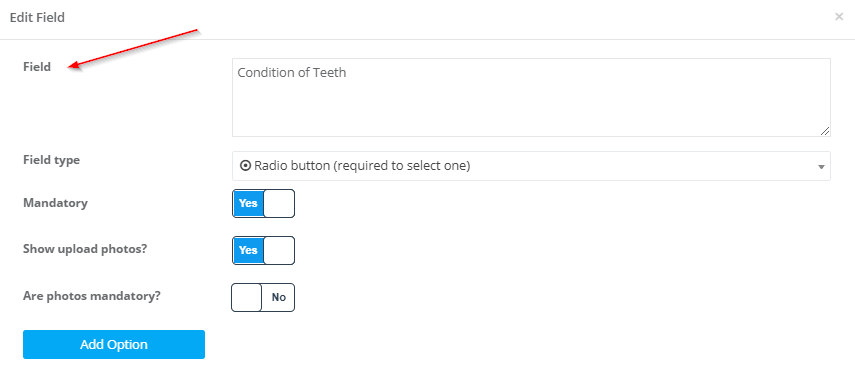
- Field type: In this example, we need to use only two different field types: “Radio button” and “Text box”.
Example 1: (Radio button)
- The “Radio button” is going to be used for questions/form elements with multiple choice. While the “Text box” is going to be used for form elements that require description to be provided or written manually.
- When selecting the “Radio button” field type you need to manually write the options. This is done by clicking on the “Add Option” button, which appears upon selecting the “Radio button” field type.
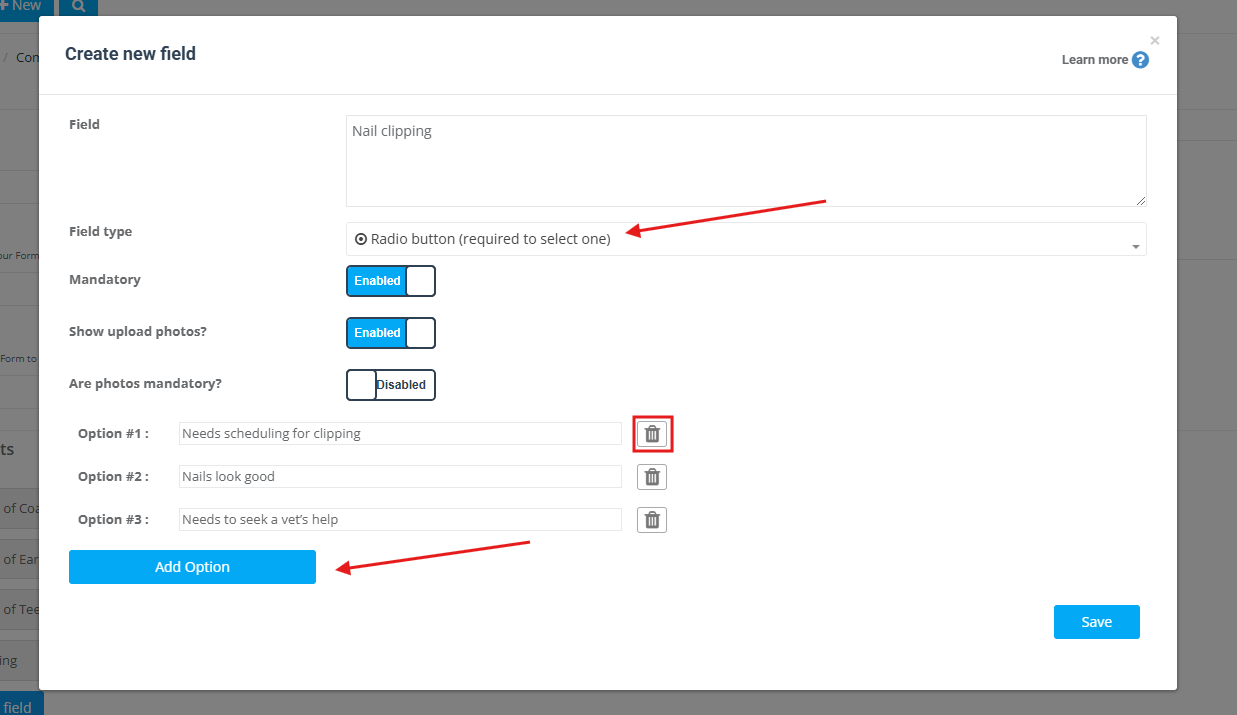
Example 2: (Text box)
- In this case, the “Text box” is going to be used for the field name “Product Recommendation”, because it is a field that requires manual writing/description for the products recommended.
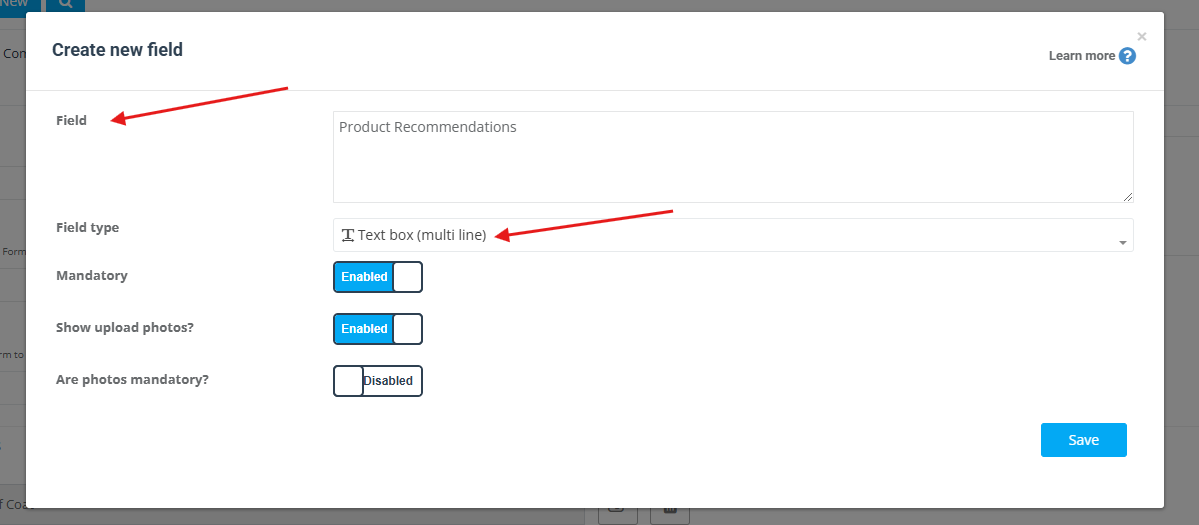
Mandatory, Show upload photos? Are photos mandatory?: In this case, all of them will be flagged as yes for all of the elements added since documentation for this provided service is quite important for the company to view as well as the customer.
- After each time creating a form element, do not forget to press the Save button

- The created form elements will appear as follows
- You can edit the order of the elements by simply using the drag and drop method

- Don’t forget to click on the Save button located at the bottom right of the page when you finish creating a form

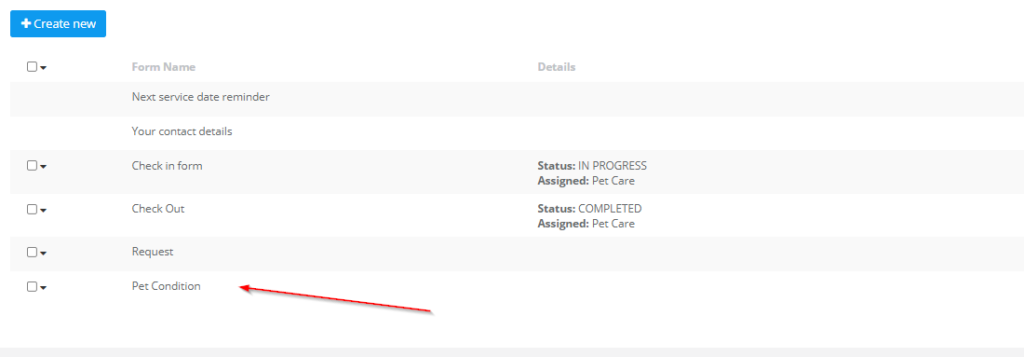
- The created Form will appear in the Forms & Checklists Settings as follows:
Note that the check-out form can only be filled out by the fieldworker. However, the filled-out check-out forms can appear to any of the admin users, fieldworkers, or customers, depending on the visibility option selected for the form.
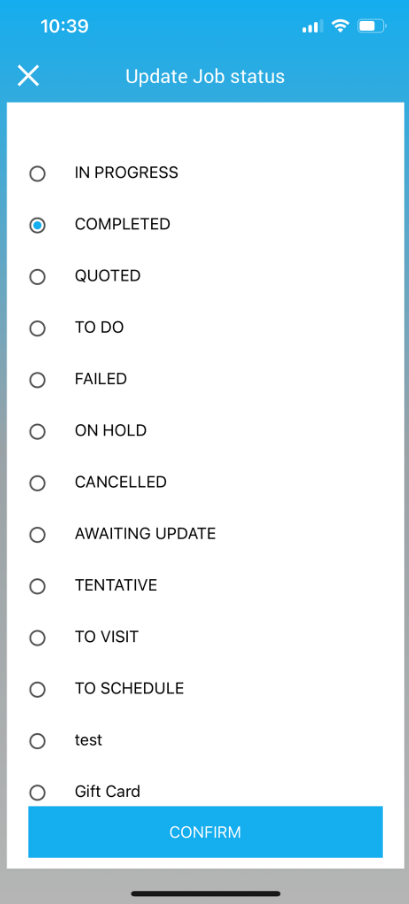
- The check-out form appears to the fieldworker once they update the job status and change it into “Completed” as shown below:
- After following the check-out process, the form will appear for the fieldworker to fill out as shown below:
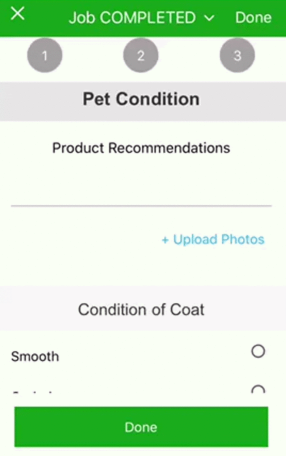
- After filling out the form, the fieldworker must click on “Done” to save the changes/edits they made to the check-out form.
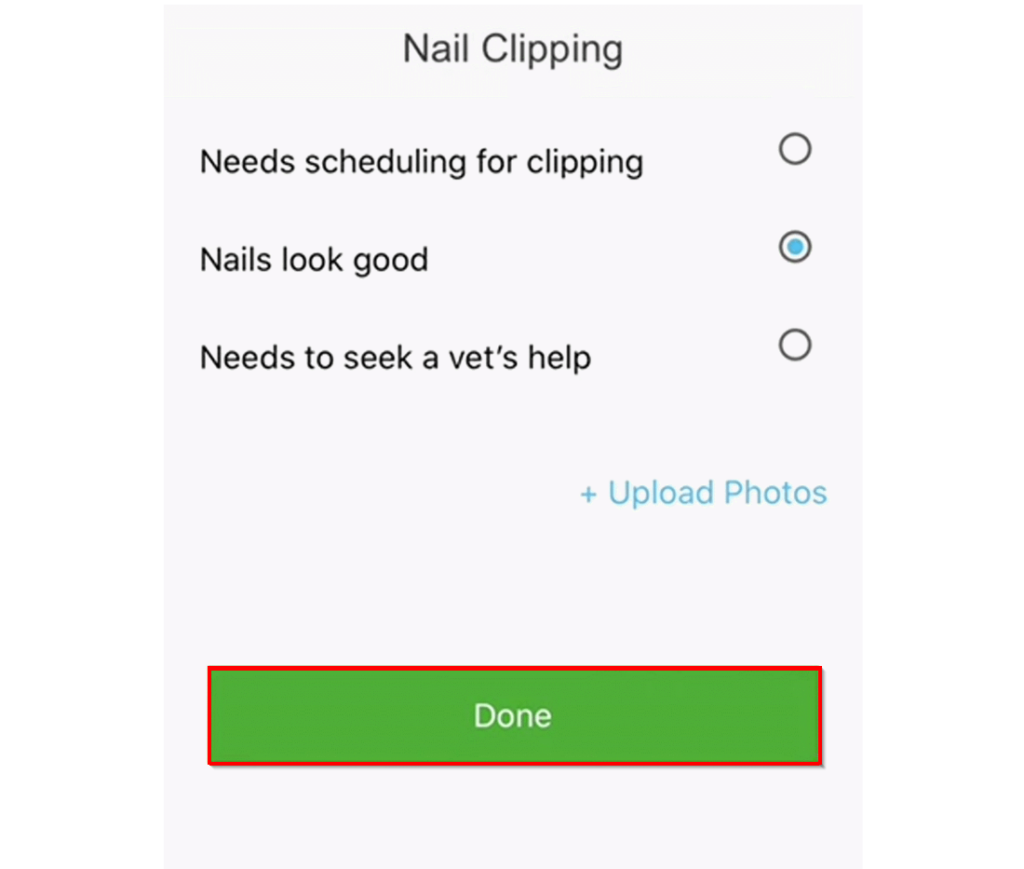
- Even though the admin users can’t answer the elements in the check-out form, they are able to view the filled-out check-out form after the fieldworker submits it. Admin users can check the filled out check-out form when accessing the booking’s information from “All Bookings” as shown below:
Change status
When selecting this display option in the process of creating a form/checklist, the form/checklist will be displayed for the fieldworkers when they change the status of the booking.
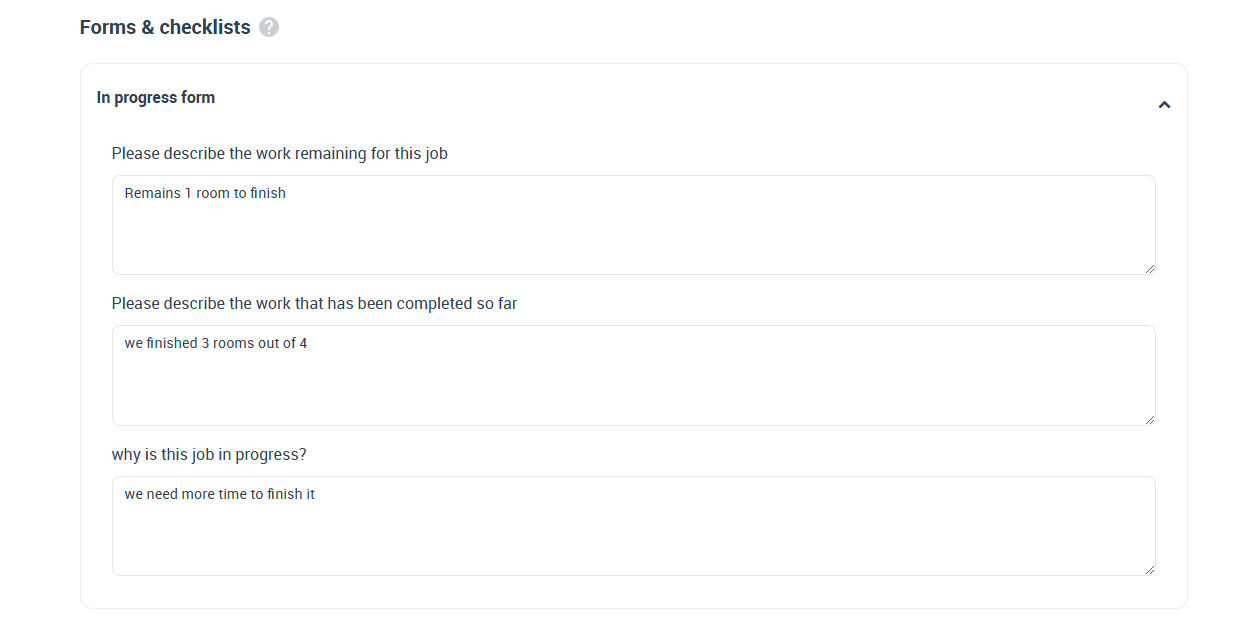
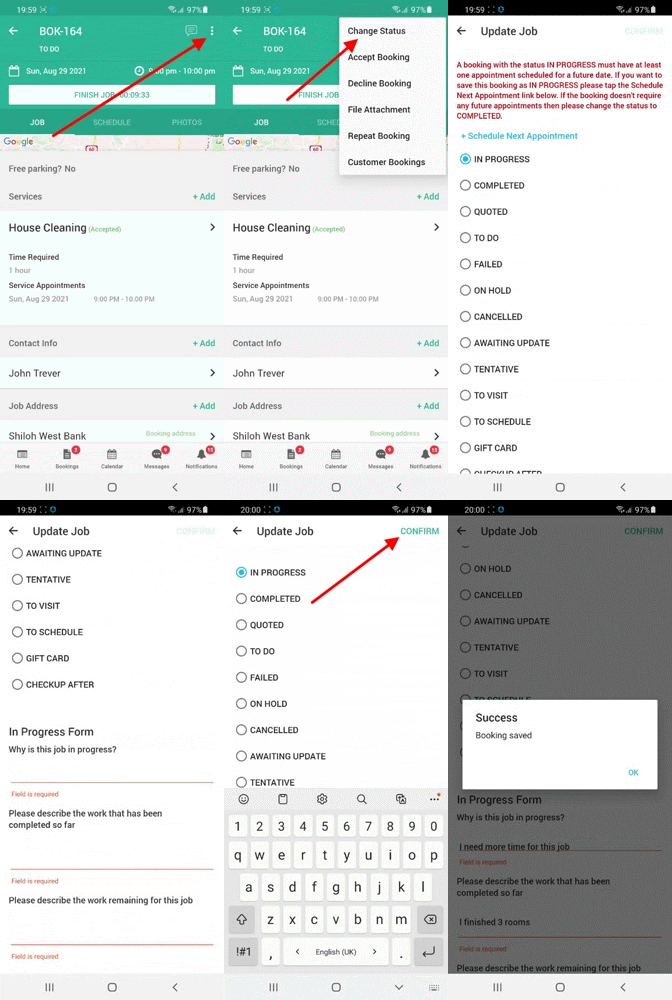
When admin users create a form that appears upon updating job statuses to ‘IN PROGRESS’, the form with the “Change status” display option will appear. This form can be used for asking the fieldworkers for more information about the reason for updating the status.
This display option can be used in a form containing the following elements in, for example, the cleaning industry. Form elements suggestions could be:
- Why is this job in progress?: “Text input field”
- Please describe the work that has been completed so far: “Text input field”
- Please describe the work remaining for this job: “Text input field”
For setting up this checklist:
- From the admin web view, go to Settings > General Settings > Forms & Checklists from the side menu on the left
- Click on +Create new

- Set the form name, the visibility option that controls who can view the form, and the display option to determine when it will be displayed.
- In that case, the visibility option will be set as “All”, which means that the form will be visible for office users, fieldworkers, and customers.
- Also, the display option will be set as “Changing Status”, which means that the form will appear to all users once the fieldworker or the admin attempt to change the booking status.
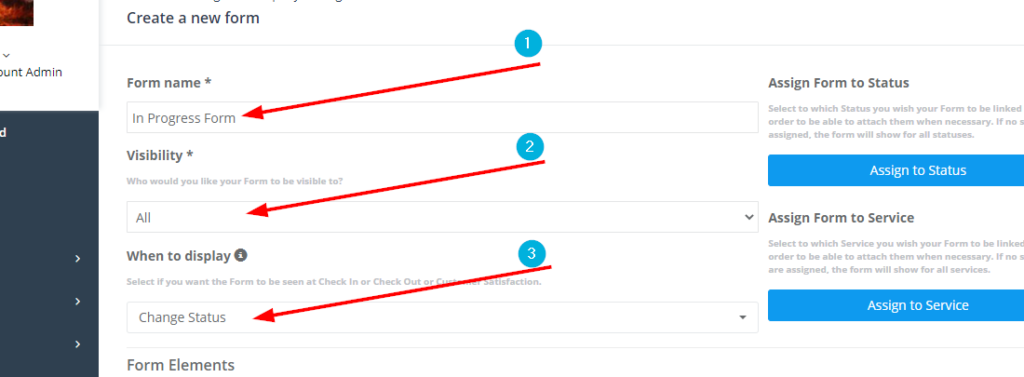
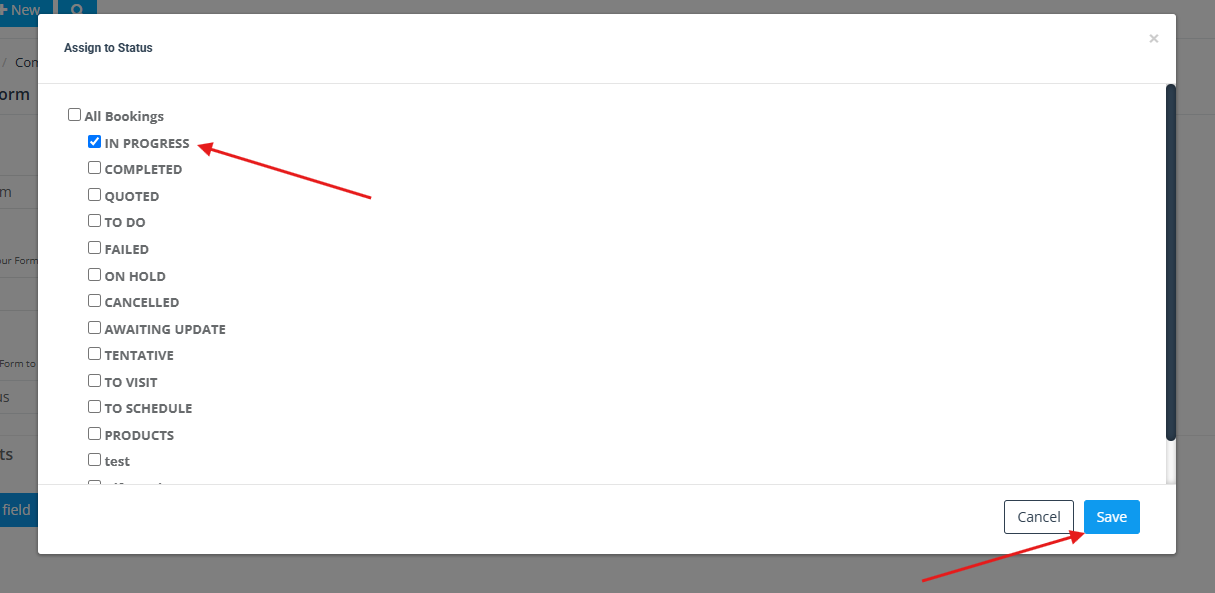
- You can have the option of having this form appear only when the job status is being changed to “IN PROGRESS” by assigning the form to the status of your selection from the “Assign to Status” button highlighted below.

- After clicking on Assign to Status, select IN PROGRESS and press on Save. Through this following popup, you can decide which services the form will appear for fieldworkers upon changing job status. You can select one or multiple job statuses.
- Next, admin users should start adding the Form elements, which in that case are the service details that the fieldworker needs to update for all users to view.
In order to do that, click on ‘+Create new field’.

A popup will appear requiring admin users to provide:
- Field name: The field name is the question/information that the admin users need to answer or fill out by fieldworker
- Field type: In this example, we need to use the ‘Text box (multiline)’ for fieldworkers to be able to manually type the answers for form elements/questions.
Example: (Text box)
- In this case, the ‘Text box (multiline) is going to be used to answer questions such as: “Why is this job in progress?”, “Please describe the work that has been completed so far”. The multiline text box is going to be used because these questions require a detailed explanation to be provided by the fieldworker.
- It is convenient to make all of the elements Mandatory for this form
- The created form elements will appear as follows:

- You can edit the order of the elements by simply using the drag and drop method

- Don’t forget to click on the Save button located at the bottom right of the page when you finish creating a form

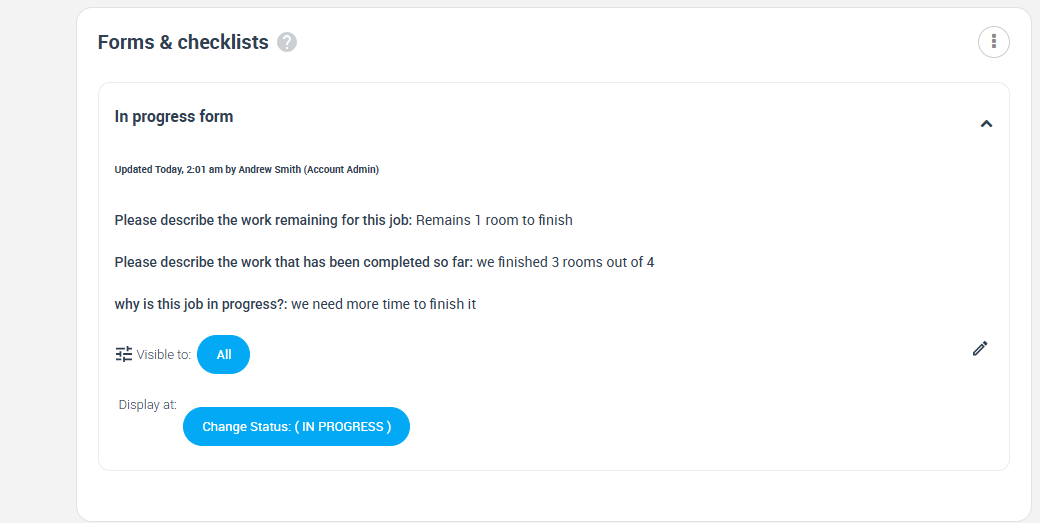
- The created Form will appear in the Forms & Checklists Settings as follows:

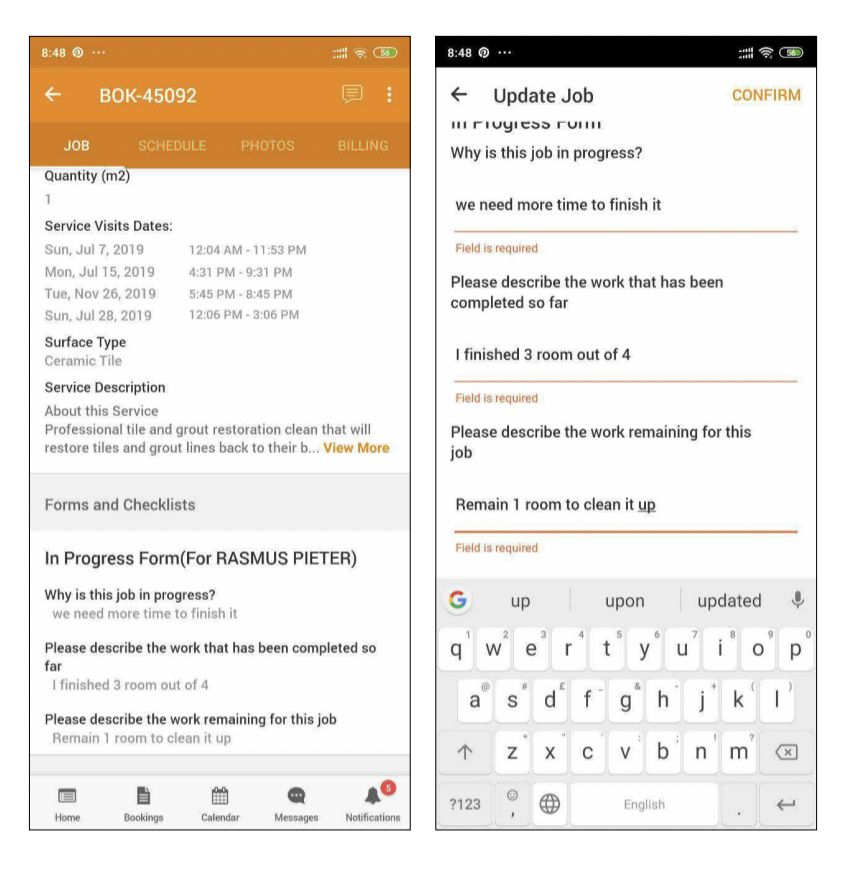
- The form will appear to the fieldworker when changing the status of a job to IN PROGRESS as shown in the right screenshot. The fieldworker can also review the answered elements from the “booking view” in the app as shown in the left screenshot.
- Admin users can always check the form at any time from the Booking View in Forms and Checklists container located at the down right side of the page
- Admins can edit the filled form by clicking on Actions > Edit from the booking view, or from the booking lists
- The form will appear in the edit booking page as follows:
Customer satisfaction
You can create a customer satisfaction form to share with your customers in order to rate the work completed by your fieldworkers. The form will appear in the “rating form” page, which your customers can access from multiple places including:
- The feedback email, which you can enable from your “automation” section under Settings > Communications > Automations
- The customer portal view page when customers access the portal to rate the fieldworker
- The branded app, where the customer can rate the fieldworker after their job is completed and paid
An example of questions added in the feedback form can be:
- How satisfied were you with your overall experience?
- How likely are you to recommend the company to a friend?
- How satisfied were you with the timeliness of the experience?
- How knowledgeable were the employees
- How friendly were the employees?
How to assign a form to a booking status
- As an admin user, you can assign each form to a specified booking status, so that it does not appear for the fieldworkers unless the booking is changed to that status. You can assign the form to certain booking statuses such as (In progress, completed, failed, on hold… etc.).
- This can be done when creating a new form or editing an already existing form by navigating through the side menu to Settings > General Settings > +Create new > Assign to Status or Settings > General Settings > Edit > Assign to Status

- When any of the fieldworkers change the status of the booking, the assigned form to that status will then be displayed to them. You can also assign the form to more than one status; however, if the form is not assigned to a specific status, it will show for all statuses.
- Shown below is an example of how the fieldworkers can view the form/checklist when attempting to change the booking status to a different one (in the case shown below, it is being changed to IN PROGRESS status)
How to assign a form to a service
- Similar to assigning the form to status, you can also assign the form to different services. For example, if you create a form specific for determining the customer satisfaction level, you can assign this form for this specific service, and then it will appear to the customer after the service is completed.
- This option can be added for each service provided by the company as well. For example, if you provide a pet grooming service, you can assign a specific form to be filled by any user that requires needed information before, after, or during the time the service is being provided.
- You can assign the form to more than one service as well, and if the form is not assigned to a specific service, it will appear for all services
Why ‘assign form to a service’ option is available for some services and not others
- Each service in a booking can require different information gathered to complete the service properly; therefore, needing different forms and checklists to be assigned to them.
- What happens if a booking has multiple services that have different forms assigned?
- If the booking has different services that have different forms assigned to them, all the different forms will appear to the user.
- For example, making a booking for a “pet care” request can have multiple services from pet grooming to pet walking or pet training. Each service of these can be requested in one booking for the same pet or more than one pet; however, each service has different requirements and requires different information to be collected. That is why we need to create a different form/checklist for each service.
- On the other hand, some services do not need multiple forms, whereas a single form appears every time a booking is attempted to be made asking the same set of questions to acquire a set of specifically needed information.
Next service date reminder form (Default form in the system)
- The next service date reminder is a feature that helps you generate repeat work from existing customers that have already tried your service, which increases customer retention rate. If you provide a service that might be required again by your customers, whether it is within a week, a month, or a year after job completion, then it’s a great idea to set a follow-up date to remind your customers to book your service again, just before they might require them in the future.
- The intent of setting up a follow-up date is for your customers and admin users to be reminded that your customer’s next service is due soon. You can also encourage customers to rebook your service by including a special offer or suggesting scheduling a recurring booking in your email or SMS templates.
- This form is activated by default for all new companies. ِAdmin users will be able to see this form upon making a new quote. This form contains certain fields such as: a date picker, so the next service date can be selected from. The second field is a check box containing options for admin users to select from how they would like to reach out to their customers (via email or via SMS). The last field is a text input field for additional notes that might need to be added to the reminder.
- Admin users can see the Next service date reminder form added in the Quote view page under forms and checklists. In that container, they can review the Follow update, the delivery method (SMS or Email or both), and the notes related to the Next service reminder.
- Also, admin users can send an email to the customers about the future booking by clicking on the mail icon at the top right of the container, the Email will contain the form information (Follow update, Delivery method, and Notes)
- In the Note section, admin users can add important leads, so they can guarantee that the next time a customer makes a booking, they are met with the same level and quality of service similar to the one they had before. This can be guaranteed by either making a note of a certain fieldworker that exceeded the customer’s expectations or any extra measures that have been taken to ensure this level of customer satisfaction.
- If you don’t need the Next service date reminder to appear for your admin creating a Quote you can go to Setting > General settings > Forms & Checklists and deactivate it by clicking on the slide button
Your contact details (Default form in the system)
Your Contact Details is another form that is set by default for any new company or business. This form is beneficial when a customer needs to request a service for a different address than the original one that is saved to the system.

The display Option for this form is set to be a Gift Card. The gift card option can only be selected through this form. Therefore, when admin users attempt to change the form’s display option through the “When to Display” option into any other display option than the Gift Card, the system will automatically disregard the attempt.
Admin users can add as many fields as they find suitable to this form. They can also edit/delete the already existing elements, or even change the form name, as well as the “Visibility” option
- For more details on the “Visibility” options click here
- For more details on the “When to display” options click here
- For more details on creating new fields click here
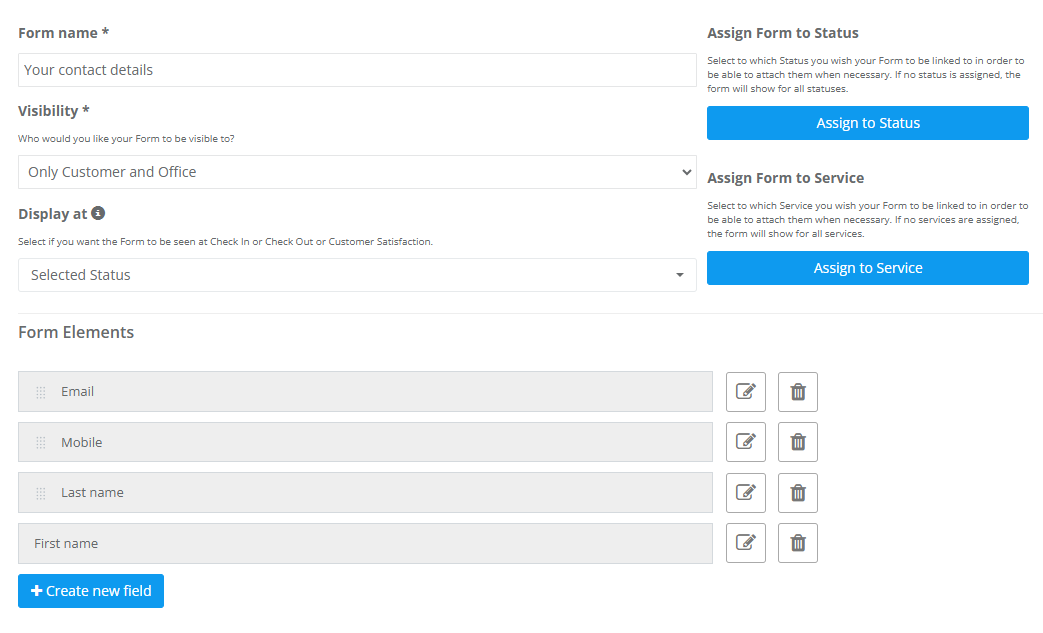
An example of how the Your Contact Details form can be used is if a customer would like to give a service to their friend/family member as a gift. If said customer would like to send a free massage session. For example, this form will be activated so that the customer has to fill in the contact details of the gift receiver. This facilitates the communication between the company and the end customer, making it much easier and time-efficient.
Why are we using Your contact details form for gift cards and how it relates to the customer portal?
- The Your Contact Details form/feature can be linked to the gift card feature as well, whereas when a customer clicks on the gift card button, they will be redirected to the customer portal. From there, the customer will have to fill out the Your Contact Details form to complete the gift request. Admin users can easily take the Embedded code for any service from Settings > Services settings > services > Embed > Gift card button and put it on the company website.
- One good example for using the Your contact details form along with the gift cards feature and connecting the company website with the customer portal is Zenin.
- Zenin is a company powered by OctopusPro that provides massage services, as shown below is the main page of Zenin’s website, which includes the “Buy gift voucher button” which is the gift card button
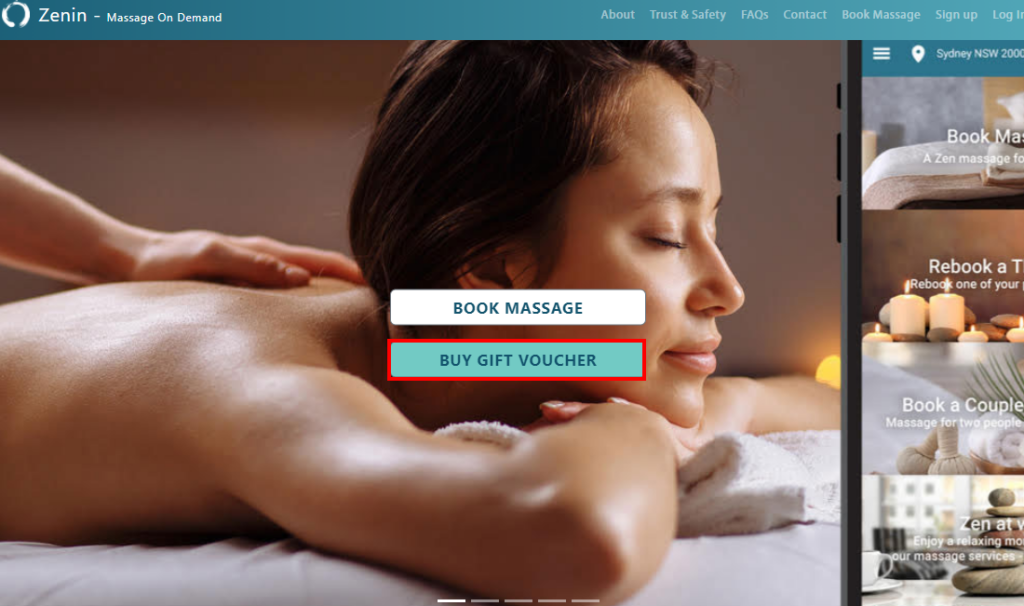
- When customers click on the “Buy gift voucher button” they will be redirected to the selected service in the customer portal
- Customers will be asked to provide some details, that are called custom fields, about the gifted service and they will get a quotation based on their selections.
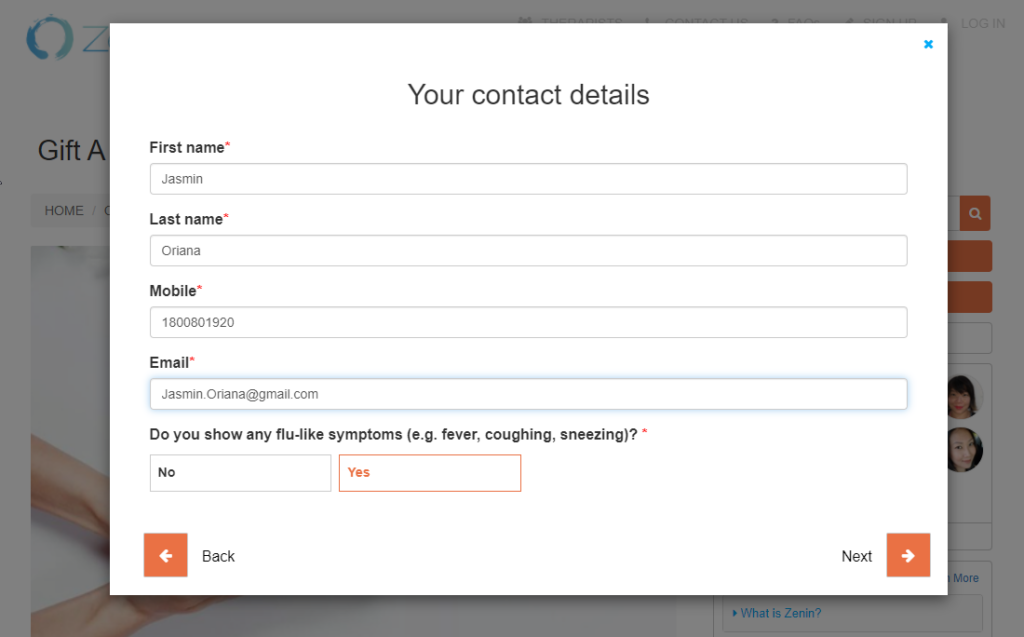
- After confirming the quotation and proceeding with making a booking, the first thing customers will be asked to provide is their contact details using the ‘Your contact details’ form which is the default form the appears in the gift card case
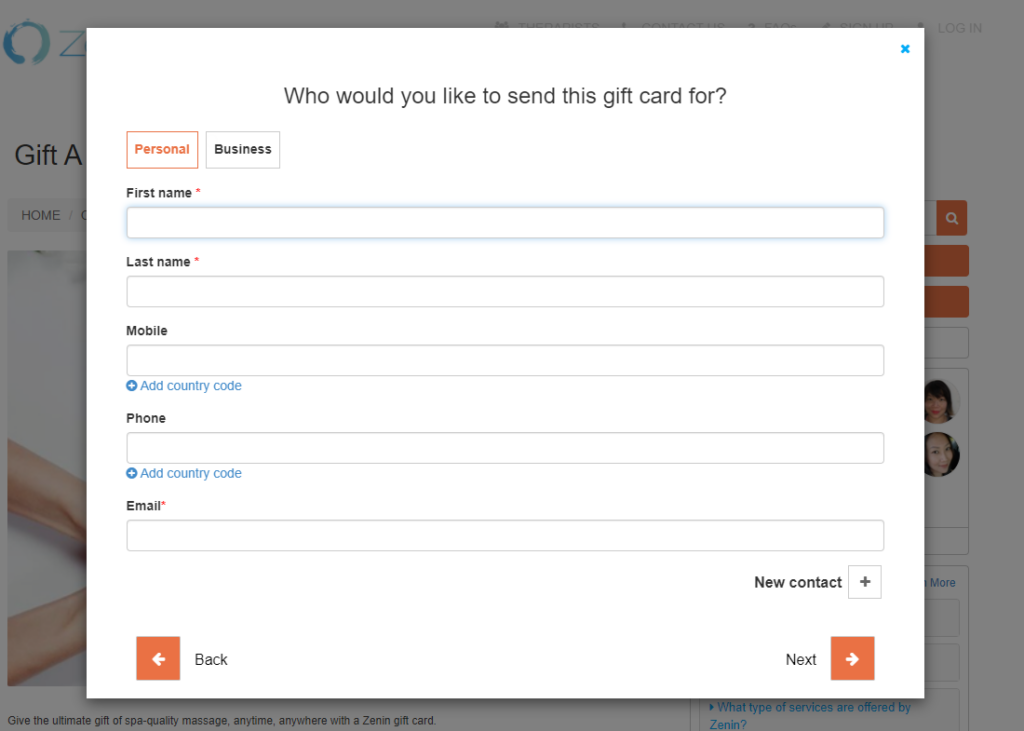
- After following the booking process, customers will be asked to fill out the gift receiver’s contact information as follows:
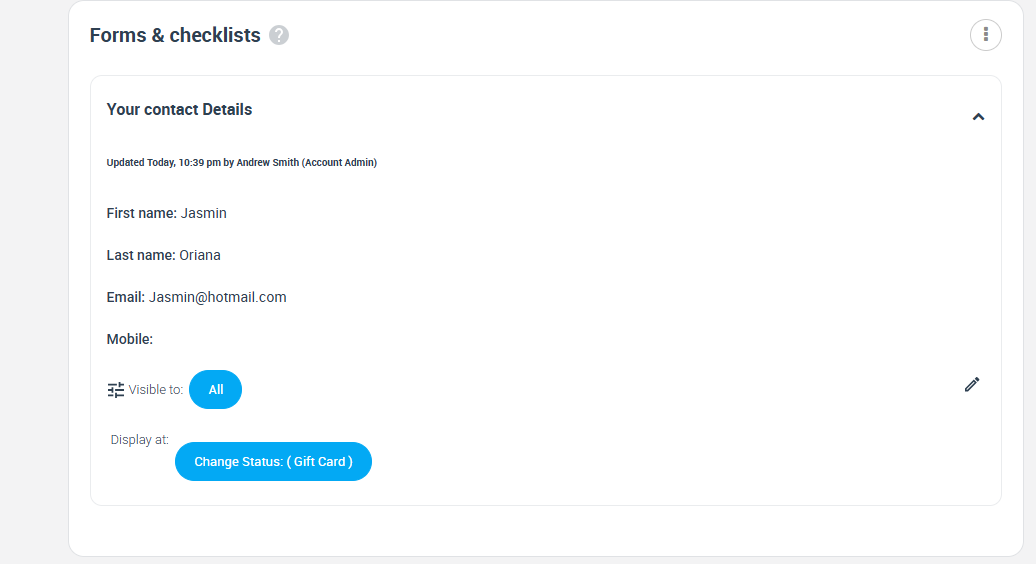
- So, admin users will see the location and the contact information in the booking view
- Note: If you want to change the default style of the Gift card button, go to Settings > Customer Portal > Branding & Style > Gift Voucher button
- Admin users can change the color, size, border, or text that appears for the button. The default button has a blue-colored box that contains “Buy Gift Card” as text.
Editing forms and checklists
- Admin users can edit any form, including custom or default forms from Settings > General Settings > Forms & Checklists, by clicking on the Edit button for the form/checklist.

- Admin users can change the visibility, form name, assign status, assign to service, edit/delete form elements, create a new field for the form/checklist.
- Note: You can edit the Next Service Date Reminder and Your Contact Details forms (default forms); however, you can not assign them to a status nor a service. These forms are unrelated to certain booking statuses or specific services.
Deleting a form or a checklist
Admin users can delete any form, including custom or the default forms from Settings > General Settings > Forms & Checklists, by clicking on the delete button for the form/checklist

Note: The Next Service Date Reminder and Your Contact Details forms (default forms) can not be deleted from the system, they can only be deactivated.
Activating and deactivating forms
Admin users have the option of hiding forms/checklists from users without having to delete them. This can be through activating or deactivating forms based on admin users’ needs. To activate or deactivate a form, click on the visible toggle button in Settings > General Settings > Form & Checklists

Note: This will not delete the form, it is only hiding the form or checklist from the users temporarily until admin users request otherwise.
Also, check out more forms and checklists topics we’ve prepared for you:
If you need to learn about the definition of Forms and Checklists in OctopusPro, click on the link and you will be redirected to a page containing comprehensive information about what forms and checklists are used for, similarities and differences between a checklist and a form, benefits of using the forms & checklists feature, forms & checklists benefits for businesses and difference between service custom fields and forms & checklists.
The usage of different forms and checklists in OctopusPro depends on the user dealing with a form. So, after setting up a form, and depending on the form setup, the forms can be directed to admin users, fieldworker and customers. This page explains how to use forms/checklists in different users perspectives, admins from the admin dashboard, customers from the customer portal/ branded apps and fieldworkers from the fieldworker app and customer portal.
This document is covering the following topics: Where can admin users fill forms & checklists from? Where can admin users view the filled out forms & checklists? Forms and checklists from the fieldworker’s perspective, completing Forms and checklists as a fieldworker using the app and completing Forms and checklists as a fieldworker using the browser.
Field Types/Elements in OctopusPro are a set of input fields that the admin can add to the form/checklist so users can fill in the correct data. Admins can create a huge variety of field Types/Elements to a form, from asking a user to provide a date to answering multiple answer questions. So, this page will provide the admin users with details about all of the field types in the system, and how they appear to users.
The page topics are:
-
- How to create a new field and what are the types of fields that can be used in the system
- Date picker field type
- Time picker field type
- Text box (multi-lines) field type
- Text field (one line) field type
- (+/-) button field type
- Toggle field type
- Dropdown field type
- Radio button field type
- Button group field type
- List field type
- Checkbox field type
- Making a form element/field Mandatory
- Mandatory fields in admin web view
- Mandatory fields in fieldworker App
- Mandatory fields in the customer portal
- Requesting to upload photos for a form/checklist element
- Requesting to upload photos fields in admin web view
- Requesting to upload photos fields in fieldworker App
- Requesting to upload photos fields in the customer portal
- Making Photo Uploads Mandatory for all Users
- Editing and Deleting Form & Checklists Fields/Elements
This page provides real-time examples of forms and checklists for different industries. So, admin users can preview the use cases and create forms/checklists that are compatible with their business. Industries like real estate, cleaning and automotive are considered and explained in this document.
For more information please visit Octopuspro user guide, and subscribe to our youtube channel.

