
What is the minimum notice time required for any new booking?
OctopusPro allows you to set a minimum notice time for your bookings if your bookings require time to be organized and confirmed in advance. Your customers will only be able to book services after the notice time required for each service. For example, if you set the minimum notice time required for new bookings to 45 minutes, this will prevent your customers from booking jobs that start less than 45 minutes ahead of their current local time. This gives you the required time for any service to be held efficiently.
Table of contents
- How to set the minimum notice time required for any booking?
- Minimum notice time starting from cases
- How to set the time slot intervals?
- Use cases
How to set the minimum notice time required for any booking?
To add a minimum notice time for your bookings, go to Settings > Customer Portal > Flags & Permissions.
You will be redirected to the customer portal flags and permissions settings page. In the booking flags sections, set the time using the “What is the minimum notice time required for any new bookings” flag.

After setting the notice time from the settings, only times available after the notice time required will be visible to your customers to book from in the customer portal. For example, if you set the minimum time required to 120 minutes and your current time is 10 AM, the next available time that will appear to your customers will be 12 PM, after 120 minutes.

Minimum notice time starting from cases:
You can select your preferred minimum notice time starting from the drop-down menu.
Choose either “Current time” to specify the minimum time interval required between the booking time and service time, or “Beginning of working hours” to specify the time your business needs between the start of working hours and the first booking.

For example, if your business working hours start from 8:00 AM to 9 PM, and you have set the minimum notice time required 30 minutes, and select “Beginning of the working hours” then, your customers will be able to schedule a booking appointment from 8:30 AM. So, that means your customers will only be able to schedule bookings 30 minutes prior to the booking time and only after the start of the office working hours.
If you select “Current time” your customers will book an appointment based on the current moment and all times are calculated based on your local time.
The job will start after 30 minutes from the current time so the customer will book at 3 pm. It means that your customer will be able to book an appointment at 3:30 pm.
How to set the time slot intervals?
If no minimum time requirement was added in the settings, all the available time slots will appear when booking the next available time, so if the current time is 10 AM, your customers can book from 10:30 or 11 AM based on your time slot interval.
Time slot intervals determine the duration between each booking and when a client is able to schedule a booking.

For example, an interval of 30 minutes allows bookings at 1:00 p.m., 1:30 p.m., 2 p.m., and every 30-minute interval after that.

Having time slot intervals increases the accuracy of your fieldworkers’ schedules as it schedules their appointments in a way that prevents overlaps without wasting any time between the appointments. Setting your time slot intervals also helps the customers select the exact time they need to book the appointment easily.
Time slot intervals start at the earliest available time for the fieldworker and run until the end of the fieldworker’s available time. For example, if the booking interval is 1 hour and the fieldworker’s available time is from 9 a.m. until 5 p.m., a client can book at 9 a.m., 10 a.m., 11 a.m., etc. To learn more about fieldworkers’ working hours, click here.
This will also account for the duration that this fieldworker is booked for. For example, with a 30-minute interval, it is still possible to book a fieldworker for an hour (provided the fieldworker can be booked for this duration). However, the 30-minute time slot interval that overlaps with the 1-hour duration can no longer be booked.
To set time slot intervals, go to Settings > Customer Portal > Flags & Permissions. You will be redirected to the customer portal flags and permissions settings page. In the booking flags sections, use the Time slot interval option.

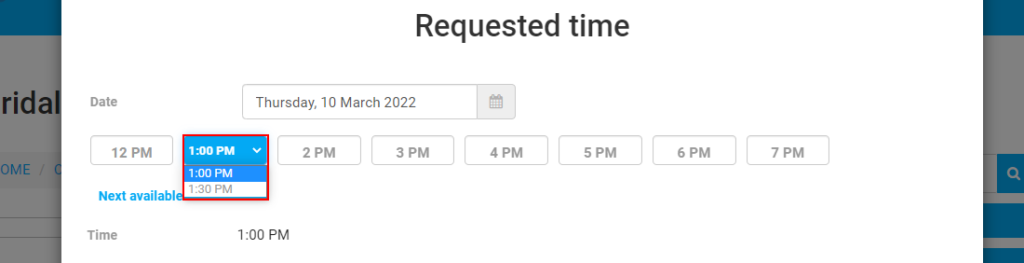
After setting the time slot interval from the settings, it will appear in the customer portal as shown below. For example, if it’s set to 30 minutes, each hour of the day will be divided into two slots and the customers can select their preferred time from the drop-down menu for each hour.
Use Cases
Here are some use cases that highlight how to benefit from the minimum notice time feature for different industries. These are some of the best suggestions that business owners can get ideas from or even replicate when setting their own minimum notice time on OctopusPro, to detail their process and their customer’s positive experience. The step-by-step guide for setting the minimum notice time is as follows:
Beauty Care Salon: Beauty & More
To add a minimum notice time for your bookings, go to Settings > Customer portal > Flags & permissions. using the What is the minimum notice time required for any new bookings flag.
Business working hours start from 8:00 am to 5 pm, and the minimum notice time required is 30 minutes

If it suits the needs of the company, select “Current Time” from the drop-down option.

When the customer schedules a booking appointment, the current time is 2:45 pm, so the next available time for your customer will be at 3:15 pm.

The time slot interval that fits the work requirements is 15 minutes, therefore click on the arrow and a drop-down selection will display.

From the customer interface, the customer has the option to click on the arrow to bring up a drop-down menu where they can choose their preferred time.

For more information please visit Octopuspro user guide, and subscribe to our youtube channel.